background image


P

age


11


C

C

a

a

r

r

a

a

u

u

d

d

i

i

o

o

-

-

S

S

y

y

s

s

t

t

e

e

m

m

s

s


V

V

e

e

r

r

t

t

r

r

i

i

e

e

b

b

s

s


G

G

m

m

b

b

H

H


R

R

h

h

e

e

i

i

n

n

h

h

o

o

r

r

s

s

t

t

s

s

t

t

r

r

a

a

s

s

s

s

e

e


2

2

2

2


6

6

7

7

0

0

7

7

1

1


L

L

u

u

d

d

w

w

i

i

g

g

s

s

h

h

a

a

f

f

e

e

n

n


T

T

e

e

l

l

.

.

:

:


+

+

4

4

9

9


6

6

2

2

1

1


9

9

5

5

3

3

4

4

4

4

1

1

7

7

-

-

0

0


F

F

a

a

x

x

.

.

:

:


+

+

4

4

9

9


6

6

2

2

1

1


9

9

5

5

3

3

4

4

4

4

1

1

7

7

-

-

9

9

9

9


E

E

m

m

a

a

i

i

l

l


:

:


t

t

e

e

c

c

h

h

n

n

i

i

k

k

@

@

c

c

a

a

r

r

a

a

u

u

d

d

i

i

o

o

-

-

s

s

y

y

s

s

t

t

e

e

m

m

s

s

.

.

d

d

e

e


Control: 

 
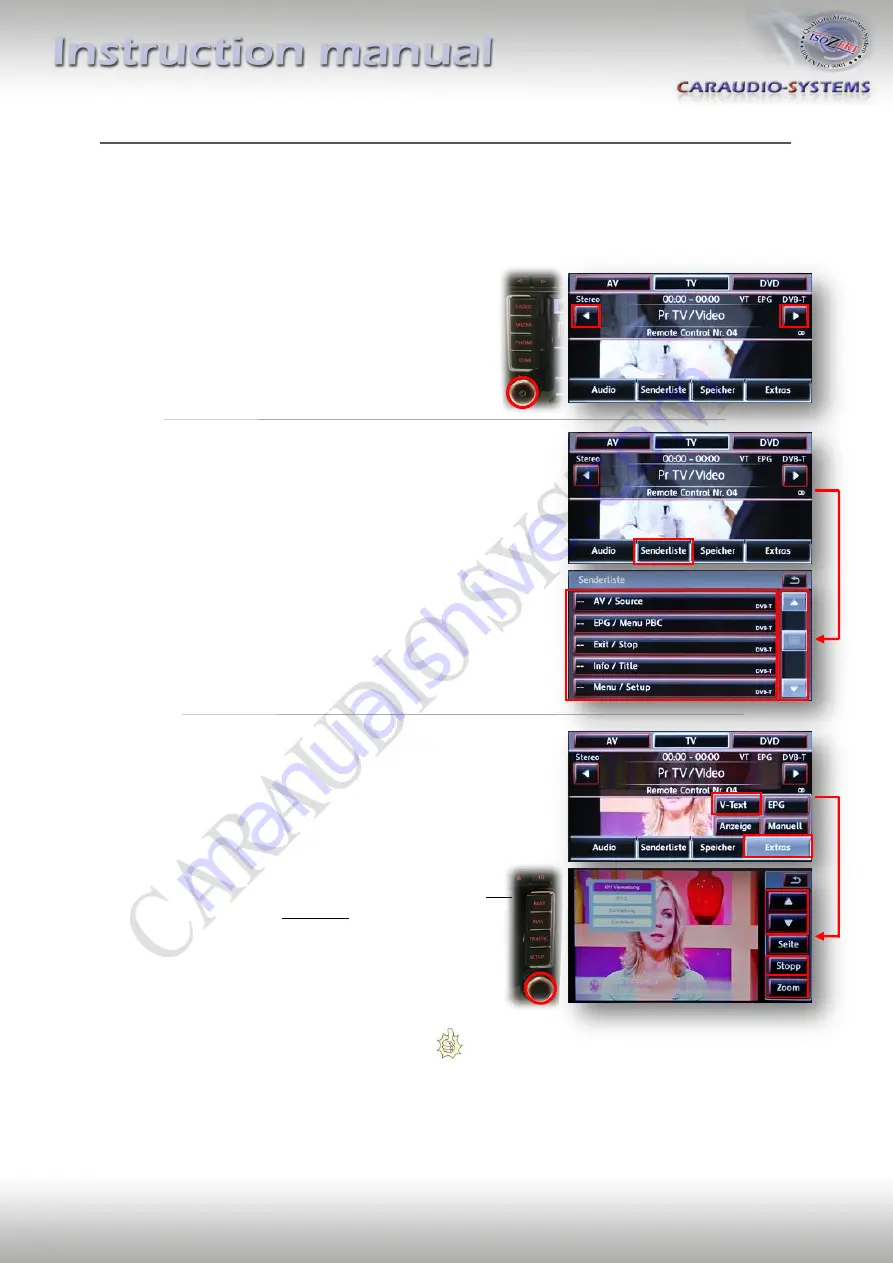
You can control the devices with the touch screen, the right knob and the arrow button at the 
left upper corner of the monitor.  


When you tap on the monitor two arrows 
are displayed on the screen. 
With them you can switch the channel (DVB-T)  
or track (DVD). 
You can also use the arrow buttons  
at the left upper corner of the monitor. 


In the “station list” you will find more control options 
 for your devices. 
A new menu will pop up and show you the 
available commands. 
 The commands on the left (left side of the slash) 
are for DVB-T tuners, the ones on the right side 
for DVD players. 


To optimize the handling of the video source’s menu 
first activate its menu of it. 
 Select (Menu / Setup) in the station list to do so. 
 Now select „Extras“ and „V-Text“ to invoke the 
 controls. 
 
 
 Pressing „Zoom“ on the screen sends the command OK 
 to the device. „Stop“ is step back. 
 Use the arrows on the screen and the right knob to 
 navigate in the menu. 


Thank you for choosing our products and we are sure you will have a lot of joy with it!


© Caraudio-Systems 2009 


Rev. 1.0  /  26.05.2009 

Содержание MD-VW03

Страница 1: ...nh ho or rs st ts st tr ra as ss se e 2 22 2 6 67 70 07 71 1 L Lu ud dw wi ig gs sh ha af fe en n T Te el l 4 49 9 6 62 21 1 9 95 53 34 44 41 17 7 0 0 F Fa ax x 4 49 9 6 62 21 1 9 95 53 34 44 41 17 7...

Страница 2: ...62 21 1 9 95 53 34 44 41 17 7 0 0 F Fa ax x 4 49 9 6 62 21 1 9 95 53 34 44 41 17 7 9 99 9 E Em ma ai il l t te ec ch hn ni ik k c ca ar ra au ud di io o s sy ys st te em ms s d de e Contents Contents...

Страница 3: ...up in direct proximity of heat sources e g power amplifier 6 Connection electric power supply Use the device only at a 12 volt vehicle electrical system Make sure to have a proper ground 7 Intrusion...

Страница 4: ...do occur problems or if you have technical questions contact us directly under Caraudio Systems Vertriebs GmbH Rheinhorststr 22 67071 Ludwigshafen am Rhein Germany Phone 49 621 9534417 0 Fax 49 621 95...

Страница 5: ...uran Touareg T5 Pin assignment of the harness Color connector Signal 26pin AMP connector To the MFD3 RNS510 18pin AMP connector To the interface MULTI200 Red 12V DC Battery Black Ground Yellow CAN HIG...

Страница 6: ...plug and the yellow cable to pin 9 CAN HIGH The black cable has to be connected to ground on pin 12 The red cable has to be connected to battery on pin 15 Additionally you can use the pink cable 12V...

Страница 7: ...the rear view camera function you have to open the interface As seen on the right side you have to close the connection with the middle jumper Connect the video signal of the aftermarket rear view cam...

Страница 8: ...om the dash You will need a dedicated tool which isn t supplied 2 Remove the Quadlock plug form the navigation system Connect the 26pin AMP connector from the harness to the navigation 3 Connect the b...

Страница 9: ...r and the 18pin AMP connector to the interface You can also connect an external monitor to the VIDEO OUT plug at the interface 6 To use the rear view camera function you have to open the interface As...

Страница 10: ...7 Dietz 1491 V x02 AMPIRE DVB T100 x03 DVB2008 TRT400 x04 DVDC CKO DVC10 x05 DVD Changer CKO DVC 6M Yamakawa DVD Changer x06 DVBT NL SENERGY C KO DVBT 1080 Axion DVBT 500 x07 DVD ADJQ DVDRD PYLE PLTD2...

Страница 11: ...can switch the channel DVB T or track DVD You can also use the arrow buttons at the left upper corner of the monitor In the station list you will find more control options for your devices A new menu...

Отзывы: