background image

ELECTRIC GRILL 


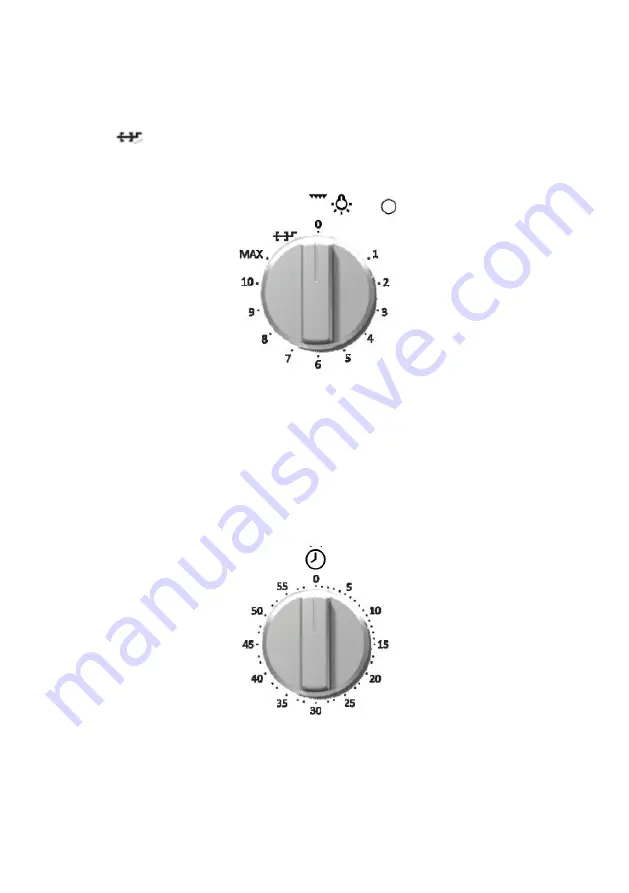
Infrared grill: equipped with an energy regulator. The heat intensity of the grill can be set from 1 to 
MAX using the relative control knob (picture). When the grill is in operation, the grill indicator light 
and the oven interior light will be illuminated. To operate the spit roaster motor, turn the knob to 

the symbol 

 until you feel a click. Then turn the knob to desired power setting from 0 to 8. 


WARNING: 

The grill will not operate when the oven is on. 


MECHANICAL MINUTE TIMER 


The minute timer can be set to a maximum time of 60 minutes; it emits an alarm tone when the 
set time period has elapsed. The minute timer operates independently of the oven. The timer knob 
(picture) must first be turned clockwise to the 60 minute position and then turned anti-clockwise to 
the desired time setting. When the set time has elapsed, the alarm will sound. The alarm tone will 
stop automatically after a certain period. 


Содержание BOG622E00X

Страница 1: ...GAS OVEN EN Installation Use Maintenance...

Страница 2: ...e instructions and suggestions carefully to ensure the safe and proper use of this product THIS APPLIANCE IS CONCEIVED FOR DOMESTIC USE ONLY THE MANUFACTURER SHALL NOT IN ANY WAY BE HELD RESPONSIBLE F...

Страница 3: ...ECTRICAL CONNECTIONS INSTRUCTIONS FOR THE USER THE FIRST TIME YOU USE THE OVEN SELF CLEANING CATALYTIC PANELS DESCRIPTION OF THE FRONT CONTROL PANEL GAS OVEN WITH ELECTRIC GRILL OVEN TEMPERATURE CONTR...

Страница 4: ...ion VENTILATION It is essential that the room in which gas appliances are installed is adequately ventilated to ensure that all the appliances receive the required quantity of fresh air for combustion...

Страница 5: ...ments RIGID PIPE CONNECTION Connection to the mains gas supply may be made via a rigid pipe firmly attached to the fitting G picture or via a flexible stainless steel continuous wall hose conforming w...

Страница 6: ...crew securing the oven burner and withdraw the burner from the support together with the heat sensor and the ignition spark plug 3 Remove the nozzle using a 7 mm box wrench 4 Screw the new nozzle in f...

Страница 7: ...n turn the thermostat to the minimum position Then turn the bypass screw A counterclockwise until you see a reduced by stable flame Check that the flame does not go out when the door of the oven is op...

Страница 8: ...iven in the picture Make sure that surrounding materials are heat resistant Align the oven centrally with respect to the side walls of the units surrounding it and fix it in place with the screws and...

Страница 9: ...ture at any point along its length If a fixed appliance is not provided with a power cable and plug or some other device permitting it to be disconnected from the mains electricity supply with a gap b...

Страница 10: ...mum temperature to burn off all traces of grease which might otherwise create unpleasant smells when cooking Important As a safety precaution before cleaning the oven always disconnect the plug from t...

Страница 11: ...he side frames are fitted They are coated in a special micro porous catalytic enamel which oxidises and gradually vaporises splashes of grease and oil at cooking temperatures above 200 C If the oven i...

Страница 12: ...corresponds to an oven temperature of 250 C and is obtained when the knob is turned fully anticlockwise To light the burner push in the temperature control knob and turn it anticlockwise to the desire...

Страница 13: ...turn the knob to desired power setting from 0 to 8 WARNING The grill will not operate when the oven is on MECHANICAL MINUTE TIMER The minute timer can be set to a maximum time of 60 minutes it emits...

Страница 14: ...set the time at a later stage press the central button and then adjust the clock as described above Minute counter As this minute counter does not control the oven when it finishes counting the oven...

Страница 15: ...in operation the green light is illuminated To turn on the bottom burner push in the temperature control knob and turn it anticlockwise to the desired temperature The minimum position corresponds to...

Страница 16: ...t shield supplied inserted in the slots under the control panel To turn on the grill turn the knob clockwise to the position and hold it pressed in for 5 10 seconds OVEN LIGHT SPIT ROASTER This knob i...

Страница 17: ...table for cooking foods of different types fish meat etc on a number of levels Pre heating is not needed with this function but for cakes it is in any case preferable DEFROSTING By selecting one of th...

Страница 18: ...oven It is turned on when the temperature of the outer shell of the oven reaches 60 C By switching on the oven with the thermostat at 200 C the fan starts working after approx 10 min It is turned off...

Страница 19: ...grill or brown foods Some ovens may be equipped with an electric motor spit and skewers for turning on the spit Place the shelf with the food to be cooked in the 1st or 2nd position from the top Pre h...

Страница 20: ...UX PASTRY 200 35 40 yes ROAST BEEF APPROX 1 5 KG 200 90 120 yes ROAST PORK APPROX 1 5 KG 200 100 120 yes PIZZA 200 20 25 yes BAKED FISH 180 50 60 yes BAKED VEGETABLES 170 30 40 yes POULTRY 190 200 60...

Страница 21: ...ss cover of the light unscrew the old light bulb and replace it with the new one put back the glass cover and remove the tea cloth connect the appliance to the main electricity supply REMOVING THE OVE...

Страница 22: ...rial is ecological and can be re used or recycled By recycling the packaging you will help save raw materials as well as reducing the bulk of domestic and industrial waste The manufacturer declines al...

Отзывы: