10
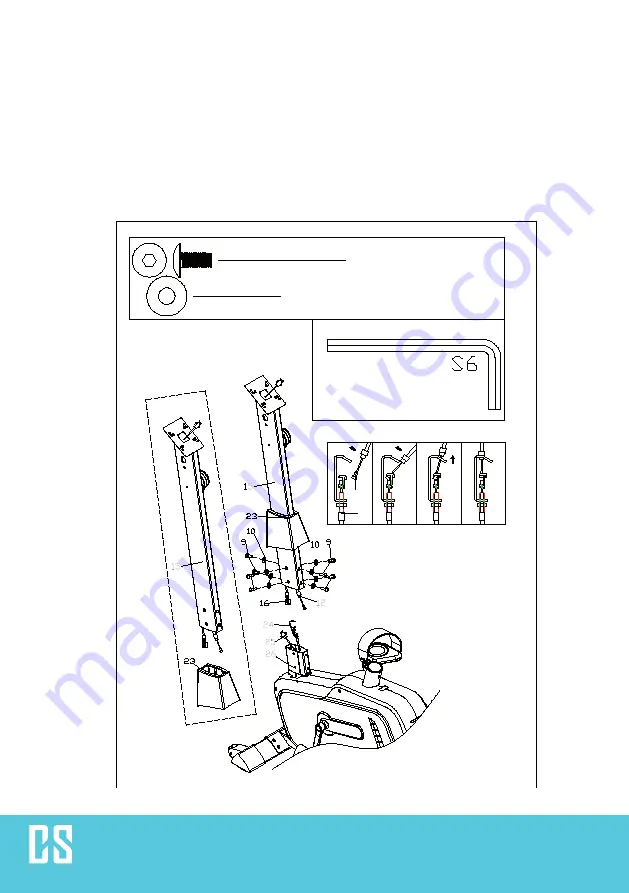
9# M8*16 8x
10# d8*
Φ
20*1.5 8x
12
24
Schritt 2
Bringen Sie die vordere Plastikabdeckung (23) am Stützrohr (15) an und verbinden Sie anschließend die
Sensordrähte (16 & 25), wie in Abbildung 2 gezeigt, mit den Kontrolldrähten (12 & 14). Bringen Sie das
Stützrohr anschließend, mit Bolzen (9) und Unterlegscheiben (10) am Hauptrahmen an.
Содержание Evo Pro
Страница 1: ...10032847 Connective Exercise Bike ...
Страница 6: ...6 Geräteübersicht Explosionsansicht ...
Страница 7: ...7 Montagematerial 9 M8 16 20x 35 d10 20 2 1x S13 S14 S15 S6 10 d8 Φ20 1 5 20x 36 M10 1x 39 M16 1x ...
Страница 13: ...13 ...
Страница 38: ...38 Parts List Exploded view ...
Страница 39: ...39 Montagematerial 9 M8 16 20x 35 d10 20 2 1x S13 S14 S15 S6 10 d8 Φ20 1 5 20x 36 M10 1x 39 M16 1x ...
Страница 45: ...45 ...
Страница 69: ...69 Lista de piezas Vista en despiece ordenado ...
Страница 70: ...70 Material de montaje 9 M8 16 20x 35 d10 20 2 1x S13 S14 S15 S6 10 d8 Φ20 1 5 20x 36 M10 1x 39 M16 1x ...
Страница 76: ...76 ...
Страница 91: ...91 Pantalla externa Siga las instrucciones para ver el anuncio en su televisor usando Chromecast o Apple TV ...
Страница 101: ...101 Aperçu de l appareil Vue éclatée ...
Страница 102: ...102 Matériel de montage 9 M8 16 20x 35 d10 20 2 1x S13 S14 S15 S6 10 d8 Φ20 1 5 20x 36 M10 1x 39 M16 1x ...
Страница 108: ...108 ...
Страница 133: ...133 Descrizione del prodotto Visione esplosa ...
Страница 134: ...134 Materiale di montaggio 9 M8 16 20x 35 d10 20 2 1x S13 S14 S15 S6 10 d8 Φ20 1 5 20x 36 M10 1x 39 M16 1x ...
Страница 140: ...140 ...
Страница 155: ...155 Display esterno Seguire le istruzioni per visualizzare il display sul televisore tramite Chromecast o Apple TV ...


