62
EN
HINTS ON DISPOSAL
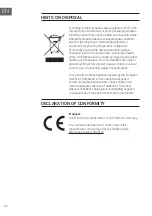
According to the European waste regulation 2012/19/EU
this symbol on the product or on its packaging indicates
that this product may not be treated as household waste.
Instead it should be taken to the appropriate collection
point for the recycling of electrical and electronic
equipment. By ensuring this product is disposed
of correctly, you will help prevent potential negative
consequences for the environment and human health,
which could otherwise be caused by inappropriate waste
handling of this product. For more detailled information
about recycling of this product, please contact your local
council or your household waste disposal service.
Your product contains batteries covered by the European
Directive. 2006/66/EC, which cannot be disposed
of with normal household waste. Please check local
rules on separate collection of batteries. The correct
disposal of batteries helps prevent potentially negative
consequences on the environment and human health.
DECLARATION OF CONFORMITY
Producer:
Chal-Tec GmbH, Wallstraße 16, 10179 Berlin, Germany.
The complete declaration of conformity of the
manufacturer can be found at the following link:
https://use.berlin/10035175
Содержание 10035175
Страница 1: ...10035175 Evo Comfor Fahrrad Heimtrainer Exercise Bike Bicicleta Estática Vélo d exercice Cyclette ...
Страница 2: ......
Страница 13: ...13 DE 8 Schließen Sie das Netzteil 29 an den Hauptrahmen 48 an um den Zusammenbau abzuschließen ...
Страница 39: ...39 EN 4 Secure the pedals 51L and 51R to the pedal tubes 44 with hexagonal bolts 47 washers 38 and nuts 36 ...
Страница 43: ...43 EN 8 Connect the power supply unit 29 to the main frame 48 to complete the assembly ...
Страница 73: ...73 ES 8 Conecte la fuente de alimentación 29 a la estructura principal 48 para finalizar el montaje ...
Страница 100: ...100 FR 5 Fixez les poignées 14L et 14R aux poignées inférieures 31L et 31R avec les vis 21 et les vis de blocage 22 ...
Страница 103: ...103 FR 8 Pur terminer l assemblage fixez l adaptateur secteur 29 au cadre principal 48 ...
Страница 129: ...129 IT 4 Fissare i pedali 51L e 51R ai tubi dei pedali 44 con viti esagonali 47 rondelle 38 e dadi 36 ...
Страница 133: ...133 IT 8 Collegare l alimentatore 29 al telaio principale 48 per concludere il montaggio ...
Страница 153: ......
Страница 154: ...154 IT ...
Страница 155: ...155 IT ...
Страница 156: ......

