


20
21
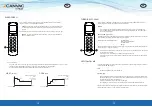
This product contains parts that can cause damage or injury when handled incorrectly. Read the “Safety Regulations” before using the product.
Follow the regulations carefully.
Warnings and their meaning:
WARNING: Incorrect operation poses a serious risk of fatality, severe injury etc.
CAUTION: Depending on the circumstances incorrect operation can cause serious damage or injury.
The symbols used in this manual and their meaning:
Absolutely prohibited.
Follow the instructions carefully.
SAFETY REGULATIONS
WARNING!
•
Do not use an extension lead or connect the unit to a wall socket. This can cause overheating, fire or electric shocks.
•
Do not subject your body to cold draughts for an extended period.
•
Do not insert your fingers, sticks or other objects into the unit.
•
The user must not install, move, modify or repair the unit. Always contact your nearest service point.
•
Never pull the mains lead.
•
Do not locate the unit in a wet area such as a bathroom or laundry room.
•
If the unit is acting strangely (there is a smell of smoke for example) shut it down immediately and switch off the power. Contact Canvac.
•
Always switch off the power to the unit before cleaning it.
•
The unit must be installed by an authorised service company.
•
Always use an authorised service company to service the unit.
•
The unit should not be used by individuals (including children) who are not familiar with or able to operate the product, unless they are super-
vised or being instructed in the use of the unit.
•
Children should be supervised so that they do not play with the unit.
SAFETY REGULATIONS
21–22
SPECIFICATIONS 22
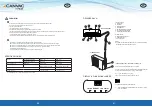
COMPONENTS 23
DISPLAY & FUNCTION LAMPS
23
OUTDOOR UNIT
23
INDOOR UNIT
23
BUILT-IN FUNCTIONS
24
GUARANTEED TEMPERATURE RANGES
24
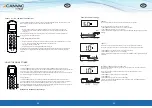
REMOTE CONTROL
25
INSERT NEW BATTERIES
25
TECHNICAL DATA
25
USER-SELECTABLE FUNCTIONS
25
REMOTE CONTROL BUTTONS
26
REMOTE CONTROL DISPLAY
27
AUTO/COOL/HEAT/FAN
28
ADJUSTING THE AIR FLOW DIRECTION
29
SLEEP/FRESH 30
TURBO/SELF CLEAN
31
LED/FOLLOW ME
31
SILENCE / FP (LOW TEMPERATURE FUNCTION)
32–33
USING THE ON/OFF TIMER
32
FOR OPTIMUM PERFORMANCE
34
CARE AND MAINTENANCE
34
IF THE UNIT WILL NOT BE USED FOR AN EXTENDED PERIOD
35
CLEANING THE INDOOR UNIT
35
CLEANING THE INDOOR UNIT HEAT EXCHANGER/LAMELLA PACKAGE
35
CLEANING THE OUTDOOR UNIT
35
NORMAL FUNCTIONS/HEAT PUMP SYMPTOMS
36
THE UNIT IS NOT OPERATING AS IT SHOULD
37
SCRAPPING THE UNIT
37
WARRANTY 56
CONGRATULATIONS ON YOUR NEW
CANVAC Q HEAT AIR SOURCE HEAT
PUMP!
EN
EN


