background image

3

119

English

Network Info [NWI]
This menu item is used to view all information about the network and related settings of the Smart Amp 5.1.

The listed items have the following meanings:
 • 

IP Adress [IP]:


The IP (internet protocol) adress of the WiFi module assigned by the network-router. 

 • 

MAC Adress [MAC]:

The Media Access Control adress is a unique, unchangeable identification number of the WiFi module.

 • 

Name [NAM]:


 The (network)name of the Amp 5.1 that has been set during the installation process. The default name is set as  
Smart Amp 5.1.

 • 

SSID  [SSI]:


The name of the connected WiFi network.

 • 

WiFi Band [BAN]:

  The current frequency band of the WiFi module.

 • STS Wireless [WCH]: The current frequency band of the wireless audio module.

To view the network information, do the following:

1

    To enter the menu, press the "Mbutton.

2

    Use the 

" "

 or " " button to navigate to the menu System Info [INF] and confirm with the "OKbutton

3

    Select the menu item Firmware Info [FWI] and confirm with the "OKbutton. All firmware versions will the be displayed as a list in case 

you have have TV connected.

4

    In case you do not have a TV connected to the Amp 5.1 you can select the specific firmware version by using the 

" "

 or " " button and 

press the "OKbutton  
to confirm. The information about the firmware version will then be shown as scroll text in the display.  
To exit the selected info press the "Mbutton.

5

    Repeat step 4 until you have all needed informations.   

6

    Exit the menu item by pressing the "Mbutton.

Note:


• The IP address and frequency band of the WiFi module (WiFi band) can only be displayed after the Smart Amp 5.1 is connected  


  to your network via WiFi or network cable. If the Amp 5.1 is connected via network cable, it is not possible to display the SSID.

Содержание Smart Amp 5.1

Страница 1: ...BEDIENUNGSANLEITUNG Smart Amp 5 1 OPERATING INSTRUCTIONS Deutsch English...

Страница 2: ...un viele H rstunden mit hervorragenden Kl ngen bevor Sollten Sie Fragen haben oder weitere Informationen ben tigen stehen wir Ihnen gerne zur Verf gung Service Telefon 06083 287 87 Service E Mail serv...

Страница 3: ...1 Wiedergabe via Bluetooth Funktechnologie Seite 22 Speichertaste 1 3 Seite 23 Men struktur und Navigation Seite 24 bersicht Seite 24 1 Lautsprecher Einstellung SPS Seite 25 Kanalpegel CHL Seite 25 La...

Страница 4: ...Seite 41 Laufschrift SCT Seite 42 Werkseinstellung RES Seite 41 3 Netzwerkeinstellung NWS Seite 42 Netzwerkverbindung NWC Seite 42 Netzwerk Reset NWR Seite 43 4 Funkeinstellung WIS Seite 44 Bluetooth...

Страница 5: ...ten Seite 64 EU Konformit tserkl rung Seite 65 Weitere wichtige Informationen Seite 66 Informationen ber den bestimmungsgem en Betrieb Seite 66 Informationen ber einen umweltgerechten Betrieb Seite 66...

Страница 6: ...nsachgem en Anschluss ver ursacht werden W hlen Sie einen ebenen Untergrund Feuchtigkeit vermeiden Ersch tterungen vermeiden Netzkabel nicht mit nassen H nden anfassen Nicht in den Hausm ll werfen Dir...

Страница 7: ...iben Sie dieses Ger t nicht in der N he von Wasser Setzen Sie dieses Ger t keinem Tropf oder Spritzwasser aus ACHTUNG Gefahr eines elektrischen Schlages Nicht ffnen ACHTUNG Zur Vermeidung eines Brande...

Страница 8: ...ich an einen qualifizierten Elektriker um die veraltete Steckdose auszutauschen Zur Vermeidung eines elektrischen Schlages verbinden Sie den Netzstecker nur mit Steckdosen oder Verl ngerungen bei dene...

Страница 9: ...rdnungsgem funktioniert oder fallen gelassen wurde Nehmen Sie keine Ver nderungen am Ger t oder Zubeh r vor Nicht autorisierte Ver nderungen k nnen die Sicherheit die Einhaltung von Gesetzen oder die...

Страница 10: ...st Sie auf nicht isolierte gef hrliche Spannungen im Inneren des Geh uses hin die eine ausreichende St rke Amplitude haben um einen Brand oder elektrischen Schlag zu verursachen Dieses Symbol weist Si...

Страница 11: ...entsprechend den Polarit tsmarkierungen korrekt eingelegt wird Verwenden Sie ausschlie lich die f r dieses Sys tem spezifizierte Batterie CR 2032 CR 2032 AUF ZU Anschlie en In diesem Kapitel zeigen wi...

Страница 12: ...talen Zuspielger t 5 Sub Out Cinch max 2Vrms F r die Verbindung mit einem aktiven Subwoofer 6 Digital S PDIF Optisch TOSLINK max 96kHz F r die Verbindung mit dem optischen Audioausgang an Ihrem TV ode...

Страница 13: ...muss die Consumer Electronics Control CEC Funktion zwingend aktiviert sein F r weitere Informationen schauen Sie bitte in der Anleitung Ihres TV Ger tes nach Eingang ARC HD1 HD2 HD3 OPT COA ANA Blueto...

Страница 14: ...s Lautst rke erh hen 5 Minus Lautst rke verringern 6 Play Pause Wiedergabe Pause Funktion bei Verwendung von Chromecast built in for audio Spotify Connect und Bluetooth Funktechnologie Men steuerung 3...

Страница 15: ...y Wiedergabe der vorderen Kan le FL FR auch auf den Surround Lautsprechern Pure Direct Gibt alle Signale so wieder wie sie im Audiosignal vorgesehen sind ohne Verwendung eine Virtualizers oder Upmixer...

Страница 16: ...creen Display Men im TV sichtbar sowie ein LED Display in der Front des Ger tes On Screen Display OSD Alle Einstellungen und die Konfiguration des Amp 5 1 k nnen bequem ber das On Screen Display auf I...

Страница 17: ...V35 Lautst rke auf 35 von max 70 Ton Einstellung Verst rker ist stumm geschaltet Ton Einstellung BAS Bass Anpassung Ton Einstellung MID Mittelton Anpassung Ton Einstellung TRE Hochton Anpassung Wieder...

Страница 18: ...Digitales Stereo Signal Netzwerkbetrieb CAST Verwendung von Chromecast built in Netzwerkbetrieb SPOTIFY Verwendung von Spotify Connect Netzwerkbetrieb WIF CON Netzwerk WLAN Verbindung hergestellt Net...

Страница 19: ...Netzwerk befinden Zur Einrichtung gehen Sie bitte wie folgt vor 1 Schalten Sie den Amp ein und starten Sie Ihr mobiles Endger t An Ihrem mobilen Endger t muss die Funktion WLAN und Bluetooth zwingend...

Страница 20: ...lation abzuschlie en 13 Um Musik mittels Chromecast built in wiederzugeben ffnen Sie eine App Spotify TuneIn o die diese Funktion unterst tzt Dies ist an dem Chromecast built in Icon in der jeweiligen...

Страница 21: ...n auch im Standby sucht der Amp 5 1 nach einer Aktualisierung und in stalliert diese sofern vorhanden Die LED blinkt w hrend des Updates gr n rot und das Display zeigt zun chst DOWNLOADING danach UPDA...

Страница 22: ...n z B Wohnzimmer wird hier ebenfalls dieser Name angezeigt 4 Die Verbindung stellt sich nach Best tigung automatisch her und wird Ihnen mit der Meldung BT und CON im LED Display ange zeigt 5 Sollte da...

Страница 23: ...hlte Speicherplatz P1 P2 oder P3 angezeigt Der Eingang und die entsprechenden Klangeinstellungen werden aufgerufen Wiedergabelisten Playlists aus der App Spotify abspeichern 1 ffnen Sie eine zuvor ang...

Страница 24: ...se Taste Um eine Funktion auszuw hlen dr cken Sie ebenfalls die Play Pause Taste Um den Wert bzw Zustand einer Funktion zu ndern dr cken Sie die Taste oder Um den Wert bzw Zustand der Funktion zu best...

Страница 25: ...equenzweiche XOV DRC DRC Sprachverst ndlichkeit VOI Ausgleich EQ EQ Sub Phase PHA Sub Stereo SSM Raumh he RHE Ger teh hen DHE Kanalpegel CHL Im Men Kanalpegel k nnen Sie den Lautst rkepegel jedes einz...

Страница 26: ...Lautsprecherkonfiguration SPC aktiviert sind Lautsprecher die dort deaktiviert wurden Displayanzeige NO werden ausgegraut und sind nicht ausw hlbar 11 Aufgrund des unterschiedlichen Frequenzbandes is...

Страница 27: ...zu gelangen 2 Best tigen Sie den ersten Men punkt Lautsprecher Einstellung SPS mit der OK Taste 3 W hlen Sie mit der Pfeiltaste oder den Men punkt Frequenzweiche XOV aus und best tigen Sie diesen mit...

Страница 28: ...5 1 verbundenen Lautsprecher an den jeweiligen Aufstellungsort anpassen Sie haben f r jeden Lautsprecher bzw jedes Lautsprecherpaar die Auswahl zwischen drei EQ Einstellungen Werksseitig ist eine fre...

Страница 29: ...bzw Taste zwischen 0 Grad 0 und 180 Grad 180 und best tigen Sie Ihre Eingabe mit der OK Taste 5 Um das Men zu verlassen dr cken Sie die Men Taste M Sub Stereo SSM Sollten Sie einen Subwoofer am Amp 5...

Страница 30: ...t der OK Taste 4 Stellen Sie mit der oder Taste die Raumh he ein 5 Verlassen Sie den Men punkt durch Dr cken der Men Taste M Ger teh he DHE Bei der Verwendung von Dolby Atmos lizensierten Aufsatz Laut...

Страница 31: ...haltet sich der Amp 5 1 nach einer vorgew hlten Zeit in den Standby Modus Sie k nnen zwischen 15 15M 30 30M 45 45M oder 60 Minuten 60M w hlen Wenn der Wert OFF ausgew hlt ist ist die Funktion deaktivi...

Страница 32: ...den Men punkt IR Men IRM und best tigen Sie ihn durch Dr cken der OK Taste 4 Best tigen Sie den ersten Men punkt IR Lernen IRL durch Dr cken der OK Taste Auf dem Bildschirm erscheint die Aufforderung...

Страница 33: ...ing nge z B TV ARC direkt ausw hlen Das hei t Sie k nnen einen Eingang fest einer Taste auf Ihrer Fernbedienung zuweisen Lernbare Eing nge HDMI Eing nge 1 3 HD1 HD3 HDMI Ausgang ARC optischer Eingang...

Страница 34: ...e von Funkfernbedienungen RF k nnen prinzipiell nicht angelernt werden IR L schen CLR Verwenden Sie diese Funktion um alle von dem Amp 5 1 gelernten Infrarot Codes wieder zu l schen Um die gelernten I...

Страница 35: ...eigene Protokolle zur Steuerung ihrer Ger te Dies kann dazu f hren dass die o g Funktionen nur teilweise oder berhaupt nicht funktionieren Um Konflikte bei der Ansteuerung des Amp 5 1 zu vermeiden d r...

Страница 36: ...hen Pegel aber nicht h her als 2 Vrms Um den Standby Modus von der Werkseinstellung Netzwerk NSB umzustellen gehen Sie bitte wie folgt vor 1 Dr cken Sie die Men Taste M auf der Fernbedienung um in das...

Страница 37: ...dem Sie den Namen ausgew hlt haben verlassen Sie diesen Eingang durch Dr cken der OK Taste 5 Um einem anderen Eingang eine abweichende Bezeichnung zuzuweisen wiederholen Sie die Schritte 4 bis 5 6 Um...

Страница 38: ...nge wie gewohnt manuell ber die Pfeiltasten bzw der Fernbedienung ausgew hlt werden Werksseitig ist die Funktion deaktiviert Um die Funktion Eingangswahl zu aktivieren Auto AUT oder zu deaktivieren Ma...

Страница 39: ...M Hinweis Aufgrund verbundener Smart Funklautsprecher kann die maximal m gliche Verz gerung kleiner als 200ms sein Max Lautst rke VOL Mit dieser Schutz Funktion k nnen Sie die maximal einstellbare Lau...

Страница 40: ...bemodus PLM und best tigen Sie diesen durch Dr cken der OK Taste 4 W hlen Sie mittels Pfeiltaste oder den gew nschten Wiedergabemodus aus und dr cken Sie die OK Taste 5 Aktivieren EIN ON bzw deaktivie...

Страница 41: ...it der OK Taste 5 Um das Men zu verlassen dr cken Sie die Men Taste M Werkseinstellungen RES Mit dieser Funktion k nnen Sie den Amp 5 1 in den Auslieferzustand Werkseinstellungen zur cksetzen und eine...

Страница 42: ...im LED Display steht NO 5 Um den Vorgang abzubrechen dr cken Sie die OK Taste oder alternativ die Men Taste M 6 Um den Reset durchzuf hren w hlen Sie ber die Pfeiltaste bzw den Eintrag Zur cksetzen im...

Страница 43: ...ihn mit der Play Pause Taste Auf dem Bildschirm erscheint die Anzeige Zur cksetzen Reset das LED Display zeigt Ihnen YES an 5 Um den Vorgang abzubrechen dr cken Sie die Eingangswahltaste Die Anzeige w...

Страница 44: ...ich Bluetooth Funktechnologie anpassen Es enth lt die Elemente Bluetooth BT BT Koppeln BTP BT Eingangswahl BTS Automatische Wiedergabe APL BT Reset BRE Sendeleistung TXP HF Kanal CHN Funk Reset WRE Bl...

Страница 45: ...e zum Koppeln den Eingang BT Um eine vom gew hlten Eingang unabh ngige Kopplung zu erreichen muss die Funktion BT Eingangswahl BTS aktiviert sein Die Voraussetzung f r einen erfolgreichen Kopplungspro...

Страница 46: ...bilen Endger t gestartet Gehen Sie bitte wie folgt vor um diese Funktion zu aktivieren bzw zu deaktivieren 1 Dr cken Sie die Men Taste M auf der Fernbedienung um in das Men zu gelangen 2 Navigieren Si...

Страница 47: ...t weiterhin YES Nach wenigen Sekunden springt der Amp 5 1 zur ck ins Men Bluetooth 8 Um das Men zu verlassen dr cken Sie die Men Taste M HF Sendeleistung TXP Das Wireless Audio Modul des Amp 5 1 ist w...

Страница 48: ...e oder zum Men punkt Funkeinstellung WIS und w hlen Sie diesen durch Dr cken der OK Taste aus 3 W hlen Sie mittels Pfeiltaste oder den Men punkt HF Kanal CHN und best tigen Sie diesen durch Dr cken de...

Страница 49: ...bwoofer einstellen Werksseitig ist der Amp 5 1 auf ein 5 1 Passiv Lautsprechersys tem voreingestellt Es sind unter Verwendung von Canton Smart Lautsprechern jedoch Konfigurationen von 2 0 bis zu 7 1 4...

Страница 50: ...Klang zu erhalten besteht die M glichkeit zwei weitere Aufsatz Lautsprecher Upfire oder De ckenlautsprecher zu nutzen Die Aufsatz Lautsprecher Dolby Atmos Enabled Speaker werden auf den Lautsprechern...

Страница 51: ...z z B 100Hz liegt Alle Frequenzen darunter werden dem Subwoofer zugef hrt und von diesem wiedergegeben Aus NO Diese Einstellung nehmen Sie vor wenn dieses Lautsprecher Paar bzw ein Center Sub nicht ve...

Страница 52: ...erzuordnung SPM Das Men Lautsprecherzuordnung SPM dient dem Einrichten einer Verbindung zwischen Amp 5 1 und Lautsprecher Die Verbindung kann bei Smart Lautsprechern kabellos per Funk Wireless oder be...

Страница 53: ...gese hen ist Ein aktiver Subwoofer kann alternativ mittels Cinchkabel an den Sub Out des Amp 5 1 angeschlossen werden Achtung Um einen Smart Lautsprecher Subwoofer mit dem Amp 5 1 verbinden zu k nnen...

Страница 54: ...undene Smart Lautsprecher zeigt in seinem LED Display CON an Von nun an arbeiten die Dis plays von Amp 5 1 und Smart Lautsprecher synchron und zeigen den aktuell ausgew hlen Lautsprecher an Die Status...

Страница 55: ...des digitalen Signalprozessor mit allen Algorithmen zur Signaldekodierung und verarbeitung OSD Fonts OSD Die Version der auf dem Bildschirm und im LED Display angezeigten Texten und Zeichen Um diese...

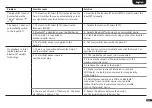
Страница 56: ...requenzband auf dem das Audio Funkmodul arbeitet Um diese Netzwerkinformationen abzurufen gehen Sie bitte wie folgt vor 1 Dr cken Sie die Men Taste M auf der Fernbedienung um in das Men zu gelangen 2...

Страница 57: ...zw die Lautst rke steht auf Null 2 Digital Ausgang am Quellger t einschalten Lautst rke erh hen ggf Anleitung des Ger tes zur Hand nehmen 3 Das Signalkabel ist nicht korrekt verbunden oder defekt 3 1...

Страница 58: ...liegende Signal hat einen zu niedrigen Signalpegel 3 Erh hen Sie den Ausgangspegel Lautst rke Ihres analogen Quellger tes Der Amp 5 1 schaltet ungewollt in den Standby Zustand 1 Die Standby Funktion w...

Страница 59: ...4 1 M gliche St rquelle zum Test abschalten und betreffen des Ger t entst ren lassen falls das Brummger usch ver schwindet Alternativ die St rquelle an einer anderen Netzphase L1 L2 bzw L3 anschlie en...

Страница 60: ...tooth Funktechnologie 1 Es besteht keine Verbindung zwischen dem Amp 5 1 und dem mobilen Endger t 1 Koppeln und verbinden Sie Ihr mobiles Endger t mit dem Amp 5 1 gem Anleitung 2 Das mobile Endger t i...

Страница 61: ...den 4 Der Abstand zwischen Slave Lautsprecher und Amp 5 1 ist zu gro 4 1 Erh hen Sie die Sendeleistung des Audio Funkmoduls gem Anleitung 4 2 Verringern Sie den Abstand zwischen Slave Lautspre cher un...

Страница 62: ...n Sie ihn ber die POWER Taste ein 3 Der Slave Lautsprecher wurde mit dem Stromnetz verbunden bevor der Kopplungsvor gang am Amp 5 1 dem sog Master initiiert wurde 3 Starten Sie immer erst den Kopplung...

Страница 63: ...den 4 Der Abstand zwischen Slave Lautsprecher und Amp 5 1 ist zu gro 4 1 Erh hen Sie die Sendeleistung des Audio Funkmoduls gem Anleitung 4 2 Verringern Sie den Abstand zwischen Slave Lautspre cher un...

Страница 64: ...ungsaufnahme Leerlauf kein Ausgangssignal ca 10W Leistungsaufnahme maximal ca 400W Abmessungen B 24 5 cm H 12 0 cm T 15 4 cm Gewicht 2 64 kg Decoder Dolby Atmos DTS HD PCM 32kHz 96kHz 8Bit 24Bit Virtu...

Страница 65: ...den mit den Richtlinien des Europ ischen Parlaments und des Rates Richtlinie 2014 53 EU Funkanlagen Richtlinie 2014 35 EU Niederspannungsrichtlinie Richtlinie 2011 65 EU Beschr nkung der Verwendung be...

Страница 66: ...en und oder der Bedienung kommen Bitte schauen Sie in einem solchen Fall nach der neuesten Version der Bedienungsanleitung auf unserer Homepage Informationen zur CE Kennzeichnung Innerhalb der Europ i...

Страница 67: ...BEDIENUNGSANLEITUNG Smart Connect 5 1 OPERATING INSTRUCTIONS Deutsch English...

Страница 68: ...rd to countless hours filled with excellent sound If you have any questions or need further information please do not hesitate to contact us Service Telefon 06083 287 87 Service E Mail service canton...

Страница 69: ...es Page 87 Using Spotify Connect Page 87 Playback via Bluetooth wireless technology Page 88 Preset 1 3 Page 89 Menu structure and navigation Page 90 1 Speaker Setup SPS Page 91 Channel Level CHL Page...

Страница 70: ...5 Factory Reset RES Page 105 3 Network Setup NWS Page 106 Network Select NWC Page 106 Network Reset NWR Page 107 4 Wireless Setup WIS Page 108 Bluetooth Setup BT Page 108 Pair Mode BTP Page 108 BT Sel...

Страница 71: ...English Network Info NWI Page 120 Trouble shooting Page 121 Technical data Page 128 EU declaration of conformity Page 129 Further important information Page 130 Warranty Page 131 License Notices Page...

Страница 72: ...or connection Choose a flat surface Avoid moisture Avoid shocks Do not touch the mains cable with wet hands Do not throw in household waste Distance to sources of heat Do not use aggressive alcoholic...

Страница 73: ...st not be exposed to rain or moisture Do not operate this device near water Do not expose this device to dripping or splashing water CAUTION Risk of electric shock Do not open CAUTION To reduce the ri...

Страница 74: ...ck connect the mains plug only to sockets or extensions where the contact pins can be fully inserted to prevent exposed contact pins Never touch the signal and mains cable with wet hands Do not step o...

Страница 75: ...pen the housing There are no user serviceable parts in the device Consult qualified personnel for all repair and maintenance work This is required when the device has been damaged in any way such as m...

Страница 76: ...mprint Incorrect insertion can lead to damage Only use the batteries or rechargeable batteries specified for the device The batteries supplied are not rechargeable batteries i e these batteries must n...

Страница 77: ...emove the protective film to activate When replacing the battery ensure that it is correctly inserted according to the polarity markings Only use the battery specified for this system CR 2032 CR 2032...

Страница 78: ...onnection with your digital coax audio output of your TV or digital source device 2x RCA max 96kHz 5 SUB OUT For connection with an active subwoofer RCA max 2Vrms 6 OPTICAL IN OPT For the connection w...

Страница 79: ...ot need to be activated or deactivated For your TV to support the ARC function it must have at least one HDMI input with Audio Return Channel ARC The CEC function must be activated For more informatio...

Страница 80: ...volume levels for night usage Pure Direct Surround sound without a Virtualizer or Upmixer Party Plays the front channels L R additionally on the surround speakers 10 Sound Toggles btw bass midrange a...

Страница 81: ...s of the Amp 5 1 can comfortably be done using the On Screen display with your TV Screen To do so the Amp must be connected with your TV using a HDMI cable The menu is comprehensibly structured Pressi...

Страница 82: ...is muted Sound Setting BAS Bass tone control adjustment Sound Setting MID Midrange tone control adjustment Sound Setting TRE Treble tone control adjustment Playmode STEREO Stereo mode selected Playmod...

Страница 83: ...ignal DTS DTS digital surround bitstream Incoming Signal PCM Digital stereo signal Networking CAST Usage of Chromecast built in Networking SPOTIFY Usage of Spotify Connect Networking WIF CON Network W...

Страница 84: ...1 and start your mobile device The WiFi and Bluetooth function must be activated on your mobile device If the Amp 5 1 has been disconnected from the mains please wait with the procedure until the dis...

Страница 85: ...omecast built in icon on the screen Depending on the app it may be necessary to start playback the stream first so that this function is displayed and available 14 In order to play back music that you...

Страница 86: ...ntervals also in standby it searches for a firmware update and installs it if available The LED flashes red green during the update process and the display shows DOWNLOADING followed by UPDATING Durin...

Страница 87: ...Once confirmed the connection will be made automatically and will appear as BT and CON in the display 5 If the mobile device requires an access code please enter 0000 6 If the connection fails the mes...

Страница 88: ...ontrol settings are selected executed Storing playlists from the app Spotify 1 Open a previously created playlist in the app Spotify on your mobile device and start the playback Please select Spotify...

Страница 89: ...ay Pause button To select a function also press the Play Pause button To change the value of a parameter press the or button To change the value or state of a function press the input select key To en...

Страница 90: ...evel between 20 and 30 The test tone generator is de pending on the main volume level and cannot be increased or decreased within the menu For adjusting the relative volume of the different speakers c...

Страница 91: ...s the M button 2 Enter the first menu item Speaker Setup SPS by pressing OK 3 Select the menu item Distance DST using the or button and confirm with the OK button 4 Select the speaker that you want to...

Страница 92: ...u 2 Confirm the first menu item Speaker Setup SPS by pressing the OK button 3 Use the or button to select the menu item Compression DRC and confirm with the OK button 4 Activate or deactivate the func...

Страница 93: ...repeat the process for the rest of speakers 7 Press the M button to exit this menu item Sub Phase PHA Use this function Sub Phase to change the phase of a connected subwoofer between 0 degree factory...

Страница 94: ...e bass signals factory setting Off OFF means that the bass signals are played through the front speakers Front Left and Front Right 5 Confirm and exit the menu item by pressing the M button Room Heigh...

Страница 95: ...h the OK button 5 Use the resp the key to set the height and confirm your selection with the OK button Repeat this steps in case for the other pair of speakers 6 Confirm and exit the menu item by pres...

Страница 96: ...n learn the infrared codes of your TV remote control and therefore allows you to control the functions of the amplifier and your TV via one remote control You can allocate any key of the TV remote con...

Страница 97: ...the Standby function can be learned If your TV remote control has only one key for the On and Standby functions both the On and Standby functi on must still be allocated with this command Due to the v...

Страница 98: ...The BT input is the last entry in the list After this input the system jumps back to the IR menu Note Due to the variety of infrared codes it is not possible to guarantee that every IR remote control...

Страница 99: ...have developed their own protocols for controlling their devices based on the CEC standard This can mean that the functions described above only function partially or does not function at all In orde...

Страница 100: ...analogue input the threshold value has been set quite high To make sure the Amp 5 1 powers up correctly please set the output level of your analog audio source to a high level but not more than 2Vrms...

Страница 101: ...eat steps 4 and 5 7 To leave this menu item press the M button Notes Should you assign a name to an input that is already assigned the input previously assigned with this name will be deactivated To c...

Страница 102: ...ally in case of an incoming audio signal even in the standby mode If you want the HDMI inputs to be switched automatically too please activate the HDMI CEC function in the same named menu To automatic...

Страница 103: ...an activate additional playmodes that can then be used and selected in addition to the 3 standard playmodes Stereo Movie and Music with the PM button on the optionally available Smart remote These pla...

Страница 104: ...menu item Language LAN and confirm with the OK button 2 Use the resp the key to select the desired volume 3 Confirm and exit the menu item by pressing the M button Factory Reset RES With this functio...

Страница 105: ...l two times to exit the menu 6 To execute the reset keep Reset All YES and confirm with the Play Pause button The display then shows YES to confirm the reset procedure the OSD shows Please Wait 7 Afte...

Страница 106: ...n The display then shows YES to confirm the reset procedure the OSD shows Please Wait 7 After some seconds the Amp 5 1 returns to the Network Connection NWC menu to the menu item Network Reset NWR and...

Страница 107: ...tion is disabled MAN to avoid unwanted pairing processes with mobile devices If you deactivate this function a pairing request can only be send manually using the Smart remote with the Bluetooth Pairi...

Страница 108: ...To enter the menu press the M button 2 Use the or button to select the menu item Wireless Setup WIS and confirm with the OK button 3 Select the first menu item Bluetooth BT and confirm with the OK bu...

Страница 109: ...5 1 will be deleted To perform the reset please proceed as follows 1 To enter the menu press the M button 2 Use the or button to select the menu item Wireless Setup WIS and confirm with the OK button...

Страница 110: ...rences and dropouts should no longer occur The selected frequency for the Amp 5 1 and the router should ideally be as far apart as possible The Amp 5 1 uses the following radio chan nels 5 2GHz Band 5...

Страница 111: ...em Wireless Reset and the display shows WRE again Press the M button additional two times to exit the menu 5 To execute the reset press the OK button The display then shows YES to confirm the reset pr...

Страница 112: ...surround effects the speakers should be positioned in an angle between 90 and 110 on each side to the listening position with a minimum height of 60cm 5 Rear left and right RER These speakers are used...

Страница 113: ...E channel Low Frequency Effect Additionally the subwoofer reproduces all frequencies that can not be repro duced by small speakers und are below the set crossover frequency e g 100Hz please refer to t...

Страница 114: ...up which is why the the type NO is not selectable Large LAR Please use this type for large passive speakers that are connected to the speaker terminals of the Amp 5 1 The full audio signal will be rou...

Страница 115: ...Smart speaker can be connected wirelessly The names of the speaker terminals on the rear panel of the Amp 5 1 correspond with the factory default routing of the channels Front Left FL Front Right FR S...

Страница 116: ...ant to connect your Smart speaker Wireless will be the only selectable option The abbreviations behind Wireless have the following meanings Wireless DIS Smart speaker not connected Disconnected Wirele...

Страница 117: ...the speaker on c the distance between the Amp 5 1 and the speaker may not exceed 10m and they are in the same room Please increase the transmission power of the wireless audio module described in cha...

Страница 118: ...re information do the following 1 To enter the menu press the M button 2 Use the or button to navigate to the menu System Info INF and confirm with the OK button 3 Select the menu item Firmware Info F...

Страница 119: ...owing 1 To enter the menu press the M button 2 Use the or button to navigate to the menu System Info INF and confirm with the OK button 3 Select the menu item Firmware Info FWI and confirm with the OK...

Страница 120: ...ume is set to zero 2 Unlock the digital output on the source device increase the volume please refer to the manual of the device 3 The cable is not connected correctly or defective 3 1 Check the conne...

Страница 121: ...gether with your TV 3 The signal from the source at the analogue input AUX is too low 3 Increase the output level volume on your analogue source device The Amp 5 1 switches off unintentionally 1 The s...

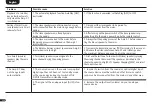
Страница 122: ...f interference have the relevant device suppressed for interfe rence if the humming sound disappears or initially connect the source of interference to another mains phase L1 L2 or L3 consult a specia...

Страница 123: ...he Amp 5 1 4 Pair your mobile device with the Amp 5 1 No playback or inter rupted playback via Bluetooth wireless technology 1 There is no connection between the Amp 5 1 and the mobile device 1 Pair a...

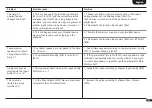
Страница 124: ...ance between slave speaker and Amp 5 1 master device is too high 4 1 Increase the transmission power TXP according to this manual 4 2 Reduce the distance between Amp 5 1 and slave speaker The maximum...

Страница 125: ...stem sounds on your mobile device 2 2 Deactivate the function Input Select SEL resp BT Select BTS Paired wireless speakers do not turn on together with the Amp 5 1 1 The slave speakers are not paired...

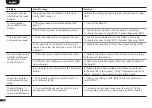
Страница 126: ...utput Config OPC No connection can be established between the network router and the Amp 5 1 1 The DHCP server is deactivated in the router 1 Activate the DHCP server of the network router according t...

Страница 127: ...consumption Idle no output signal ca 10W Power consumption maximum ca 400W Dimensions W 24 5 cm H 12 0 cm D 15 4 cm Weight 2 64 kg Decoder Dolby Atmos DTS HD PCM 32kHz 96kHz 8Bit 24Bit Virtualizer Dol...

Страница 128: ...rol is in accordance with the Directives of the European Parliament and of the Council Directive 2014 53 EU Radio Equipment Directive 2014 35 EU Low Voltage Directive Directive 2011 65 EU Restriction...

Страница 129: ...ons and or in the controls may occur In case please visit our homepage for the latest manuel version Information about the CE marking Electrical and electronic devices placed on the market within the...

Страница 130: ...kt an den Canton Service ENG WARRANTY Above and beyond the legally prescribed warranty period Canton offers a guarantee of 5 years on all its passive loudspeakers A 2 year guarantee is offered for act...

Страница 131: ...Bluetooth word mark and logos are registered trademarks owned by the Bluetooth SIG Inc and any use of such marks by Canton is under license Other trademarks and trade names are those of their respect...

Страница 132: ...ct our Customer Service Canton Elektronik GmbH Co KG Neugasse 21 23 61276 Weilrod Germany Tel 49 0 6083 287 87 info canton de www canton de Alle Angaben ohne Gew hr Technische nderungen Tippfehler und...

Отзывы: