background image

Digital Video Software

Version 10

Instruction Manual

If you are using Windows operating system, use the supplied
DIGITAL VIDEO SOLUTION DISK 

For Windows

.

If you are using Macintosh operating system, use the supplied
DIGITAL VIDEO SOLUTION DISK 

For Macintosh

.

PUB. DIM-620

E

Содержание ZR90

Страница 1: ... Instruction Manual If you are using Windows operating system use the supplied DIGITAL VIDEO SOLUTION DISK For Windows If you are using Macintosh operating system use the supplied DIGITAL VIDEO SOLUTION DISK For Macintosh PUB DIM 620 E ...

Страница 2: ...HOLE OR IN PART EXCEPT AS EXPRESSLY PROVIDED IN THIS AGREEMENT 2 BACK UP COPY You may make one copy of the SOFTWARE solely for back up purposes or copy the SOFTWARE onto the permanent storage device e g a hard disk of your computer and retain the original for back up purposes Any other copying of the SOFTWARE is a violation of this Agreement You must reproduce and include the copyright notice on t...

Страница 3: ...of the terms of this Agreement and you must then promptly return the SOFTWARE In addition Canon may enforce its other legal rights 6 U S GOVERNMENT RESTRICTED RIGHTS NOTICE The SOFTWARE is a commercial item as that term is defined at 48 C F R 2 101 Oct 1995 consisting of commercial computer software and commercial computer software documentation as such terms are used in 48 C F R 12 212 Sept 1995 ...

Страница 4: ...ed to give Canon any ownership rights in any images graphics or textual material that you save in connection with the Software You may not modify remove or delete any or all copyright notices i which are contained in the Software including any copy thereof and ii which are on the original CD ROM and on the medium of a back up copy made pursuant to Section 2 above 11 ACKNOWLEDGEMENT BY USING THE SO...

Страница 5: ...ndow 33 Playing Back Movies From a Memory Card 34 Running a Slide Show 36 Searching Images 38 Searching Images 38 Setting Parameters for Future Searches 41 Adding Sound to an Image 43 Adding Sound to an Image 43 Playing Back the Sound 43 Attaching Still Images to E mail Messages 44 Printing Still Images PhotoRecord 47 Selecting the Print Mode and Number of Copies DPOF Print Settings 50 Merging Pan...

Страница 6: ... Image Viewer Window 102 Displaying the Image Information 103 View Menu 104 Displaying Images in TimeTunnel 105 Playing Back Movies From a Memory Card 106 Running a Slide Show 107 Adding Sound to a Still Image 108 Adding Sound to a Still Image 108 Playing Back the Sound 109 Using the Sound Panel 109 Attaching Images to E mail Messages 110 Printing Still Images ImageBrowser 113 The Print Window 115...

Страница 7: ...7 E My Camera Window 128 Saving the My Camera Settings to the Camcorder 129 Adding Still Images to the My Camera Window 130 Uninstalling the Software 131 Troubleshooting 132 ...

Страница 8: ...s or due to use of a memory card not formatted by a Canon camcorder Trademark Acknowledgments Canon is a registered trademark of Canon Inc Macintosh and Mac OS are trademarks of Apple Computer Inc registered in the United States and other countries iPhoto and QuickTime are trademarks of Apple Computer Inc Microsoft and Windows are either registered trademarks or trademarks of Microsoft Corporation...

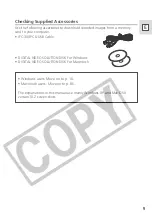
Страница 9: ... from a memory card to your computer IFC 300PCU USB Cable DIGITAL VIDEO SOLUTION DISK For Windows DIGITAL VIDEO SOLUTION DISK For Macintosh Windows users Move on to p 10 Macintosh users Move on to p 86 The explanations in this manual use mainly Windows XP and Mac OS X version10 2 screen shots ...

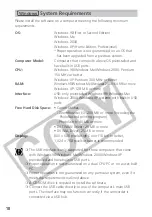
Страница 10: ...ms with built in USB ports Free Hard Disk Space Canon Utilities ZoomBrowser EX 200 MB or more Including the PhotoRecord printing program PhotoStitch 40 MB or more DV TWAIN Driver 25 MB or more DV WIA Driver 25 MB or more Display 800 600 pixels High Color 16 bit or better 1 024 768 pixels or better is recommended The USB interface is only supported for those computers that come with Windows 98 Wind...

Страница 11: ...he same time If this occurs disconnect the other devices from the computer and try reconnecting the camcorder Do not connect two or more camcorders to the same computer via the USB interface The connections may not operate correctly Not all operations performed with a connection to a USB 2 0 compatible board can be guaranteed ...

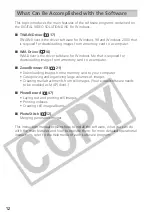
Страница 12: ...ng images from a memory card to a computer ZoomBrowser EX 21 Downloading images from a memory card to your computer Categorizing and organizing large volumes of images Creating mail attachments from still images Your e mail software needs to be enabled as MAPI client PhotoRecord 47 Laying out and printing still images Printing indexes Creating still image albums PhotoStitch 52 Merging panoramic im...

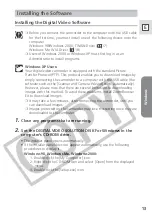
Страница 13: ...Wizard starts automatically However please note that there are several limitations to downloading images with this method To avoid these problems install ZoomBrowser EX to download images It may take a few minutes after connecting the camcorder until you can download images Images protected on the camcorder may lose this setting once they are downloaded to the computer 1 Close any programs that ar...

Страница 14: ...up exe icon Depending on the setting of your computer the file extension exe may not appear 3 Select your language 4 Click Digital Video Software Installation For details about the DV Network Software refer to the DV Network Software Instruction Manual 5 Click Next 6 Select your country region and click Next Installer Panel Installing the Software ...

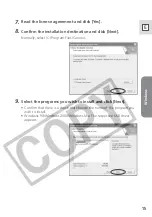
Страница 15: ...ion destination and click Next Normally select C Program Files Canon 9 Select the programs you wish to install and click Next Confirm that there is a check mark beside the name of the program you wish to install Windows 98 Windows 2000 Windows Me The respective USB driver appears ...

Страница 16: ...ppears click OK This window only appears if you installed the TWAIN Driver or the WIA Driver 11 When installation is complete select Yes I want to restart my computer now and click Finish 12 When the computer has restarted and the regular desktop screen is displayed remove the DIGITAL VIDEO SOLUTION DISK For Windows from the CD ROM drive Installing the Software ...

Страница 17: ...s flashing 4 Connect the camcorder to the computer using the supplied USB cable 19 If the Digital signature not found message appears click Yes After a few moments a message such as New Hardware Found appears and the TWAIN driver will be installed automatically If you are prompted to restart the computer restart the computer When installation is complete a window appears allowing you to select an ...

Страница 18: ...vice 1 Insert a memory card containing images into the camcorder 2 Connect the Power Adapter to the camcorder 3 Turn the POWER switch to PLAY VCR and move the TAPE CARD switch to CARD Wait until the card access indicator stops flashing 4 Connect the camcorder to the computer using the supplied USB cable 19 If the Digital signature not found message appears click Yes After a few moments a message s...

Страница 19: ...into standby sleep mode while a camcorder is connected via the USB interface If it does happen never disconnect the USB cable Try to awaken the computer with the camcorder in the connected state Some computers will not awaken properly if you disconnect the camcorder while they are in standby mode Please refer to your computer manual for instructions regarding its standby mode 1 Insert a memory car...

Страница 20: ...e install the TWAIN Driver or the WIA Driver 17 18 Windows XP If a window appears prompting you to select an application program to start select ZoomBrowser EX or Scanners and Cameras Wizard to start If neither of these is selected operation may not work correctly You can also set the computer to start ZoomBrowser EX or Scanners and Cameras Wizard automatically 72 Connecting the Camcorder to a Com...

Страница 21: ... camcorder or from the Camera Settings Window 29 Images recorded onto the memory card or downloaded to the hard disk are important original data files Create a copy of the file first before working on it on your computer For Windows XP Users Do not rotate the image in the Windows Picture and Fax Viewer or in the explorer view The file format of the original image will be changed and the image can ...

Страница 22: ... the window does not appear or if PC CONNECT does not appear on the camcorder screen start ZoomBrowser EX and open the Camera Window following the steps 5 to 7 for Windows Me 5 Select Canon ZoomBrowser EX and click OK ZoomBrowser EX starts With Windows 2000 the name of the application program may not appear on the Canon Camera event window In such case double click the ZoomBrowser EX icon on the d...

Страница 23: ...der 2 Connect the Power Adapter to the camcorder 3 Turn the POWER switch to PLAY VCR and move the TAPE CARD switch to CARD Wait until the card access indicator stops flashing 4 Connect the camcorder to the computer using the supplied USB cable 19 The Scanners and Cameras Wizard automatically opens Click Cancel to close the Wizard 5 Double click the ZoomBrowser EX icon on the desktop ZoomBrowser EX...

Страница 24: ...dow 7 Click Browse and Download Images 8 Click Browse Images The Camera Window opens displaying the camcorder images as thumbnails small images For instructions on how to set the Auto download settings see page 76 Downloading Images ZoomBrowser EX ...

Страница 25: ...e image you wish to download and click Download image An orange frame appears around the selected image You can select multiple images by continuously clicking on the images Click on the image again to deselect 2 In the Download Settings window confirm the settings and click OK 29 ...

Страница 26: ...l 1 Insert a memory card containing images recorded with the camcorder into the reader 2 Windows 98 Windows 2000 Windows Me Double click the ZoomBrowser EX icon on the desktop Windows XP When a window appears allowing you to select an application program to start select ZoomBrowser EX and click OK ZoomBrowser EX starts Move on to the step 5 Downloading Images ZoomBrowser EX The Camera Window close...

Страница 27: ...ith memory cards are connected or if a camcorder and a PC card reader are connected a selection dialog will appear before the Download image window opens Select one of the devices to proceed and click OK 5 Click Browse Images The Camera Window opens displaying the camcorder images as thumbnails small images ...

Страница 28: ...Connect to Internet Attaches selected still images to an e mail message Toolbar Set Adjusts the connection settings and camcorder settings Menu options Reconnect Camera Settings Slide DPOF Add Image s and My Camera The Slide function cannot be used Select Selects images Menu options Select All Select New Select Print mark Select Send mark Select Slide Show mark and Invert Selection Deselect Desele...

Страница 29: ...ra Window Select a folder in which you wish to download and save the image If you wish to create a new folder select Create new folder and select the item you wish to use as folder name If you leave this box without check mark the images will be named in the form of IMG_XXXX JPG If you place a check mark in this box you can designate a file prefix The images will be named file prefix XXXX JPG Inpu...

Страница 30: ... images Menu options Layout Print and Contact Sheet Print View Modify Use this to view or edit images Menu options View as a Slide Show Export Images Edit Image Stich Photos Search and Backup to CD Internet Attaches selected still images to an e mail message Clicking hides the area Click again to redisplay the area Toolbar Task Area Folders Area Select image folders here As in Windows Explorer you...

Страница 31: ... or the folder level You can also zoom up by double clicking an empty part of the Browser Area or the tab of a folder name Preview Mode Displays one image at a large size You can review file name comment histogram and image information Select the preview image from the bottom of the Main Window or by clicking Previous or Next Thumbnail Size Selects the size at which images are displayed in the Bro...

Страница 32: ...es selected still images Delete Deletes selected images Switch between images with this button when more than one image is selected You can change the file name or enter a comment Using Other ZoomBrowser EX Functions ...

Страница 33: ...trast You can adjust the color brightness and contrast by dragging the respective slide Zoom You can change the zoom ratio Crop You can extract a part of the still image 1 Click on the still image and drag to form a rectangular frame You can move or change the size of the frame 2 Click this button to extract the area within the frame The extracted part of the still image appears ...

Страница 34: ...ady installed on your computer install the QuickTime from the DIGITAL VIDEO SOLUTION DISK Place the disk in the CD ROM drive and click QuickTime Installation in the installer panel Do not double click a movie file AVI extension in Windows Explorer That will start Windows Media Player which may not support this file type To play back movies double click the thumbnail with a movie icon in the Main W...

Страница 35: ...Windows 35 E 2 Click the e play button in QuickTime Player The movie will be played back ...

Страница 36: ... selected still images in a slide show Movies cannot be selected for a slide show 1 Click View Modify in the Main Window 2 Click View as a Slide Show 3 Select the images and click Setup Slide Show Running a Slide Show ...

Страница 37: ...lly When you select Every 3 seconds you can select the interval in the control below from 1 to 120 seconds Loop Select to stop the slide show after the last image or to continuously run it in a loop Effect Select the transition effect to be used when moving from one slide to another When you click an effect you can check the effect in the preview window 5 Click Start Slide Show Click in the lower ...

Страница 38: ...r by modification date shooting date or keywords You can mark images as Favorites 41 and add keywords 41 Searching Images 1 Click View Modify in the Main Window 2 Select the folder in which you wish to search for the image and click Search Searching Images ...

Страница 39: ...de the parameter you wish to use If you selected Modification Date or Shooting Date set the date range If you selected Keywords select the keywords 4 Click Start Search The images matching the conditions will be displayed Clicking here hides the search parameter details ...

Страница 40: ...cify Search Condition and repeat steps 3 4 The images of the search result are displayed in the Search Results folder You can print or copy these images to another folder The images will remain in this folder until ZoomBrowser EX is closed or another search is performed Searching Images ...

Страница 41: ...dify Keywords in the Main Window Making an Image as Favorite 1 Select an image in the Browser Area and click Properties 2 Place a check mark beside Favorite Photo and close the Properties window The symbol shown below is displayed on images marked as Favorites Adding Keywords to Images 1 Select an image in the Browser Area and click Properties Favorites Symbol ...

Страница 42: ... a check mark beside the keyword you wish to use and click OK You can add and delete keywords Open the Manage keywords window by selecting Manage keywords from the Tools menu Searching Images Place a check mark beside the keyword you wish to use To add a keyword type the new word in the box and click ...

Страница 43: ...Sound window appears 2 Click Add A window appears allowing you to select a file 3 Select the sound file and click Open 4 Click OK appears on the image The sound file will be copied to the same folder as the image To remove sound from an image select Remove on the Sound Window in step 2 disappears and the copied sound file will be deleted Playing Back the Sound In the Main Window select the image w...

Страница 44: ... can attach selected still images to an E mail message To use this function the e mail software must be enabled as MAPI client For details refer to the instruction manual of the e mail software 1 Click Internet in the Main Window 2 Click Email Images ...

Страница 45: ... If you wish to send the still image without changes select Send images unchanged Normally select Resize and compress images into JPEG format Resize Image Select the reduction ratio to the original still image Image quality The lower the quality the coarser becomes the still image and smaller the file size Pressing Apply displays the file size after the compression as Total size of changed images ...

Страница 46: ...d the selected still images appear as an attachment in the message window Input address subject and your comments and send the message E mail software not supporting MAPI does not start automatically In this case select Save the images in a folder If you select Save the images in a folder click Browse and select the destination folder Start your e mail software and attach the saved still image to ...

Страница 47: ...e camcorder s card access indicator is flashing Doing so may cause memory card data to become corrupted If you are using a network printer and the printer name including the network path exceeds 31 characters it may not be possible to print from PhotoRecord If this happens open Control Panel on the Start menu Click the Printers icon and change the name of the your printer limiting its length to wi...

Страница 48: ...uously clicking on the images Click on the image again to deselect 4 Select the image information you wish to include in the print and click Open Layout Print PhotoRecord starts Place a check mark beside the items you wish include in the print If you wish to add a comment select a still image and enter a comment in the Properties window by clicking Properties ...

Страница 49: ...t design for background photo frames and text frames or set the design elements individually When you set the design elements individually make sure to select the target page If you click Add Titles Captions you can add titles and text and change font font size justification and color Make sure to select the target page when performing these changes Select the printer Select the album type Set the...

Страница 50: ...ality prints Selecting the Print Mode and Number of Copies DPOF Print Settings You can select the image and the number of prints print setting for automatic printing on a DPOF compliant printer You can set the DPOF print settings also on the camcorder Digital Print Order Format When you are using a SD memory card make sure the protect switch is set to allow recording 1 Click Set in the Camera Wind...

Страница 51: ...Print and the option Titles of the Edit menu printing of date and file number are not supported by the camcorder 3 Click Save to Camera The DPOF print settings will be saved to the memory card The Edit Slide DPOF window allows print settings on up to 998 still images With some camcorders DPOF print settings are limited to a maximum of 200 still images In that case all DPOF print settings on the 20...

Страница 52: ...struction Manual to learn how to record in Stitch Assist mode The following instruction explains how to merge still images recorded in Stitch Assist mode with the camcorder Still images recorded in Stitch Assist mode with Wide converter or Tele converter attached cannot be merged correctly 1 Click the arrow in the Camera Window 2 In the confirmation window click OK PhotoStitch starts Merging Panor...

Страница 53: ...Windows 53 E 3 Arrange the order of the images and click 2 Merge Operational instructions are displayed in the upper section of the window 4 Click Start ...

Страница 54: ...d to have QuickTime installed on your computer If it is not already installed install it from the DIGITAL VIDEO SOLUTION DISK For Windows Place the disk in the CD ROM drive and click QuickTime Installation in the installer panel Please refer to the PhotoStich Help menu for more details Merging Panoramic Images PhotoStitch 5 Select 3 Save and then click Save Select the destination folder input the ...

Страница 55: ... can also export selected movie and still image information to text file or copy and rename movies and still images 1 Click View Modify in the Main Window 2 Click Export Images 3 Select the images and click Select Export Type You can select multiple images or a folder to include all images in that folder Select only one image if you wish to set it as wallpaper Exporting Images ...

Страница 56: ...n also specify a prefix to be added to the exported still images Export Image Shooting Properties Exports selected image information to a text file Export Images as a Screen Saver Saves still images as a Screen Saver Export an Image as Wallpaper Saves still images as Windows wallpaper Copy Images and Rename Copies and names the selected images You can also specify a prefix to be added to the expor...

Страница 57: ... type Follow the instructions displayed in the window In each case specify the destination folder and file name for the images to be exported Image information will be saved along with the images when you select Edit Images and Resave and save images in JPEG format or when you select Copy Images and Rename Destination Folder ...

Страница 58: ...rom the computer to a memory card You can also add sample images for card mix from the DIGITAL VIDEO SOLUTION DISK For Windows Adding Still Images to the Memory Card 1 Click Camera Memory Card in the Main Window 2 Click Upload Images If you have already selected an image move on to the step 4 ...

Страница 59: ...ple still images by continuously clicking on the still images Click on the still image again to deselect 4 In the Add Image window select the image size and click Add The selected still images will be recorded to the memory card When recording is complete the still images will appear in the Camera Window ...

Страница 60: ...emory card 4 images for CARD CHROMA 2 images for CARD LUMINANCE 2 images for CAMERA CHROMA and 4 images for CARD ANIMATION are provided on the DIGITAL VIDEO SOLUTION DISK For Windows 1 Insert the DIGITAL VIDEO SOLUTION DISK For Windows to the computer s CD ROM drive If the installer panel appears click Exit to close it 2 Click Camera Memory Card 3 Click Upload Images ...

Страница 61: ...IMAGE Sample images or folders for CARD CHROMA CARD LUMINANCE CAMERA CHROMA or CARD ANIMATION appear in the Browser Area 5 Select the sample images you wish to add and click Open Camera Window You can select multiple images by continuously clicking on the images Click on the image again to deselect ...

Страница 62: ...d Image window click Add The selected images will be recorded to the memory card When recording is complete the sample images will appear in the Camera Window Adding Still Images from Your Computer to the Memory Card ...

Страница 63: ... RW disks The shooting information is copied along with the images This function can only be used on a computer that came with a CD R RW drive as standard equipment 1 Place a CD R RW disk in the computer s CD ROM drive 2 If the following window appears click Cancel 3 Click View Modify in the Main Window ...

Страница 64: ...nd click Specify Backup Settings 6 Select the CD R RW drive enter a title and click Start Backup The disk will be ejected from the drive when copying is complete You can add images to a CD R RW disk that already contains images Saving Images on CD R RW Disks Windows XP Only ...

Страница 65: ...y Camera Settings are saved to the camcorder Do not open the memory card cover or remove the memory card Do not detach the USB cable Do not turn off the camcorder or computer Do not change the position of the POWER switch or TAPE CARD switch Customizing Your Camcorder with the My Camera Settings Saving the My Camera Settings to the Camcorder 1 In the Main Window click Camera Memory Card followed b...

Страница 66: ...ck OK The selected setting replaces the old setting and appears in the Camera list If you wish to use this setting on the camcorder change the My Camera Setting on the camcorder itself Refer to the Camcorder Instruction Manual for details Alternatively you can display the My Camera window from the Camera Window by clicking Set and selecting My Camera from the displayed menu ...

Страница 67: ...l settings For setting in theme sets Displays the My Camera Settings saved on the computer Adds an image file to the My Computer list Plays back the sound setting selected in the My Computer list Plays back the sound setting selected in the Camera list Deletes a setting from the Camera list Saves the setting from the computer to the camcorder Deletes a setting from the My Computer list ...

Страница 68: ...lick the Set individually tab select Startup Image in the Data Type list and click Add File The file opening window appears 2 Select the still image file JPEG you wish to add and click Open The selected file appears in the My Computer list You can now save the newly added file to the camcorder using the procedures described in Saving the My Camera Settings to the Camcorder 65 To delete a setting s...

Страница 69: ...the DIGITAL VIDEO SOLUTION DISK for Windows Place the disk in the CD ROM drive and click QuickTime Installation in the installer panel You need to connect a microphone to the computer 1 In the Main Window select Create a My Camera Sound from the Camera menu The My Camera Sound Maker window appears 2 Click the tab of the sound type you wish to create and click Record 3 To begin recording click the ...

Страница 70: ...e Sound Format button Adjust the length of the recording to conform with the time limits by moving the blue and red switches and clicking the Cut button The following chart shows standard time lengths for My Camera sounds Sound Type Lengths in Seconds 11 025 kHz 8 000 kHz Start up Sound 1 0 sec or less 1 3 sec or less Shutter Sound 0 3 sec or less 0 4 sec or less Operation Sound 0 3 sec or less 0 ...

Страница 71: ... 7 Input a file name and click OK The created sound file appears in the My Computer list You can now save the newly created sound file to the camcorder using the procedures described in Saving the My Camera Settings to the Camcorder 65 8 Click to close the My Camera Sound Maker window ...

Страница 72: ...t until the card access indicator stops flashing 4 Connect the camcorder to the computer using the supplied USB cable 19 When a window appears allowing you to select an application program to start click Cancel 5 Click the Windows Start menu and select Settings and Control Panel 6 Double click the Scanners and Cameras icon If you cannot find the Scanners and Cameras icon see TWAIN Driver WIA Drive...

Страница 73: ...the camcorder 3 Turn the POWER switch to PLAY VCR and move the TAPE CARD switch to CARD Wait until the card access indicator stops flashing 4 Connect the camcorder to the computer using the supplied USB cable 19 When the Scanners and Cameras Wizard opens click Cancel 5 Click the Windows Start menu and select Settings and Control Panel 6 Double click the Scanners and Cameras icon If you cannot find...

Страница 74: ... click OK When you have restarted your computer a window appears allowing you to select an application program to start Select Canon ZoomBrowser EX place a check mark beside Always use this program for this action and click OK ZoomBrowser EX starts and the Camera Window opens automatically The next time the camcorder is connected ZoomBrowser EX starts and the Camera Window opens automatically ...

Страница 75: ...t until the card access indicator stops flashing 4 Connect the camcorder to the computer using the supplied USB cable 19 A window appears allowing you to select an application program to start 5 Select Canon ZoomBrowser EX place a check mark next to Always use this program for this action and click OK The next time the camcorder is connected ZoomBrowser EX starts and the Camera Window opens automa...

Страница 76: ...is started specify the download settings 1 In the Main Window select Auto download setting from the Camera menu 2 Enable or disable the auto download setting and click Select Image Type When you selected Images are not automatically downloaded click Setup Completed The setup process is complete When you selected Images are automatically downloaded click Select Image Type and move on to the steps 3...

Страница 77: ...ndows 77 E 3 Select the image type to be downloaded and click Save In 4 Select the destination folder in which you wish to save the image and click Set Action This option is not supported by the camcorder ...

Страница 78: ...Layout Print Contact Sheet Print View as slideshow Send by e mail Allows you to display the folder in which the images have been saved after downloading them Auto Downloading Settings 5 Set the action to be carried out after images are downloaded and click Setup Completed ...

Страница 79: ...ital cameras The camcorder does not support these programs Uninstall the software when you wish to delete it from your computer or when reinstallation is required to fix corrupted files Users of Windows 2000 and Windows XP must first log in as an Administrator to uninstall the driver and other programs Uninstalling ZoomBrowser EX 1 Click the Windows Start menu and select All Programs Canon Utiliti...

Страница 80: ...ners and Cameras icon see TWAIN Driver WIA Driver Uninstallation 82 5 Windows 98 Windows 2000 1 Delete Canon Camera from the Scanners and Cameras Properties list 2 Click OK to close the window 3 Click the Windows Start menu and select Programs Canon Utilities DV TWAIN Driver x x and TWAIN Driver Uninstall A version number appears in place of x x Windows Me 1 Delete the camcorder icon from the Scan...

Страница 81: ...ing the Camcorder to a Computer 19 and check the connection Ensure that you are using the correct cable and that its connectors are in good shape If you are experiencing operational problems detach the USB cable from the camcorder and computer and terminate the connection Restart the computer and then reconnect the camcorder TWAIN Driver or WIA Driver is not installed properly First uninstall the ...

Страница 82: ...n good shape Are you using the power adapter to power the camcorder If the problem is not mentioned above the TWAIN Driver WIA Driver may not have been recognized by Windows Uninstall 80 and reinstall 17 the driver TWAIN Driver WIA Driver Uninstallation If you had problems uninstalling the driver use the following procedures to remove it The Inf folder contains numerous files that are critical to ...

Страница 83: ...rive and the Windows and Inf folders If the Inf Folder Is Not Visible in the Windows Folder 1 Windows 98 Click the View menu and select Folder Options Windows Me Click the Tools menu and select Folder Options 2 Click the View tab 3 Windows 98 Set the Hidden files section to Show all files Windows Me Set the Hidden files and folders section to Show hidden files and folders 4 Click OK This makes the...

Страница 84: ...roperties dialog Remove all copies of Canon Camera or your camcorder model name that appear in the Other Devices or Imaging Devices categories or that appear more than once in one category 6 Double click the My Computer icon on the desktop followed by the C drive and the Winnt and Inf folders If the Inf Folder Is Not Visible in the Winnt Folder Use the following procedures to show all files and fo...

Страница 85: ...omments added using a prior version of ZoomBrowser EX will not be displayed Use the following procedure to display them 1 In Windows Explorer open the Program folder under the folder in which you installed ZoomBrowser EX 4 or higher C Program Files Canon ZoomBrowser EX Program 2 Double click dbcobverter exe 3 Select the database you were using until now C Program Files Canon ZoomBrowser EX Program...

Страница 86: ...uirements outlined above ImageBrowser and PhotoStitch do not operate on disks formatted with the Unix File System UFS A CD ROM drive is required to install the software Connect the USB cable directly to one of the computer s main USB ports The interface may not function correctly if the camcorder is connected via a USB hub The connection may not operate correctly if you are using other USB devices...

Страница 87: ...d on the DIGITAL VIDEO SOLUTION DISK For Macintosh ImageBrowser 92 Downloading images recorded onto a memory card to your computer Categorizing and organizing large volumes of images Creating mail attachments from images Adding a title and a comment and printing still images Printing indexes PhotoStitch 119 Merging panoramic images ...

Страница 88: ...mcorder for example MVI_0001 AVI and MVI_0001 THM MVI_0001 THM files cannot be downloaded but movies can still be played back on the computer Mac OS X version 10 2 You may not be able to download images with iPhoto if the memory card contains an enormous volume of images approx 900 or more The Exif version may change to 2 1 and image information may be modified when downloading images with Image C...

Страница 89: ...he Mac OS X and Canon Digital Video Installer icons The installer panel appears 4 Select your language 5 Click Digital Video Software Installation 6 Select the programs you wish to install and click Install Confirm that there is a check mark beside the name of the program you wish to install 7 Select your country region and click Next 8 Read the license agreement and click Agree Installer Panel ...

Страница 90: ...nstallation destination and click Choose Installation starts 10 When the message Installation has finished appears click OK 11 After the installation is complete restart the computer as prompted Installing the Software ...

Страница 91: ...llow the computer to go into standby sleep mode while a camcorder is connected via the USB interface If it does happen never disconnect the USB cable Try to awaken the computer with the camcorder in the connected state Some computers will not awaken properly if you disconnect the camcorder while they are in standby mode Please refer to your computer manual for instructions regarding its standby mo...

Страница 92: ... downloaded to the hard disk are important original data files Create a copy of the file first before working on it on your computer Starting ImageBrowser 1 Insert a memory card containing images into the camcorder 2 Connect the Power Adapter to the camcorder 3 Turn the POWER switch to PLAY VCR and move the TAPE CARD switch to CARD Wait until the card access indicator stops flashing 4 Connect the ...

Страница 93: ... the check mark 3 Click the close box at the upper left to close the dialog ImageBrowser will cease to start automatically thereafter Click here to close the dialog 5 Select Display Images and click OK The Communications Settings window appears This window only appears the first time the camcorder is connected 6 Confirm that USB port and Canon Camera are selected and click Set The Camera Window op...

Страница 94: ...rd access indicator stops flashing 4 Connect the camcorder to the computer using the supplied USB cable 91 5 Double click the Canon ImageBrowser icon on the desktop If the Canon ImageBrowser icon does not appear on the desktop double click the Canon Utilities folder on the drive on which the program was installed followed by the ImageBrowser folder and ImageBrowser icon 6 Click Canon Camera in the...

Страница 95: ...elect Macintosh HD in the explorer view section Mac OS X version 10 1 10 2 Select the user name subfolder of the Users folder in Macintosh HD 7 Confirm that USB port and Canon Camera are selected and click Set The Camera Window opens displaying the camcorder images as thumbnails small images ...

Страница 96: ...ge the folder name as you wish In this example we will input ZOO 3 In the Explorer View Section click the newly created folder 4 Select images in the Camera window and click DOWNLOAD You can select multiple images by holding down Shift or Option Shift while clicking A blue frame appears around the selected image Downloaded images are saved to the computer and appear in the Browser area Thumbnail E...

Страница 97: ...ose box Mac OS X version 10 1 10 2 at the upper left of the Camera Window The Camera Window will close Double clicking an image on the camera window imports it to the computer You can also download images to the computer by dragging them from the Camera window and dropping them on the Browser area or the Explorer View Section ...

Страница 98: ...version 10 1 10 2 If a dialog appears click the red close box 2 Double click the Canon ImageBrowser icon on the desktop ImageBrowser starts If the icon does not appear on the desktop double click the folder in which you installed the program followed by the Canon Utilities and ImageBrowser folders and the ImageBrowser file 3 Double click the CANON_DV and DCIM folders in the Explorer View Section T...

Страница 99: ...der to the computer SELECT Selects images Menu options Select All and Deselect All DELETE Deletes selected images DOWNLOAD Downloads selected image to the computer PRINT Prints selected still images Menu options Layout printing and Index printing ROTATE Rotates still images Menu options 90 degrees right 90 degrees left and 180 degrees UPLOAD Adds selected still images to the memory card IMAGE INFO...

Страница 100: ...he Camera Window click the SETUP OPTIONS button and select Camera Settings from the displayed menu 2 Check or change the settings Click OK to close the window Input a camcorder owner name here up to 31 characters Set the date and time here Check this box to synchronize the camcorder to the computer s date and time settings Check the power status here Click this to format the memory card in the cam...

Страница 101: ...out printing and Index printing Image Name This is where the file name of each individual image is displayed Explorer View Section Displays the disks and folders that you can use on your computer If you click the disclosure triangle on the left edge of the display you can switch between collapsing and expanding the contents of that folder You can drag this line to change the position of the bounda...

Страница 102: ...ll image 1 Click on the still image and drag to form a rectangular frame You can move or change the size of the frame 2 Click this button to extract the area within the frame The extracted part of the still image appears ADJUST COLOR Click here to display the Adjust Color window to adjust hue saturation and lightness of the still image by dragging the respective slide Enlarge or reduce the still i...

Страница 103: ...to display the information 2 From the File menu select Get Info The File Information window appears If you wish to add a comment input it in the Comment area Click OK to close the window It depends on your camcorder model which image information will be displayed When you modify and save an image using another program shooting information or comments may be lost ...

Страница 104: ...n image in the Browser Area To stop displaying the preview image select View Mode followed by List in the View menu Allows you to enlarge and reduce the size of the thumbnails Allows you to enlarge or reduce the size of the thumbnails Allows you to select the information displayed under the thumbnails Allows you to select the operating panel displayed below the Browser Area Using Other ImageBrowse...

Страница 105: ...play A window similar to the one below appears Specify the new date time Click to display the control panel Display Tool Panel Select to display or hide the tool panel Auto Cruise Enables or disables Auto Cruise When Auto Cruise is active the time movement continues even after you have moved and released the bar Switch to Browser View Exit TimeTunnel and returns to the previous screen Tool Panel A...

Страница 106: ...rst scene as a still image with a movie icon When you double click the thumbnail in the Browser Area QuickTime Player starts and plays back the movie 1 In the Browser Area double click a thumbnail with a movie icon QuickTime Player starts 2 Click the e play button in QuickTime Player The movie will be played back ...

Страница 107: ...l with Mouse or Keypad Advances the slide show manually with the mouse or keyboard Repeat Continuously Runs the slide show in a loop Hide buttons Hides the buttons during the slide show Transition Effect Select the transition effect to be used when moving from one slide to another When you select an effect you can check the effect in the preview window 3 Select the images and select Slide Show fro...

Страница 108: ...n the Browser Area select a still image and select Record from the Sound menu The recording window appears 2 Click and start recording when the Save button is enabled 3 Click Save to stop recording appears on the still image The sound file will be copied in AIFF format extension AIF to the same folder as the still image To remove sound from a still image select Send to Trash from the Sound menu di...

Страница 109: ... Back the Sound In the Browser Area select the still image with the sound attachment and select Play from the Sound menu The sound will be played back You can control playback by selecting Pause or Stop from the Sound menu Using the Sound Panel You can use the sound panel to record playback and adjust the volume 1 From the View menu select View Settings and select Sound Panel from the displayed me...

Страница 110: ...esize Select the reduction ratio relative to the original size of the image Quality Select the image quality The lower the quality the rougher the image becomes but the size of the file also becomes smaller Compress Use it to check the file size when you actually compress the image The file size appears next to Total Size After Compression Attaching Images to E mail Messages Select this if you do ...

Страница 111: ...tware starts automatically Open a new e mail message and attach the image With some types of e mail software you can attach images to e mail messages simply by dragging them from the Browser Area to the new message window Click Preview to check the changed image The image will be saved to the Email Images folder in the explorer view section Explorer View Section ...

Страница 112: ...0 2 From the Apple menu select System Preferences followed by Internet and click the Email tab Change the setting in the displayed window The images in the Email Images folder are saved in the following location Mac OS 9 0 9 2 Open the folder you installed ImageBrowser or the Document folder followed by ImageBrwoserUserData and Mail Mac OS X version 10 1 10 2 Open the Users folder followed by User...

Страница 113: ...ory card data to become corrupted 1 Select the still image s you wish to print in the Browser Window 2 Click PRINT and select Layout printing from the displayed menu The Layout Options window and Print window appears If the Layout Options window does not appear display it by clicking LAYOUT OPTIONS in the Print window You can select the layout when printing still images Movies cannot be printed Pr...

Страница 114: ...of the still images for printing The other options allow you to print an index or print onto Canon perforated paper Canon perforated paper cannot be selected with Mac OS X version 10 1 10 2 4 Select a paper size and click OK The Print window opens allowing you to change the layout and printing settings The settings available will vary according to the type of layout selected in Step 3 ...

Страница 115: ...nted per page Click this to rotate the selected still image Click this to reset the layout Edit the Page Title Open the Edit menu and select Edit Header Change the Layout Drag the still image to change the layout Click this to select a layout type Click this to display the Print dialog Add Text Open the Edit menu and select Add Text Add Captions to Still Images Click the still image and then the E...

Страница 116: ...ser also supports the Exif 2 2 standard or Exif Print Still images shot with camcorders complying with the Exif 2 2 standard incorporate shooting settings information such as the shooting conditions and scene mode along with the image data The Exif Print adjustment protocol uses this information to correct the image quality more accurately to reflect the shooting settings When printing from ImageB...

Страница 117: ...lick OK See Printing Still Images for the next steps 113 Select this option to automatically correct only images shot with Exif 2 2 compliant camcorders Select this option to automatically correct images shot with Exif 2 2 compliant camcorders and other images A check mark must be placed here to automatically correct the image quality Mac OS X version 10 1 10 2 ...

Страница 118: ...settings are limited to a maximum of 200 still images In that case all DPOF print settings on the 201st still image and onward will be erased 1 Click SLIDE DPOF in the Camera Window The Edit Slide DPOF window appears 2 Select the still image you wish to print and the number of copies Standard Print Prints selected images in the specified number of copies Use the arrows next to the boxes below the ...

Страница 119: ...uction Manual to learn how to record in Stitch Assist mode The following instruction explains how to merge still images recorded in Stitch Assist mode with the camcorder Still images recorded in Stitch Assist mode with Wide converter or Tele converter attached cannot be merged correctly 1 Click the green stitch mark in the Camera Window 2 In the confirmation window click Yes PhotoStitch starts Mer...

Страница 120: ...age window click Yes The Viewer window opens and displays the merged image You can record the surroundings in 360 degrees and stitch them together later to form a 360 degrees cylinder In 1 Selection and Arrangement select Arrange and 360 degrees By saving this stitched image in QuickTime VR format you can then get a virtual view of the surroundings by manipulating the mouse For more details please...

Страница 121: ...ect the export type and click Next Resave the image Converts still images to another file format resizes and saves them as new files You can select the file format from JPEG PICT TIFF and BMP You can also specify a prefix to be added to the exported images Write the image info Exports selected movie and still image information to a text file Rename the file and copy Renames and copies selected mov...

Страница 122: ...d click Finish The options for the export settings vary according to the export type Follow the instructions displayed in the window In each case specify the destination folder and file name for the images to be exported Exporting Images ...

Страница 123: ...ages will be saved in JPEG format on the memory card You can also add still images to a memory card by using drag and drop to move it from the browser area to the Camera window Adding Still Images to the Memory Card 1 In the Camera Window click UPLOAD 2 Select the still image you wish to add and click Open You can check the selected still image Mac OS 9 0 9 2 Click Show Preview Mac OS X version 10...

Страница 124: ... 2 images for CAMERA CHROMA and 4 images for CARD ANIMATION are provided on the DIGITAL VIDEO SOLUTION DISK For Macintosh 1 Insert the DIGITAL VIDEO SOLUTION DISK For Macintosh to the computer s CD ROM drive 2 In the Camera Window click UPLOAD 3 In the Add Image window select the image size and click Add The selected images will be recorded to the memory card When recording is complete the images ...

Страница 125: ...ROMA or CARD ANIMATION appear 4 Open the CARD CHROMA CARD LUMINANCE CAMERA CHROMA or CARD ANIMATION folder select the image you wish to copy to the camcorder and click Open 5 In the Add Image window click Add The selected images will be recorded to the memory card When recording is complete the images will appear in the Camera Window ...

Страница 126: ...e g Animal Baseball You can use the pre recorded My Camera Settings 129 or add still images to the My Camera Settings 130 Observe following precautions while the My Camera Settings are saved to the camcorder Do not open the memory card cover or remove the memory card Do not detach the USB cable Do not turn off the camcorder or computer Do not change the position of the POWER switch or TAPE CARD sw...

Страница 127: ...und Selftimer Sound and Shutter Sound and click OK 3 Click View Camera to display the My Camera Settings of the camcorder Alternatively you can display the My Camera window from the Camera Window by clicking SETUP OPTIONS and selecting My Camera from the displayed menu ...

Страница 128: ...computer Adds an image sound file to the Computer list Plays back the sound setting selected in the Computer list Plays back the sound setting selected in the Camera list Deletes a setting from the Camera list Saves the setting from the computer to the camcorder Deletes a setting from the Computer list Saves the setting from the camcorder to the computer Customizing Your Camcorder with the My Came...

Страница 129: ...er in the Computer list To change the settings individually select the setting type in the Type list A window appears when you select a theme set and plays back the start up operation selftimer and shutter sound 2 Select the setting you wish to replace in the Camera list and click 3 On the confirmation window click OK 4 Click Save to Camera ...

Страница 130: ...computer before you can add them to the My Camera Window Sound cannot be added 1 In the My Camera window select Start up Image in the Type list and click Add The Select an image to add window appears 2 Select the still image file JPEG you wish to add and click Open The selected file appears in the Computer list You can now save the newly added file to the camcorder using the procedures described i...

Страница 131: ...ng ImageBrowser and PhotoStitch Move the program s folder into the Trash to uninstall programs such as ImageBrowser and PhotoStitch If the program folders contain subfolders into which images have been saved be careful not to accidentally delete those subfolders For more details on how to uninstall ImageBrowser refer to Read Me Uninstalling the Software ...

Страница 132: ... Camcorder is not correctly connected to the computer Read Connecting the Camcorder to a Computer 91 and check the connection Ensure that you are using the correct cable and that its connectors are in good shape If you are experiencing operational problems detach the USB cable from the camcorder and computer and terminate the connection Restart the computer and then reconnect the camcorder ImageBr...

Страница 133: ...tomer Care Center Tel US 1 800 828 4040 Mon Fri 9 AM to 8 PM Eastern Time CANADA Canon Canada Inc Tel Canada 1 800 OK CANON 1 800 652 2666 ASIA Canon Hongkong Co Ltd 19 F The Metropolis Tower 10 Metropolis Drive Hunghom Kowloon Hong Kong Phone 852 2170 2828 Fax 852 2723 9684 ...

Отзывы: