Canon XL 1 Скачать руководство пользователя страница 10


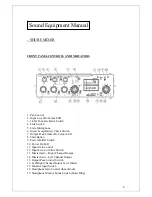
Rifle mic – put yellow cable (Female) into Male. Insert the opposite end of the yellow 
cable into the Shure Mixer. Turn Shure Mixer on. 
Plug headphones in by inserting the big jac. 
Use channel 1, turn channels 2 and 3 down in order to avoid a hissing sound. 
 
To check tone, turn tone button on, use the master switch to set it to -4. Insert green 
plug into Shure mixer and the camera which must be set to 12. 
If the green lights flashes red, the levels are too high. 
 
Lappelle mic – The end of one side of the plug is inserted into the lapelle mic and the 
other end into the Shure mixer. 
 
Radio mic – There is a transmitter and a receiver. Ensure that the transmitter is 
plugged into the Shure mixer while the receiver is plugged into the camera. 
 
Wireless mic - that the frequency on the transmitter and the camera are the same. 


Pulse Code Modulation (PCM):  

sound is recorded as 0 and 1 after it is converted 
in pulse codes. The digital audio code (a series 
of "off or on" signals) is recorded by the drum, 
on a part of the tape that is separate from the 
video information. 

 
Sound waves: 

are vibrations in the air. There are 2 basic properties:  
frequency and amplitude. Frequency – from low to 
high, Amplitude – from soft to loud. Together they form 
a sine wave. The wave’s amplitude is represented by its 
height; the further the curve swings above and below its 
centre line, the louder the signal. Its frequency can be 
represented by the number of times per second the wave 
goes through a complete "cycle". The more cycles per 
second, the higher the wave’s frequency.  

 
What does the microphone do?  


The microphone picks up sound and outputs an analogue signal. This signal is then 
passed through an analogue-to-digital (A/D) converter.   
An analogue signal that ranges b1 and -1 volts goes through an infinite range 
of values between those points, but a digital system can record only a finite number of 
those values. The more digits it has, the more steps it can distinguish and the more 
closely it can match its readings to the variations in the original signal. Because 
digital systems use finite means to record infinite signal variations, some mismatch is 
inevitable, and every such mismatch adds noise and distortion to the signal. 


10


Содержание XL 1

Страница 1: ...CANON XL1 USER MANUAL 1 By Lindsey Thorpe...

Страница 2: ...s cap 2 Align the hood with the lens lengthways and the Canon logo facing to the left 3 Twist it 90 into position clockwise so that the Canon logo is to the top You do not need to assert any pressure...

Страница 3: ...selected option remains on the screen and all other options are removed 6 Press the r or t cursor keys to choose its setting You can return to the full menu by pressing the e cursor key 7 Press the M...

Страница 4: ...the camera s manual functions you can adjust focus and exposure set the white balance and so on Manual Select this program for total creative freedom when operating the camcorder You can set aperture...

Страница 5: ...switch ON OFF as appropriate before changing the setting NB The camera memorizes the latest Tv or Av value until a new value is set Turning off the camcorder or changing the recording program does not...

Страница 6: ...the five preset levels that range from 3 to 12 dB 1 Turn the POWER dial to any recording program except Easy Recording or Spotlight 2 Press the GAIN knob so that it pops out You can now turn it to ad...

Страница 7: ...to a slower speed rather than remain lit The result will remain better than with the auto setting and you can continue recording c Turn the white balance selector knob back to A to return to the auto...

Страница 8: ...Limiter Bi Colour LED 8 Slate Button 9 Power On Off Switch 10 Power On LED 11 Input Gain Control 12 Input Low Cut Filter Switch 13 Master Gain Right Channel Output 14 Master Gain Left Channel Output...

Страница 9: ...Channel Inputs 2 Mic Line Level Input Switch OUTPUT PANEL CONNECTORS AND CONTROLS 1 Mix Bus Jack 2 Main Output 3 Headphones Outputs 4 Monitor In Jack 5 Tape Output Jack 6 Mic Line Level Output Switch...

Страница 10: ...ape that is separate from the video information Sound waves are vibrations in the air There are 2 basic properties frequency and amplitude Frequency from low to high Amplitude from soft to loud Togeth...

Страница 11: ...on the back of the camcorder Audio 2 terminals are on the right side of the handle Stereo 1 and Stereo 2 refer to the stereo tracks available on the tape Audio Monitor only use when using 12 bit Stere...

Страница 12: ...ugged into the mini jacks 3 5mm mini plug type 1 Open the Camera Menu Select AUDIO MODE Choose one of the following modes a 16 bit 48kHz 2 channel for the highest sound quality Note the 16 bit mode co...

Страница 13: ...t AUDIO MODE and choose one of the following modes a 16 bit 48KHz 2 channel for the highest sound quality Note the 16 bit mode contains only Stereo 1 sound There is no Stereo 2 in this mode b 12 bit S...

Страница 14: ...the highest sound quality Note the 16 bit mode contains only Stereo 1 sound There is no Stereo 2 in this mode b 12 bit Stereo 1 32kHz 2 out of 4 total channels for recording on 2 channels Stereo 1 lea...

Страница 15: ...2 is displayed in the viewfinder and main LCD panel Selecting Audio Mode 12 bit ST 1 2 32kHz 4 channels is for simultaneous recording on four channels referred to as Stereo 1 and Stereo 2 2 To set th...

Страница 16: ...MIC controls to M Turn the LEVEL dial to adjust the recording level and BALANCE dial to adjust the balance between the two inputs Check the levels in the audio LCD panel b Set the recording level for...

Страница 17: ...ricity outside of it professional cable analogue cable carrying an analogue signal 2 Kettle plug carries current electricity controls behaviour of devices carries only electricity not audio or video 3...

Страница 18: ...h 1 Spatial compression affects only a single frame at a time This type of compression makes random access to any point in the video and editing easy Spatial compression finds redundancy within a fram...

Страница 19: ...mes and B frames The content of a P frame predictive frame is based on the previous frame the content of a B frame bi directional frame is based on the previous and subsequent frames Audio compression...

Страница 20: ...lies quite well Tilts and pans are more difficult Depending on the codec rotating the camera a Dutch can be trivial or extremely costly in compression efficiency The most difficult motion for any code...

Страница 21: ...ttenuation or the loss of signal power and quality over long cable runs usually 300 meters or more Equipment that supports analogue signals is generally more affordable and analogue video formats are...

Страница 22: ...e susceptible to interference so they are not often used in professional applications There are three basic kinds of unbalanced audio connectors The most familiar to consumers is traditional unbalance...

Страница 23: ...time Motion JPEG is 4 2 2 and most implementations allow you to specify a data rate or quality level 3 Uncompressed codecs More and more cards support true 4 2 2 uncompressed video The data rates are...

Страница 24: ...file formats for rendering The most common formats are QuickTime and AVI both offer good quality intermediate codecs You can also use MPEG 2 at high data rates Modern tools like After Effects and Adob...

Страница 25: ...me size for example going from a 720 x 480 source frame to a 320 x 240 output frame for web video Scaling up on either axis forces a video editing application to make up data that s not in the source...

Отзывы: