


Output Size
Select an output size.
Output size options vary by the item selected in
Destination
.
Flexible
Adjust the cropping frames (scan areas) freely.
In thumbnail view:
Drag the mouse over a thumbnail to display a cropping frame. When a cropping frame is
displayed, the portion within the cropping frame will be scanned. When no cropping frame is
displayed, each frame is scanned individually.
In whole image view:
When no cropping frame is displayed, the entire Preview area will be scanned. When a cropping
frame is displayed, the portion within the cropping frame will be scanned.
Paper Size (such as L or A4)
Select an output paper size. The portion within the cropping frame will be scanned at the size of
the selected paper size. Drag the cropping frame to enlarge/reduce it while maintaining the
aspect ratio.
Monitor Size (such as 1024 x 768 pixels)
Select an output size in pixels. A cropping frame of the selected monitor size will appear and the
portion within the cropping frame will be scanned. Drag the cropping frame to enlarge/reduce it
while maintaining the aspect ratio.
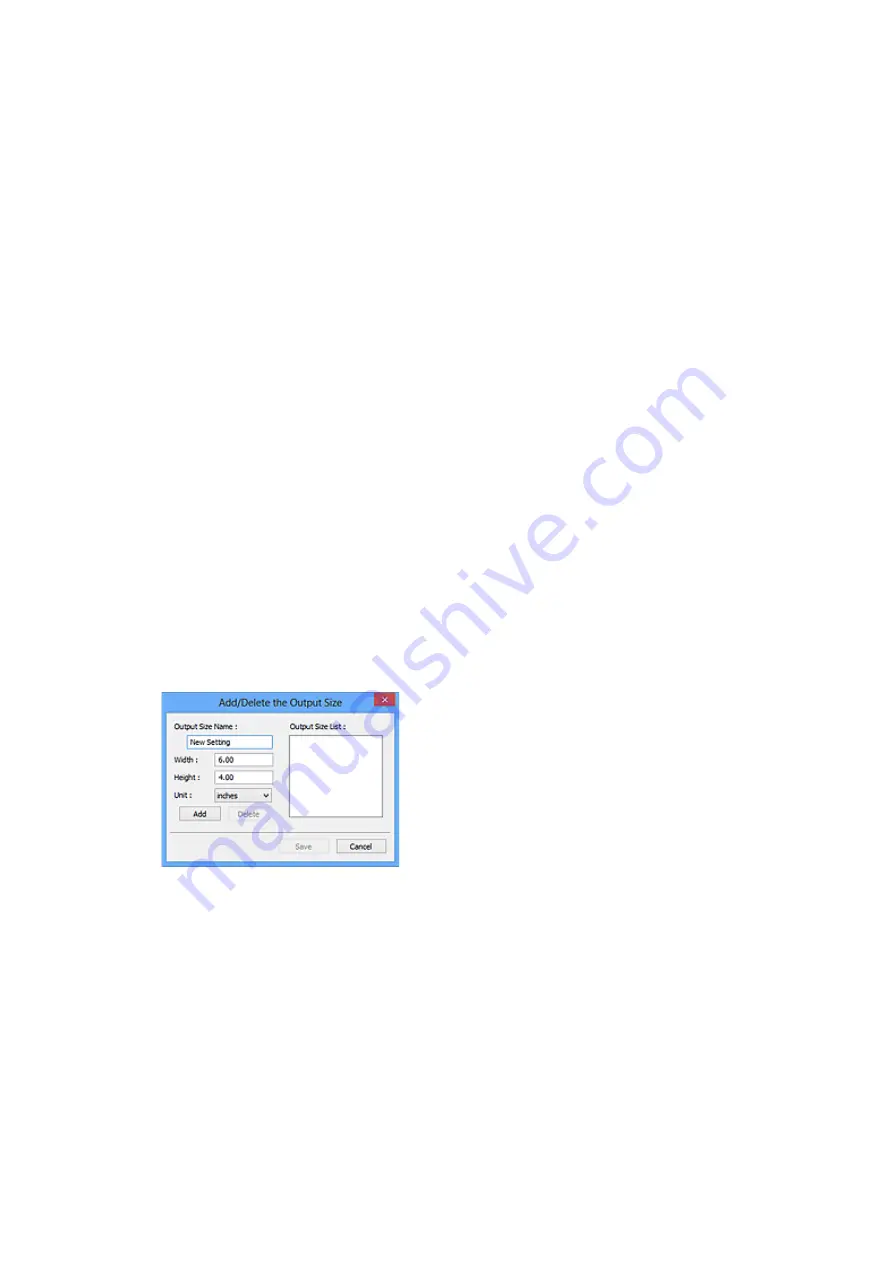
Add/Delete...
Displays the
Add/Delete the Output Size
dialog box for specifying custom output sizes. This
option can be selected when
Destination
is
or
Image display
.
In the
Add/Delete the Output Size
dialog box, multiple output sizes can be specified and then
saved at one time. Saved items will be registered to the
Output Size
list and can be selected,
along with the predefined items.
Adding:
Enter
Output Size Name
,
Width
, and
Height
, and then click
Add
. For
Unit
, select
inches
or
mm
if
Destination
is
; if it is
Image display
, only
pixels
can be selected. The name of the
added size appears in
Output Size List
. Click
Save
to save the items listed in
Output Size List
.
Deleting:
Select the output size you want to delete in
Output Size List
, and then click
Delete
. Click
Save
to save the items listed in
Output Size List
.
318
Содержание TR7500 Series
Страница 25: ...Basic Operation Printing Photos from a Computer Printing Photos from a Smartphone Tablet Copying Faxing 25 ...
Страница 56: ...Handling Paper Originals Ink Tanks etc Loading Paper Loading Originals Replacing Ink Tanks 56 ...
Страница 57: ...Loading Paper Paper Sources Loading Paper in the Rear Tray Loading Paper in the Cassette Loading Envelopes 57 ...
Страница 83: ...Replacing Ink Tanks Replacing Ink Tanks Checking Ink Status on the Touch Screen Ink Tips 83 ...
Страница 113: ...Safety Safety Precautions Regulatory Information WEEE EU EEA 113 ...
Страница 136: ...Main Components Front View Rear View Inside View Operation Panel 136 ...
Страница 139: ... 19 platen glass Load an original here 139 ...
Страница 158: ...The Page Setup tab is displayed again 158 ...
Страница 168: ...For more on setting items on the operation panel Setting Items on Operation Panel 168 ...
Страница 183: ...Language selection Changes the language for the messages and menus on the touch screen 183 ...
Страница 198: ...Information about Paper Supported Media Types Paper Load Limit Unsupported Media Types Handling Paper Print Area 198 ...
Страница 223: ...Note Selecting Scaled changes the printable area of the document 223 ...
Страница 241: ...In such cases take the appropriate action as described 241 ...
Страница 285: ...Printing Using Operation Panel Printing Templates Such as Lined or Graph Paper 285 ...
Страница 305: ...Note To set the applications to integrate with see Settings Dialog Box 305 ...
Страница 315: ...ScanGear Scanner Driver Screens Basic Mode Tab Advanced Mode Tab 315 ...
Страница 335: ...335 ...
Страница 353: ...8 Specify number of time and select OK 9 Select OK The Function list screen is displayed 353 ...
Страница 396: ...The touch screen returns to the Fax standby screen when you finish specifying the setting and selecting OK 396 ...
Страница 407: ...4 When a confirmation message is displayed click Yes 407 ...
Страница 415: ...Receiving Faxes Receiving Faxes Changing Paper Settings Memory Reception 415 ...
Страница 425: ...Other Useful Fax Functions Document Stored in Printer s Memory 425 ...
Страница 433: ...Installation and Download Problems Errors and Messages If You Cannot Solve a Problem 433 ...
Страница 436: ...Network Communication Problems Cannot Find Printer on Network Network Connection Problems Other Network Problems 436 ...
Страница 462: ...Other Network Problems Checking Network Information Restoring to Factory Defaults 462 ...
Страница 476: ...Paper Is Blank Printing Is Blurry Colors Are Wrong White Streaks Appear Printing Is Blurry Colors Are Wrong 476 ...
Страница 485: ...Scanning Problems Windows Scanning Problems 485 ...
Страница 486: ...Scanning Problems Scanner Does Not Work ScanGear Scanner Driver Does Not Start 486 ...
Страница 489: ...Faxing Problems Problems Sending Faxes Problems Receiving Faxes Telephone Problems 489 ...
Страница 490: ...Problems Sending Faxes Cannot Send a Fax Errors Often Occur When You Send a Fax 490 ...
Страница 495: ...Problems Receiving Faxes Cannot Receive a Fax Cannot Print a Fax Quality of Received Fax is Poor 495 ...
Страница 500: ...Telephone Problems Cannot Dial Telephone Disconnects During a Call 500 ...
Страница 512: ...Errors and Messages An Error Occurs Message Support Code Appears 512 ...


