


Note
• If the corners or edges of the paper are smudged, try to print with the paper thickness lever set to
the left. It may improve print quality. Reset the paper thickness lever to the right when you finish
printing.
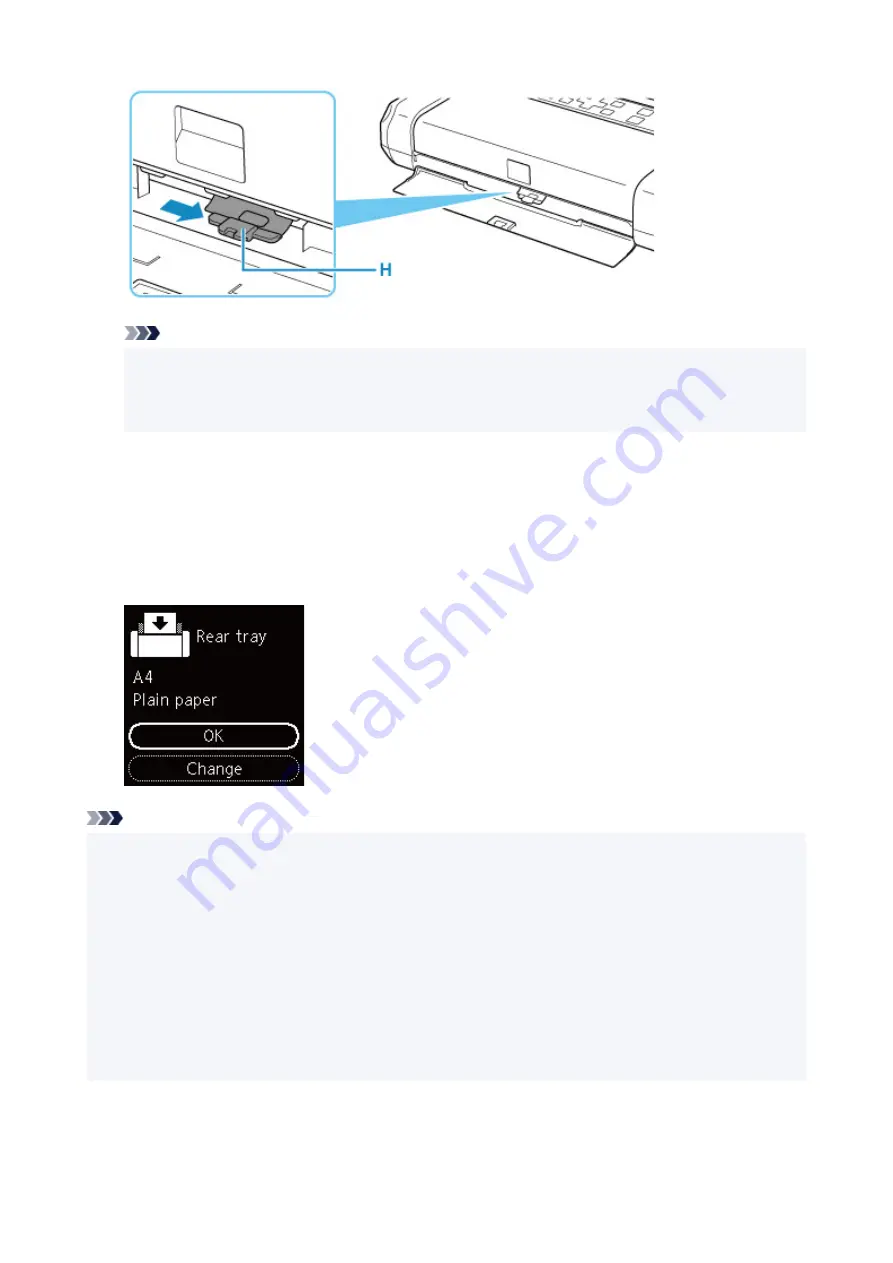
After closing the feed slot cover, the paper setting confirmation screen for the rear tray appears on the
LCD.
7.
If page size and media type on LCD match size and type of paper loaded in rear tray, select
OK
.
If not, select
Change
to change the settings in accordance with the size and type of the loaded paper.
Note
• There are various types of paper, such as paper with a special surface coating for printing photos at
optimal quality and paper suitable for documents. Each media type has specific preset settings (how ink
is used and sprayed, distance from nozzles, etc.), that allow you to print to that type with optimal image
quality. The wrong paper settings may cause poor printout color quality or scratches on the printed
surface. If you notice blurring or uneven colors, increase the print quality setting and try printing again.
• To prevent incorrect printing, this printer has a function that detects whether the settings for the paper
loaded on the rear tray matches the paper settings. Before printing, make print settings in accordance
with the paper settings. When this function is enabled, an error message is displayed if these settings
do not match to prevent incorrect printing. When this error message is displayed, check and correct the
paper settings.
55
Содержание TR150 Series
Страница 1: ...TR150 series Online Manual English ...
Страница 39: ... XX represents alphanumeric characters 39 ...
Страница 50: ...Handling Paper Ink Tanks etc Loading Paper Replacing Ink Tanks 50 ...
Страница 51: ...Loading Paper Loading Plain Paper Photo Paper Loading Envelopes 51 ...
Страница 60: ...Replacing Ink Tanks Replacing Ink Tanks Checking Ink Status on the LCD Ink Tips 60 ...
Страница 68: ...You can check the ink model number 68 ...
Страница 97: ...Important Be sure to turn off the power and unplug the power cord before cleaning the printer 97 ...
Страница 99: ...Safety Safety Precautions Regulatory Information WEEE EU EEA 99 ...
Страница 124: ...Main Components and Their Use Main Components Power Supply LCD and Operation Panel 124 ...
Страница 125: ...Main Components Front View Rear View Inside View Operation Panel 125 ...
Страница 130: ...Note For details on replacing an ink tank see Replacing Ink Tanks 130 ...
Страница 136: ...Managing the Printer Power 136 ...
Страница 139: ...The specification of the power cord differs depending on the country or region of use 139 ...
Страница 143: ...The menu screen appears Note For details on how to change settings refer to Changing Settings from Operation Panel 143 ...
Страница 145: ...Changing Printer Settings from Your Computer macOS Managing the Printer Power Changing the Printer Operation Mode 145 ...
Страница 150: ...For more on setting items on the operation panel Setting Items on Operation Panel 150 ...
Страница 171: ...Information about Paper Supported Media Types Paper Load Limit Unsupported Media Types Handling Paper Print Area 171 ...
Страница 193: ...Printing Using Canon Application Software Easy PhotoPrint Editor Guide 193 ...
Страница 196: ...7 Use the button to specify the number of copies 8 Select Print The printing starts 196 ...
Страница 204: ...Network Communication Problems Cannot Find Printer on Network Network Connection Problems Other Network Problems 204 ...
Страница 230: ...Other Network Problems Checking Network Information Restoring to Factory Defaults 230 ...
Страница 235: ...Problems while Printing from Smartphone Tablet Cannot Print from Smartphone Tablet 235 ...
Страница 268: ...Errors and Messages When Error Occurred Message Support Code Appears 268 ...
Страница 288: ...1660 Cause The ink tank is not installed What to Do Install the ink tank 288 ...


