background image

Replaying

77

Viewing Movies

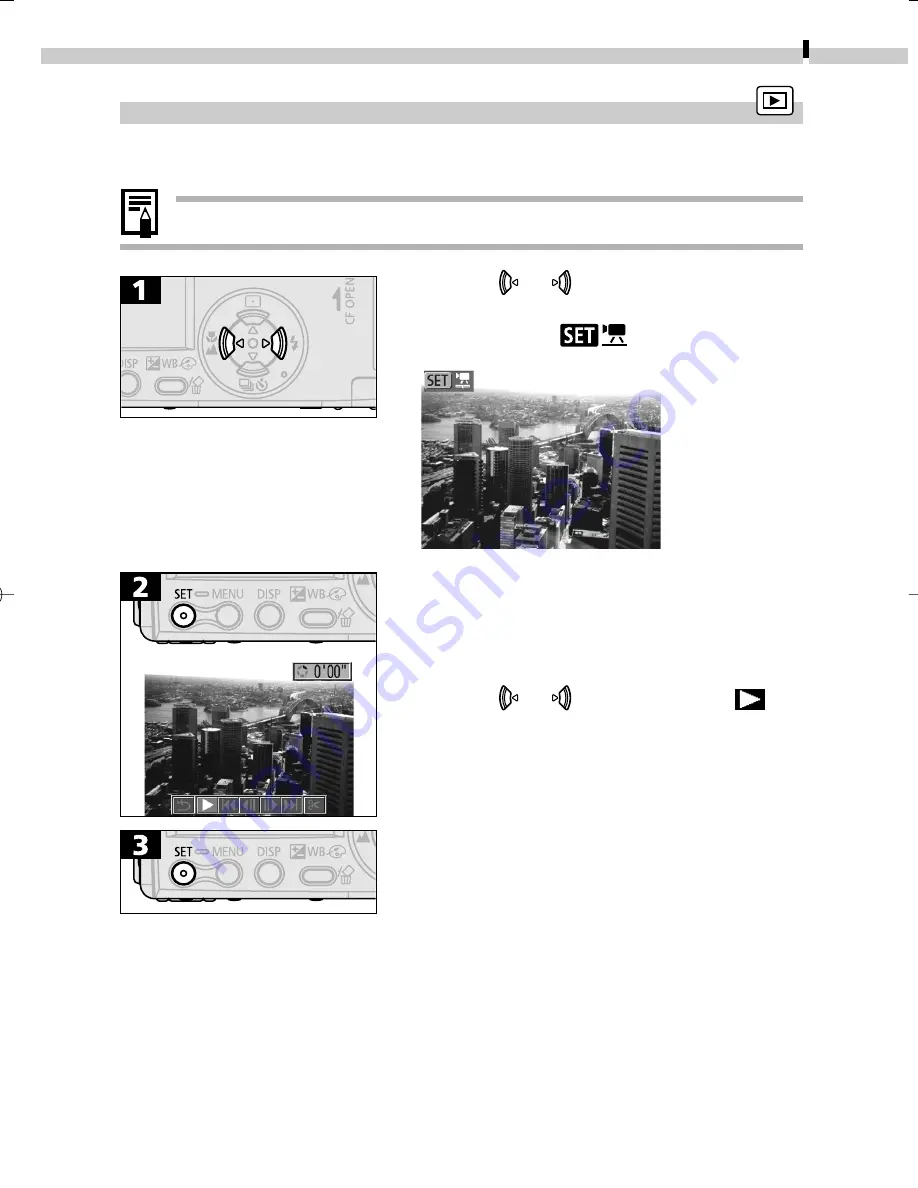
Movie clips can be replayed with the following procedures.

•Movies cannot be played in the index replay mode.

• Use the   or   button to select a

movie.

• Images with a 

 icon are movies.

• The movie control panel will display.
• Use the   or   button to select 

(Play).

• The movie images will play.
• When a movie is finished, it stops and

displays its last frame.

06-124usCUGE_074_089_GM.p65

7/26/02, 11:19 AM

77

Содержание PowerShot S230 DIGITAL ELPH

Страница 1: ...Solution Disk ArcSoft Camera Suite Disk SB Interface Cable FC 200PCU 1 Direct Interface Cable DIF 200 1 Supplied with Card Photo Printer CP 100 CP 10 Card Photo Printer CP 10 CF Card Reader PCMCIA Ad...

Страница 2: ...h these super compact light weight printers with the direct print function by connecting them to the camera with a single cable and operating the camera s controls Some accessories are not sold in som...

Страница 3: ...re information about usage precautions and detailed instructions please refer to the other related manuals p 2 You must install the software bundled on the Canon Digital Camera Solution Disk before co...

Страница 4: ...and Messages 7 Printing Images by Connecting the Camera Directly to a Printer 12 Downloading Images to a Computer Windows 16 Downloading Images to a Computer Macintosh 23 For detailed instructions see...

Страница 5: ...de the battery cover in the direction of the arrows 3 Install the battery pack and close the battery cover Press the battery lock while inserting the battery pack 4 Open the CF card slot cover Slide t...

Страница 6: ...date and time First time the camera is powered on The Set Date Time menu will appear on the LCD monitor Select the items you wish to set using the or button and set the value using the or button To p...

Страница 7: ...he recorded images on the LCD monitor 1 Selecting a replay mode Slide the mode switch to 2 Turn on the power Press the ON OFF button until the power lamp lights The last recorded image will appear in...

Страница 8: ...Play menu appears 2 Switch between menu tabs using the or button 3 Select a menu item using the or button 4 Select setting contents using the or button Press the button for items followed by an ellip...

Страница 9: ...Resolution Movies Sets the number of pixels used to record movies to CF cards 640 x 480 pixels 320 x 240 pixels 160 x 120 pixels Compression Sets the relative compression ratio used to record images t...

Страница 10: ...the duration images display on the LCD monitor after the shutter button releases Off 2 10 seconds 1 second increments AF assist Beam Sets the AF assist Beam to on or off On Off File No Reset Sets how...

Страница 11: ...Erase all Deletes all images from a CF card except for protected images Slide Show Plays images in automated slide shows Print Order Selects images and the number of print copies for output to a DPOF...

Страница 12: ...r not the camera automatically powers down after a set period of time elapses without something being pressed On Off Date Time Sets the date and time and the date format Format Formats initializes CF...

Страница 13: ...11 Item Menu Screen Settings Content Video System Sets the video output signal standard NTSC PAL Communication Sets the camera and computer communication settings Normal PTP...

Страница 14: ...rinter With the CP 10 printer the printer s power turns on automatically 3 Connect the camera to the printer and press the printer s ON OFF button to turn on the power Set the camera s mode switch to...

Страница 15: ...image using the or button and press the button 5 Choose Print using the buttons and press the button The image will start to print and when it is completely finished the display will revert to standa...

Страница 16: ...s 1 Prepare the printer For more information please see the Quick Start Guide that came with your BJ printer 2 Turn the BJ printer s power on 3 Connect the camera to the BJ printer Set the camera s mo...

Страница 17: ...ert to standard replay mode We recommend the use of the AC Adapter Kit ACK500 optional as the camera s power source Images cannot be printed through the BJ printer operation panel during the camera co...

Страница 18: ...s Me Windows 2000 Windows XP All procedures performed with a connection to a USB 2 0 compliant board are not guaranteed Installing the Software Do not connect the camera to the computer before the sof...

Страница 19: ...e CD ROM icon and select Open 3 Double click the SETUP exe icon If the exe extension does not show see the computer s manual for instructions on showing file name extensions 2 Click Software Installat...

Страница 20: ...the installation is over select Yes I want to restart my computer now in the screen below and click Finish Remove the Canon Digital Camera Solution Disk once the installation is complete and before y...

Страница 21: ...rt 2 Select an application to start Select Canon ZoomBrowser EX and click OK With Windows XP the Event dialog does not appear the first time the camera is connected after computer start up If this hap...

Страница 22: ...ion the Event dialog will appear allowing you to select an application program to start 2 Select an application to start Select Canon ZoomBrowser EX and click OK ZoomBrowser EX starts the Camera Windo...

Страница 23: ...The images on the CF card will display in the Camera window as thumbnails Select the images you wish to download in the Camera window and click Download image RAW displays on RAW images The movie icon...

Страница 24: ...to select the image destination folder will display Make sure the settings are the same as the following and click OK At this point the Camera window will close and the main window will open The downl...

Страница 25: ...ped with genuine Apple brand built in USB interfaces All operations performed with a connection to a USB 2 0 compliant board are not guaranteed Installing the Software Close any programs that are runn...

Страница 26: ...software required for the camera will be installed 4 Once the installation is complete and the installer panel appears click Quit 5 Remove the Canon Digital Camera Solution Disk from the CD ROM drive...

Страница 27: ...the OK button Mac OS X Double click the Canon ImageBrowser icon on the desktop Once ImageBrowser is started click Canon Camera in the Explorer View section Set the communication settings first time c...

Страница 28: ...ges from the camera Click the File menu and select New Folder A folder with the name Untitled will be created Click it to change the folder name as you wish 2 In the Explorer View Section click the ne...

Страница 29: ...the Camera Select images in the Camera window and click the Download button The downloaded images are saved to the computer and appear in the Browser area RAW displays on RAW images Thumbnail The mov...

Страница 30: ...28 MEMO...

Страница 31: ...29 MEMO...

Страница 32: ...30 MEMO...

Страница 33: ...CDI E074 010 XXXXXXX 2002 CANON INC PRINTED IN JAPAN...

Страница 34: ...Postcard approx 4 x 6 High quality 256 level 300 dpi dye sublimation printing with durable clear protective overcoat directly from your PowerShot camera...

Страница 35: ...t 2 1 Ibs 970g excluding paper cassette and inl cassette Print Method Dye sublimation thermal print method with overcoating Resolution 300 x 300 dpi Color Gradation 256 levels per color Printing Size...

Страница 36: ......

Страница 37: ...ges do not display with the Scanners and Cameras po Explorer they appear as 8MI but cannot be opened or to the _ a Other images of different formats may not be downloadable if are on a CF card r sound...

Страница 38: ...ece escrito en su certificado de garantia Guarde este impreso en lugar seguro ya que contiene informacion importante La garantie de ce OLI cas produits n est valide que dans Ie pays indique sur votfe...

Страница 39: ...non 0282492000 E mail support canon it Canon Belgium N V SRA Helpdesk 0900 1 0627 Tel 02 722 04 11 Fax 02 721 32 74 Canon luxembourg S J t Tel 352 4847961 Fax 352 484796232 Canon Nederland N V Helpdes...

Страница 40: ...es to receive the notifications Protect your product We wiH the modei number and date of new Canon on fHe to you refer to this information in the event of an insurance clairn such as loss or theft Rec...

Страница 41: ...NAME ADDRESS NOM ADRESSE OF SALE MUST BE THiS WARRANTY CARD AND YOUR PRESENTED FOR WARRANTY eETTE CARTE DE ET VOTRE PREUVE D ACHAT DOIVENT ETRE POUR RECEVOIR LE SERViCE SOUS GARANTIE 1002CH56...

Страница 42: ...anada Inc Canon Canada in Canada with respect to the Canon brand compact power adapter AC cable video cable PC Mac IF cables and DC coupler for the PowerShot Digital Camera limited warranty when purch...

Страница 43: ...0K CANON 1 800 652 2666 Technical support program sllbject to change without notice This limit 3d warranty gives you specific legal rights and you rnc y also have other rights which V IY from state to...

Страница 44: ...DUCTS NTERESTED N dignes d interet OWNS iNTERESTED IN En possession Interesse par _ J...

Страница 45: ...ide iefly etailed using the terms of CDI E071 Windows Macintosh Windows Macintosh a Solution Disk...

Страница 46: ...e are trademarks of Apple Computer Inc registered in the United States and other countries Microsoft Windows and Windows logo are either registered trademarks or trademarks of Microsoft Corporation in...

Страница 47: ...the SOFTWARE is a violation of this Agreement You must reproduce and include the copyright notice on the back up copy 3 SUPPORT AND UPDATES Neither Canon nor its subsidiaries dealers or distributors...

Страница 48: ...null and void with respect to the jurisdiction of that court or tribunal and all the remaining provisions of this Agreement shall remain in full force and effect 9 CONTROLLING LAW The terms of this A...

Страница 49: ...tware 6 Canon Digital Camera Solution Disk 6 Adobe Photoshop LE CD ROM 11 ArcSoft Camera Suite 2 0 CD ROM 11 ArcSoft Camera Suite 1 2 CD ROM 11 Camera and Software Compatibility 12 About the Other Man...

Страница 50: ...ital cameras with an overview of the procedures for downloading images from the camera to a computer Do not connect the camera to a computer before installing the software Connecting the camera before...

Страница 51: ...ll start and open the ImageBrowser Automation Wizard Mac OS X Double click the Canon ImageBrowser icon on the desktop With Windows XP the Event dialog does not appear the first time the camera is conn...

Страница 52: ...File Viewer Utility in the Classic environment PowerShot G3 The following program is supplied on the Adobe Photoshop LE CD ROM PowerShot S45 The following programs are supplied on the ArcSoft Camera S...

Страница 53: ...DIGITAL ELPH DIGITAL IXUS v3 The following programs are supplied on the ArcSoft Camera Suite 1 2 CD ROM Program ArcSoft PhotoImpression ArcSoft VideoImpression Windows 98 Me 2000 Macintosh OS 8 6 9 2...

Страница 54: ...l images or movies by selecting the thumbnails tiny images shown on the computer display TWAIN Driver Windows This driver for Windows 98 and Windows 2000 loads camera images into TWAIN compliant progr...

Страница 55: ...or organizing your pictures Searching and Organizing Images Chronologically ImageBrowser Macintosh This programs can display images in order according to the creation date As the images display in a s...

Страница 56: ...es small enough for easy transmission The automatic start of email programs is only supported by Windows and the email programs must be enabled as MAPI clients Programs for Uploading New Start Up Imag...

Страница 57: ...ws ImageBrowser Macintosh These programs can output an index of the computer or camera s image thumbnails tiny versions to a printer Programs for Printing Photo Cards and Adhesive Labels with Card Pho...

Страница 58: ...e You can shoot and stitch 360 scenes together and save them in the QuickTime VR format to make them appear to surround you as you view them Computer Controlled Camera Shooting RemoteCapture This prog...

Страница 59: ...and edit and print images ArcSoft PhotoStudio is Arcsoft Inc s high performance user friendly image editing program Programs for Editing Stills and Movies ArcSoft VideoImpression This program provide...

Страница 60: ...Canon cameras can be converted with the bundled software Shooting from the Computer Merging Images Shot in Stitch Assist Mode Using the Camera as a Read Only Card Reader RAW Image Conversion Download...

Страница 61: ...s for the separately sold Card Photo Printer CP 100 or Card Photo Printer CP 10 It is contained on the Canon Digital Camera Solution Disk The following procedures can be used to read the manual Window...

Страница 62: ...click the ar405eng exe file to start the installer Follow the onscreen instructions to install Adobe Acrobat Reader Macintosh 1 Place the Canon Digital Camera Solution Disk in the CD ROM drive 2 Open...

Страница 63: ...r Utility 100 MB or more PhotoStitch 40 MB or more RemoteCapture 20 MB or more Canon Camera TWAIN Driver 25 MB or more Canon Camera WIA Driver 25 MB or more Canon CP 100 CP 10 Printer Driver 1 MB or m...

Страница 64: ...Canon CP 100 CP 10 Printer Driver 3 8 MB or more space required for installation Adobe Photoshop LE 40 MB or more ArcSoft PhotoStudio 50 MB or more ArcSoft PhotoImpression 275 MB or more ArcSoft Vide...

Страница 65: ...er EX 30 Starting ZoomBrowser EX 30 Downloading and Saving Images from the Camera 34 Printing Images 35 Adjusting Image Quality and Printing Exif 2 2 Compliant 37 ZoomBrowser EX Features 38 Camera Win...

Страница 66: ...administrator to install programs These instructions show Windows XP screen shots They may slightly differ from the screens that appear on your computer according to your operating system 1 Close any...

Страница 67: ...all and click Next Confirm that there is a check mark beside the names of the programs you wish to install Installer Panel 4 Click Next 5 Read the software license agreement and click Yes if you conse...

Страница 68: ...s displayed here differ according to the software installed Place a check mark beside your camera model name The installation will start Follow the onscreen instructions to proceed If you installed th...

Страница 69: ...an be installed At this point the required TWAIN Driver or WIA Driver has only been copied to your computer When you connect the camera to the computer with the USB cable the actual installation will...

Страница 70: ...s Follow the onscreen messages to install PhotoStudio and VideoImpression Installing ArcSoft Camera Suite 1 2 The ArcSoft Camera Suite CD ROM is distributed with PowerShot S230 DIGITAL ELPH DIGITAL IX...

Страница 71: ...ecord click the Windows Start menu and select All Programs Canon PhotoRecord and PhotoRecord uninstall You can uninstall Adobe Photoshop LE by clicking the Start menu and selecting All Programs follow...

Страница 72: ...similar to the following to appear TWAIN data source not found Reinstall the scanner software If this happens select WIA camera model in the application program as the TWAIN device Your camera model n...

Страница 73: ...waken the computer with the camera in the connected state Some computers will not awaken properly if you disconnect the camera while they are in sleep standby mode Please refer to your computer manual...

Страница 74: ...ows 2000 Windows Me Windows 98 Users of Windows 2000 must first log in as an Administrator to install programs After a few moments a dialog such as the Add New Hardware Wizard will display and automat...

Страница 75: ...t the communication setting 4 Is the battery charge sufficient You should use a household power source to power the camera when it is connected to a computer If the Problem Lies in the Above The Add N...

Страница 76: ...e computer s USB port and the camera s Digital Terminal Prepare the camera for communication with the computer For USB cable connection instructions see Connecting the Camera to a Computer p 25 A dial...

Страница 77: ...river Uninstall or WIA Driver Uninstall The content of the underlined items will vary according to your camera model as follows PowerShot G3 PowerShot G3 TWAIN Driver or PowerShot G3 WIA Driver TWAIN...

Страница 78: ...ect after approximately 1 minute Please see the Camera User Guide for information on what to do if the camera powers down because of the power saving function Starting ZoomBrowser EX Camera to Compute...

Страница 79: ...g you to select the camera model will display Confirm that your camera model name is displayed and click OK CF Card Reader PC Card Reader Connection 1 Insert the CF card into the CF card reader or PC...

Страница 80: ...op This will display the Camera window The images on the CF card will display in the Camera window as thumbnails p 34 If multiple PC card readers loaded with CF cards are connected or if a camera and...

Страница 81: ...ted as the third digit in the name i e STA_0001 JPG STB_0002 JPG STC_0003 JPG The xxxx in file names represent four digit numbers All folders except the xxxCANON folders contain image settings files D...

Страница 82: ...ing you to select the image destination folder will display If you are downloading images previously selected with the camera s Transfer Order setting click Select and select Select Send Mark 2 Make s...

Страница 83: ...images To deselect an image click it again Movie images cannot be printed 2 Click Print and select Layout Print A dialog allowing you to select the type of information that will be printed with the im...

Страница 84: ...y 7 If you wish to change the layout set the printing settings in the PhotoRecord window 8 Click the PhotoRecord Print button The Print dialog will display 9 Click Print to start printing When you cli...

Страница 85: ...tter prints 1 Right click an image you wish to print and select Clip Correct Photo 2 Place a check mark beside Exif Print or Photo Optimizer Pro and click Close The selected image will be corrected Im...

Страница 86: ...ts the printing process after downloading the selected images to the computer View as Slideshow Button Automatically starts a slide show after downloading the selected images to the computer Connect t...

Страница 87: ...et to On or manually by the camera or that have been rotated in the Camera window two images are saved onto the computer the pre rotation image and the post rotation image This setting can be changed...

Страница 88: ...Print Button Use this to print an image Clicking this button opens the menu with options such as Layout Print and Index Print View Modify Button Use this to view or edit images Clicking this button o...

Страница 89: ...der only at a large easy to view size When there are more images than can fit in the Browser Area scroll bars appear at the right of the Browser Area When a folder has been created within a folder it...

Страница 90: ...File Viewer Utility from ZoomBrowser EX you can adjust the attributes of the original data before conversion to retain the degree of image quality appropriate to your purposes The result is high quali...

Страница 91: ...in use Display Size List Box Selects the size at which images display Adjusts image color saturation Adjusts image contrast Adjusts white balance settings Click this button and then a white portion of...

Страница 92: ...ecific processing list box Step 3 refers to this box 4 Adjust the image quality as required 5 Select Save File from the File menu and select Convert and save in file The Save File dialog appears 6 Sel...

Страница 93: ...Place the disk in the CD ROM drive and click QuickTime Installation in the installer panel p 19 1 Double click an image with a movie icon QuickTime Player will start 2 Click the play button in QuickT...

Страница 94: ...tails Images shot in Stitch Assist mode with a wide converter teleconverter or close up lens cannot be merged accurately Follow the instructions to merge the images Stitch Assist mode images have a bl...

Страница 95: ...e to the Disconnect button while a connection is open Click it to close the connection Image Display Area Displays the image selected in the Thumbnail View Shooting with RemoteCapture RemoteCapture al...

Страница 96: ...ture Recordable Image Counter Displays the number of images that will fit onto the computer or CF card in the camera Release Button Click here to release the camera s shutter and record the image Reco...

Страница 97: ...lick Connect The Shooting RemoteCapture window will display 4 Set the Size Quality Flash and Rotation settings If you are shooting with the camera on end to either the right or left at 90 you can set...

Страница 98: ...can use the timer feature to shoot after a specified number of seconds 1 In the Shooting RemoteCapture window click the Interval Timer Shooting tab The Timer Shooting dialog will display 2 Set the del...

Страница 99: ...lect a folder where images will be saved How to Display the Subject in the Camera s LCD Monitor You can view the subject you are shooting in the camera s LCD monitor 1 In the Shooting RemoteCapture wi...

Страница 100: ...JPEG format image files can be downloaded using the TWAIN Driver Use ZoomBrowser EX to download RAW images or movies Downloading Images with Adobe Photoshop LE Starting the TWAIN Driver from within A...

Страница 101: ...hotoStudio and choose Select Source 5 Select your camera model name and click OK 6 Click the File menu and select Acquire The TWAIN Driver will start p 54 Downloading Images with ArcSoft PhotoImpressi...

Страница 102: ...ct images for downloading click the File menu and select Transfer Image You can also download images by double clicking them 2 Click close box Depending on the software you are using the TWAIN driver...

Страница 103: ...amera s Digital Terminal For USB cable connection instructions see Connecting the Camera to a Computer p 25 If the Event dialog which allows you to select an application to start appears p 30 select M...

Страница 104: ...les 5 Click Next The images will start downloading to the computer 6 Select Nothing I m finished working with these pictures and click Next 7 Click Finish This concludes the download Specify a file na...

Страница 105: ..._0001 on the computer In Windows XP RAW images are saved with their original file name Converting RAW Images in Windows Explorer You can convert a RAW image by right clicking it and selecting Convert...

Страница 106: ...g the Camera to a Computer p 25 If the Event dialog which allows you to select an application to start p 30 or if the Scanner and Camera Wizard appear click Cancel 2 Start an application For these ins...

Страница 107: ...oad certain types of images If this happens set the camera s communication setting to Normal and use the software bundled on the Canon Digital Camera Solution Disk to download the images For more info...

Страница 108: ...download images using the applications on the Canon Digital Camera Solution Disk such as ZoomBrowser EX or File Viewer Utility you must reset the camera s Communication setting to Normal These applic...

Страница 109: ...ing Images with ImageBrowser 67 Starting ImageBrowser 67 The ImageBrowser Camera Window 72 Downloading and Saving Images from the Camera 73 Printing Images 75 ImageBrowser Features 77 Adjusting Image...

Страница 110: ...staller icons The installer panel will display 4 Click Digital Camera Software Installation 5 Follow the onscreen instructions to proceed with the installation 6 After the installation is complete res...

Страница 111: ...ributed with PowerShot G3 digital cameras For detailed installation instructions double click the Adobe Photoshop LE CD ROM icon followed by the English folder and the Install file 1 Close any program...

Страница 112: ...sh folder and the VideoImpression Installer icon Installation will start Follow the onscreen messages to proceed with the installation 2 Restart the computer when the installation is complete This con...

Страница 113: ...00 sold separately is required to connect the Card Photo Printer CP 10 to a computer Not sold in some regions Uninstalling the Software The procedures for uninstalling the software are only required w...

Страница 114: ...will not awaken properly if you disconnect the camera while they are in sleep mode Please refer to your computer manual for instructions regarding the sleep mode Connecting the Camera to a Computer 1...

Страница 115: ...will disconnect after approximately 1 minute Please see the Camera User Guide for information on what to do if the camera powers down because of the power saving function Starting ImageBrowser USB Po...

Страница 116: ...ill open and display the camera images as thumbnails tiny versions p 72 In the ImageBrowser Automation Wizard dialog you can select the action that is carried out after ImageBrowser starts What to Do...

Страница 117: ...eBrowser from starting automatically USB Port Connection Mac OS X 1 Attach the supplied USB cable to the computer s USB port and the camera s DIGITAL Terminal Prepare the camera for communication with...

Страница 118: ...humbnails tiny versions p 72 CF Card Reader PC Card Reader Connection 1 Insert the CF card into the CF card reader or PC card reader Use a PC card adapter PCMCIA adapter if required See the manual for...

Страница 119: ...geBrowser file 3 Double click the DCIM folder in the Explorer View Section The images from the CF card will display as thumbnails in the Camera window p 72 Mac OS 8 6 9 2 Mac OS X Explorer View Sectio...

Страница 120: ...Settings You can adjust the date time and owner settings in the Camera Settings dialog using the computer when the camera is connected You can also check the battery charge and remaining memory capaci...

Страница 121: ...change the folder name as you wish 3 In the Explorer View Section click the newly created folder Downloading and Saving Images from the Camera 1 With Mac OS 8 6 9 2 select Macintosh HD in the Explore...

Страница 122: ...d appear in the Browser area You can also download images to the computer by dragging them from the Camera window and dropping them on the Browser area or the Explorer View Section 4 Select images in...

Страница 123: ...nd click the Next button Select the Custom layout printing option for the purposes of this example The Custom Layout printing option in the Layout Options window allows you to freely change the size a...

Страница 124: ...printing Print Window When the Custom layout printing option is selected in the Layout Options window you can freely change the size and position of the images for printing Add Text Open the Edit menu...

Страница 125: ...rint adjustment protocol uses this information to correct the image quality more accurately to reflect the shooting settings When printing from ImageBrowser the image quality adjustment settings are a...

Страница 126: ...settings and click OK A check mark must be placed here to automatically correct the image quality Select this option to automatically correct images shot with Exif 2 2 compliant cameras and other ima...

Страница 127: ...file formats is irrevocably processed in the camera and again by an application program when you change the file attributes which reduces the image quality As measured by standard Canon test conditio...

Страница 128: ...ile menu and select Convert and save in file The Save File dialog appears 6 Select a file destination and a file format for the image you wish to process Images can be saved in the JPEG format or in t...

Страница 129: ...Box Selects the thumbnail or preview display mode Display Size List Box Selects the size at which images display Model specific Processing Mode List Box Selects the model of camera in use Adjusts ima...

Страница 130: ...image with a movie icon in the Browser Window QuickTime Player will start and replay the movie 1 Double click an image with a movie icon QuickTime Player will start 2 Click the play button in QuickTi...

Страница 131: ...n Stitch Assist mode with a wide converter teleconverter or close up lens cannot be merged accurately Follow the instructions to merge the images Images Shot in Stitch Assist Mode PhotoStitch automati...

Страница 132: ...are automatically saved to the folder selected in ImageBrowser You cannot use RemoteCapture when the USB Mounter is running p 89 Save RemoteCapture Window View Button Select an image in the Thumbnail...

Страница 133: ...Reflect Changes Button Updates the settings Recordable Image Counter Displays the number of images that will fit onto the computer or CF card in the camera PowerShot S230 DIGITAL ELPH DIGITAL IXUS v3...

Страница 134: ...emoteCapture window will display 5 Set the Size Quality and Rotate settings If you turn the camera on either side to shoot you can rotate the recorded image 90 either way when it is saved by selecting...

Страница 135: ...ng You can use the timer feature to shoot after a specified number of seconds 1 In the Save RemoteCapture window or Shooting RemoteCapture window click the File menu and select Timer Shooting The Time...

Страница 136: ...l instead you can view the subject on a TV Please see the Camera User Guide to learn how to connect to a TV Printing an Index of the Thumbnail Images If you select images in the Thumbnail View area of...

Страница 137: ...ion images cannot be deleted from the camera and the computer images cannot be uploaded to the camera Enabling the USB Mounter To download images with the USB Mounter first enable it with the followin...

Страница 138: ...opying The equipment may not operate correctly How to Download Images from ImageBrowser while the USB Mounter is Enabled When the USB Mounter is enabled use the card reader downloading procedures for...

Страница 139: ...f this happens set the camera s communication setting to Normal and use the software bundled of the Canon Digital Camera Solution Disk to downloard the images For more information please read the supp...

Страница 140: ...ve been downloaded the destination folder will open To download images using the applications bundled on the Canon Digital Camera Solution Disk such as ImageBrowser you must reset the camera s Communi...

Страница 141: ...Windows Macintosh Using the My Camera Settings Windows Macintosh My Camera Settings 94 Windows 94 Macintosh 102...

Страница 142: ...era Window To save the My Camera Settings to the camera you use the My Camera window The following explains the procedures for displaying the My Camera window 1 The Camera Window will open after you h...

Страница 143: ...sound file for use as the start up sound shutter sound operating sounds or self timer sound Delete Button Click here to delete a setting from the My Computer list Play Button Click here to play the s...

Страница 144: ...u wish to save to the camera from the My Computer list If you are working in the Setup as a theme tab the thumbnail tiny version of the start up image will display to the right and the sound files wil...

Страница 145: ...ttings file s from the Camera list that you wish to save to the computer If you are working in the Setup as a theme tab the thumbnail tiny version of the start up image will display to the right and t...

Страница 146: ...Once you have created the data and saved it to the computer use the following procedures to add it to the My Camera window 1 Open the My Camera window click the Set individually tab select Startup Ima...

Страница 147: ...select a sound type in the Data Type and click the Create Sound button in the My Camera window The My Camera Sound Maker window will display 2 Click the tab of the sound file you will be creating foll...

Страница 148: ...ms to the time limits Adjust the time of the recording with the blue or red switch The extra data outside the starting and finishing switches can be erased by clicking the Cut button 7 Click the Save...

Страница 149: ...the Saving the Data to the Camera section p 96 To delete a setting select the file name and click the Delete button at the bottom of the My Computer list Record the sound as an 11 025 KHz or 8 000 KH...

Страница 150: ...Connect the camera to the computer start ImageBrowser and display the Camera window See Starting ImageBrowser for instructions p 67 2 Click Setup Options in the Camera window and select My Camera for...

Страница 151: ...lete Button Click here to delete a setting from the Camera list Save to Camera Button Click here to save the settings onto the camera Send to Trash Button Click here to delete a setting from the My Co...

Страница 152: ...n the Type category the thumbnail tiny version of the start up image will display to the right and the sound files will play in the order of start up sound shutter sound operating sounds and self time...

Страница 153: ...o save to the computer If you selected Theme in the Type category the thumbnail tiny version of the start up image will display to the right and the sound files will play in the order of start up soun...

Страница 154: ...t Create the file in the JPEG format at a size of 320 x 240 pixels After creating the file add it to the My Camera window with the following procedures 1 Open the My Camera window and click the Add bu...

Страница 155: ...to convert it to the WAV format Then add it to the My Camera window using the procedures on the preceding page Record the sound as an 11 025 KHz or 8 000 KHz 8 bit mono sound in the WAV format It shou...

Страница 156: ...108 MEMO...

Страница 157: ...Windows Macintosh This topic explains some of the causes for and solutions to problems with the software Troubleshooting Windows Macintosh...

Страница 158: ...ed to the computer Read Connecting the Camera to a Computer p 25 for the correct connection method Ensure that you are using the correct cable and that both connectors are firmly attached Cause 3 Came...

Страница 159: ...icon does not display in the Scanners and Cameras Properties dialog or the Scanners and Cameras folder First try the following procedures 1 Install the TWAIN Driver or WIA Driver with the installer u...

Страница 160: ...click Device Manager 3 Click the sign beside the Other devices or Imaging devices category If your camera is being recognized as an other device its model name will appear If your camera model name d...

Страница 161: ...known file types is selected remove its check mark 5 Click OK to close the dialog This will make the hidden files and folders visible 8 Look for files for Canon digital cameras that start with Oem A n...

Страница 162: ...ndows Me Check to see if the camera is being recognized as an other device and delete the driver if it is 1 Click the Start menu and select Settings followed by Control Panel Double click the System i...

Страница 163: ...click the View menu and select Folder Options For Windows Me click the Tool menu and select Folder Options 2 Click the View tab 3 For Windows 98 set the Hide files section to Show all files For Windo...

Страница 164: ...tart Windows Reinstall the Driver 11 Reinstall the driver according to the instructions in Installing the TWAIN Driver WIA Driver p 24 Cause 8 Driver not installed correctly Windows only Uninstall the...

Страница 165: ...k the Start button Please note that with ZoomBrowser EX 4 0 both titles and comments appear in the comment list With ZoomBrowser EX 4 0 images files in the Program Files folder cannot be displayed If...

Страница 166: ...118 MEMO...

Страница 167: ...riate language folder and the Support pdf file within it Macintosh Place the Adobe Photoshop LE CD ROM in the drive and double click the Adobe Photoshop LE icon on the desktop Double click the appropr...

Страница 168: ......

Страница 169: ...h...

Страница 170: ...sing the Printer and Printing Precautions This digital camera is designed to perform optimally when used with genuine Canon brand digital camera accessories Canon Brand Accessories You may use non Can...

Страница 171: ...o Format Please set the camera s video signal format to the one used in your region before using it with a TV monitor p 124 Charging the Date Time Battery The camera has a built in rechargeable lithiu...

Страница 172: ...s issues that may affect the camera s operation This mark denotes additional topics that complement the basic operating procedures Question Look Here First How do I navigate the Menu Selecting Menus a...

Страница 173: ...Guide Front View 14 Back View 15 Operation Panel 16 Indicators 17 Preparing the Camera Charging the Battery Pack 18 Installing the Battery Pack 20 Installing a CF Card 22 Setting the Date and Time 23...

Страница 174: ...ock 60 Locking the Flash Exposure Setting FE Lock 61 Switching between Autofocus Modes 62 Switching between Light Metering Modes 63 Adjusting the Exposure Compensation 64 Shooting in Long Shutter Mode...

Страница 175: ...Settings 103 Image Transmission Settings DPOF Transfer Order Selecting Images for Transferring 111 Shooting Replaying with a TV Shooting Replaying with a TV 113 Downloading Images to a Computer Downlo...

Страница 176: ...es Using an AC Adapter Kit 130 Using a Car Battery Charger 131 Camera Care and Maintenance 132 Troubleshooting 133 Specifications Specifications 137 Index Index 143 List of Functions Functions Availab...

Страница 177: ...camera or other device may contravene copyright or other legal rights even if the image was shot for personal use Warranty Limitations This camera s warranty is only effective in the country of sale...

Страница 178: ...on Customer Support Help Desk To avoid the risk of high voltage electrical shock do not touch the flash portion of the camera if it has been damaged Similarly never touch internal portions of the equi...

Страница 179: ...e Do not cut damage alter or place heavy items on the power adapter cable Any of these actions may cause an electrical short circuit which may lead to fire or electrical shock Do not handle the power...

Страница 180: ...ctrical shock Disconnect the battery charger and compact power adapter from both the camera and the power outlet after recharging and when they are not in use to avoid fire and other hazards Continuou...

Страница 181: ...to form on its external and internal surfaces You can avoid this by placing the equipment in an airtight resealable plastic bag and letting it adjust to temperature changes slowly before removing it...

Страница 182: ...ress the battery lock while you insert the battery pack Insert the battery pack correctly by aligning the arrows on the camera and battery pack Install the CF Card p 22 Slide the lock on the CF card c...

Страница 183: ...keep the shutter button pressed or hold the shutter button until you press the button and then release both To Immediately Delete the Displayed Image 1 Press the button while the image is displayed 2...

Страница 184: ...es are used to connect the camera to a computer or printer Computer p 115 USB Interface Cable IFC 200PCU supplied with camera Direct Print Function Compatible Printer sold separately p 94 Direct Inter...

Страница 185: ...Cover p 22 Battery Cover p 20 DC Coupler Terminal Cover p 130 CF Card Slot Cover p 22 Wrist Strap Mount Attaching the Wrist Strap LCD Monitor p 29 Tripod Socket Be careful not to wave the camera abou...

Страница 186: ...Lever Shooting Telephoto Wide Angle p 36 Replay Magnify p 75 Index p 76 ON OFF Button p 26 Light Metering p 63 Button Flash p 47 Button Continuous p 51 Self timer p 52 Button Macro Infinity p 49 Butt...

Страница 187: ...ecording to CF card Reading CF card Erasing from CF card Transmitting data during a computer connection Orange Ready to shoot with slow shutter speed flash on Blinking Orange Ready to shoot but shutte...

Страница 188: ...ete After charging unplug the battery charger and remove the battery pack To protect the battery pack and prolong its life do not charge it for longer than 24 hours continuously Since this is a lithiu...

Страница 189: ...lder etc Do not place anything such as tablecloths carpets bedding or cushions on top of the battery charger while it is charging Heat will build up and could result in a fire Do not charge batteries...

Страница 190: ...the battery pack correctly by aligning the arrows on the camera and the battery pack To remove the battery pack press the battery lock and pull the battery pack out Slide the battery cover closed Do n...

Страница 191: ...as possible before it is required for an extended period When the LCD monitor is off this icon will display when you press the or button mode Battery charge is insufficient to operate the camera Repl...

Страница 192: ...rasing or transmitting data to or from the CF card when the indicator blinks green never perform the following actions during this time It could corrupt the image data Subject the camera body to vibra...

Страница 193: ...erature If condensation forms on the CF card store it at room temperature until the water droplets have evaporated naturally Do not use or store CF cards in the following types of location Locations s...

Страница 194: ...me settings does not cause the date time stamp to appear on images Charging the Date Time Battery The camera has a built in rechargeable lithium battery for saving settings such as the date and time T...

Страница 195: ...ss the button to display the Rec or Play menu Use the or button to select the Set up menu Use the or button to select Use the or button to select a language Press the button to redisplay the Rec or Pl...

Страница 196: ...e mode switch is set to from the or position The LCD monitor will always turn on when the mode switch is set to the or position Press the ON OFF Button again to turn off the power The Set Date Time me...

Страница 197: ...D monitor back on Replay Mode Powers down approximately 5 minutes after the last control is accessed on the camera Connected to a Printer optional Powers down approximately 5 minutes after the last co...

Страница 198: ...o To Replay Images Replay Mode Slide the mode switch to Recorded images can be printed when a printer sold separately is connected p 90 Recorded images can be downloaded to and viewed with a computer...

Страница 199: ...ain However the setting may be lost when the power has been turned off after the Change the battery pack message has displayed while the LCD monitor was on in shooting mode In the or mode the LCD moni...

Страница 200: ...t to On or Off The power is turned on The or button mode is pressed The camera settings are changed The Set up menu is closed While this information is displayed you may set the flash continuous mode...

Страница 201: ...ng Method Macro Infinity Metering Mode Movie Recording Digital Zoom Camera Shake Warning Low Battery x2 6 x3 2 x4 0 x4 9 x6 4 The icons in the shaded boxes above display regardless of the selected dis...

Страница 202: ...ecognized JPEG file with format not conforming to Design rule for Camera File System Standards RAW format file File with unrecognized format The image information may not display correctly if images s...

Страница 203: ...nder vs Recorded Image Please note that the actual image may differ from the image seen in the optical viewfinder due to the physical separation between the viewfinder and lens This is called the para...

Страница 204: ...Blinking Orange Camera shake warning Insufficient exposure Lower Indicator Yellow Macro mode Infinity mode Focus lock Method 2 p 58 Blinking Yellow Focusing difficulty single beep sounds When the indi...

Страница 205: ...indicator blinks green AF assist Beam The AF assist Beam will sometimes emit when the shutter button is pressed halfway to assist focusing in certain conditions i e dark conditions The AF assist Beam...

Страница 206: ...om lever toward to zoom in telephoto Press the zoom lever toward to zoom out wide angle Digital Zoom When the LCD monitor is on you can shoot with a combined optical and digital zoom factor of up to 6...

Страница 207: ...lts p 40 Press the button Use the or buttons to select the Rec Play or Set up menu Use the or buttons to select an option With some Rec Set up menu items the or buttons select the options for the item...

Страница 208: ...Basic Functions Play Menu Rec Menu Selecting a Mode Selecting a Menu Switching between the Rec Play and Set up Menus Selecting Menus and Settings Cont d The menu will appear slightly different in mod...

Страница 209: ...Setting Options Completing the Procedure See Print Menu Settings p 92 for the procedures used with the Print Order item in the Play menu You can switch between menus at any time simply by pressing th...

Страница 210: ...the display Erases all images on the CF card Replays selected images in a slide show Sets the print settings Sets the transfer settings Resolution Still images Resolution Movies Compression ISO Speed...

Страница 211: ...anges made with the camera buttons can be reset to the default values in a single operation p 125 p 123 p 27 p 23 p 89 p 25 p 113 p 116 On Off On Off Sets the date and time Formats initializes the CF...

Страница 212: ...osure compensation white balance and other settings can be manually selected Stitch Assist Images are shot in overlapping series to create single panoramic images Movie Shoots movie clips Some setting...

Страница 213: ...riptions of the shooting functions that follow the icons beside the titles indicate the applicable shooting modes Before you proceed with Step 1 in each case set the camera to one of the shooting mode...

Страница 214: ...y p 75 Changing the Review Duration The default review time is 2 seconds The review function can be set to Off or changed to any time in the range of 2 to 10 seconds in one second increments See Selec...

Страница 215: ...ormal High Quality Normal High Low 2048 x 1536 pixels 1600 x 1200 pixels 1024 x 768 pixels 640 x 480 pixels Resolution Compression Purpose Purpose 640 x 480 pixels 320 x 240 pixels 160 x 120 pixels Re...

Страница 216: ...option Resolution Still Images Select or Resolution Movies Select or Compression Select or The display will return to the Rec screen See Functions Available in Each Shooting Mode p 148 See Image File...

Страница 217: ...every shot Flash Off The flash will not fire Slow Synchro The flash timing is adjusted to slow shutter speeds This reduces the chance that the background will be dark when shots are taken at night or...

Страница 218: ...upper indicator lights a steady orange The flash may take up to approximately 10 seconds to charge The recharging time will vary with such factors as the shooting conditions and battery charge The fla...

Страница 219: ...or compositions combining both near and distant objects Distance from Image Area Lens to Subject Telephoto End 27 cm 10 6 in 138 x 103 mm 5 4 x 4 1 in Wide Angle End 10 cm 3 9 in 102 x 76 mm 4 0 x 3 0...

Страница 220: ...select On The display will return to the Rec screen Press the zoom lever toward until the lens reaches the maximum optical telephoto setting and stops Press it again to activate the digital zoom and t...

Страница 221: ...ses when the shutter button is released This figure reflects standard shooting criteria established by Canon Actual figures may vary according to the subject and shooting conditions Display The interv...

Страница 222: ...lecting Menus and Settings p 37 Use the or button to select 10 sec or 2 sec When 10 sec is selected the self timer sounds and the blinking gets faster 2 seconds before the shutter activates When 2 sec...

Страница 223: ...a Subject The PhotoStitch program detects the overlapping portions of adjoining images and merges them When shooting try to include a distinctive item landmark in the overlapping portions Compose eac...

Страница 224: ...und its own vertical axis To shoot close ups slide the camera over the subject keeping it parallel to the subject as you move it Shooting Images can be shot in two sequences in Stitch Assist mode The...

Страница 225: ...onal images A sequence may contain up to 26 images Press the button to close Stitch Assist mode A custom white balance setting cannot be set in or mode To use a custom white balance setting first set...

Страница 226: ...tely 15 frames sec is approximately 30 sec 3 min or 3 min according to Canon s testing standard Using an optional Canon FC 256MH CF Card not sold in some regions When using the CF card supplied with t...

Страница 227: ...at the values selected for the first frame After a clip is shot the upper indicator will blink green while the clip is being written to the CF card You cannot shoot again until the blinking stops See...

Страница 228: ...ith the Focus Lock Method 1 1 Aim the camera so that an object at the same focal distance as the main subject is centered in the AF frame in the viewfinder or LCD monitor 2 Press the shutter button ha...

Страница 229: ...button Method 2 is convenient because you can let go of the shutter button to recompose the image Moreover the focus remains locked after the picture is taken allowing you to capture a second image w...

Страница 230: ...to The AE lock cannot be set if the flash fires Turn on the LCD monitor Focus the camera on the subject on which you wish to lock the exposure setting Press the shutter button halfway and wait until t...

Страница 231: ...h to lock the flash exposure setting Press the shutter button halfway and wait until two beeps sound Without releasing your finger press the button The flash will fire a pre flash and lock the flash e...

Страница 232: ...the center AF frame This is convenient for focusing on a specific part of a subject with greater certainty On Off The symbol represents the AF frames as they appear in the LCD monitor No frame Switchi...

Страница 233: ...light metering It evaluates the complex lighting conditions such as the position of the subject the brightness the direct light and the backlighting and adjusts the settings to the correct exposure f...

Страница 234: ...in night shots Use the or button to adjust the exposure compensation The settings can be adjusted in 2 stops in 1 3 stop increments You can confirm the effect of the exposure compensation setting in...

Страница 235: ...select On The display will return to the Rec screen Use the or button to select the long shutter menu and the or button to select a shutter speed A shot can be taken immediately after The menu will re...

Страница 236: ...evertheless a certain amount of processing time may be required before the next image can be shot Use the LCD monitor to confirm that the image was recorded at the desired brightness Use of the flash...

Страница 237: ...wavelength fluorescent lighting Fluorescent H For recording under daylight fluorescent or daylight fluorescent type 3 wavelength fluorescent lighting Custom For setting a custom value with a white she...

Страница 238: ...button repeatedly until the White Balance Settings menu displays Use the or button to select Aim the camera at the white paper cloth or gray card and press the button Aim the camera so that the white...

Страница 239: ...itor to compose the shot and to zoom in to the telephoto end setting Since the white balance data cannot be read in and mode preset the white balance in another shooting mode first before selecting th...

Страница 240: ...en the LCD monitor is on A shot can be taken immediately after The menu will reappear after the shot allowing you to further adjust the setting Photo Effect Off Records with no effect Vivid Emphasizes...

Страница 241: ...in a dark area or use a fast shutter speed See Selecting Menus and Settings p 37 Use the or button to select a setting The display will return to the Rec screen Higher ISO speeds increase image noise...

Страница 242: ...When the camera is held on end to shoot the Intelligent Orientation sensor judges the upper end to be up and the lower end to be down It then regulates the optional white balance exposure and focus fo...

Страница 243: ...om 0001 to 9900 and organized in folders generally containing up to 100 images Folders are assigned numbers from 100 to 998 a folder with 99 in the last two digits cannot be created Since images shot...

Страница 244: ...ition The last recorded image will appear in the display single image replay Use the button to move to the previous image and the button to move to the next Holding the button down advances the images...

Страница 245: ...the image Hold the button down and press the zoom lever toward to cycle through each setting from approxi mately 2 5 times to approximately 5 and 10 times Press the zoom lever toward to cease magnifyi...

Страница 246: ...o display the selected image in single image replay Switching between Sets of Nine Images Successive sets of nine images can be shown in the display Use the button to move to the previous set and the...

Страница 247: ...dures Movies cannot be played in the index replay mode Use the or button to select a movie Images with a icon are movies The movie control panel will display Use the or button to select Play The movie...

Страница 248: ...ame Last Frame Switch to Movie Editing Mode p 79 The sound can also be played when a movie is displayed on a TV p 113 You may experience frame dropping and audio breakup when replaying a movie on a co...

Страница 249: ...ion to which the cut is applied When Cut Beginning is selected the left hand cursor moves and when Cut End is selected the right hand cursor moves Use the or button to select Play A preview of the tem...

Страница 250: ...card lacks sufficient space to create a new file only Overwrite can be selected A small symbol will appear in the time display on the movie in that case The minimum duration of an edited movie is 1 se...

Страница 251: ...rientations with each press of the button Press the button repeatedly until the replay screen reappears to finish the procedure Movies cannot be rotated When images are downloaded to a computer the or...

Страница 252: ...finish the procedure Movies play for their entire recorded length regardless of the time set in the slide show settings The power saving function does not activate during a slide show p 27 Automated P...

Страница 253: ...mages more rapidly Stopping a Slide Show Press the button to stop the slide show and redisplay the Slide Show menu Selecting Images for Slide Shows You can mark images for inclusion in slide shows 1 3...

Страница 254: ...sponding to their selection order and a white checkmark You can press the zoom lever toward to switch to the index mode 3 images and use the same procedures to select images While in index replay you...

Страница 255: ...n all the slides have been displayed or continues until stopped Use the or button to select Set up Use the or button to select or and the or button to select an option Select a play time Select On or...

Страница 256: ...mage Press the button again to remove the protection You can make the selection of images easier by toggling between single image replay and index replay by pressing the zoom lever toward Press the bu...

Страница 257: ...d images cannot be recovered Exercise adequate caution before erasing a file Protected images cannot be erased with this function Use the or button to select an image for deletion Use the or button to...

Страница 258: ...es cannot be recovered Exercise adequate caution before erasing a file Protected images cannot be erased with this function See Selecting Menus and Settings p 37 Use the or button to select OK To exit...

Страница 259: ...s malfunctioning a corrupted CF card might be the cause Reformatting the CF card may solve the problem When a non Canon brand CF card is malfunctioning reformatting it may solve the problem CF cards f...

Страница 260: ...loping service by sending your CF card with the DPOF Digital Print Order Format print settings set in advance on your camera Please refer to the System Map supplied with your camera for direct print f...

Страница 261: ...ct Printing Setting the Number of Print Copies p 99 Setting the Print Style p 99 Standard Multiple Direct Print Function Compatible Printer Paper Card 1 Card 2 Card 3 LTR A4 Direct Print Function Comp...

Страница 262: ...int Menu Settings Use the Print menu to set print related settings The following diagrams illustrate how to use the Print menu DPOF Print Settings Set the Mode Switch to Direct Print Function Set the...

Страница 263: ...On Off Selects items and settings Sets items and settings Print Type p 106 Date p 106 File No p 106 Order Number of Copies p 104 Set up Reset p 108 Style Number of Copies p 99 Trimming p 101 Image p...

Страница 264: ...the battery charge while printing Please see the System Map supplied with your camera for the list of direct print function compatible printers Please see your printer s user guide for information abo...

Страница 265: ...ter and power cable are connected Set the mode switch to the position and turn on the camera s power will display when the printer is correctly connected Connecting to a Bubble Jet Printer Please read...

Страница 266: ...el Set the mode switch to the position and turn on the camera s power will display when the printer is correctly connected This shows when a BJ printer is connected Interface Cable Ensure that you pus...

Страница 267: ...se the or button to select the images you wish to print Specify the number of print copies print style and print area as required Setting the Number of Print Copies p 99 Setting the Print Style p 99 S...

Страница 268: ...eject the paper Printing Errors An error message will display if an error occurs while printing p 128 129 Use the or button to select Stop or Resume and press the button With a BJ printer the print w...

Страница 269: ...g the Print Style You can select from among the following print styles Direct Print Function Compatible Printer BJ Printer Paper Select a paper size from the following Card 1 Card 2 Card 3 LTR and A4...

Страница 270: ...ct or and the or button to select an option Image Settings Direct Print Function Compatible Printer Select Standard or Multiple Paper BJ Printer Select Card 1 Card 2 Card 3 LTR or A4 Borders Select Bo...

Страница 271: ...bottom and sides trimmed The date settings are overridden by the DPOF print settings if you are using them to print p 106 Setting the Printing Area Trimming You can print a portion of an image The sha...

Страница 272: ...agnifying rate With direct print function compatible printers the trimming frame displays in red Moving the Trimming Frame Use the or button to set the trimming frame s position Rotating the Trimming...

Страница 273: ...g the images to a photo developing service or for printing on a direct print function compatible printer or a direct print function compatible BJ printer Selecting Images for Printing There are two wa...

Страница 274: ...to maximum of 99 Index Use the or button to move to an image and the or button to select or deselect it A checkmark displays on selected images You can use the same procedures to select images in ind...

Страница 275: ...ies can be set individually for each image When Index is selected the print settings can be deleted p 104 Press the button repeatedly until the replay screen reappears to complete the procedure The sy...

Страница 276: ...When Both is selected the number of print copies can be set but it applies to Standard prints only The Index setting only produces one print copy Print settings can also be assigned to images with th...

Страница 277: ...or Off File No Select On or Off Press the button repeatedly until the replay screen reappears to complete the procedure The date prints as the date and time in the format specified in the Set Date Ti...

Страница 278: ...an all be removed at once The print type resets to Standard and the Date and File No options to Off See Print Menu Settings p 92 Use the or button to select Reset Use the or button to select OK To exi...

Страница 279: ...Use the button to select Print Set the print style as required p 106 The print style cannot be set for images that have had the print type set to Index in the DPOF print settings You can also select...

Страница 280: ...oyourBubbleJetPrinterQuickStartGuideforan explanationofthenumberofimagesprintedwithaBubbleJetPrinter Canceling Printing Seepage98 Restarting Printing InthePrintOrdermenu usethe or buttontoselect Resum...

Страница 281: ...for image transfer instructions The settings used on the camera comply with the Digital Print Order Format DPOF standards The symbol will display on images that have had print settings set by other DP...

Страница 282: ...eplay and index replay While in index replay you can select all of the images by pressing the button using the or button to select Mark all and pressing the button again Press the button to complete t...

Страница 283: ...the normal procedures If the images are not appearing on the TV when shooting press the button A TV cannot be used in or mode No image will appear on the LCD monitor when the camera is connected to a...

Страница 284: ...a computer with the supplied USB cable Please refer to the Software Starter Guide for installation instructions image download instructions and system requirements Downloading Directly from a CF Card...

Страница 285: ...era Solution Disk before connecting the camera to the computer Please refer to the Software Starter Guide for installation instructions Use the supplied USB cable to connect the computer s USB port to...

Страница 286: ...led on the Canon Digital Camera Solution Disk have not been installed Viewing the camera s images Downloading the camera s images to a computer Deleting the camera s images These functions are availab...

Страница 287: ...ter p 130 If the USB cable is detached while the camera power is on the camera will power down When the camera is connected to a computer a warning displays on the computer display after 5 minutes if...

Страница 288: ...o CF cards Superfine Fine Normal Sets the sensitivity at which images are recorded 50 100 200 400 AUTO Sets the number of pixels used to record movies to CF cards 640 x 480 pixels 320 x 240 pixels 160...

Страница 289: ...sist Beam AiAF Sets whether or not the camera automatically selects one of nine AF frames or a fixed center AF frame On Off Sets the duration before the selftimer releases the shutter 10 seconds 2 sec...

Страница 290: ...how file numbers are assigned to images when new CF cards are inserted On Off Long Shutter File No Reset Auto Rotate Sets whether or not images shot with the camera on end are automatically rotated i...

Страница 291: ...rence Page Protect Rotate p 86 p 81 p 88 Erase all Slide Show Protects images from accidental erasure Rotates images clockwise 90 or 270 in the display Deletes all images from a CF card except for pro...

Страница 292: ...reen Options Reference Page Print Order Transfer Order p 103 p 111 Selects images and the number of print copies for output to a DPOF compatible printer or a photo developing service Selects the image...

Страница 293: ...d or a menu operation is performed On Off A beep still sounds to warn of errors even when Off is selected Sets whether or not the camera automatically powers down after a set period of time elapses wi...

Страница 294: ...d in menus and messages on the LCD monitor English Italiano Deutsch Norsk Fran ais Svenska Nederlands Espa ol Dansk Chinese Suomi Japanese You can also change the language in replay mode by holding th...

Страница 295: ...n power lamp lights Set the mode switch to any position Press and hold the button for more than 5 seconds Use the or button to select OK To exit without resetting select Cancel White balance data reco...

Страница 296: ...file with the same name as the directory that the camera is attempting to create or the highest possible file number has already been reached In the Rec Menu set the File Reset option to On Save all...

Страница 297: ...rotate You attempted to rotate an image which was photographed with another camera recorded in a different format or edited on a computer Protected You attempted to erase a protected image Too many ma...

Страница 298: ...ette Paper and ink do not match The paper and ink are from different sets Paper Jam Paper jammed during printing Paper has been changed The paper size was changed between the time the Print Style menu...

Страница 299: ...ill start printing automati cally No printhead No printhead installed in printer Printer cover open Secure the printer front cover Media type error You selected a paper type incompatible with the prin...

Страница 300: ...ug the other end into the power outlet Open the battery cover and press the battery lock in the direction shown while inserting DC Coupler DR 500 Insert the DC coupler all the way in until the battery...

Страница 301: ...y charger Insert the battery pack all the way into the battery charger as shown The charge indicator will light red while the battery pack is charging It will change to green when the charge is comple...

Страница 302: ...ns blower brush to remove dust and dirt then remove any remaining dirt by wiping the lens lightly with a soft cloth Never use synthetic cleansers on the camera body or lens If dirt remains contact the...

Страница 303: ...new CF card If required download the images to a computer and erase them from the CF card to make space Format CF card See Formatting CF Cards p 89 If reformatting doesn t work the CF card logic circ...

Страница 304: ...shutter button Be careful not to block the AF assist Beam with fingers or other items Problem Cause Solution Lens will not retract Battery pack consumed quickly Battery pack will not charge Image is b...

Страница 305: ...f the subject at the maximum wide angle or 2 m 6 6 ft of the subject at the telephoto end setting when using the flash When using the flash stay at least 27 cm 10 6 in from the subject Set the exposur...

Страница 306: ...NTSC or PAL for your TV p 124 The output will not appear on a TV in or Stitch Assist mode Shoot in a different mode Adjust the zoom before shooting a movie Use a CF card formatted in your camera See F...

Страница 307: ...ycrystalline silicon TFT color LCD approx 120 000 pixels Autofocus TTL 9 point AiAF TTL 1 point center AF Focus lock possible Focusing Range Normal 47 cm 1 5 ft Macro AF 10 47 cm 3 9 in 1 5 ft W 27 47...

Страница 308: ...Recording Format Still images JPEG Exif 2 2 1 Movies AVI Image data Motion JPEG Audio data WAVE monaural Compression Superfine fine normal Number of Recording Pixels Still images large 2048 x 1536 pi...

Страница 309: ...rints 2 This is the maximum recording time per movie clip for the optional Canon FC 256MH CF card not sold in some regions Battery Capacity Battery Pack NB 1LH fully charged Excludes movie data At low...

Страница 310: ...ec 1954 sec CF Cards and Estimated Capacities Recordable Images The maximum movie clip length is approximately 30 sec or 3min The times shown are the maximum continuous recording times When used with...

Страница 311: ...0 oz Battery Charger CB 2LS CB 2LSE Rated Input 100 240 V AC 50 60 Hz 0 075 A 100 V 0 045 A 240 V Rated Output 4 2 V DC 0 5 A Charging Time Approx 130 minutes Operating Temperatures 0 40 C 32 104 F Di...

Страница 312: ...tional Rated Input DC 12 24 V 4 3 W Rated Output 4 2 V DC 0 55 A Charging Time Approx 130 minutes Operating Temperatures 0 40 C 32 104 F Dimensions 90 4 x 56 0 x 28 0 mm 3 6 x 2 2 x 1 1 in Weight Appr...

Страница 313: ...Custom White Balance 68 D Date Time 23 DIGITAL A V OUT Terminal 95 96 115 Digital Zoom 36 50 Direct Interface Cable DIF 200 94 Direct Print function Compatible BJ Printer 95 Direct Print function Comp...

Страница 314: ...ay Menu 121 Power On Off 26 Power Lamp 16 Power Save 27 Print Settings Direct Print Printers Number of Print Copies 99 Print Area Trimming 101 Print Style 99 Selecting Images 97 Protect 86 R Rec Menu...

Страница 315: ...145...

Страница 316: ...to a mistaken operation or malfunction of the camera the software the CompactFlash cards CF cards personal computers peripheral devices or use of non Canon CF cards Trademark Acknowledgments Canon and...

Страница 317: ...ment off and on the user is encouraged to try to correct the interference by one or more of the following measures Reorient or relocate the receiving antenna Increase the separation between the equipm...

Страница 318: ...45 p 45 p 45 p 45 p 45 p 45 p 45 p 45 p 45 p 47 p 47 p 47 p 47 p 47 p 49 p 49 p 58 p 60 p 61 p 51 p 52 p 62 Reference Page Resolution Compression Flash Macro Mode Infinity Mode Focus Lock AE Lock FE L...

Страница 319: ...2 2 Default setting Setting available Setting can only be selected for the first image Shaded Area Setting is memorized even when the camera power is shut off With the exception of the Date Time Langu...

Страница 320: ......

Отзывы: