26
1
2
3
4
5
6
7
8
9
Cover
Preliminary Notes and
Legal Information
Contents:
Basic Operations
Advanced Guide
Camera Basics
Smart Auto
Mode
Other Shooting
Modes
P Mode
Wi-Fi Functions
Setting Menu
Accessories
Appendix
Index
Basic Guide
Playback Mode
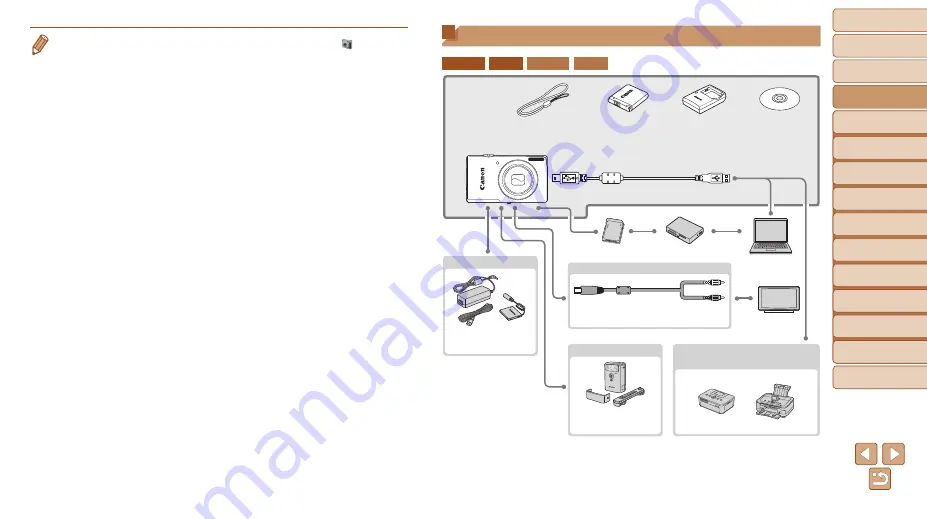
System Map
ELPH 130 IS IXUS 140 ELPH 120 IS IXUS 135
Wrist Strap
WS-800
Battery Pack
NB-11L*
1
Battery Charger
CB-2LF/
CB-2LFE*
1
DIGITAL
CAMERA
Solution Disk
Interface Cable IFC-400PCU*
1
Memory Card
Card Reader
Windows/
Macintosh
Computer
TV/Video
System
AC Adapter Kit
ACK-DC90
High-Power Flash
HF-DC2*
2
Included
Accessories
Power
Flash Unit
Canon-brand PictBridge-
Compatible Printers
Cable
AV Cable AVC-DC400
*1 Also available for purchase separately.
*2 High-Power Flash HF-DC1 also supported.
•
In Windows 7, if the screen in step 2 is not displayed, click the [
] icon in the
taskbar.
•
To start CameraWindow in Windows Vista or XP, click [Downloads Images
From Canon Camera using Canon CameraWindow] on the screen displayed
when you turn the camera on in step 2. If CameraWindow is not displayed,
click the [Start] menu and choose [All Programs] ► [Canon Utilities] ►
[CameraWindow] ► [CameraWindow].
•
On a Macintosh computer, if CameraWindow is not displayed after step 2, click
the [CameraWindow] icon in the Dock (the bar at the bottom of the desktop).
•
Although you can save images to a computer simply by connecting your
camera to the computer without using the software, the following limitations
apply.
-
It may take a few minutes after you connect the camera to the computer until
camera images are accessible.
-
Images shot in vertical orientation may be saved in horizontal orientation.
-
Image protection settings may be cleared from images saved to a computer.
-
Some problems may occur when saving images or image information,
depending on the operating system version, the software in use, or image
file sizes.
-
Some functions provided by the software may not be available, such as
movie editing.


