background image

87

Macintosh

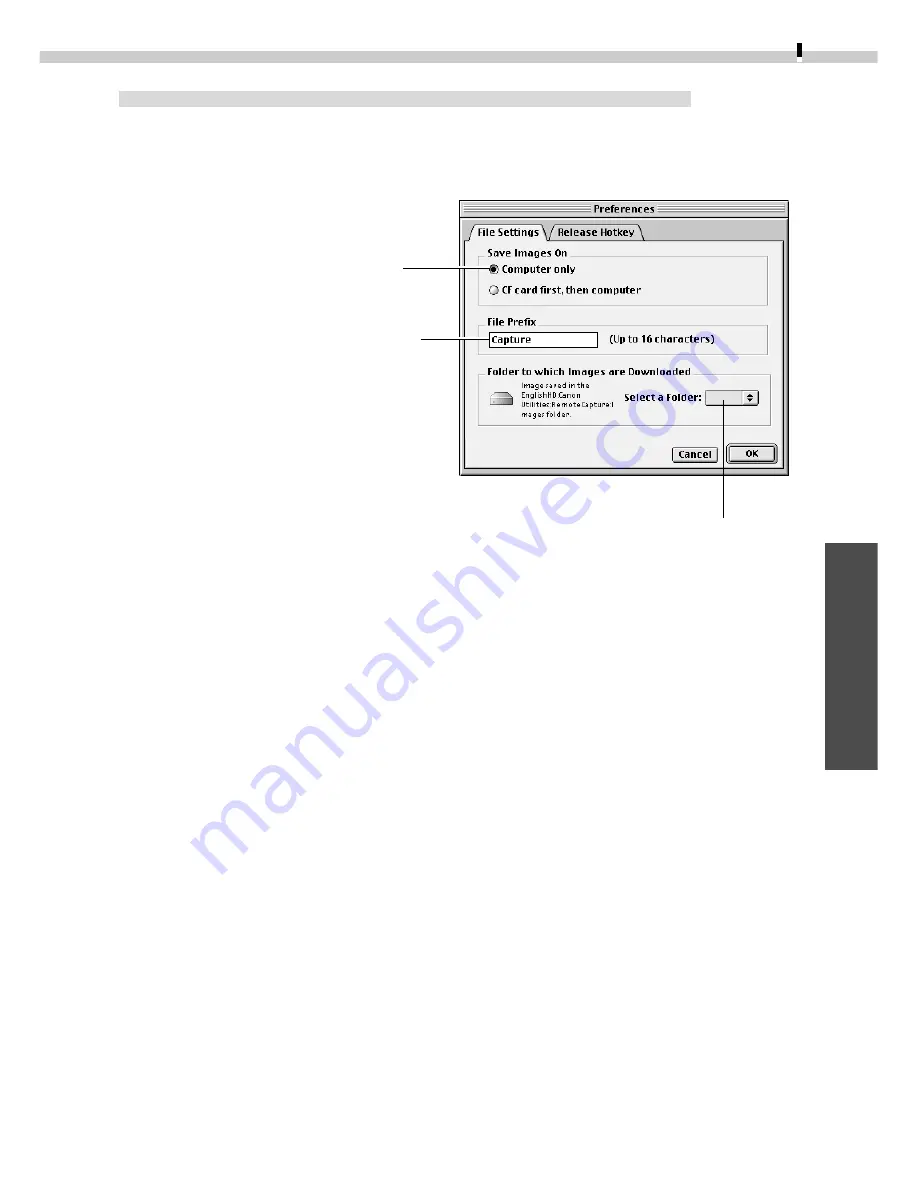
Selects whether the image is saved
only on the computer or on the
camera’s CF card too.

Sets the folder in which
the image file is saved.

Sets the image file prefix. If the prefix
is set to [Capture], for example, the
first image will be named
[Capture_00001.jpg] and successive
images will have higher numbers.

Changing the Save Location and Other Preferences

The Preferences dialog can be opened by clicking the RemoteCapture [File] menu and
selecting [Preferences]. This dialog can be used to change the save location and
settings.

Содержание PowerShot A20

Страница 1: ...g the software on the supplied CD ROM By using the software you agree to be bound by the terms of the agreement Windows Macintosh Start ZoomBrowser EX Windows or ImageBrowser Macintosh computers and load images onto the computer CDI E015 010 XXXXXXX X 2001 CANON INC PRINTED IN JAPAN Installing the USB Driver The USB driver must be installed to connect the camera to a computer Windows via a USB int...

Страница 2: ... normal use for a period of ninety 90 days after purchase from an authorized Canon dealer as evidenced by your sales receipt Your sole remedy for a defective CD ROM shall be replacement of the same without charge when returned by you at your expense to your point of purchase and proven to be defective upon inspection The Replacement CD ROM will be warranted for the remainder of the original ninety...

Страница 3: ...sdiction such provision shall be null and void with respect to the jurisdiction of that court or tribunal and all the remaining provisions of this Agreement shall remain in full force and effect 8 CONTROLLING LAW The terms of this Agreement as it relates to purchases of the Software in the United States of America shall be governed and construed in all respects in accordance with the laws and regu...

Страница 4: ... with headphones to the loud sounds of a data CD ROM played on a music CD player Introduction Thank you for purchasing a Canon digital camera This guide explains how to use the software bundled with your camera Where to Find Instructions for Attaching Your Camera to a Computer Models Where to Find the Instructions PowerShot Pro90 IS PowerShot G1 PowerShot A10 A20 PowerShot S300 DIGITAL ELPH DIGITA...

Страница 5: ...amera Slide Shows 24 Editing the Print Order Settings DPOF 25 Sending Images via E mail 26 Merging Panoramic Images with PhotoStitch 27 Editing and Applying Special Effects to Images 28 Editing Movies 29 Printing Images 30 Shooting with RemoteCapture 33 Converting RAW Images 37 Restore the Database 38 Loading Images with TWAIN Compliant Programs 39 Using ArcSoft PhotoImpression 39 Using Adobe Phot...

Страница 6: ...OF compliant settings of images on a CF card Connecting to a USB port automatically starts ZoomBrowser EX and displays the camera images Sets the camera parameters Image File Management Functions Displays moves copies or deletes images stored on computer disks Allows simple editing procedures such as image color adjustments and cropping Displays all the files in a specified folder at once and zoom...

Страница 7: ...ect the wide display format A 360 degree scene shot in several frames can be merged into a 360 degree image and saved in the QuickTime VR format making it appear as if you were standing in the middle of the image looking about in all directions RemoteCapture Connecting via a USB port allows you to release the camera s shutter button from the computer The images load directly into the computer Conn...

Страница 8: ... print and create sophisticated graphics for the web Adobe PhotoDeluxe Home Edition CD ROM Adobe PhotoDeluxe Home Edition Allows you to edit images and effortlessly create greeting cards birthday cards and calendars The retouching software bundled with cameras varies between camera models Some models are not bundled with retouching software Please refer to the System Map for the programs supplied ...

Страница 9: ...ot with the Wide Converter Tele converter or Close up lens do not merge well in PhotoStitch USB Serial ZoomBrowser EX TWAIN Driver ZoomBrowser EX ZoomBrowser EX TWAIN Driver ZoomBrowser EX ZoomBrowser EX ZoomBrowser EX PhotoStitch RemoteCapture Computer Interface Downloading Camera Images Downloading Movies RAW Image Conversion Uploading Images to Camera Editing Camera Slide Show Editing Camera Pr...

Страница 10: ...cluding the Second Edition Windows Millennium Edition Windows Me Windows NT 4 0 Service Pack 3 or a later version required or Windows 2000 CPU Pentium 150 MHz or better RAM 32 MB or more Windows 95 Windows 98 64 MB or more Windows Me Windows NT 4 0 Windows 2000 Interface USB Limited to pre installed Windows 98 Windows Me or Windows 2000 systems RS 232C Serial or COM Port Free Hard Disk Space Canon...

Страница 11: ...e it will automatically select the correct USB driver 1 Close any programs that are running 2 Place the Canon Digital Camera Solution Disk in the CD ROM drive The installer panel will automatically display If the installer panel does not automatically display use the following procedures to start it 1 Double click the My Computer icon on the desktop and double click the CD ROM icon in the next win...

Страница 12: ...OM in the drive and click Readme Guide and Install Guide in the window that displays Write down the serial number shown during installation because it is required for the user registration process Uninstalling the Software To remove the installed software click the Windows Start menu and select Settings Control Panel and Add Remove Programs ZoomBrowser EX can also be uninstalled by clicking the St...

Страница 13: ...tallation is incomplete Read the Troubleshooting the USB Driver Installation section on page 52 if the installation cancels itself during the procedure if the installation does not proceed as described in these procedures or if you think that the drivers are not properly installed Read the Uninstalling the USB Driver section on page 52 for instructions for that procedure Installing the USB Driver ...

Страница 14: ...restart the computer as instructed Installing and uninstalling the WIA driver If you are using Windows Me you can alter to install the WIA driver 1 Set the Solution disk in the CD ROM drive The install panel opens automatically 2 Click To Users of WIA Driver The operation restrictions and install uninstall methods are displayed When you use WIA driver you should obtain these operation restrictions...

Страница 15: ...passes The power will remain on and no message will appear if the camera is powered by a household power source or its auto power off function is set to Off excluding PowerShot S10 S20 models To reopen the connection press the camera s shutter button or main switch Please see the Camera User Guide for details Starting ZoomBrowser EX USB Interface 1 Attach the camera to the computer with the USB ca...

Страница 16: ...vice events option has a check mark the automatic start will be turned off CF Card Reader or PC Card Slot Interface 1 Place the CF card into the CF card reader or into the PC card adapter and then into the PC card slot Refer to Where to Find Instructions for Attaching Your Camera to a Computer p ii for connection instructions 2 Start ZoomBrowser EX Double click the Canon ZoomBrowser EX icon on the...

Страница 17: ...ZoomBrowser EX icon on the desktop to start the program If the Canon ZoomBrowser EX icon does not appear on the desktop click the Windows Start button and select Programs Canon Utilities ZoomBrowser EX and ZoomBrowser EX Quick Tips will automatically display Read these tips to quickly understand operating procedures 4 Click the Import Images button and select From Canon Camera The camera s images ...

Страница 18: ...ttings see inset below using the computer An image of the connected camera or CF card will display Thumbnail Upload Button Copies images from the computer to the camera or CF card p 24 Delete Button Deletes the selected images Download Button Copies selected images to the computer from the camera or CF card p 15 How to Check and Change Various Camera Settings You can adjust the date time and owner...

Страница 19: ...r name 2 Select the new folder in the Tree View 3 Select the images that you wish to download from the Camera Window and click the Download button Click the thumbnail you wish to select or press Ctrl and click to select multiple thumbnails The downloaded images will be saved to the computer disk and appear in the Browser Display Area Tree View Thumbnail RAW will display on RAW images The movie ico...

Страница 20: ...dow and dropping them on the Browser Display Area or Tree View To disconnect the camera click the close box at the upper right of the Camera Window The Camera Window will close Tree View Browser Display Area RAW will display on RAW images The movie icon will display on movie thumbnails ...

Страница 21: ... The PhotoRecord printing utility will start and automatically display the selected image s in a page layout 2 Adjust the print settings if you wish to change the page layout Please refer to page 30 or the PhotoRecord Help file for details of the settings 3 Click the PhotoRecord Print button The Print dialog will display 4 Click the OK button to start printing Print Button Print Layout Button ...

Страница 22: ...ility p 5 Displaying Images Zooming Images In and Out a Double Clicking the Browser Display Area Double click the background frame of the folder in which an image is registered to zoom it to fill the Browser Display Area b Selecting a Folder in the Tree View You can also zoom a folder in or out with its icon selected in the Tree View Browser Display Area Click this button to go back to a folder on...

Страница 23: ... panel displays when you click Edit Panel button in the Image Viewer Crop Button Drag the cursor to select the crop area and click the CROP button to trim everything outside the crop area Undo Redo Buttons Reverse an action or reimplement it Color Brightness Contrast Sliders Slide the tab to adjust the color brightness or contrast settings Save As Button Save the image with a different name and fi...

Страница 24: ... operate this function Drag the tab up or down to go backward or forward in time The time tunnel will advance in the selected direction To quit TimeTunnel and return to the ZoomBrowser EX window click this button Replaying Movies Double click a thumbnail with the movie icon to start QuickTime Player and replay the movie If QuickTime 3 0 or a later version is not already installed install it from t...

Страница 25: ...ction displays images saved onto the computer disk one by one at full screen size as if they were part of a slide show 1 Click the View menu and select Slide Show Options 2 Select a play method The Slide Show Options dialog will display Set a play interval and a transition effect and click the OK button 3 Select images from the ZoomBrowser EX Browser Display Area for showing 4 Click the View menu ...

Страница 26: ... EX Click the File menu select Add Image Library and select the folder The selected folder will appear in the ZoomBrowser EX Tree View as a new library Refreshing the Contents of a Library If you have used another program such as the Windows Explorer utility or Adobe Photoshop LE to move or edit images registered with ZoomBrowser EX you should select the library click the View menu and select Refr...

Страница 27: ...eck the image to make sure it can be deleted and click Delete The image will be erased Erasing Images by Folder 1 Click the background frame of the target folder and the Delete button A confirmation dialog will display 2 Check the images to make sure they can be deleted and click Delete The images and the folder will be erased Tree View Delete Button Click images singly to erase them Click on the ...

Страница 28: ...ter display see Showing Images in a Slide Show p 21 1 Open the Camera Window pp 11 14 2 Click the Slide DPOF button The Edit Slide DPOF window will display 3 Click Slide Show on the window s upper left The camera images will display on the left side Images registered in the selected slide show will display on the right side Slide Shows 1 to 3 correspond to the numbers of the slide shows that can b...

Страница 29: ... window s upper left 4 Select the print type from among the Standard Print Index Print or Both options Standard Set the number of copies of the images you wish to print in the column below the thumbnails Index A check mark will appear below the thumbnails selected for printing 5 Click the Save to Camera button The print order settings will be saved to the CF card in the camera 6 Click the Exit but...

Страница 30: ...he image size and quality and follow the on screen messages to complete the procedures 4 Click the Finish button When you click the Finish button your e mail program will start and open a new message with the image file attached Input your message a subject the recipient s address and send the message Some e mail programs or operating systems may not support the auto start function In that case te...

Страница 31: ...refer to the PhotoStitch Help file for more details Follow the instructions to merge the images Stitch Assist mode images have a green stitch mark Click the stitch mark to start PhotoStitch and merge them Images Shot in Stitch Assist Mode PhotoStitch automatically arranges images shot with the Stitch Assist mode of Canon digital cameras in the correct order and orientation making it easy to merge ...

Страница 32: ...o update the thumbnail in ZoomBrowser EX Adobe PhotoDeluxe Home Edition 1 Confirm that Adobe PhotoDeluxe Home Edition has been installed 2 Select an image from the Browser Display Area of ZoomBrowser EX 3 Click the Edit menu and select Edit Image using Adobe PhotoshopDeluxe Home Edition Please refer to the Adobe PhotoDeluxe Home Edition Help file and electronic guide Getting Started pdf for instru...

Страница 33: ...location please return to the ZoomBrowser EX window click the View menu and select Refresh Current Library to update the thumbnail in ZoomBrowser EX Editing Movies ArcSoft VideoImpression 1 Confirm that ArcSoft VideoImpression has been installed 2 Click the Start menu and select Programs ArcSoft Camera Suite and VideoImpression ArcSoft VideoImpression will start 3 Click the New button add a movie ...

Страница 34: ...PhotoRecord Window Drag the images to change the layout Slide this tab to the left to shrink the image right to expand it Click this to display Help Click this to switch between auto and manual layout mode Click this to stop importing images Click these buttons to select a layout pattern for each page Click this to display the Print dialog Click this to set the album type paper size and orientatio...

Страница 35: ...sy to create beautiful albums 1 To save an album click the PhotoRecord File menu and select Save As 2 Input a name and click Save Image Resizing and Rotating Modes Add a title to the page Click the arrow6and select Edit Title from the pop up menu Add a caption to an image Right click an image and select Edit Caption from the pop up menu Change the text box format Right click a text box and select ...

Страница 36: ...BJ printer that supports Canon Perforated Paper media Canon Perforated Paper has perforations at the preset dimensions allowing you to print at the specified size and simply tear along the perforated lines to produce an image with the appearance of a finished photo print Please consult the BJ Solution Disk User s Guide for more details Printing from PhotoRecord from Windows NT 4 0 Windows 2000 If ...

Страница 37: ... the number of images that can be saved to the computer or the camera s CF card Displays the location in which files are saved p 36 Control Buttons These buttons control the basic RemoteCapture functions p 34 Displays the image information Allows you to add comments to images Image View Displays the image selected in the Thumbnail View Displays the distribution of brightness data How to Start Remo...

Страница 38: ...re will start timer shooting capturing an image after the specified delay Printing a Thumbnail Index Sheet Thumbnails you select in the Thumbnail View can be printed in order on a single index sheet by clicking the File menu and selecting Print Index Since the file name and shooting date and time can be printed with each image index sheets serve as a convenient record of and reference for your ima...

Страница 39: ...mera will not be able to shoot at the specified interval if it is shorter than the time required to send the image and save it on the computer If the camera is set for mirror lockup shooting the shutter will activate approximately two seconds after the release button is clicked in RemoteCapture Supported by the EOS D30 only Setting Basic Shooting Settings in RemoteCapture The camera s shooting set...

Страница 40: ... will be named Capture_00001 jpg and successive images will have higher numbers Sets the folder in which the image file is saved Selects a drive on the computer Changing the Save Location and Other Preferences The Preferences dialog can be opened by clicking the RemoteCapture File menu and selecting Preferences This dialog can be used to change the save location and settings ...

Страница 41: ...cessed irrevocably by retouching software to change the attributes which reduces the image quality Please note that ZoomBrowser EX or the TWAIN Driver are required to load RAW images onto a computer Converting RAW Images without Adjusting the Quality 1 Select a RAW image from the Browser Display Area of ZoomBrowser EX 2 Click the File menu and select Convert RAW Images The image is converted and s...

Страница 42: ...is image format can be used in several application programs such as Adobe Photoshop LE Formats other than TIFF 16 bits channel all save the image using 8 bits per RGB channel Click this and a white point of the image in the Preview Area to set it as the value for the white balance Preview Area Resets the image quality settings to the state in which the image was shot Displays the image in the Prev...

Страница 43: ...er icon on the desktop followed by the ArcSoft folder and Setup exe icon Follow the on screen instructions to install the program Starting the Software Connecting the Camera to a USB Port 1 Connect the camera to the computer s USB port Refer to Where to Find Instructions for Attaching Your Camera to a Computer p ii for connection instructions 2 Set the camera to the mode for communicating with a c...

Страница 44: ... to a Serial Interface 1 Attach the camera to the computer with the serial cable Refer to Where to Find Instructions for Attaching Your Camera to a Computer p ii for connection instructions 2 Set the camera to the mode for communicating with a computer 3 Click the Start menu and select Programs ArcSoft Camera Suite and PhotoImpression ArcSoft PhotoImpression will start 4 Click the Get Photo button...

Страница 45: ... You must input the software serial number to install Adobe Photoshop LE It can be found on the CD ROM case Starting the Software Connecting the Camera to a USB Port 1 Connect the camera to the computer s USB port Refer to Where to Find Instructions for Attaching Your Camera to a Computer p ii for connection instructions 2 Set the camera to the mode for communicating with a computer After a moment...

Страница 46: ...ropriate If several models are listed select the one that corresponds to your camera 5 Click the File menu and select Import and TWAIN_32 The TWAIN Driver will start Connecting the Camera to a Serial Interface 1 Attach the camera to the computer with the serial cable Refer to Where to Find Instructions for Attaching Your Camera to a Computer p ii for connection instructions 2 Set the camera to the...

Страница 47: ...onnect the camera to the computer s USB port Refer to Where to Find Instructions for Attaching Your Camera to a Computer p ii for connection instructions 2 Set the camera to the mode for communicating with a computer After a moment an event dialog will allow you to select an application program to start 3 Select PhotoDeluxe Home Edition and click OK Adobe PhotoDeluxe Home Edition will start and op...

Страница 48: ...uctions for Attaching Your Camera to a Computer p ii for connection instructions 2 Set the camera to the mode for communicating with a computer 3 Start Adobe PhotoDeluxe Home Edition 4 Click Get Fix Photo at the upper left of the window 5 Click Get Photo from the icons that display and select Cameras 6 Click the 1 Camera tab In the Camera Models option confirm that Canon Digital Camera RS 232C is ...

Страница 49: ...s Display Style Buttons Help Button Thumbnail Display Area Image thumbnails display here when the camera is connected Main Buttons These buttons control the main commands such as those for loading images and exiting the TWAIN driver Preferences Button Displays and changes the image transmission settings p 51 Set RAW Param Button Sets the image quality settings for RAW images p 49 ...

Страница 50: ...rmat to save the images Input a file name and change the file location and format settings as required Downloading Images Directly from a CF Card 1 Double click the TWAIN Driver s My Computer button The My Computer dialog will open 2 Select the folder containing the images and click OK The CF card images will display in the Thumbnail Display Area 3 Select the images you wish to download and click ...

Страница 51: ...lect the icon of your camera which will appear in the left portion of Windows Explorer The camera images will show as thumbnails in the right portion 3 Copy the image files to the computer s hard drive using standard Windows Explorer techniques Using the File Dialog 1 Connect the camera to the computer s USB port and start an image editing application such as ArcSoft PhotoImpression or Adobe Photo...

Страница 52: ...n the TWAIN Driver window The Camera Settings dialog will display 2 Click the Parameters button The Parameter Settings dialog will display 3 Click Add Set 4 Set each parameter 5 Click Apply to Camera The settings will be applied to the camera Parameter Settings Dialog Sets the various parameters Loads the contents of a parameter set saved to the computer s hard disk Click here first to add a new p...

Страница 53: ...ed in the camera and must be further processed irrevocably by retouching software to change the attributes which reduces the image quality Please note that ZoomBrowser EX or the TWAIN Driver are required to load RAW images onto a computer Converting RAW Images without Adjusting the Quality 1 Select a RAW image from the Thumbnail Display Area of the TWAIN Driver window 2 Click the Acquire button Th...

Страница 54: ...ting RAW images with Windows Me installing WIA driver RAW images can be converted with the following procedures Converting a RAW Image on a Camera s CF Card 1 Select the RAW image in the Windows Explorer 2 Right click the mouse and select Preview to start the RAW image utility 3 Set the file format and save the image to the computer Converting a RAW Image on the Computer s Hard Drive 1 Double clic...

Страница 55: ...plays the image in the Preview Area at full size Parameter setting selections are reflected in the preview image Placing a check here applies linear processing to the contrast sharpness and color saturation and allows the images to be edited with photo retouching software such as Adobe Photoshop The Linear option is only enabled when TIFF 16 bits channel is selected as the file format Selecting an...

Страница 56: ... problems above are OK first uninstall the USB driver with the procedures below before reinstalling it according to the instructions in the Installing the USB Driver section p 9 Refer to the Installing and uninstalling the WIA driver to uninstall the WIA driver p 10 Uninstalling the USB Driver from Windows 98 Check the USB Driver Status Does your camera model name or icon appear in the Scanners an...

Страница 57: ...n in the Control Panel 2 Click the Device Manager tab 2 Check the Other devices or Imaging Devices categories for an item corresponding to your camera model Delete it with the following procedures 1 Select the item corresponding to your camera model and click the Remove button 2 Click the OK button in the confirmation dialog 3 Click the OK button to close the System Properties dialog 3a If you ins...

Страница 58: ...ick the OK button to close the Folder Options dialog This will show all the previously hidden files 5 Find and delete the Drvdata bin and Drvidx bin files The Inf folder contains numerous files Ensure that you double check the file names before you delete any files Deleting the wrong file may in the worst case scenario result in the failure of your computer to run the Windows operating system 6 Do...

Страница 59: ... Remove button 2 Click the OK button in the confirmation dialog 3 Click the OK button to close the System Properties dialog 3a If you installed the software with the installer then connected the camera to the computer and installed the USB Driver Click the Start menu and select Programs Canon Utilities Digital Camera USB Driver and USB Driver Uninstall The installation process is complete 3b If yo...

Страница 60: ...mber following the Oem prefix e g the Oem0 and Oem0 pnf files form one set of Oem files Please note that numerous groupings of Oem files may be present in the Inf folder Do not delete the wrong files 6 Search for the Oem files for Canon digital cameras Double click a file to open it in the Windows Notepad accessory and look for Canon Digital Camera USB Setup File in the first line If you find it n...

Страница 61: ... Images 78 Editing Camera Slide Shows 78 Editing the Print Order Settings DPOF 79 Adjusting Images for Transmission by E mail 80 Merging Panoramic Images with PhotoStitch 81 Editing and Applying Special Effects to Images 82 Editing Movies 83 Shooting with RemoteCapture 84 Converting RAW Images 88 Loading Images with Plug In Compliant Application Programs 90 Using Adobe Photoshop LE 90 Using Adobe ...

Страница 62: ...tings of images on a CF card Edits slide shows for replay on the camera Connecting to a USB port automatically starts ImageBrowser and displays the camera images Sets the camera parameters Image File Management Functions Displays moves copies or deletes images stored on computer disks Allows simple editing procedures such as image color adjustments and cropping Displays all the files in a specifie...

Страница 63: ...can be merged into a 360 degree image and saved in the QuickTime VR format making it appear as if you were standing in the middle of the image looking about in all directions RemoteCapture Connecting via a USB port allows you to release the camera s shutter button from the computer The images load directly into the computer Connecting via a USB port also allows you to load images directly into the...

Страница 64: ...lete frames Adobe Photoshop LE CD ROM Adobe Photoshop LE Allows you to edit images apply special effects print and create sophisticated graphics for the web Adobe PhotoDeluxe Home Edition CD ROM Adobe PhotoDeluxe Home Edition Allows you to edit images and effortlessly create greeting cards birthday cards and calendars The retouching software bundled with cameras varies between camera models Some m...

Страница 65: ...ug In Module 3 Only compatible with the USB interface 4 Images shot with the Wide Converter Tele converter or Close up lens do not merge well in PhotoStitch 4 4 USB 1 Serial ImageBrowser Plug in Module 2 ImageBrowser ImageBrowser Plug in Module 2 ImageBrowser ImageBrowser ImageBrowser PhotoStitch RemoteCapture 3 Computer Interface Downloading Camera Images Downloading Movies RAW Image Conversion U...

Страница 66: ...ater version Not compatible with Mac OS X CPU PowerPC RAM 20 MB or more of application memory Interface USB Power Macintosh NEW G3 G4 PowerBook G3 iMac iBook Limited to genuine Apple Computer brand models with a built in USB interface iMac computers running Mac OS 8 1 require installation of the iMac Update 1 0 and iMac Firmware Update 1 0 RS 422 Printer or modem port Free Hard Disk Space Canon Ut...

Страница 67: ... Camera Solution Disk in the CD ROM drive 3 Double click the CD ROM icon and the Canon Digital Camera Installer icon The installer panel will display 4 Click Software Installation 5 Select the programs you wish to install and follow the on screen instructions to install them 6 Click the Quit button when the installation is complete and restart the computer if prompted ...

Страница 68: ...ut the software serial number to install Adobe Photoshop LE It can be found on the CD ROM case Installing from the Adobe PhotoDeluxe CD ROM For installation instructions please see the electronic guide Getting Started pdf contained in the Open Me First folder on the Adobe PhotoDeluxe CD ROM Place it in the drive and click Readme Guide and Install Guide in the window that displays Write down the se...

Страница 69: ...the camera will close the connection after an additional minute passes The power will remain on and no message will appear if the camera is powered by a household power source or its auto power off function is set to Off excluding PowerShot S10 S20 models To reopen the connection press the camera s shutter button or main switch Please see the Camera User Guide for details Starting ImageBrowser USB...

Страница 70: ...en into the PC card slot Refer to Where to Find Instructions for Attaching Your Camera to a Computer p ii for connection instructions 2 Start ImageBrowser Double click the Canon ImageBrowser icon on the desktop to start the program If the Canon ImageBrowser icon does not appear on the desktop open the Canon Utilities folder and ImageBrowser folder and double click the ImageBrowser icon 3 Double cl...

Страница 71: ...unicating with a computer 3 Start ImageBrowser Double click the Canon ImageBrowser icon on the desktop to start the program If the Canon ImageBrowser icon does not appear on the desktop open the Canon Utilities folder and ImageBrowser folder and double click the ImageBrowser icon 4 Click the Canon Camera button The camera s images will display as small thumbnail images in the ZoomBrowser EX Camera...

Страница 72: ...ettings dialog 2 Check or change the settings Input a camera owner name here up to 31 characters Click this button to synchronize with the computer s date and time settings Set the date and time Check the battery charge here Formats the CF card in the camera Except in PowerShot S10 S20 models Check the remaining memory capacity here Sets the camera parameters p 98 Supported by the EOS D30 only Set...

Страница 73: ...r View Section 2 Create a new folder in which to save the images from the camera Open the File menu and select New Folder A folder with the name Untitled will be created Click the folder and change the name as you wish 3 Select the new folder in the Explorer View Section Explorer View Section ...

Страница 74: ...er Window You can also download images to the computer by dragging them from the Camera Window and dropping them on the Browser Window or Explorer View Section To disconnect the camera click the close box at the upper left of the Camera Window The Camera Window will close Thumbnail RAW will display on RAW images The movie icon will display on movie thumbnails Browser Window Explorer View Section T...

Страница 75: ...he ImageBrowser Help file for more details on the Print window Edit the Page Title Open the Edit menu and select Edit Header Change the Layout Drag the images to change the layout Add Text Open the Edit menu and select Add Text This button displays the Print dialog This changes the default number of images printed per page Click this to rotate the selected image Click this to reset the image layou...

Страница 76: ...gory select Fixed Photo Size 3 Set the photo size and click OK Printing on Canon Perforated Paper The Canon Perforated Paper option will be selectable in the Layout Options dialog if you are using a Canon BJ printer that supports Canon Perforated Paper media Canon Perforated Paper has perforations at the preset dimensions allowing you to print at the specified size and simply tear along the perfor...

Страница 77: ...61 Displaying Images Zooming Images In and Out You can zoom images in and out by clicking the REDUCE or ENLARGE button Zooming a Single Image Double click an image in the Browser Window to display it in the Viewer Window Double click the target image Edit Panel Adjust Color Button Color brightness and contrast can be adjusted in the Adjust Color dialog Crop Button Drag the mouse cursor to select a...

Страница 78: ...tab up or down to go backward or forward in time Displaying Images in Chronological Order Select a folder choose the Display menu and select Switch to TimeTunnel All of the images in the selected folder will display in a time tunnel To return to the Browser Window choose the Display menu and select Switch to Browser View ...

Страница 79: ...Options 2 Select a play method The Slide Show Options dialog will display Set a play interval and a transition effect and click the OK button 3 Select images from the ImageBrowser Browser Window for showing 4 Click the Display menu and select Slide Show The selected images will play in order The slide show will close after the last image is displayed If the slide show is set to repeat press the Es...

Страница 80: ... in the Explorer View Section b Drag and Drop a Folder within the Explorer View Section Refreshing the Contents of the Browser Window If you have used the Macintosh Finder or another program to move or edit images that are registered with ImageBrowser you should click the Display menu and select Refresh Browser Window The file or folder will move to the item outlined in blue Explorer View Section ...

Страница 81: ...ser Window 2 Click the Send to Trash button The deleted image files and folders are moved to the Trash folder on the desktop To restore the deleted items open the desktop Trash folder and drag and drop the target files or folders to their original locations Browser Window Click the image in the Browser Window to delete a single image Explorer View Section Click on a folder in the Explorer View Sec...

Страница 82: ...tion allows you to edit slide shows played by the camera To edit slide shows shown on the computer display see Showing Images in a Slide Show p 75 1 Open the Camera Window pp 68 70 2 Click the Slide DPOF button The Edit Slide DPOF window will display 3 Click Slide Show on the window s upper left The camera images will display on the left side Images registered in the selected slide show will displ...

Страница 83: ...he window s upper left 4 Select the print type from among the Standard Print Index Print or Both options Standard Set the number of copies in the No of Standard Print Copies column of the images you wish to print Index Click for a check mark below the thumbnails selected for printing 5 Click the Save to Camera button The print order settings will be saved to the CF card in the camera 6 Click the Q...

Страница 84: ...edures 4 Click the Finish button When you click the Finish button the image will appear in the Email Images folder and your e mail program will start 5 Create a new message Drag and drop the image from the Email Images folder into the message Input your message a subject the recipient s address and send the message Some e mail programs will not start automatically Start them manually if required T...

Страница 85: ...refer to the PhotoStitch Help file for more details Images Shot in Stitch Assist Mode PhotoStitch automatically arranges images shot with the Stitch Assist mode of Canon digital cameras in the correct order and orientation making it easy to merge these images Stitch Assist mode images display in the Camera Window as shown below Please see the Camera User Guide for instructions for shooting in Stit...

Страница 86: ...otoshop Please refer to the Adobe Photoshop LE Help file and electronic guide User Guide pdf for instructions for this program 4 Edit and apply special effects to the image ImageBrowser supports the BMP JPEG PICT and TIFF file formats Click the Display menu and select Refresh to update the folder data Adobe PhotoDeluxe 1 Confirm that Adobe PhotoDeluxe has been installed 2 Select an image from the ...

Страница 87: ...which it was installed ArcSoft VideoImpression will start 3 Click the New button add a movie or still image to the storyboard a board like a film and perform the edit Please refer to the ArcSoft VideoImpression Help file for instructions for this program ImageBrowser supports the MOV and AVI file formats Movie files appear as icons in the ImageBrowser thumbnail view ...

Страница 88: ...er of images that can be saved to the computer or the camera s CF card Displays the location in which files are saved p 87 Control Buttons These buttons control the basic RemoteCapture functions p 85 Displays the image information Allows you to add comments to images Image View Displays the image selected in the Thumbnail View Displays the distribution of brightness data How to Start RemoteCapture...

Страница 89: ...t specified intervals Interval Shooting or to shoot an image after a specified delay Timer Shooting Interval Shooting You can set the number of frames and the interval at which they are shot 1 Click the File menu and select Interval Shooting The Interval Shooting dialog will display 2 Set the number of frames and interval value and click Start RemoteCapture will start interval shooting capturing t...

Страница 90: ...ll not be able to shoot at the specified interval if it is shorter than the time required to send the image and save it on the computer If the camera is set for mirror lockup shooting the shutter will activate approximately two seconds after the release button is clicked in RemoteCapture Supported by the EOS D30 only Setting Basic Shooting Settings in RemoteCapture The camera s shooting settings c...

Страница 91: ...ile prefix If the prefix is set to Capture for example the first image will be named Capture_00001 jpg and successive images will have higher numbers Changing the Save Location and Other Preferences The Preferences dialog can be opened by clicking the RemoteCapture File menu and selecting Preferences This dialog can be used to change the save location and settings ...

Страница 92: ...irrevocably by retouching software to change the attributes which reduces the image quality Please note that ImageBrowser or the Plug In Module are required to load RAW images onto a computer Converting RAW Images without Adjusting the Quality 1 Select a RAW image Select a RAW image from the Browser Window of ImageBrowser 2 Click the File menu and select Convert RAW Images The image is converted a...

Страница 93: ...ded in a multiple selection of RAW images are from the same camera before attempting to adjust the image attributes The white balance will not adjust properly if images from different cameras are mixed and the Manual white balance option is selected in the RAW Image Parameter Settings dialog or if a white portion of the image is selected in the preview area How to Change the File Format 1 Click th...

Страница 94: ... LE icon Follow the on screen instructions to continue with the installation You must input the software serial number to install Adobe Photoshop LE It can be found on the CD ROM case Copying Plug In Module to the Plug Ins Folder 1 Open the Canon Utilities and Digital Camera Plug In folders 2 Copy the Canon Digital Camera Plug In file to the Adobe Photoshop LE Import Export folder Open the Adobe P...

Страница 95: ...dialog can be opened by choosing the Apple menu and selecting Control Panels and Canon USB Camera p 66 Connecting via a CF Card Reader or PC Card Slot 1 Place the CF card into the CF card reader or into the PC card adapter and then into the PC card slot Refer to Where to Find Instructions for Attaching Your Camera to a Computer p ii for connection instructions 2 Start Adobe Photoshop LE Serial Int...

Страница 96: ...he images will appear in the Adobe Photoshop LE window 5 Click the Quit button to close Plug In Module To save the loaded images click the Adobe Photoshop File menu and select Save Input a file name and change the file location and format settings if necessary Downloading Images Directly from a CF Card 1 Click the Adobe Photoshop LE File menu and select Import and Canon Digital Camera Plug In Plug...

Страница 97: ...gs p 68 Communication Settings Button Sets the settings for communicating with the camera Display Style Button Changes the shape of the thumbnail display area Image Information Button Displays image details RAW Button Adjusts the quality at which RAW images are converted p 99 Main Buttons Use them to perform the main commands such as acquiring images and closing the program Thumbnail Display Area ...

Страница 98: ...n process Copying Plug In Module to the Plug Ins Folder 1 Open the Canon Utilities and Digital Camera Plug In folders 2 Copy the Canon Digital Camera Plug In file to the Adobe PhotoDeluxe Import Export folder Starting Adobe PhotoDeluxe Connecting the Camera to a USB Port 1 Connect the camera to the computer s USB port Refer to Where to Find Instructions for Attaching Your Camera to a Computer p ii...

Страница 99: ... dialog can be opened by choosing the Apple menu and selecting Control Panels and Canon USB Camera p 66 Connecting via a CF Card Reader or PC Card Slot 1 Place the CF card into the CF card reader or into the PC card adapter and then into the PC card slot Refer to Where to Find Instructions for Attaching Your Camera to a Computer p ii for connection instructions 2 Start Adobe PhotoDeluxe Serial Int...

Страница 100: ...utton Serial Interface Select the port and baud rate settings and click the Set button p 102 2 Click the Camera button The images from the camera will display in the Thumbnail Display Area 3 Select the images you wish to download and click the Acquire button 4 Input the file name in untitled box and click the Save button The thumbnail will appear in the My Photo window at the lower right of the Ad...

Страница 101: ...gs p 68 Communication Settings Button Sets the settings for communicating with the camera Display Style Button Changes the shape of the thumbnail display area Image Information Button Displays image details RAW Button Adjusts the quality at which RAW images are converted p 99 Main Buttons Use them to perform the main commands such as acquiring images and closing the program Thumbnail Display Area ...

Страница 102: ...e Camera Settings dialog will display 2 Click the Parameters button The Parameter Settings dialog will display 3 Click Add Set Click Add Set and select the number of the set you wish to add 4 Set each parameter 5 Click Apply to Camera The settings will be applied to the camera Parameter Settings Dialog Applies the current parameter set to the camera Sets the various parameters Loads the contents o...

Страница 103: ...ust the attributes of the original data you can achieve the effects you wish while maintaining high image quality In contrast image data recorded in the RGB TIFF and other standard uncompressed file formats is irrevocably processed in the camera and must be further processed irrevocably by retouching software to change the attributes which reduces the image quality Please note that ImageBrowser or...

Страница 104: ... the changes are also reflected in the remaining images in the selection 4 Click the Acquire button The RAW image will be converted according to the specified parameters and the data will be sent to Adobe Photoshop LE or Adobe PhotoDeluxe at 8 bits per RGB channel To learn how to change the file transmission format please see How to Change the File Transmission Format on the next page The image qu...

Страница 105: ... the image in the Preview Area to set it as the value for the white balance Preview Area Resets the image quality settings to the state in which the image was shot Displays the image in the Preview Area at full size Placing a check here applies linear processing to the contrast sharpness and color saturation and allows the images to be edited with photo retouching software such as Adobe Photoshop ...

Страница 106: ...munication settings appropriate If the settings for the port to which the camera is connected are incorrect the Communication Settings dialog will display If these remedies do not work please contact the nearest Canon Customer Support Help Desk Windows Platform Select USB or RS 232C Select the port to which the interface cable is connected If you are unsure to which serial port you are connected c...

Страница 107: ...ax 91 411 76 65 E mail helpdesk1 btlink net Canon Norge as Tlf 22 62 93 21 Faks 22 62 06 15 E mail helpdesk canon no Finland Canon OY Puhelin 010 54420 Fax 010 544 4571 Help Desk 0600 0 22606 14 80 mk min pvm Help Desk 0600 0 22666 enint 40mk puhelu pvm Sähköposti helpdesk canon fi Canon Schweiz AG Tel 01 835 6161 Fax 01 835 6526 Hotline 0900 57 55 20 Canon Svenska AB Tel 08 744 85 00 Fax 08 744 6...

Страница 108: ...olders with language names Double click the appropriate language folder and the Support pdf file within it To read PDF files Adobe Acrobat Reader must already be installed on your computer An installer for this program is on the Adobe Photoshop LE CD ROM within each language folder in a folder labeled Acroread ArcSoft Customer Support North America 46601 Fremont Blvd Fremont CA 94538 Tel 510 440 9...

Отзывы: