Aligning the Print Head Manually
Try aligning the print head manually after automatic print head alignment if printing results are not as
expected, as when printed ruled lines are misaligned.
Note
• For details on automatic print head alignment, see
.
What you will need: three sheets of A4 or Letter-sized plain paper
1.
Check that printer is turned on.
2.
Load three sheets of A4 or Letter-sized plain paper in cassette.
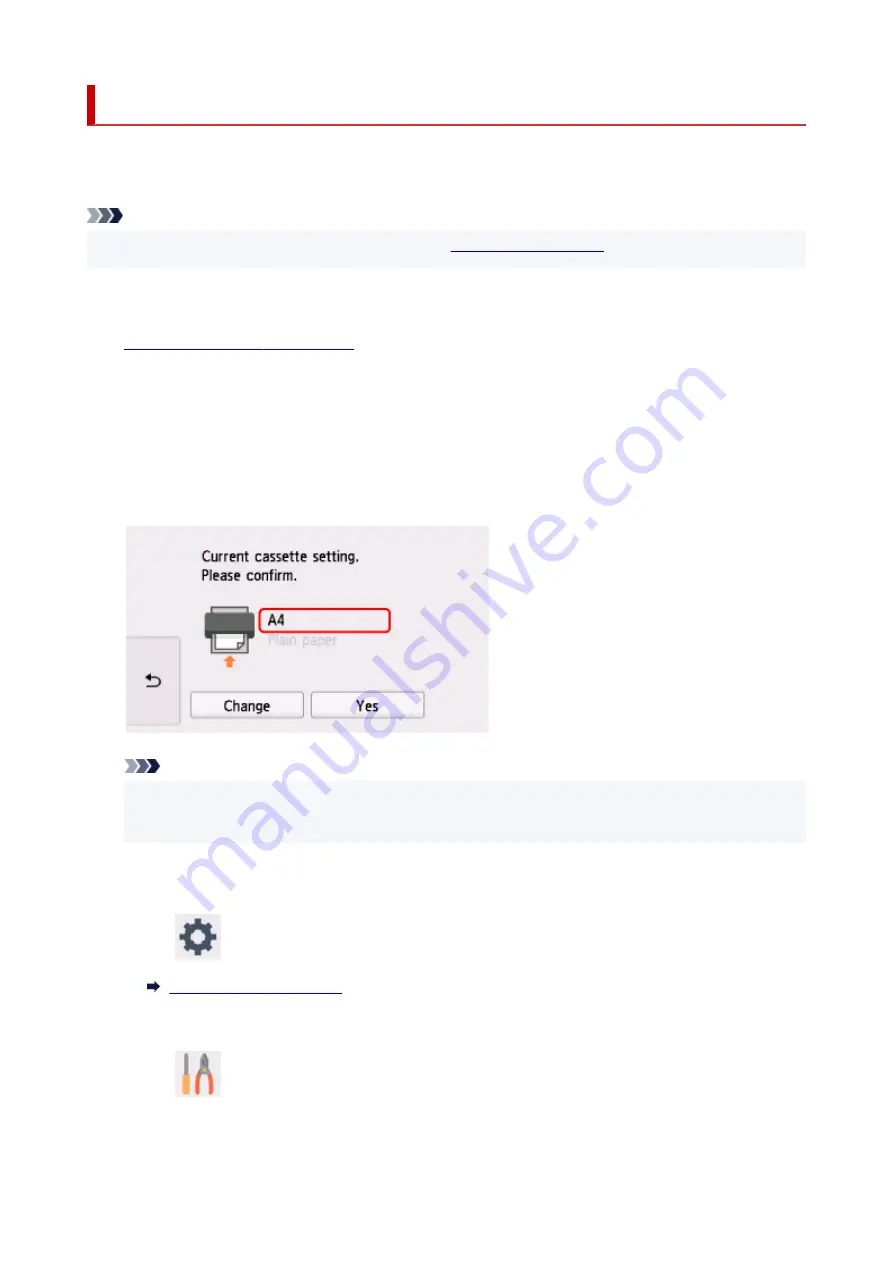
After inserting the cassette into the printer, the paper setting confirmation screen appears on the touch
screen.
If the page size shown on the touch screen is
A4
or
Letter
, select
Yes
.
If not, select
Change
and change the page size to
A4
or
Letter
.
Note
• Be sure to load paper in the cassette. If you load paper on the rear tray, the print head alignment
sheet is not printed.
3.
Open operation panel and pull out paper output tray.
4.
Select
(Setup) on HOME screen.
The setup menu screen will appear.
5.
Select
Maintenance
.
The
Maintenance
screen will appear.
151
Содержание PIXMA TS9550
Страница 1: ...TS9500 series Online Manual English...
Страница 9: ...2110 426 4103 429 5011 430 5012 431 5100 432 5200 433 5B00 434 6000 435 C000 436...
Страница 36: ...13 Select Print 36...
Страница 76: ...4 If message saying setup is completed appears select OK For macOS Redo setup from the web page 76...
Страница 102: ...Placing a Printable Disc Before Placing a Printable Disc Placing a Printable Disc Removing a Printable Disc 102...
Страница 117: ...117...
Страница 123: ...Inserting the Memory Card Before Inserting the Memory Card Inserting the Memory Card Removing the Memory Card 123...
Страница 129: ...Replacing Ink Tanks Replacing Ink Tanks Checking Ink Status on the Touch Screen Ink Tips 129...
Страница 140: ...Adjusting Print Head Position 140...
Страница 169: ...Safety Safety Precautions Regulatory Information WEEE EU EEA 169...
Страница 191: ...Main Components and Their Use Main Components Power Supply Using the Operation Panel 191...
Страница 192: ...Main Components Front View Rear View Inside View Operation Panel 192...
Страница 211: ...Changing Printer Settings from Your Computer macOS Managing the Printer Power Changing the Printer Operation Mode 211...
Страница 216: ...For more on setting items on the operation panel Setting Items on Operation Panel 216...
Страница 227: ...Language selection Changes the language for the messages and menus on the touch screen 227...
Страница 241: ...Information about Paper Supported Media Types Paper Load Limit Unsupported Media Types Handling Paper 241...
Страница 262: ...Printing Using Canon Application Software Easy PhotoPrint Editor Guide 262...
Страница 263: ...Printing Using a Web Service Using PIXMA MAXIFY Cloud Link Printing with Google Cloud Print 263...
Страница 278: ...Other device settings 278...
Страница 279: ...Disc Label Printing Copying Label Side of Disc Basic Printing Photo from Memory Card onto Disc Label 279...
Страница 301: ...Note To set the applications to integrate with see Settings Dialog 301...
Страница 303: ...Scanning Multiple Documents at One Time from the ADF Auto Document Feeder 303...
Страница 305: ...Scanning Tips Positioning Originals Scanning from Computer 305...
Страница 310: ...The item type may not be detected automatically In that case specify the item type in IJ Scan Utility and scan 310...
Страница 311: ...Scanning Using Smartphone Tablet Using PIXMA MAXIFY Cloud Link Printing Scanning with Wireless Direct 311...
Страница 317: ...Network Communication Problems Cannot Find Printer on Network Network Connection Problems Other Network Problems 317...
Страница 350: ...Other Network Problems Checking Network Information Restoring to Factory Defaults 350...
Страница 355: ...Problems while Printing Scanning from Smartphone Tablet Cannot Print Scan from Smartphone Tablet 355...
Страница 381: ...Scanning Problems macOS Scanning Problems 381...
Страница 382: ...Scanning Problems Scanner Does Not Work Scanner Driver Does Not Start 382...
Страница 396: ...Errors and Messages An Error Occurs Message Support Code Appears 396...
Страница 415: ...If the measures above do not solve the problem contact your nearest Canon service center to request a repair 415...


