background image

7

ENGLISH

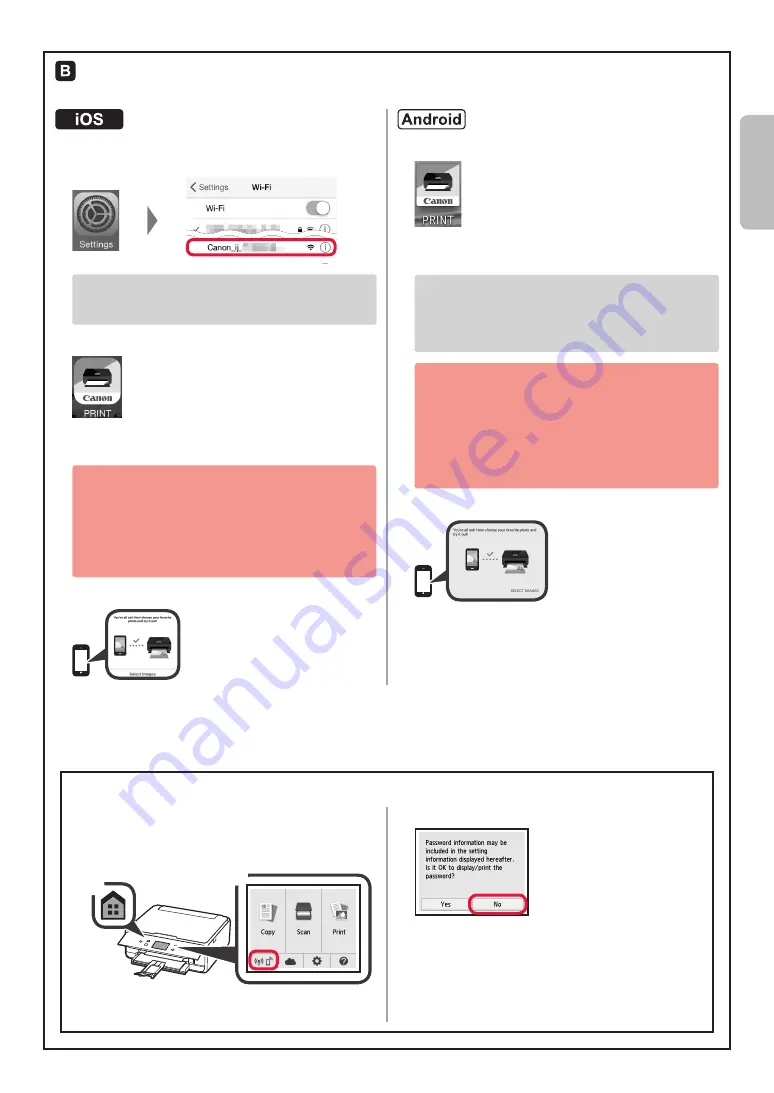
Procedures below vary depending on iOS or Android. Select your operating system and proceed to its 

procedure.

Tap 

Settings

 on your smartphone's home screen, 

and tap 

Canon_ij_XXXX

 in the Wi-Fi settings.

If 

Canon_ij_XXXX

 does not appear on the list, 

see "Preparation for Printer" below to operate the 

printer, and then repeat step 

a

.

Tap the installed application software.

Follow the on-screen instructions to register the 

printer.

Follow the on-screen instructions to proceed 

with the setup.

If you select 

Auto Select Conn. Method 

(recommended)

 on the connection method 

selecting screen, the appropriate connection 

method is selected automatically depending on 

your environment.

Make sure that the following screen appears.

Tap the installed application software.

Follow the on-screen instructions to register the 

printer.

If a message saying "

Printer is not registered. 

Perform printer setup?

" does not appear, see 

"Preparation for Printer" below to operate the 

printer, and then wait for a while until the message 

appears.

Follow the on-screen instructions to proceed 

with the setup.

•  The appropriate connection method is selected 

depending on your environment.

•  If two printer names appear on the 

Register 

Printer

 screen as shown below, select A. 

A) TS6100 series (xxx.xxx.xxx.xxx) 

B) Direct-xxxx-TS6100series

Make sure that the following screen appears.

The connection with your smartphone is now complete. You can print from your 

smartphone.

To print photos, load photo paper. Proceed to "Loading Photo Paper" on page 8.

Press the 

HOME

 button on the printer.

Select the icon on the lower left of the HOME 

screen.

a

b

If the following screen appears, select 

No

.

Select 

LAN settings

 > 

Wireless LAN

 > 

Wireless 

LAN setup

 > 

Easy wireless connect

 in this order.

Select 

Yes

.

Return to the operation of your smartphone.

Preparation for Printer

Содержание PIXMA TS6100 series

Страница 1: ...Gu a de inicio Lea primero Informaci n de seguridad e informaci n importante ap ndice Getting Started Read Safety and Important Information addendum first...

Страница 2: ...xi n con el ordenador y con el tel fono inteligente o la tableta p gina 4 C mo sujetar la impresora Pel culas explicativas Installing the Printer page 1 Connecting with Computer and Smartphone Tablet...

Страница 3: ...rinter with your fingers and open the scanning unit cover b Remove the orange tape b a 3 LIFT UP the scanning unit cover and then close it 4 Connect the power cord diagonally from the back Back Do not...

Страница 4: ...or of the ink tank may be wrong or you may have installed an ink tank such as one with a different model number that is not supported by this printer Either install an ink tank for the correct color o...

Страница 5: ...4 Attach the cassette cover and insert the cassette The following figure shows the state after the cassette is inserted Side 5 Pull out the paper output tray 6 If the following screen appears select...

Страница 6: ...s now complete 6 B Connecting to Computer Windows Mac OS You need a connection setup for each computer Proceed with the setup from step 1 for each computer 1 Start the setup file for either method or...

Страница 7: ...on on the right side of the window If the contents of the CD ROM appear double click Msetup4 exe 4 Proceed to step d When using Windows 7 b When the AutoPlay screen appears click Run Msetup4 exe c If...

Страница 8: ...tract with your service provider Up to 5 devices can be connected to the printer via wireless LAN connection directly 2 Check the display on the printer The screen turns off when no operation is made...

Страница 9: ...ster the printer If a message saying Printer is not registered Perform printer setup does not appear see Preparation for Printer below to operate the printer and then wait for a while until the messag...

Страница 10: ...utput tray 1 Make sure the printer is turned on 2 Load several sheets of photo paper 3 Select Copy on the HOME screen 4 Drag the screen and select Photo copy 5 Read the messages and select OK 6 Follow...

Страница 11: ...bos lados de la impresora y abra la cubierta unidad de escaneado b Retire la cinta naranja b a 3 LEVANTE la cubierta unidad de escaneado y luego ci rrela 4 Conecte el cable de alimentaci n en sentido...

Страница 12: ...dep sito de tinta por ejemplo con un n mero de modelo distinto que no sea compatible con esta impresora Instale un dep sito de tinta para el color correcto o utilice el dep sito de tinta proporcionado...

Страница 13: ...serte el cassette La figura siguiente muestra el estado tras insertar el cassette Lateral 5 Extraiga la bandeja de salida del papel 6 Si aparece la siguiente pantalla seleccione OK 7 Aseg rese de que...

Страница 14: ...zado la configuraci n 6 B Conexi n con el ordenador Windows Mac OS Necesitar configurar una conexi n para cada ordenador Complete la configuraci n desde el paso 1 para cada ordenador 1 Inicie el archi...

Страница 15: ...a ventana Si se muestra el contenido del CD ROM haga doble clic en Msetup4 exe 4 Contin e en el paso d Si utiliza Windows 7 b Cuando se muestre la pantalla Reproducci n autom tica AutoPlay haga clic e...

Страница 16: ...n su proveedor de servicios Se pueden conectar un m ximo de 5 dispositivos directamente a la impresora mediante la conexi n LAN inal mbrica 2 Compruebe la pantalla en la impresora Cuando el equipo no...

Страница 17: ...da Realizar preparaci n de impresora Printer is not registered Perform printer setup consulte la secci n Preparaci n para la impresora a continuaci n para hacer funcionar la impresora y espere un mome...

Страница 18: ...se de que la impresora est encendida 2 Cargue varias p ginas de papel fotogr fico 3 Seleccione Copiar Copy en la pantalla INICIO 4 Arrastre la pantalla y seleccione Copiar foto Photo copy 5 Lea los me...

Страница 19: ...Videoteca sobre procedimientos How To Video Library RMC Regulatory Model Code K10457...

Страница 20: ...N INC 2017 XXXXXXXX Windows 10 Acceso al Manual en l nea Desde el sitio web Desde el acceso directo del escritorio Access Online Manual From Web site From desktop shortcut PRINTED IN XXXXXXXX QT6 1979...

Отзывы: