


6
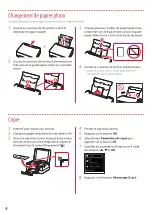
Loading Photo Paper
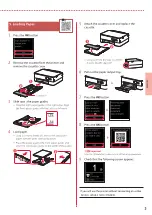
1
Open the rear tray cover and extend the paper
support.
2
Open the feed slot cover and slide the right-
hand side paper guide to the far right.
a
b
3
Load several sheets of photo paper with the
print side facing up and slide the side paper
guide against the edge of the paper stack.
a
b
4
Close the feed slot cover.
•
Follow the on-screen instructions to set information
for the loaded paper.
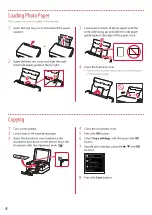
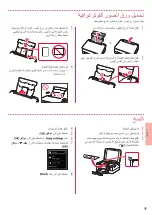
Copying
Photo paper can only be loaded in the rear tray.
1
Turn on the printer.
2
Load Letter or A4 sized plain paper.
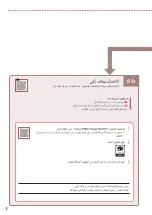
3
Open the document cover and place the
document face down on the platen. Align the
document with the alignment mark ( ).
4
Close the document cover.
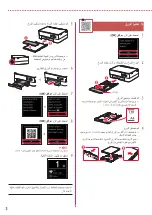
5
Press the
OK
button.
6
Select
Copy settings
, and then press the
OK
button.
7
Specify print settings using the
{
,
}
and
OK
buttons.
8
Press the
Start
button.
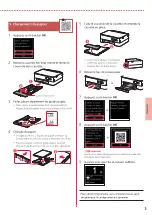
Содержание PIXMA TS5340a
Страница 3: ...1 1 FINE Windows 2 1 2 b a 3 a b 3 1 2 ON 3 OK 4 OK QR 5 OK...
Страница 4: ...2 4 FINE 1 FINE 2 3 FINE a b 4 FINE FINE FINE 5 6 2 5 FINE 7 a b...
Страница 5: ...3 5 1 OK 2 a b 3 Letter A4 4 2 Letter A4 a b 5 a b 6 7 OK 8 OK QR 9...
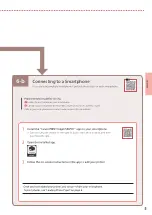
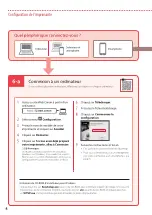
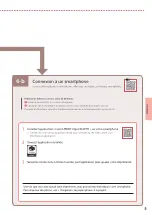
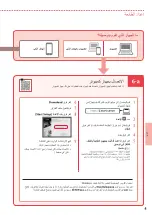
Страница 7: ...6 b 5 1 Canon PRINT Inkjet SELPHY Canon QR 2 3 a Wi Fi b 6 b 6...
Страница 8: ...6 1 2 a b 3 a b 4 1 2 Letter A4 3 4 5 OK 6 Copy settings OK 7 OK 8 Start...
Страница 9: ...1 1 FINE Windows 2 1 2 b a 3 a b 3 1 2 ON 3 OK 4 OK QR 5 OK...
Страница 10: ...2 4 FINE 1 FINE 2 3 FINE a b 4 FINE FINE FINE 5 6 2 5 FINE 7 a b...
Страница 11: ...3 5 1 OK 2 a b 3 Letter A4 4 2 Letter A4 a b 5 a b 6 7 OK 8 OK QR 9...
Страница 13: ...6 b 5 1 Canon PRINT Inkjet SELPHY QR Canon 2 3 a Wi Fi b 6 b 6...
Страница 14: ...6 1 2 a b 3 a b 4 1 2 Letter A4 3 4 5 OK 6 Copy settings OK 7 OK 8 Start...
Страница 27: ...6 1 1 2 2 a b 3 3 a b 4 4 1 1 2 2 A4 Letter 3 3 4 4 5 5 OK 6 6 OK Copy settings 7 7 OK 8 8 Start...
Страница 28: ...6 b 5 1 1 Canon PRINT Inkjet SELPHY Canon 2 2 3 3 Wi Fi a b 6 b 6...
Страница 30: ...3 5 1 1 OK 2 2 a b 3 3 Letter A4 4 4 A4 Letter 2 a b 5 5 a b 6 6 7 7 OK 8 8 OK 9 9...
Страница 31: ...2 FINE 4 1 1 FINE 2 2 3 3 FINE a b 4 4 FINE FINE FINE 5 5 6 6 FINE 5 2 7 7 a b...
Страница 32: ...1 1 Windows FINE 2 1 1 2 2 b a 3 3 a b 3 1 1 2 2 ON 3 3 OK 4 4 OK 5 5 OK...
Страница 33: ...RMC Regulatory Model Code K10500 RMC Regulatory Model Code K10564...


