Canon PIXMA MX7600 Скачать руководство пользователя страница 128

124

Routine Maintenance

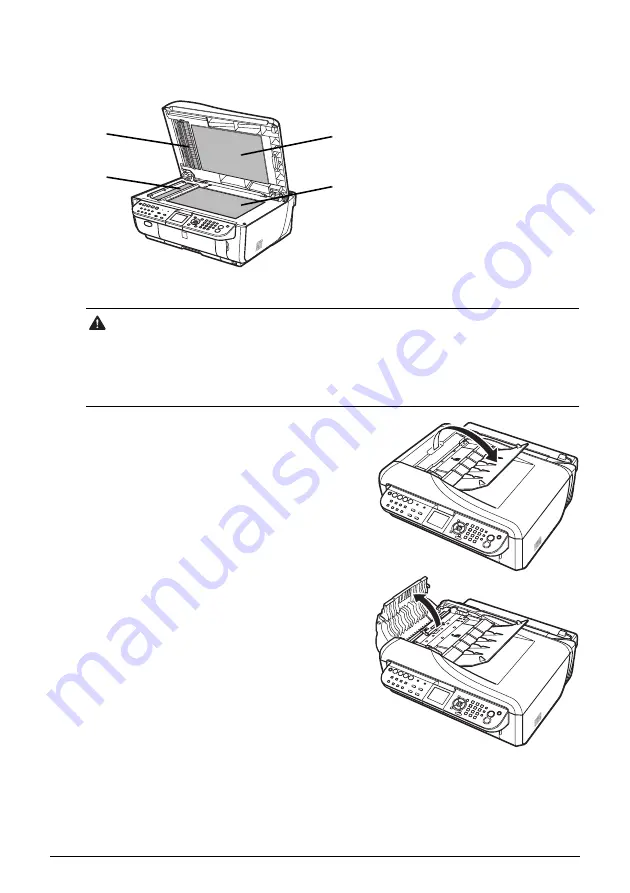
With a clean, soft, lint-free cloth, wipe the Platen Glass (B), the inner side of the Document 
Cover (white sheet) (A), the glass of the ADF (C), and the inner side of the ADF (white area) (D) 
gently. Make sure not to leave any residue, especially on the Platen Glass.

„

Cleaning the ADF

1

Open the Document Tray.

2

Open the Document Feeder Cover.

Caution

z

Be sure to turn off the power and unplug the power cord before cleaning the machine.

z

The power cannot be turned off while the machine is sending or receiving a fax, or when there 

are unsent faxes stored in the machine’s memory.

z

The machine cannot receive faxes when the power is turned off.

z

If you unplug the power cord, all the documents stored in memory are deleted. Send or print 

necessary documents before unplugging the power cord.

(D)

(A)

(B)

(C)

Содержание PIXMA MX7600

Страница 1: ...rt Guide Office All In One series QT5 0080 V01 XXXXXXXX CANON INC 2008 PRINTED IN THAILAND The following ink tanks are compatible with this product For information on product specifications please visit our website at www usa canon com ...

Страница 2: ... 1 800 385 2155 or visit our Web site at www canonesp com CarePAK must be purchased during your product s warranty period For more information and updated program specifics please visit our web site at www canontechsupport com Support program specifics are subject to change without notice Ordering Information For additional supplies use the following descriptions and order numbers Description Orde...

Страница 3: ...Office All In One Quick Start Guide series ...

Страница 4: ...instruction manual of your application The steps described in this manual are in Windows Vista operating system Ultimate Edition hereafter referred to as Windows Vista and Mac OS X v 10 4 x All information regarding non Canon products was compiled from publicly available information No representation is made regarding the accuracy thereof As an ENERGY STAR Partner Canon Inc has determined that thi...

Страница 5: ...Colors Are Incorrect 113 Printing the Nozzle Check Pattern 114 Examining the Nozzle Check Pattern 115 Print Head Cleaning 116 Print Head Deep Cleaning 117 Aligning the Print Head 118 Performing Ink Quality Maintenance Manually 122 Cleaning Your Machine 123 Troubleshooting 131 An Error Message Is Displayed on the LCD 133 LCD Cannot Be Seen At All or Display is Difficult to See 139 An Unintended Lan...

Страница 6: ...that if ignored could result in death or serious personal injury caused by incorrect operation of the equipment These must be observed for safe operation Caution Instructions that if ignored could result in personal injury or material damage caused by incorrect operation of the equipment These must be observed for safe operation Important Instructions that must be observed for safe operation ...

Страница 7: ...y stretch or excessively bend or twist the power cord Do not place heavy objects on the power cord Never plug the machine into a power socket that is shared with other equipment extension lead cord 2 or 3 way adapter etc Never use the machine if the power cord is bundled or knotted If you detect smoke unusual smells or strange noises around the machine immediately unplug the machine at the power s...

Страница 8: ...ents inside the machine Caution You may cause injury or damage the machine if you ignore any of these safety precautions Choosing a location Do not install the machine in a location that is unstable or subject to excessive vibration Since this machine weighs approximately 36 6 lbs 16 6 kg it is recommended that two people move or relocate the machine Attempting to do so alone could result in dropp...

Страница 9: ...ns nitrates In case ink is accidentally licked or swallowed rinse out mouth or give one or two glasses of water to drink If irritation or discomfort occurs obtain medical advice immediately In case ink gets in contact with eyes rinse with water immediately In case ink gets in contact with skin wash with soap and water immediately If irritation to eyes or skin persists obtain medical advice immedia...

Страница 10: ...blurred or colors may run together By coating the surface of plain paper with clear ink before actual printing begins the clear ink coating prevents absorption of other inks to enhance colors and prevent smudging when printing on both sides of the paper In addition paper curling which often occurs when printing on plain paper is reduced Note that since plain paper is coated with the clear ink afte...

Страница 11: ... Memory lamp Flashes when sending or receiving faxes and lights when there are documents stored in the machine s memory 7 Alarm lamp Lights or flashes orange when an error such as paper out or ink out occurs 8 LCD Liquid Crystal Display Displays messages menu selections and the operational status 9 Menu button Displays the menu screen 10 Settings button Configures the page size media type and imag...

Страница 12: ...olls through menu selections and increases decreases setting values such as the number of copies You can use these buttons when and are displayed on the LCD Also the button cancels the entered character and the button enters a space between characters when entering characters 20 OK button Finalizes your selection for the menu or setting item This button is also used to dismiss the error message an...

Страница 13: ...n on the LCD press the Menu button To select the menu item use the and buttons to select the item then press the OK button Menu Screens Note z You can return the LCD to the previous screen by pressing the Back button z For details on each item see Menu Screens on page 9 Note z You can display the Maintenance screen or Device settings screen in the copy mode fax mode memory card mode or scan mode T...

Страница 14: ...age 99 Activity report Telephone number list User s data list Memory list TEL number registration page 68 One touch speed dial Coded speed dial Group dial Maintenance settings page 11 This setting is only available in US and Canada Scan mode The Maintenance settings screen will be displayed by pressing the Menu button For details on the scan mode see Scanning Images on page 46 Memory card mode Car...

Страница 15: ... cleaning page 126 Device settings screen FAX settings User settings TX settings RX settings Print settings Prevent paper abrasion Extended copy amount Two sided output setting Auto ink qual maintenance PictBridge settings page 52 LAN settings Reset LAN settings Display LAN details IPv4 IPv6 setting WSD setting Other settings Read write attribute Volume control Adjust contrast Slide show setting Q...

Страница 16: ... procedure to change the settings taking the steps to specify the page size for the memory card mode to 4 x 6 101 x 152 as an example 1 Display the settings screen 1 Press the Settings button The Memory card settings screen is displayed 2 Select the settings tab 1 Use the or button to select the settings tab Example Select Tab 1 here 3 Select the setting item 1 Use the or button to select the sett...

Страница 17: ...ttings in the copy mode see Setting Items on page 33 z For the settings in the memory card mode see Setting Items on page 41 z For the settings in the fax mode see Changing the Print Settings on page 93 You can set the image quality and scan contrast of the fax to send by pressing the FAX Quality button For details see Before Sending Faxes on page 78 z For the settings when printing directly from ...

Страница 18: ...to your computer or a compatible device z The MP Drivers are installed Note If the Alarm lamp lights up or flashes orange and an error message is displayed on the LCD see An Error Message Is Displayed on the LCD on page 133 Important When you turn off the machine Follow the procedure below to turn off the machine 1 Confirm that all the lamps on the Operation Panel have gone out 2 Unplug the power ...

Страница 19: ...e minutes You cannot change the wait time before the LCD goes out Note When you want to restore the display perform any operation such as copying faxing or scanning or press any button except for the ON OFF button When you press the ON OFF button while the machine is in Screen saver mode the machine turns off ...

Страница 20: ...ents for duplex copying and scanning 2 on 1 copy and 4 on 1 copy Quantity 1 sheet z A4 or Letter size Max 35 sheets 20 lb 75 gsm paper up to 0 20 inches 5 mm in height z Legal size Max 30 sheets 20 lb 75 gsm paper up to 0 16 inches 4 mm in height z Other sizes 1 sheet Weight 13 to 24 lb 50 to 90 gsm Note z Make sure any glue ink correction fluid or the like on the original document is completely d...

Страница 21: ...Do not place any objects weighing more than 4 4 lb 2 0 kg on the Platen Glass z Do not press or put weight on the original with pressure exceeding 4 4 lb 2 0 kg Doing so may cause the scanner to malfunction or the Platen Glass to break Note z The machine cannot scan the shaded area in the figure on the right A 0 04 inches 1 mm z For details about making copies see Copying on page 32 z For details ...

Страница 22: ...hen setting two or more photographs at the same time place them at least 0 4 inches 10 mm apart from each other C 0 4 inches 10 mm 3 Gently close the Document Cover Note z If photographs are placed closer they may be scanned as a single image For details refer to the Scanning Guide on screen manual z For details about scanning images see Scanning Images on page 46 B B C C C C ...

Страница 23: ... document with the side to be copied scanned or faxed facing up in the ADF 4 Adjust the Document Guides to match the document width Note Set a document on the Platen Glass if you want to scan it at optimum quality Note Ensure that the edge of the document stack is in line with the Paper Size Mark A imprinted on the Document Tray A ...

Страница 24: ...Media Canon recommends that you use Canon genuine media to ensure optimal print quality Note Do not place any objects in front of the machine z Photo Quality Media z Matte Photo Paper z Photo Paper Plus Glossy z Photo Paper Plus Glossy II z Photo Paper Plus Semi gloss z Fine Art Paper Photo Rag z Media Suited for Business Documents z Super White Paper ...

Страница 25: ...g to avoid blurs and discoloration 5 When loading paper in stacks the print side may be marked as it is fed in or sheets may be stuck to one another causing them not to be fed properly In this case load one sheet at a time 6 This paper cannot be fed from the Cassette Load in the Rear Tray Media Type Model 1 Paper Load Limit Paper Output Tray Load Limit Media Type Rear Tray Cassette Machine Setting...

Страница 26: ...ine to jam or malfunction Additionally when printing on A5 or smaller sized paper do not use paper thinner than a postcard including plain paper or notepad paper cut to a small size z Folded curled or wrinkled paper z Damp paper z Paper that is too thin weighing less than 17 lb 64 gsm z Paper that is too thick plain paper except for Canon genuine paper weighing more than 28 lb 105 gsm z Picture po...

Страница 27: ...ccording to how you are using them z When You Print on Photo Paper Load photo paper or any type of paper other than plain paper in the Rear Tray When any media type other than plain paper is selected for printing paper is automatically fed from the Rear Tray A Rear Tray Load photo paper or any type of paper other than plain paper Note For details on loading paper see Loading Paper in the Rear Tray...

Страница 28: ...s selected for printing paper is automatically fed from the Cassette Only A4 B5 A5 Letter or Legal sized paper can be loaded in the Cassette A Cassette Load plain paper Note z For details on loading paper see Loading Paper in the Cassette on page 27 z Load A4 Letter Legal sized plain paper when receiving faxes A ...

Страница 29: ...opy paper or Canon s Super White Paper When printing on both sides we recommend Canon s Super White Paper Double Sided Paper size Standard sizes A4 B5 A5 Letter and Legal Non standard sizes 5 5 x 8 27 inches to 8 5 x 14 00 inches 139 7 x 210 0 mm to 215 9 x 355 6 mm Paper weight 17 to 28 lb 64 to 105 gsm non Canon genuine plain paper z 100 recycled paper can be used z If you cut plain paper to 4 x...

Страница 30: ...d the paper source will switch to the Rear Tray Note Make sure that the Cover Guide is set upright when you load paper in the Rear Tray Important Do not slide the Paper Guide too hard The paper may not be fed properly Note z When using the Operation Panel on the machine to perform copying or printing operation without using a computer select the size and type of the loaded paper in Page size and M...

Страница 31: ...om the machine 3 Load the paper with the print side facing DOWN 1 Load the paper in the Cassette with the print side facing DOWN and the leading edge to the far side 2 Align the paper stack against the right side of the Cassette 3 Slide the Paper Guides to fit to the loaded paper stack Important When loading Legal sized paper pull the tab B towards you to unlock and fully extend the Cassette Do no...

Страница 32: ... the Cassette the Cassette will protrude slightly Note z When using the Operation Panel on the machine to perform copying or printing operation without using a computer select the size and type of the loaded paper in Page size and Media type in each mode For details on settings in each mode see Setting Items on page 33 for the copy mode and Setting Items on page 41 for the memory card mode z When ...

Страница 33: ...ope is puffed up or curled use a pen to press the envelope flat and sharpen the crease Press the envelope flat working from the middle to the edge The above illustrations show a side view of the leading edge of the envelope Important z Load envelopes in the Rear Tray z You need to print from the computer to print on envelopes z Do not use the following envelopes Envelopes with a double flap or sti...

Страница 34: ...the size for envelopes In Windows select DL Env or Comm Env 10 in Page Size In Macintosh select DL Envelope or 10 Envelope in Paper Size 3 Select Landscape in Orientation Note Make sure that the Cover Guide is set upright when you load envelopes in the Rear Tray Important Do not slide the Paper Guide too hard The envelopes may not be fed properly Important Be sure to set the printer driver setting...

Страница 35: ...the paper to be jammed Note Load 4 x 6 101 6 x 152 4 mm 5 x 7 127 0 x 177 8 mm and Credit card sized papers in the Rear Tray Note Make sure that the Cover Guide is set upright when you load paper in the Rear Tray Note z When using the Operation Panel on the machine to perform copying or printing operation without using a computer select the size and type of the loaded paper in Page size and Media ...

Страница 36: ... or in the ADF B See Handling the Original Document on page 16 5 Specify the copy settings 1 Use the or button or the Numeric buttons to specify the number of copies 2 Use the or button to adjust the intensity 3 Confirm the page size media type and other settings The paper source will switch to the Cassette when Media type is set to Plain paper or to the Rear Tray when any other type of media is s...

Страница 37: ...nlarging a Copy in Making Copies of the User s Guide on screen manual z Tab 2 You can specify whether to enable the automatic intensity adjustment Note z To change the tab use the or button to select the tab and use the or button z Depending on the functions some setting items cannot be specified in combination z The settings of the page size media type and print quality are retained even if the m...

Страница 38: ...ected Auto will be displayed in the intensity slide bar on the copy screen Important You can change the intensity by pressing the or button even when Auto intensity ON is selected To enable the auto intensity adjustment again move the cursor to the center of the slide bar Note The automatic intensity adjustment is not available when copying originals from the ADF ...

Страница 39: ...Image repeat Copying Thick Originals Such as Books Frame erase Copying Two Pages to Fit onto a Single Page 2 on 1 copy Copying Four Pages to Fit onto a Single Page 4 on 1 copy Making Multiple Copies of an Entire Document Collated copy Copying with Fade Restoration Fade restored copy You can obtain color corrected printouts when copying documents that have faded over time Copying onto Both Sides of...

Страница 40: ... directly inserted into the Card Slot z SD Secure Digital memory card z SDHC memory card z MultiMediaCard z Compact Flash CF Card Supports Type I II 3 3 V z Microdrive z Memory Stick z Memory Stick PRO Memory cards that can be inserted in the Card Slot using the adapter Important If one of the following memory cards is inserted without an adapter you may not be able to remove the card Be sure to a...

Страница 41: ...hine On and Off on page 14 2 Attach a card adapter if your memory card requires one 3 Open the Card Slot Cover Note Compatible image types are limited to JPEG and TIFF only Other image or movie types such as RAW images cannot be printed Caution When a memory card is inserted into the Card Slot the Access lamp A is lit When the Access lamp is flashing the machine is accessing to the memory card In ...

Страница 42: ...e Digital memory card z SDHC memory card z miniSD Card 1 z microSD Card 2 z Memory Stick z Memory Stick PRO z Memory Stick Duo 1 z Memory Stick PRO Duo 1 z MultiMediaCard z RS MMC 1 Caution z The memory card will stick out of the Card Slot but do not force it into the slot any further Doing so damages the machine and the memory card z Make sure that the memory card is correctly oriented before ins...

Страница 43: ... the print menu 1 Use the or button to select Display photo then press the OK button 4 Select the photo to print 1 Use the or button to display a photo to print 2 Press the Color button Important The Access lamp flashes while the machine is reading or writing data from to the memory card Removing the memory card or turning off the machine while the Access lamp is flashing may damage the data saved...

Страница 44: ...the number of copies for each photo Search When there are a lot of photos saved on the memory card displays and prints only photos shot on the specified date or within the specified range of dates Trimming Edits images displayed on the LCD by cropping them Layout print Prints photos you pasted in the specified layout Print all photos Prints all photos saved on the memory card Photo Index print Pri...

Страница 45: ...e original 4 Border Select bordered or borderless print 5 Date file no Select whether to print the shooting date file no or not Note z To change the tab use the or button to select the tab and use the or button z Depending on the functions some setting items cannot be specified in combination z The print settings are retained even if the machine is turned off Note It is not possible to print both ...

Страница 46: ...reen and blue more lively 9 Photo optimizer pro Automatically optimizes brightness and tone of a photo 10 Noise reduction Reduces the noise on blue areas like the sky as well as on black areas 11 Face brightener Brightens a darkened face on the photo taken against the light 12 Image optimizer Corrects and smooths the jagged contours for printing 13 Brightness Adjusts brightness 14 Contrast Adjusts...

Страница 47: ...n press the OK button 5 Use the or button to select Photo Index Sheet print then press the OK button 6 Use the or button to select a range of images to include in the Photo Index Sheet then press the OK button 7 Press the Color button to start printing the Photo Index Sheet The Photo Index Sheet s will be printed 8 Fill in the appropriate circles in the Photo Index Sheet 9 Load the type of paper y...

Страница 48: ...te will be displayed When any media type other than plain paper is selected a message indicating that paper will be fed from the Rear Tray will be displayed Click OK 6 Click Print or OK Note When printing photographs taken by your digital camera you can perform Borderless Printing in easy steps using Easy PhotoPrint EX Easy PhotoPrint EX is provided on the Setup CD ROM Easy PhotoPrint EX supports ...

Страница 49: ...Select the page size of the loaded paper in Paper Size 6 Click OK 7 Select Print on the application software s File menu 8 Select Quality Media in the pop up menu 9 Specify the required settings When plain paper is selected the paper source will switch to the Cassette When any media type other than plain paper is selected the paper source will switch to the Rear Tray 10 Click Print Note For detail...

Страница 50: ...he Machine on page 47 z If You Want to Edit or Print the Scanned Images MP Navigator EX enables you to edit the scanned images such as optimizing or trimming You can also start application software from MP Navigator EX to edit or print the scanned images For detailed operations of MP Navigator EX refer to the Scanning Guide on screen manual z If You Want to Scan Originals with Advanced Settings Sc...

Страница 51: ...n to select Local USB or a LAN connected computer then press the OK button 6 Use the or button to select the document type then press the OK button 7 Use the or button to select the scan operation then press the OK button 8 Press the Color or Black button Important Make sure that the document has been loaded correctly according to the document type that you have selected For details refer to Scann...

Страница 52: ...a Format This machine prints images taken with a DCF Design rule for Camera File system ver 1 0 2 0 compatible digital camera Exif ver 2 2 2 21 compliant as well as PNG files Printing Photographs Directly from a PictBridge Compliant Device To connect a PictBridge compliant device to this machine use a USB cable recommended by the device s manufacturer 1 Prepare for printing 1 Turn on the machine S...

Страница 53: ...t PictBridge Print Settings on page 50 You can make settings using the menu on the LCD of your PictBridge compliant device Select the size and type of paper that you loaded in the machine If your PictBridge compliant device does not have setting menu change the setting from the machine For details see Setting on the Machine on page 52 4 Start printing from your PictBridge compliant device Note Dep...

Страница 54: ... borderless printing will be disabled even when Layout is set to Borderless 5 You may not be able to purchase some Canon genuine papers depending on the country or region of purchase 6 When printing on 8 x 10 203 2 x 254 0 mm SG 201 paper select 8 x 10 20 x 25 cm for Paper size and Default for Paper type Select the media type in the PictBridge settings screen on the machine as follows Photo Paper ...

Страница 55: ...A4 or 8 5 x 11 Letter is selected for Paper size 4 DPOF Digital Print Order Format is a standard format to record the specified information regarding images such as which image or number of copies to print z Date File No Print Setting You can specify whether the date and or file number will be printed z Image Optimize Setting You can select the optimization method to obtain high print quality When...

Страница 56: ...3 Press the or button to select Maintenance settings then press the OK button 4 Press the or button to select Device settings then press the OK button 5 Press the or button to select PictBridge settings then press the OK button 6 Use the or button to select the tab 7 Use the or button to select the item to set 8 Use the or button to change the setting 9 Repeat steps 6 to 8 to specify the setting 1...

Страница 57: ... the media type when printing directly from a PictBridge compliant device Paper type 3 Print quality Select the print quality when printing directly from a PictBridge compliant device 4 Border Select bordered or borderless print Layout 5 Auto image fix 2 Automatically corrects the brightness contrast and color hue of a photo Image optimize 6 Red eye correction Corrects red eyes in portraits caused...

Страница 58: ...Telephone or answering machine Important If the Power Disconnects Unexpectedly If there is a power failure or if you accidentally unplug the power cord all documents stored in memory will be lost User data and speed dialing settings are retained If the power disconnects the following will apply z You will not be able to send or receive faxes or make copies z When you are connecting the telephone o...

Страница 59: ...ine you will need to purchase a B T adapter to connect as follows Connect the external device line to the B T adapter then connect the B T adapter to the jack Important Do not connect the machine and external devices in parallel to the same telephone line using a distribution adapter B The machine may not operate properly Note Before connecting a telephone or answering machine remove the Telephone...

Страница 60: ... xDSL A Digital Subscriber Line B Splitter C xDSL modem splitter may be built in to the modem D Computer z Connecting to an ISDN Line For details on ISDN Integrated Service Digital Network connection and settings refer to the manuals supplied with your terminal adapter or dial up router Important Do not branch the telephone line before the splitter wall side And also do not connect splitters in pa...

Страница 61: ...he Device settings screen 1 Use the or button to select Maintenance settings then press the OK button The Maintenance settings screen is displayed 2 Use the or button to select Device settings then press the OK button The Device settings screen is displayed 3 Display the User settings screen 1 Use the or button to select FAX settings then press the OK button The FAX settings screen is displayed No...

Страница 62: ...elephone line type screen 1 Use the or button to select Telephone line type then press the OK button The Telephone line type screen is displayed 5 Select the telephone line type 1 Use the or button to select the telephone line type then press the OK button Rotary pulse Suitable for pulse dialing Touch tone Suitable for tone dialing ...

Страница 63: ... one touch or coded speed dial E Page number Note z When sending a fax in black white you can set the sender information to print inside or outside the image area Refer to TTI position in Device Settings of the User s Guide on screen manual z For color sending the sender information is printed inside the print area and the recipient s name is not printed z You can select FAX or TEL to be displayed...

Страница 64: ...the character you want to enter appears z To enter a character that is assigned to the same button as the previous entry e g to enter A after C Press the button then press the same Numeric button z To enter a space Press the button twice In number mode press the button once z To delete a character Press the button Button Uppercase letter mode Lowercase letter mode Number mode 1 1 2 ABCÅÄÁÀÃÂÆÇ abc...

Страница 65: ... 2 Use the or button to select User settings then press the OK button The User settings screen is displayed 4 Display the Date time setting screen 1 Use the or button to select Date time setting then press the OK button The Date time setting screen is displayed Note z Three date display formats are available YYYY MM DD MM DD YYYY and DD MM YYYY For details on the date format settings refer to Date...

Страница 66: ... 1 Use the or button to select Maintenance settings then press the OK button The Maintenance settings screen is displayed 2 Use the or button to select Device settings then press the OK button The Device settings screen is displayed 3 Display the User settings screen 1 Use the or button to select FAX settings then press the OK button The FAX settings screen is displayed 2 Use the or button to sele...

Страница 67: ...n is displayed 5 Enable summer time 1 Use the or button to select ON to enable summer time then press the OK button To disable summer time select OFF 6 Set the date and time that summer time starts 1 Use the or button to select Start date time then press the OK button 2 Use the or button to select the month when summer time starts then press the OK button ...

Страница 68: ... when summer time starts then press the OK button 5 Use the Numeric buttons to enter the time in 24 hour format when summer time starts then press the OK button Precede single digits with a zero The summer time start date time is set 7 Set the date and time that summer time ends 1 Use the or button to select End date time then press the OK button ...

Страница 69: ... summer time ends then press the OK button 4 Use the or button to select the day of the week when summer time ends then press the OK button 5 Use the Numeric buttons to enter the time in 24 hour format when summer time ends then press the OK button Precede single digits with a zero The summer time end date time is set 8 Press the FAX button ...

Страница 70: ...lay the User settings screen 1 Use the or button to select FAX settings then press the OK button The FAX settings screen is displayed 2 Use the or button to select User settings then press the OK button The User settings screen is displayed 4 Display the Unit name TEL registr screen 1 Use the or button to select Unit name TEL registr then press the OK button The Unit name TEL registr screen is dis...

Страница 71: ...setting The display returns to the User settings screen Note For details on how to enter or delete characters see Guidelines for Entering Numbers Letters and Symbols on page 60 Note z For details on how to enter or delete numbers see Guidelines for Entering Numbers Letters and Symbols on page 60 z You can print the User s data list to confirm the sender information you have registered See Printing...

Страница 72: ...ton to select it You can register up to 100 00 to 99 destinations z Group Dial Register two or more registered one touch or coded speed dial numbers for group dial You can send the same document to all members in that group Registering One Touch Speed Dial Before you can use one touch speed dial you need to register the recipients numbers 1 Display the FAX menu screen 1 Press the FAX button then p...

Страница 73: ...ou can also select a button by pressing the One Touch Speed Dial button 01 to 08 Note z For details on how to enter or delete characters or numbers see Guidelines for Entering Numbers Letters and Symbols on page 60 z Press the Redial Pause button to enter a pause z Press the Tone button to enter a tone Note z To register another recipient s name and number to the one touch speed dial repeat the pr...

Страница 74: ... the OK button The TEL number registration screen is displayed 3 Display the Coded speed dial screen 1 Use the or button to select Coded speed dial then press the OK button The Coded speed dial screen is displayed 4 Register the recipient s name and number to a coded speed dial code 1 Use the Numeric buttons A or the or button B to select an unoccupied speed dial code 00 to 99 then press the OK bu...

Страница 75: ...on screen 1 Use the or button to select TEL number registration then press the OK button The TEL number registration screen is displayed 3 Display the Group dial screen 1 Use the or button to select Group dial then press the OK button Note z For details on how to enter or delete characters or numbers see Guidelines for Entering Numbers Letters and Symbols on page 60 z Press the Redial Pause button...

Страница 76: ...ed one touch speed dial 01 to 08 then press the OK button z To register a group under a coded speed dial code 1 Use the Numeric buttons A or the or button B to enter an unoccupied coded speed dial code 00 to 99 then press the OK button 5 Register the group s name 1 Use the Numeric buttons to enter a name for the group max 16 characters including spaces then press the OK or button Note You can regi...

Страница 77: ...creen is displayed 3 Select the speed dial to change 1 Use the or button to select One touch speed dial Coded speed dial or Group dial to change Note z For details on how to enter or delete characters see Guidelines for Entering Numbers Letters and Symbols on page 60 z Groups will appear on the Group dial list by the names you enter in this step Note z To continue registering one touch speed dial ...

Страница 78: ...tons to enter the new name max 16 characters including spaces then press the OK button 2 Use the button to delete the number registered enter the new fax telephone number max 60 digits 40 digits for Korea including spaces then press the OK button Deleting Registered Information To delete information registered for the speed dial follow the procedure below 1 Display the FAX menu screen 1 Press the ...

Страница 79: ...Numeric buttons or the or button to select the coded speed dial code to which the group dial to delete is registered then press the OK button 5 Use the or button to select Delete then press the OK button 6 Use the or button to select Yes then press the OK button Printing a List of the Registered Destinations You can print a list of the recipients registered for the speed dial You may want to keep ...

Страница 80: ...you selected One touch speed dial or Coded speed dial 1 Use the or button to select whether to print the list in numerical order of the speed dial buttons or codes or in alphabetical order of the registered names z If you selected Group dial 1 Use the or button to select Yes then press the OK button Yes Prints the list in alphabetical order of the registered names No Prints the list in numerical o...

Страница 81: ...ck button If you have only one page of original go to step 3 2 Load the next page on the Platen Glass and press the Color or Black button In the same way repeat this procedure until all originals are loaded 3 Press the OK button to send the fax z Using the ADF 1 Press the Color or Black button The machine starts sending Important A PBX Private Branch Exchange is an on site telephone switchboard If...

Страница 82: ...AX resolution 3 Use the or button to select the image quality 4 Press the OK button z Adjusting the Density Scan contrast Contrast is the degree of difference between light and dark Increasing the scan contrast thickens the whole fax image or light penciled texts and such can be thickened 1 Press the FAX button then press the FAX Quality button 2 Use the or button to select Scan contrast 3 Use the...

Страница 83: ...s on page 78 z Sending a Fax using the Numeric Buttons 1 Use the Numeric buttons to dial the recipient s number 2 Press the Color button for color sending or the Black button for black white sending z When the document was loaded on the Platen Glass 1 When the following message is displayed load the next page on the Platen Glass If you have only one page of original to scan press the OK button to ...

Страница 84: ...black white Note z To cancel sending a fax press the Stop Reset button To cancel sending a fax while it is being sent press the Stop Reset button then follow the instructions on the LCD z If documents remain in the ADF after pressing the Stop Reset button during scanning Document in ADF Press OK to discharge document appears on the LCD Press the OK button so that the remaining document is automati...

Страница 85: ...s the Stop Reset button then follow the instructions on the LCD z If documents remain in the ADF after pressing the Stop Reset button during scanning Document in ADF Press OK to discharge document appears on the LCD Press the OK button so that the remaining document is automatically fed out Note If you hear a high pitched signal instead of the recipient s voice go to step 5 Important Color sending...

Страница 86: ...tinations z Coded speed dial up to 100 destinations z Regular dial using the Numeric buttons or redial one destination You can enter the destinations in any order but be sure to press the OK button after your entry with the Numeric buttons Important Color sending requires that the recipient s fax machine supports color faxing Note z To cancel sending a fax press the Stop Reset button To cancel sen...

Страница 87: ...n for black white sending See Sending a Fax using the Numeric Buttons on page 79 Note To review the numbers you have entered use the or button Important Color sending is available only when the recipient s fax machine supports color faxing Note z To cancel sequential broadcasting press the Stop Reset button To cancel sending a fax while it is being sent press the Stop Reset button then follow the ...

Страница 88: ...ettings under the FAX settings screen For details on the automatic redialing settings refer to Auto redial in Device Settings of the User s Guide on screen manual z Manual Redialing To redial the fax number last dialed with the Numeric buttons press the Redial Pause button Note z The range of values you can set for the automatic redialing settings varies depending on the country or region of purch...

Страница 89: ...ric buttons to press the number by following the message 5 Press the Hook button to finish using the service z Using the Telephone Connecting to the Machine 1 Press the FAX button 2 Lift the handset of the telephone 3 Use the telephone to dial the number of the information service 4 When the recorded message for the information service answers use the telephone to press the number by following the...

Страница 90: ...d faxes using the fax driver from any application software that has a printing function For details refer to the FAX Driver Guide on screen manual Sending Receiving Using ECM This machine is set to send receive faxes in ECM Error Correction Mode If the recipient s fax machine is compatible with ECM ECM automatically corrects errors and resend the fax Note When you talk to him her lift the handset ...

Страница 91: ...n you receive mainly voice calls and sometimes faxes Select TEL priority mode z When you subscribe to a ring pattern detection service provided by your telephone company and you want to receive a fax only if the machine detects the pattern for fax Select DRPD 1 or Network switch 2 1 This setting is only available in US and Canada 2 This setting may not be available depending on the country or regi...

Страница 92: ...If you want it to ring immediately set to TEL priority mode z The following settings can be modified to control how your machine handles incoming calls Specify the FAX priority mode settings in RX settings under FAX settings Refer to FAX priority mode in Device Settings of the User s Guide on screen manual The time the machine takes to determine whether a call is a fax or a voice call The time the...

Страница 93: ...necting to the machine and dial 25 the remote reception ID to receive faxes remote reception The remote reception is only available for the touch tone dial See Remote Receiving on page 94 The remote reception can be disabled Refer to Remote RX in Device Settings of the User s Guide on screen manual Note z The machine can be set to receive faxes automatically after the telephone rings for a specifi...

Страница 94: ...ch This setting may not be available depending on the country or region of purchase A Incoming call The machine judges whether call is voice or fax by the ringing pattern In the meanwhile the telephone rings B Voice call The telephone continues to ring Pick up the handset to answer the call C Fax The fax is received automatically when the machine detects the fax ring pattern Note If you selected D...

Страница 95: ...the Receive mode settings screen 1 Use the or button to select Receive mode settings then press the OK button The Receive mode settings screen is displayed 3 Select a receive mode 1 Use the or button to select a receive mode then press the OK button 2 Press the Back button to exit the FAX menu screen The selected receive mode A will be displayed on the LCD A ...

Страница 96: ...utton The FAX menu screen is displayed 2 Display the Device settings screen 1 Use the or button to select Maintenance settings then press the OK button The Maintenance settings screen is displayed 2 Use the or button to select Device settings then press the OK button The Device settings screen is displayed 3 Display the RX settings screen 1 Use the or button to select FAX settings then press the O...

Страница 97: ...or DRPD US and Canada only is selected as the receive mode you can specify the number of rings for fax calls in Incoming ring in RX settings under FAX settings Refer to Incoming ring in Device Settings of the User s Guide on screen manual Important If no paper is loaded in a specified paper source or paper has run out during printing the received faxes are stored in memory then There is no paper L...

Страница 98: ...ine that can carry out remote control operations the security code for this function may be the same as the remote reception ID In this case change the remote reception ID in Remote RX ID in Remote RX in RX settings under FAX settings Refer to Remote RX in Device Settings of the User s Guide on screen manual Remote reception can be disabled Refer to Remote RX in Device Settings of the User s Guide...

Страница 99: ...cuments the memory list or print a specified document 1 Load paper See Loading Printing Paper on page 20 2 Display the FAX menu screen 1 Press the FAX button then press the Menu button The FAX menu screen is displayed 3 Display the Memory reference screen 1 Use the or button to select Memory reference then press the OK button The Memory reference screen is displayed Important If you unplug the pow...

Страница 100: ...me of transaction and fax telephone number B Transaction number TX RX NO z A transaction number from 0001 to 4999 indicates a document being sent z A transaction number from 5001 to 9999 indicates a document being received 3 Use the or button to select Yes to print the first page only or No to print all pages of the document then press the OK button Note The date and time of transaction and fax te...

Страница 101: ...FAX menu screen is displayed 2 Display the Memory reference screen 1 Use the or button to select Memory reference then press the OK button The Memory reference screen is displayed 3 Use the or button to select Delete specified doc then press the OK button Note z If there are no documents stored in memory There is no document in memory is displayed and the machine returns to the previous screen z I...

Страница 102: ...r TX RX NO of the document you want to delete then press the OK button 5 Use the or button to select Yes then press the OK button 6 Press the Back button or the Stop Reset button to close the screen To delete other documents repeat the procedure from steps 4 to 5 ...

Страница 103: ...and names registered for coded speed dial See Printing a List of the Registered Destinations on page 75 Group dial list Lists the numbers and names registered for group dial See Printing a List of the Registered Destinations on page 75 User s data list Lists the current settings of your machine and the registered sender information See User s Data List on page 100 Memory list Lists the documents c...

Страница 104: ... printed User s Data List The User s data list enables you to confirm the current settings of your machine as well as the registered sender information See Registering Sender Information on page 59 z Printing the User s Data List 1 Load paper See Loading Printing Paper on page 20 2 Display the FAX menu screen 1 Press the FAX button then press the Menu button The FAX menu screen is displayed 3 Disp...

Страница 105: ... send a fax on page 101 No Cause Action 001 Document in ADF Redo operation after checking document in ADF and pressing OK The document is jammed in the ADF Remove the document page jammed in the ADF When the error is cleared redo the operation See Document Jams in the ADF on page 153 003 Document is too long You attempted to send a document longer than 15 75 inches 400 mm You can send the document...

Страница 106: ... full Resend the document after deleting contents in memory See Deleting a Document in Memory on page 97 085 TRY AGAIN IN BLACK WHITE The recipient s fax machine is not color compatible Resend the document in black white STOP The Stop Reset button was pressed to cancel sending the document Resend it if necessary Note z For details on the RX report setting refer to RX report in Device Settings of t...

Страница 107: ...a few seconds A Confirm whether any symbols are displayed here An error message may be displayed on the LCD during printing Note z Be sure to install the ink tanks in the correct order indicated by the label on the Print Head Holder The machine will not print if an ink tank is installed in the incorrect position z For information on the compatible ink tanks see the back cover of this guide z If pr...

Страница 108: ...set properly or the function for detecting the remaining ink level is disabled If the ink tank is not set properly press the mark on the ink tank until the tank clicks into place If it does not click into place make sure that the orange protective cap has been removed from the bottom of the ink tank See Prepare the replacement tank on page 107 If the function for detecting the remaining ink level ...

Страница 109: ...priate action Note z The ink status information is also displayed on the screen that appears during printing z Clear ink is used only when printing on plain paper Therefore it is possible to print on photo paper or any type of paper other than plain paper loaded in the Rear Tray even if clear ink has run out Refer to When Replacing the Clear Ink Tank on page 109 and replace the clear ink tank If y...

Страница 110: ...achine and leave it out in the open This will cause the ink tank to dry out and the machine may not operate properly when it is reinstalled To maintain optimal printing quality use an ink tank within six months of first use z Color ink may be consumed even when printing a black and white document or when black and white printing is specified Color ink is also consumed in Print Head Cleaning and Pr...

Страница 111: ...tant z Do not touch the electrical contacts C on the ink tank Doing so can cause the machine to malfunction or become unable to print z Do not shake ink tanks as this may cause the ink to leak out and stain your hands or the surrounding area z Do not squeeze the side of ink tanks as this may cause the ink to leak out and stain your clothes and hands z Be careful not to stain your clothes and hands...

Страница 112: ...stall all the ink tanks to print The machine cannot be used unless all the ink tanks are installed Caution z Be sure to hold the Scanning Unit Printer Cover firmly using both hands and be careful not to get your fingers caught z Do not hold the LCD Note z If the error message is still displayed after the Scanning Unit Printer Cover is closed see An Error Message Is Displayed on the LCD on page 133...

Страница 113: ...u when it is time to replace the tank z Replace an empty tank with a new one Inserting a partially used ink tank may cause a malfunction Furthermore with such a tank the machine will not be able to inform you when to replace the tank properly z Once a clear ink tank has been installed do not remove it from the machine and leave it out in the open This will cause the ink tank to dry out and the mac...

Страница 114: ...card empty ink tanks according to the local laws and regulations regarding disposal of consumables Important z Do not shake ink tanks as this may cause the ink to leak out and stain your hands or the surrounding area z Do not squeeze the side of the clear ink tank as this may cause the ink to leak out and stain your clothes and hands z Though the clear ink is clear liquid be careful not to stain y...

Страница 115: ... Unit Printer Cover Printing cannot be done until the machine is ready This takes about 2 minutes Caution z Be sure to hold the Scanning Unit Printer Cover firmly using both hands and be careful not to get your fingers caught z Do not hold the LCD Note If the error message is still displayed after the Scanning Unit Printer Cover is closed see An Error Message Is Displayed on the LCD on page 133 B ...

Страница 116: ...ballpoint pen or marker becomes dry and unusable if it is not used for a long period of time the print head nozzles become blocked by dried ink Periodically printing or cleaning the Print Head can prevent this blockage If you have not used the machine for a long time print out the nozzle check pattern to check the print head condition before printing See Printing the Nozzle Check Pattern on page 1...

Страница 117: ...crease the Print Quality setting in the printer driver settings For details refer to the PC Printing Guide on screen manual Step 1 See Printing the Nozzle Check Pattern on page 114 If lines are missing or if white streaks appear After cleaning the Print Head print and examine the nozzle check pattern Step 2 See Print Head Cleaning on page 116 If the problem is not resolved after performing Print H...

Страница 118: ...zzle check pattern 1 Press the Menu button 2 Use the or button to select Maintenance settings then press the OK button The Maintenance settings screen is displayed 3 Use the or button to select Maintenance then press the OK button The Maintenance screen is displayed 4 Use the or button to select Nozzle check then press the OK button The pattern print confirmation screen is displayed 5 Use the or b...

Страница 119: ...Lines are missing 2 Check if there are white streaks in this pattern A Good B White streaks present 2 The confirmation screens for white streaks and missing lines are displayed alternately Select the pattern that is closer to the nozzle check pattern that you printed Note If the ink level is low the nozzle check pattern is not printed correctly Replace the relevant ink tank See Replacing an Ink Ta...

Страница 120: ... so perform Print Head Cleaning only when necessary 1 Make sure that the machine is turned on and then load a sheet of A4 or Letter sized plain paper in the Cassette 2 Open the Paper Output Tray and then open the Output Tray Extension 1 Press the Open button to open the Paper Output Tray 2 Open the Output Tray Extension 3 Start Print Head Cleaning 1 Press the Menu button 2 Use the or button to sel...

Страница 121: ...on to open the Paper Output Tray 2 Open the Output Tray Extension 3 Start Print Head Deep Cleaning 1 Press the Menu button 2 Use the or button to select Maintenance settings then press the OK button The Maintenance settings screen is displayed 3 Use the or button to select Maintenance then press the OK button The Maintenance screen is displayed 4 Use the or button to select Deep cleaning then pres...

Страница 122: ...nd then load four sheets of A4 or Letter sized plain paper in the Cassette 2 Open the Paper Output Tray and then open the Output Tray Extension 1 Press the Open button to open the Paper Output Tray 2 Open the Output Tray Extension 3 Adjust the print head position 1 Press the Menu button 2 Use the or button to select Maintenance settings then press the OK button The Maintenance settings screen is d...

Страница 123: ...ess the OK button The Maintenance settings screen is displayed 3 Use the or button to select Maintenance then press the OK button The Maintenance screen is displayed 4 Use the or button to select Manual head align then press the OK button The confirmation screen is displayed 5 Use the or button to select Yes then press the OK button The print head alignment pattern is printed 6 When Did the patter...

Страница 124: ...ical streaks 2 Repeat the same procedure until you finish inputting the pattern number for columns B to K then press the OK button 3 Confirm the displayed message and press the OK button The second pattern is printed Note If it is difficult to pick the best pattern pick the setting that produces the least noticeable vertical white streaks A Less noticeable vertical white streaks B More noticeable ...

Страница 125: ...ern number for columns M to Q then press the OK button 3 Use the or button to input the number of the pattern in column R that has the least noticeable horizontal streaks 4 Repeat the same procedure until you finish inputting the pattern number for columns S to T then press the OK button Note If it is difficult to pick the best pattern pick the setting that produces the least noticeable horizontal...

Страница 126: ...Use the or button to select Maintenance then press the OK button The Maintenance screen is displayed 4 Use the or button to select Ink quality maintenance then press the OK button The confirmation screen is displayed 5 Use the or button to select Yes then press the OK button The machine will vibrate for about 10 seconds and up to 2 minutes while the machine stirs the inks Do not open the Scanning ...

Страница 127: ... while the machine is sending or receiving a fax or when there are unsent faxes stored in the machine s memory z The machine cannot receive faxes when the power is turned off z If you unplug the power cord all the documents stored in memory are deleted Send or print necessary documents before unplugging the power cord Important z When cleaning the exterior of the machine do not use tissue paper ro...

Страница 128: ... Document Tray 2 Open the Document Feeder Cover Caution z Be sure to turn off the power and unplug the power cord before cleaning the machine z The power cannot be turned off while the machine is sending or receiving a fax or when there are unsent faxes stored in the machine s memory z The machine cannot receive faxes when the power is turned off z If you unplug the power cord all the documents st...

Страница 129: ...layed 4 Use the or button to select Roller cleaning then press the OK button The confirmation screen is displayed 5 Use the or button to select Yes then press the OK button 6 Use the or button to select Rear tray or Cassette then press the OK button The Paper Feed Roller will rotate as it is cleaned 3 Repeat 4 and 6 in step 2 twice 4 Open the Paper Output Tray and then open the Output Tray Extensi...

Страница 130: ...our Canon service representative Cleaning the Inside of the Machine Bottom Plate Cleaning This section describes how to clean the inside of the machine If the inside of the machine becomes dirty printed paper may get dirty so we recommend performing cleaning regularly 1 Make sure that the machine is turned on and then remove any paper from the Rear Tray 2 Open the Paper Output Tray and then open t...

Страница 131: ...ress the OK button The confirmation screen is displayed 5 Use the or button to select Yes then press the OK button The paper cleans the inside of the machine as it feeds through the machine Check the folded part of the ejected paper If it is smudged with ink perform Bottom Plate Cleaning again If the problem is not resolved after performing Bottom Plate Cleaning twice the protrusions inside the ma...

Страница 132: ...tall or use cleaning sheets 1 Install or use cleaning sheets Caution You do not need to clean the inside of the machine until this message is displayed Note You can continue to print even after the message informing you that cleaning is necessary is displayed However if the inside of the machine is not cleaned printed surfaces may be smudged or print quality reduced We recommend that you clean the...

Страница 133: ...8 3 Open the Paper Output Tray and then open the Output Tray Extension 1 Press the Open button to open the Paper Output Tray 2 Open the Output Tray Extension 4 Peel off the protective tape from the cleaning sheet and load the cleaning sheet into the Rear Tray with the adhesive area on top and facing DOWN A Load the cleaning sheet with the notch at the top B Peel off the protective tape Important z...

Страница 134: ...nside the Machine If protrusions inside the machine are stained wipe off any ink from the protrusions using a cotton swab or the like Important Discard used cleaning sheets as soon as sheet cleaning is done Handle the sheets carefully to avoid staining clothing or the surrounding area since the ejected sheet is stained Caution z Be sure to turn off the power and unplug the power cord before cleani...

Страница 135: ...But Ink Is Not Ejected on page 148 z Paper Does Not Feed Properly on page 148 z Paper Jams on page 149 z Document Jams in the ADF on page 153 z The Machine Makes the Operation Noise Even When the Machine Is Not in Use on page 156 z Message Appears on the Computer Screen on page 157 z Error Message Appears on a PictBridge Compliant Device on page 161 z Cannot Print Properly from a Photo Index Sheet...

Страница 136: ... Computer When an error occurs in printing such as the machine is out of paper or paper is jammed a troubleshooting message is displayed automatically Take the appropriate action described in the message The message may vary depending on the version of your operating system ...

Страница 137: ...the ink tank is recommended U045 The clear ink tank is empty You are recommended to replace the clear ink tank with a new one If printing is in progress and you want to continue printing press the machine s OK button Then printing can continue Replacing the clear ink tank is recommended after the printing If the clear ink runs out you will not be able to print on plain paper See Replacing an Ink T...

Страница 138: ...Stop Reset button for at least 5 seconds and then release it This operation releases the function for detecting the remaining level of the above ink and releasing the function is memorized Please be advised that Canon shall not be liable for any malfunction or trouble caused by continuation of printing under the ink out condition See Replacing an Ink Tank on page 103 Note z If the function for det...

Страница 139: ...nk tank flashes Stop printing replace the ink tank and then print again Be sure to replace the empty ink tank before resuming printing An ink tank that was once empty is installed Printing under the ink out condition may cause the printing trouble such as the mixing of inks or a printer malfunction If you want to continue printing you need to release the function for detecting the remaining ink le...

Страница 140: ...t After carrying out the above measures if the problem continues after aligning the Print Head again press the OK button to dismiss the error message and then perform Manual Print Head Alignment For details on Manual Print Head Alignment see Manual Print Head Alignment on page 119 The transport unit may not be clean Perform sheet cleaning See manual When a sheet cleaning operation is necessary the...

Страница 141: ...d scanning can be used only for A4 or Letter sized documents Press the OK button to discharge the document and rescan the document one side at a time This paper is not compatible with duplex printing Remove the paper and press OK The Page size or Paper size setting in the printer driver is not compatible with automatic duplex printing Make sure that the paper size suitable for automatic duplex pri...

Страница 142: ...om the Memory reference screen Refer to Changing the Machine Settings of the User s Guide on screen manual z You pressed the Stop Reset button to cancel printing of a fax press the FAX button Note When you did not print the fax stored in memory e g when you did not resolve the problem by pressing the Stop Reset button you can delete or print the fax stored in memory later See Document Stored in Me...

Страница 143: ... a button other than the ON OFF button See Screen saver Mode on page 15 The LCD display is difficult to see Adjust the LCD contrast setting For details refer to Adjust contrast in Device Settings of the User s Guide on screen manual Cause Action The language you want to be displayed is not selected Select the language you want to be displayed according to the following procedure 1 Press the COPY b...

Страница 144: ... 5 Turn the machine off 6 Restart the computer 7 Make sure you have no application software running 8 Follow the procedure described in your setup sheet or the Network Setup Guide to reinstall the MP Drivers Installation does not start automatically when the Setup CD ROM is inserted into your computer s disc drive 1 Click Start then Computer In Windows XP click Start then My Computer In Windows 20...

Страница 145: ...is case the machine operates properly but printing speed may slow down due to communication speed Check the following to ensure that your system environment supports USB 2 0 Hi Speed connection z The USB port on your computer supports USB 2 0 Hi Speed connection z The USB cable and the USB hub if you are using one support USB 2 0 Hi Speed connection Be sure to use a certified USB 2 0 Hi Speed cabl...

Страница 146: ...ng from a PictBridge compliant device set the print quality setting by using the Operation Panel on the machine You cannot make this setting from a PictBridge compliant device The method to confirm the paper and print quality settings differs depending on what you do with your machine z Check 3 If the problem is not resolved there may be other causes See also the sections below z Printing Does Not...

Страница 147: ...nt on page 118 and perform Automatic Print Head Alignment If this does not solve the problem see Manual Print Head Alignment on page 119 and perform Manual Print Head Alignment Inks have separated resulting in poor or reduced print quality Ink in one or more ink tanks has separated resulting in uneven density See Print Head Cleaning on page 116 and perform Print Head Cleaning If the problem is not...

Страница 148: ...the media type the paper may be smudged or may not be fed properly even if it is not curled In such case follow the procedure described above to curl the paper before printing This may improve the print result Printing on thick paper Selecting the Prevent paper abrasion setting will widen the clearance between the Print Head and the loaded paper If you notice abrasion even with the media type set ...

Страница 149: ...on page 113 and perform any necessary maintenance operation Print Head is misaligned See Automatic Print Head Alignment on page 118 and perform Automatic Print Head Alignment If this does not solve the problem see Manual Print Head Alignment on page 119 and perform Manual Print Head Alignment Automatic ink quality maintenance is disabled If automatic ink quality maintenance is disabled ink in one ...

Страница 150: ...rint jobs follow the procedure below to delete them 1 Open the printer properties dialog box Refer to Opening the Printer Properties Dialog Box Directly from the Control Panel in Opening the Printer Properties Dialog Box Windows of the User s Guide on screen manual 2 Click the Maintenance tab and then View Printer Status The printer status monitor is displayed 3 Click Display Print Queue 4 Select ...

Страница 151: ...perties Dialog Box Windows of the User s Guide on screen manual 2 Click Print Options in the Page Setup sheet The Print Options dialog box is displayed 3 Select Maximum for Unit of Print Data Processing and click OK z If the problem is still not resolved follow the procedure below to change the indicated setting and try printing again 1 Log into a user account with administrator privilege 2 Click ...

Страница 152: ...ng orientation z When loading paper in the Rear Tray load the paper with the print side facing UP Align the right edge of the paper stack against the Cover Guide and slide the Paper Guide so that it just touches the left edge of the stack z When loading paper in the Cassette load the paper with the print side facing DOWN Align the right edge of the paper stack against the right edge of the Cassett...

Страница 153: ... and remove the paper Be careful not to touch the components inside the machine After removing all paper close the Scanning Unit Printer Cover and turn the machine on z If you cannot pull the paper out turn the machine off and turn it back on The paper may be ejected automatically 2 Reload the paper in the machine and press the OK button on the machine If you turned off the machine in step 1 all p...

Страница 154: ... in queue are canceled Reprint if necessary If you cannot remove the jammed paper or the paper jam error continues after removing the paper contact your Canon service representative Paper jammed inside the machine at the transport unit Remove the paper following the procedure below 1 Open the Rear Cover 2 If you can see the jammed paper slowly pull the paper out Caution When opening the Rear Cover...

Страница 155: ...he Cassette into the machine and press the OK button on the machine If you turned off the machine in step 4 all print jobs in queue are canceled Reprint if necessary Note When reloading the paper in the machine see Paper Does Not Feed Properly on page 148 to confirm that you are using the correct paper and are loading it into the machine correctly If you cannot remove the paper or the paper tears ...

Страница 156: ... out while pulling the green cover toward you Caution Set the machine back to its original position immediately after removing the jammed paper 5 Close the Rear Cover 6 Insert the Cassette into the machine and turn on the machine Reload paper in the Rear Tray if necessary All print jobs in queue are canceled Reprint if necessary Note When reloading the paper into the machine see Paper Does Not Fee...

Страница 157: ...o not unplug the power cord while the machine is receiving a fax If you unplug the power cord all the documents stored in memory are deleted Cause Action The document remains in the ADF because the Stop Reset button is pressed when the machine is scanning the document If you press the Stop Reset button during scanning Document in ADF Press OK to discharge document appears on the LCD Press the OK b...

Страница 158: ...n the ADF inner side on page 155 6 Press down the Paper Release Lever A close the Document Feeder Cover then turn on the machine When rescanning the document after clearing the error rescan it from the first page If you cannot remove the document or the document tears inside the machine or if the document jam error continues after removing the document contact your Canon service representative Not...

Страница 159: ...off the machine 3 If a multi page document is loaded remove any pages other than the jammed page from the ADF 4 Open the Document Output Slot 5 Open the Document Cover 6 Insert your hand into the Document Output Slot then while pushing up the part above the paper feed rollers with your fingers pull out the document from the inner side of the Document Cover Cause Action ...

Страница 160: ...irs ink to maintain ink quality while no other operation is in progress the Performing ink quality maintenance message is displayed When this operation is in progress the machine vibrates and makes noise This does not indicate a malfunction however so please wait until the operation is completed If this vibration and noise is bothersome such as when using the machine late at night automatic ink qu...

Страница 161: ...t the Network in Troubles When Using the Machine over Network of the User s Guide on screen manual Printer port setting does not match the computer s interface connecting the machine Check the printer port settings In the following instruction XXX signifies your machine s name 1 Log into a user account with the administrator privilege 2 Click Control Panel then Printer under Hardware and Sound In ...

Страница 162: ...has failed See Auto head align has failed Press OK and repeat operation See manual on page 136 Cause Action The machine is not ready Check if any lamp on the Operation Panel is lit If all the lamps on the Operation Panel are off press the ON OFF button to turn on the machine While the COPY button is flashing the machine is initializing Wait until the COPY button stops flashing and remains lit If t...

Страница 163: ...3 If your machine s name is not displayed click Add to add the machine If you cannot add the machine follow the procedure described in your setup sheet or the Network Setup Guide to reinstall the MP Drivers Cause Action The ink absorber is almost full See The ink absorber is almost full Press OK to continue printing Contact the service center on page 136 Cause Action No response from connected dig...

Страница 164: ... the ink tank when printing is not in progress U171 on page 134 Cause Action Ink PGI 7BK has run out See Printer detected ink out condition Stop printing then replace the ink tank when printing is in progress Printer detected ink out condition of the following ink Replace the ink tank when printing is not in progress U181 on page 135 Cause Action The clear ink tank is empty See The clear ink tank ...

Страница 165: ...omatically If the machine does not start printing check whether an error message is displayed on the LCD of the machine or not z If the The transport unit may not be clean Perform sheet cleaning Error message is displayed refer to Cleaning the Inside of the Machine with a Cleaning Sheet on page 129 and perform sheet cleaning z If the Ink quality maintenance is complete Continue printing error mess...

Страница 166: ...machine and then reconnect the PictBridge compliant device to the machine If the same error occurs contact your Canon service representative Cause Action Failed to scan Photo Index Sheet is displayed z Make sure the Photo Index Sheet is set in the correct position and orientation on the Platen Glass z Make sure the Platen Glass and the Photo Index Sheet are not dirty z Make sure all required circl...

Страница 167: ...Legal is loaded in the specified paper source incoming faxes are not printed and are stored in memory Change the paper in the specified paper source to A4 Letter or Legal size then press the OK button on the machine Load Legal sized paper in the Rear Tray Legal may not be available depending on the country or region of purchase Paper is not loaded If paper is not loaded in the specified paper sour...

Страница 168: ...quently on page 89 1 This setting is only available in US and Canada 2 This setting may not be available depending on the country or region of purchase Cause Action The receive mode displayed in the FAX standby screen is FAX only mode If the receive mode is set to FAX only mode there will be no automatic switching between voice and fax calls Set the receive mode to FAX priority mode DRPD 1 or Netw...

Страница 169: ...achine is not compatible with ECM the fax will be sent received in the standard mode z Reduce the reception start speed Refer to RX start speed in Device Settings of the User s Guide on screen manual Cause Action The telephone line condition or the connection is poor If there is a poor line or connection reducing the reception start speed may correct the error Reduce the reception start speed Refe...

Страница 170: ... that the fax number is correctly registered when speed dialing See Registering Recipients for the Speed Dial on page 68 There was an error during transmission z Check the LCD for an error message See An Error Message Is Displayed on the LCD on page 133 z Print the Activity report and check for an error See Printing the Activity Report Manually on page 99 The telephone line is not connected correc...

Страница 171: ...o TX start speed in Device Settings of the User s Guide on screen manual Cause Action The telephone line is not correctly connected Check that the telephone line is connected correctly Refer to your setup sheet or see Preparing the Machine for Fax on page 54 The telephone line type is not set correctly Check the telephone line type setting and change it as necessary See Setting the Telephone Line ...

Страница 172: ...me of the main functions that can be performed on your machine On screen Manuals User s Guide Read this guide when starting to use the machine If the Quick Start Guide does not provide you enough information please refer to the User s Guide which can be installed from the Setup CD ROM This guide provides detailed instructions for z copying z printing from a memory card z printing from your compute...

Страница 173: ...ble click the XXX On screen Manual alias where XXX is your machine s name on the desktop System Requirements Browser Help Viewer Note z Microsoft Internet Explorer 5 0 or later must be installed z The on screen manual may not be displayed properly depending on your operating system or Internet Explorer version We recommend that you keep your system up to date with Windows Update Note z The on scre...

Страница 174: ...tomatically when your computer starts up For details refer to the Introduction to Solution Menu on screen manual My Printer Windows only This application helps you to operate this machine Use this application to open the printer driver or the status monitor screen and confirm or change both the printer settings or status Also this application has a menu to provide troubleshooting tips when problem...

Страница 175: ...RH no condensation Storage environment Temperature 0 to 40 C 32 to 104 F Humidity 5 to 95 RH no condensation Power supply AC 100 240 V 50 60 Hz Power consumption Printing Copy Approx 26 W Standby minimum Approx 6 5 W OFF Approx 1 6 W External dimensions Approx 19 7 W x 21 0 D x 10 1 H inches Approx 500 W x 535 D x 257 H mm With the Paper Support Paper Output Tray and Document Tray retracted Weight...

Страница 176: ...y Based on ITU T No 1 chart for US specifications and Canon FAX Standard chart No 1 for others both in standard mode or Canon FAX Standard chart No 1 standard mode Color Approx 1 minute page at 33 6 Kbps ECM JPEG transmitting from memory Based on Canon COLOR FAX TEST SHEET Scanning image processing Halftones 256 levels of gray Density adjustment 3 levels Memory Transmission reception Approx 250 pa...

Страница 177: ...mpliant device Paper type Default Selections based on the machine setting Photo Photo Paper Plus Glossy Photo Paper Plus Glossy II Glossy Photo Paper Photo Paper Plus Semi gloss Plain A4 Letter only Layout Default Selections based on the machine setting Borderless Bordered 20 up 1 35 up 2 1 You can print shooting Info Exif Data on photos in list format 20 up or in the margins of specified photos 1...

Страница 178: ... be guaranteed on a PC pre installed Windows Vista XP or 2000 Mac OS X v 10 4 Intel processor PowerPC G3 256 MB Mac OS X v 10 3 9 PowerPC G3 128 MB Note Hard disk must be formatted as Mac OS Extended Journaled or Mac OS Extended Browser Internet Explorer 6 0 or later Safari Hard Disk Space 800 MB Note For bundled software installation 650 MB Note For bundled software installation CD ROM Drive Requ...

Страница 179: ...rders z Certificates of deposit z Postage stamps canceled or uncanceled z Identifying badges or insignias z Selective service or draft papers z Checks or drafts issued by governmental agencies z Motor vehicle licenses and certificates of title z Traveler s checks z Food stamps z Passports z Immigration papers z Internal revenue stamps canceled or uncanceled z Bonds or other certificates of indebte...

Страница 180: ... jack that is also compliant See installation instructions for details Connection to party lines is subjected to state tariffs Contact the state public utility commission public service commission or corporation commission for information If your home has specially wired alarm equipment connected to the telephone line ensure the installation of this equipment does not disable your alarm equipment ...

Страница 181: ...s for a Class B digital device pursuant to Part 15 of the FCC Rules These limits are designed to provide reasonable protection against harmful interference in a residential installation This equipment generates uses and can radiate radio frequency energy and if not installed and used in accordance with the instructions may cause harmful interference to radio communications However there is no guar...

Страница 182: ...pose and all such warranties are disclaimed The sole warranty if any with respect to such non Canon brand items is given by the manufacturer or producer thereof This limited warranty covers all defects encountered in normal use of the Product and does not apply in the following cases a Loss of or damage to the Product due to abuse neglect mishandling improper packaging by you alteration accident e...

Страница 183: ...ty period Canon USA offers two hardware support options Authorized Service Facility Carry In Mail In Service Canon USA s Carry In Mail In Service provides repair or exchange at Canon USA s option through Canon USA s Authorized Service Facility ASF network The name and telephone number of the ASF s near you may be obtained from Canon USA s Web site at www canontechsupport com or by calling the Cano...

Страница 184: ... the continental United States Alaska and Hawaii during such period This limited warranty gives you specific legal rights and you may also have other rights which vary from state to state Support program specifics are subject to change without notice InstantExchange warranty service is subject to the availability of refurbished or new replacement units Canon U S A Inc One Canon Plaza Lake Success ...

Страница 185: ...ation of devices subject only to the requirement that the sum of the RENs of all the devices does not exceed five Avis Le présent matériel est conforme aux spécifications techniques applicables d Industrie Canada L indice d équivalence de la sonnerie IES sert à indiquer le nombre maximal de terminaux qui peuvent être raccordés à une interface téléphonique La terminaison d une interface peut consis...

Страница 186: ...lecom s network services Telepermitted equipment only may be connected to the auxiliary telephone port The auxiliary telephone port is not specifically designed for 3 wire connected equipment that may not respond to incoming ringing when attached to this port The automatic calling functions of this equipment must not be used to cause a nuisance to other Telecom customers This equipment must not be...

Страница 187: ...ended paper and requirements 21 small sized paper 31 M Media cannot use 22 specialty 20 Media Type 21 Memory Card inserting 37 removing 39 supported by this machine 36 N Nozzle Check Pattern examining 115 printing 114 O Operation Panel 7 P Print Head aligning 118 cleaning 116 deep cleaning 117 Printing from a Memory Card photo displayed on the LCD 39 Photo Index Sheet 43 Printing from Your Compute...

Страница 188: ...184 ...

Страница 189: ...185 ...

Страница 190: ...186 ...

Страница 191: ... 1 800 385 2155 or visit our Web site at www canonesp com CarePAK must be purchased during your product s warranty period For more information and updated program specifics please visit our web site at www canontechsupport com Support program specifics are subject to change without notice Ordering Information For additional supplies use the following descriptions and order numbers Description Orde...

Страница 192: ...rt Guide Office All In One series QT5 0080 V01 XXXXXXXX CANON INC 2008 PRINTED IN THAILAND The following ink tanks are compatible with this product For information on product specifications please visit our website at www usa canon com ...

Отзывы: