background image

4

5

6

7

2

1

E

D

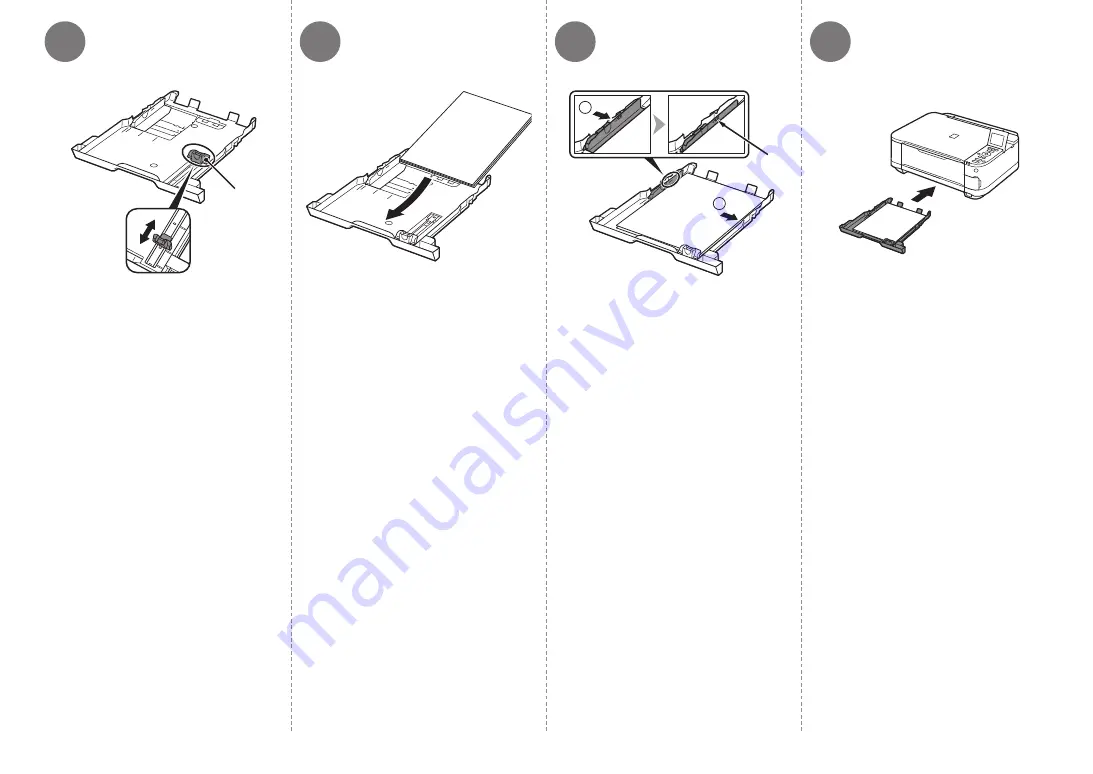
3  Load Paper

Slide the front Paper Guide (D) 

to align with the actual size of the 

paper.

The front Paper Guide will click 

and stop when it aligns with the 

corresponding mark of paper size.

Load plain paper.

Load paper with the printing side facing 

down.

Align the paper to the right side of 

the Cassette (1), and slide the left 

Paper Guide completely against the 

left edge of the paper (2).

Make sure that the height of the paper 

stack does not exceed the line (E).

Insert the Cassette slowly into the 

machine until it clicks into place.

Содержание PIXMA MG5120

Страница 1: ...em as Windows Vista In this guide the screens are based on Windows 7 Home Premium and Mac OS X v 10 6 x Unless noted otherwise the screens are those of Windows 7 Symbols Used in This Document Prohibited actions Preparation P 1 1 Try Using the Machine P 16 P 19 P 20 Print Photos from a Memory Card Try Copying Print Photos from a Computer 5 Install the Software 4 Load Paper 3 Install the Ink Tanks 2...

Страница 2: ... make full use of machine Getting Started this manual Basic Guide Advanced Guide Printed Manuals For details on opening the on screen manuals refer to page 15 This machine contains both printed manuals and on screen manuals to be viewed on a computer The on screen manuals are included on the Setup CD ROM and are installed during the software installation Model Number K10358 MG5120 Describes troubl...

Страница 3: ...rs applications and on screen manuals 5 Other documents Make sure all the following items are supplied Do not install the machine where an object may fall on it In addition do not place any object on the top of the machine It may fall into the machine when opening covers resulting in malfunction Paper Output Tray A automatically opens when printing starts Do not place anything in front of the Pape...

Страница 4: ... until the machine turns off Be sure to follow the procedure below 1 Press the ON button to turn off the machine 2 Make sure that the POWER lamp G is not lit Do NOT connect the USB cable at this stage Make sure that the Document Cover B is closed When removing the power plug make sure that the POWER lamp is not lit before removing the plug Removing the power plug while the POWER lamp lights up or ...

Страница 5: ...Close the Document Cover C and lift it with the Scanning Unit Cover The Print Head Holder D moves to the installation position If the Print Head Holder does not move make sure that the machine is turned on For details refer to to on page 2 in 1 Preparation Go to the next page Install the Ink Tanks ...

Страница 6: ...0 degrees horizontally to remove it off Do not push the sides of the ink tank Handle the ink tanks carefully Do not drop or apply excessive pressure to them Be sure to use the supplied ink tanks If the orange tape remains on the L shape air hole ink may splash or the machine may not print properly If you push the sides of the ink tank with the L shape air hole blocked ink may splash Do not touch t...

Страница 7: ...to the color order indicated on the label When the installation is completed properly the Ink lamp lights red Make sure all the Ink lamps light red Install in a well lit environment Do not touch the Print Head Lock Lever I Once you have installed the ink tanks do not remove them unnecessarily If the Print Head Holder moves to the right close and reopen the Scanning Unit Cover Make sure that the co...

Страница 8: ...operation The LCD will turn off if the machine is not operated for about 5 minutes To restore the display press any button except the ON button If an error message is displayed on the LCD make sure that the ink tanks are correctly installed Make sure that the LCD changes as shown in the illustration and go to the next step Load plain paper in the Cassette by referring to 3 Load Paper on page 7 and...

Страница 9: ... 3 Close the Paper Output Tray A Pull out the Cassette B Move the left Paper Guide C to the edge The Cassette supports plain paper only To load specialty paper including photo paper refer from on page 9 Load Paper ...

Страница 10: ...corresponding mark of paper size Load plain paper Load paper with the printing side facing down Align the paper to the right side of the Cassette 1 and slide the left Paper Guide completely against the left edge of the paper 2 Make sure that the height of the paper stack does not exceed the line E Insert the Cassette slowly into the machine until it clicks into place ...

Страница 11: ...inting side facing up Slide the left and right Paper Guides against both edges of the paper Make sure that the height of the paper stack does not exceed the line I For details on how to handle paper refer to Loading Paper in the on screen manual Basic Guide after installation is complete 1 Open it 2 Withdraw it upwards 3 Tilt it back Load specialty paper including photo paper in the Rear Tray ...

Страница 12: ...upplied software Internet Explorer 7 or later is required to use this software An Internet connection is required for installation For Windows 7 1 Remove the USB cable connected to your computer 2 Proceed to on page 11 For Windows Vista Windows XP This dialog box may appear Quit all running applications before installation Log on as the administrator or a member of the Administrators group Do not ...

Страница 13: ... click Yes or Continue If you do not know your administrator name or password click the help button then follow the on screen instructions If the CD ROM folder does not open automatically double click the CD ROM icon on the desktop Double click the Setup icon of the CD ROM folder to proceed to the following screen Enter your administrator name and password then click OK Do NOT connect the USB cabl...

Страница 14: ...stall Click Easy Install The drivers application software and on screen manuals are installed If you want to select particular items to install click Custom Install Follow any on screen instructions to proceed with the software installation ...

Страница 15: ...ed Survey Program click Agree If you click Do not agree the Extended Survey Program will not be installed This has no effect on the machine s functionality Important Information for the Installation USB Port When the Printer Connection screen appears connect the machine to the computer with a USB cable After connecting the cable TURN ON THE MACHINE The USB Port is located on the right side at the ...

Страница 16: ...place Installing the XPS Printer Driver In Windows 7 and Windows Vista SP1 or later the XPS Printer Driver can be installed additionally To install perform from in 4 Install the Software on page 11 Click Custom Install in then select XPS Printer Driver in the Custom Install screen For details on useful functions of the XPS Printer Driver refer to the on screen manual Advanced Guide For Windows Sol...

Страница 17: ...open the on screen manual How to start Solution Menu EX Click this icon on the desktop Windows or on the Dock Macintosh to start Solution Menu EX Easy WebPrint EX When Easy WebPrint EX is installed the Easy WebPrint EX toolbar appears in Internet Explorer This toolbar can be used any time while Internet Explorer is running Use Easy WebPrint EX to print web pages in Internet Explorer easily Some of...

Страница 18: ... Type M xD Picture Card Type H You can also print from USB flash drives For details refer to Printing Photos in the on screen manual Basic Guide Corresponding Card Slot MMCmobile Insert a memory card with the labeled side facing left Insert a memory card into the Card Slot in the direction of the arrow on the label with the labeled side facing left Insert only one memory card The Access lamp B lig...

Страница 19: ...Tray D is open If printing starts while the Paper Output Tray is closed it will automatically open While the HOME screen appears open the Card Slot Cover insert a memory card into the Card Slot When inserting a memory card into the Card Slot the photos on the memory card are read and the screen to specify photos and the number of copies to print appears Make sure that the Access lamp E has lit up ...

Страница 20: ...printing open the Card Slot Cover pinch the memory card and pull it straight out After removing the memory card close the Card Slot Cover For more information on printing from a memory card refer to Printing Photos in the on screen manual Basic Guide Do not remove the memory card while the Access lamp is flashing Saved data may be damaged When the machine is ready for printing the Color button lig...

Страница 21: ...H 3 Press the Black button I or the Color button J When the machine is ready for copying the Black button and Color button light up Copying will start Do not open the Document Cover until copying is complete Remove the document after printing For the procedure to copy on paper other than plain paper refer to Copying in the on screen manual Advanced Guide Do not place objects weighing 4 4 lb 2 0 kg...

Страница 22: ...on with the printing side facing up Make sure that the Paper Output Tray B is open If printing starts while the Paper Output Tray is closed it will automatically open This section explains how to print borderless photos using 4 x 6 10 x 15 cm Photo Paper Plus Glossy II Click Print For details on starting Solution Menu EX refer to page 15 For more information refer to the on screen manual Advanced ...

Страница 23: ...ted resolution max 19200 dpi X 19200 dpi Gradation Input Output Gray 16 bit 8 bit Color 48 bit 24 bit RGB each 16 bit 8 bit Minimum System Requirements Conform to the operating system s requirements when higher than those given here Operating System Processor RAM Windows 7 1 GHz or faster 32 bit x86 or 64 bit x64 processor 1 GB 32 bit 2 GB 64 bit Windows Vista Vista SP1 Vista SP2 1 GHz processor 5...

Страница 24: ...rosoft Corporation in the U S and or other countries Internet Explorer is a trademark or registered trademark of Microsoft Corporation in the U S and or other countries Macintosh and Mac are trademarks of Apple Inc registered in the U S and other countries CANON U S A INC One Canon Plaza Lake Success NY 11042 U S A www usa canon com Toll Free Tech Support 1 800 OK CANON Ordering Information PGI 22...

Отзывы: