Canon Pixma G3020 Series Скачать руководство пользователя страница 236

Canon IJ Status Monitor

The Canon IJ Status Monitor displays the printer status and the printing progress. The printer status is
shown by the icons and messages in the status monitor.

Launching the Canon IJ Status Monitor

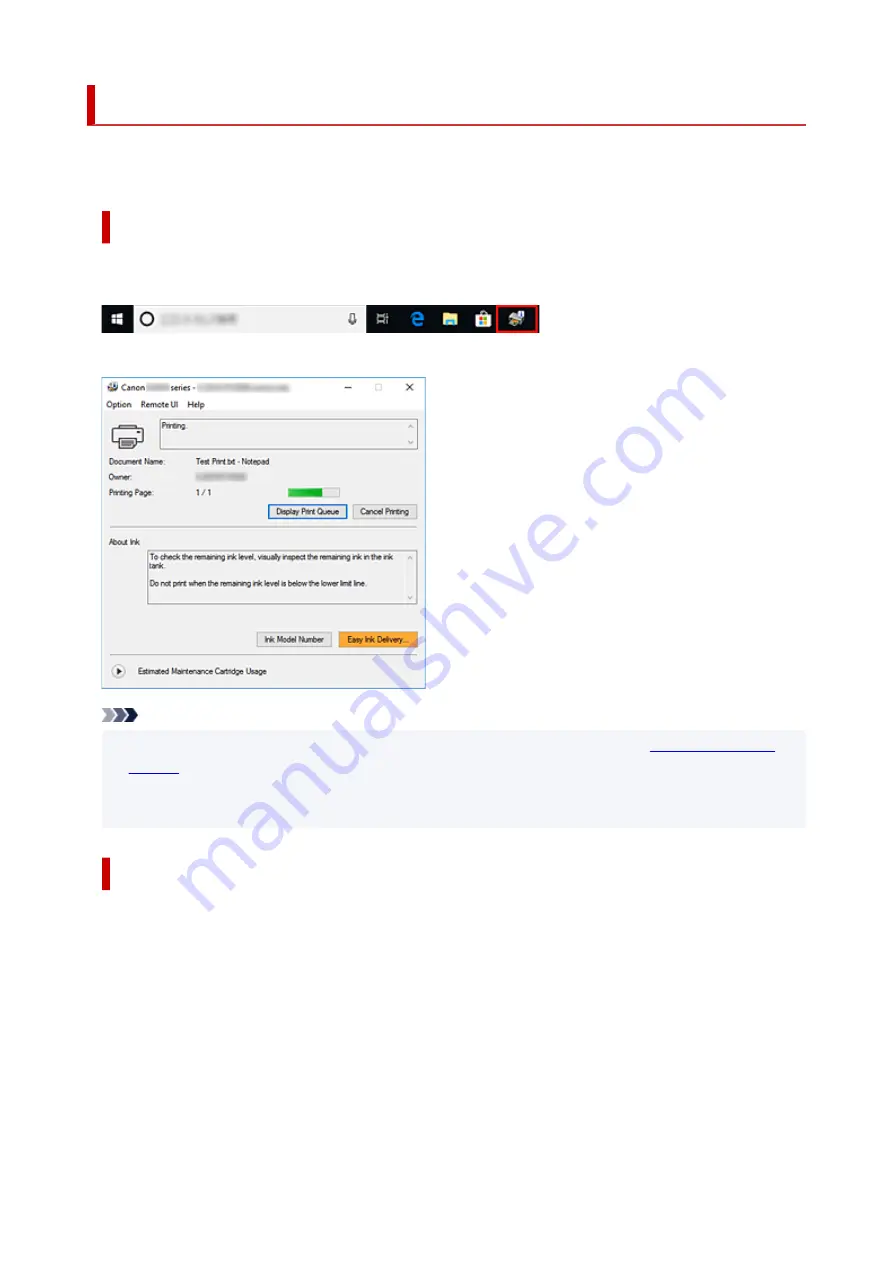
The Canon IJ Status Monitor launches automatically when print data is sent to the printer. When
launched, the Canon IJ Status Monitor appears as a button on the task bar.

Click the button of the status monitor displayed on the task bar. The Canon IJ Status Monitor appears.

Note

• To open the Canon IJ Status Monitor when the printer is not printing, open the 

printer driver setup

window

 and click 

View Printer Status

 on the 

Maintenance

 tab.

• The information displayed on the Canon IJ Status Monitor may differ depending on the country or

region where you are using your printer.

When Errors Occur

The Canon IJ Status Monitor is automatically displayed if an error occurs (e.g., if the printer runs out of
paper or if the ink is low).

236

Содержание Pixma G3020 Series

Страница 1: ...G3020 series Online Manual English ...

Страница 2: ...e Setup Utility 50 Starting Up IJ Network Device Setup Utility 51 Diagnosing and Repairing Network Settings 52 Performing Changing Network Settings 53 Canon IJ Network Device Setup Utility Screen 54 Performing Network Settings 58 Performing Changing Wired LAN Connection Ethernet Cable Settings 59 Performing Changing Wi Fi Settings 62 Assigning Printer Information 67 List of Models Which Does Not S...

Страница 3: ...he Print Head 109 Cleaning 112 Cleaning Paper Feed Rollers 113 Cleaning Inside the Printer Bottom Plate Cleaning 115 Replacing Maintenance Cartridge 118 Checking Maintenance Cartridge Status on LCD 122 Overview 123 Safety 124 Safety Precautions 125 Regulatory Information 128 WEEE EU EEA 129 Handling Precautions 140 Legal Restrictions on Scanning Copying 141 Printer Handling Precautions 142 Transpo...

Страница 4: ...stering a Frequently Used Printing Profile 169 Setting the Ink to be Used 171 Managing the Printer Power 172 Changing the Printer Operation Mode 174 Changing Settings from Operation Panel 176 Changing Settings from Operation Panel 177 Setting Items on Operation Panel 178 Print settings 179 LAN settings 180 Other dev settings 184 Language selection 185 Firmware update 186 Reset setting 187 Feed set...

Страница 5: ...Perform Borderless Printing 220 Scaled Printing 223 Page Layout Printing 225 Duplex Printing 227 Setting Up Envelope Printing 229 Printing on Postcards 231 Overview of the Printer Driver 233 Canon IJ Printer Driver 234 Opening Printer Driver s Setup Screen 235 Canon IJ Status Monitor 236 Instructions for Use Printer Driver 238 Printer Driver Description 240 Quick Setup Tab Description 241 Main Tab...

Страница 6: ...Basic Mode Tab 298 Advanced Mode Tab 306 General Notes Scanner Driver 312 Scanning Tips 314 Positioning Originals Scanning from Computer 315 Network Scan Settings 317 Frequently Asked Questions 321 Network Settings and Common Problems 323 Network Communication Problems 325 Cannot Find Printer on Network 326 Cannot Find Printer During Setup 327 Cannot Proceed beyond Printer Connection Screen Cannot...

Страница 7: ... Are Misaligned Distorted 372 Paper Is Smudged Printed Surface Is Scratched 373 Vertical Line Next to Image 377 Scanning Problems Windows 378 Scanning Problems 379 Scanner Does Not Work 380 ScanGear Scanner Driver Does Not Start 381 Mechanical Problems 382 Printer Does Not Turn On 383 Printer Turns Off Unexpectedly or Repeatedly 384 USB Connection Problems 386 Cannot Communicate with Printer via U...

Страница 8: ...0 Paper Is Jammed inside Printer 402 1000 406 1070 408 1200 409 1368 410 1496 411 1640 412 1723 413 1724 414 1725 415 1726 416 1727 417 Shipping Tape etc Are Still Attached 1890 418 2114 419 2200 421 2900 422 2901 423 3252 424 4103 425 5011 426 5012 427 5100 428 5200 429 6000 430 ...

Страница 9: ...Using Online Manual Operating Environment Symbols Used in This Document Touch enabled Device Users Windows Printing Online Manual Trademarks and Licenses Screenshots in This Manual 9 ...

Страница 10: ...sonal injury or property damage caused by incorrect operation of the equipment These must be observed for safe operation Important Instructions including important information that must be observed to avoid damage and injury or improper use of the product Be sure to read these instructions Note Instructions including notes for operation and additional explanations Basics Instructions explaining ba...

Страница 11: ...ows For touch actions you need to replace right click in this document with the action set on the operating system For example if the action is set to press and hold on your operating system replace right click with press and hold 11 ...

Страница 12: ...S A and licensed to Canon Inc Autodesk and AutoCAD are registered trademarks or trademarks of Autodesk Inc and or its subsidiaries and or affiliates in the USA and or other countries QR Code is a registered trademark of DENSO WAVE INCORPORATED in Japan and in other countries USB Type C is a trademark of USB Implementers Forum The Mopria word mark and the Mopria Logo are registered and or unregiste...

Страница 13: ...l mean the preferred form for making modifications including but not limited to software source code documentation source and configuration files Object form shall mean any form resulting from mechanical transformation or translation of a Source form including but not limited to compiled object code generated documentation and conversions to other media types Work shall mean the work of authorship...

Страница 14: ...medium with or without modifications and in Source or Object form provided that You meet the following conditions 1 You must give any other recipients of the Work or Derivative Works a copy of this License and 2 You must cause any modified files to carry prominent notices stating that You changed the files and 3 You must retain in the Source form of any Derivative Works that You distribute all cop...

Страница 15: ...ll other commercial damages or losses even if such Contributor has been advised of the possibility of such damages 9 Accepting Warranty or Additional Liability While redistributing the Work or Derivative Works thereof You may choose to offer and charge a fee for acceptance of support warranty indemnity or other liability obligations and or rights consistent with this License However in accepting s...

Страница 16: ...STITUTE GOODS OR SERVICES LOSS OF USE DATA OR PROFITS OR BUSINESS INTERRUPTION HOWEVER CAUSED AND ON ANY THEORY OF LIABILITY WHETHER IN CONTRACT STRICT LIABILITY OR TORT INCLUDING NEGLIGENCE OR OTHERWISE ARISING IN ANY WAY OUT OF THE USE OF THIS SOFTWARE EVEN IF ADVISED OF THE POSSIBILITY OF SUCH DAMAGE Part 3 Cambridge Broadband Ltd copyright notice BSD Portions of this code are copyright c 2001 ...

Страница 17: ...S PROVIDED BY THE COPYRIGHT HOLDERS AND CONTRIBUTORS AS IS AND ANY EXPRESS OR IMPLIED WARRANTIES INCLUDING BUT NOT LIMITED TO THE IMPLIED WARRANTIES OF MERCHANTABILITY AND FITNESS FOR A PARTICULAR PURPOSE ARE DISCLAIMED IN NO EVENT SHALL THE COPYRIGHT HOLDERS OR CONTRIBUTORS BE LIABLE FOR ANY DIRECT INDIRECT INCIDENTAL SPECIAL EXEMPLARY OR CONSEQUENTIAL DAMAGES INCLUDING BUT NOT LIMITED TO PROCURE...

Страница 18: ...isclaimer in the documentation and or other materials provided with the distribution Neither the name of Cisco Inc Beijing University of Posts and Telecommunications nor the names of their contributors may be used to endorse or promote products derived from this software without specific prior written permission THIS SOFTWARE IS PROVIDED BY THE COPYRIGHT HOLDERS AND CONTRIBUTORS AS IS AND ANY EXPR...

Страница 19: ...that the following conditions are met 1 Redistributions of source code must retain the above copyright notice this list of conditions and the following disclaimer 2 Redistributions in binary form must reproduce the above copyright notice this list of conditions and the following disclaimer in the documentation and or other materials provided with the distribution 3 Neither the name of Apple Inc Ap...

Страница 20: ...THER IN CONTRACT STRICT LIABILITY OR TORT INCLUDING NEGLIGENCE OR OTHERWISE ARISING IN ANY WAY OUT OF THE USE OF THIS SOFTWARE EVEN IF ADVISED OF THE POSSIBILITY OF SUCH DAMAGE LEADTOOLS Copyright C 1991 2009 LEAD Technologies Inc CMap Resources Copyright 1990 2009 Adobe Systems Incorporated All rights reserved Copyright 1990 2010 Adobe Systems Incorporated All rights reserved Redistribution and u...

Страница 21: ...MERCHANTABILITY FITNESS FOR A PARTICULAR PURPOSE AND NONINFRINGEMENT IN NO EVENT SHALL THE AUTHORS OR COPYRIGHT HOLDERS BE LIABLE FOR ANY CLAIM DAMAGES OR OTHER LIABILITY WHETHER IN AN ACTION OF CONTRACT TORT OR OTHERWISE ARISING FROM OUT OF OR IN CONNECTION WITH THE SOFTWARE OR THE USE OR OTHER DEALINGS IN THE SOFTWARE Copyright 2000 Computing Research Labs New Mexico State University Copyright 2...

Страница 22: ...ifornia Berkeley Copyright c 1981 2000 The Regents of the University of California All rights reserved Redistribution and use in source and binary forms with or without modification are permitted provided that the following conditions are met Redistributions of source code must retain the above copyright notice this list of conditions and the following disclaimer Redistributions in binary form mus...

Страница 23: ...nt in parts or full form without having to pay us royalty free usage o You may not pretend that you wrote this software If you use it or only parts of it in a program you must acknowledge somewhere in your documentation that you have used the FreeType code credits We specifically permit and encourage the inclusion of this software with or without modifications in commercial products We disclaim al...

Страница 24: ...works thereof for any purpose and to authorize others to exercise some or all of the rights granted herein subject to the following conditions o Redistribution of source code must retain this license file FTL TXT unaltered any additions deletions or changes to the original files must be clearly indicated in accompanying documentation The copyright notices of the unaltered original files must be pr...

Страница 25: ...ect special incidental or consequential as a result of the reproduction modification distribution or other use of the TWAIN Toolkit JSON for Modern C Copyright c 2013 2017 Niels Lohmann Permission is hereby granted free of charge to any person obtaining a copy of this software and associated documentation files the Software to deal in the Software without restriction including without limitation t...

Страница 26: ...right c 2014 Kenneth MacKay All rights reserved Redistribution and use in source and binary forms with or without modification are permitted provided that the following conditions are met Redistributions of source code must retain the above copyright notice this list of conditions and the following disclaimer Redistributions in binary form must reproduce the above copyright notice this list of con...

Страница 27: ...CT STRICT LIABILITY OR TORT INCLUDING NEGLIGENCE OR OTHERWISE ARISING IN ANY WAY OUT OF THE USE OF THIS SOFTWARE EVEN IF ADVISED OF THE POSSIBILITY OF SUCH DAMAGE ISC License Copyright c 2013 2017 Frank Denis j at pureftpd dot org Permission to use copy modify and or distribute this software for any purpose with or without fee is hereby granted provided that the above copyright notice and this per...

Страница 28: ...ce this list of conditions and the following disclaimer Redistributions in binary form must reproduce the above copyright notice this list of conditions and the following disclaimer in the documentation and or other materials provided with the distribution Neither name of Intel Corporation nor the names of its contributors may be used to endorse or promote products derived from this software witho...

Страница 29: ...OVIDED BY THE COPYRIGHT HOLDERS AND CONTRIBUTORS AS IS AND ANY EXPRESS OR IMPLIED WARRANTIES INCLUDING BUT NOT LIMITED TO THE IMPLIED WARRANTIES OF MERCHANTABILITY AND FITNESS FOR A PARTICULAR PURPOSE ARE DISCLAIMED IN NO EVENT SHALL THE COPYRIGHT HOLDER OR CONTRIBUTORS BE LIABLE FOR ANY DIRECT INDIRECT INCIDENTAL SPECIAL EXEMPLARY OR CONSEQUENTIAL DAMAGES INCLUDING BUT NOT LIMITED TO PROCUREMENT ...

Страница 30: ... cannot be used If you connect a device connected to the Internet via a wireless router to the printer that is in the Wireless Direct the connection between the device and wireless router will be disabled In that case the connection of the device may switch to a mobile data connection automatically depending on your device Transmission fees for connecting to the Internet using a mobile data connec...

Страница 31: ... Status Using IJ Network Device Setup Utility Performing Changing Network Settings Windows For Windows you can perform network settings using IJ Network Device Setup Utility IJ Network Device Setup Utility Windows Diagnosing and Repairing Network Settings Windows macOS You can diagnose or repair network settings using IJ Network Device Setup Utility For Windows IJ Network Device Setup Utility Wind...

Страница 32: ...led while the setting is changed Do not proceed to the next screen of this guide until setup is complete For office use consult your network administrator Note that if you connect to a network with no security protection your personal information could be disclosed to a third party Wireless Direct Important If a device is connected to the Internet via a wireless router and you then connect it to a...

Страница 33: ... and then redo the settings Devices connected to the printer using Wireless Direct cannot communicate with each other Firmware updates for the printer are not available while using Wireless Direct When a device has been connected to the printer without using a wireless router and you want to set it up again using the same connection method disconnect it first Disable the connection between the dev...

Страница 34: ...Default Network Settings Detect Same Printer Name Connects to Another Computer via LAN Changes from USB to LAN Connection Printing Network Settings Reconfiguration Method of Wi Fi Connection Connecting with Wireless Direct 34 ...

Страница 35: ...s LPR setting Enable RAW protocol Enable LLMNR Enable PictBridge commun Enable disable Enable XX represents alphanumeric characters Default value depends on printer To check value use operation panel LAN settings Wireless Direct Defaults Item Default WL Direct net SSID DIRECT abXX G3020series 1 Password YYYYYYYYYY 2 Security method WPA2 PSK AES Confirm request Displayed 1 ab is specified at random...

Страница 36: ... 2 The password is specified automatically when the printer is turned on for the first time 36 ...

Страница 37: ...acOS The printer names appear with the MAC address added at the end or as the printer name specified by Bonjour Check identifiers such as the MAC address the printer name specified by Bonjour and the printer s serial number to select the printer from among those that appear Note Serial number may not appear on result screen To check the printer s MAC address and the serial number print out the net...

Страница 38: ...Connects to Another Computer via LAN Changes from USB to LAN Connection To connect an additional computer to the printer via LAN or to change from USB to LAN connection click here and perform setup 38 ...

Страница 39: ...formation The following information on the printer s network setting is printed out Some setting values are not displayed depending on the printer settings Item Num ber Item Description Setting 1 Product Information Product information 1 1 Product Name Product name XXXXXXXX 1 2 ROM Version ROM version XXXXXXXX 1 3 Serial Number Serial number XXXXXXXX 2 Network Diagnostics Network diagnostics 2 1 D...

Страница 40: ...XX XXX 3 2 15 TCP IPv6 TCP IPv6 Enable Disable 3 2 16 Link Local Address Link local address XXXX XXXX XXXX XXXX XXXX XXXX XXXX XXXX 3 2 17 Link Local Prefix Length Link local prefix length XXX 3 2 18 Stateless Address1 Stateless address 1 XXXX XXXX XXXX XXXX XXXX XXXX XXXX XXXX 3 2 19 Stateless Prefix Length1 Stateless prefix length 1 XXX 3 2 20 Stateless Address2 Stateless address 2 XXXX XXXX XXX...

Страница 41: ...3 2 Connection Connection status Active Inactive 3 3 3 SSID SSID Wireless Direct network name SSID 3 3 4 Password Password Wireless Direct password 3 3 5 Channel Channel 3 3 3 6 Encryption Encryption method AES 3 3 7 Authentication Authentication method WPA2 PSK 3 3 8 TCP IPv4 TCP IPv4 Enable Disable 3 3 9 IP Address IP address XXX XXX XXX XXX 3 3 10 Subnet Mask Subnet mask XXX XXX XXX XXX 3 3 11 ...

Страница 42: ...LLMNR setting Enable Disable 5 12 SNMP SNMP setting Enable Disable 5 13 PictBridge Commun PictBridge Communica tion Enable Disable 5 14 DNS Server Obtain DNS server ad dress automatically Auto Manual 5 15 Primary Server Primary server address XXX XXX XXX XXX 5 16 Secondary Server Secondary server ad dress XXX XXX XXX XXX 5 17 Proxy Server Proxy server setting Enable Disable 5 18 Proxy Address Prox...

Страница 43: ...p Utility Important Before you perform settings using IJ Network Device Setup Utility turn on Easy WL connect mode on the printer following the procedure below 1 Check that printer is turned on 2 Press and hold Wireless connect button for 3 seconds LCD and Operation Panel 3 Perform operations following instructions on your computer smartphone tablet 4 If message saying setup is completed appears p...

Страница 44: ...ter Connecting a smartphone tablet computer to the printer Important You can connect up to 5 devices to the printer at the same time with Wireless Direct Check the usage restrictions and switch the printer to the Wireless Direct Restrictions Changing Printer Setting to Use Wireless Direct 1 Make sure the printer is turned on 2 Press Setup button The Setup menu screen appears 3 Select Device settin...

Страница 45: ...et computer Enable Wi Fi in the Settings menu on your smartphone tablet computer For instructions on enabling the Wi Fi function refer to the instruction manual for your smartphone tablet computer 2 Select DIRECT XXXX G3020series X represents alphanumeric characters from list on your smartphone tablet computer Note If DIRECT XXXX G3020series does not appear on the list Wireless Direct is not enabl...

Страница 46: ...the printer is turned on 2 Press Setup button The Setup menu screen appears 3 Select Device settings and press the OK button 4 Select LAN settings and press the OK button 5 Select Wireless Direct and press the OK button 6 Select a setting item Scroll down if necessary Change name SSID Change the identifier SSID for Wireless Direct The identifier SSID is the printer s name device name displayed on ...

Страница 47: ... time and press OK button Press the Setup button to change the type of characters to enter uppercase lowercase numbers symbols One character can be erased by pressing the Back button 3 Confirm the input contents and press and hold OK button 4 Check displayed message select Yes and press the OK button To set automatically 1 Select Auto update and press OK button 2 Select Yes and press OK button Not...

Страница 48: ...t an unauthorized access we recommend you should select the setting to display the confirmation screen Note If you change the Wireless Direct setting of the printer also change the wireless router setting of the device 48 ...

Страница 49: ...y Starting Up IJ Network Device Setup Utility Diagnosing and Repairing Network Settings Performing Changing Network Settings List of Models Which Does Not Support Diagnosis and Repair Function List of Models Which Does Not Support IPv6 Configuration via USB Connection 49 ...

Страница 50: ...tion IJ Network Device Setup Utility repairs the status of the printer and computer Not available for some models Important Depending on the printer you are using an administrator password is already specified for the printer at the time of purchase When you change the network settings authentication by the administrator password is required For details Administrator Password For improving securit...

Страница 51: ...en select the Search charm and search for IJ Network Device Setup Utility In Windows 7 or Windows Vista click Start and select All Programs Canon Utilities IJ Network Device Setup Utility and then IJ Network Device Setup Utility When you start up IJ Network Device Setup Utility a message appears Check the message and select Yes The screen below appears Select Diagnose and Repair or Printer Network...

Страница 52: ...on Follow the procedure below 1 Start up IJ Network Device Setup Utility 2 Check the displayed message and select Yes 3 Select Diagnose and Repair on the displayed screen Perform operations following the instructions on the screen Note This function checks the following items whether the computer is connected to the router whether a web page on the Internet can be viewed whether the printer can be...

Страница 53: ...Performing Changing Network Settings Canon IJ Network Device Setup Utility Screen Performing Network Settings 53 ...

Страница 54: ...of detected printer The icon below appears on the left if the printer cannot be used Appears when the printer requires setup or has not been configured Appears when the IP address is duplicated to another printer Appears when you cannot communicate with the printer Note If a printer you want to use is not detected try to set the criteria for printer search Setting Criteria for Printer Search Searc...

Страница 55: ...p Note If USB is selected from the pulldown menu on the toolbar is displayed E Location Displays the printer location if it is registered Nothing is displayed if the printer status is Requires Setup Note If USB is selected from the pulldown menu on the toolbar nothing is displayed Assigning Printer Information F Connection Method Displays printer connection method wired LAN Wi Fi or USB Note If US...

Страница 56: ...lldown menu on the toolbar nothing is displayed The printer with Requires Setup displayed on Status is not displayed Assigning Printer Information J IPv6 On appears when an IPv6 address is assigned for the printer Note If USB is selected from the pulldown menu on the toolbar is displayed K Displays the printer status and operation guides Selecting a printer from the printer list displays its curre...

Страница 57: ...tects printers Note This item has the same function as Update in the View menu C Stops detecting printers Note This item has the same function as Cancel in the View menu D Switches the printer list IPv4 IPv6 or USB printers Note This item has the same function as Switch View in the View menu You can also display the USB connected printer list Not available for some models In this case select USB E...

Страница 58: ...Performing Network Settings Performing Changing Wired LAN Connection Ethernet Cable Settings Performing Changing Wi Fi Settings Assigning Printer Information 58 ...

Страница 59: ...the printer with Wired LAN displayed on Connection Method and Available displayed on Status to perform settings You can perform settings for a printer with Available not displayed on Status via USB connection To perform setup for a USB connected printer select USB from the pulldown menu on the toolbar and select the printer to perform change settings 5 Select Network Settings on Printer Settings m...

Страница 60: ...CP server functionality must be enabled on your router C Use next IP address Select this option if no DHCP server functionality is available in your setup where you use the printer or you want to use a fixed IP address Enter the IP address subnet mask and default gateway IPv6 settings Note If you select a USB connected printer on step 4 you cannot perform IPv6 settings depending on the printer you...

Страница 61: ...are using C Use Manual Address Select this option if no DHCP server functionality is available in your setup where you use the printer or you want to use a fixed IP address Enter the IP address and IP address prefix length Note This setting item is not available depending on the printer you are using D Use DHCPv6 Select when you obtain an IP address using DHCPv6 Note This setting item is not avail...

Страница 62: ...3 Select Printer Network Setup on the displayed screen Detected printers are listed 4 Select printer to perform change settings from printer list Select the printer with Wi Fi displayed on Connection Method and Available or Requires Setup displayed on Status to perform settings You can perform settings for a printer with Available or Requires Setup not displayed on Status via USB connection To per...

Страница 63: ...nects the printer to wireless communication devices smartphone or tablet without a wireless router Note If Wi Fi is enabled on the computer and if you select a USB connected printer on step 4 you can select Direct depending on the printer you are using If Direct is selected all items are displayed in a gray out status and you cannot perform any settings In addition you cannot connect to Internet f...

Страница 64: ...en Appears D Encryption Type Displays the encryption method used over the Wi Fi IPv4 settings Note The setting items below are available only when Infrastructure is selected for Network Type If Direct is selected all items are displayed in a gray out status and you cannot perform any settings A Use IPv4 address Always selected displayed in a gray out state B Get IP address automatically Select thi...

Страница 65: ...ed in a gray out status and you cannot perform any settings A Use IPv6 address Select when you use the printer with IPv6 environment B Use Stateless Address Select when you use an IP address assigned automatically Use a router compatible with IPv6 Note This setting item is not available depending on the printer you are using C Use Manual Address Select this option if no DHCP server functionality i...

Страница 66: ...D Use DHCPv6 Select when you obtain an IP address using DHCPv6 Note This setting item is not available depending on the printer you are using 8 Click Set 66 ...

Страница 67: ... Yes 3 Select Printer Network Setup on the displayed screen Detected printers are listed 4 Select printer to assign location name and device name Select the printer with Available displayed on Status 5 Select Detailed Printer Settings on Printer Settings menu The Confirm Printer Password screen appears For more on the password refer to Administrator Password 6 Enter password and click OK The Detai...

Страница 68: ...nction of IJ Network Device Setup Utility G4000 series PRO 500 series PRO 1000 series MB2100 series MB2700 series MB5100 series MB5400 series iB4100 series PRO 520 PRO 540 PRO 540S PRO 560 PRO 560S PRO 2000 PRO 4000 PRO 4000S PRO 6000 PRO 6000S TS9000 series TS8000 series TS6000 series TS5000 series MG3000 series E470 series 68 ...

Страница 69: ...0 series TS8000 series TS9000 series TR8500 series TR7500 series TS9100 series TS8100 series TS6100 series TS5100 series TS3100 series E3100 series TS300 series E300 series TR8580 series TS9180 series TS8180 series TS6180 series TR8530 series TR7530 series TS8130 series TS6130 series XK70 series XK50 series G4010 series G3010 series TR4500 series E4200 series TS6200 series TS6280 series TS6230 ser...

Страница 70: ... TR9530 series TS3300 series E3300 series 70 ...

Страница 71: ...Handling Paper Originals Ink Tanks etc Loading Paper Loading Originals Refilling Ink Tanks 71 ...

Страница 72: ...Loading Paper Loading Plain Paper Photo Paper Loading Envelopes 72 ...

Страница 73: ... Media Types 1 Prepare paper Align the edges of paper If paper is curled flatten it Note Align the edges of paper neatly before loading Loading paper without aligning the edges may cause paper jams If paper is curled hold the curled corners and gently bend them in the opposite direction until the paper becomes completely flat For details on how to flatten curled paper see Check3 in Paper Is Smudge...

Страница 74: ... on the weight of the paper the leading edge may rise and printing may be shifted Make sure that the leading edge of the paper does not rise such as by holding the part that protrudes from the rear tray 3 Pull out the paper output tray B and the output tray extension C 74 ...

Страница 75: ... orientation WITH PRINT SIDE FACING UP After loading paper on the rear tray the paper information registration screen for the rear tray appears on the LCD 7 Slide right paper guide to align with both sides of paper stack Do not slide the paper guides too hard against the paper The paper may not be fed properly 75 ...

Страница 76: ...nt Always load paper in portrait orientation F Loading paper in landscape orientation G can cause paper jams Note Do not load sheets of paper higher than the load limit mark H 8 Close feed slot cover gently 76 ...

Страница 77: ...k is used and sprayed distance from nozzles etc that allow you to print to that type with optimal image quality The wrong paper settings may cause poor printout color quality or scratches on the printed surface If you notice blurring or uneven colors increase the print quality setting and try printing again To prevent incorrect printing this printer has a function that detects whether the settings...

Страница 78: ...put paper with your hands or use the printer in a place where the paper does not fall If the paper falls the printed side may become dirty or scratched Also when supporting the paper with hands be sure not to pull the paper forcefully while printing 78 ...

Страница 79: ...pare envelopes Press down on all four corners and edges of the envelopes to flatten them If the envelopes are curled hold the opposite corners and gently twist them in the opposite direction If the corner of the envelope flap is folded flatten it Use a pen to press the leading edge in the inserting direction flat and sharpen the crease The figures above show a side view of the leading edge of the ...

Страница 80: ...3 Pull out the paper output tray B and the output tray extension C 4 Open the feed slot cover D 5 Slide right paper guide E to open both paper guides 80 ...

Страница 81: ... the paper information registration screen for the rear tray appears on the LCD Fold flap of the envelope and load the envelope in portrait orientation with the address side facing up 7 Slide right paper guide to align with both sides of envelopes Do not slide the paper guides too hard against the envelopes The envelopes may not be fed properly 81 ...

Страница 82: ...Note Do not load envelopes higher than the load limit mark F 8 Close feed slot cover gently 82 ...

Страница 83: ...to register the paper information Note To prevent incorrect printing this printer has a function that detects whether the settings for the paper loaded on the rear tray matches the paper settings Before printing make print settings in accordance with the paper settings When this function is enabled an error message is displayed if these settings do not match to prevent incorrect printing When this...

Страница 84: ...Loading Originals Loading Originals on Platen Loading Based on Use Supported Originals How to Detach Attach the Document Cover 84 ...

Страница 85: ...nal WITH SIDE TO SCAN FACING DOWN on platen Loading Based on Use Supported Originals Important Be sure to observe the following when loading the original on the platen Failure to observe the following may cause the scanner to malfunction or the platen glass to break 85 ...

Страница 86: ...en glass Do not put any pressure of 4 4 lb 2 0 kg or more on the platen glass such as pressing down the original 3 Close the document cover gently Important After loading the original on the platen be sure to close the document cover before starting to copy or scan 86 ...

Страница 87: ... size A4 Letter etc for Scan size Photos Postcards Business Cards and Disc BD DVD CD Scanning only one original If you scan using the operation panel fol low the operation below Press the SCAN button and select Auto scan for Original type Press the SCAN button select Photo for Original type and then specify Auto scan A Singl for Scan size Loading Only One Original in Center of Platen Scanning two ...

Страница 88: ...nally striped area cannot be scanned Important The printer cannot scan the striped area A 0 04 in 1 mm from the edges of the platen glass Loading Only One Original in Center of Platen Place the original WITH THE SIDE TO SCAN FACING DOWN with 0 40 in 1 cm or more space between the edges diagonally striped area of the platen Portions placed on the diagonally striped area cannot be scanned 88 ...

Страница 89: ...ls Portions placed on the diagonally striped area cannot be scanned You can place up to 12 items B More than 0 40 in 1 cm Note The Skew Correction function automatically compensates for the originals placed at an angle of up to approximately 10 degrees Slanted photos with a long edge of 7 1 in 180 mm or more cannot be corrected Non rectangular or irregular shaped photos such as cut out photos may ...

Страница 90: ...aper Printed photo postcard business card or disc BD DVD CD etc Size width x height Max 8 5 x 11 7 in 216 x 297 mm Note When loading a thick original such as a book on the platen you can load it by removing the document cover from the printer How to Detach Attach the Document Cover 90 ...

Страница 91: ... document cover Hold up the document cover in portrait orientation and then tip it back Attaching the document cover Fit both hinges A of the document cover into the holder B and insert both hinges of the document cover vertically as illustrated below 91 ...

Страница 92: ...92 ...

Страница 93: ...Refilling Ink Tanks Refilling Ink Tanks Checking Ink Level Ink Tips 93 ...

Страница 94: ...he ink level correctly From the printer Ink level monitor From the computer Changing the remaining ink level notification setting If the remaining ink level notification function is disabled visually inspect the remaining ink and refill the ink tanks as necessary Continuing printing with ink below the lower limit line of an ink tank may prevent satisfactory print quality Note If print results beco...

Страница 95: ... the printer 3 Open the tank cap C of the ink tank to be refilled D Yellow E Magenta F Cyan G Black Important Carefully open the tank cap of the ink tank Ink on the inside of the tank cap may spatter when opening it 4 Hold the ink bottle upright and gently twist the bottle cap H to remove 95 ...

Страница 96: ...n and push the bottle into the inlet The ink tank is refilled Support the bottle with your hand so that it does not fall Important Make sure that each color of ink tanks is filled with corresponding color of ink bottles If ink is not injected into the ink tank slowly remove and insert the ink bottle Make sure to refill the ink tank with ink up to the upper limit line J on the ink tank 96 ...

Страница 97: ...ttles in ink tanks Close the bottle cap of the ink bottle securely and store the ink bottle upright 7 Close the tank cap of the ink tank Make sure the tank cap is completely inserted 8 Close the scanning unit cover To close the scanning unit cover hold it up once then take it down gently Note If the error message appears on the LCD after the scanning unit cover is closed take appropriate action 97...

Страница 98: ...may warp and cause ink leakage or ink may become poor quality Do not subject ink bottles to impacts Ink bottles may be damaged or bottle caps may come off by such impact and ink may leak Do not transfer ink to other containers This may result in accidental ingestion inappropriate use or poor ink quality Do not mix ink with water or other ink This may damage the printer Once an ink bottle has been ...

Страница 99: ...r occurs the error message appears on the LCD When Error Occurred The remaining ink level notification function works from initial printing to the time when one of the inks reaches the lower limit line shown on the ink tank For the remaining ink level notification function to work appropriately each ink tank must be filled with entire contents of the corresponding color ink bottle bundled with the...

Страница 100: ...g function The cleaning function helps the printer to suck air bubbles or ink itself from the nozzle and thus prevents print quality degradation or nozzle clogging Important The used ink is ejected into the maintenance cartridge When the maintenance cartridge becomes full replacement is necessary If the displayed message indicates that the maintenance cartridge is nearly full promptly obtain a new...

Страница 101: ...If Printing Is Faint or Uneven Maintenance Procedure Printing the Nozzle Check Pattern Examining the Nozzle Check Pattern Cleaning the Print Head Deep Print Head Cleaning Aligning the Print Head 101 ...

Страница 102: ...sult Changing the Print Quality and Correcting Image Data When the Print Results Are Blurred or Uneven Step1 Print the nozzle check pattern From the printer Printing the Nozzle Check Pattern From the computer For Windows Printing a Nozzle Check Pattern For macOS Printing a Nozzle Check Pattern Step2 Examine the nozzle check pattern If there are missing lines or horizontal white streaks in the patt...

Страница 103: ...ink flush Ink flush consumes a great amount of ink Frequent ink flush can rapidly consume ink so perform ink flush only when necessary Important If ink flush is performed when the remaining ink level is insufficient it may cause a failure Be sure to check the remaining ink level before performing ink flush From the printer How to Perform Ink Flush From the computer Ink Flush If the nozzle check pa...

Страница 104: ...Adjusting Print Head Position 104 ...

Страница 105: ...or Letter sized plain paper 1 Check that printer is turned on 2 Load a sheet of A4 or Letter sized plain paper in the rear tray Loading Plain Paper Photo Paper 3 Press the Setup button use the button to select Maintenance and press the OK button LCD and Operation Panel 4 Use the button to select Nozzle check and press the OK button The nozzle check pattern will be printed Do not perform any other ...

Страница 106: ... streaks in the pattern B If there are missing lines in the pattern A C Good D Bad lines are missing If there are horizontal white streaks in the pattern B E Good F Bad horizontal white streaks are present If any color in the pattern A or the pattern B is not printed Example Magenta pattern is not printed If one of the above is applied cleaning the print head is required 106 ...

Страница 107: ...s the Setup button use the button to select Maintenance and press the OK button LCD and Operation Panel 3 Use the button to select Cleaning and then press the OK button The printer starts cleaning the print head Do not perform any other operations until the printer completes the cleaning of the print head This takes about 1 minute 4 Check the print head condition To check the print head condition ...

Страница 108: ...ton use the button to select Maintenance and press the OK button LCD and Operation Panel 3 Use button to select Deep Cleaning and press OK button The printer starts cleaning the print head deeply Do not perform any other operations until the printer completes the deep cleaning of the print head This takes about 2 to 3 minutes 4 Check the print head condition To check the print head condition print...

Страница 109: ...int head alignment sheet is printed an error message appears on the LCD When Error Occurred You need to prepare a sheet of A4 or Letter sized plain paper 1 Check that printer is turned on 2 Load a sheet of A4 or Letter sized plain paper on the rear tray Loading Plain Paper Photo Paper 3 Press the Setup button use the button to select Maintenance and press the OK button LCD and Operation Panel 4 Us...

Страница 110: ...heet is stained or wrinkled it may not be scanned properly 5 Confirm the message then place print head alignment sheet on platen Place the print head alignment sheet WITH THE PRINTED SIDE FACING DOWN and align the mark on the upper left corner of the sheet with the alignment mark 110 ...

Страница 111: ...nt head alignment sheet on the platen until adjusting the print head position is complete If an error message is displayed on the LCD press the OK button to release the error then take appropriate action When Error Occurred Note For Windows when the print results are still not satisfactory after adjusting the print head position as described above adjust the print head position manually from the c...

Страница 112: ...Cleaning Cleaning Exterior Surfaces Cleaning Platen and Document Cover Cleaning Paper Feed Rollers Cleaning Inside the Printer Bottom Plate Cleaning 112 ...

Страница 113: ...te as it is cleaned without paper 5 Clean the paper feed rollers with paper 1 Make sure that the paper feed rollers have stopped rotating and then load three sheets of A4 or Letter sized plain paper in the rear tray Loading Plain Paper Photo Paper 2 Press the OK button The printer starts cleaning The cleaning will be complete when the paper is ejected If the problem is still not resolved with the ...

Страница 114: ...3 Turn on the power then clean the paper feed rollers again If the problem is not resolved after cleaning the paper feed roller contact your nearest Canon service center to request a repair 114 ...

Страница 115: ...o use a new piece of paper 1 Make sure that the power is turned on then remove any paper from the rear tray 2 Prepare paper 1 Fold a single sheet of A4 or Letter sized plain paper in half widthwise then unfold the paper 2 Load only this sheet of paper on the rear tray with the open side facing you After loading paper on the rear tray the paper information registration screen for the rear tray appe...

Страница 116: ...elect Maintenance and press the OK button LCD and Operation Panel 4 Use button to select Btm Plate Cleaning and press OK button The paper cleans the inside of the printer as it feeds through the printer Check the folded parts of the ejected paper If they are smudged with ink perform Bottom Plate Cleaning again 116 ...

Страница 117: ...ew piece of paper If the problem is not resolved after performing cleaning again the protrusions inside the printer may be stained Wipe off any ink from the protrusions using a cotton swab or the like Important Before cleaning the printer turn it off and unplug it 117 ...

Страница 118: ...comes full an error message is displayed and the printer stops working until it is replaced with a new one Do not touch the terminal A or opening B of the maintenance cartridge Note When purchasing a new maintenance cartridge order the following cartridge number Maintenance Cartridge MC G02 1 Prepare a new maintenance cartridge Remove the maintenance cartridge and the attached plastic bag from the...

Страница 119: ...eful not to drop or place the removed maintenance cartridge on a desk or something Dirt on the bottom may adhere to it or the ink inside may be scattered Put the used one immediately into the plastic bag attached to the new maintenance cartridge and seal the bag by tying the opening tightly to prevent the ink from leaking 119 ...

Страница 120: ...e cartridge according to local regulations 7 Insert the new maintenance cartridge straight until it stops 8 Attach the maintenance cover Align the tab on the back of the maintenance cover with the hole on the printer and close it 9 Insert the coin screw into the screw hole and turn it clockwise to secure 120 ...

Страница 121: ...10 Turn the printer on 121 ...

Страница 122: ...k the maintenance cartridge status A symbol appears in the area A if there is any information about the used space of the maintenance cartridge The maintenance cartridge is almost full Prepare a new one The maintenance cartridge is nearly full or has become full Confirm the error message prepare a new maintenance cartridge and take appropriate action Note The above screen shows estimated used spac...

Страница 123: ...g Your Printer When Repairing Lending or Disposing of the Printer Keeping Print Quality High Main Components and Their Use Main Components Power Supply LCD and Operation Panel Entering Numbers Letters and Symbols Changing Settings Changing Printer Settings from Your Computer Windows Changing Printer Settings from Your Computer macOS Changing Settings from Operation Panel Specifications 123 ...

Страница 124: ...Safety Safety Precautions Regulatory Information WEEE EU EEA 124 ...

Страница 125: ...close to the flammable solvents such as alcohol or thinner Do not open or modify the printer Use only the power cord cables that came with your printer Do not use these cables with other devices Do not plug in to voltages or frequencies other than those specified Plug the power cord into the socket completely Do not plug in or unplug the power cord with wet hands Do not damage the power cord by tw...

Страница 126: ...e sufficient care to prevent ink from spattering onto surroundings Ink may stain clothes or other belongings permanently Washing may not remove ink stains Do not leave ink bottles in areas exposed to high temperature such as near fire or a heater or in a car Bottles may warp and cause ink leakage or ink may become poor quality Do not subject ink bottles to impacts Ink bottles may be damaged or bot...

Страница 127: ...stand it on end or turn it upside down This may cause ink to leak Do not place anything on top of the printer Be especially careful to avoid metal objects such as paper clips and staples and containers holding flammable liquids such as alcohol or thinner Be sure to observe the following when loading the original on the platen Failure to observe the following may cause the scanner to malfunction or...

Страница 128: ...Regulatory Information Interference Do not use the printer around medical equipment or other electronic devices Signals from the printer may interfere with the correct operation of these devices 128 ...

Страница 129: ...che Union und EWR Norwegen Island und Liechtenstein Dieses Symbol weist darauf hin dass dieses Produkt gemäß der EU Richtlinie über Elektro und Elektronik Altgeräte 2012 19 EU und nationalen Gesetzen nicht über den Hausmüll entsorgt werden darf Dieses Produkt muss bei einer dafür vorgesehenen Sammelstelle abgegeben werden Dies kann z B durch Rückgabe beim Kauf eines ähnlichen Produkts oder durch A...

Страница 130: ... geautoriseerd inzamelpunt bijvoorbeeld wanneer u een nieuw gelijksoortig product aanschaft of bij een geautoriseerd inzamelpunt voor hergebruik van elektrische en elektronische apparatuur EEA Een onjuiste afvoer van dit type afval kan leiden tot negatieve effecten op het milieu en de volksgezondheid als gevolg van potentieel gevaarlijke stoffen die veel voorkomen in elektrische en elektronische a...

Страница 131: ...ció sobre els punts on podeu lliurar aquest producte per procedir al seu reciclatge adreceu vos a la vostra oficina municipal a les autoritats encarregades dels residus al pla de residus homologat per la RAEE o al servei de recollida de deixalles domèstiques de la vostra localitat Per a més informació sobre la devolució i el reciclatge de productes RAEE visiteu www canon europe com weee Solo per U...

Страница 132: ...odutos REEE vá a www canon europe com weee Gælder kun i Europæiske Union og EØS Norge Island og Liechtenstein Dette symbol angiver at det pågældende produkt ikke må bortskaffes sammen med dagrenovation jf direktivet om affald af elektrisk og elektronisk udstyr WEEE 2012 19 EU og gældende national lovgivning Det pågældende produkt skal afleveres på et nærmere specificeret indsamlingssted f eks i ov...

Страница 133: ...ov Produktet må leveres til et dertil egnet innsamlingspunkt det vil si på en autorisert en til en basis når du kjøper et nytt lignende produkt eller til et autorisert innsamlingssted for resirkulering av avfall fra elektrisk og elektronisk utstyr EE utstyr Feil håndtering av denne typen avfall kan være miljø og helseskadelig på grunn av potensielt skadelige stoffer som ofte brukes i EE utstyr Sam...

Страница 134: ...ha mer information om var du kan lämna den kasserade produkten för återvinning För mer information om inlämning och återvinning av WEEE produkter se www canon europe com weee Pouze Evropská unie a EHP Norsko Island a Lichtenštejnsko Tento symbol znamená že podle směrnice o OEEZ 2012 19 EU a podle vnitrostátních právních předpisů nemá být tento výrobek likvidován s odpadem z domácností Tento výrobe...

Страница 135: ...dukt lub do autoryzowanego punktu gromadzenia zużytego sprzętu elektrycznego i elektronicznego w celu poddania go recyklingowi Usuwanie tego typu odpadów w nieodpowiedni sposób może mieć negatywny wpływ na otoczenie i zdrowie innych osób ze względu na niebezpieczne substancje stosowane w takim sprzęcie Jednocześnie pozbycie się zużytego sprzętu w zalecany sposób przyczynia się do właściwego wykorz...

Страница 136: ...tīvai 2012 19 ES par elektrisko un elektronisko iekārtu atkritumiem EEIA un vietējiem tiesību aktiem no šī izstrādājuma nedrīkst atbrīvoties izmetot to kopā ar sadzīves atkritumiem Šis izstrādājums ir jānodod piemērotā savākšanas vietā piemēram apstiprinātā veikalā kur iegādājaties līdzīgu jaunu produktu un atstājat veco vai apstiprinātā vietā izlietotu elektrisko un elektronisko iekārtu pārstrāde...

Страница 137: ...avnih virov Če želite več informacij o tem kje lahko odložite odpadno opremo za recikliranje pokličite občinski urad komunalno podjetje ali službo ki skrbi za odstranjevanje odpadkov ali si oglejte načrt OEEO Če želite več informacij o vračanju in recikliranju izdelkov v skladu z direktivo OEEO obiščite www canon europe com weee Само за Европейския съюз и ЕИП Норвегия Исландия и Лихтенщайн Този си...

Страница 138: ...om weee Samo za Europsku uniju i EEZ Norveška Island i Lihtenštajn Ovaj simbol pokazuje da se ovaj proizvod ne smije odlagati s kućnim otpadom sukladno WEEE Direktivi 2012 19 EC i vašem nacionalnom zakonu Ovaj proizvod je potrebno predati na posebno mjesto za sakupljanje otpada npr na ovlašteno mjesto gdje možete zamijeniti staro za novo ukoliko kupujete novi sličan proizvod ili na ovlašteno mjest...

Страница 139: ...ispravnom odlaganju ovog proizvoda će doprineti efikasnom korišćenju prirodnih resursa Za više informacija o tome gde možete da predate vašu staru opremu radi recikliranje vas molimo da kontaktirate lokalne gradske vlasti komunalne službe odobreni plan reciklaže ili Gradsku čistoću Za više informacija o vraćanju i recikliranju WEEE proizvoda posetite stranicu www canon europe com weee 139 ...

Страница 140: ... Precautions Canceling Print Jobs Legal Restrictions on Scanning Copying Printer Handling Precautions Transporting Your Printer When Repairing Lending or Disposing of the Printer Keeping Print Quality High 140 ...

Страница 141: ... of deposit Postage stamps canceled or uncanceled Identification badges or insignia Selective service or draft papers Checks or drafts issued by governmental agencies Motor vehicle licenses and certificates of title Traveler s checks Food stamps Passports Immigration papers Internal revenue stamps canceled or uncanceled Bonds or other certificates of indebtedness Stock certificates Copyrighted wor...

Страница 142: ... any object on the document cover Do not place any object on the document cover It will fall into the rear tray when the document cover is opened and cause the printer to malfunction Also place the printer where objects will not fall on it 142 ...

Страница 143: ...printer in a sturdy box so that it is placed with its bottom facing down using sufficient protective material to ensure safe transport Do not tilt the printer Ink may leak When a shipping agent is handling transport of the printer have its box marked THIS SIDE UP to keep the printer with its bottom facing down Mark also with FRAGILE or HANDLE WITH CARE Please handle with care and ensure the box re...

Страница 144: ...e scanning unit cover A Important Do not touch tubes or other parts inside the printer This can cause trouble with the printer 5 Turn the ink valve lever B to the left Important The inside of the printer may become stained with ink Be careful not to get your clothes and your hands dirty 6 Close the scanning unit cover 144 ...

Страница 145: ...or flashing as it may cause malfunction or damage to the printer making the printer unable to print 8 Open the scanning unit cover again 9 Remove the carriage stopper C and insert it all the way into the hole in the printer side Pull the carriage stopper forward while pulling it up and insert it in the same orientation 10 Close the scanning unit cover 11 Retract output tray extension and paper out...

Страница 146: ...pening during transportation Then pack the printer in the plastic bag Close and seal the opening of the bag with an object such as tape so as not to leak ink 15 Attach the protective material to the printer when packing the printer in the box Important After transporting your printer remove the carriage stopper place it in the original position turn the ink valve lever to the right and then turn o...

Страница 147: ...may be stored in the printer When sending the printer for repair lending or transferring the printer to another person or disposing of the printer please be sure to follow the steps below in order to delete such information and prevent third parties from accessing it Press the Setup button select Device settings Reset setting All data and then select Yes 147 ...

Страница 148: ...u press the ON button to turn off the power the printer caps the print head nozzles automatically to prevent from drying If you unplug the power cord from the wall outlet before the ON lamp is turned off the print head will not be capped properly and this will cause drying or clogging When unplugging the power cord check that the ON lamp is not lit Print periodically Just as the tip of a felt pen ...

Страница 149: ...Main Components and Their Use Main Components Power Supply LCD and Operation Panel Entering Numbers Letters and Symbols 149 ...

Страница 150: ...Main Components Front View Rear View Inside View Operation Panel 150 ...

Страница 151: ...ck E Feed Slot Cover Prevents anything from falling into the feed slot Open it to slide the paper guides and close it before printing F Rear Tray Load paper here Two or more sheets of the same size and type of paper can be loaded at the same time and fed automatically one sheet at a time Loading Plain Paper Photo Paper Loading Envelopes G Paper Output Tray Printed paper is ejected Pull out it befo...

Страница 152: ...I Platen Load an original here 152 ...

Страница 153: ...aintenance cartridge see Replacing Maintenance Cartridge C Maintenance Cover Open when replacing the maintenance cartridge D USB Port Plug in the USB cable to connect the printer with a computer Important Do not touch the metal casing Do not plug in or unplug the USB cable while the printer is printing or scanning with the computer This can cause trouble 153 ...

Страница 154: ...re low refill the low tanks Refilling Ink Tanks D Upper limit line Indicates the maximum capacity of the ink E Single dot Indicates the amount of ink required when performing ink flush F Lower limit line Indicates the lower limit of the sufficient amount of ink to print Refill the ink tank before the amount of ink is below this line G Ink Valve Lever Operate when transporting a printer Transportin...

Страница 155: ...f items Also used to resolve errors E Setup button Displays the Setup menu screen With this menu you can perform printer maintenance and change printer settings Also used for selecting the input mode F SCAN button Switches the printer to the scan mode G Wireless connect button To set wireless router information in the printer directly from a smartphone or other such device without having to do any...

Страница 156: ...button Starts black white copying scanning etc L MENU button Press to display the copy and scan menu items M COPY button Switches the printer to the copy mode N and buttons Used to select a setting item These buttons are also used for entering characters O Back button Returns the LCD to the previous screen 156 ...

Страница 157: ...Power Supply Checking that Power Is On Turning the Printer On and Off Checking the Power Plug Power Cord Unplugging the Printer 157 ...

Страница 158: ... off if the ON lamp is lit the printer is on Note It may take a while for the printer to start printing immediately after you turn on the printer The LCD will turn off if the printer is not operated for about 11 minutes To restore the display press any button or perform the print operation 158 ...

Страница 159: ... is displayed on the LCD see When Error Occurred You can set the printer to automatically turn on when a print or scan operation is performed from a computer connected by USB cable or wireless network This feature is set to off by default From the printer ECO settings From the computer For Windows Managing the Printer Power For macOS Managing the Printer Power Turning off the printer Press the ON ...

Страница 160: ...Note You can set the printer to automatically turn off when no operations are performed or no print jobs are sent to the printer for a certain interval This feature is set to on by default From the printer ECO settings From the computer For Windows Managing the Printer Power For macOS Managing the Printer Power 160 ...

Страница 161: ...r cord is hot The power plug power cord is rusty The power plug power cord is bent The power plug power cord is worn The power plug power cord is split Caution If you find anything unusual with the power plug power cord described above unplug the power cord and call for service Using the printer with one of the unusual conditions above may cause a fire or an electric shock 161 ...

Страница 162: ...the ON lamp is off Unplugging the power cord while the ON lamp is lit or flashing may cause drying or clogging of the print head and print quality may be reduced 1 Press the ON button to turn the printer off 2 Confirm that the ON lamp is off 3 Unplug the power cord The specification of the power cord differs depending on the country or region of use 162 ...

Страница 163: ...n the MENU button is pressed in the Copy standby screen or Scan standby screen the menu screen appears Copy menu Setting Items for Copying Special Copy Menu Scan menu Setting Items for Scanning Using Operation Panel In a menu or settings screen use the button to select an item or option and then press the OK button to proceed with the procedure Note For details on how to change settings refer to C...

Страница 164: ...e Signal strength 81 or more You can use the printer over Wi Fi without any problems Signal strength 51 or more The problem such as the printer cannot print may occur according to the network status We recommend placing the printer near the wireless router Signal strength 50 or less The problem such as the printer cannot print may occur Place the printer near the wireless router Wi Fi is enabled b...

Страница 165: ...umeric 1234567890 SP Symbols _ SP SP Indicates a space Note Only the input modes or characters available for input appear in their respective screens Entering Numbers Letters and Symbols Use the button to select a character and press the OK button to input it When input of all characters is complete hold down the OK button When a confirmation message appears select Yes and press the OK button To i...

Страница 166: ...Changing Settings Changing Printer Settings from Your Computer Windows Changing Printer Settings from Your Computer macOS Changing Settings from Operation Panel 166 ...

Страница 167: ...Printer Settings from Your Computer Windows Changing the Print Options Registering a Frequently Used Printing Profile Setting the Ink to be Used Managing the Printer Power Changing the Printer Operation Mode 167 ...

Страница 168: ... this option if you encounter print failures such as part of an image data being cut off 1 Open the printer driver setup window 2 Click Print Options on the Page Setup tab The Print Options dialog box opens 3 Change the individual settings If necessary change the setting of each item and then click OK The Page Setup tab is displayed again 168 ...

Страница 169: ...up window 2 Set the necessary items From Commonly Used Settings on the Quick Setup tab select the printing profile to be used and if necessary change the settings after Additional Features You can also register necessary items on the Main and Page Setup tabs 3 Click Save The Save Commonly Used Settings dialog box opens 4 Save the settings Enter a name for the print settings to register in the Name...

Страница 170: ...dy registered will be deleted from Commonly Used Settings Registered print settings cannot be saved and preserved If a profile is deleted register the print settings again Deleting Unnecessary Printing Profile 1 Select the printing profile to be deleted Select the printing profile you want to delete from the Commonly Used Settings list on the Quick Setup tab 2 Delete the printing profile Click Del...

Страница 171: ...Page Setup tab When you perform printing the specified ink will be used Important When the following settings are specified Black Only does not function because the printer uses an ink other than black to print documents Other than Plain Paper Envelope Ink Jet Hagaki A Hagaki K A Hagaki A or Hagaki is selected for Media Type on the Main tab Borderless is selected from the Page Layout list on the P...

Страница 172: ...f the printer when there are no operations from the printer driver or the printer for a specified period of time 1 Open the Canon IJ Printer Assistant Tool 2 Check that the printer is on and then click Auto Power The Auto Power Settings dialog box will open Note If the printer is off or if communication between the printer and the computer is disabled an error message may appear because the comput...

Страница 173: ...firmation message appears click OK The setting is enabled after this When you want to disable this function select Disable from the list according to the same procedure Note When the printer is turned off the Canon IJ Status Monitor message varies depending on the Auto Power On setting When the setting is Enable Printer is standing by is displayed When the setting is Disable Printer is offline is ...

Страница 174: ... head alignment but you can change it to manual head alignment If the printing results of automatic Print Head Alignment are not satisfactory perform manual head alignment Check this check box to perform the manual head alignment Uncheck this check box to perform the automatic head alignment Rotate 90 degrees left when orientation is Landscape On the Page Setup tab you can change the rotation dire...

Страница 175: ...s check box Ink Drying Wait Time You can set the length of the printer rest time until printing of the next page begins Moving the slider to the right increases the pause time and moving the slider to the left decreases the time If the paper gets stained because the next page is ejected before the ink on the printed page dries increase the ink drying wait time Reducing the ink drying wait time spe...

Страница 176: ...Operation Panel Setting Items on Operation Panel Print settings LAN settings PictBridge settings Smartphone print Other dev settings Language selection Firmware update Reset setting Feed settings Ink level monitor ECO settings Quiet setting System information 176 ...

Страница 177: ...ned on 2 Press the Setup button The Setup menu screen is displayed 3 Select Device settings and then press the OK button The Device settings screen is displayed 4 Select a setting item to adjust and then press the OK button The setting screen for the selected item is displayed 5 Select a setting item and then press the OK button 6 Select a setting to specify and then press the OK button For more o...

Страница 178: ...settings Language selection ECO settings Quiet setting Items for Paper Printing Print settings PictBridge settings Smartphone print Feed settings Items for Maintenance Management LAN settings Firmware update Reset setting Ink level monitor System information 178 ...

Страница 179: ...from a PictBridge Wi Fi supporting device Printing from a standard form Note When performing settings from application software or the printer driver these settings will be prioritized If printouts contain margins even though you are printing in Borderless specifying Amount Large for this setting may help solve the problem Auto photo fix set When ON is selected you can select whether to print phot...

Страница 180: ...e on screen instructions of the connecting device for the setup procedure Manual connect Select when you perform settings for Wi Fi manually using the operation panel of the printer WPS Push button Select when you perform settings for Wi Fi using a wireless router supporting a Wi Fi Protected Setup WPS push button method Follow the on screen instructions during setup Other setup Manual setup Selec...

Страница 181: ... settings of the printer such as its IP address and SSID For more information on the printer s network setting is printed out Printing Network Settings Important The network settings printout contains important information about your network Handle it with care Manual setup Set printer name Specifies the printer name You can use up to 15 characters for the name Note You cannot use the same printer...

Страница 182: ...s the Bonjour service name You can use up to 48 characters for the name Note You cannot use the same service name as that already used for other LAN connected devices LPR setting Enables disables the LPR setting RAW protocol Enables disables RAW printing LLMNR Enables disables LLMNR Link Local Multicast Name Resolution Selecting Enable allows the printer to detect printer s IP address from the pri...

Страница 183: ... IPsec settings Selecting Enable allows you to specify the IPsec settings 183 ...

Страница 184: ...of the document cover forgetting to remove the original may not be detected Wi Fi pairing In order to connect Canon PRINT Inkjet SELPHY multiple configurations will be performed Enab disab pairing Set the printer s Wi Fi pairing function to enable or disable Additional pairing On another function permit or prohibit Canon PRINT Inkjet SELPHY pairing Del paired devices Cancel all Canon PRINT Inkjet ...

Страница 185: ...ish German French Italian Spanish Portuguese Dutch Danish Norwegian Swedish Finnish Russian Ukrainian Polish Czech Slovene Hungarian Slovak Croatian Romanian Bulgarian Turkish Greek Estonian Latvian Lithuanian Simplified Chinese Korean Traditional Chinese Indonesian Vietnamese 185 ...

Страница 186: ...s not complete check the following and take an appropriate action Check the network settings such as a wireless router If Cannot connect to the server try again is displayed on the LCD press the OK button and try again after a while Current version You can check the current firmware version Update notification When ON is selected and the firmware update is available the screen to inform you of the...

Страница 187: ...ttings such as the paper size or media type back to the default All data Sets all settings you made to the printer back to the default The administrator password specified by Remote UI or IJ Network Device Setup Utility reverts to the default setting Note You cannot set the following setting items back to the default The language displayed on the LCD The current position of the print head CSR Cert...

Страница 188: ...ttings you can specify by the printer driver Windows or on the LCD Paper Settings on the Printer Driver and the Printer Media Type Paper Settings on the Printer Driver and the Printer Paper Size Det paper mismatch If you select ON the printer detects whether the paper size and the media type are identical with those registered in Save paper info If printing starts with the settings that do not mat...

Страница 189: ...maining ink level notification function from disabled to enabled it is necessary to refill all ink tanks up to the upper limit line Refilling Ink Tanks Reset ink lev count Resets the remaining ink count If you select Yes you can reset the remaining ink count of all the ink tanks at once If you select No you can specify the ink color and reset the remaining ink count in any ink tank Important After...

Страница 190: ...enu screen is displayed 3 Select ECO settings and then press the OK button 4 Select Auto power off and then press the OK button 5 Select a time to turn off the printer and then press the OK button Turning on Printer Automatically You can enable the printer to turn on automatically when printing data is sent to the printer or the printer is operated for scanning from the computer 1 Check that print...

Страница 191: ...perating noise while printing is in progress Important When ON is selected operating speed may be reduced compared to when OFF is selected This function may not be so effective depending on the printer s setting Furthermore certain noise such as when the printer is preparing for printing is not reduced Note You can set the quiet mode from the operation panel of the printer the printer driver or Sc...

Страница 192: ...isplays the current firmware version Printer name Displays the printer name currently specified Serial number Displays the printer serial number Printed sheet count Displays the printed sheet count in increments of 50 sheets Ex In case of 25 sheets 1 50 is displayed 192 ...

Страница 193: ...s Temperature 59 to 86 F 15 to 30 C Humidity 10 to 80 RH no condensation For the temperature and humidity conditions of papers such as photo paper refer to the paper s packaging or the supplied instructions Storage environment Temperature 32 to 104 F 0 to 40 C Humidity 5 to 95 RH no condensation Power supply AC 100 240 V 50 60 Hz The supplied power cord is only for the country or region you purcha...

Страница 194: ...d available channels differ depending on country or region Communication distance Indoors 164 feet 50 m Effective range varies depending on the installation environment and location Security WEP 64 128 bits WPA PSK TKIP AES WPA2 PSK TKIP AES Setup WPS Push button configuration PIN code method Easy wireless connect Minimum System Requirements Conform to the operating system s requirements when high...

Страница 195: ...rd disk space may be changed without notice macOS Operating System macOS 10 12 6 macOS 10 15 Other Supported OS iOS iPadOS Android Chrome OS Some functions may not be available with the supported OS Refer to the Canon web site for details Information in this manual is subject to change without notice 195 ...

Страница 196: ...Information about Paper Supported Media Types Paper Load Limit Unsupported Media Types Handling Paper Print Area 196 ...

Страница 197: ...ailable in some countries or regions Note that in the United States Canon paper is not sold by model number Instead purchase paper by name Paper for printing documents Canon Red Label Superior WOP111 Canon Océ Office Colour Paper SAT213 High Resolution Paper HR 101N Paper for printing photos Glossy Photo Paper Everyday Use GP 501 GP 508 Photo Paper Glossy GP 701 Photo Paper Plus Glossy II PP 201 P...

Страница 198: ...edia Type Windows Note When printing photos saved on a PictBridge Wi Fi compliant device you must specify the page size and media type Printing from Digital Camera Page Sizes You can use the following page sizes Note Page sizes and media types the printer supports differ depending on the OS you are using Standard sizes Letter Legal Executive A6 A5 A4 B5 B Oficio M Oficio Foolscap Legal India KG 4 ...

Страница 199: ...nvelope Monarch Card 2 17 x3 58 Special sizes Minimum size 2 17 x 3 50 in 55 0 x 89 0 mm Maximum size 8 50 x 47 24 in 216 0 x 1200 0 mm When Height of Page Size is set to a value exceeding 26 61 in 676 mm Media Type is set to Plain Paper Paper Weight You can use paper in the following weight range Plain paper From 17 to 28 lb 64 to 105 g m2 199 ...

Страница 200: ... 1 Approx 80 sheets Paper for printing photos Media Name Model No Rear Tray Glossy Photo Paper Everyday Use GP 501 GP 508 2 Photo Paper Glossy GP 701 2 Photo Paper Plus Glossy II PP 201 PP 208 PP 301 2 Photo Paper Pro Luster LU 101 2 Photo Paper Plus Semi gloss SG 201 2 Matte Photo Paper MP 101 A4 Letter 5 x7 13x18cm 8 x10 20x25cm 2L 127x178mm 10 sheets KG 4 x6 10x15 L 89x127mm Square 3 5 Square 5...

Страница 201: ...leave marks on the printed side or prevent efficient feeding In this case load one sheet at a time Paper Load Limit of Paper Output Tray Genuine Canon Paper Paper for printing documents Media Name Model No Paper Output Tray Canon Red Label Superior WOP111 Canon Océ Office Colour Paper SAT213 High Resolution Paper HR 101N Approx 50 sheets Paper other than Genuine Canon Paper Common Name Paper Outpu...

Страница 202: ...ng plain paper or notepad paper cut to a small size when printing on paper smaller than A5 Picture postcards Postcards Envelopes with a double flap Envelopes with an embossed or treated surface Envelopes whose gummed flaps are already moistened and adhesive Any type of paper with holes Paper that is not rectangular Paper bound with staples or glue Paper with an adhesive surface on the back such as...

Страница 203: ... the printed surface until the ink is dried Even when the ink is dried be careful not to touch the printed surface as much as possible when handling Due to the nature of the pigment ink the ink on the printed surface may be removed when being rubbed or scratched Take out only the necessary number of paper from the package just before printing To avoid curling when you do not print put unused paper...

Страница 204: ...ble sheets per pigment black ink bottle A4 plain paper when printing in color Standard mode 6 000 sheets Economy mode 7 600 sheets Measurement conditions Measurement images Color printing A4 color document ISO IEC24712 Measurement method Canon original Paper type Plain paper Print driver setting Setting to the default for plain paper setting Print Quality to Economy Borderless printing OFF The num...

Страница 205: ...Printing Printing from Computer Printing from Smartphone Tablet Printing Using Operation Panel Printing from Digital Camera Using PIXMA MAXIFY Cloud Link Paper Settings 205 ...

Страница 206: ...Printing from Computer Printing from Application Software Windows Printer Driver Printing from Application Software macOS AirPrint Printing Using Canon Application Software Printing from Chrome OS 206 ...

Страница 207: ...on Software Windows Printer Driver Basic Printing Setup Basic Various Printing Methods Changing the Print Quality and Correcting Image Data Overview of the Printer Driver Printer Driver Description Updating the MP Drivers 207 ...

Страница 208: ... printer driver s setup screen 4 Select frequently used settings On the Quick Setup tab use Commonly Used Settings to select from predefined print settings When you select a print setting the settings for Additional Features Media Type and Printer Paper Size automatically switch to the predefined values 5 Select print quality For Print Quality select from High Standard or Economy 208 ...

Страница 209: ...ion This means that you can print more than if you have Standard selected When performing color printing or color copying ink consumption for the black areas is reduced However for the color areas the same amount of ink is consumed as the Standard setting For details on Economy Mode see Economy Mode 6 Click OK The printer will now print using these settings 209 ...

Страница 210: ...ttings To check the current printer settings or to apply the printer settings to the printer driver display the Quick Setup tab click Printer Media Information and specify the settings in the dialog box that appears For details about the paper information to be registered on the printer see the following Paper Settings on the Printer Driver and the Printer Media Type Paper Settings on the Printer ...

Страница 211: ...Set to display the dialog box Select the media type and paper size that match your purpose and then click OK If the media type or the paper size on the printer are not set or are set to Others Set will be grayed out and cannot be clicked If communication with the printer is disabled the Printer Media Information dialog box will not appear or the printer driver will not be able to obtain printer me...

Страница 212: ...inting Media name Model No Media Type in the printer driver Paper information reg istered on the printer Photo Paper Plus Glossy II PP 201 PP 208 PP 301 Photo Paper Plus Glossy II PlusGlossyII Photo Paper Pro Luster LU 101 Photo Paper Pro Luster Pro Luster Photo Paper Plus Semi gloss SG 201 Photo Paper Plus Semi gloss Semi gloss Glossy Photo Paper Everyday Use GP 501 GP 508 Glossy Photo Paper Glos...

Страница 213: ...Matte Photo Paper Matte Commercially available papers Media name Media Type in the printer driver Paper information registered on the printer Plain Paper including recycled paper Plain Paper Plain paper Envelopes Envelope Envelope Greeting Cards Inkjet Greeting Card Others Card Stock Card Stock Card stock 213 ...

Страница 214: ...m Letter Legal 8 5 x14 22x36cm Legal Executive 7 25 x10 5 184 2x266 7mm Executive A6 A6 A5 A5 A4 A4 B5 B5 B Oficio 8 5 x14 216 0x355 0mm B Oficio M Oficio 8 50 x13 43 216 0x341 0mm M Oficio Foolscap F4 Oficio2 FC F4 Ofc2 Legal India 8 46 x13 58 215x345mm Legal India 4 x6 10x15cm KG 4 x6 5 x7 13x18cm 2L 5 x7 7 x10 18x25cm 7 x10 8 x10 20x25cm 8 x10 L 89x127mm L 2L 127x178mm 2L 5 x7 Square 3 5 x3 5 9...

Страница 215: ... 3 Nagagata 4 3 54 x8 07 Nagagata 4 Yougata 4 4 13 x9 25 Yougata 4 Yougata 6 3 86 x7 48 Yougata 6 Envelope C5 Envelope C5 Envelope Monarch 3 88 x7 5 98 4x190 5mm Env Monarch Card 2 17 x3 58 55x91mm Card 2 x3 5 Custom Size Others 215 ...

Страница 216: ...ods Setting a Page Size and Orientation Setting the Number of Copies and Printing Order Perform Borderless Printing Scaled Printing Page Layout Printing Duplex Printing Setting Up Envelope Printing Printing on Postcards 216 ...

Страница 217: ...ab 1 Open the printer driver setup window 2 Select the paper size Select a page size from the Page Size list on the Page Setup tab 3 Set Orientation Select Portrait or Landscape for Orientation Check Rotate 180 degrees check box when you want to perform printing with the original being rotated 180 degrees 4 Click OK When you perform print the document will be printed with the selected page size an...

Страница 218: ... Specify the print order Check the Print from Last Page check box when you want to print from the last page in order and uncheck the check box when you want to print from the first page Check the Collate check box when you are printing multiple copies of a document and want to print out all pages in each copy together Uncheck this check box when you want to print all pages with the same page numbe...

Страница 219: ...ware and this printer driver the number of copies may be multiplied numbers of the two settings or the specified printing order may not be enabled Print from Last Page appears grayed out and is unavailable when Tiling Poster is selected for Page Layout When Booklet is selected for Page Layout Print from Last Page and Collate appear grayed out and cannot be set When Duplex Printing Manual is select...

Страница 220: ...created When you want to print data such as a photo without providing any margin around it set borderless printing You can also set borderless printing in Additional Features on the Quick Setup tab Note You can also set Amount of extension on the operation panel of the printer but the settings on the printer driver will be prioritized Setting Borderless Printing 1 Open the printer driver setup win...

Страница 221: ...be used for borderless printing is selected the size is automatically changed to the valid page sizes for borderless printing When Borderless is selected the Printer Paper Size Duplex Printing Manual Stapling Side settings and the Stamp Background button on the Page Setup tab appear grayed out and are unavailable When Envelope Light Fabric Iron on Transfers Dark Fabric Iron on Transfers or High Re...

Страница 222: ...extension The extension amount decreases as the Amount of Extension slider is moved to the left Important When the amount of extension is decreased an unexpected margin may be produced on the print depending on the size of the paper Note When the Amount of Extension slider is set to the leftmost position image data will be printed in the full size If you set this when printing the address side of ...

Страница 223: ...nt Using Page Size select the page size that is set with your application software 4 Set the scaling rate by using one of the following methods Select a Printer Paper Size When the printer paper size is smaller than the Page Size the page image will be reduced When the printer paper size is larger than the Page Size the page image will be enlarged Specify a scaling factor 223 ...

Страница 224: ...erform print the document will be printed with the specified scale Important When the application software which you used to create the original has the scaled printing function configure the settings on your application software You do not need to configure the same setting in the printer driver Note Selecting Scaled changes the printable area of the document 224 ...

Страница 225: ...yout list on the Page Setup tab The current settings are displayed in the settings preview on the left side of the printer driver 3 Select the print paper size Select the size of the paper loaded in the printer from the Printer Paper Size list 4 Set the number of pages to be printed on one sheet and the page order If necessary click Specify specify the following settings in the Page Layout Printin...

Страница 226: ...er To change the page arrangement order select a placement method from the list Page Border To print a page border around each document page check this check box 5 Complete the setup Click OK on the Page Setup tab When you perform print the specified number of pages will be arranged on each sheet of paper in the specified order 226 ...

Страница 227: ...age Setup tab 3 Select the layout Select Normal size Fit to Page Scaled or Page Layout from the Page Layout list 4 Specify the side to be stapled The best Stapling Side is selected automatically from the Orientation and Page Layout settings To change the setting select another stapling side from the list 5 Set the margin width If necessary click Specify Margin and set the margin width and then cli...

Страница 228: ...her than Plain Paper is selected from Media Type on the Main tab Duplex Printing Manual appears grayed out and is unavailable When Borderless Tiling Poster or Booklet is selected from the Page Layout list Duplex Printing Manual and Stapling Side appear grayed out and are unavailable Note If the back side of the paper becomes smudged during duplex printing perform Bottom Plate Cleaning in the Canon...

Страница 229: ... Envelope DL Yougata 4 4 13 x9 25 Yougata 6 3 86 x7 48 Envelope C5 or Envelope Monarch 3 88 x7 5 98 4x190 5mm and then click OK 5 Set the orientation To print the addressee horizontally select Landscape for Orientation Note If Envelope Com 10 Envelope DL Yougata 4 4 13 x9 25 Yougata 6 3 86 x7 48 Envelope C5 or Envelope Monarch 3 88 x7 5 98 4x190 5mm is selected for Printer Paper Size the printer r...

Страница 230: ...tus Monitor Then click Envelope Printing from Display Guide Message of the Option menu to enable the setting Note If the paper settings in the printer driver differ from the paper information registered on the printer an error may occur For instructions on what to do if an error occurs see Paper Settings To check the current printer settings or to apply the printer settings to the printer driver c...

Страница 231: ...tings in the dialog box that appears For details about the paper information to be registered to the printer driver and on the printer see the following Paper Settings on the Printer Driver and the Printer Media Type Paper Settings on the Printer Driver and the Printer Paper Size 5 Select the paper size For Printer Paper Size select Hagaki 100x148mm or Hagaki 2 200x148mm Important Return postcards...

Страница 232: ...OK When you perform printing the data will be printed onto the postcard Important When printing on media other than postcards load the media according to usage method of that media and click Start Printing 232 ...

Страница 233: ...Overview of the Printer Driver Canon IJ Printer Driver Opening Printer Driver s Setup Screen Canon IJ Status Monitor Instructions for Use Printer Driver 233 ...

Страница 234: ...ort different data formats you need a printer driver that supports your printer Installing the Printer Driver To install the printer driver install the driver from the Setup CD ROM or our website Specifying the Printer Driver To specify the printer driver open the Print dialog box of the application software you are using and select Canon XXX where XXX is your model name Displaying the Manual from...

Страница 235: ...details refer to the operating instructions of your application software Displaying the Printer Driver s Setup Screen by Clicking the Printer Icon From the setup screen you can perform printer maintenance operations such as print head cleaning or set print settings to be shared by all application software 1 Select Control Panel Hardware and Sound Devices and Printers 2 Right click the icon of your...

Страница 236: ...n on the task bar Click the button of the status monitor displayed on the task bar The Canon IJ Status Monitor appears Note To open the Canon IJ Status Monitor when the printer is not printing open the printer driver setup window and click View Printer Status on the Maintenance tab The information displayed on the Canon IJ Status Monitor may differ depending on the country or region where you are ...

Страница 237: ...In such cases take the appropriate action as described Related Topic Canon IJ Status Monitor Description 237 ...

Страница 238: ...ince the resolution in the preview display differs from the printing resolution text and lines in the preview display may appear different from the actual print result With some applications the printing is divided into multiple print jobs To cancel printing delete all divided print jobs If image data is not printed correctly display the Print Options dialog box from the Page Setup tab and change ...

Страница 239: ...ng If bitmap printing is enabled in Adobe Illustrator Adobe Systems Incorporated printing may take time or some data may not be printed Print after unchecking the Bitmap Printing check box in the Print dialog box 239 ...

Страница 240: ...Printer Driver Description Quick Setup Tab Description Main Tab Description Page Setup Tab Description Maintenance Tab Description Canon IJ Status Monitor Description 240 ...

Страница 241: ...es either by dragging the individual profiles or by holding down the Ctrl key and pressing the up or down arrow keys Standard These are the factory settings If Page Size Orientation and Copies were set from the application software those settings have priority Photo Printing If you select this setting when printing a photo the photo paper and photo size generally used are set The Borderless Printi...

Страница 242: ...laid out on a sheet of paper You can check an overall image of the layout Preview before printing Shows what the print result will look like before you actually print the data Check this check box to display a preview before printing Uncheck this check box if you do not want to display a preview Additional Features Displays the frequently used convenient functions for the printing profile that you...

Страница 243: ...umed as the Standard setting For details on Economy Mode see Economy Mode Rotate 180 degrees Prints the document by rotating it 180 degrees against the paper feed direction The width of print area and the amount of extension that are configured in other application software will be reversed vertically and horizontally Color Intensity Manual Adjustment Select when you set the Color Correction metho...

Страница 244: ...vidually click the Main tab and for Print Quality select Custom The Set becomes enabled Click Set to open the Custom dialog box and then specify the desired settings High Gives priority to print quality over printing speed Standard Prints with average speed and quality Economy Reduces the amount of black ink used when printing Note Selecting Economy reduces black ink consumption This means that yo...

Страница 245: ...ormation that you set on the Quick Setup Main and Page Setup tabs and add the information to the Commonly Used Settings list on the Quick Setup tab Name Enter the name for the printing profile you wish to save Up to 255 characters can be entered The name appears with its associated icon in the Commonly Used Settings list on the Quick Setup tab Options Opens the Save Commonly Used Settings dialog b...

Страница 246: ...d with the application software Custom Paper Size dialog box This dialog box allows you to specify the size width and height of the custom paper Units Select the unit for entering a user defined paper size Paper Size Specifies the Width and the Height of the custom paper Measurement is shown according to the units specified in Units Printer Media Information dialog box This dialog box allows you t...

Страница 247: ...ing Color Correction Adjusting Color Balance Adjusting Brightness Adjusting Contrast Setting Paper Dimensions Custom Size Setting a Page Size and Orientation Setting the Number of Copies and Printing Order 247 ...

Страница 248: ...ype that matches the paper that is loaded in the printer This ensures that printing is carried out properly for the specified paper Paper Source Shows the source from which paper is supplied Rear Tray Paper is always supplied from the rear tray Print Quality Selects your desired printing quality Select one of the following to set the print quality level that is appropriate for the purpose Importan...

Страница 249: ...a Yellow Brightness Contrast etc and Color Correction method Set Select Manual for Color Intensity to enable this button In the Manual Color Adjustment dialog box you can adjust individual color settings such as Cyan Magenta Yellow Brightness and Contrast on the Color Adjustment tab and select the Color Correction method on the Matching tab Note If you want to use an ICC profile to adjust colors u...

Страница 250: ...ta and Yellow Moving the slider to the right makes a color stronger and moving the slider to the left makes a color weaker You can also directly enter a value linked to the slider Enter a value in the range from 50 to 50 This adjustment changes the relative amount of ink of each color used which alters the total color balance of the document Use your application if you want to change the total col...

Страница 251: ...ost people prefer ICM Adjusts the colors by using an ICC profile when printing Important If the application software is set so that ICM is disabled ICM is unavailable for Color Correction and the printer may not be able to print the image data properly None Disables color adjustment with the printer driver Select this value when you are specifying an individually created printing ICC profile in an...

Страница 252: ...o specify any vertical and horizontal dimensions for the paper size Orientation Selects the printing orientation If the application used to create your document has a similar function select the same orientation that you selected in that application Portrait Prints the document so that its top and bottom positions are unchanged relative to the paper feed direction This is the default setting Lands...

Страница 253: ...t the printer can automatically reduce the size when it prints the document Check this check box to reduce the size when printing the document Borderless Chooses whether you are printing on a full page without any page margins or printing with page margins In borderless printing originals are enlarged to extend slightly off the paper Thus printing can be performed without any margins border Use Am...

Страница 254: ...unction can be used only when Plain Paper is selected for Media Type and one of Normal size Fit to Page Scaled or Page Layout is selected Stapling Side Selects the stapling margin position The printer analyzes the Orientation and Page Layout settings and automatically selects the best stapling margin position Check Stapling Side and select from the list to change it Specify Margin Opens the Specif...

Страница 255: ...the environment Stamp and Background may not be available Custom Paper Size dialog box This dialog box allows you to specify the size width and height of the custom paper Units Select the unit for entering a user defined paper size Paper Size Specifies the Width and the Height of the custom paper Measurement is shown according to the units specified in Units Page Layout Printing dialog box This di...

Страница 256: ...Depending on the environment of the printer driver you are using this function may not be available Print Cut Paste lines in margins Specifies whether to print cut lines that serve as guidelines for pasting together the pages into a poster Check this check box to print the cut lines Print page range Specifies the printing range Select All under normal circumstances Select Pages to specify a specif...

Страница 257: ...ble Disable ICM required from the application software Disables the ICM function required from the application software When an application software uses Windows ICM to print data unexpected colors may be produced or the printing speed may decrease If these problems occur checking this check box may resolve the problems Important Uncheck this check box under normal circumstances This function does...

Страница 258: ...and then print the data Depending on the application software being used the image data may be cut off or may not be printed properly In such cases select On If you will not be using this function select Off Important When using this function the print quality may drop depending on the print data Unit of Print Data Processing Selects the processing unit of the print data to be sent to the printer ...

Страница 259: ...overlapped by the document may be hidden Stamp first page only Selects whether the stamp is to be printed on the first page only or on all pages when the document has two or more pages Check the Stamp check box to enable this Check this check box to print a stamp on the first page only Background Background printing is a function that allows you to print an illustration or a similar object bitmap ...

Страница 260: ...xt Specifies the stamp text string Up to 64 characters can be entered For Date Time User Name the creation date time and user name of the printed object are displayed in Stamp Text Important Stamp Text appears grayed out and is unavailable if Date Time User Name is selected TrueType Font Selects the font for the stamp text string Style Selects the font style for the stamp text string Size Selects ...

Страница 261: ... You can also change the stamp position by dragging the stamp in the preview window Rotation Specifies the angle of rotation for the stamp The angle can be set by entering the number of degrees Negative values rotate the stamp clockwise Note Rotation is enabled only when Text or Date Time User Name is selected for Stamp Type on the Stamp tab Note Click Defaults to set the stamp position to Center ...

Страница 262: ...w Intensity Adjusts the intensity of the bitmap to be used as a background Moving the slider to the right increases the intensity and moving the slider to the left decreases the intensity To print the background at the original bitmap intensity move the slider to the rightmost position Note Depending on the environment this function may not be available Click Defaults to set File to blank Layout M...

Страница 263: ...pics Setting Paper Dimensions Custom Size Setting a Page Size and Orientation Perform Borderless Printing Fit to Page Printing Scaled Printing Page Layout Printing Tiling Poster Printing Booklet Printing Duplex Printing Setting the Stapling Margin Setting the Number of Copies and Printing Order Changing the Print Options Stamp Background Printing 263 ...

Страница 264: ...he printer status and how a print job is proceeding About Opens the About dialog box The version of the printer driver plus a copyright notice can be checked In addition the language to be used can be switched About dialog box When you click About the About dialog box is displayed This dialog box displays the version copyright and module list of the printer driver You can select the language to be...

Страница 265: ...Important If the font for displaying the language of your choice is not installed in your system the characters will be garbled 265 ...

Страница 266: ...tion on any errors that occur on the printer You can then immediately check what sort of action to perform Overview of the Canon IJ Status Monitor The Canon IJ Status Monitor displays icons and messages related to printer status and ink During printing you can check information about the document being printed and the print progress If an error occurs the status monitor displays the error content ...

Страница 267: ...t the Canon IJ Status Monitor Select Enable Status Monitor to use the following commands Always Display Current Job Displays the Canon IJ Status Monitor whenever a document is being printed Always Display on Top Displays the Canon IJ Status Monitor in front of other windows Display Guide Message Displays guide messages for complicated paper setting operations Envelope Printing Displays a guide mes...

Страница 268: ...you to check detailed information such as the printer status and print progress Maintenance Allows you to run printer maintenance and change printer settings Download Security Certificate Displays the For secure communication window This window allows you to download the route certificate register it to the browser and disable warning displays Help Menu Select this menu to display Help information...

Страница 269: ... to continue Some applications require an administrator account to continue In such cases switch to an administrator account and restart the operation from the beginning 2 Install the MP Drivers Take the appropriate action as described on the screen 3 Complete the installation Click Exit Depending on the environment you are using a message prompting you to restart the computer may be displayed To ...

Страница 270: ...Printing Using Canon Application Software Easy PhotoPrint Editor Guide 270 ...

Страница 271: ...Printing from Smartphone Tablet Printing from iPhone iPad iPod touch iOS Printing from Smartphone Tablet Android 271 ...

Страница 272: ...r when you print from Smartphone tablet when you print from Windows and when you print from macOS Default Setting for Displaying the Message which Prevents Misprinting After loading paper The screen to register the rear tray paper information is displayed Register the paper size and the media type according to the loaded paper Important For more on the proper combination of paper settings you can ...

Страница 273: ...to the printer is A4 the printer starts printing copying on the paper loaded in the rear tray without changing the paper size setting for printing copying Replace the paper Select if you want to print after replacing the paper of the rear tray For example when the paper size setting for printing copying is A5 and the paper information registered to the printer is A4 you load A5 sized paper in the ...

Страница 274: ...fault To change the setting Feed settings When you print from Windows The message which prevents misprinting is disabled by default To change the setting Changing the Printer Operation Mode When you print from macOS The message which prevents misprinting is enabled by default To change the setting Changing the Printer Operation Mode Important When the message which prevents misprinting is disabled...

Страница 275: ...Copying Making Copies Basics Reducing Enlarging Copies Special Copy Menu Copying Using Smartphone or Tablet 275 ...

Страница 276: ...ton then use the button to display the desired setting item Setting Items for Copying Press the COPY button to reset the magnification to 100 6 Use the button to specify the number of copies 7 Press the Black button or the Color button The printer starts copying Remove the original on the platen after copying is complete Important Do not open the document cover or remove the original while Scannin...

Страница 277: ...ettings such as the page size or media type cannot be changed If you press the Stop button while reserve copying is in progress the screen to select the method to cancel copying is displayed If you select Cancel all reserv then press the OK button you can cancel copying all scanned data If you select Cancel last reserv then press the OK button you can cancel the last copying job If you set a docum...

Страница 278: ...ing Some settings cannot be specified in combination with the setting of other setting items or the copy menu The settings of the page size media type etc are retained even if the printer is turned off Enlarge Reduce Select the reduction enlargement method Reducing Enlarging Copies Ex Note This setting item is displayed under the following conditions When standard copying is selected When Borderle...

Страница 279: ...the quality is not as good as expected select Standard or High and try copying again Economy Mode Select High to copy in grayscale Grayscale renders tones in a range of grays instead of black or white 4 on 1 layout Select the layout when copying four original pages onto a single sheet of paper by reducing each image Four different layouts are available Ex Note This setting item is displayed only w...

Страница 280: ...Scanning Scanning from Computer Windows Scanning from Computer macOS Scanning from Operation Panel 280 ...

Страница 281: ...y Auto Scan Basics Scanning Documents and Photos Creating Editing PDF Files Setting Passwords for PDF Files Editing Password Protected PDF Files Scanning Using Application Software ScanGear Scanning Tips Positioning Originals Scanning from Computer Network Scan Settings IJ Network Scanner Selector EX2 Menu and Setting Screen 281 ...

Страница 282: ...Item Type or Purpose IJ Scan Utility IJ Scan Utility Features Scanning Easily Auto Scan Basics Scanning Documents and Photos Creating Editing PDF Files Setting Passwords for PDF Files Editing Password Protected PDF Files 282 ...

Страница 283: ... Note For details on the IJ Scan Utility main screen see IJ Scan Utility Main Screen Save Scanned Images Automatically Scanned images are automatically saved to a preset folder The folder can be changed as needed Note The default save folders are as follows Windows 10 Windows 8 1 Documents folder Windows 7 My Documents folder To change folder see Settings Dialog Box Application Integration Scanned...

Страница 284: ...Note To set the applications to integrate with see Settings Dialog Box 284 ...

Страница 285: ... printed on white paper hand written text business cards and other unclear items Thin items Thick items 1 Make sure scanner or printer is turned on 2 Place items on platen Positioning Originals Scanning from Computer 3 Start IJ Scan Utility 4 Click Auto Scanning starts Note To cancel the scan click Cancel Use the Settings Auto Scan dialog box to set where to save the scanned images and to make adv...

Страница 286: ...y the paper size resolution PDF settings etc click Settings and then set each item in the Settings dialog box Note Once settings are made in the Settings dialog box the same settings can be used for scanning from the next time In the Settings dialog box specify image processing settings such as slant correction and outline emphasis set the destination of the scanned images and more as needed When ...

Страница 287: ...es whose number of pixels in the vertical or horizontal direction is 10501 or more cannot be used When you select a password protected PDF file you must enter the password Editing Password Protected PDF Files 1 Place items on platen 2 Start IJ Scan Utility 3 Click PDF Editor IJ PDF Editor starts 4 To specify paper size resolution and other settings click Settings from the File menu and then set ea...

Страница 288: ...on the Toolbar When adding existing images or PDF files Click Add Page on the Toolbar After the Open dialog box appears select the image s or PDF file s you want to add and then click Open Note You can also add images or PDF files from Add Page from Saved Data in the File menu 7 Edit pages as needed When changing page order Click the page you want to move and then click Page Up or Page Down on the...

Страница 289: ...d 8 Select Save As in File menu The Save dialog box appears 9 Specify save settings Save Dialog Box PDF Edit Screen 10 Click Save The PDF file is saved Note When a password protected PDF file is edited the passwords will be deleted Reset the passwords in the Save dialog box Setting Passwords for PDF Files To overwrite a saved file click Save on the Toolbar 289 ...

Страница 290: ...Gear What Is ScanGear Scanner Driver Starting ScanGear Scanner Driver Scanning in Basic Mode ScanGear Scanner Driver Screens General Notes Scanner Driver Important Available functions and settings vary depending on your scanner or printer 290 ...

Страница 291: ...s Specify the document type output size and other settings when scanning documents and preview scan results Make various correction settings or finely adjust the brightness contrast and other parameters to scan in a specific color tone Screens There are two modes Basic Mode and Advanced Mode Switch modes with the tabs on the upper right of the screen Note ScanGear starts in the last used mode Sett...

Страница 292: ...Advanced Mode Use the Advanced Mode tab to scan by specifying the color mode output resolution image brightness color tone and other settings 292 ...

Страница 293: ...ng from IJ Scan Utility 1 Start IJ Scan Utility For details click Home to return to the top page of the Online Manual for your model and search for Starting IJ Scan Utility 2 In IJ Scan Utility main screen click ScanGear The ScanGear screen appears Starting from Application The procedure varies depending on the application For details see the application s manual 1 Start application 2 On applicati...

Страница 294: ... view and scan Photos with a whitish background Documents printed on white paper hand written text business cards and other unclear documents Thin documents Thick documents The following types of documents cannot be scanned correctly Documents smaller than 1 2 inches 3 cm square Photos that have been cut to irregular shapes Note Both sides of a two sided document can be scanned simultaneously on m...

Страница 295: ...anning from the ADF For details see the application s manual Note To scan magazines containing many color photos select Magazine Color 3 Click Preview Preview image appears in the Preview area Important Preview is not available when scanning from the ADF 295 ...

Страница 296: ...needed Adjust the size and position of the cropping frames on the preview image Adjusting Cropping Frames ScanGear 7 Set Image corrections as needed 8 Click Scan Scanning starts Note Click Information to display a dialog box showing the document type and other details of the current scan settings How ScanGear behaves after scanning is complete can be set from Status of ScanGear dialog after scanni...

Страница 297: ...ScanGear Scanner Driver Screens Basic Mode Tab Advanced Mode Tab 297 ...

Страница 298: ...ems vary by document type and view Preview is not available when scanning from the ADF Auto Document Feeder 1 Settings and Operation Buttons Select Source Photo Color Scan color photos Magazine Color Scan color magazines Document Color Scan documents in color Document Grayscale Scan documents in black and white Document Color ADF Simplex Scan documents from the ADF in color Document Grayscale ADF ...

Страница 299: ...tive When you select an option other than the ADF types the image adjustment function which adjusts images based on the document type will also be active When you select Magazine Color the descreen function will be active Display Preview Image Preview Performs a trial scan Note When using the machine for the first time scanner calibration starts automatically Wait a while until the preview image a...

Страница 300: ... selected paper size Drag the cropping frame to enlarge reduce it while maintaining the aspect ratio Monitor Size such as 1024 x 768 pixels Select an output size in pixels A cropping frame of the selected monitor size will appear and the portion within the cropping frame will be scanned Drag the cropping frame to enlarge reduce it while maintaining the aspect ratio Add Delete Displays the Add Dele...

Страница 301: ...Adjust the scan area within the Preview area If an area is not specified the document will be scanned at the document size Auto Crop If an area is specified only the portion in the cropping frame will be scanned Adjusting Cropping Frames ScanGear Image corrections Correct the image to be scanned Important Apply Auto Document Fix and Correct fading are available when Recommended is selected on the ...

Страница 302: ...ilable when Color Matching is selected on the Color Settings tab of the Preferences dialog box Scan Image Scan Starts scanning Note When scanning starts the progress appears To cancel the scan click Cancel Preferences Displays the Preferences dialog box for making scan preview settings Close Closes ScanGear scanner driver 2 Toolbar Adjust or rotate preview images The buttons displayed on the Toolb...

Страница 303: ...able when two or more frames are displayed Deselects the checkboxes of the images in thumbnail view Select All Frames Available when two or more frames are displayed Selects the images in thumbnail view and outlines them in blue Select All Cropping Frames Available when two or more cropping frames are specified Turns the cropping frames into thick broken lines and applies the settings to all of th...

Страница 304: ... thin blue outline The settings will be applied to the Focus Frame and Selected Frames simultaneously To select multiple images click them while pressing the Ctrl key Unselected no outline The settings will not be applied Double click a frame to enlarge the image Click Frame Advance at the bottom of the screen to display the previous or next frame Double click the enlarged frame again to return it...

Страница 305: ...me s on the displayed image In thumbnail view one cropping frame can be created per image In whole image view multiple cropping frames can be created Adjusting Cropping Frames ScanGear Related Topic Scanning in Basic Mode 305 ...

Страница 306: ...ent type and view The preview function is not available when scanning from the ADF Auto Document Feeder 1 Settings and Operation Buttons Favorite Settings You can name and save a group of settings Input Settings Output Settings Image Settings and Color Adjustment Buttons on the Advanced Mode tab and load it as required It is convenient to save a group of settings if you will be using it repeatedly...

Страница 307: ...corrections to the image brightness and color tones can be made including adjustments to the image s overall brightness or contrast and adjustments to its highlight and shadow values histogram or balance tone curve Zoom Zooms in on a frame or zooms in on the image in the area specified with a cropping frame scan area When zoomed in Zoom changes to Undo Click Undo to return the display to its non m...

Страница 308: ...t the next action may appear Follow the prompt to complete For details refer to Status of ScanGear dialog after scanning in Scan Tab Preferences dialog box It will take time to process the images if the total size of the scanned images exceeds a certain size In that case a warning message appears it is recommended that you reduce the total size To continue scan in whole image view Preferences Disp...

Страница 309: ...ng the image Right click the image to zoom out Rotate Left Rotates the preview image 90 degrees counter clockwise The result will be reflected in the scanned image The image returns to its original state when you preview again Rotate Right Rotates the preview image 90 degrees clockwise The result will be reflected in the scanned image The image returns to its original state when you preview again ...

Страница 310: ...of them Remove Cropping Frame Removes the selected cropping frame Information Displays the version of ScanGear along with the document type and other details of the current scan settings Open Guide Opens this page 3 Preview Area This is where a trial image appears after you click Preview The results of image corrections color adjustments and other settings made in 1 Settings and Operation Buttons ...

Страница 311: ...key Unselected no outline The settings will not be applied When Whole Image is displayed on Toolbar Items on the Platen are scanned and appear as a single image All portions in the cropping frames will be scanned Note Create cropping frame s on the displayed image In thumbnail view one cropping frame can be created per image In whole image view multiple cropping frames can be created Adjusting Cro...

Страница 312: ...start the computer ScanGear cannot be opened in multiple applications at the same time Within an application ScanGear cannot be opened for the second time when it is already open Be sure to close the ScanGear window before closing the application When using a network compatible model by connecting to a network the machine cannot be accessed from multiple computers at the same time When using a net...

Страница 313: ...rrectly in some applications In that case increase the operating system s virtual memory and retry When image size is too large such as when scanning large images at high resolution your computer may not respond or the progress bar may remain at 0 depending on the application In that case cancel the action for example by clicking Cancel on the progress bar then increase the operating system s virt...

Страница 314: ...Scanning Tips Positioning Originals Scanning from Computer Network Scan Settings IJ Network Scanner Selector EX2 Menu and Setting Screen 314 ...

Страница 315: ...lly Important When scanning by specifying the paper size in IJ Scan Utility or ScanGear scanner driver align an upper corner of the item with the corner at the arrow alignment mark of the platen Photos that have been cut to irregular shapes and items smaller than 1 2 inches 3 cm square cannot be cropped accurately when scanning Reflective disc labels may not be scanned as expected Photos Postcards...

Страница 316: ...ormat Multiple items Allow 0 4 inch 1 cm or more space between the edges di agonally striped area of the platen and items and between items Portions placed on the diagonally striped area cannot be scanned 0 4 inch 1 cm or more Note Place up to 12 items Positions of slanted items 10 degrees or less are cor rected automatically Important For the portions in which items cannot be scan ned see Loading...

Страница 317: ...for scanning with IJ Scan Utility changes as well The product for scanning from the operation panel also changes If your scanner or printer is not selected in IJ Scan Utility check that it is selected with IJ Network Scanner Selector EX Refer to IJ Network Scanner Selector EX2 Menu and Setting Screen for your model from Home of the Online Manual for details To scan from the operation panel specify...

Страница 318: ...ase you do not need to select it again Important If multiple scanners exist on the network multiple model names appear In that case you can select one scanner per model 4 Click OK Note The scanner selected in the Scan from PC Settings screen will be automatically selected in the Scan from Operation Panel Settings screen as well Setting for Scanning with IJ Scan Utility To scan from IJ Scan Utility...

Страница 319: ...e notification area on the desktop follow the procedure below to start Windows 10 From the Start menu click All apps Canon Utilities IJ Network Scanner Selector EX2 Windows 8 1 Click IJ Network Scanner Selector EX2 on the Start screen If IJ Network Scanner Selector EX2 is not displayed on the Start screen select the Search charm then search for IJ Network Scanner Selector EX2 Windows 7 From the St...

Страница 320: ...Settings screen click OK Note If your scanner or printer does not appear check the following click OK to close the screen then reopen it and try selecting again MP Drivers is installed Network settings of your scanner or printer is completed after installing the MP Drivers Network communication between your scanner or printer and computer is enabled If the problem is still not solved see Network C...

Страница 321: ...ror Four Digit Alphanumeric Characters Appear on LCD When Error Occurred Message Support Code Appears Repairing Your Printer Frequently Asked Questions Solve Problems Printer Does Not Work Printer Does Not Turn On Printer Turns Off Unexpectedly or Repeatedly Wrong Language Appears in LCD LCD Is Off USB Connection Problems Cannot Communicate with Printer via USB Printer Does Not Print Copying Print...

Страница 322: ...on Failed to MP Drivers Installation Windows Updating MP Drivers in Network Environment Windows Error or Message Appears Four Digit Alphanumeric Characters Appear on LCD When Error Occurred Message Support Code Appears List of Support Code for Error Error Message Appears on PictBridge Wi Fi Compliant Device IJ Scan Utility Error Messages Windows IJ Scan Utility Lite Error Messages macOS ScanGear S...

Страница 323: ...r or Changed Router Settings Cannot Access to Internet on Wi Fi from Communication Device Connecting Printer and Wireless Router Using Easy WL connect Cannot Connect Smartphone Tablet to Wireless Router Error Occurs During Wi Fi Setup Connects to Another Computer via LAN Changes from USB to LAN Connection Cannot Print or Connect LAN Setting Tips Changing LAN Settings Network Key Password Unknown F...

Страница 324: ...Print or Connect Printer Suddenly Stopped Working for Some Reason Cannot Access to Internet on Wi Fi from Communication Device Cannot Print or Connect LAN Setting Tips Changing LAN Settings Network Key Password Unknown Forgot Administrator Password of Printer Checking Network Information Restoring to Factory Defaults Default Network Settings Printing Network Settings Reconfiguration Method of Wi F...

Страница 325: ...Network Communication Problems Cannot Find Printer on Network Network Connection Problems Other Network Problems 325 ...

Страница 326: ...Cannot Find Printer on Network Cannot Find Printer During Setup While using printer Cannot Find Printer while Using Wi Fi 326 ...

Страница 327: ...the items in Step 2 and try to set up from the beginning Step 1 Check the basic items for Wi Fi Step 2 Solve the problem using IJ Network Device Setup Utility Items to check for Wi Fi Step 1 Check the basic items for Wi Fi 1 Check power status Are printer and network device router etc turned on Stop setting up and check if the router modem is turned on and then check if the printer is turned on 1 ...

Страница 328: ...ion on the printer If icon is displayed icon indicates that the wireless router and the printer are not connected Reconsider the locations of the wireless router and the printer Checking the location of wireless router After checking the wireless router setting make sure the printer is not placed too far away from the wireless router The printer can be up 50 m 164 ft from the wireless router indoo...

Страница 329: ...in regard to starting up IJ Network Device Setup Utility For Windows Starting Up IJ Network Device Setup Utility For macOS Starting Up IJ Network Device Setup Utility Once revised try to set up from the beginning 329 ...

Страница 330: ...r and connect to the printer For details refer to the instruction manual supplied with the USB cable Check2 Follow procedure below to connect printer and computer again Important For macOS make sure the lock icon is on the lower left of the Printers Scanners screen If the icon locked is displayed click the icon to unlock The administrator name and the password are necessary to unlock 1 Unplug USB ...

Страница 331: ...2 Turn off printer 3 Shut down computer After shutting down restart your computer and install the latest MP Drivers downloaded in step 1 331 ...

Страница 332: ...e icon is not displayed from the setup menu select Device settings LAN settings Wi Fi Wi Fi enab disable and then select Enable If the icon is displayed see the following check to make sure whether printer setup is complete or the settings of wireless router to connect are correct Check2 Make sure printer setup is complete on the computer If it is not click here and perform setup Check3 Make sure ...

Страница 333: ...hat emits radio waves of the same frequency bandwidth as a wireless router is nearby it may cause interference Place the wireless router as far away from interference sources as possible Check the signal strength on the LCD LCD and Operation Panel Check6 Make sure Enable bidirectional support is selected in the Ports sheet of the Printer properties dialog box Windows If not select it to enable bid...

Страница 334: ...Network Connection Problems Printer Suddenly Stopped Working for Some Reason Network Key Password Unknown Printer Cannot Be Used After Replacing Wireless Router or Changed Router Settings 334 ...

Страница 335: ... a Printer after Network Configuration Changes Cannot Connect to a Printer via Wireless LAN Wi Fi Cannot Connect to a Printer through Wireless Direct Cannot Print Scan through Network Cannot Connect to a Printer after Network Configuration Changes It may take a while for the computer to obtain an IP address or you may need to restart your computer Make sure the computer has obtained a valid IP add...

Страница 336: ...ireless router is too far wireless communication becomes poor Place the printer and wireless router close to each other Check5 Make sure wireless signal is strong Monitor signal status and move printer and wireless router as necessary Place the printer and wireless router where there are no obstacles between them Wireless communication between different rooms or floors is generally poor Wireless c...

Страница 337: ...ss Direct Check1 Check printer settings Select Device settings LAN settings Wireless Direct Switch WL Direct in this order and select Yes Check2 Check the settings of your device smartphone tablet Make sure Wi Fi is enabled on your device For details refer to your device s instruction manual Check3 Make sure printer is selected as connection for device e g smartphone or tablet Select the network n...

Страница 338: ...ct does not allow more than 5 devices to be connected Cannot Print Scan through Network Check1 Make sure the computer is connected to the wireless router For more on how to check the computer settings or connection status see your computer instruction manual or contact its manufacturer Check2 If MP Drivers are not installed install them Windows Click here and install the MP Drivers Check3 Make sur...

Страница 339: ...r WEP Key Set for Wireless Router Unknown Cannot Connect For more on setting up a wireless router see the instruction manual provided with the wireless router or contact its manufacturer Make sure your computer can communicate with the wireless router Setting an Encryption Key For more on setting up a wireless router see the instruction manual provided with the wireless router or contact its manuf...

Страница 340: ...sword generated by the wireless router For Windows When the WEP Details screen appears after you click Search on the Network Settings Wi Fi screen in IJ Network Device Setup Utility follow the on screen instructions to set the password length format and the password to use For details see If WEP Details Screen Appears Note If the printer is connected to an AirPort Base Station via LAN If the print...

Страница 341: ...ice Setup Utility If this does not solve the problem see below Cannot Communicate with Printer After Enabling MAC IP Address Filtering or Encryption Key on Wireless Router With Encryption On Cannot Communicate with Printer After Changing Encryption Type at Wireless Router Cannot Communicate with Printer After Enabling MAC IP Address Filtering or Encryption Key on Wireless Router Check1 Check wirel...

Страница 342: ...computer For details see Setting an Encryption Key With Encryption On Cannot Communicate with Printer After Changing Encryption Type at Wireless Router If you change the encryption type for the printer and it subsequently cannot communicate with the computer make sure the encryption type for the computer and the wireless router matches the type set for the printer Cannot Communicate with Printer A...

Страница 343: ...Other Network Problems Checking Network Information Restoring to Factory Defaults 343 ...

Страница 344: ... IJ Network Device Setup Utility Screen Checking Computer IP Address or MAC Address To check the IP Address or MAC address of your computer follow the instructions below For Windows 1 Select Command Prompt from Start 2 Enter ipconfig all and press Enter The IP address and MAC address of your computer appear If your computer is not connected to a network the IP address does not appear For macOS 1 S...

Страница 345: ...e For macOS 1 Start Network Utility as shown below Select Computer from Go menu of Finder double click Macintosh HD System Library CoreServices Applications Network Utility 2 Click Ping 3 Make sure Send only XX pings XX are numbers is selected 4 Enter IP address of target printer or target wireless router in Enter the network address to ping 5 Click Ping XXX XXX XXX XXX is the IP address of the ta...

Страница 346: ...on is not taking place Otherwise computer is communicating with target device Checking Network Setting Information To check the printer s network settings information print out the network settings information Printing Network Settings 346 ...

Страница 347: ... the printer making printing or scanning operation from a computer over a network impossible To use the printer over a network again after restoring it to the factory defaults click here and redo setup Initialize the network setting using the printer s operation panel Reset setting 347 ...

Страница 348: ...Problems while Printing Scanning from Smartphone Tablet Cannot Print Scan from Smartphone Tablet 348 ...

Страница 349: ...to resolve wireless router problems e g update interval of a key problems of DHCP update interval energy saving mode etc or to update the wireless router firmware For details contact the manufacturer of your wireless router Check2 Check the settings of your device smartphone tablet Make sure Wi Fi is enabled on your device For details refer to your device s instruction manual Check3 Is the printer...

Страница 350: ...o match with those of the wireless router Check5 Make sure the printer is not placed too far away from the wireless router If the distance between the printer and wireless router is too far wireless communication becomes poor Place the printer and wireless router close to each other Check6 Make sure wireless signal is strong Monitor signal status and move printer and wireless router as necessary P...

Страница 351: ...ice For details refer to your device s instruction manual or visit the manufacturer s website To check the network name SSID for Wireless Direct specified for the printer display it using the operation panel of the printer or print out the network setting information of the printer Display on the LCD LAN settings Print the network settings Printing Network Settings Check5 Have you entered the prop...

Страница 352: ...Printing Problems Printer Does Not Print Ink Does Not Come Out Ink Runs Out Fast Printer Does Not Pick up or Feed the Paper No Paper Error Printout Results Are Unsatisfactory 352 ...

Страница 353: ...ly there is a problem with the relay device Contact the vendor of the relay device There could also be a problem with the USB cable Replace the USB cable and retry the printing If you use the printer with a network connection make sure the printer is correctly set up for network use Cannot Find Printer while Using Wi Fi Note IJ Network Device Setup Utility allows you to diagnose and repair the net...

Страница 354: ...omputer set your printer as default printer to make the one selected by default For macOS Make sure your printer s name is selected in Printer in the Print dialog Note If multiple printers are registered to your computer select Set as Default Printer from System Preferences Printers Scanners for a printer to make the one selected by default Check6 Are you trying to print a large data file Windows ...

Страница 355: ...ure the print head is installed properly Next push the joint buttons B firmly to the end Important Make sure that the orange label and the protective tape have been removed when installing the print head Do not open the print head locking cover A carelessly The ink may leak out Check Installation of Print Head 355 ...

Страница 356: ...t step Step2 Clean the print head After cleaning the print head print the nozzle check pattern and check the result From the printer Cleaning the Print Head From the computer For Windows Clean the print head For macOS Clean the print head If it still does not improve go to the next step Step3 Clean the print head again After cleaning the print head again print the nozzle check pattern and check th...

Страница 357: ...nsume ink so perform it only when necessary How to Perform Ink Flush If the nozzle check pattern is not printed correctly even after performing ink flush check the installing condition of the print head Check Installation of Print Head Important Performing ink flush when the remaining ink level is not enough may damage the printer Before performing ink flush check the remaining ink level of all co...

Страница 358: ...Ink Runs Out Fast After you refill the ink tank the printer takes in ink from the ink tank and ink flows into the printer Ink may seem to run out fast due to this procedure 358 ...

Страница 359: ...e paper on the rear tray place the print side facing UP and align the right and left paper guides with the paper stack Loading Paper Check3 Is paper too thick or curled Unsupported Media Types Check4 When loading envelopes consider the following When printing on envelopes see Loading Envelopes and prepare the envelopes before printing Once you have prepared the envelopes load them in portrait orie...

Страница 360: ...sert the paper so that your hand does not directly touch the part in the center of the rear tray when removing the foreign object 4 Remove foreign object by hand with paper inserted Put your hand between the paper you inserted and the rear tray to remove the foreign object 360 ...

Страница 361: ... may cause the ink to leak Check7 Clean paper feed roller Cleaning Paper Feed Rollers If the measures above do not solve the problem contact your nearest Canon service center to request a repair Important Do not tilt the printer when moving it since the ink may leak out When transporting the printer for repairing it see Repairing Your Printer 361 ...

Страница 362: ...ded paper The method for checking the paper and print quality settings differs depending on what you are using your printer for Copying Printing Check the settings using the operation panel Setting Items for Copying Printing from your computer Check the settings using the printer driver Basic Printing Setup Printing from a PictBridge Wi Fi compliant device Check the settings on your PictBridge Wi ...

Страница 363: ...o the sections below See also the sections below Printouts Are Blank Blurry or Fuzzy Inaccurate or Bleeding Colors Streaks or Lines Colors Are Unclear Lines Are Misaligned Distorted Paper Is Smudged Printed Surface Is Scratched Vertical Line Next to Image Cannot Complete Printing Lines Incomplete or Missing Windows Images Incomplete or Missing Windows Ink Blots Paper Curl Back of Paper Is Smudged ...

Страница 364: ...Printouts Are Blank Blurry or Fuzzy Inaccurate or Bleeding Colors Streaks or Lines Printing Is Blurry Colors Are Wrong 364 ...

Страница 365: ...ite Streaks Appear Check1 Make sure joint button is not lifted up Push the print head locking cover A to make sure the print head is installed properly Next push the joint buttons B firmly to the end 365 ...

Страница 366: ... the pattern From the printer Printing the Nozzle Check Pattern From the computer For Windows Printing a Nozzle Check Pattern For macOS Printing a Nozzle Check Pattern If the pattern is not printed correctly go to the next step Step2 Clean the print head After cleaning the print head print the nozzle check pattern and check the result From the printer Cleaning the Print Head From the computer For ...

Страница 367: ...e print head Check Installation of Print Head Important Performing ink flush when the remaining ink level is not enough may damage the printer Before performing ink flush check the remaining ink level of all colors How to Perform Ink Flush Check4 When an ink tank runs out of ink refill the ink tank If the remaining ink level is below the lower limit line A refill the ink tank with the correspondin...

Страница 368: ...ad it with the side to be copied facing down Loading Originals Check8 Is copy source a printed paper by printer If you use a printout done by this printer as the original print quality may be reduced depending on the condition of the original Reprint from the computer if you can reprint from it Note Although some air may enter the ink tube it is not a malfunction No problem if the nozzle check pat...

Страница 369: ...re the print head is installed properly Next push the joint buttons B firmly to the end Important Make sure that the orange label and the protective tape have been removed when installing the print head Do not open the print head locking cover A carelessly The ink may leak out Check Installation of Print Head 369 ...

Страница 370: ...printing the nozzle check pattern print head cleaning and print head deep cleaning see If Printing Is Faint or Uneven Step1 Print the nozzle check pattern After printing the nozzle check pattern examine the pattern From the printer Printing the Nozzle Check Pattern From the computer For Windows Printing a Nozzle Check Pattern For macOS Printing a Nozzle Check Pattern If the pattern is not printed ...

Страница 371: ...prove go to the next step Step6 Perform ink flush After performing ink flush print the nozzle check pattern and check the result Ink flush consumes a great amount of ink Frequent ink flush can rapidly consume ink so perform it only when necessary How to Perform Ink Flush If the nozzle check pattern is not printed correctly even after performing ink flush check the installing condition of the print...

Страница 372: ...se unsatisfactory adjust the print head position Aligning the Print Head Note If the problem is not resolved after performing the print head alignment perform print head alignment manually from your computer For Windows Adjusting Print Head Position Manually Check3 Increase print quality and try printing again Increasing the print quality using the operation panel or the printer driver may improve...

Страница 373: ...hen using Photo Paper Plus Semi gloss even if the sheet is curled load one sheet at a time as it is Rolling this paper in the opposite direction to flatten it may crack the paper surface and reduce the print quality We recommend putting unused paper back into the package and storing it flat Plain Paper Turn the paper over and reload it to print on the other side Other Paper such as envelope If the...

Страница 374: ...time Check4 Set printer to prevent paper abrasion Adjusting the setting to prevent paper abrasion will widen the clearance between the print head and the paper If you notice abrasion even with the media type set correctly to match the paper set the printer to prevent paper abrasion using the operation panel or the computer This may reduce the print speed Once you have finished printing undo this s...

Страница 375: ...brasion Printing from your computer Windows Check the brightness setting in the printer driver Adjusting Brightness Copying Setting Items for Copying Check6 Is platen glass dirty Clean the platen glass Cleaning Platen and Document Cover Check7 Is paper feed roller dirty Clean paper feed roller Cleaning Paper Feed Rollers Check8 Is inside of printer dirty During duplex printing ink may stain the in...

Страница 376: ...t Tool Opening the Maintenance Tool Canon IJ Printer Assistant Tool 3 Select Custom Settings 4 Drag Ink Drying Wait Time slide bar to set the wait time and select OK 5 Check message and select OK For macOS Set the waiting time using Remote UI Opening Remote UI for Maintenance 376 ...

Страница 377: ...tout Results Are Unsatisfactory Note The direction or pattern of the vertical lines A may vary depending on the image data or the print setting This printer performs automatic cleaning when necessary to keep printouts clean A small amount of ink is ejected for cleaning Although the ink is normally ejected onto the ink absorber at the outer edge of the paper it may get onto the paper if the loaded ...

Страница 378: ...Scanning Problems Windows Scanning Problems 378 ...

Страница 379: ...Scanning Problems Scanner Does Not Work ScanGear Scanner Driver Does Not Start 379 ...

Страница 380: ...ct the USB cable to a different USB port on the computer Check 3 If the USB cable is connected to a USB hub remove it from the USB hub and connect it to a USB port on the computer Check 4 With network connection check the connection status and reconnect as needed Check 5 Restart the computer 380 ...

Страница 381: ...ter name is displayed multiple times select the one that does not include WIA Note The operation may differ depending on the application Use the WIA driver when scanning from a WIA compliant application Scanning with WIA Driver Check 3 Make sure that the application supports TWAIN You cannot start ScanGear scanner driver from applications not supporting TWAIN Check 4 Scan and save images with IJ S...

Страница 382: ...Mechanical Problems Printer Does Not Turn On Printer Turns Off Unexpectedly or Repeatedly USB Connection Problems Cannot Communicate with Printer via USB Wrong Language Appears in LCD 382 ...

Страница 383: ...Check3 Unplug printer leave it for at least 2 minutes and then plug it back in and turn on again If this does not solve the problem contact your nearest Canon service center to request a repair Important Do not tilt the printer when moving it since the ink may leak out When transporting the printer for repairing it see Repairing Your Printer 383 ...

Страница 384: ...press the OK button 4 Use the button to select OFF and then press the OK button The setting to shut off the power automatically is disabled To disable the setting from the computer For Windows use Canon IJ Printer Assistant Tool or ScanGear scanner driver to disable the setting Follow the procedure below to disable the setting using Canon IJ Printer Assistant Tool 1 Open Canon IJ Printer Assistant...

Страница 385: ...Scanner Tab 385 ...

Страница 386: ... speed Check Check following to make sure your system environment supports Hi Speed USB connection Does the USB port on your computer support Hi Speed USB connection Does the USB cable or the USB hub support Hi Speed USB connection Be sure to use a certified Hi Speed USB cable We recommend that the USB cable be no longer than 10 feet 3 meters or so Is the Hi Speed USB driver working properly on yo...

Страница 387: ...printer Important Check the orientation of the Type B connector and connect to the printer For details refer to the instruction manual supplied with the USB cable Check3 Make sure Enable bidirectional support is selected in the Ports sheet of the Printer properties dialog box Windows If not select it to enable bidirectional support Opening Printer Driver s Setup Screen 387 ...

Страница 388: ...lect your language 1 Press Setup button and wait a little 2 Press button 1 times and press OK button 3 Press button 5 times and press OK button 4 Use button to select language for LCD and press OK button The desired language appears on the LCD 5 Press Stop button 388 ...

Страница 389: ...Installation and Download Problems Failed to MP Drivers Installation Windows Updating MP Drivers in Network Environment Windows 389 ...

Страница 390: ...lowing operations to install the MP Drivers 1 Open screen to uninstall MP Drivers For Windows 10 Select Settings Apps For Windows 8 1 Windows 7 Select Control Panel Programs and Features 2 Check if there is Canon XXX series MP Drivers you want to install in list XXX is the model name 3 If you find MP Drivers for printer you want to install uninstall it If not found proceed to the next step 4 Resta...

Страница 391: ... for your model on the download page of the Canon website After the download is completed overwrite and install the new version of the MP Drivers according to the specified installation procedure Note The network settings on the printer are not affected so the printer can be used on the network without redoing settings 391 ...

Страница 392: ...Errors and Messages Four Digit Alphanumeric Characters Appear on LCD When Error Occurred Message Support Code Appears 392 ...

Страница 393: ...pears on the printer s LCD or your computer screen Some errors may display four digit alphanumeric characters along with the error message The characters represent a support code error number For details on each support code see List of Support Code for Error 393 ...

Страница 394: ...isplayed Take the appropriate action described in the message When a Support Code and a Message are displayed on the Computer Screen Windows When a Support Code and a Message are displayed on the Printer s LCD For details on how to resolve errors with Support Codes see List of Support Code for Error For details on how to resolve errors without Support Codes see Message Support Code Appears 394 ...

Страница 395: ... unplugged while it was on Check the error message that appears on the computer and click OK The printer starts printing See Unplugging the Printer to unplug the printer correctly Writing Error Output Error Communication Error Windows Check1 If the ON lamp is off make sure printer is plugged in and turn on The ON lamp flashes while the printer is initializing Wait until the ON lamp stops flashing ...

Страница 396: ...d to the computer Check2 Make sure printer is properly connected to computer 3 Click General tab and check for a device problem If a device error is shown see Windows Help to resolve it Other Error Messages Windows Check If an error message appears outside printer status monitor check the following Could not spool successfully due to insufficient disk space Delete any unnecessary files to increase...

Страница 397: ...ars on Printer s LCD and Computer Screen 1000 to 1ZZZ 1000 1070 1200 1215 1300 1366 1368 1431 1432 1470 1471 1472 1473 1476 1496 15A0 15A1 1640 1723 1724 1725 1726 1727 1890 1892 2000 to 2ZZZ 2114 2123 2200 2700 2900 2901 3000 to 3ZZZ 3252 3402 3403 3405 3407 3410 3411 3412 3413 3438 3440 3441 3442 3443 3444 3445 3446 3447 3449 4000 to 4ZZZ 4103 4104 495A 5000 to 5ZZZ 5011 5012 5050 5100 5200 5205...

Страница 398: ...6936 6937 6938 6940 6941 6942 6943 6944 6945 6946 6D01 7000 to 7ZZZ 7500 7600 7700 7800 A000 to ZZZZ B20B Note For information on how to deal with paper jams see What to Do When Paper Is Jammed 398 ...

Страница 399: ...cedure as shown below If you can see the jammed paper at the paper output slot or the rear tray 1300 If the paper tears and you cannot remove it from the paper output slot or if the paper is jammed inside the printer Paper Is Jammed inside Printer Cases other than above Other Cases 399 ...

Страница 400: ...Stop button to stop the printing before you turn off the printer If the paper tears and you cannot remove the jammed paper from the paper output slot or the rear tray remove the paper from inside the printer Paper Is Jammed inside Printer 2 Reload paper and press printer s OK button The printer resumes printing Reprint the page you were printing if it was not printed properly due to the paper jam ...

Страница 401: ...olve the problem contact your nearest Canon service center to request a repair Important Do not tilt the printer when moving it since the ink may leak out When transporting the printer for repairing it see Repairing Your Printer 401 ...

Страница 402: ... to remove it press the printer s Stop button to stop the printing before you turn off the printer 1 Turn off printer and unplug it 2 Open scanning unit cover Important Do not touch clear film A white belt B or tubes C If you soil or scratch this part by touching it with paper or your hand it could damage the printer 3 Check if jammed paper is under print head holder If the jammed paper is under t...

Страница 403: ... head holder hold the top of the print head holder and slide it slowly to the far right or left 4 Hold jammed paper firmly in both hands If the paper is rolled up pull out it 5 Slowly pull out paper so as not to tear it 403 ...

Страница 404: ...e print head holder Any small bits of paper left in the printer Any paper left in the left and right empty spaces D in the printer 7 Close scanning unit cover gently To close the scanning unit cover hold it up once and then take it down gently 8 Plug in the printer again and turn it back on All jobs in the print queue are canceled Redo the printing Note When reloading the paper make sure you are u...

Страница 405: ...some paper still inside the printer Check the printer again for any remaining bits of paper If the measures above do not solve the problem contact your nearest Canon service center to request a repair Important Do not tilt the printer when moving it since the ink may leak out When transporting the printer for repairing it see Repairing Your Printer 405 ...

Страница 406: ... properly What to Do Take the corresponding actions below Load paper in the rear tray Loading Plain Paper Photo Paper Loading Envelopes Align the paper guides of the rear tray with both edges of the paper Close the feed slot cover After carrying out the above measures press the printer s OK button to cancel the error 406 ...

Страница 407: ...heets of A4 or Letter size plain paper in the rear tray Note After loading the paper align the paper guides of the rear tray with both edges of the paper Press the printer s OK button to cancel the error Note If you are printing a print head alignment sheet during printer setup do not cancel printing 407 ...

Страница 408: ...er feed rollers are dirty What to Do Press the printer s Stop button to cancel printing and then perform the paper feed roller cleaning From Windows Cleaning the Paper Feed Rollers From the printer s operation panel Cleaning Paper Feed Rollers 408 ...

Страница 409: ...1200 Cause Scanning unit cover is open What to Do Close the scanning unit cover and wait for a while Do not forget to close it such as after refilling ink tanks 409 ...

Страница 410: ...ed because the maintenance cartridge is almost full What to Do To perform Ink Flush first turn off the printer and then replace the maintenance cartridge Replacing Maintenance Cartridge Press the printer s OK button to cancel the error 410 ...

Страница 411: ...ge may not be installed properly or may not be compatible with this printer What to Do Turn off the printer remove the maintenance cartridge and then reinstall it correctly Refer to Replacing Maintenance Cartridge for details on removing and installing the maintenance cartridge 411 ...

Страница 412: ...pect the remaining ink in the ink tank If the remaining ink level is below the lower limit line refill the ink tank with the corresponding color of ink by following the printer s instructions Refilling Ink Tanks If printing is continued when the remaining ink level is below the lower limit line the printer may consume a certain amount of ink to return to printable status 412 ...

Страница 413: ...he maintenance cartridge is not installed What to Do Turn off the printer and then install the maintenance cartridge Refer to Replacing Maintenance Cartridge for details on installing the maintenance cartridge 413 ...

Страница 414: ...tenance cartridge cannot be used This printer cannot use maintenance cartridges that have been installed in other printers What to Do Turn off the printer and then replace with a new maintenance cartridge Replacing Maintenance Cartridge 414 ...

Страница 415: ...ge may not be installed properly or may not be compatible with this printer What to Do Turn off the printer remove the maintenance cartridge and then reinstall it correctly Refer to Replacing Maintenance Cartridge for details on removing and installing the maintenance cartridge 415 ...

Страница 416: ...and then replace the maintenance cartridge Replacing Maintenance Cartridge Note The condition of the maintenance cartridge when this error is displayed will depend on where and how the printer is used When this message is displayed you must replace the maintenance cartridge 416 ...

Страница 417: ...at to Do The printer will not be able to print with a full maintenance cartridge Press the printer s OK button to cancel the error and then prepare a new maintenance cartridge For details on the maintenance cartridge see Replacing Maintenance Cartridge 417 ...

Страница 418: ...he scanning unit cover and make sure that shipping tape and protective material have been removed from the print head holder If the shipping tape or protective material is still there remove it and close the scanning unit cover In the case of the first printer setup click here select your printer name on the page and follow the instructions 418 ...

Страница 419: ...formation on the printer refer to the following Paper Settings If the paper settings specified when printing differ from the paper information for the rear tray registered on the printer the following message appears on the printer s LCD Paper settings specified on the printer driver when printing Paper size A5 Media type Plain paper Paper information for the rear tray registered on the printer Pa...

Страница 420: ...paper information registered on the printer refer to the following Paper Settings on the Printer Driver and the Printer Media Type Windows Paper Settings on the Printer Driver and the Printer Paper Size Windows Cancel Cancels printing copying Select this option when you want to change the paper settings specified when printing copying Change the paper settings and try printing copying again Note Y...

Страница 421: ...l the error Contact your nearest Canon service center to request a repair as soon as possible You cannot replace the internal parts of the printer yourself Important Do not tilt the printer when moving it since the ink may leak out When transporting the printer for repair see Repairing Your Printer 421 ...

Страница 422: ...and orientation on the platen Make sure the platen and the print head alignment sheet are not dirty Load A4 or Letter size plain paper in the rear tray Check the print head condition by printing the nozzle check pattern After carrying out the above actions perform automatic print head alignment again If the error is still not resolved press the printer s OK button to cancel the error and perform m...

Страница 423: ...oad print head alignment sheet on platen Place the printed side down and align the mark in the upper left corner of the sheet with the alignment mark 2 Slowly close the document cover and press printer s Color button or Black button The printer starts scanning the print head alignment sheet and automatically adjusts the print head position 423 ...

Страница 424: ...3252 Cause The maintenance cartridge is almost full What to Do The printer will not be able to print with a full maintenance cartridge Press the printer s OK button to clear the error message 424 ...

Страница 425: ...4103 Cause Cannot perform printing with current print settings What to Do Press the printer s Stop button to cancel printing Change the print settings specified when printing and retry printing 425 ...

Страница 426: ...in the printer again and turn it back on If this does not solve the problem contact your nearest Canon service center to request a repair Important Do not tilt the printer when moving it since the ink may leak out When transporting the printer for repairing it see Repairing Your Printer 426 ...

Страница 427: ...in the printer again and turn it back on If this does not solve the problem contact your nearest Canon service center to request a repair Important Do not tilt the printer when moving it since the ink may leak out When transporting the printer for repairing it see Repairing Your Printer 427 ...

Страница 428: ...impediment Important When clearing an impediment to print head holder motion be careful not to touch clear film A white belt B or tubes C If you soil or scratch this part by touching it with paper or your hand it could damage the printer Turn the printer back on If this does not solve the problem contact your nearest Canon service center to request a repair Important Do not tilt the printer when m...

Страница 429: ...k is refilled because it runs out of ink perform ink flush From Windows Cleaning the Print Heads From macOS Cleaning the Print Heads From the operation panel of the printer How to Perform Ink Flush If this does not solve the problem contact your nearest Canon service center to request a repair Important Do not tilt the printer when moving it since the ink may leak out When transporting the printer...

Страница 430: ...per Is Jammed Turn off the printer and unplug it Plug in the printer again and turn it back on If this does not solve the problem contact your nearest Canon service center to request a repair Important Do not tilt the printer when moving it since the ink may leak out When transporting the printer for repairing it see Repairing Your Printer 430 ...

Отзывы: