background image

1-4

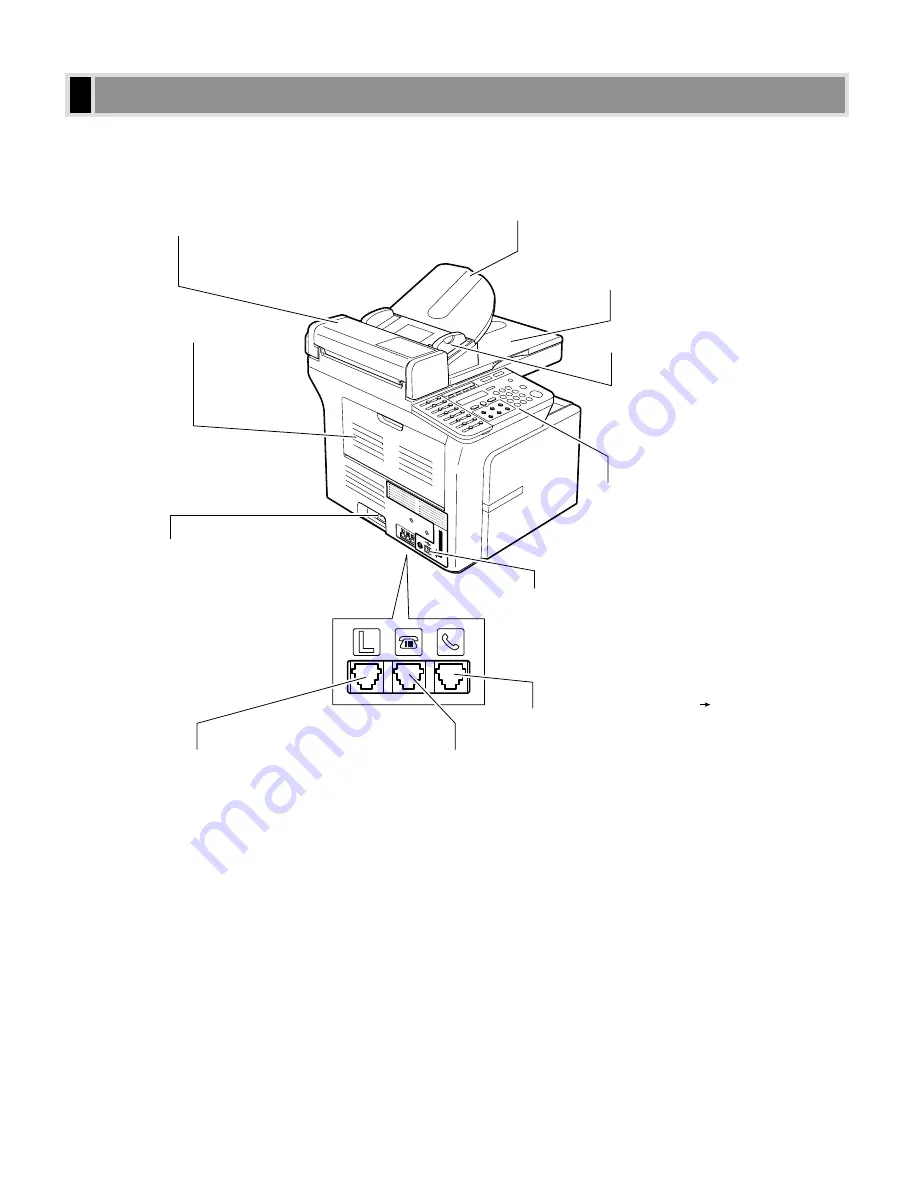
This section describes the main components of the machine.

FAX-L400

Left Side View

ADF (AUTOMATIC DOCUMENT FEEDER)

Holds documents for copying and feeds 
them automatically into the scanning unit. 

DOCUMENT OUTPUT TRAY

Documents come out here.

OPERATION PANEL

Controls the machine.

HANDSET JACK

Connect the optional handset     Appendix B.

EXTERNAL DEVICE JACK

Connect external devices.

TELEPHONE LINE JACK

Connect the telephone line.

LEFT COVER

Open it when you 
output paper face 
up or remove 
jammed paper.

POWER CORD CONNECTOR

DOCUMENT FEEDER TRAY

Place documents for copying.

SLIDE GUIDE

Adjust to the width of the document.

USB INTERFACE CONNECTOR

Main Components of the Machine

Содержание PC-D340

Страница 1: ...Quick Reference Guide Quick Reference Guide ...

Страница 2: ...ncluded on the CD ROM in PDF form The machine shown in this guide is the FAX L400 model Copyright Copyright 2003 by Canon Inc All rights reserved No part of this publication may be reproduced transmitted transcribed stored in a retrieval system or translated into any language or computer language in any form or by any means electronic mechanical magnetic optical chemical manual or otherwise withou...

Страница 3: ...ng a Document on the Platen Glass 3 2 Loading Documents in the ADF Only for the PC D340 FAX L400 Models 3 3 Chapter 4 Basic Printing from Your Computer Before Printing 4 1 Printing from the CARPS Software Ex Windows 98 4 2 Cancelling Printing 4 2 Changing Print Settings 4 3 Chapter 5 Making Copies Documents You Can Copy 5 1 Copying Documents 5 1 Cancelling the Copy Job 5 2 Basic Copying Functions ...

Страница 4: ... Exterior 7 1 Cleaning the Scanning Area 7 1 When to Replace the Cartridge 7 3 Copy Yield 7 4 Handling and Storing the Cartridge 7 4 Replacing the Cartridge 7 6 Chapter 8 Setting the Additional Functions Understanding the Additional Functions 8 1 Accessing the Additional Functions 8 1 Menu Descriptions 8 2 Appendix Specifications A 1 Index I 1 ...

Страница 5: ...to the Set up Guide for details on the topic of the previous sentence User s Guide Refer to the User s Guide for details on the topic of the previous sentence Facsimile Guide Refer to the Facsimile Guide for details on the topic of the previous sentence Software Guide Refer to the Software Guide for details on the topic of the previous sentence machine The word machine refers to the PC D320 PC D34...

Страница 6: ...of the images scanned printed or otherwise reproduced you should consult in advance with your legal advisor for guidance Paper Money Traveller s Cheques Money Orders Food Stamps Certificates of Deposit Passports Postage Stamps cancelled or uncancelled Immigration Papers Identifying Badges or Insignias Internal Revenue Stamps cancelled or uncancelled Selective Service or Draft Papers Bonds or Other...

Страница 7: ...vi ...

Страница 8: ...ances If inflammable substances come into contact with electrical parts inside the machine it may result in a fire or electrical shock Do not block or cover the ventilation port or any openings on the machine with objects as this may result in a fire Place the machine on a flat stable vibration free surface that is strong enough to support its weight approx 14 5 kg PC D320 16 0 kg PC D340 16 1 kg ...

Страница 9: ...the same circuit with appliances such as an air conditioner television or copier These devices generate an electrical noise and may interfere with your machine s operation Plug the machine into a standard 220V 240V AC power outlet Operate the machine only from the type of power source indicated on the machine s label If you are not sure of the type of power available consult your local power compa...

Страница 10: ...y to avoid catching your hand Failing to do so may result in personal injury Do not press down hard on the platen glass cover when using the platen glass to scan a thick book This may damage the platen glass and or result in personal injury Do not subject the machine to strong physical shock or vibration Unplug the machine before moving it Do not lift the machine by any of its attachments If the m...

Страница 11: ...ut here OPERATION PANEL Controls the machine HANDSET JACK Connect the optional handset Appendix B EXTERNAL DEVICE JACK Connect external devices TELEPHONE LINE JACK Connect the telephone line LEFT COVER Open it when you output paper face up or remove jammed paper POWER CORD CONNECTOR DOCUMENT FEEDER TRAY Place documents for copying SLIDE GUIDE Adjust to the width of the document USB INTERFACE CONNE...

Страница 12: ...E TRAY Load paper one by one RIGHT COVER Open it when you install the cartridge or remove jammed paper CASSETTE Load paper stack PLATEN GLASS Place documents for copying PLATEN GLASS COVER Open it when you place documents on the platen glass for copying Introduction 1 ...

Страница 13: ... documents on the platen glass for copying OPERATION PANEL Controls the machine ADF AUTOMATIC DOCUMENT FEEDER Holds documents for copying and feeds them automatically into the scanning unit DOCUMENT OUTPUT TRAY Documents come out here OPERATION PANEL Controls the machine LEFT COVER Open it when you output paper face up or remove jammed paper POWER CORD CONNECTOR DOCUMENT FEEDER TRAY Place document...

Страница 14: ...s Scroll through the selections so you can see other settings 4Enlarge Reduce key Sets an enlargement or reduction ratio of the copy 5Exposure key Adjusts the copy exposure 6Additional Functions key Customizes the way your machine operates 7Collate 2 on 1 key Sorts copies in order of pages or reduces two A4 size documents to fit on a single A4 size sheet 8Image Quality key Adjusts the quality of c...

Страница 15: ... message is displayed in the LCD DEnergy Saver key Sets or cancels the energy saver mode manually The key lights green when the energy saver mode is set and goes off when the mode is cancelled ENumeric keys Enter copy quantity and other numerical values FStop Reset key Cancels copying and other operations and returns to standby display Also this key is used to confirm the copy job you reserved GSt...

Страница 16: ...Use Memory indicator lights up When paper jams occur When an error code appears and the Alarm indicator flashes When no paper is loaded in the cassette or multi purpose tray When PRESS OK KEY is displayed Only for the FAX L400 model Setting the Energy Saver Mode Manually 1 Press Energy Saver The LCD is turned off and the Energy Saver key lights up Right after the machine is restored from the energ...

Страница 17: ...1 10 ...

Страница 18: ...sparencies for full colour copiers or printers Paper which has already been copied using a digital full colour copier Do not copy on the reverse side Paper which has been printed on using a thermal transfer printer Do not copy on the reverse side Never attempt to make copies on full colour transparencies Doing so may result in copier malfunction Acceptable Paper The printing speed may be gradually...

Страница 19: ...n the Cassette 1 Fan the paper stack first then tap the edges on a flat surface to even the stack 2 Remove the multi purpose tray 3 Load the paper stack in the cassette Insert the paper stack into the cassette as far as it will go When you insert paper with a logo on position the paper with the print side up logo side and load it so that the top of the paper feeds first in the cassette NOTE CAUTIO...

Страница 20: ...ECUTIVE ENVELOPE FREE SIZE For details see Specifying the Paper Size and Type Common for Cassette and Multi purpose Tray p 5 3 Do not load different kinds of paper at the same time Do not load extra paper when there is still paper left in the cassette If you load extra paper while making copies remove the loaded paper first Then put it together with the extra paper and tap the edges After that rel...

Страница 21: ...2 4 ...

Страница 22: ...Can Copy Document Handling 3 Document Handling Chapter 3 Type of document Size W L Quantity Weight Platen Glass Plain paper Thick documents Photographs Small documents e g index cards Special types of paper e g tracing paper 1 transparencies 1 etc Book Max 216 mm 297 mm A4 210 mm 297 mm 1 sheet Max 2 kg ADF Plain paper Multiple page documents of the same size thickness and weight or one page docum...

Страница 23: ...the appropriate paper size marks 3 Gently lower the platen glass cover The document is now ready for scanning Positioning Documents Use the size indicators on the left side of the platen glass to position a document If your document conforms to a standard paper size e g A4 or A5 align the document between the appropriate paper size marks If you do not know the size of your document or if your docu...

Страница 24: ...just the slide guides to the width of the document 4 Load the documents face up in the ADF The document is now ready for scanning For multiple page documents the pages are fed one by one from the top of the stack from the first page Wait until all pages of your document have been scanned before starting a new job 50 sheets of A4 size 80 g m2 documents can be set in the ADF If more than 50 sheets o...

Страница 25: ...3 4 ...

Страница 26: ...e Print dialog box in an application and your machine is selected in the printer box see below for details Follow this procedure if it is not selected 1 On the Windows desktop click Start point to Settings then click Printers 2 In the Printers window click the machine icon 3 On the File menu click Set as Default or Set as Default Printer Before Printing Basic Printing from Your Computer 4 Basic Pr...

Страница 27: ...int your document Cancelling Printing 1 If you want to cancel printing before clicking OK click Cancel in the Print dialog box 2 If printing has already begun follow this procedure to cancel printing from Windows 98 On the Windows 98 desktop click Start point to Settings then click Printers 3 In the Printers window double click the machine icon right click the print job then click Cancel Printing ...

Страница 28: ...files Software Guide 1 With your document open in the Windows 98 application click the Print command 2 In the Print dialog box click Properties 3 In the Properties dialog box define your settings on the appropriate tabs or dialog boxes If you are dissatisfied with your changes on a particular tab and want to revert to the default settings click Restore Defaults 4 To accept your changes and close t...

Страница 29: ...4 4 ...

Страница 30: ...e document and load it face up in the ADF or place it face down on the platen glass 3 Set copy features if you wish You can set the features below Copy quantity p 5 3 Enlarging Reducing p 5 5 Image quality p 5 7 Exposure p 5 8 Collate User s Guide 2 on 1 User s Guide Please note that you can not change settings during copying NOTE 100 A4 TEXT NOTE Copying Documents Documents You Can Copy Making Co...

Страница 31: ...will remain However if you press Stop Reset or no key is pressed for 2 minutes they will be reset to the default settings The time until the machine enters the AUTO CLEAR mode can be specified p 8 4 The capacity of the output tray is 50 sheets 80 g m2 of paper To prevent paper jams remove paper from the output tray before the count reaches 50 Cancelling the Copy Job While Scanning Documents in the...

Страница 32: ...inuously copied on paper smaller than A4 size paper the copies may be dirty To prevent copies from being dirty wait about one minute before making copies The paper in the multi purpose tray is copied prior to the paper in the cassette The settings changed in the Additional Functions are not returned automatically to the settings you set previously Change to the previous settings again if necessary...

Страница 33: ...f envelopes COM10 MONARCH DL ISO C5 When FREESIZE is selected specify the horizontal and vertical size of the paper in millimetres mm Available setting range in horizontal size 127 mm to 356 mm Available setting range in vertical size 76 mm to 216 mm Specifying the Paper Type PLAIN PAPER is selected as the default paper type When making copies on paper other than plain paper you can specify the pa...

Страница 34: ...0 A4 A5 50 MIN 3 Press OK Ex If the PAPER SIZE GROUP of COPY SETTINGS in the Additional Functions is set to INCH or AB the preset copy ratios will be as follows INCH 50 64 78 100 129 and 200 AB 50 70 81 86 100 115 141 and 200 Enlarging or reducing using preset copy ratio is not available with the 2 on 1 copy function To reset the copy ratio press Enlarge Reduce several times to display DIRECT 100 ...

Страница 35: ...en after entering the copy ratio you can use 4 or e to adjust the copy ratio To increase the copy ratio press e To decrease the copy ratio press 4 3 Press OK Ex Enlarging or reducing using custom copy ratio is not available with the 2 on 1 copy function To reset the copy ratio press Enlarge Reduce several times to display DIRECT 100 ratio then press OK NOTE 80 A4 TEXT ZOOM 50 200 80 ZOOM 50 200 10...

Страница 36: ...als Good copies can be made from even blueprints or faint pencil drawn originals TEXT PHOTO Suitable for making copies from originals containing both text and photos or photo originals containing half tones i e printed photos PHOTO Suitable for making copies from photos printed on photographic paper Copy exposure automatically changes to manual mode when TEXT PHOTO or PHOTO is set To sharpen the b...

Страница 37: ...de automatically changes to TEXT when AUTO EXPOSURE is set Adjusting Manually 1 Press Exposure twice to select the manual mode Ex 2 Use 4 or e to adjust the copy exposure For a lighter copy exposure press 4 For a darker copy exposure press e Ex 3 Press OK Ex When setting the exposure lighter the indicator moves to the left When setting the exposure darker the indicator moves to the right NOTE 100 ...

Страница 38: ... copies in page order and create special copies easily For detailed information on these features User s Guide Collate Copy Sorts copies in page order 2 on 1 Reduces two A4 size documents to fit on a single A4 size paper Reserve Copy Reserves the next job while the machine is printing out Special Features ...

Страница 39: ...5 10 ...

Страница 40: ...g a Copy Job 1 Press System Monitor Ex If there is no job NO COPY JOBS EXIST is displayed 2 Press 4 or e to confirm the job number and the quantity of copies Ex 3 If you want to delete the copy job press OK 4 If you decide to delete the job press 4 for YES To cancel deleting the job press e for NO Once the job is deleted the job can not be restored NOTE CANCEL COPYING YES NO COPY STATUS 0003 03 02...

Страница 41: ...rint job press OK 4 If you decide to delete the print job press 4 for YES To cancel deleting the job press e for NO Once the job is deleted the job can not be restored The LCD can display characters in ASCII cord Using characters other than those in ASCII cord may have the LCD display garbled characters NOTE CANCEL PRINTING YES NO PRINT STATUS ______________ NOTE PRINT STATUS ______________ File n...

Страница 42: ...to delete the job press 4 for YES 4 If there are multiple report jobs press 4 or e to select the job you want to delete Ex 5 Then press OK 6 If you decide to delete the job press 4 for YES To cancel deleting the job press e for NO Once the job is deleted the job can not be restored NOTE CANCEL REPORT YES NO REPORT STATUS 02 USER DATA LIST CANCEL REPORT YES NO NOTE REPORT STATUS A00 USER DATA LIST ...

Страница 43: ...6 4 ...

Страница 44: ...r similar materials for cleaning they can stick to the components or generate static charges Use a soft cloth to avoid scratching the components Never use volatile liquids such as thinner benzene acetone or any other chemical cleaner to clean the interior of the machine these can damage the machine s components Cleaning the Exterior Wipe the machine s exterior with a clean soft lint free cloth moi...

Страница 45: ...n copies If you have trouble getting the glass clean wipe with a cloth moistened with water or a mild neutral detergent and then wipe the glass dry with another cloth Paste ink correction fluid and other foreign matter can soil the platen glass when you send a document through the ADF while the paste ink or correction fluid on the original is still wet This is what causes black lines on copies Whe...

Страница 46: ...at the side with the written instructions faces upward Do not forcefully move or push the protection shutter of the drum in any way Rock the cartridge five or six times to distribute the toner evenly Re install the cartridge in the machine Then make a few test copies If white streaks or light bands are displayed on copies the toner in the cartridge is running low You can use the cartridge however ...

Страница 47: ... on copies Handling and Storing the Cartridge This section describes the precautions to ensure optimum copy quality Handling Precautions Do not throw cartridge into open flames as this may cause the toner to ignite and result in burns or a fire The cartridge emits low level magnetic flux If you use a cardiac pacemaker and feel abnormalities please move away from the cartridge and consult your doct...

Страница 48: ...ring the cartridge in front of heaters and humidifiers etc Store it in a location where the temperature does not exceed 40 C The recommended storage conditions are as follows Temperature 15 C to 27 C Relative Humidity 20 to 80 Do not stand the cartridge on end or turn it upside down Storing Partially Used Cartridges If you remove a cartridge from the machine store the cartridge as described below ...

Страница 49: ...e cartridge be sure to read the section When to Replace the Cartridge p 7 3 1 Open the right cover 2 Remove the cartridge from the machine 3 Remove the new cartridge from its protective bag Save the protective bag You may need it later when you remove the cartridge from the machine NOTE Replacing the Cartridge ...

Страница 50: ...rection as shown below Make sure that the tab itself is detached from the cartridge 6 While grasping the cartridge with one hand firmly and slowly pull the sealing tape tab with the other hand to remove the sealing tape completely Throw the tape away To avoid breaking the tape do not pull the tape out at an upward or downward angle IMPORTANT Tab Instructions Maintenance 7 ...

Страница 51: ...ides of the cartridge to the guides in the machine location and gently slide the cartridge into the machine until the right cover slightly rises up location The right cover moves simultaneously with the action of the cartridge Do not push the cartridge farther than the location Doing so will result in catching your hand in the right cover IMPORTANT ...

Страница 52: ...7 9 9 Close the right cover and the cartridge will be set in place location If the LCD displays INSTALL CARTRIDGE reset the machine by opening the right cover and then closing it NOTE Maintenance 7 ...

Страница 53: ...7 10 ...

Страница 54: ... to select the sub menu you want to change Ex 4 Press OK Ex Details for sub menus pp 8 2 to 8 5 After selecting the item or value with 4 or e press OK to enter the setting If you press Stop Reset before OK is pressed the item you have selected will not be registered Press Stop Reset to exit from Additional Functions If you press Additional Functions the display returns to the previous screen NOTE ...

Страница 55: ...n Descriptions PRINT EXPOSURE The exposure can be adjusted to one of five levels centre TONER SAVER MODE Sets the toner saver mode ON The toner saver mode is turned on OFF The toner saver mode is turned off DISPLAY LANGUAGE Select the message language ENGLISH FRENCH SPANISH GERMAN ITALIAN DUTCH FINNISH PORTUGUESE NORWEGIAN SWEDISH DANISH SLOVENE CZECH HUNGARIAN RUSSIAN For the FAX L400 model DEFAU...

Страница 56: ...et copy ratios 2 on 1 copy ratio and 2 on 1 paper size will change INCH Preset copy ratios 50 64 78 100 129 200 2 on 1 copy ratio 64 LTR size A Preset copy ratios 50 70 100 141 200 2 on 1 copy ratio 70 A4 size AB Preset copy ratios 50 70 81 86 100 115 141 200 2 on 1 copy ratio 70 A4 size SHARPNESS Black and white of an image can be sharpened When you want to make characters and lines clear select ...

Страница 57: ...time out period 005SEC to 300SEC 015SEC OFF The error time out is off PRINTER RESET Cancels the job currently being received and the job already received TIMER SETTINGS Action Descriptions DATE TIME SETTING Enter the current date and time AUTO CLEAR Sets the auto clear function If the machine remains idle for a certain period of time the display returns to the standby mode ON The auto clear functi...

Страница 58: ...nctions CANCEL REPORT Cancels printout of the report Select report you want to cancel the printout CANCEL REPORT YES The printout of the list is cancelled NO The printout of the list is not cancelled For the FAX L400 model SPEED DIAL LIST is also displayed Facsimile Guide NOTE 8 Setting the Additional Functions ...

Страница 59: ...8 6 ...

Страница 60: ...g System Cassette Feeding 250 sheets of 64 g m2 Multi purpose Tray 10 sheets of 64 g m2 Multiple Copies 1 99 Power Requirements 220V 240V 50 Hz Power requirements differ depending on the country in which you purchased the copier Power Consumption FAX L400 Approx 0 67 kw max PC D340 Approx 0 67 kw max PC D320 Approx 0 67 kw max Dimensions W D H FAX L400 543 mm 457 mm 453 mm PC D340 543 mm 457 mm 45...

Страница 61: ...A 2 ...

Страница 62: ...eaning machine s exterior 7 1 periodic 7 1 scanning area 7 1 Collate copy 5 9 key 1 7 COMMON SETTINGS 8 2 Convention type vi COPY key 1 7 COPY SETTINGS 8 3 Copy yield 7 4 Copying adjusting the copy exposure 5 8 document requirements 3 1 paper requirements 2 1 setting enlarging reducing 5 5 setting the image quality 5 7 Customer support 1 1 D DATE SETUP setting 8 4 DATE TIME SETTING setting 8 4 DIS...

Страница 63: ...tting 5 7 Indicator alarm 1 8 in use memory 1 8 In Use Memory indicator 1 8 L LCD 1 7 Left cover 1 4 Loading documents in the ADF 3 3 Loading paper in the cassette 2 2 Location safety instructions 1 1 M Maintenance safety instructions 1 3 Menu descriptions 8 2 Multi purpose tray 1 5 Multiple copies 5 3 N Numeric keys 1 8 O OK key 1 7 Operation panel 1 7 Output tray 1 5 P Paper cassette 1 5 jam 2 1...

Страница 64: ...on Enlargement 5 5 Replacing cartridge 7 3 7 6 Reserve Copy 5 9 Right cover 1 5 7 6 S Safety instructions handling 1 3 location 1 1 maintenance 1 3 power supply 1 2 SHARPNESS setting 8 3 Size document 3 1 indicators 3 2 print media 2 1 Slide guides ADF 1 4 3 3 STANDARD COPY QTY setting 8 3 STANDARD EXPOSURE setting 8 3 Start key 1 8 5 2 STD ZOOM RATIO setting 8 3 STD IMAGEQUALITY setting 8 3 Stop ...

Страница 65: ...I 4 U USER DATA setting 8 5 USB interface connector 1 4 W Weight document 3 1 machine A 1 print media 2 1 Z Zoom 5 6 ...

Страница 66: ...ss NY 11042 U S A CANON CANADA INC 6390 Dixie Road Mississauga Ontario L5T 1P7 Canada CANON EUROPA N V Bovenkerkerweg 59 61 P O Box 2262 1180 EG Amstelveen The Netherlands CANON FRANCE S A 17 quai du Pr sident Paul Doumer 92414 Courbevoie Cedex France CANON COMMUNICATION IMAGE FRANCE S A Pour les utilisateurs de l imprimante laser uniquement ...

Отзывы: