background image

For details on BJ cartridge holding, carriage drive and pump operation state detection, see the

FACSIMILE BASIC•INTER SUPPLEMENT 2 (supplied separately).

Chapter 2: Technical Reference

2-13

NOTE

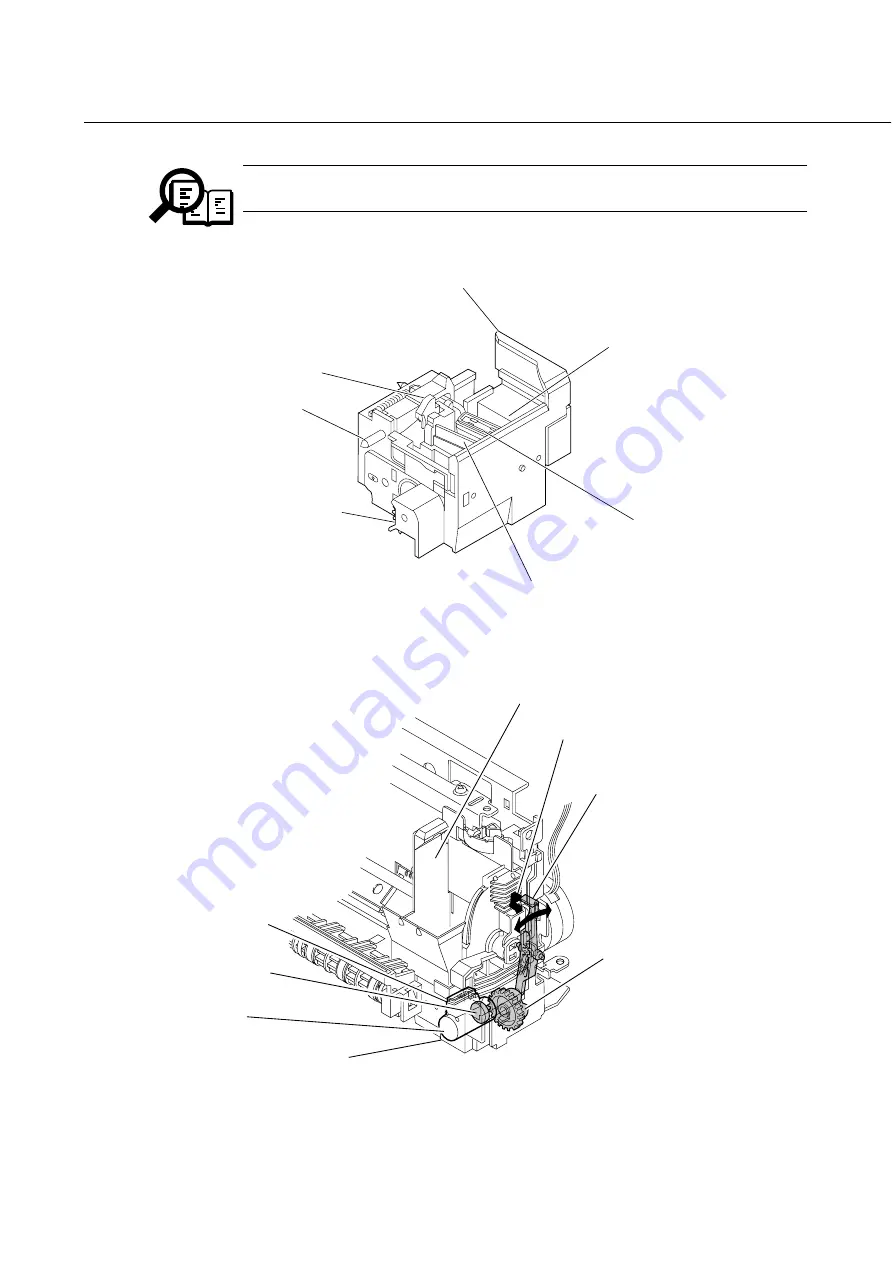
Ink shield

Slide lock pin

Rubber cap

Wiper unit

Wiper control tab

Purge unit drive gear

Pump

Figure 2-8 Purge Unit

Carriage

Home position sensor

Light shielding arm

Pump operation
control arm

Piston

Pump

Rubber cap

Purge unit

Figure 2-9 Pump Operation State Detection

Содержание MultiPASS C50

Страница 1: ...ED IN JAPAN IMPRIME AU JAPON REVISION0 HY8 10AH 000 FEB 1998 H12 1033 230V EC H12 1034 230V UK H12 1035 230V GER H12 1037 230V FRN H12 1038 230V AUS H12 1039 230V AE MultiPASS C50 MultiPASS C50 MultiPASS C50 MultiPASS C50 MultiPASS C50 MultiPASS C50 HANDSET KIT ...

Страница 2: ...editions of this manual The following paragraph does not apply to any countries where such provisions are inconsistent with local law Trademarks The product names and company names described in this manual are the registered trademarks of the individual companies Copyright This manual is copyrighted with all rights reserved Under the copyright laws this manual may not be copied reproduced or trans...

Страница 3: ...y discharge of static electricity for example States a precaution to be taken to prevent damage to electronic components by electrostatic discharge Informs you of fire related cautions Informs you that the plug must be removed from the power outlet before starting an operation Gives useful information to understand descriptions Indicates sections to be read to obtain more detailed information I NO...

Страница 4: ...s for adjustment and troubleshooting and service operations and service switches Chapter 4 Appendix This part explains the informations of the optional products and user data flow For more details of user operations and user reports see the separate volume of USER S GUIDE Procedure for assembly disassembly and greasing points are not given in this manual See the illustrations in the separate volum...

Страница 5: ...III REVISION HISTORY REVISION CONTENT 0 Original III ...

Страница 6: ...IONS 1 23 5 1 Personnel Hazards 1 25 5 1 1 Electrical shock 1 25 5 1 2 High temperature parts 1 26 5 1 3 Fire hazards 1 26 5 1 4 Moving parts 1 26 5 1 5 Preventing ink stains 1 27 5 2 General Cautions 1 27 5 2 1 Unit cautions 1 32 5 2 2 BJ cartridge cautions 1 40 5 2 3 Ink cartridge cautions 1 42 5 3 Servicing Cautions 1 42 5 3 1 Damage from static charge 1 42 5 3 2 Scanner unit 1 43 5 3 3 Print a...

Страница 7: ...cture 2 21 5 2 BJ Head Driver Block Diagram 2 23 5 3 Printing Signal 2 25 6 ELECTRIC CIRCUIT 2 25 6 1 Component Block Diagram 2 26 6 2 Circuit Board Components 2 29 6 3 Flow of Image Signals 2 32 7 COMMUNICATION SYSTEM OPERATIONS 2 32 7 1 FAX TEL Switching 2 32 7 1 1 Settings 2 32 7 1 2 Parameters 2 33 7 2 Answering Machine Connection 2 33 7 2 1 Settings 2 33 7 2 2 Parameters 2 34 8 NEW FUNCTION 2...

Страница 8: ...odes 3 26 4 3 Errors not Shown on the Display 3 26 4 3 1 General errors 3 27 4 3 2 Printing problem 3 29 4 3 3 Scanning problem 3 31 5 SERVICE SWITCHES 3 31 5 1 Hardware Switches 3 32 5 2 Service Data Setting 3 32 5 2 1 Service data overview 3 33 5 2 2 Service data registration setting method 3 34 5 2 3 Service data setting 3 41 5 2 4 Explanation of service data 3 42 5 2 5 New SSSWs parameters add...

Страница 9: ...ram 3 77 8 2 Connector Name and Signal Descriptions Chapter 4 Appendix 4 1 1 INSTALLATION 4 1 1 1 Setting Up 4 1 1 2 Checking Operations 4 2 2 OPTION 4 2 2 1 HANDSET KIT 4 8 3 USER DATA FLOW 4 8 3 1 USER DATA FLOW by Operation Panel 4 10 3 2 USER DATA FLOW by MultiPASS Desktop Manager 4 15 3 3 SPECIAL MODE FLOW by Operation Panel 4 17 4 MAKER CODE INDEX VII ...

Страница 10: ...hnical Reference 2 1 1 THEORY OF OPERATIONS 2 1 2 1 Outline 2 2 2 2 Mechanical Overview 2 3 2 3 Data Flow 2 4 2 4 Printing 2 5 2 5 Circuit Overview 2 5 2 5 1 Printer circuit 2 7 2 6 720 dpi Printing Smoothing Feature 2 7 2 6 1 Canon extension mode 2 7 2 6 2 Emulation mode 2 8 2 7 Printing Modes 2 8 2 7 1 Printing mode 2 8 2 7 2 Photoprint mode 2 10 2 8 Optimum Printing Direction Control 2 10 2 9 I...

Страница 11: ...n 3 5 5 2 Service Data 3 5 5 3 Test Functions 3 5 5 3 1 User test functions 3 6 5 3 2 Hexadecimal dump print 3 7 6 WIRING DIAGRAM 3 7 6 1 Wiring Diagram 3 7 6 2 Connector Location and Signal Description 3 7 6 2 1 SCNT board Chapter 4 Appendix 4 1 1 INSTALLATION 4 2 1 1 Choosing a Location for the Printer 4 3 1 2 Connecting the Printer to the Computer IX ...

Страница 12: ...Ink Path Cartridge 1 40 Figure 1 18 Removing Cartridge Cap 1 41 Figure 1 19 Ink Outlet 1 43 Figure 1 20 Print Assembly Precautions 1 46 Figure 1 21 Opening the Upper Cover 1 47 Figure 1 22 Memory IC and Backed up Devices 1 51 Figure 1 23 Waste Ink Absorber 1 53 Figure 1 24 All Clear Chapter 2 Technical Reference 2 1 Figure 2 1 Mechanical Layout 2 2 Figure 2 2 Electrical System Layout 2 3 Figure 2 ...

Страница 13: ...Line Misalignment Correction Procedure 3 10 Figure 3 8 Headgap 3 11 Figure 3 9 Adjustment Preparation 3 12 Figure 3 10 Head Gap Adjustment 1 3 13 Figure 3 11 Head Gap Adjustment 2 3 19 Figure 3 12 Service Error Code Display 3 27 Figure 3 13 Paper Feed Motor Carriage Motor Document Feed Motor Connector 3 28 Figure 3 14 Defective Pattern Sample 3 31 Figure 3 15 Side Switch Location on NCU Board 3 31...

Страница 14: ...ure 3 39 Service Error Tx Report 3 75 Figure 3 40 Service Error Activity Report receiving 3 76 Figure 3 41 Wiring Diagram Chapter 4 Appendix 4 8 Figure 4 1 User Menu Settings 1 7 4 9 Figure 4 2 User Menu Settings 2 7 4 10 Figure 4 3 User Menu Settings 3 7 4 11 Figure 4 4 User Menu Settings 4 7 4 12 Figure 4 5 User Menu Settings 5 7 4 13 Figure 4 6 User Menu Settings 6 7 4 14 Figure 4 7 User Menu S...

Страница 15: ...Data Flow image 2 4 Figure 2 3 Character Printing 2 5 Figure 2 4 Printer Circuit Block Diagram 2 7 Figure 2 5 720 dpi Printing Smoothing Feature 2 13 Figure 2 6 Nibble Mode Facsimile to Host Data Transfer Chapter 3 Maintenance Service 3 6 Figure 3 1 Hexadecimal Dump Print Sample 3 7 Figure 3 2 SCNT Board Chapter 4 Appendix 4 2 Figure 4 1 Location for the Printer 4 3 Figure 4 2 Attaching the Ferrit...

Страница 16: ...XIV This page intentionally left blank ...

Страница 17: ...Part 1 Facsimile ...

Страница 18: ......

Страница 19: ...Chapter 1 General Description ...

Страница 20: ......

Страница 21: ... ink cartridge contains the ink and the print head When it runs out of ink simply replace it Ink detection function REFER TO PAGE 2 16 This model has a new ink detection function After each received page is printed ink is ejected in front of a photosensor so that the machine can detect whether there is ink remaining or not Copy function This machine can make up to 99 black and white including half...

Страница 22: ...ble lines PSTN Public Switched Telephone Network PBX Private Branch eXchange Applicable Services Mercury UK Econophone SPAIN Hong Kong Telephone HK NET SWITCH AUSTRALIA Handset HANDSET KIT Option Transmission method Half duplex Transmission control protocol ITU T T30 binary protocol ECM protocol Modulation method G3 image signals ITU T V 27ter 2 4k 4 8k bps ITU T V 29 7 2k 9 6k bps ITU T V 33 12k ...

Страница 23: ...step Scanning speed interval FAX Standard 8 dot mm 3 85 line mm 150 dpi step 7 5 msec line 203 2 dpi 97 79 dpi Fine 8 dot mm 7 7 line mm 150 dpi step 7 5 msec line 203 2 dpi 195 58 dpi Scanner Text Binary 150 dpi or less 150 dpi step 5 msec line 151 300 dpi 300 dpi step 5 msec line 301 600 dpi 600 dpi step 5 msec line Gray scale 150 dpi or less 150 dpi step 7 msec line 151 300 dpi 300 dpi step 7 m...

Страница 24: ...48 6 354 6 mm Left margin 0 04 0 14 0 08 0 14 0 08 0 14 1 0 mm 3 5 mm 2 0 mm 3 5 mm 2 0 mm 3 5 mm Right margin 0 04 0 14 0 04 0 14 0 04 0 14 1 0 mm 3 5 mm 1 0 mm 3 5 mm 1 0 mm 3 5 mm Top margin 0 08 0 08 0 08 0 08 0 08 0 08 2 0 mm 2 0 mm 2 0 mm 2 0 mm 2 0 mm 2 0 mm Bottom margin 0 08 0 08 0 08 0 08 0 08 0 08 2 0 mm 2 0 mm 2 0 mm 2 0 mm 2 0 mm 2 0 mm Units are inches with mm shown in parentheses Do...

Страница 25: ...Ink contains 9 ml 5 ml each of YMC Ink detection Yes Directly detects ink ejection Printing speed Approx 5 pages minute in case of character print Printing resolution 360 dpi 360 dpi Normal print 180 dpi 180 dpi Economy print Printing in a checkered pattern without printing vertical and horizontal adjacent dots Paper output tray stacking Approx 50 sheets when using the recommended paper Approx 20 ...

Страница 26: ...13 0 06 0 25 0 06 0 25 0 06 3 4 1 5 mm 4 9 1 5 mm 4 9 1 5 mm Top margin 0 12 0 06 0 12 0 06 0 12 0 06 3 0 1 5 mm 3 0 1 5 mm 3 0 1 5 mm Bottom margin 0 27 0 12 0 27 0 12 0 27 0 12 7 0 3 0 mm 7 0 3 0 mm 7 0 3 0 mm Units are inches with mm shown in parentheses The header and footer are printed in the printing range The shaded area is included in the left and right margin errors of the paper trailing ...

Страница 27: ... B W PHOTO Color COLOR FINE COLOR STANDARD COLOR SNAPSHOT Copy resolution Scanning Black white 360 dpi 360 dpi direct copy 8 dot mm 7 7 line mm memory COPY Color 360 dpi 360 dpi FINE or SNAPSHOT 180 dpi 360 dpi STANDARD Printing 360 dpi 360 dpi Copy magnification ratio 100 90 80 70 Chapter 1 General Description 1 7 ...

Страница 28: ...originating None Relay broadcasting None Reception Dual Access Yes FAX TEL switching Yes Method CNG ROT Re Order Tone detection Message None Except AUSTRALIA Pseudo CI None Pseudo ring Yes Pseudo ringback tone Yes Reduction settings for reception Yes Automatic reduction of reception images Yes 100 70 Built in Answering machine None Answering machine connection Yes Telephone answering priority type...

Страница 29: ...prox 5 years Image data backup None Activity management Yes a User report Activity management report Every 20 transactions always transmission and reception together Activity report sending receiving One touch speed dialling list by SPECIAL MODE Coded speed dialling list by SPECIAL MODE Group dialling list by SPECIAL MODE Memory clear list User s data list by SPECIAL MODE Multi activity report b S...

Страница 30: ...ata Year month date day hour minute 24 hour display Precision 90 sec per month Display 1 row 16 digits Completion stamp None Program key None Telephone exchange function None Speaker phone None Demo print function None HELP function None Part 1 Facsimile 1 10 ...

Страница 31: ...e 3 31 Chapter 1 General Description 1 11 Front View OPERATION PANEL PRINTER COVER AUTOMATIC DOCUMENT FEEDER ADF SENDING DOCUMENT SUPPORT DOCUMENT SUPPORT FOR SCANNED DOCUMENTS OUTPUT TRAY EXTENSION OUTPUT TRAY SHEET FEEDER PAPER GUIDE PAPER OUTPUT GUIDES PAPER REST DOCUMENT GUIDES Figure 1 3 External View 1 NOTE ...

Страница 32: ...r View BI DIRECTIONAL PARALLEL PORT MANUAL FEEDER POWER CONNECTOR TELEPHONE LINE JACK OPTIONAL HANDSET TELEPHONE ANSWERING MACHINE JACK Figure 1 4 External View 2 Inside the Printer Cover PAPER THICKNESS LEVER CARTRIDGE HOLDER ...

Страница 33: ...The Handset Option For a description of the optional handset components see Chapter 4 2 OPTION 2 1 HANDSET KIT Chapter 1 General Description 1 13 ...

Страница 34: ...pe of call Fax Tel Mode LCD display This displays messages and prompts during operation and displays selections text numbers and names when registering information RESOLUTION button Press this button to select the resolution the MultiPASS C50 will use for the document you want to fax copy or scan 1 2 ABC 3 DEF 4 5 JKL GHI 6 MNO 7 8 TUV PQRS 9 WXYZ 0 PAUSE RECEIVE MODE RESOLUTION ALARM CODED DIAL 1...

Страница 35: ...dial the last number that was dialled using the number buttons or to enter pauses between digits when dialling fax numbers CODED DIAL button Press this button followed by entering a two digit code with the numeric buttons to dial a fax number that you have registered for coded speed dialling START COPY button Press this button to begin sending receiving scanning or other operations or to select fu...

Страница 36: ...d 2 Use these buttons to scroll through menu selections or to move the cursor when registering data PRINTER RESET button 3 Press this button to reset the MultiPASS C50 if your PC crashes This will maintain all the faxes currently in memory Do not unplug the MultiPASS C50 to reset the unit or the faxes in memory will be lost TONE button 4 Press this button to switch to tone dialling temporarily whe...

Страница 37: ...ange between number mode uppercase letter mode and lowercase letter mode When you are in number mode 1 appears on the right of the display When you are in uppercase letter mode A appears on the right of the display When you are in lowercase mode a appears on the right of the display a A 1 To enter a symbol press repeatedly until the symbol you want appears Press any other button or to enter the sy...

Страница 38: ...s cartridge incorporates a BJ print head and black ink in a single unit The BC 20 can be used if most of your printing is black e g for receiving faxes making copies and monochrome printing It can print twice as fast as a colour cartridge and at higher resolution BC 21 21e Colour BJ Cartridge The BC 21 21e incorporates a BJ print head and two replaceable ink tanks a BCI 21 Black and a BCI 21 Colou...

Страница 39: ... make copies while the BC 22 22e or BC 29F cartridge is installed This is an ink saving feature because the BC 22 22e and BC 29F are single units and do not have ink tanks that can be replaced separately using them to print faxes will use the black ink faster using up the cartridges while they still have a considerable amount of colour ink remaining SB 21 BJ Cartridge Container Use the SB 21 to st...

Страница 40: ... Resolution Paper HR 101 This paper is designed to produce near photographic quality print output with sharp vivid graphics and photographs You must use this paper when printing with the BC 22 22e Photo Colour BJ Cartridge When using HR 101 paper be sure to print on the whiter side of the sheets and after printing a pack of this paper use the cleaning sheet provided with it to clean the printer ro...

Страница 41: ...y Paper in the printer driver when you have this paper loaded This is a high grade gloss film that lets you create sharper and more vivid colour output than is possible with coated paper This film provides the best colour print quality for the BC 21 21e Colour BJ cartridge Use this film for trade show displays or other special presentations and when printing at 720 360 dpi resolution These white c...

Страница 42: ...4 DIMENSIONS Part 1 Facsimile 1 22 622 365 198 59 205 295 Units mm 400 482 Figure 1 13 Dimensions ...

Страница 43: ...ge 1 25 Lithium battery Page 1 26 Electrical Shock and High Temperature Parts Fire hazards parts Telephone line Page 1 25 PCNT board 173 1 F Page 1 25 Carriage motor 145 2 F Page 1 25 Paper feed motor 132 F Page 1 25 Document feed motor 113 F Page1 25 BJ cartridge 212 F Alminium plate PAGE 1 25 Figure 1 14 Personnel Hazards 1 ...

Страница 44: ...Purge unit Ink absorber Paper feed roller Moving parts Page1 26 Preventing ink stains Page1 26 Separation roller Document eject roller Document feed roller Document feed motor Paper eject roller Paper feed motor Carriage motor Carriage belt Figure 1 15 Personnel Hazards 2 ...

Страница 45: ... power cord and let this unit stand for at least 10 minutes to allow hot parts to cool How to treat burns Heat of about 122 F or more causes burns Also the longer the contact the more severe the burn When treating a burn the first minute after receiving the burn is the most important Cool the burn immediately with cold running water In case of a serious burn seek medical attention immediately The ...

Страница 46: ... disassembly Since the this unit does not have a sensor on the printer cover the carriage and rollers will not stop even if the printer cover is opened during a printing operation If the printer cover must be opened during printing beware of the moving parts Figure 1 14 shows the driving section s location 5 1 5 Preventing ink stains Avoid touching the BJ cartridge ink nozzles ink pad head cap hea...

Страница 47: ... centre The back and bottom of the MultiPASS C50 include slots and openings for ventilation To keep the MultiPASS C50 from overheating which can cause it to operate abnormally and create a fire risk take care not to block or cover these openings Do not operate the unit on a bed sofa rug or other similar soft surface or near a radiator or other heat source Do not place the MultiPASS C50 in a cupboa...

Страница 48: ...ug the MultiPASS C50 before moving or cleaning it Whenever you unplug the MultiPASS C50 wait at least five seconds before you plug it back in Keep the MultiPASS C50 away from direct sunlight as this can damage it If you have to place it near a window install heavy curtains or blinds Do not expose the MultiPASS C50 to extreme temperature fluctuations Install the unit in a place with temperatures in...

Страница 49: ...SS C50 does not operate normally when you follow the operating instructions Adjust only those controls that are covered by the operating instructions in this user s guide or you can damage the unit and require extensive repair work If the MultiPASS C50 is dropped or its cabinet damaged If the MultiPASS C50 begins performing poorly and you cannot correct the problem by using the procedures in Chapt...

Страница 50: ...ecting it to Make sure you can reach it easily as you will be using it as a printer fax machine copier scanner and telephone Do not plug the MultiPASS C50 into the same circuit as an appliance such as an air conditioner electric typewriter television or copier Such devices generate electrical noise that can interfere with your MultiPASS C50 s ability to send or receive faxes Set the MultiPASS C50 ...

Страница 51: ...nce such as an air conditioner computer electric typewriter or copier These devices generate electrical noise which can interfere with the MultiPASS C50 s operation Make sure nothing is laying on the power cord and that the cord cannot be walked on or tripped over Do not overload the electrical outlet Make sure the total amperage used by all the machines plugged into the outlet does not exceed the...

Страница 52: ...ridges following these guidelines Store cartridges at room temperature Keep cartridges in their sealed containers until you are ready to use them Install the cartridge immediately after removing its print head cap and protective tape Always use the cartridge within one year of unpacking it When changing cartridges always store the unused cartridge in the SB 21 BJ cartridge container that comes wit...

Страница 53: ... button Leaving it out of its home position will dry out the print head on the cartridge Clean the print head when print quality is no longer satisfactory See Cleaning and Testing the BJ Cartridge Print Head for instructions If the print quality does not improve after five consecutive cleanings replace the ink tank or BJ cartridge Do not use a BC 21 21e Colour BJ cartridge with either of its ink t...

Страница 54: ... otherwise If your printing is faded you can often correct the problem by adjusting print head significantly reduces the amount of ink in the cartridge so clean only when necessary 1 Make sure the MultiPASS C50 is plugged in 2 3 Press or to select CLEANING CLEANING FUNCTION 1 2 FUNCTION Maintaining BJ Cartridge Cleaning and Testing the BJ Cartridge Print Head The print head in the BJprint cartridg...

Страница 55: ...eyscales you will need to replace the cartridge more often than if you print mainly text To help ensure the maximum life for your cartridges always follow the guidelines for cartridge maintenance given in Guidelines for Using and Maintaining BJ Cartridges In general you will need to replace the BJ cartridge in the following situations If you have been using a BC 21 21e Colour BJ cartridge for over...

Страница 56: ... will clear up the problem If the print is light or shows gaps go to step 2 2 If there was no fax in memory or if the fax s print was light blank or showed gaps print or copy a document to make sure the problem is not with the machine that sent the fax 3 If the document is light blank or shows gaps clean the printing area If this doesn t work replace the cartridge Press START COPY to print any fax...

Страница 57: ...tion at the right side of the unit and capping itself If you remove a partially used BJ cartridge from the MultiPASS C50 store it in the SB 21 BJ cartridge container that came with your unit 1 Insert the cartridge in the container with the cartridge s label facing forward and the print head down 2 Close the container lid and snap it shut Ink Cartridge BCl 21 Color Made in Japan Color Slot Ink Cart...

Страница 58: ... cartridge If the BJ cartridge packaging has been opened and the BJ cartridge is not to be installed immediately store the cartridge in the SB 21 cartridge container to prevent the printing head from drying out and clogging As much as possible do not open the packaging until the BJ cartridge is to be installed immediately Part 1 Facsimile 1 38 NOTE Figure 1 16 Unpacking the BJ Cartridge Color BJ C...

Страница 59: ...ith water d Ink conductivity The BJ cartridge ink can conduct electricity If ink has leaked onto any mechanical parts wipe off with a damp paper towel If ink has leaked onto the circuit board use tissue paper and carefully wipe off the ink completely even at the base of the IC chips Never turn on the power while ink still remains on the circuit board Doing so may damage the circuits Chapter 1 Gene...

Страница 60: ...Page 1 27 b Unpacking the ink cartridge Do not open the ink cartridge packaging unless you are ready to install the new ink cartridge Before installing it in the BJ cartridge remove the protective cap from the ink inlet Part 1 Facsimile 1 40 Cap Figure 1 18 Removing Cartridge Cap ...

Страница 61: ...ve the ink cartridge except when it is to be replaced If the ink nozzles are clogged or if the ink suction is poor the printout may have horizontal white stripes If the cleaning operation does not restore it to normal replace the BJ cartridge Chapter 1 General Description 1 41 Color Ink Cartridge Contact Section of the Joint Pipe Contact Section of the Joint Pipe Cyan Ink Outlet Contact Section of...

Страница 62: ...sport printed circuit boards and electronic devices Avoid wearing silk or polyester clothing and leather soled shoes Wear cotton clothing and rubber soled shoes instead Avoid servicing this unit in a carpeted room Before servicing this unit touch this unit s grounded terminals to discharge any static charge Wear grounding wrist straps and ground this unit s metal chassis Always handle the circuit ...

Страница 63: ...5 3 3 Print assembly Chapter 1 General Description 1 43 BJ Cartridge Carriage Head Gap Spurs Carriage ribbon cable ass y Figure 1 20 Print Assembly Precautions ...

Страница 64: ...se other than the specified type Using a different type of grease may dissolve or deform plastic parts If you accidentally touch a greased surface reapply the grease See the PARTS CATALOG provided separately Spurs During servicing be careful not to damage or deform the spur assembly s spur tips If the spur tips are deformed the area of the paper coming into contact after the printing increases cau...

Страница 65: ... paper size the following will be executed As with A the document will be printed to fit the length of the paper size that has been set Since the actual paper size is shorter than the paper size setting the document s contents would be broken up to fit the paper size setting CHECK PAPER SIZE will therefore be displayed and printing will be canceled 5 3 5 Control boards a Hardware switch and adjust...

Страница 66: ...rs are damaged during the work they must be replaced with new ones To remove the upper cover prise loose the four tabs using the tip of the recommended tool When loosing these tabs be careful of the following points Use a tool whose diameter is less than that of the holes hole 3mm 1 5mm Using larger diameter tools may damage the surface around the holes Be careful not to cause any damage around th...

Страница 67: ...ntents of these items are stored as necessary in the settings files in the PC and at the same time are rewritten into the user setting items in the SRAM via bi centronics interface This function means that when replacing the lithium battery or performing repairs that normally entail the loss of data if the user s PC contains valid settings files there is no need to reenter user managed data Refer ...

Страница 68: ...d REC D IN MEMORY will be displayed This product does not have a memory reception image transfer capability If printing is disabled due to a fault in the printing section check the Memory Clear List after turning off the power to repair the fault and request the other party to retransmit the message If the setting is for the received image data to be transferred to PC instead of being printed the ...

Страница 69: ...mper plug is removed and the power is turned off the data in SRAM will be lost Before removing the jumper plug be sure to print out the data stored in the SRAM Lithium battery life The lithium battery can last for over 5 years after the power is turned off When the power is on the lithium battery s power is untapped Therefore the actual battery life can be much longer When the lithium battery beco...

Страница 70: ...hapter 3 5 2 5 New SSSW s parameters added to this model on Page 3 41 Vertical alignment data To adjust the vertical alignment see Chapter 3 3 2 Vertical Alignment Correction on Page 3 7 Re entering the waste ink absorber s ink absorption amount The amount data is calculated one waste ink absorber The waste ink absorption amount displayed in the SYSTEM DUMP LIST indicates the percentage of the res...

Страница 71: ...Chapter 1 General Description 1 51 Waste Ink absorber Figure 1 23 Waste Ink Absorber ...

Страница 72: ...3 57 To PC registration function see Page 1 46 The serviceable SCNT board does not have a jumper plug This is to prevent the lithium battery power from draining Use the jumper plug on the old SCNT board After the new SCNT board is installed and the power is turned on DATA ERROR will be displayed Press the START COPY key to discard the SRAM s irregular contents and initialize it to the factory defa...

Страница 73: ...ank and all the buttons may stop working Severe electrical noise and static can cause problems as well In such a case use the All clear feature After installing the unit for the first time and connecting the power cord execute All clear The procedure is described below Chapter 1 General Description 1 53 REFERENCE NOTE START COPY FUNCTION 5 times 8 CLEAR ALL Standby START COPY Execute All clear STA...

Страница 74: ...as a cleaning feature that wipes off dust from the BJ cartridge nozzles with a head wiper and fills the nozzles with fresh ink b Nozzle capping The fax unit caps the BJ cartridge nozzles with the Capping section cap after the carriage returns to the front of the Capping section on the right side This protects the nozzles from dust and prevents the ink from drying out or leaking c Maintenance jet T...

Страница 75: ...ked If the temperature has dropped below 75 C normal printing resumes without any wait period inserted However if the head temperature is still above 75 C the wait period is inserted after each printed line until the printing head cools sufficiently If a head temperature exceeding 100 C is detected for 0 2 sec during printing it will be deemed as a BJ head abnormal temperature error and CHECK PRIN...

Страница 76: ...When protection is not possible The SCNT board may not be adequately protected even with the protection circuits if lightning strikes the telephone line 5 5 6 Power leakage protection The AC line telephone line and metal parts of the fax unit are completely insulated The fax unit has a grounded power cord three prong plug to prevent electrical shock If power leakage does occur use the fax unit onl...

Страница 77: ...6 QUALIFICATIONREQUIREDFORINSTALLATIONWORK The qualifications for installation must satisfy local laws and regulations Chapter 1 General Description 1 57 ...

Страница 78: ...Part 1 Facsimile 1 58 This page intentionally left blank ...

Страница 79: ...Chapter 2 Technical Reference ...

Страница 80: ......

Страница 81: ...rms cleaning of the BJ head and printing to paper For details on each Section of the mechanism see the sections below beginning with 2 SCANNER MECHANISM on Page 2 3 Chapter 2 Technical Reference 2 1 Figure 2 1 Mechanical Layout Manual feed paper path Automatic feed paper path Document path Paper eject roller Paper feed motor Paper feed roller Carriage motor Carriage belt Transmission roller Pickup...

Страница 82: ... status Part 1 Facsimile 2 2 Paper edge sensor Detects the state of paper feeding and delivery Pickup roller sensor Detects the state of pickup roller Home position sensor Detects the carriage position and purge unit status Document sensor Detects whether or not a document is set Document edge sensor Detects the trailing edge of the document Ink detect sensor Detects ink fired from the BJ head in ...

Страница 83: ...2 SCANNER MECHANISM The scanner section scans documents that are to be sent or copied Chapter 2 Technical Reference 2 3 7 7 10 8 13 11 6 4 5 2 3 9 15 13 14 12 10 14 12 1 Figure 2 3 Document Feed Section ...

Страница 84: ...ces in the coefficients of friction of the separation guide document and separation roller to separate each of the sheets in a multiple page document 8 Upper Document Feed Roller See next page When the separation roller starts to rotate the upper document feed roller raises the document stopper so that documents can be fed 9 Document Edge Sensor DES Using an actuator the DES detects the edge of a ...

Страница 85: ...ument separation does not occur in manual document feed mode only one sheet at a time may be loaded Loading multiple sheets will result in double feed Document feed error detection There are three types of document feed errors which may occur a Feed jam error When the leading edge of the document is not detected by the document edge sensor DES within 15 seconds after the start of document feed a f...

Страница 86: ...r on automatic sheet feeder If paper meets specifications it can be fed without selecting operation the paper type Also this printer s paper feed mechanism can supply paper in two ways automatically from the cut sheet feeder and manually from the manual feeding slot Part 1 Facsimile 2 6 12 11 10 9 7 5 8 3 2 1 6 4 Figure 2 4 Paper Feed Section ...

Страница 87: ...aper or envelope and holds the extra paper back 6 Paper Edge Sensor PES This sensor monitors the paper feed state and detects jams and misfeeds 7 Paper Feed Roller See Page 2 8 The Paper Feed Roller transports paper which has been picked up by the automatic sheet feeder to the printing position in the Printer Section It then feeds the paper one line at a time in coordination with the carriage move...

Страница 88: ...d motor rotates in the reverse direction the swing gear rotates and moves up to the purge drive gear to drive the purge unit When the control pin is locked the paper feed roller is driven to feed the paper Part 1 Facsimile 2 8 NOTE Paper feed state Paper feed roller Fed in forward direction by paper feed motor Swing gear Control pin Fixed to swing gear Purge unit Pump drive state Paper feed roller...

Страница 89: ... roller sensor on the PCNT board When the paper is sensed by the paper edge sensor for over a second it is fed automatically until it reaches the starting position for printing If the paper is not sensed even when the paper pick up operation is executed it is executed again If the paper is still not sensed it is assessed as a paper feed error When manual feeding set the paper in the manual feeding...

Страница 90: ...per Edge Sensor does not detect the paper s trailing edge after the page has been printed or after 22 inches 558 8 mm of paper eject operation has been performed c Paper size error When the size of the paper being fed is different from that registered in the user data and the page being printed is divided during printing a paper size error will occur When a paper feed error occurs memory reception...

Страница 91: ...BJC 4200 BJ printer Major changes are as follows Cartridge installation is not performed from the front but from above The spur attachment location has been changed An ink detection sensor has been added Chapter 2 Technical Reference 2 11 5 8 3 2 1 6 7 4 Figure 2 7 Printer Section ...

Страница 92: ...between the paper feed purge unit and the sheet feeder 5 Paper thickness adjustment lever Adjust the gap between the print head and paper according to the thickness of the paper 6 Purge unit See Page 2 13 In order to maintain the BJ cartridge s high print quality the BJ cartridge s nozzles and spray orifices are cleaned by a wiper and pump When in standby mode the BJ cartridge s spray orifice sect...

Страница 93: ...2 supplied separately Chapter 2 Technical Reference 2 13 NOTE Ink shield Slide lock pin Rubber cap Wiper unit Wiper control tab Purge unit drive gear Pump Figure 2 8 Purge Unit Carriage Home position sensor Light shielding arm Pump operation control arm Piston Pump Rubber cap Purge unit Figure 2 9 Pump Operation State Detection ...

Страница 94: ...iage passes by from right to left the blade rises to contact the print head and wipe away paper fibers and ink residue The wiping operation is performed at the following times At the start of printing when less than 72 hours has passed since the last cleaning operation Every 60 seconds during printing or after a fixed number of dots have been ejected During a capping operation Maintenance jet The ...

Страница 95: ...idge and mechanical errors This gap is corrected by adjusting the carriage drive motor load and the carriage position which is determined logically from the number of stepping pulses Gap detection is performed before the start of printing during the home position detection operation Chapter 2 Technical Reference 2 15 NOTE ...

Страница 96: ...check the first detection operation If it is determined that there is ink remaining the image data for that page will be erased from memory If the cartridge is out of ink the message CHANGE CARTRIDGE will be displayed to inform the user that the cartridge is out of ink and the page will be received to memory again from the image data The detection level of the ink detection sensor is adjusted auto...

Страница 97: ...ed as a total of all of these When the counted absorption levels reach 100 the CHECK PRINTER message error code 342 will be displayed and printing will stop to allow the absorber to be changed To clear the error it is necessary to replace the absorbers and to reset the waste ink absorption level counts If there is no other error at this time any image in the memory will be output automatically The...

Страница 98: ...contains 9 ml of black ink The BCI 21 color ink tank contains 5 ml each of yellow cyan and magenta ink c BC 22 Photo Color BJ cartridge structure The photo color BJ cartridge has a printing head equipped with 360 dpi 136 nozzles through which the four ink colors are ejected 24 nozzles each for yellow magenta and cyan 64 nozzles for black The BJ cartridge contains 9 ml of black ink 5 ml each of yel...

Страница 99: ...ignal Connection Point 128 Bubble Jet Nozzles Faceplate Bubble Jet Head Unit Figure 2 12 Black BJ Cartridge Structure Nozzle 1 Nozzle 128 Nozzle 1 Nozzle 136 Yellow Nozzles 1 to 24 Magenta Nozzles 25 to 48 Cyan Nozzles 49 to 72 Black Nozzles 73 to 136 Black BJ Cartridge Color BJ Cartridge Photo BJ Cartridge Figure 2 11 Nozzle Arrangement ...

Страница 100: ... Sponges Air Intake Plate Ink Sponge Aluminum Plate Signal Connection Point 136 Bubble Jet Nozzles Faceplate Bubble Jet Head Unit Ink Filter Rubber Sheet Cartridge Body Label Ink Passage Section Label Label Ink Suppliers Ink Sponges Cartridge Cover Air Intake Plate Air Intake Plate Cartridge Cover Ink Sponge Ink Suppliers Holder Figure 2 13 Color BJ Cartridge Structure ...

Страница 101: ...able HENB0 to 3 signals Sub heater This heater maintains the optimum conditions in the nozzle for ejecting ink Temperature control heater This heater controls the head temperature to stabilize the ink ejecting amount Rank resistor To execute optimum heat control of each BJ cartridge production related deviation in heater characteristics is classified into 13 types which are identified by changing ...

Страница 102: ...2 123 124 72 136 16 24 72 121 122 135 136 Heater 1 Heater 24 Y M Heater 25 C Heater 72 Heater 73 BK Heater 136 Yellow Magenta Cyan Black Temperature Control Heater x 2 Rank Resistor Sub heater x 2 136bit Shift Resistor 136bit Latch Head Temperature Sensor HTO HVH HTI RANK VHG W HT 0 1 2 3 0 1 2 HENB Odd ENB Even ENB BENB HDATA HCLOCK HRES HLATCH HVdd HVss DIODE A DIODE K ID0 ID1 135 136 136bit Tr ...

Страница 103: ...ol signal are output together the heater for the applicable nozzles is driven and the ink is ejected b Color BJ cartridge drive control The color BJ cartridge head s nozzle configuration differs from that of the black BJ cartridge The black has 64 nozzles while the color has 24 nozzles each for Y M and C Therefore the number of nozzles in each control block is different from that of the black BJ c...

Страница 104: ...Even ENB B ENB 0 B ENB 1 B ENB 2 H ENB 0 1 2 H ENB 3 Data transmission to shift resistor Head Driving in HQ Mode Divided into 16 Head Driving in HS Mode Divided into 8 1 Block 154µs 6 51kHz 77µs 13 02kHz 9 76kHz 109µs 9 19kHz HQ 720dpi Smoothing HS Pre Pulse Main Pulse 1 0 0 1 1 0 0 1 0 1 1 0 1 0 0 1 1 Block Variable Pulse Width 9 76kHz Color 1pass Figure 2 18 Printing Signals HQ Mode ...

Страница 105: ... ROM 8M bit IC3 Temperature sensor DRAM 4M bit IC4 Data Bus D0 to D15 Cartridge detection Bi Centronics interface Printer control section M M MPU PRINTER IC1 Power supply unit 12V 24V 5V AC230V Ink detect sensor 20MHz EEP ROM IC8 Heater driver Heater driver Address Bus A0 to A23 Pulse genration circuit Driver IC IC 302 Document feed motor M Regulator IC403 DRAM 4M bit IC307 Pickup roller sensor UH...

Страница 106: ...ntroller are as follows Printer resolution conversion Ultra smoothing This IC converts facsimile data of horizontal resolution of 8 dots mm and vertical resolution of 3 85 or 7 7 lines mm to print data of 360 dpi and 360 dpi respectively BJ printer interface 8 bit parallel print data sent to the Printer controller OPCNT serial interface Contains document sensor and document edge sensor signals DRA...

Страница 107: ...m the telephone line according to the same standards c Document scanning section c 1 System controller IC IC 401 The system controller IC include image processing function UHQ are as follows A D conversion Input signals from the contact sensor are A D converted Generation of shading data RGB color Black and white ABC Auto Background Control Sets the slice level for each scan line Edge enhancement ...

Страница 108: ...or optimum driving The stepping motor controller outputs the switching control signal to the carriage motor driver Detection of BJ head temperature Detection of printer s internal temperature Detection of Home position sensor Paper edge sensor and Pickup roller sensor Cartridge detection Ink detection sensor control d 3 ROM IC 3 The 8 Mbit control CG ROM contains the program and bitmap font data f...

Страница 109: ...to parallel data and writes them to the DRAM 4 The MPU encodes raw data in the DRAM using a soft codec and rewrites the encoded data into the DRAM 5 The MODEM IC modulates the coded image data 6 The modulated data are then sent from the MODEM IC to the NCU board 7 The data are returned to the SCNT board and from there are sent to the line for transmission Chapter 2 Technical Reference 2 29 SCNT bo...

Страница 110: ...ted printer data and writes them to the DRAM 4 The system controller IC converts the resolution converted printer data to BJ printer head control signals and then sends the signals to the BJ print head via the BJ controller IC Simultaneously the printer MPU sends motor control signals to the carriage motor and line feed motor via the driver IC Part 1 Facsimile 2 30 SCNT board d a b a MODEM IC b DR...

Страница 111: ...rint data then returns it to DRAM storage 5 The system controller IC converts the CMYK printer data to BJ printer head control signals and then sends the signals to the BJ print head via the BJ controller IC Simultaneously the printer MPU sends motor control signals to the carriage motor and line feed motor via the driver IC Chapter 2 Technical Reference 2 31 SCNT board a System controller IC b DR...

Страница 112: ...c Pseudo Ring time F T SW ACTION RECEIVE User data RECEIVE Operation after FAX TEL switching DISCONNECT Pseudo RBT frequency 400 Hz None None fixed Pseudo RBT transmission from CML 4 sec Service data 3 16 0 to 9 sec on time until start CNG detection time Pseudo RBT pattern on time 1000 ms Service data 3 17 0 to 9990 ms Pseudo RBT pattern off time short 0 ms Service data 3 18 0 to 9990 ms Pseudo RB...

Страница 113: ...ress the fax s RECEIVE MODE button and select the Ans Machine mode 3 When putting the fax into reception mode by detecting no sound on the line set the SILENT DETECT to ON then set the no sound time with user data DURATION See the MultiPASS Desktop Manager for Windows User s Guide for instruction 7 2 2 Parameters Default Setting Selection Item Setting Switch Range SILENT DETECT OFF User data ON OF...

Страница 114: ...picture elements pixels 2552 pixels Scanning rate When color scanning 30 300 dpi 21 ms line 301 600 dpi 33 ms line When color copying 360 dpi fixed 33 ms line Pixel density 300 dpi Data Output 1 analog output Rod lens array Single row type Light source Red Green and Blue LED s mounted on one side of scanner Part 1 Facsimile 2 34 ...

Страница 115: ...a is independent from the reading contact sensor data When CMYK data generation is slower than the reading process reading is halted until CMYK data generation is completed When using the unit as a color scanner the Red Green and Blue data which were scanned and stored to memory are converted to parallel data and sent to the PC via the Centronics interface 8 1 3 Reading black white documents When ...

Страница 116: ...Part 1 Facsimile 2 36 This page intentionally left blank ...

Страница 117: ...Chapter 3 Maintenance and Service ...

Страница 118: ......

Страница 119: ...hey can be used with this machine although full use of their new features is not possible 1 2 Cleaning For the cleaning procedure see 2 HOW TO CLEAN PARTS on page 3 4 Level Location When User Main unit outer covers When dirty Printer platen When ink adheres to the platen Separation roller When document separation performance deteriorates Document feed eject When document feed eject performance rol...

Страница 120: ...adjustment Head gap When the carriage guide frame and the platen installation positions have been moved resulting in the head gap changing CS LED automatic lights on duration adjustment The lights on duration data for each color are on the SCNT board The data are also backed up in SRAM When power is turned on the data are checked by check sum If the data are incorrect the lights on duration is cor...

Страница 121: ...11S Apply to specified parts TKC 0953 Grease EM 50L Apply to specified parts HY9 0007 Grease IF 20 Apply to specified parts CK 8006 Grease PERMALUB G 2 Apply to specified parts CK 0551 Gap gauge 1 2mm For head gap adjustment QY9 0016 BJ cartridge BC 20 BC 21 For head gap adjustment Cover opener For opening the upper cover HY9 0021 Cover opener The Cover opener round tip screwdriver has been set as...

Страница 122: ... dry soft cloth 2 6 White Sheet Open the operation panel and wipe with a dry soft cloth 2 7 Printer Platen Open the Printer cover and wipe with a cloth moistened with a little water If the parts above are very dirty wipe with a cloth moistened with IPA isopropyl alcohol Do not use tissue paper Dust from the tissue paper causes static electricity Precautions when Using IPA When cleaning with IPA ta...

Страница 123: ...Chapter 3 Maintenance Service 3 5 Printer platen White sheet Document feed roller Document eject roller Separation roller Glass window contact sensor Separation guide Figure 3 1 Cleaning Location ...

Страница 124: ...most never necessary to perform this adjustment during normal use However if the SCNT board Contact sensory ass y or lithium battery is replaced be sure to perform this adjustment Also if the color or brightness of scanned or copied images is faulty performing this adjustment may correct the problem b Procedure 1 Check that the operation panel is closed correctly then perform the adjustment by fol...

Страница 125: ...est pattern As shown in Fig 3 5 the test pattern shows the SHQ SHQ2 Not used HQ normal mode HS economy mode and uni direction printing condition from the top The respective vertical lines for HQ and HS can be moved left or right on the second row of three rows As shown in Fig 3 6 adjust so that the vertical lines in the middle are correctly aligned Chapter 3 Maintenance Service 3 7 FUNCTION Printi...

Страница 126: ...ws the procedure for making a 2 dot correction to the right for the all print mode respectively The actual display may look different from the figure 4 After making the correction print out the test pattern If there is any misalignment do the correction again All registration defaults are 0 SHQ2 mode is not used in this model Part 1 Facsimile 3 8 Center 0 dot Misalignment Direction LEFT Misalignme...

Страница 127: ...mple enter 4 with the numeric keypad and select RT RIGHT with START COPY SHQ START COPY SHQ LF0 For this example enter 9 with the numeric keypad and select RT RIGHT with START COPY START COPY HQ LF0 For this example enter 6 with the numeric keypad and select RT RIGHT with START COPY START COPY HS LF0 For this example enter 4 with the numeric keypad and select RT RIGHT with START COPY A PATTERN PRI...

Страница 128: ...eeds to be adjusted to approximately 1 2 mm to ensure optimum print quality This adjustment is done by moving the carriage guide frame forward or back The head gap differs depending on the position of the paper thickness lever To adjust the head gap move the paper thickness lever to the left for plain paper printing with a black BJ cartridge and set the head gap to approximately 1 2 mm Part 1 Facs...

Страница 129: ...ove the upper cover Refer to the Parts Catalog and remove the upper cover Disassemble the main unit as shown in Fig 3 10 2 Install a black BJ cartridge for servicing into the carriage 3 Push in the carriage guide frame as of the arrows and tighten screws A and B lightly 4 Move the carriage belt with your fingers to move the carriage to position A center of platen Before making the adjustment make ...

Страница 130: ...tion screw B is too tight And if it moves on the screw B end as well screw B is too loose Refasten the carriage guide frame lightly again and repeat the procedure from C 1 Adjustment preparation 6 Lightly tighten screw A 7 Put the paper thickness lever to the right and move the carriage to position A Then place the gap gauge at position C 8 Move the carriage to position C 9 Put the paper thickness...

Страница 131: ...ration 12 Lightly tighten screw B 13 Push the paper thickness lever to the right and move the carriage to position A Then place the gap gauge at position B 14 Repeat steps 2 through 13 twice 15 Tighten screws A and B alternately for final tightening Do not use your hand to move the carriage It may cause the carriage guide frame to shift To move the carriage use the carriage belt instead On the pla...

Страница 132: ... does not run The paper is not picked up from the auto sheet feeder The printing operation is abnormal Page 3 27 Nothing is printed The carriage motor does not run Printing quality error Page 3 28 Evaluation criteria Look at the printing result Print is not clear Blurred or smudged characters Smudges appear on back of printed page Irregular print quality Print head needs cleaning Horizontal white ...

Страница 133: ...The telephone number you dialed is busy Solution Try sending the document at a later time CHECK DOCUMENT 001 Cause Document jam This is displayed when the document sensor detects paper but the document edge sensor cannot detect the leading edge of the document with 15 seconds from the start of the feed operation Solution Clear the document jam CHECK PAPER SIZE Cause The size of the paper loaded in...

Страница 134: ...Cause The handset or the extension telephone is off the hook Solution Put the handset or the extension telephone back on the hook PUT IN CARTRIDGE Cause The BJ cartridge is not set Solution Set the BJ cartridge Cause The BJ cartridge is set incorrectly Solution Set the BJ cartridge correctly MEMORY FULL 037 Cause The fax s memory is full because it has received too many documents Solutions 1 Print...

Страница 135: ...Loose carriage belt Countermeasure Replace carriage belt Cause Guide frame home position detection tabs is damaged or bent parts Countermeasure Replace the damaged or bent parts Cause Carriage motor does not work Countermeasure 1 Switch power OFF ON 2 Replace carriage motor Cause Carriage position cannot be detected Home position sensor breakdown or BJ controller malfunction Countermeasure 1 Switc...

Страница 136: ...stered Solution Check the contents of the one touch or coded speed dialling registration then try again CLEAR PAPER JAM 009 Cause Paper jam Solution Clear the paper jam and press the STOP button CHANGE CARTRIDGE 052 Cause The BJ cartridge has run out of ink Solution Replace the BJ cartridge WAIT COOLING Cause The BJ cartridge is hot Solution Wait until the message disappears START AGAIN Cause An e...

Страница 137: ...ncluded here as specific countermeasures for your reference Increase the transmission level Set service data 2 MENU Parameter No 07 to 0 dBm Decrease the transmission level Set service data 2 MENU Parameter No 07 to 15 dBm Echo measures Change the following bit switches of service data 1 SSSW SW03 Bit 4 1 Ignore the first DIS signal sent by the other fax machine 0 Do not ignore the first DIS signa...

Страница 138: ...le for this fax Loosen the RTN transmission conditions Change service data 3 NUMERIC Param Parameter No 02 to 04 No 02 Percentage of errors in all lines Set close to 99 No 03 Number of lines of burst condition Set close to 99 lines No 04 Lines below the burst condition Set close to 99 times Increase the no sound time after CFR reception Change service data 1 SSSW SW04 bit 4 to 1 Bit 4 1 Time when ...

Страница 139: ...uring Tx 106 RX Fail to Receive Protocol for 6 Seconds when Waiting for Protocol during Rx 107 RX Fall Back Failure on Tx Side during Rx 109 TX Receive Signals Other than DIS DTC FTT CFR or CRP after DCS Tx and Exceed the Number of Protocol re transmissions during Tx 111 TX RX Memory error 114 RX RTN Transmission during Reception 200 RX Fail to Detect Picture Rx Carrier for 5 Seconds during Rx 201...

Страница 140: ...ion sensor error 750 TX Exceed Repeat Protocol Due to Failure to Receive Significant Signals after Transmitting PPS NULL during ECM Tx 752 TX Receive DCN after PPS NULL Transmission during ECM Tx 753 TX Exceed Protocol Retransmission Limit or T5 Time 60 seconds after PPS NULL Transmission during ECM Tx 754 TX Exceed Retransmit Protocol after PPS NULL Transmission during ECM Tx 755 TX Exceed Protoc...

Страница 141: ...nsmission during ECM Tx 779 TX Receive ERR after EOR MPS Transmission during ECM Tx 780 TX Exceed Protocol Retransmission Limit Due to Failure to Receive Significant Signals after EOR EOM Transmission during ECM Tx 782 TX Receive DCN after EOR EOM Transmission during ECM Tx 783 TX Exceed Protocol Retransmission Limit or T5 Time 60 seconds after EOR EOM Transmission during ECM Tx 784 TX Receive ERR...

Страница 142: ...cannot be cleared using the STOP button Replace the waste ink absorber as follows in the error occurs 1 Select 3 INK ABS CAPA under 7 PRINTER in service mode and the counter to 0 2 When 4 PRINTER RESET appears under 7 PRINTER in response to step 1 press the START COPY button and the button to reset the printer The error will be cleared and the image stored in memory will automatically be printed 3...

Страница 143: ...Chapter 3 Maintenance Service 3 25 This page intentionally left blank ...

Страница 144: ... and SCNT board JOPCNT1 2 Replace the Operation panel unit 3 Replace the SCNT board Part of the LCD panel does not display anything 1 Check for LCD problems with the test mode 2 Check the connection between the Operation panel unit and SCNT board JOPCNT1 3 Replace the Operation panel unit Faulty LCD 4 Replace the SCNT board The keys do not work Applicable test mode Operation panel test 1 If the te...

Страница 145: ...oller ass y 4 Replace PCNT board Faulty PRS or PES 5 SCNT board The printing operation is abnormal Nothing is printed 1 Remove the BJ cartridge and re install it 2 Execute cleaning five times and try printing again 3 Replace the BJ cartridge The carriage motor does not run 1 Check the connection from the carriage motor to the PCNT board J2 2 Check the carriage motor s resistance 9 Ω 1 phase is nor...

Страница 146: ...er automatically cleans the BJ head when you follow these steps Press the FUNCTION button and select CLEANING menu Print head needs cleaning 1 Paper dust or ink may get clogged in an ink nozzle in the BJ cartridge Performing the BJ head cleaning procedure should clear up this problem The printer automatically cleans the BJ head when you follow these steps Press the FUNCTION button and select CLEAN...

Страница 147: ...ollers The document does not separate Evaluation criteria Check it visually 1 Check whether the reading motor is driving all the rollers Check for any damaged gears or foreign matter stuck inside 2 See page 3 4 and clean the separation roller and separation guide 3 Replace the separation roller and separation guide Faulty scanner unit s sensors Evaluation criteria The placed document or transporte...

Страница 148: ...eading glass 2 Clean the white sheet 3 Make sure the document is not slanted 4 Check the connection between the contact sensor and SCNT board JCS1 5 Replace the contact sensor assembly The halftone image contains black dots 1 Clean the contact sensor s reading glass 2 Clean the white sheet 3 Check the connection between the contact sensor and SCNT board JCS1 4 Adjust the CS LED lights on duration ...

Страница 149: ...o connection terminals changing the switch settings for use in Sweden is unnecessary The machine can be used without changing switches 1 through 3 from position A the factory setting Chapter 3 Maintenance Service 3 31 B A SW1 B A SW2 B A SW3 U K AUS FRN AE OTHERS B A B A A A SW No 1 2 3 Nation Figure 3 15 Slide Switch Location on NCU Board NOTE Figure 3 16 Slide Switch Settings ...

Страница 150: ...s for the FAX TEL switching function 4 NCU NCU settings These setting items are for telephone network control functions such as the selection signal transmission conditions and the detection conditions for the control signals sent from the exchange 5 TYPE TYPE setting The type setting makes the service data conform to a specific country communications standards There is only one setting item in th...

Страница 151: ... 01 Fax Only 1 SSSW 3 NUMERIC Param Press the START COPY button 01 0 Press the STOP button to return to standby Input the data and press the START COPY button 4 Data registration Press the button 2 Service data mode selection 1 User data mode selection Press the FUNCTION button and then button 3 Menu item selection Select the menu item by pressing the or button Figure 3 17 Service Data Setting Met...

Страница 152: ... Communications result display function settings Not used Not used Page timer settings Not used Not used Not used Not used Not used Not used Not used Copy function settings Not used Not used Not used Not used Report display function settings Transmission function settings Not used Not used Not used Not used Service soft switch setting 7 6 5 4 3 2 1 0 SW01 SW02 SW03 SW04 SW05 SW06 SW07 SW08 SW09 SW...

Страница 153: ...0 11 20 ON OFF DIAL SERVICEMAN OFF 10 0 15 Not used Not used Not used Not used NL equalizer setting Line monitor setting Transmission level setting Not used Not used Frequency of pseudo ring signal Not used Menu switch settings Figures in boldface indicate the default setting 50 Hz 25 Hz 17 Hz Items 11 to 20 Figure 3 19 Service Data page 2 ...

Страница 154: ... TSI signal to be matched for restricted receiving function Line connection detection time T0 timer T1 Timer Rx Not used Maximum time to receive oneline of image data Not used Hooking detection time Pseudo RBT transmission from CML on time until start Pseudo RBT signal pattern On time Pseudo RBT signal pattern Off time short Pseudo RBT signal pattern Off time long Pseudo ring pattern On time setti...

Страница 155: ...Bm 7 47 dBm 8 50 dBm 9 50 dBm Parameter 24 0 Not used 1 Not used 2 Not used 3 Not used 4 Not used 5 8 dBm 6 9 dBm 7 10 dBm 8 11 dBm 9 12 dBm 10 13 dBm 11 14 dBm 12 15 dBm 13 16 dBm 14 17 dBm 15 18 dBm 16 19 dBm 17 20 dBm 18 21 dBm 19 22 dBm 20 23 dBm Parameter 26 0 30 dBm 1 34 5dBm 2 36 5dBm 3 40 dBm 4 42 dBm 5 46 dBm 6 48 dBm 7 50 dBm 8 51 dBm 9 54 dBm Chapter 3 Maintenance Service 3 37 NOTE ...

Страница 156: ...ese settings Part 1 Facsimile 3 38 4 NCU TONE PULSE NCU settings DIAL TONE 2nd DIAL TONE BUSY TONE 0 BUSY TONE 1 REORDER TONE MULTI AUTO RX CNG DETECT SPECIAL RKEY PBX DIAL TONE PBX BUSY TONE EUROPE U K SWEDEN SWISS AUSTRIA DENMARK NORWAY HOLLAND BELGIUM AUSTRALIA FINLAND N Z ITALY SPAIN PORTUGAL IRELAND HONG KONG MALAYSIA HUNGARY SAF CHINA GERMAN FRANCE SINGAPORE CZECH SLOVENIA 5 TYPE Type settin...

Страница 157: ...ot used SUCTION Waste ink capacity check entry See page 3 42 01 18 02 0 03 0 04 0 05 7 12 6 Item 06 11 13 30 30 0 0 0 1 0 0 Not used Not used 7 6 5 4 3 2 1 0 Bit Not used Not used Not used Not used Reduction cassette selection settings Reduction settings Copy printing setting Report frame setting 2 Numeric Param 3 IN K AB S CAPA Printer section reset function Yes No 4 PRINTE R RESET Hexadecimal du...

Страница 158: ... 4 NCU setting data initialization Data on system dump list initialization Data on activity report initialization Total number of pages printed scanned All user data service data activity management data and image data initialization except COUNTER Data initialization mode settings ROM management Version No and Checksum display TEST MODE BJ ADJUST A PATTERN PRINT CHANGE VALUE LF 0 60 or RT CLR SHQ...

Страница 159: ...Handbook supplied separately for details of the switches Below are examples showing how to read bit switch tables Chapter 3 Maintenance Service 3 41 SW01 0 0 0 0 0 0 0 0 B i t 7 B i t 6 B i t 5 B i t 4 B i t 3 B i t 2 B i t 1 B i t 0 Figure 3 24 Bit Switch Display Service error code Error dump list Not used Copy function 300 series service error code Not used Date Time setting restriction User set...

Страница 160: ...receive 500 3000 1300 13 second one line of image data Parameter 10 The wait time after transmission of a dialing signal ends until a significant signal is detected in transmission was set as T1 timer with parameter 10 However ITU T recommends that it should be set as T0 timer so parameter 10 has been renamed to T0 timer and the default time out time has been changed from 35 to 55 seconds The T1 t...

Страница 161: ...mage as long as it is not suffering from an error or is not performing a printer operation The machine will then switch back to printer mode after generating the received image Specifying 0 to the parameter will disable the automatic switch over it does not mean 0 sec 3 INK ABSORBER CAPA This switch allows the waste ink capacity stored in the PCNT board to be checked or entered SUCTION This allows...

Страница 162: ...0000000 SW15 00000000 00000000 00000000 00000000 00000000 00000000 SW16 00000000 00000000 00000000 00000000 00000000 00000000 SW17 00000010 00000010 00000010 00000010 00000010 00000010 SW18 00000000 00000000 00000000 00000000 00000000 00000000 SW19 01000000 01000000 01000000 01000000 01000000 01000000 SW20 01000000 01000000 01000000 01000000 01000000 01000000 SW21 00000000 00000000 00000000 000000...

Страница 163: ...000 SW15 00000000 00000000 00000000 00000000 00000000 00000000 SW16 00000000 00000000 00000000 00000000 00000000 00000000 SW17 00000010 00000010 00000010 00000010 00000010 00000010 SW18 00000000 00000000 00000000 00000000 00000000 00000000 SW19 01000000 01000000 01000000 01000000 01000000 01000000 SW20 01000000 01000000 01000000 01000000 01000000 01000000 SW21 00000000 00000000 00000000 00000000 0...

Страница 164: ...00 00000000 SW15 00000000 00000000 00000000 00000000 00000000 00000000 SW16 00000000 00000000 00000000 00000000 00000000 00000000 SW17 00000010 00000010 00000010 00000010 00000010 00000010 SW18 00000000 00000000 00000000 00000000 00000000 00000000 SW19 01000000 01000000 01000000 01000000 01000000 01000000 SW20 01000000 01000000 01000000 01000000 01000000 01000000 SW21 00000000 00000000 00000000 00...

Страница 165: ...00000 00000000 00000000 00000000 00000000 00000000 SW16 00000000 00000000 00000000 00000000 00000000 00000000 00000000 00000000 SW17 00000010 00000010 00000010 00000010 00000010 00000010 00000010 00000010 SW18 00000000 00000000 00000000 00000000 00000000 00000000 00000000 00000000 SW19 01000000 01000000 01000000 01000000 01000000 01000000 01000000 01000000 SW20 01000000 01000000 01000000 01000000 ...

Страница 166: ...6000 8500 5500 5500 11 3500 3500 3500 3500 3500 3500 13 1300 1300 1300 1300 1300 1300 15 120 120 120 120 120 120 16 2 2 2 2 2 2 17 100 40 100 40 100 75 18 0 20 0 20 0 0 19 400 200 400 200 400 250 20 100 40 100 100 100 100 21 0 20 0 0 0 0 22 400 200 400 400 400 400 23 7 7 7 7 7 7 24 10 10 10 10 10 10 25 60 60 60 60 60 60 26 5 5 5 5 5 5 5 TYPE EUROPE U K SWEDEN SWISS AUSTRIA DENMARK Part 1 Facsimile...

Страница 167: ...00 5500 5500 11 3500 3500 3500 3500 3500 3500 13 1300 1300 1300 1300 1300 1300 15 120 120 120 120 120 120 16 2 2 2 2 4 2 17 30 100 100 100 100 40 18 30 0 0 0 0 20 19 400 400 300 400 400 200 20 30 100 100 100 100 40 21 30 0 0 0 0 20 22 400 400 300 400 400 200 23 7 7 7 7 7 7 24 10 10 10 10 12 10 25 60 60 60 60 60 60 26 5 5 5 5 5 5 5 TYPE NORWAY HOLLAND BELGIUM AUSTRALIA FINLAND N Z Chapter 3 Mainten...

Страница 168: ...5500 5500 5500 5500 11 3500 3500 3500 3500 3500 3500 13 1300 1300 1300 1300 1300 1300 15 120 120 120 120 120 120 16 2 2 2 2 2 2 17 30 150 40 40 40 100 18 30 0 20 20 20 0 19 400 300 200 200 200 400 20 30 150 40 40 40 100 21 30 0 20 20 20 0 22 400 300 200 200 200 400 23 7 7 7 7 7 7 24 10 10 10 10 10 10 25 60 60 60 60 60 60 26 5 5 5 5 5 5 5 TYPE ITALY SPAIN PORTUGAL IRELAND HONG KONG MALAYSIA Part 1 ...

Страница 169: ...00 3500 3800 3500 3500 3500 13 1300 1300 1300 1300 1300 1300 1300 1300 15 120 120 120 120 120 120 120 120 16 2 2 2 2 2 2 2 2 17 100 40 100 40 30 100 100 100 18 0 20 0 20 30 0 0 0 19 400 200 400 200 400 400 400 400 20 100 40 100 100 150 100 100 100 21 0 20 0 0 0 0 0 0 22 400 200 400 200 300 400 400 400 23 7 7 7 9 7 7 7 7 24 10 10 10 10 10 10 10 10 25 60 60 60 30 60 60 60 60 26 5 5 5 5 5 5 5 5 5 TYP...

Страница 170: ...r the cartridge is cleaned five times replace the BJ cartridge or the ink cartridge Press the FUNCTION button then select NOZZLE CHECK Part 1 Facsimile 3 52 Black BJ Cartridge Printed with the first nozzle Printed with the 128th nozzle Missing dots Unstable printing Splashed dots Color Photo BJ Cartridge Printed with the first nozzle Printed with the 136th nozzle Black 24 nozzles 24 nozzles 24 noz...

Страница 171: ...enu items from the display a DRAM tests Writes data to DRAM image storage areas and reads that data to check operations b CS test CS test is used to enter the contact sensor s shading data c Print test Prints nine different patterns within the print area d Modem NCU tests The frequency test and the G3 signal transmission and CNG signal and DTMF signals reception tests e Faculty tests Test the oper...

Страница 172: ...d 5 Not used 6 Not used 7 CHECKERS 8 BIAS 9 Not used 1 G3 4800bps Tx 2 REGISTRATION 3 SENSOR 4 ADF 5 Not used 6 SPEAKER 7 OPERATION PANEL 8 CNG MODEM CHECK 9 LINE 1 4 See Page 3 55 See Page 3 58 See Page 3 59 See Page 3 60 See Page 3 61 See Page 3 63 See Page 3 65 1 CS SHADE ADJUST LED TIMER ADJUST 2 CS READ 3 Not used See Page 3 55 indicates that these items are not used in the field See Page 3 5...

Страница 173: ...LED lights on duration Performs the same operation as 5 CALIBRATION in SPECIAL MODE Details on CS LED lights on duration adjustment see 3 1 CS LED lights on duration adjustment on page 3 6 Tests 2 and Tests 3 are not used in the field Chapter 3 Maintenance Service 3 55 1 D RAM 768K COMPLETE 768K 768K D RAM total memory capacity bytes Indicates an address for which write testing is complete Indicat...

Страница 174: ...d since they are for development and factory personnel End this test by pressing the STOP button Check the pattern for the following If the print test is normal make a copy of a document If the copy is faulty the reading section is faulty Part 1 Facsimile 3 56 Check for any vertical or horizontal white stripes on the black squares Also check that all the squares have straight edges on all four sid...

Страница 175: ...Chapter 3 Maintenance Service 3 57 Figure 3 30 Print Pattern Sample ...

Страница 176: ...on test The modem sends G3 signals from the modular jack and the speaker CNG signal reception tests The modem detects specific frequencies and DTMF signals received from the modular jack a Frequency test The frequency test menu is selected by pressing the 2 button from the MODEM NCU test menu Signals of the frequencies below are sent from the modem using the modular jack and the speaker The freque...

Страница 177: ...sent from the modem using the modular jack and the speaker The frequency can be changed with the numeric buttons Numeric button Frequency 0 300 bps 1 2400 bps 2 4800 bps 3 7200 bps 4 9600 bps 5 TC7200 bps 6 TC9600 bps 7 12000 bps 8 14400 bps The transmission level can be changed with the FUNCTION button then and button Chapter 3 Maintenance Service 3 59 NOTE ...

Страница 178: ...CNG signals and DTMF signals received from the modular jack are detected by the modem Part 1 Facsimile 3 60 2nd received DTMF 2 is displayed 4 6 TONE RX 0 OFF NO ENERGY 0 OFF 9 0 ON 92 The received DTMF 9 is displayed alternately displayed Detection Level The CNG is not detected The CNG is detected Press the STOP button to end the test Figure 3 31 CNG and DTMF Signal Reception Tests ...

Страница 179: ... Sensor tests The sensor test is selected by pressing the 3 button from the faculty test menu In this test you can check the status of each sensor of this fax in item 1 on the display You can also check if sensors that use actuators and microswitches are operating correctly by moving the actuator or microswitch The sensor tests cannot be used to test all of the sensors The following sensors cannot...

Страница 180: ...3 62 D 1 E 0 C 1 P 0 R Document Sensor Document Edge Sensor Cartridge Pickup Roller Sensor O OFF 1 ON O OFF 1 ON No Cartridge 1 Cartridge Present O OFF 1 ON D E C P Pressing the 1 key 6 3 SENSOR Figure 3 32 Sensor Tests ...

Страница 181: ... test The Operation button test is selected by pressing the START COPY button after the LED lamp test In this test you press the button corresponding to the displayed character to put it out The table giving the correspondence between the characters and the buttons is below Character Operation button Character Operation button 1 Numeric buttons Resolution button Receive mode button R Redial Pause ...

Страница 182: ...ed the corresponding character goes out When the entire display has gone out When a one touch speed dialing key is pressed the corresponding letter goes out a b c d e f When the entire display has gone out 6 7 OPERATION PANEL Press START button Press START button Press START button Press START button Press the STOP button to end the test Figure 3 33 Operation Panel ...

Страница 183: ... jack the display changes from OFF to ON and the received frequency is displayed c 2 Test Menu 2 Test Menu 2 is selected by pressing the 2 button from the Line Detect menu When a tonal frequency is detected from the modular jack the display changes from OFF to ON and the received frequency is displayed The frequency detection level can be set with the numeric buttons Numeric button Detection level...

Страница 184: ...ton and Press START COPY button User s data list Select report type by and and Press START COPY button Error report system dump list Activity Management Reports b Reports output automatically by user data settings Each report written below can be automatically output by specifying REPORT SETTINGS in user data Transmission report Reception report Activity Management Reports ROM Version display The ...

Страница 185: ...ates four digits of the transaction number MODE Indicates TRANSMISSION or MEMORY RX CONNECTION TEL Number sent from the other party or number dialled PAGES Number of pages are stored in memory SET TIME Time when data is stored in memory START TIME Planned transmission start time 24 hour display Chapter 3 Maintenance Service 3 67 Figure 3 34 Memory Clear List ...

Страница 186: ...e service mode select the 10 REPORT and the 2 System dump list desired numeric button 0 to 2 Pressing buttons 1 to 2 outputs the respective service reports on the left When pressing button 0 both are output Service activity report If you set bits 0 and 1 of 1 SSSW SW01 in the service with service error code mode the service error code and dump list are indicated and dump list on the activity repor...

Страница 187: ...a 1 System data list This list shows service data 1 5 7 9 setting statuses Chapter 3 Maintenance Service 3 69 Figure 3 35 System Data List page 1 page 4 ...

Страница 188: ... START DATE records the date when the fax performs its first transmission after shipment from the factory Part 1 Facsimile 3 70 Figure 3 36 System Data List page 5 page 6 NOTE ...

Страница 189: ...a 2 System dump list Chapter 3 Maintenance Service 3 71 Figure 3 37 System Dump List 1 2 ...

Страница 190: ...es transmitted and received for each coding method G3 MF2 ECM Total number of pages transmitted and received in each mode PRINT READ Total number of pages printed scanned Display example PRINT 30 100 READ 30 100 Indicates the value input with Service Data 8 CLEAR COUNTER Indicates the value counted since shipment from the factory INK ABSORBER CAPACITY Waste ink absorber s ink absorption amount Dis...

Страница 191: ... Chapter 4 4 MAKER CODE on page 4 10 1000 1000 Indicates a Canon fax lower nibble upper nibble MACHINE CODE For future use RX TX Received transmitted protocol signal bit 1 to bit 56 of received transmitted DIS DCS or DTS If no service errors have occurred in the past the above report will not be output Chapter 3 Maintenance Service 3 73 Figure 3 38 System Dump List 2 2 NOTE ...

Страница 192: ... TIME Communication time in minutes and seconds PAGES Number of pages for which transmission was complete For details see User s guide RESULT NG display with number of pages for which transmission was fault and service error code MAKER CODE Maker code For details see Chapter 4 4 MAKER CODE on page 4 17 1000 1000 Indicates a Canon fax lower nibble upper nibble MACHINE CODE For future use RX TX Rece...

Страница 193: ... seconds PAGES Number of pages for which receiving was complete For details see User s guide RESULT NG display with number of pages for which receiving was fault and service error code MAKER CODE Maker code For details see Chapter 4 4 MAKER CODE on page 4 17 1000 1000 Indicates a Canon fax lower nibble upper nibble MACHINE CODE For future use RX TX Received transmitted protocol signal bit 1 to bit...

Страница 194: ...1 JPCNT1 JPCNT2 to PCNT J6 Flat cable to PCNT J5 Flat cable HOST P C Centronics cable Extension phone Telephone line to SCNT JPCNT2 24V to SCNT JPCNT1 5V Ink detect sensor Paper feed motor paper edge sensor pick up roller sensor Home position sensor BJ Cartridge Carriage ribbon cable Carriage motor PCNT board 24V 5V 1 12 JCS1 Flat cable Color contact sensor 1 11 Operation panel unit Flat cable JOP...

Страница 195: ...U board after modulation by the MODEM IC and before demodulation Also transmits control signals for the relays JPCNT1 PCNT board J5 See PCNT board J5 JPCNT2 PCNT board J6 See PCNT board J6 JTEL1 Extension telephone Connects to Extension telephone JLINE1 Telephone line Connects to Telephone line JEU NCU board J2 J4 See NCU board J2 J4 NCU board Connector name Connected to Description J1 SCNT board ...

Страница 196: ...4 Powersupplyunit Input connector for DC voltage converted by the PSU 5V and 24V voltages are supplied J5 SCNTboard JPCNT1 Supplies 5V voltage for the SCNT board and Centronics interface signal J6 SCNTboard JPCNT2 Supplies 24V voltage for the SCNT board and receives control signals for the document feed motor and printer control signal J8 Ink detection sensor Receives detection signals from the in...

Страница 197: ...Chapter 4 Appendix ...

Страница 198: ......

Страница 199: ...l the BJ cartridge and load it into the machine The instructions for this operation are written on the printer cover Loading paper Set paper in the auto sheet feeder in SELECT PAPER SIZE under FAX PRINTER SETUP set the size of paper that is to be used Setting the TEL LINE TYPE Choose the setting the matched the type of line being used Entering user information Enter user information such as DATE T...

Страница 200: ...able for connection to your MultiPASS C50 Contact your Canon dealer for more information Package Contents Make sure you have the following items If anything is damaged or missing notify your Canon dealer immediately The two screws with a plastic white head are not for use with the MultiPASS C50 You only need the two screws with plugs provided Note IB B 2 ...

Страница 201: ...Handset to Your Unit To attach the handset to your unit follow these steps Use a screwdriver to remove the two covers on the left side of the unit Remove the screws from the plugs and insert the plugs in the holes on the handset cradle IB B 3 ...

Страница 202: ...d the right side is placed against a wall This will allow you to insert the plugs without the unit moving Insert the screws into the plugs and push them in with your finger If you cannot push the screws in with your finger use a phillips screwdriver to push them in Do not screw them in as the screws may break Make sure the screws are inserted all the way into the plugs Note Note IB B 4 ...

Страница 203: ...put jack marked on the left side of the unit When carrying the unit do not lift it by the handset cradle as it may break Caution Note If you need to remove the handset cradle after it is installed use a small phillips screwdriver to remove the two screws IB B 5 ...

Страница 204: ...m R E N capacity of 4 Your Canon unit has a R E N value of 1 unless otherwise stated and this handset also has a R E N value of 1 You can therefore use additional equipment with a total R E N value of up to 2 If the R E N value exceeds 4 the ringer volume will be reduced and one or more of the connected equipment may not function For details on the functions see the following pages Note IB B 6 HOO...

Страница 205: ...OFF according to your preference Ringer Switch Tone Pulse Switch The handset is designed to operate on both Multi Frequency Tone and Loop Disconnect Pulse telephone lines The tone pulse switch enables you to switch from tone dialling to pulse dialling or vice versa Contact your service provider for further information Use a pointed instrument to set this switch to P pulse dialling or T tone dialli...

Страница 206: ...se alterations when performing service you will need a MultiPASS Desktop Manager enabled environment 3 1 USER DATA FLOW by Operation Panel Only items that can be programmed by operation panel without using the PC are listed Part 1 Facsimile 4 8 1 1 TOUCH SPD DIAL 1 TELEPHONE NUMBER 2 NAME 2 CODED SPEED DIAL 1 TELEPHONE NUMBER 2 NAME 3 GROUP DIAL 1 TELEPHONE NUMBER 2 NAME Press the FUNCTION button ...

Страница 207: ...STANDARD DARKER LIGHTER MID MAX MIN VOL MID VOL MAX OFF VOL MIN VOL MID VOL MAX OFF VOL MIN STANDARD HIGH PLAIN PAPER HIGH RES PAPER PSTN PBX VOL MID VOL MAX OFF VOL MIN EARTH CONNECTION PREFIX HOOKING OFF ON ACCESS CODE 132 131P ID CODE up to 20 digits 10 E KEY SETTING SPAIN only OFF ON ACCESS CODE up to 20 digits ID CODE up to 20 digits 4 FILE PRINT Prints documents stored in the fax s memory 5 ...

Страница 208: ... Figures in boldface indicate the default setting The flowchart shows the default values and the setting range for Europe These values may differ from country to country 1 SPEED DIAL SETUP 1 1 TOUCH SPD DIAL DATA REGISTRATION 1 TELEPHONE NUMBER 2 NAME 2 CODED SPD DIAL 1 TELEPHONE NUMBER 2 NAME 3 GROUP DIAL 1 TELEPHONE NUMBER 2 NAME 1 1 These item can be entered even with key operation Figure 4 3 U...

Страница 209: ...LUME 4 ALARM VOLUME 2 USER SETTINGS VOL MIN VOL MID VOL MAX TOUCH TONE ROTARY PULSE VOL MIN VOL MID VOL MAX OFF VOL MIN VOL MID VOL MAX OFF 3 3 3 2 VOL MIN VOL MID VOL MAX OFF 3 2 Also the TELEPHONE MARK is FAX only 3 These items can be entered even with key operation 4 This item is entered with key operation only ON OFF 1 TTI POSITION 3 3 3 PSTN PBX 3 EARTH CONNECTION PREFIX HOOKING OFF ON ACCESS...

Страница 210: ...ST PG ERROR PAGE ON OFF ON OFF PRINT ERROR ONLY REPORTWITHTX IMAGE OUTPUT YES OUTPUT NO 4 SEND TX SETUP PRINT ERROR ONLY OUTPUT YES OUTPUT NO ON OFF ON OFF 02SEC 01 15SEC ON OFF 02TIMES 01 10TIMES 02MIN 02 99MIN RESEND TX FROM REPORT WITH TX IMAGE 5 5 The ACTIVITY REPORT is permanently set to AUTO PRINT The ACTIVITY REPORT cannot be separated into TX and RX output ON OFF Figure 4 5 User Menu Setti...

Страница 211: ... 08SEC 00 30SEC 022SEC 010 045SEC RING COUNT 02TIMES 01 99TIMES DURATION 06SEC 01 99SEC ON OFF F T RING TIME 10SEC 01 99SEC FAX TEL AUTO SW 4 FAX INCOMING RING 5 SILENT DETECT 6 MAN AUTO SWITCH 7 REMOTE RX 8 MEMORY RX 2 FAX TEL AUTO SW 3 NET SWITCH Australia only ON OFF ON OFF REMOTE RX ID 25 01 99 ON OFF Figure 4 6 User Menu Settings 6 7 ...

Страница 212: ...K PHONE PASS WORD LOCK PHONE ON OFF 2 DATE FORMAT 3 DISPLAY LANGUAGE 4 TX START SPEED 5 RX START SPEED 14400bps 9600bps 7200bps 4800bps 14400bps 9600bps 7200bps 4800bps 6 Using the BC 20 BC 21 BJ cartridge fax reception images and reports can be printed and copied When using the BC 22 cartridge INSTALL BC 21 20 is displayed the error alarm sounds and printing is disabled 7 This item can be entered...

Страница 213: ...ata 1 to 4 and 6 to 7 initialization IMAGE MEMORT Image data initialization ALL CLEAR All user data service data activity management data and image data initialization except COUNTER 2 LINE TEST Line connection test with keys 0 and 1 Press 1 Line connect CML relay set ON and H relay set OFF Press 0 Line disconnect CML relay set OFF and H relay set ON Chapter 4 Appendix 4 15 SERVICE DATA IMAGE MEMO...

Страница 214: ...Group dial list in order USER S DATA LIST Prints User s data list ERROR REPORT Prints System dump list 4 DOS PRINTING Set the DOS emulation mode to printer mode Returns to normal mode when OFF 5 CALIBRATION Performs the same operation as CS LED ON time duration in TEST MODE For details see page 3 6 Part 1 Facsimile 4 16 ...

Страница 215: ...le Hexadecimal notation Binary notation 1100 0 0000 1 0001 2 0010 3 0011 4 0100 5 0101 6 0110 7 0111 8 1000 9 1001 A 1010 B 1011 C 1100 D 1101 E 1110 F 1111 PANASONIC MATSUSHITA F 1111 E 1110 TAMURA TEC SILVER D 1101 C SHARP IBM JAPAN MATSUSHITA ELECTRIC MATSUSHITA COMMUNICATION B 1011 A 1010 BROTHER SANYO FUJITSU NITTSUKO KUONI 9 1001 7 0111 6 0110 MITA CASIO HITACHI OMRON HITACHI TELECOM TECH 5 ...

Страница 216: ...Part 1 Facsimile 4 18 This page intentionally left blank ...

Страница 217: ...ent items 3 2 All clear 1 53 3 40 Answering machine connection 1 8 2 33 Auto dialing 1 8 Automatic document feeder ADF 1 3 2 3 Automatic sheet feeder ASF 1 5 2 6 B BJ cartridge 1 5 1 18 1 32 1 54 2 18 3 1 3 3 BJ cartridge container 1 19 1 37 BJ head 1 5 2 21 Broadcast transmission 1 8 C CALIBRATION Special mode 4 15 Capping 2 14 Carriage 2 12 Carriage motor 1 25 2 12 2 25 3 27 3 76 Carriage ribbon...

Страница 218: ... Error code countermeasures 3 19 ERROR CODE LIST 3 21 Error message 3 15 Errors not shown on the display 3 26 External view 1 11 F FAX TEL switching 1 8 2 32 G G3 reception image signal flow 2 30 G3 signal transmission test 3 59 G3 transmission image signal flow 2 29 General specifications 1 2 H Head gap 1 44 3 2 3 10 High temperature parts 1 23 Home position sensor 2 2 2 12 2 25 3 17 3 76 I Image...

Страница 219: ...r 3 72 Print test 3 56 Printer section 2 11 Printer specifications 1 5 Printing problem 3 27 Printing range 1 6 PRINT REPORT Special mode 4 15 R Reception image data 1 48 Recommended paper 1 5 Remote reception 1 8 ROM 2 27 2 28 ROM version display 3 66 S Scanner section 2 3 Scanner specifications 1 3 Scanning problem 3 29 Scanning range 1 4 SCNT board 1 23 1 45 1 52 2 2 2 25 3 76 Sensor tests 3 61...

Страница 220: ...User error codes 3 21 User report 3 66 V Vertical alignment Correction 3 7 W Wiring diagram 3 76 Part 1 Facsimile 4 ...

Страница 221: ...Part 2 Printer ...

Страница 222: ......

Страница 223: ...Chapter 1 General Description ...

Страница 224: ......

Страница 225: ...ze Plain paper Printing is also possible on Coated paper Transparency Envelope Back print film Glossy paper High gross film Fabric sheet Excellent print quality The high performance print head of the ink cartridge offers 720 360 dots per inch dpi for high resolution graphics Automatic printer ON OFF When you print data using the MultiPASS Server MultiPASS printer driver under Windows the printer m...

Страница 226: ...ode Canon extended mode Canon extended mode shall be selected when the MultiPASS printer driver is used Printing speed BC 20 Black printing up to 5 pages per minute 1500 characters per page BC 21 Black printing up to 2 pages per minute BC 21 Color approx 0 3 0 8 pages per minute Print direction Uni directional Print direction automatically changes according to optimum printing directional control ...

Страница 227: ...ed paper Transparency Canon transparency film CF 102 Envelope Commercial number 10 or DL size BPF Canon back print film BF 102 High gross film Canon High gross film HG 101 Glossy paper Canon glossy paper GP 201 Fabric sheet Canon Fabric sheet FS 101 T Shirt transfers Canon T Shirt transfers TR 101 Chapter 1 General Description 1 3 ...

Страница 228: ... 0 25 inch 6 4 mm 0 12 inch 3 0 mm 0 28 inch 7 mm 0 27 inch 6 4 mm COM 10 1 24 inch 31 4 mm DL 0 41 inch 10 4 mm 0 81 inch 20 5 mm 0 81 inch 20 5 mm COM 10 9 48 4 17 inch 241 106 mm DL 8 66 4 33 inch 220 110 mm b a a b c d e f c d W L W L a b c W L W L b a c d Printable area contains recommended printing area e f e f 0 81 inch 20 5 mm 0 81 inch 20 5 mm Plain paper and Special media Feed direction ...

Страница 229: ...ace IBM PC or compatible Synchronizing signal STROBE signal from the computer Handshake BUSY ACKNLG Interface connectors Printer side Amphenol 57 40360 or equivalent Cable side Amphenol 57 30360 or equivalent Recommended interface cable Type Twisted pair shielded cable Material AWG No 28 or larger Length Up to 6 56 feet 2 0 m Signal voltage levels Low level 0 0 V to 0 4 V High level 2 4 V to 5 0 V...

Страница 230: ...3 K Ω ERROR PE SELECT ACKNLG Input circuit Output circuit GA SN74LS245 DIR 100 Ω 5V 3 3 K Ω GA BUSY 5V 1 K Ω GA SN74LS05 or equivalent SN74LS05 or equivalent 470 pF 470 pF 5V SN74LS14N or equivalent 3 3 K Ω 5V SN74LS14N or equivalent 3 3 K Ω 100 Ω INIT 0 01 µF DATA HOSTBUSY AUTO FEED XT 1284A SELECT IN Figure 1 2 Signal Circuits ...

Страница 231: ...T IN 2 Input 1 All RETs are connected to GND 2 These signals are valid only in Epson LQ mode 3 This signal is connected to 5 0V via 3 3k resistor 4 The level is raised to 5V at 390 resistor Signal descriptions STROBE When the printer receives a low STROBE pulse of width greater than 0 5µs from the computer it reads the data from the interface and makes the BUSY line high DATA These signals are the...

Страница 232: ...The printer receives the Printer Deselect command It ignores all incoming data except DC1 which returns the printer to a selected state AUTO FEED XT If this signal is low when the printer is initializing the printer automatically feeds the paper one line when it receives a carriage return CR control code This signal is valid only in Epson LQ mode INIT INIT from the system resets the printer to its...

Страница 233: ...data it pulses the ACKNLG line This signals the computer that the printer has read the byte of data into the printer memory If the printer buffer is not full and it can receive more data it removes the BUSY signal The timing charts that follow illustrate the data and handshake lines during the transfer of one data byte from the computer DATA 1 through DATA 8 and the STROBE line are driven by the c...

Страница 234: ...3 OVERVIEW 3 1 Interface Connector Part 2 Printer 1 10 BI DIRECTIONAL PARALLEL PORT Figure 1 4 Interface Connector ...

Страница 235: ...3 2 Printer Operation Panel See Part 1 Facsimile Chapter 1 General Description for details Chapter 1 General Description 1 11 REFERENCE ...

Страница 236: ...or disconnecting the interface cable make sure that the computer power is off and the fax outlet is pulled out to turn the power off 4 2 2 Data lost when power cord is pulled out When the power cord is pulled out following data will be lost Downloaded font image in the DRAM Current print data in the DRAM receive print buffer Current printer settings by application software 4 2 3 Data reset When th...

Страница 237: ...ted Memory Fax Transmission FAX TEL Switching Extension Telephone Communication Connected to external jack Answering Machine Connected to external jack Memory Tx in the printer mode cannot be set Call operations for preset memory Tx are carried out even in the printer mode Memory Tx Redial standby for memory transmission Chapter 1 General Description 1 13 ...

Страница 238: ...Part 2 Printer 1 14 This page intentionally left blank ...

Страница 239: ...Chapter 2 Technical Reference ...

Страница 240: ......

Страница 241: ...ribed in Part 1 In the printer mode the printer part prints the character and image data from the computer via the centronics type 8 bit parallel interface Chapter 2 Technical Reference 2 1 Computer Telephone Line Facsimile Circuit Centronics Type Parallel Interface Printer Control Circuit Printer Mechanism Figure 2 1 Printer Outline ...

Страница 242: ...2 2 Mechanical Overview For details on mechanical overview of printer mechanism see Part 1 Facsimile Chapter 2 Technical Reference Part 2 Printer 2 2 REFERENCE ...

Страница 243: ... image data are stored in the print buffer Control codes are used for switching print modes etc The image data are already formatted for each nozzle of the BJ cartridge and are stored as is in the print buffer 4 Printing When control codes with a CR LF etc print start function are processed and the print buffer becomes full the image data stored in the printer buffer are sent to the BJ cartridge a...

Страница 244: ...i As Microsoft Windows 95 creates the font image data in the computer and then transmits them the font image data in the Control CG ROM cannot be used Because there is no larger than 1 6 inch line feeding in the printer mode In the facsimile mode all 128 nozzles are used for printing Part 2 Printer 2 4 OPQRST ABCDEF 1 36 1 65 48 1 12 60 124 64 128 Line feed pitch ex 1 6 1 8 Character pitch ex 10 c...

Страница 245: ...Paper edge sensor System control section System controller 2 3 IC401 Bi Centronics interface EEP ROM IC8 Printer control section Data Bus D0 to D15 Printer controller IC5 Heater driver Heater driver ROM 8M bit IC3 DRAM 4M bit IC4 Address Bus A0 to A23 BJ head Sub heater MPU PRINTER IC1 Carriage motor Paper feed motor Driver IC IC 12 Driver IC IC 6 Pickup roller sensor Temperature sensor Home posit...

Страница 246: ... bit parallel data sent from the computer in synchronization with the data strobe pulse by BUSY ACK handshaking It controls other interface signals The data received from the interface are stored in the receive buffer in DRAM and is analyzed by the MPU If the printer initialize signal INIT is input to the printer controller and MPU from the interface the printer controller outputs the BUSY status ...

Страница 247: ...dot printing the second dot is printed in the 720 dpi position As a result the degree of gradation is high in the printing 2 6 2 Emulation mode When a black BJ cartridge is installed for printing the printed character s edges can be smoothed at a high resolution of 720 dpi along the horizontal axis Dots along the character s edges are added or deleted for smoothing the edge Along the horizontal ax...

Страница 248: ...ed as follows During internal processing by the printer the borders where the color and black inks meet are identified Cyan and black ink are mixed in the printed black portion to suit the state of the distance and density of the black and color dots The printing method for the respective printing modes are listed below 2 7 2 Photoprint mode Photoprint mode can be used to obtain high level gradati...

Страница 249: ...ss Switches automatically 6 51KHz 4 88KHz 9 76KHz between 24 or 64 nozzles 2 Color Fine1 3 passes 8 nozzles 6 51KHz 6 51KHz 13 02KHz Color Fine2 3 passes 8 nozzles 6 51KHz 6 51KHz 13 02KHz Color HS 1 pass Switches automatically 9 19KHz between 24 or 64 nozzles With a Photo BJ Cartridge Printing Mode Carriage Number of Nozzles Heat Frequency 1 Movement Bk HQ 1 pass 64 nozzles for black 6 51KHz 6 51...

Страница 250: ... null raster onward the printing is executed from the opposite carriage direction From the next raster onward the printing is executed from the same carriage direction until the direction changes again 2 9 Ink Smear Control Immediately after the printed sheet is ejected from the printer the ink dries naturally on the Paper output tray If the next printed sheet is ejected before the ink dries on th...

Страница 251: ...ter mode is off the Bi Centronics interface is selected and the functions mentioned below can be used with the MultiPASS Desktop manager software under MS Windows or Windows 95 1 Sending Data from the computer can be sent by facsimile 2 Receiving Received facsimile data can be sent to the computer 3 Scanning Documents can be scanned into the computer 4 Telephone dialing Telephone dialing from the ...

Страница 252: ... are connected to GND 2 These signals are valid only in Epson LQ printer control mode 3 The level is raised to 5 0V at 3 3k register 4 The level is raised to 5V at 390 register Part 2 Printer 2 12 No 1 2 3 4 5 6 7 8 9 10 11 12 13 14 15 16 17 18 No 19 20 21 22 23 24 25 26 27 28 29 30 31 32 33 34 35 36 Signal STROBE HOSTCLK DATA 1 DATA 2 DATA 3 DATA 4 DATA 5 DATA 6 DATA 7 DATA 8 ACKNLG PTRCLK BUSY P...

Страница 253: ...out as same as 0 to 3 bits transfer and 1 bite transfer completes If the next byte can be transferred the facsimile sets nDataAvail to low and PtrClk to High to responds to host s receipt Some types of host computers use a mode other than the Bi Centronics interface Nibble mode as default In this case the host computer must be set to Nibble mode Check the host computer specifications and change th...

Страница 254: ... data in Compatibility mode and Nibble mode ECP mode must be set for some host computers ECP stands for Extended Compatibility Port Data can be transferred at high speed in ECP mode In this mode data can be transferred more quickly than in Nibble mode because 8 bit data lines are used bi directionally without changing the mode Optionally data can be compressed and transferred Part 2 Printer 2 14 ...

Страница 255: ...Chapter 3 Maintenance and Service ...

Страница 256: ......

Страница 257: ...1 MAINTENANCE LIST 2 HOW TO CLEAN PARTS 3 ADJUSTMENT See Part 1 Facsimile Chapter 3 Maintenance Service for details Chapter 3 Maintenance Service 3 1 REFERENCE ...

Страница 258: ... to how your software interacts with the printer If your printer is not operating properly try the suggestions in this section Also you should see Part 1 Facsimile Chapter 3 4 TROUBLESHOOTING for details 4 1 Errors Shown on the Display 4 1 1 User error message See Part 1 Facsimile Chapter 3 4 2 1 User error message for details 4 1 2 Error codes See Part 1 Facsimile Chapter 3 4 2 2 Error codes for ...

Страница 259: ...the computer is set up correctly for your printer Printer driver and output interface port 5 Print a screen dump from your computer If it still does not print there is a problem with your software or your interface port b Paper pickup eject error Paper is not picked up from the auto sheet feeder Solutions 1 Check whether the recommended paper is in use 2 If the problem is not cleared make sure the...

Страница 260: ...ined areas Solution If you use the Windows 95 open the option window in the printer setup window Then set the intensity control slide bar to a lighter position d Printing problems This section contains problems and solutions related to your printer or the software you are using Printing beyond the edge of the page If the printer is printing only part of each line follow these steps Solutions 1 Mak...

Страница 261: ... setting for printer mode For details on Printer mechanism service data setting see Part 1 Facsimile Chapter 3 5 2 Service Data Setting on page 3 31 5 3 Test Functions 5 3 1 User test functions For details on User Test Functions see Part 1 Facsimile Chapter 3 6 1 User Test Print Functions on page 3 43 Chapter 3 Maintenance Service 3 5 REFERENCE REFERENCE ...

Страница 262: ...r line Remaining data less than one line long are printed when the printer mode is finished In order to output the hexadecimal dump print you have to change the service data switch settings in facsimile mode In Service data 7 PRINTER 5 HEX DUMP MODE select Yes then when printer mode is entered by selecting 4 DOS PRINTING with the SPECIAL MODE a hexadecimal dump print is output To stop the hexadeci...

Страница 263: ...iagram See Part 1 Facsimile Chapter 3 7 WIRING DIAGRAM in the general wiring diagram 6 2 Connector Location and Signal Description 6 2 1 SCNT board Chapter 3 Maintenance Service 3 7 REFERENCE JCNTR1 19 36 18 1 Figure 3 2 SCNT Board ...

Страница 264: ... supply Power ON Signal 19 GND Ground 20 GND Ground 21 GND Ground 22 GND Ground 23 GND Ground 24 GND Ground 25 GND Ground 26 GND Ground 27 GND Ground 28 GND Ground 29 GND Ground 30 GND Ground 31 INIT IN Computer 7 32 FAULT OUT PCNT board IC5 Printer interrupt signal 33 GND Ground 34 Not used 35 5 0V OUT Power supply Peripheral 36 SELECTIN IN Computer SLCT IN 1 Data transmission synchronizing signa...

Страница 265: ...Chapter 4 Appendix ...

Страница 266: ......

Страница 267: ... Centronics compatible parallel interface cable is provided with this fax package Therefore you must obtain an interface cable for connecting to the computer Contents 1 1 Choosing a Location for the Printer 1 2 Connecting the Printer to the Computer For details of printer driver installation and default settings see the User s Guide Chapter 4 Appendix 4 1 NOTE REFERENCE ...

Страница 268: ...fice you need to find a comfortable and convenient location for the printer However the maximum length of the interface cable must be approximately 2 0m 6 5 feet Part 2 Printer 4 2 Interface cable Maximum length must be 2 0 m 6 5 feet Figure 4 1 Location for the Printer ...

Страница 269: ...e printer s connector 4 Secure the cable connector by snapping the two wire clips located on the printer into the cable connector 5 Open the ferrite core and attach it to the parallel cable near the end closest to the MultiPASS C50 Unit 6 Connect the other end of the interface cable to the parallel port on the computer Chapter 4 Appendix 4 3 Parallel interface connector Connector clips Interface c...

Страница 270: ...Part 2 Printer 4 4 This page intentionally left blank ...

Страница 271: ...0298 SC 2 00 0 ...

Страница 272: ...PRINTED IN JAPAN IMPRIME AU JAPON CANON INC 0298 SC 2 00 0 Printed on paper that contains 60 reused paper HY8 10AH 000 00001 Q TY 1 MultiPASS C50 SERVICE MANUAL ...

Отзывы: