


When you set the
Gutter Shadow Correction
setting in the preview image, the result will be reflected.
Preview the effects before scanning, as results vary depending on the type of document and how it is
pressed.
Unclear or blurred text/lines caused by curved pages are not corrected.
None
Gutter shadow will not be corrected.
Low
Select this when the effect level is too strong with the medium setting.
Medium
It is recommended that you normally select this setting.
High
Select this when the effect level is too weak with the medium setting.
Important
• You can set
Gutter Shadow Correction
after preview.
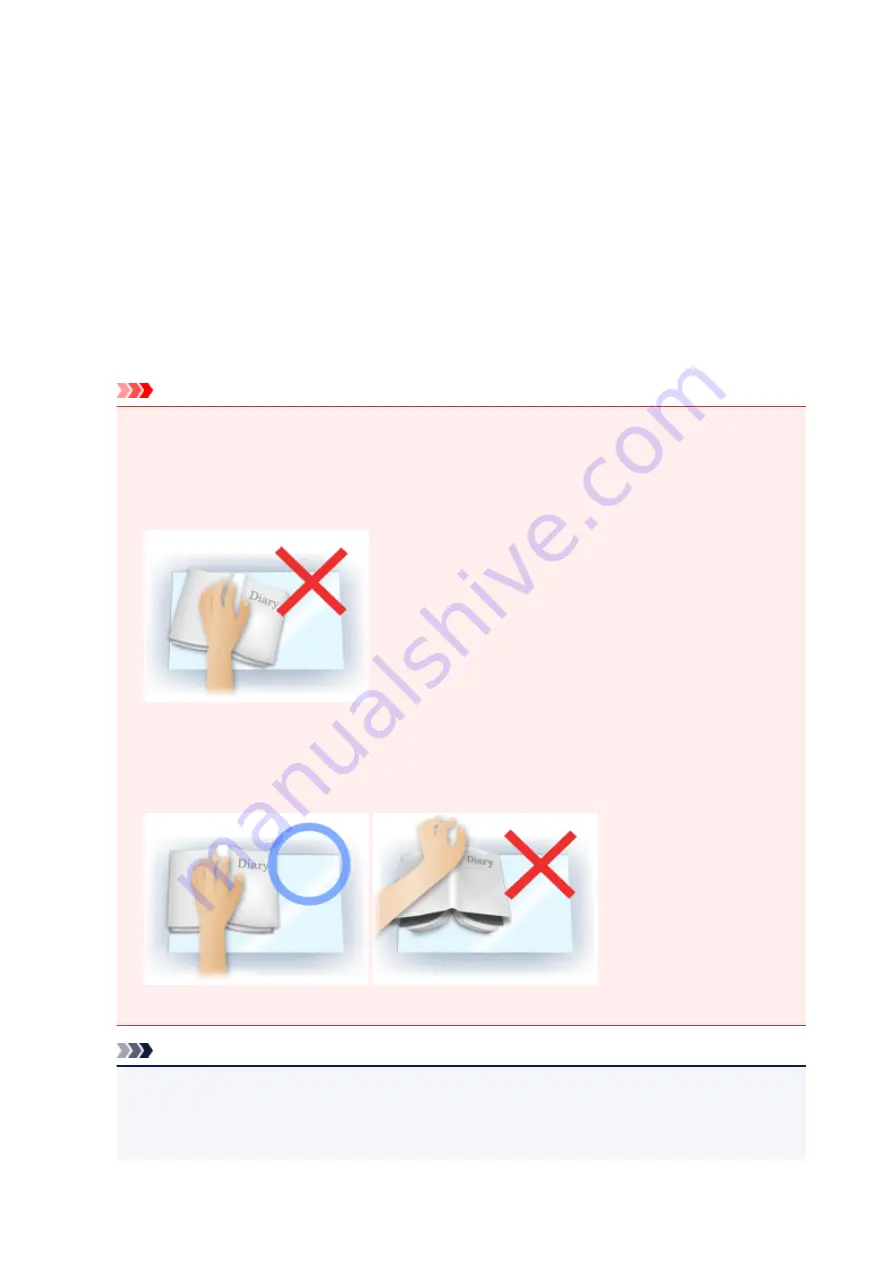
• Do not place objects that weigh 4.4 lbs (2.0 kg) or more on the platen. Also, do not press on the
document with a force exceeding 4.4 lbs (2.0 kg). If you press heavily, the scanner may not work
correctly or you might break the glass.
• Align the document with the edge of the Platen. If not, the shadow will not be corrected properly.
• Shadows may not be corrected properly depending on the document. If the page background is not
white, shadows may not be detected correctly or may not be detected at all.
• While scanning, press down on the spine with the same amount of pressure you used to preview
the scan. If the binding part is not even, the shadow will not be corrected properly.
• How to place the document depends on your model and the document to be scanned.
Note
• Cover the document with black cloth if white spots, streaks, or colored patterns appear in scan
results due to ambient light entering between the document and the Platen.
• If the shadow is not corrected properly, adjust the cropping frame (scan area) on the preview
image.
646
Содержание MG3600 series
Страница 25: ...Using the Machine Printing Photos from a Computer Copying Originals 25 ...
Страница 29: ...My Image Garden Guide Mac OS 29 ...
Страница 32: ...Note For details on copy features see Copying 32 ...
Страница 116: ...4 The senior clerk selects Advanced management from 5 For Select how to manage the senior clerk selects Set 116 ...
Страница 119: ...11 On Printers tab check that all printers are selected 12 On Apps tab set only Evernote app to 119 ...
Страница 123: ...6 On the Printers tab select printer to be used 7 On the Apps tab set the Evernote and Facebook apps to 123 ...
Страница 149: ...Loading Paper Loading Plain Paper Photo Paper Loading Envelopes 149 ...
Страница 162: ...Replacing a FINE Cartridge Replacing a FINE Cartridge Checking Ink Status 162 ...
Страница 200: ...Keeping Print Quality High Transporting Your Printer Legal Restrictions on Scanning Copying Specifications 200 ...
Страница 201: ...Safety Safety Precautions Regulatory Information 201 ...
Страница 206: ...Main Components and Their Use Main Components Power Supply 206 ...
Страница 207: ...Main Components Front View Rear View Inside View Operation Panel 207 ...
Страница 229: ...Note The effects of the quiet mode may be less depending on the print quality settings 229 ...
Страница 232: ...Changing Settings from Operation Panel Quiet setting Turning on off Machine Automatically 232 ...
Страница 237: ...Network Connection Network Connection Tips 237 ...
Страница 285: ...5 Delete Deletes the selected IP address from the list 285 ...
Страница 331: ...Printing Area Printing Area Other Sizes than Letter Legal Envelopes Letter Legal Envelopes 331 ...
Страница 340: ...Printing Printing from Computer Printing from Smartphone Tablet Printing from Digital Camera 340 ...
Страница 359: ...Note Selecting Scaled changes the printable area of the document 359 ...
Страница 392: ...Adjusting Color Balance Adjusting Brightness Adjusting Intensity Adjusting Contrast 392 ...
Страница 398: ...Adjusting Intensity Adjusting Contrast 398 ...
Страница 478: ...Printing Using Canon Application Software My Image Garden Guide Easy PhotoPrint Guide 478 ...
Страница 480: ...Printing Using a Web Service Using PIXMA MAXIFY Cloud Link Printing with Google Cloud Print 480 ...
Страница 494: ...Printing from Smartphone Tablet Printing Directly from Smartphone Tablet Printing Using a Web Service 494 ...
Страница 504: ...Printing Using a Web Service Using PIXMA MAXIFY Cloud Link Printing with Google Cloud Print 504 ...
Страница 519: ...Scanning Scanning from Computer Windows Scanning from Computer Mac OS Scanning Using Smartphone Tablet 519 ...
Страница 535: ...5 Select Select Source according to the items to be scanned 6 Select Auto scan for Paper Size then click OK 535 ...
Страница 578: ...Defaults You can restore the settings in the displayed screen to the default settings 578 ...
Страница 580: ...Instructions Opens this guide Defaults You can restore the settings in the displayed screen to the default settings 580 ...
Страница 590: ...590 ...
Страница 608: ...608 ...
Страница 647: ...Adjusting Cropping Frames ScanGear 647 ...
Страница 671: ...Other Scanning Methods Scanning with WIA Driver Scanning Using the Control Panel Windows XP Only 671 ...
Страница 675: ...Scanning starts then the scanned image appears in the application 675 ...
Страница 682: ...Scanning Tips Resolution Data Formats Color Matching 682 ...
Страница 696: ...Network Communication Problems Cannot Find Machine on Network Network Connection Problems Other Network Problems 696 ...
Страница 705: ...Note For Windows you can use the Setup CD ROM to redo setup 705 ...
Страница 729: ...Problems while Printing Scanning from Smartphone Tablet Cannot Print Scan from Smartphone Tablet 729 ...
Страница 739: ...Back of Paper Is Smudged Vertical Line Next to Image Uneven or Streaked Colors 739 ...
Страница 785: ...Software Problems The E mail Client You Want to Use Does Not Appear in the Screen for Selecting an E mail Client 785 ...
Страница 820: ...For paper jam support codes see also List of Support Code for Error Paper Jams 820 ...
Страница 836: ...1202 Cause Paper output cover is open What to Do Close the paper output cover 836 ...
Страница 837: ...1250 Cause Paper output tray is closed What to Do Open the paper output tray and resume printing 837 ...
Страница 876: ...5B02 Cause Printer error has occurred What to Do Contact your nearest Canon service center to request a repair 876 ...
Страница 877: ...5B03 Cause Printer error has occurred What to Do Contact your nearest Canon service center to request a repair 877 ...
Страница 878: ...5B04 Cause Printer error has occurred What to Do Contact your nearest Canon service center to request a repair 878 ...
Страница 879: ...5B05 Cause Printer error has occurred What to Do Contact your nearest Canon service center to request a repair 879 ...
Страница 880: ...5B12 Cause Printer error has occurred What to Do Contact your nearest Canon service center to request a repair 880 ...
Страница 881: ...5B13 Cause Printer error has occurred What to Do Contact your nearest Canon service center to request a repair 881 ...
Страница 882: ...5B14 Cause Printer error has occurred What to Do Contact your nearest Canon service center to request a repair 882 ...
Страница 883: ...5B15 Cause Printer error has occurred What to Do Contact your nearest Canon service center to request a repair 883 ...


