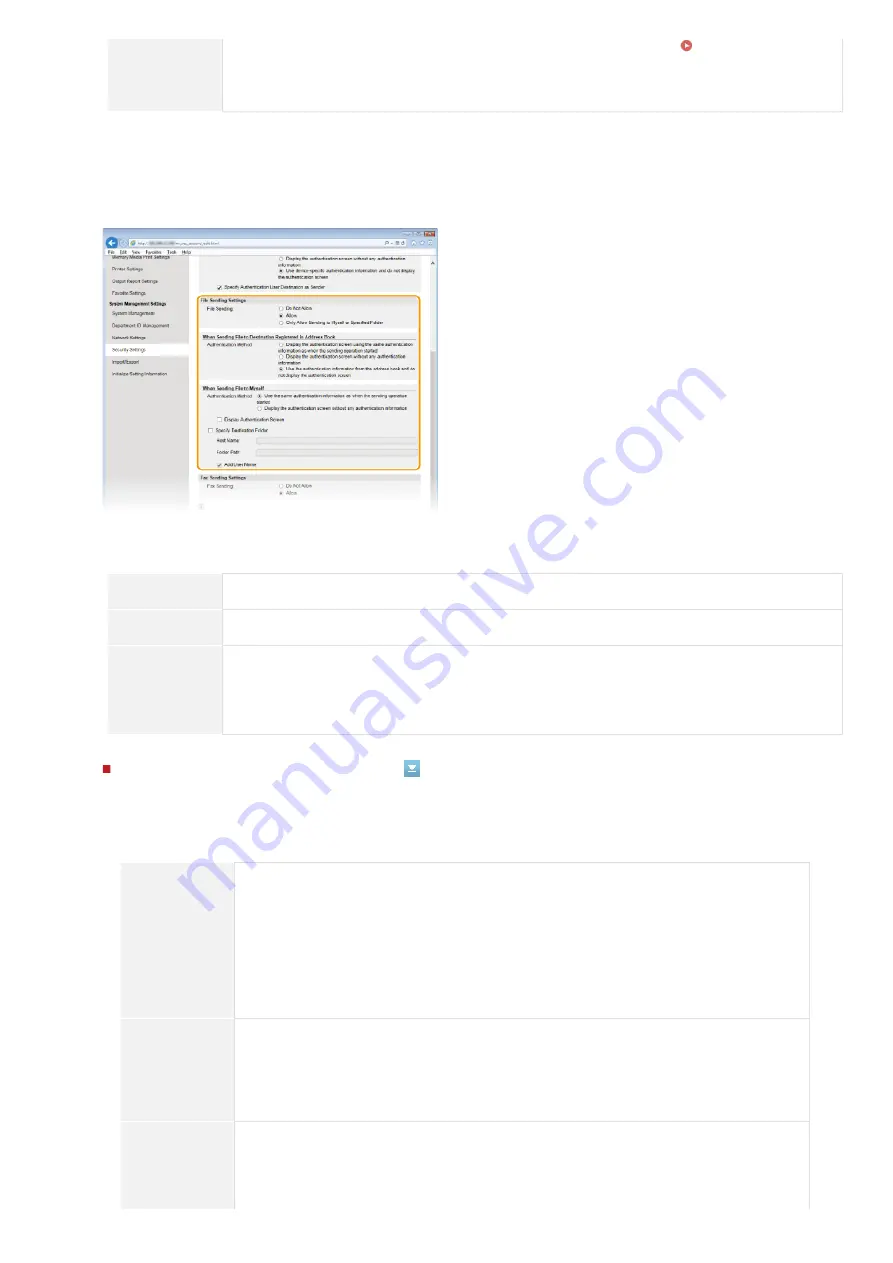
background image

do not display
the
authentication
screen]

is carried out using the user name and password set in [E-Mail/I-Fax Settings] 

Configuring E-mail/I-

Fax Communication Settings

.

[Specify Authentication User Destination as Sender]

Select this check box when the e-mail address of an authorized user will be set as the sender. The e-mail addresses of authorized
users must be registered on the LDAP server. If you clear this check box, the e-mail address set in the [E-Mail/I-Fax Settings] is
set as the sender.

Configure the file transfer settings (for saving to shared folders or an FTP server).

[File Sending]

Set whether to allow saving to shared folders and file servers.

[Do Not Allow]

Blocks saving to shared folders or FTP servers. <File> in the scan function can no longer be used.

[Allow]

Saving to shared folders or FTP servers is not blocked.

[Only Allow
Sending to
Myself or
Specified
Folder]

Blocks saving to all shared folders or FTP servers other than specified folders. The data is saved to folders
registered on the LDAP server or to the folder specified in [Specify Destination Folder].

When [Allow] is specified in [File Sending]

[Authentication Method]

Allows you to specify whether an authentication screen is shown on the server when sending.

[Display the
authentication
screen using the
same
authentication
information as
when the
sending
operation
started]

Displays the authentication screen showing the same user name and password entered in the
Authorized Send logon screen.

[Display the
authentication
screen without
any
authentication
information]

Displays the authentication screen with the user name and password fields blank.

[Use the
authentication
information from
the address book
and do not

No authentication screen is displayed when e-mail or I-Faxes are sent. Authentication is carried
out on the server using the user name and password set in the Address Book.

7

㻠㻞㻣㻌㻛㻌㻣㻟㻡

Содержание MF729Cx

Страница 1: ...㻝㻌㻛㻌㻣㻟㻡 Questo manuale d istruzione è fornito da trovaprezzi it Scopri tutte le offerte per Canon i SENSYS MF729Cx o cerca il tuo prodotto tra le migliori offerte di Stampanti ...

Страница 2: ...aper Size and Type in the Paper Drawer 62 Specifying Paper Size and Type in the Manual Feed Slot 63 Registering Default Paper Settings for the Manual Feed Slot 65 Registering a Custom Paper Size 67 Limiting the Paper Sizes Displayed 70 Registering in the Address Book 71 Registering Destinations in the Address Book 72 Registering Destinations for Favorites 75 Registering Multiple Destinations for G...

Страница 3: ...s 135 Scanning 2 Sided Documents MF729Cx MF728Cdw 136 Configuring Fax Settings to Your Needs 137 Changing Default Settings 138 Registering Frequently Used Fax Settings 139 Canceling Sending Faxes 142 Receiving Faxes MF729Cx MF728Cdw MF628Cw 143 Sending and Receiving Faxes According to Your Purposes MF729Cx MF728Cdw MF628Cw 146 Making a Call before Sending Faxes Manual Sending 147 Sending Faxes to ...

Страница 4: ...uring Print Settings to Your Needs 228 Registering Combinations of Frequently Used Print Settings 229 Changing Default Settings 231 Printing from USB Memory USB Print 232 Changing Default USB Print Settings 242 Using the Machine as a Scanner 243 Preparing to Use the Machine as a Scanner 244 Scanning from the Machine 245 Scanning from a Computer 248 Scanning Using an Application 249 Configuring Sca...

Страница 5: ...F728Cdw MF628Cw 320 If AirPrint Cannot Be Used 321 Using Google Cloud Print 322 Printing with Google Cloud Print 323 Network 326 Connecting to a Network 327 Selecting Wired LAN or Wireless LAN MF729Cx MF728Cdw MF724Cdw MF628Cw 329 Connecting to a Wired LAN 330 Connecting to a Wireless LAN MF729Cx MF728Cdw MF724Cdw MF628Cw 331 Setting Up Connection Using WPS Push Button Mode 333 Setting Up Connecti...

Страница 6: ...Addresses for Firewall Rules 430 Specifying MAC Addresses for Firewall Rules 433 Changing Port Numbers 436 Setting a Proxy 437 Restricting the Machine s Functions 439 Restricting Access to Address Book and Sending Functions 440 Setting a PIN for Address Book 441 Limiting Available Destinations 442 Prohibiting PC Faxing MF729Cx MF728Cdw MF628Cw 443 Disabling Use of Previously Used Destinations 444 ...

Страница 7: ...599 When an Error Code Appears 613 Common Problems 622 Installation Settings Problems 623 Copying Problems 626 Printing Problems 627 Faxing Telephone Problems MF729Cx MF728Cdw MF628Cw 628 When You Cannot Print Properly 629 Printing Results Are Not Satisfactory 630 Paper Creases or Curls 633 Paper Is Fed Incorrectly 634 When a Problem Cannot Be Solved 635 Maintenance 636 Cleaning the Machine 637 Ex...

Страница 8: ...ddress Book 679 Appendix 680 Feature Highlights 681 Going Green and Saving Money 682 Improving Efficiency 684 Going Digital 686 So Much More 688 Specifications 691 Machine Specifications 692 Wireless LAN Specifications MF729Cx MF728Cdw MF724Cdw MF628Cw 694 Document Type 695 Scan Area 696 Paper 697 Copy Specifications 700 Fax Specifications MF729Cx MF728Cdw MF628Cw 701 Scanner Specifications 702 Pr...

Страница 9: ... others Before using this machine read this chapter and follow the instructions to properly use this machine Do not perform any operations not described in this manual Canon will not be responsible for any damages resulting from use not described in this manual improper use or repair changes not performed by Canon or a third party authorized by Canon 㻥㻌㻛㻌㻣㻟㻡 ...

Страница 10: ...ce cables may be damaged resulting in a fire or electrical shock Do not use near any medical equipment Radiowaves emitted from this machine may interfere with medical equipment which may cause a malfunction and result in serious accidents If any foreign substance falls into this machine unplug the power plug from the AC power outlet and contact your local authorized Canon dealer Do not install in ...

Страница 11: ... before use When using wireless LAN MF729Cx MF728Cdw MF724Cdw MF628Cw Set the machine at a distance of 50 m or less from the wireless LAN router Do not set machine in a location where any object blocks communication The signal may be degraded when passing through walls or floors Keep the machine as far as possible from digital cordless phones microwave ovens or other equipment that emit radio wave...

Страница 12: ...lti plug power strips with the machine Doing so may result in a fire or electrical shock Do not wrap the power cord or tie it in a knot as this may result in a fire or electrical shock Insert the power plug completely into the AC power outlet Failure to do so may result in a fire or electrical shock Remove the power plug completely from the AC power outlet during a thunder storm Failure to do so m...

Страница 13: ...hine generates a low level magnetic flux If you use a cardiac pacemaker and feel abnormalities please move away from this machine and consult your physician immediately Do not place heavy objects on this machine as they may fall resulting in injury For your safety please unplug the power cord if the machine will not be used for a long period of time Use caution when opening and closing covers to a...

Страница 14: ... machine in the original box with packing materials If the operating noise concerns you Depending on the use environment and operating mode if the operating noise is of concern it is recommended that the machine be Installed in a place other than the office Other precautions Follow the instructions in the caution label attached to this machine Avoid shaking or applying shock to this machine Do not...

Страница 15: ... not use alcohol benzenes paint thinners or other flammable substances Do not use tissue paper or paper towels If these substances come into contact with electrical parts inside the machine they may generate static electricity or result in a fire or electrical shock Check the power cord and plug periodically for damage Check the machine for rust dents scratches cracks or excessive heat generation ...

Страница 16: ...iately wash with cold water and consult a physician Use caution so that toner does not come into contact with your skin If it should wash with soap and cold water If there is any irritation on your skin consult a physician immediately Keep the toner cartridges and other consumables out of the reach of small children If toner is ingested consult a physician or poison control center immediately Do n...

Страница 17: ...erature and high humidity Locations subject to dramatic changes in temperature and humidity where condensation may easily occur Locations with a large amount of dust Locations within the reach of children Be careful of counterfeit toner cartridges Please be aware that there are counterfeit Canon toner cartridges in the marketplace Use of counterfeit toner cartridge may result in poor print quality...

Страница 18: ...Their Functions Using the Display The display used on this machine is a touch panel display This section describes how to use the display for tasks such as selecting items and adjusting settings Using the Display Entering Text This section describes how to enter the characters and numbers for registering destinations in the Address Book or sending faxes Entering Text Logging on to the Machine This...

Страница 19: ...g in the Address Book Adjusting the Volume This section describes how to adjust the volume of various machine sounds such as those produced when fax sending is complete or when an error occurs Adjusting the Volume Entering Sleep Mode This section describes how to set the sleep mode Entering Sleep Mode Setting Auto Shutdown Time This section describes how to enable the Auto Shutdown Time setting Se...

Страница 20: ... to describing the parts of the machine used for such basic operations as placing documents loading paper and replacing the toner cartridges this section also describes the keys on the operation panel and display Read this section for tips on how to use the machine properly Front Side Back Side Interior Manual Feed Slot Paper Drawer Operation Panel 㻞㻜㻌㻛㻌㻣㻟㻡 ...

Страница 21: ...es Clearing Jams Paper drawer Load the type of paper you frequently use into the paper drawer Loading Paper in the Paper Drawer Power switch Turns the power ON or OFF To restart the machine turn OFF the machine wait for at least 10 seconds and turn it back ON Ventilation slots Air from inside the machine is vented out to cool down the inside of the machine Note that placing objects in front of the...

Страница 22: ...er Placing Documents USB port USB2 0 Use this port to connect a third party USB memory device or USB keyboard Connecting a USB memory device allows you to print data from the memory device or store scanned documents on the memory device Printing from USB Memory USB Print Scanning Documents Directly to USB Memory Manual feed slot Load the paper into the manual feed slot when you want to temporarily...

Страница 23: ...one line Connecting the Telephone Line External telephone jack MF729Cx MF728Cdw MF628Cw Connect your telephone or answering machine Connecting the Telephone Line Handset Jack MF729Cx MF728Cdw MF628Cw Connect the optional handset Rear cover Open the rear cover when clearing paper jams Clearing Jams Rating label The label shows the serial number which is needed when making inquiries about the machin...

Страница 24: ...Cw MF623Cn Toner cartridge tray Install the toner cartridges Load the Y yellow M magenta C cyan and K black toner cartridges in the slots from the rear to the front respectively How to Replace Toner Cartridges LINKS Replacing Toner Cartridges 㻞㻠㻌㻛㻌㻣㻟㻡 ...

Страница 25: ...actly the width of the loaded paper to ensure that paper is fed straight into the machine Paper tray MF729Cx MF728Cdw MF724Cdw Pull out the paper tray when loading paper Tray extension MF729Cx MF728Cdw MF724Cdw Open the tray extension when loading large paper LINKS Loading Paper in the Manual Feed Slot 㻞㻡㻌㻛㻌㻣㻟㻡 ...

Страница 26: ...in the illustrations to release the locks and slide the paper guides Lock release lever for extending the paper drawer When loading Legal size paper the paper drawer needs to be extended Press this lever to release the lock and extend the length of the paper drawer When Legal size paper is loaded The front side of the paper drawer is not flush with the machine when the extended paper drawer is ins...

Страница 27: ...Energy Saver key Press to put the machine into sleep mode The key lights up green when the machine is in sleep mode Press the key again to exit sleep mode Entering Sleep Mode Sound Volume key Press to adjust volume Adjusting the Volume NFC Near Field Communication mark MF729Cx You can also use functions such as printing by waving a smartphone or similar device with Canon Mobile Application install...

Страница 28: ...he machine You can also check the status of the machine such as the remaining amounts of paper and the amount remaining in the toner cartridges or whether any errors occurred Display Error indicator Blinks or lights up when an error such as a paper jam occurs Wi Fi indicator MF729Cx MF728Cdw MF724Cdw MF628Cw Lights up when the machine is connected to wireless LAN Processing Data indicator Blinks w...

Страница 29: ...Address Book Menu Timer Settings Preferences and many other machine settings start from this button Setting Menu List Secure Print MF729Cx MF728Cdw MF724Cdw Use this function to print a secure document Printing a Document Secured by a PIN Secure Print MF729Cx MF728Cdw MF724Cdw Paper Settings This button is also used for specifying the size and type of paper loaded in the paper drawer and manual fe...

Страница 30: ...the separate totals for black and white and color printouts Viewing the Counter Value Secure Print Memory Usage MF729Cx MF728Cdw MF724Cdw Displays the amount of memory currently used for storing secured document data Printing a Document Secured by a PIN Secure Print MF729Cx MF728Cdw MF724Cdw Version Information Displays firmware version information Serial Number Displays the serial number Status o...

Страница 31: ...re displayed at the top of the screen in situations such as when paper runs out or end of toner cartridge lifetime The display alternates between showing the normal screen and the message When an Error Message Appears When Is Displayed Tap to view the notification When an Error Occurs In some cases when an error occurs instructions on how to respond to the error are displayed Follow the on screen ...

Страница 32: ... compressed PDF file and send it via e mail to a single button The settings to be added as a shortcut button must be registered beforehand as Favorite Settings Registering Frequently Used Copy Settings Registering Frequently Used Fax Settings Registering Frequently Used Scan Settings E mail I Fax Shared Folder FTP Server You can register up to 11 shortcut buttons Press and tap Home Screen Settings...

Страница 33: ...Delete registered buttons and spaces in Home Screen Settings To make the buttons easier to use you can rearrange the buttons however you like For instance you can put the most frequently used functions first or arrange the function buttons together with shortcut buttons for Favorite Settings Press and tap Home Screen Settings If the logon screen appears enter the correct ID and PIN using the numer...

Страница 34: ...me Screen Settings If the logon screen appears enter the correct ID and PIN using the numeric keys and then press Logging on to the Machine Tap Insert and Delete Blank Select the button where you want to insert a blank and tap Insert A space is inserted before the selected button Deleting Spaces To delete a space select the space to be deleted and tap Delete Tap Apply LINKS Inserting a Blank 5 1 2...

Страница 35: ...Display 㻟㻡㻌㻛㻌㻣㻟㻡 ...

Страница 36: ...ng items Long Touch Keep finger held on the screen When text cannot be completely displayed on one line appears touch and hold the line to scroll all of the text You can also use a long touch to continuously increase or decrease numbers such as the copy magnification Flick Flick with the finger on the display The effect of flicking varies depending on the screen For instance flicking in the Home S...

Страница 37: ...irection of the flick Note that the scroll bar only appears while the screen is being touched Changing values and settings Changing values Tap to enter values If an icon such as below is displayed at the upper left of the screen you can enter values directly using the numeric keys To move the cursor When is displayed tap to move the cursor Value range Values in displayed below the entry box are th...

Страница 38: ...lay related settings such as the scrolling speed or display language Display Settings To change the screen that is automatically displayed when the machine remains idle for a specified length of time Function After Auto Reset 㻟㻤㻌㻛㻌㻣㻟㻡 ...

Страница 39: ... also press to switch the type of text Types of Text That Can Be Entered Text that can be entered is listed below Key A a 12 _ 1 ABC abc 2 DEF def 3 GHI ghi 4 JKL jkl 5 MNO mno 6 PQRS pqrs 7 TUV tuv 8 WXYZ wxyz 9 Not available 0 space _ Not available Press or tap when the type of text that is entered is A or a to display enterable symbols in the screen Tap symbols to enter Deleting Text One charac...

Страница 40: ...Keyboard When is displayed on the screen you can connect a keyboard to the USB port for USB devices on the Back Side and enter text from the keyboard When using a keyboard you can still use the number keypad Some keys on the USB keyboard such as the Backspace Home and End keys cannot be used When keys that cannot be used are pressed nothing is entered or changed To delete text press the Delete key...

Страница 41: ...ting you to insert a control card see Optional Items Enter an ID 1 Tap Department ID or System Manager ID 2 Enter a ID using the numeric keys and tap Apply If no PIN is registered proceed to step 3 Enter the PIN 1 Tap PIN 2 Enter a ID using the numeric keys and tap Apply Press The logon screen will be changed to the Home Screen After you finish using the machine press again to display the logon sc...

Страница 42: ...ng the machine press again to display the logon screen If the logout selection screen appears If you are logged in to both Authorized Send and Department ID Management a dialog box appears in which you can select the items you want to log out of Log Out from All Authenticated Functions Select to log out of Authorized Send fax or scan function and Department ID Management simultaneously Log Out fro...

Страница 43: ...LINKS Setting the Department ID Management Setting the System Manager ID 㻠㻟㻌㻛㻌㻣㻟㻡 ...

Страница 44: ... paper jams Do not place the following types of documents in the feeder as this may cause paper jams Wrinkled or creased paper Carbon paper Curled or rolled paper Coated paper Torn paper Onion skin or thin paper Stapled or clipped documents Paper printed by a thermal transfer printer Transparencies To scan documents more accurately Documents placed in the feeder are scanned while being fed into th...

Страница 45: ... actual document width Pull out the tray extension when loading large documents to prevent them from drooping over the edge of the feeder Fan the document stack and align the edges Fan the document stack in small batches and align the edges by lightly tapping the stack on a flat surface a few times Place the document s face up in the feeder Make sure that the document stack does not exceed the loa...

Страница 46: ... machine is ready to scan the document Align the document guides securely against the edges of the document Document guides that are too loose or too tight can cause misfeeds or paper jam While documents are being scanned Do not add or remove documents When scanning is complete Remove the scanned documents from beneath the feeder to prevent paper jams 4 㻠㻢㻌㻛㻌㻣㻟㻡 ...

Страница 47: ... g m Plain 2 75 to 90 g m Plain 3 Recycled paper 60 to 74 g m Recycled Color paper 60 to 74 g m Color Heavy paper 86 to 119 g m Heavy 1 120 to 128 g m Heavy 2 129 to 163 g m Heavy 3 Envelope Envelope Coated paper 100 to 110 g m Coated 1 120 to 130 g m Coated 2 155 to 165 g m Coated 3 210 to 220 g m Coated 4 Transparency Transparency Label Labels You can specify either Plain 1 or Plain 2 as the pap...

Страница 48: ...er type for 75 to 84 g m paper If you experience any of the following problems after specifying either of these two settings specify the other setting Paper that is output curls Afterimages appear on the blank area Toner is not fully fixed and the printouts are faded You can also specify Plain 1 Plain 2 Plain 3 Recycled Color Heavy 1 Envelope or Thin as the paper type for index cards Do not use th...

Страница 49: ...he back side of the operation panel or around the paper output area There is nothing unusual about any of these occurrences which occur when the heat generated from fixing toner on the paper causes moisture in the paper to evaporate most likely to occur at low room temperatures LINKS Registering a Custom Paper Size 㻠㻥㻌㻛㻌㻣㻟㻡 ...

Страница 50: ...strations below Follow the procedure below when loading paper into the optional paper drawer MF729Cx MF728Cdw MF724Cdw Pull out the paper drawer Make sure to hold the paper drawer with both hands and pull it out gently Otherwise you may damage the paper drawer by dropping it if it slides out too easily Slide the paper guides apart Press the lock release lever to slide the paper guides outward On t...

Страница 51: ...drawer is not flush with the machine when the extended paper drawer is inserted Continue to Specifying Paper Size and Type in the Paper Drawer When changing the paper size or type The factory default settings for paper size and type are A4 and Plain 2 respectively If you load a different size or type of paper into the machine make sure to change the settings If you do not change the settings the m...

Страница 52: ...LINKS Paper Notify to Check Paper Settings 㻡㻞㻌㻛㻌㻣㻟㻡 ...

Страница 53: ...oad the paper in portrait orientation as shown in the illustrations below MF729Cx MF728Cdw MF724Cdw MF628Cw MF623Cn Make sure to insert the paper drawer The machine only prints when the paper drawer is inserted even if paper is loaded in the manual feed slot An error message is displayed if you attempt to print without inserting the paper drawer Open the cover Hold the top center of the cover to o...

Страница 54: ...edges of the paper Paper guides that are too loose or too tight can cause misfeeds or paper jams Continue to Specifying Paper Size and Type in the Manual Feed Slot Printing on the Back Side of Printed Paper Manual 2 Sided Printing You can print on the back side of printed paper Flatten any curls on the printed paper and insert it into the paper drawer Loading Paper in the Paper Drawer or manual fe...

Страница 55: ...Align the paper guides securely against the edges of the paper Paper guides that are too loose or too tight can cause misfeeds or paper jams Insert the paper slowly into the rear of the manual feed slot The paper is pulled slightly into the machine when inserted into the slot When loading envelopes or paper with a logo see Loading Envelopes or Loading Preprinted Paper Continue to Specifying Paper ...

Страница 56: ... Drawer 1 Drawer 2 or Multi Purpose Tray depending on the paper source you are using in Manual Back Side Settings for 2 Sided Only Special Processing If you are using A5 paper the reverse side may not be printed correctly LINKS Paper 㻡㻢㻌㻛㻌㻣㻟㻡 ...

Страница 57: ...nvelopes in the paper drawer or manual feed slot see Loading Paper in the Paper Drawer or Loading Paper in the Manual Feed Slot Follow the procedure below to prepare the envelopes before loading On the MF628Cw MF623Cn only one envelope at a time can be loaded in the manual feed slot Follow steps 1 to 3 in the procedure below to prepare the envelope for loading Close the flap of each envelope Flatt...

Страница 58: ...elopes so that the edge with the flap is toward the left side as shown in the illustration Load the envelopes Monarch COM10 DL or ISO C5 in portrait orientation with the short edge toward the machine with the non glued side front side face up You cannot print on the reverse side of envelopes Load only one envelope for the MF628Cw MF623Cn each time you print Load the envelopes so that the edge with...

Страница 59: ...rocedure for loading paper in the paper drawer or manual feed slot see Loading Paper in the Paper Drawer or Loading Paper in the Manual Feed Slot Load the paper with the logo side the side to print the document face up Load only one sheet of paper in the manual feed slot of the MF628Cw MF623Cn each time you print Printing on Paper with Logos in Portrait Orientation Printing on Paper with Logos in ...

Страница 60: ...paper to load each time you perform 1 sided and 2 sided printing However if Switch Paper Feed Method is set to Print Side Priority the facing that you use for loading preprinted paper for 2 sided printing logo side face down can also be used for 1 sided printing This setting is especially useful if you frequently perform both 1 sided and 2 sided printing Switch Paper Feed Method 㻢㻜㻌㻛㻌㻣㻟㻡 ...

Страница 61: ...d type settings to match the paper that is loaded Make sure to change the paper settings when you load the paper that is different from the previously loaded paper If the setting does not match the size and type of loaded paper a paper jam or printing error may occur 㻢㻝㻌㻛㻌㻣㻟㻡 ...

Страница 62: ...s displayed only when the optional paper drawer drawer 2 is installed MF729Cx MF728Cdw MF724Cdw Select the paper size If the loaded paper size is not displayed tap Other Sizes Select the paper type LINKS Loading Paper in the Paper Drawer Limiting the Paper Sizes Displayed Paper Notify to Check Paper Settings 1 2 3 4 㻢㻞㻌㻛㻌㻣㻟㻡 ...

Страница 63: ...registering the paper size and type as the default setting When the default setting is registered however the screen shown above is not displayed To display the screen select Off for Register Default Settings Registering Default Paper Settings for the Manual Feed Slot Select the paper size If the loaded paper size is not displayed tap Other Sizes When loading custom size paper 1 Tap Custom 2 Speci...

Страница 64: ...Select the paper type LINKS Loading Paper in the Manual Feed Slot Limiting the Paper Sizes Displayed Paper 4 Tap Apply 2 㻢㻠㻌㻛㻌㻣㻟㻡 ...

Страница 65: ...tting screen is not displayed when paper is loaded and the same setting is always used If you load a different paper size or type without changing the paper settings the machine may not print properly To avoid this problem disable the default setting by selecting Off in step 3 and then load the paper Press and tap Paper Settings Tap Multi Purpose Tray Tap On Select the paper size If the loaded pap...

Страница 66: ...Manual Feed Slot Limiting the Paper Sizes Displayed Paper Tap X Input the length of the X side using or the numeric keys and tap Apply 3 Specify the length of the Y longer side Tap Y Input the length of the Y side and tap Apply 4 Tap Apply 5 㻢㻢㻌㻛㻌㻣㻟㻡 ...

Страница 67: ... If paper sizes 1 to 3 have already been registered either change or delete the setting to continue The procedures for changing and deleting these settings are described below Changing a setting 1 Select the registered size you want to change 2 Tap Edit and proceed to step 4 Deleting a setting 1 Select the registered size you want to delete 2 Tap Delete 3 Tap Yes 1 2 3 㻢㻣㻌㻛㻌㻣㻟㻡 ...

Страница 68: ...r size When selecting the paper size for the paper drawer On the screen to specify the size of the paper that is loaded in the paper drawers the registered paper sizes are displayed Specifying Paper Size and Type in the Paper Drawer Only the registered paper sizes that can be loaded in the paper drawer are displayed Paper When selecting the paper size for the manual feed slot When paper is loaded ...

Страница 69: ... for the manual feed slot From the screen you can select one of the displayed sizes as the default paper size for the manual feed slot Registering Default Paper Settings for the Manual Feed Slot LINKS Loading Paper in the Paper Drawer Loading Paper in the Manual Feed Slot 㻢㻥㻌㻛㻌㻣㻟㻡 ...

Страница 70: ...paper drawer drawer 2 is installed MF729Cx MF728Cdw MF724Cdw Clear the check boxes for paper sizes you do not want displayed Ensure that only the check boxes for frequently used paper sizes are selected Paper sizes that are not selected can be viewed by tapping Other Sizes in the paper size setting selection screen Tap Apply LINKS Specifying Paper Size and Type in the Paper Drawer Specifying Paper...

Страница 71: ...ady been registered and register them together as a group You can send faxes or e mails to multiple destinations at the same time You can register up to 299 destinations 100 destinations for e mails for a group Groups can also be registered in Favorites Registering Multiple Destinations for Group Dial Use the Send Function Setting Tool or the Remote UI when registering a shared folder or FTP serve...

Страница 72: ... searched from the server in the Address Book You need to specify the settings for connecting to an LDAP server beforehand Registering LDAP Servers Tap Name Registering Name is optional If you register Name the destination can be searched alphabetically Enter the name using the numeric keys and tap Apply Tap Fax Number E Mail Address or I Fax Address Enter the number using the numeric keys and tap...

Страница 73: ... and tap Apply Setting a PIN for Address Book Select the item you want to edit perform editing and then tap Apply ECM TX If an error occurs in an image that is being sent the error is checked and corrected to prevent an improper image from being sent when setting On TX Speed If it takes time for transmissions to start such as when there is a poor telephone connection you can adjust the transmissio...

Страница 74: ...ls Edit Select the tab containing the destination you want to delete and select the destination Tap Delete If a screen appears prompting you to enter a PIN enter the correct PIN using the numeric keys and tap Apply Setting a PIN for Address Book Tap Yes 1 2 3 4 5 㻣㻠㻌㻛㻌㻣㻟㻡 ...

Страница 75: ...P server If your office has an LDAP server installed you can register destinations searched from the server in the Address Book You need to specify the settings for connecting to an LDAP server beforehand Registering LDAP Servers Tap Name Registering Name is optional If you register Name the destination can be searched alphabetically Enter the name using the numeric keys and tap Apply Tap Fax Numb...

Страница 76: ...you to enter a PIN enter the correct PIN using the numeric keys and tap Apply Setting a PIN for Address Book Tap the item you want to edit perform editing and then tap Apply Tap Apply Deleting a Registered Destination Press and tap Address Book Tap Tap Details Edit and select the destination you want to edit Tap Delete If a screen appears prompting you to enter a PIN enter the correct PIN using th...

Страница 77: ...ric keys and tap Apply Setting a PIN for Address Book Tap Coded Dial Groups can also be registered in Favorites Tap Favorites to register the group as Favorites Tap Group Tap Name Registering Name is optional If you register Name the destination can be searched alphabetically Enter the name using the numeric keys and tap Apply Tap Number of Destinations Tap Add Select the tab and select a destinat...

Страница 78: ...mpting you to enter a PIN enter the correct PIN using the numeric keys and tap Apply Setting a PIN for Address Book Select the item you want to edit perform editing and then tap Apply Tap Apply Deleting a Group Press and tap Address Book Tap Details Edit Tap and select the group you want to delete Tap Delete If a screen appears prompting you to enter a PIN enter the correct PIN using the numeric k...

Страница 79: ...e Tone Sound produced when fax sending is complete RX Done Tone Sound produced when fax receiving is complete Scanning Done Tone Sound produced when fax document scanning is complete Entry Tone Confirmation sound each time a key on the operation panel or button on the display is pressed Select On produce a tone or Off not produce a tone Invalid Entry Tone Sound produced when an invalid key operati...

Страница 80: ...hen an original is loaded in the feeder Displayed only for MF729Cx MF728Cdw MF628Cw Use to set volume tap Apply Tap and move the cursor all the way to the left to mute the sound End sound only for error Tap Only When Err On Apply 3 㻤㻜㻌㻛㻌㻣㻟㻡 ...

Страница 81: ...hen a job is waiting to be scanned to a USB memory device or to a computer When an error message is displayed on the screen There are some exceptions The machine sometimes enters sleep mode when error messages are displayed When the machine is communicating with an LDAP server etc When the SSID network key screen for Direct Connection is displayed MF729Cx MF728Cdw MF724Cdw MF628Cw When You Want to...

Страница 82: ...If the optional handset or an external telephone is connected the machine exits sleep mode when you take the receiver off the hook 㻤㻞㻌㻛㻌㻣㻟㻡 ...

Страница 83: ...he machine may automatically shut down even if you are operating the machine from the Remote UI or from the Send Function Setting Tool A malfunction may occur particularly if the machine shuts down while data is being imported When you import data using the Remote UI or use the Send Function Setting Tool set Auto Shutdown Time to 0 Off in advance The default setting is 4 hours If any setting of th...

Страница 84: ...tings to Suit Your Needs Enlarging or Reducing Erasing Dark Borders and Frame Lines Erase Frame Collating Copies by Page Selecting Document Type Adjusting Density Adjusting Color Balance Adjusting Sharpness 2 Sided Copying MF729Cx MF728Cdw MF724Cdw Copying Multiple Documents onto One Sheet 2 on 1 4 on 1 Copying Both Sides of an ID Card onto One Page Simplifying Your Frequent Copy Operations Changi...

Страница 85: ...item you want to set Various Copy Settings Press Copying starts If you want to cancel copying tap Cancel Yes Canceling Copies When placing documents in the feeder in step 1 The document is automatically scanned When placing documents on the platen glass in step 1 Depending on the copy settings you made the screen for selecting the document size and paper source are displayed when copying multiple ...

Страница 86: ...the page The edges of the document might not be copied For more information about the scan margins see Scan Area If you always want to make copies with the same settings Changing Default Settings If you want to register a combination of settings to use when needed Registering Frequently Used Copy Settings 1 Select the document size 2 Select the paper source that contains the paper you want to use ...

Страница 87: ...that is loaded in the paper source Specifying Paper Size and Type Loading Paper Copy Paper Select the paper source MF729Cx MF728Cdw MF724Cdw MF628Cw MF623Cn Selects the paper loaded in the manual feed slot Selects the paper loaded in the drawer MF729Cx MF728Cdw MF724Cdw Selects the paper loaded in the optional paper drawer LINKS Basic Copy Operations 㻤㻣㻌㻛㻌㻣㻟㻡 ...

Страница 88: ...isplays a List of Documents When is Pressed Documents have been scanned and are waiting to be printed Select the copy document to cancel Check the copy job status before canceling Copy Print Job Job Status Select the copy document on the Copy Print Job Status screen Cancel Yes Copy details The number of copies settings and other details are displayed If you only want to check the details without c...

Страница 89: ...LINKS Basic Copy Operations 㻤㻥㻌㻛㻌㻣㻟㻡 ...

Страница 90: ...sier to read Enlarging or Reducing Selecting Document Type Adjusting Density Adjusting Color Balance Adjusting Sharpness 2 Sided Copying MF729Cx MF728Cdw MF724Cdw Copying Multiple Documents onto One Sheet 2 on 1 4 on 1 Copying Both Sides of an ID Card onto One Page Erasing Dark Borders and Frame Lines Erase Frame Collating Copies by Page 㻥㻜㻌㻛㻌㻣㻟㻡 ...

Страница 91: ...5 A4 or by setting a custom copy ratio in increments of 1 Copy Copy Ratio Select the copy ratio Custom Ratio Tap or the numeric keys to enter the copy ratio and tap Apply You can set any copy ratio from 25 to 400 in 1 increments Preset copy ratio Select a copy ratio LINKS Basic Copy Operations 㻥㻝㻌㻛㻌㻣㻟㻡 ...

Страница 92: ...ect whether to give priority to copy speed or image quality Printed Image Suitable when copying documents that contain printed photos such as magazines or pamphlets Text Suitable when copying documents that only contain text LINKS Basic Copy Operations Text Photo Map Speed Priority is given to speed over image quality This setting is effective only when selected for color copying Text Photo Map Qu...

Страница 93: ...rinted on thin paper such as a newspaper so that the text and images on the opposite side of the page are not visible in the copy Copy Density Adjust the density Apply Decreases the density Increases the density Adjusting the background color Copy Density Background Background Manual Adjust the background color Apply Makes the background color lighter Makes the background color darker Adj by Color...

Страница 94: ...LINKS Basic Copy Operations Adjusting Color Balance Adjusting Sharpness 㻥㻠㻌㻛㻌㻣㻟㻡 ...

Страница 95: ... Makes the selected color darker Fine Adjust Fine tune the colors by adjusting the levels of the 3 density areas for each color Example If you want to make a copy with colors that more closely match the original Example If you want to make a copy with brighter colors than the original Fine Adjust Select the color Select the density area Adjust the color level Apply Apply Apply 㻥㻡㻌㻛㻌㻣㻟㻡 ...

Страница 96: ...LINKS Basic Copy Operations Adjusting Density Adjusting Sharpness 㻥㻢㻌㻛㻌㻣㻟㻡 ...

Страница 97: ...e the appearance of magazine photos Copy Sharpness Adjust the sharpness Apply Decreases the sharpness resulting in a softer image Example If you want to improve the appearance of magazine photos Increases the image sharpness Example If you want to sharpen text and lines written in pencil LINKS Basic Copy Operations Adjusting Density Adjusting Color Balance 㻥㻣㻌㻛㻌㻣㻟㻡 ...

Страница 98: ... illustration below shows the types of 2 sided copying 1 Sided 2 Sided 2 Sided 2 Sided 2 Sided 1 Sided Original Finishing Type Specify if you want to change the binding such as when copying book type documents in calendar type format 1 Sided 2 Sided 2 Sided 2 Sided If you want to copy portrait oriented documents in calendar type format short edge binding Original Finishing Type 1 Sided 2 Sided Por...

Страница 99: ... type Select the binding type for the finished copy which is different from that of the original document This setting enables you to align the direction of the output paper When a 2 sided document is in portrait oriented calendar type format short edge binding Original Finishing Type 2 Sided 1 Sided Portrait Calendar Type When a 2 sided document is in landscape oriented book type format short edg...

Страница 100: ...rease it 2 on 1 4 on 1 is not available when using Erase Frame or ID Card Copy When you copy multiple documents onto one page margins may be created in the copied image Copy N on 1 Select 2 on 1 or 4 on 1 Select the document size on the Scan Size On the Output Size screen select the paper source that contains the paper you want to use 2 on 1 4 on 1 Select 2 on 1 to copy two pages of documents onto...

Страница 101: ... This function is useful when copying a driver s license or ID card ID Card Copy is available with A4 Letter size paper or larger Copy Ratio is automatically set to 100 ID Card Copy is not available when using Erase Frame 2 Sided or 2 on 1 4 on 1 Place the card ID Card Copy Turn the card over How to place the card LINKS Basic Copy Operations 㻝㻜㻝㻌㻛㻌㻣㻟㻡 ...

Страница 102: ...frame lines and dark borders The width of the frame to erase is increased or decreased relative to the Copy Ratio setting Erase Frame is not available when using 2 on 1 4 on 1 or ID Card Copy Copy Erase Frame On Specify the width of the frame to erase Apply Select the document size on the Scan Size screen Frame Width Tap or the numeric keys to enter the frame width 1 to 50 mm and tap Apply Example...

Страница 103: ...s are grouped by page and not collated For example if you are making three copies of a five page document the printouts will be arranged in the following page order 1 1 1 2 2 2 3 3 3 4 4 4 5 5 5 On The copies are grouped into complete sets in sequential page order For example if you are making three copies of a five page document the printouts will be arranged in the following page order 1 2 3 4 5...

Страница 104: ...copy settings and use them whenever you need them The machine comes pre configured with factory default settings Setting Menu List You can change and register the default settings according to your needs Change the copy ratio to 95 and register it as the default setting From now on you can make copies without changing the copy ratio Changing Default Settings Go to Favorite Settings and register th...

Страница 105: ...ch the operations that you perform frequently you can eliminate the need to configure the same settings every time you make copies Menu Copy Settings Change Default Settings Select the setting Change the default value of the selected item Apply Settings Select the item you want to set and change the default value LINKS Basic Copy Operations Various Copy Settings Copy Settings 㻝㻜㻡㻌㻛㻌㻣㻟㻡 ...

Страница 106: ...ame to On and increase the sharpness when copying You can also display settings as shortcut buttons in the Home Screen Registering Favorite Settings Recalling Favorite Settings Press and tap Copy Tap Favorite Settings Register Edit Select where to register the settings Change the values for the settings you want to register and tap Apply Various Copy Settings To rename the registration destination...

Страница 107: ...the machine is turned OFF To edit registered settings select the setting combination to be edited in step 3 and then edit the settings If you want to delete a registered setting tap Copy Favorite Settings Delete Select the Settings Yes Yes Simply select the setting combination that suit your purpose from the favorite settings Copy Favorite Settings Select the setting combination to be recalled Onc...

Страница 108: ...ing Initial Settings for Fax Functions MF729Cx MF728Cdw MF628Cw You need to register destinations in the Address Book before using this feature Registering in the Address Book Using Basic Operations Sending Faxes MF729Cx MF728Cdw MF628Cw Canceling Sending Faxes Receiving Faxes MF729Cx MF728Cdw MF628Cw Specifying Scanning Settings Adjusting Resolution Adjusting Density Adjusting Sharpness Scanning ...

Страница 109: ... into Memory Memory Reception Forwarding Received Faxes Archiving Sent Faxes Receiving Fax Information Services Sending Faxes Directly from Your Computer Sending Faxes from Your Computer PC Fax MF729Cx MF728Cdw MF628Cw Sending and Receiving Faxes via the Internet Using Internet Fax I Fax Faxing with AirPrint In Mac OS AirPrint provides a simple way to send faxes without using a driver Faxing with ...

Страница 110: ...uits your intended use and then follow the on screen instructions to configure the settings For more information about a particular step click on the link to go to the corresponding section Step 1 Deciding Which Fax Receive Mode to Use Step 2 Registering the Fax Number and Unit Name Step 3 Selecting the Receive Mode Step 4 Connecting the Telephone Line 㻝㻝㻜㻌㻛㻌㻣㻟㻡 ...

Страница 111: ...hone Use answering machine Answering Machine Connect your answering machine Callers can record a message if they call while you are away from the telephone The machine automatically receives incoming faxes Use standard telephone or optional handset Fax Tel Auto Switch Connect your telephone or handset The machine automatically receives incoming faxes and the telephone rings for incoming calls Depe...

Страница 112: ... unit name of your machine This information is printed at the top of each page sent from the machine Press and tap Menu Tap Fax Settings Fax Setup Guide Tap Set Up Now Tap Next Enter the fax number using the numeric keys Entering Text and tap Apply Tap Next 1 2 3 4 5 6 㻝㻝㻞㻌㻛㻌㻣㻟㻡 ...

Страница 113: ...a user name or company name Entering Text and tap Apply Enter up to 24 alphanumeric characters Tapping A a 12 toggles the input modes Continue to Selecting the Receive Mode LINKS Sending Faxes MF729Cx MF728Cdw MF628Cw 7 㻝㻝㻟㻌㻛㻌㻣㻟㻡 ...

Страница 114: ... your intended use Select the receive mode with tapping Yes or No You may be able to manually set a receive mode other than those described below depending on your country or region Receiving Faxes MF729Cx MF728Cdw MF628Cw To set the receive mode to Auto To set the receive mode to Fax Tel Auto Switch To set the receive mode to Answering Machine To set the receive mode to Manual Tap Apply If the ma...

Страница 115: ...LINKS Receiving Faxes MF729Cx MF728Cdw MF628Cw 㻝㻝㻡㻌㻛㻌㻣㻟㻡 ...

Страница 116: ...ally Tap Next after the telephone line has been connected Notice for Connecting the Telephone Line This product includes the Telephone Line Cord and Adapter to connect the telephone line Depending on your country or region you may need to use the provided Adapter to connect the Telephone Line Cord to the wall telephone jack If you use the provided Adapter follow the instructions below to connect c...

Страница 117: ...ow the procedure below to set the type of telephone line If you are not sure of the type of phone line you are using contact your local telephone company Select Line Type may not be available depending on the country where you are using the machine Menu Fax Settings Basic Settings Select Line Type Manual Select the type of telephone line LINKS Installation Sending Faxes MF729Cx MF728Cdw MF628Cw Re...

Страница 118: ...before entering the destination If R is not available you need to register the R key settings R Key Setting If you enter the wrong characters press Press to delete each character one by one press and hold to delete all the input characters at once Using the Address Book to quickly specify destinations Specifying Registered Destinations If a confirmation window appears When Confirm Entered Fax Numb...

Страница 119: ...try code the area code and the fax number to specify the destination 1 Enter the international access code 2 Tap Pause p pause is inserted between numbers In this case 012 will be dialed first then 4 seconds later the next number will be dialed Inputting pauses is optional however consecutive numbers that are input without pauses may not be recognized correctly Pauses can be inserted continuously ...

Страница 120: ...uments on the platen glass in step 1 4 Tap Pause to insert a pause at the end of the fax number as necessary The waiting time inserted here is fixed to 10 seconds This time cannot be changed 5 Tap Apply Follow the procedures below 1 Select the document size When there is only one page to be scanned proceed to step 3 2 Place the next document on the platen glass and press B W Repeat this step until...

Страница 121: ... settings to use when needed Registering Frequently Used Fax Settings If you want to sound an alarm when the handset is off the hook Off Hook Alarm LINKS Canceling Sending Faxes Sending and Receiving Faxes According to Your Purposes MF729Cx MF728Cdw MF628Cw Checking Status and Log for Sent and Received Documents 㻝㻞㻝㻌㻛㻌㻣㻟㻡 ...

Страница 122: ...rver Specifying from Address Book Fax Selecting Destinations Directly by Entering Coded Dial Numbers Fax Specifying Previously Used Destinations Fax Specifying Destinations in an LDAP Server Fax TIPS for Enhancing Security If you want to limit available destinations to ones from the Address Book ones in an LDAP server or previously specified ones Limiting Available Destinations If you want to disa...

Страница 123: ...ered in Favorites A Z 0 9 ABC to YZ Displays destinations with recipient names whose first characters correspond to the characters of the selected tab Displays destinations for faxes Displays destinations for e mails To specify destinations using this tab see Specifying from Address Book Displays destinations for I fax To specify destinations using this tab see Specifying from Address Book Display...

Страница 124: ...usly Sequential Broadcast 1 Tap Destination Confirm Edit 2 Select a destination you want to delete 3 Tap Remove If you specified Group Dial in step 2 XX destination s is displayed Tapping Destination displays destinations registered in the group 4 Tap Yes If you want to easily and quickly delete destinations without displaying a list of destinations Before tapping Destination in step 1 you can tap...

Страница 125: ...cter one by one press and hold to delete all the input characters at once If a confirmation screen appears When Coded Dial TX Confirmation is set to On a screen is displayed that shows the destination and the name for the number For Group Dial the destination name and the number of destinations are shown Check the contents and if everything is correct and tap On To specify a different destination ...

Страница 126: ...fied Group Dial in step 2 XX destination s is displayed Tapping Number of Destinations displays destinations registered in the group 4 Tap Yes If you want to easily and quickly delete destinations without displaying a list of destinations Before tapping Destination in step 1 you can tap to toggle the destinations you specified Display a destination you want to delete and press 㻝㻞㻢㻌㻛㻌㻣㻟㻡 ...

Страница 127: ...Faxes Manual Sending When you specify a destination using this feature any destinations that you have already specified are deleted Press and tap Fax When the logon screen appears use the numeric keys to enter the user name and password Then select the authentication server and press Logging on to Authorized Send Select Destination Recall Set Select a destination If you are using a sequential broa...

Страница 128: ...on s is displayed Tapping Number of Destinations displays destinations registered in the group 4 Tap Yes If you want to easily and quickly delete destinations without displaying a list of destinations Before tapping Destination in step 1 you can tap to toggle the destinations you specified Display a destination you want to delete and press 㻝㻞㻤㻌㻛㻌㻣㻟㻡 ...

Страница 129: ...the numeric keys to enter the user name and password Then select the authentication server and press Logging on to Authorized Send Tap Destination Specify from LDAP Server Select the LDAP server you are using Select the search criteria Name fax numbers e mail addresses organization names and organization unit are available criteria for searching destinations Multiple search criteria can be specifi...

Страница 130: ...ation screen appears when you tap Start Search enter the user name of the machine and the password registered in the LDAP server and tap Apply Registering LDAP Servers Select a destination and tap Apply Up to 10 destinations can be specified To search for a destination using other search criteria repeat steps 2 to 9 The maximum number of destinations that you can specify when using the numeric key...

Страница 131: ...cast 2 Select a destination you want to delete 3 Tap Remove 4 Tap Yes If you want to easily and quickly delete destinations without displaying a list of destinations Before tapping Destination in step 1 you can tap to toggle the destinations you specified Display a destination you want to delete and press 㻝㻟㻝㻌㻛㻌㻣㻟㻡 ...

Страница 132: ...ty of settings are available to suit your needs for example when you want to adjust density or enhance the clarity of an image Adjusting Resolution Adjusting Density Adjusting Sharpness Scanning 2 Sided Documents MF729Cx MF728Cdw 㻝㻟㻞㻌㻛㻌㻣㻟㻡 ...

Страница 133: ...e resolution 200 x 100 dpi Normal Suitable for documents that contain text only 200 x 200 dpi Fine Suitable for documents that contain fine text 200 x 200 dpi Photo Suitable for documents that contain photographs 200 x 400 dpi Superfine Achieves an even finer resolution than Fine 400 x 400 dpi Ultrafine Achieves an even finer resolution than Superfine LINKS Sending Faxes MF729Cx MF728Cdw MF628Cw 㻝...

Страница 134: ...ust the density of the fax if the text or images in a document are too light or dark Fax Density Adjust the density Apply Decreases the density Increases the density LINKS Sending Faxes MF729Cx MF728Cdw MF628Cw Adjusting Sharpness 㻝㻟㻠㻌㻛㻌㻣㻟㻡 ...

Страница 135: ...o improve the appearance of magazine photos Fax Sharpness Adjust the sharpness Apply Decreases the sharpness resulting in a softer image Example If you want to improve the appearance of magazine photos Increases the image sharpness Example If you want to sharpen text and lines written in pencil LINKS Sending Faxes MF729Cx MF728Cdw MF628Cw Adjusting Density 㻝㻟㻡㻌㻛㻌㻣㻟㻡 ...

Страница 136: ...s are placed on the platen glass or when the machine is set to Manual Sending Fax 2 Sided Original Select Book Type or Calendar Type Book Type Select for documents whose images on the front and back sides face the same direction Calendar Type Select for documents whose images on the front and back sides face in opposite directions LINKS Sending Faxes MF729Cx MF728Cdw MF628Cw Making a Call before S...

Страница 137: ...iple fax settings and use them whenever you need them The machine comes pre configured with factory default settings Setting Menu List You can change and register the default settings according to your needs Increase the density and register it as the default setting From now on you can send faxes without changing the density Changing Default Settings Register the combination of 2 sided scan and s...

Страница 138: ...perform frequently you can eliminate the need to configure the same settings every time you send faxes Menu Fax Settings TX Function Settings Change Default Settings Tap the setting Change the default value of the selected item Apply Settings Tap the item you want to set and change the default value LINKS Sending Faxes MF729Cx MF728Cdw MF628Cw Various Fax Settings Fax Settings MF729Cx MF728Cdw MF6...

Страница 139: ...en Registering Favorite Settings Recalling Favorite Settings Press and tap Fax When the logon screen appears use the numeric keys to enter the user name and password Then select the authentication server and press Logging on to Authorized Send Change the values for the settings you want to register Various Fax Settings To also include the destination in a favorite fax setting enter the destination...

Страница 140: ... machine is turned OFF To edit or delete registered settings go to Fax Favorite Settings Edit Delete Edit or Delete and then follow the steps below To edit a setting Select the setting to be edited Change the setting and tap Apply Yes To delete a setting Select the setting to be deleted tap Yes Destinations cannot be changed once the settings have been registered To change a destination delete the...

Страница 141: ...Once you have recalled the setting combination you can also change the fax settings as needed LINKS Sending Faxes MF729Cx MF728Cdw MF628Cw 㻝㻠㻝㻌㻛㻌㻣㻟㻡 ...

Страница 142: ... is pressed Documents have been scanned and are waiting to be processed Select the document to cancel Check the transmission status before canceling TX Job Job Status Select the document on the TX Job Status screen Cancel Yes Fax details The number of sending document settings and other details are displayed If you only want to check the details without sending press to return to the fax main scre...

Страница 143: ...et If you do not hear a beep start your conversation You need to connect your telephone or the optional handset to the machine beforehand You can set the machine to automatically receive faxes when an incoming call rings within a specified timeframe Switch to Auto RX Answering Machine When the call is a fax After an incoming call rings the machine receives the fax automatically When the call is a ...

Страница 144: ...ge is low Continue Printing When Amount in Cartridge Is Low Specify the following three settings as necessary When the setting is complete tap Apply Ring Start Time Enables you to specify the duration during which the machine determines whether an incoming call is a fax or a telephone call Setting values 5 to 30 seconds default setting 8 seconds Incoming Ring Time Enables you to specify the durati...

Страница 145: ...not directly connected with the machine the remote reception function is not available When an incoming call rings pick up the telephone handset If you hear a beep enter the ID number for Remote Reception with the telephone The ID number is set to 25 by default You can change this number as necessary Remote RX Hang up the handset LINKS Sending and Receiving Faxes According to Your Purposes MF729Cx...

Страница 146: ...efore Sending Faxes Manual Sending Sending Faxes to Multiple Destinations Simultaneously Sequential Broadcast Storing Received Faxes into Memory Memory Reception Forwarding Received Faxes Archiving Sent Faxes Receiving Fax Information Services LINKS Sending Faxes MF729Cx MF728Cdw MF628Cw Receiving Faxes MF729Cx MF728Cdw MF628Cw Checking Status and Log for Sent and Received Documents 㻝㻠㻢㻌㻛㻌㻣㻟㻡 ...

Страница 147: ...be sent Press and tap Fax When the logon screen appears use the numeric keys to enter the user name and password Then select the authentication server and press Logging on to Authorized Send Press If the destinations set by the previous user are still selected this can cause transmission errors Always reset the settings before sending Specify the scanning settings as necessary Various Fax Settings...

Страница 148: ...the Address Book before using this feature Registering in the Address Book Place the document s Placing Documents Press and tap Fax When the logon screen appears use the numeric keys to enter the user name and password Then select the authentication server and press Logging on to Authorized Send Press If the destinations set by the previous user are still selected this can cause transmission error...

Страница 149: ...Press B W to start sending LINKS Sending Faxes MF729Cx MF728Cdw MF628Cw Canceling Sending Faxes Checking Status and Log for Sent and Received Documents 6 㻝㻠㻥㻌㻛㻌㻣㻟㻡 ...

Страница 150: ...e same numbers again for confirmation and tap Apply This password is necessary when you change the memory reception settings or when you deactivate the Memory Reception feature to print all the stored documents If you do not want to register a password just tap Apply without entering anything Passwords with only zeros as in 00 or 0000000 are not allowed Report Print Enables you to print RX Result ...

Страница 151: ... including sender fax numbers and number of pages sent and then delete unnecessary documents Press Tap RX Job Tap Job Status Select the document you want to check To delete the checked document Checking Deleting Documents in Memory 1 Tap Delete 2 Tap Yes 1 2 3 4 㻝㻡㻝㻌㻛㻌㻣㻟㻡 ...

Страница 152: ...LINKS Receiving Faxes MF729Cx MF728Cdw MF628Cw Checking Status and Log for Sent and Received Documents 㻝㻡㻞㻌㻛㻌㻣㻟㻡 ...

Страница 153: ... FTP server can be specified as forwarding destinations Available destinations for forwarding are limited to the destinations registered in the Address Book If no destinations are registered register destinations in the Address Book before using this feature Registering in the Address Book If e mail addresses shared folders in computers or FTP server are specified as forwarding destinations the do...

Страница 154: ...he Memory Reception feature is not deactivated the documents in memory are not deleted even after they are forwarded the same documents can be forwarded multiple times Press Tap RX Job Tap Job Status Select the document you want to forward Tap Forward Select the forwarding destination from the Address Book For instructions on how to use the Address Book see Specifying from Address Book Fax The doc...

Страница 155: ... instructions on how to use the Address Book see Specifying from Address Book Fax If you want to check the documents to be forwarded for yourself you can set the machine to print the documents whenever they are forwarded or to print only the documents that failed to be forwarded Menu Fax Settings Forwarding Settings Print Images Select On or Only When Error Occurs On Prints all the documents to be...

Страница 156: ...ges in Memory Only When Error Occurs Printing Resending Deleting Documents Stored in Memory Press Tap Fax Forwarding Errors Select the document you want to check To print the checked document 1 Tap Print Forward 2 Tap Print 3 Tap Yes 1 2 3 㻝㻡㻢㻌㻛㻌㻣㻟㻡 ...

Страница 157: ...729Cx MF728Cdw MF628Cw Checking Status and Log for Sent and Received Documents 1 Tap Print Forward 2 Tap Forward 3 Select the forwarding destination from the Address Book For instructions on how to use the Address Book see Specifying from Address Book Fax 1 Tap Delete 2 Tap Yes 㻝㻡㻣㻌㻛㻌㻣㻟㻡 ...

Страница 158: ...r on the computer an FTP server or an I Fax as the storage address Only destinations in the Address Book can be specified as a storage address To use the Address Book the destination must be registered beforehand Registering in the Address Book Menu Fax Settings Basic Settings Communication Management Settings Archive TX Document On Select the archive destination from the Address Book For instruct...

Страница 159: ...c keys to enter the user name and password Then select the authentication server and press Logging on to Authorized Send Tap Hook If an external telephone or the optional handset is connected to the machine you can pick up the handset instead of tapping Hook When you hear a dial tone dial the information service When the recorded message of the information service answers press This step is unnece...

Страница 160: ...Tap Start Receiving If you have picked up the handset hang it up LINKS Receiving Faxes MF729Cx MF728Cdw MF628Cw 6 㻝㻢㻜㻌㻛㻌㻣㻟㻡 ...

Страница 161: ...k the statuses and communication logs for sent and received documents To check the statuses for sent and received documents 1 Tap Job Status 2 Select the document whose status you want to check TX Job Status RX Job Status Displays a list of the documents that are being sent and received or are waiting to be processed Details Displays detailed information about the document selected from the list I...

Страница 162: ...ully and Error is displayed when a document failed to be sent or received because it was canceled or there was some error Details Displays detailed information about the document selected from the list If the Result column shows a three digit number This number represents an error code When an Error Code Appears LINKS TX Result Report Communication Management Report RX Result Report 㻝㻢㻞㻌㻛㻌㻣㻟㻡 ...

Страница 163: ...x driver on your computer before using this feature About the Fax Driver Help Clicking Help on the fax driver screen displays the Help screen On this screen you can see information that is not in the e Manual including information about driver features such as registering frequently used settings and how to set up those features If you are a Mac OS user see MF Driver Installation Guide for install...

Страница 164: ... and click Print When Sending from the Windows Store app in Windows 8 Server 2012 Display the charms on the right side of the screen and use the procedure shown below Windows 8 Server 2012 Devices Your printer Tap or click Print Windows 8 1 Server 2012 R2 Devices Print Your printer Tap or click Print If you send faxes using this method only a limited number of fax functions are available If the me...

Страница 165: ...ith its image including destinations and number of pages For more information click Help on the fax driver screen Detailed Settings in the print dialog box If you have selected Confirm Fax Number URI when Setting Destination in the dialog box that is displayed when Security Settings of the Special tab is clicked also enter a number in Confirm Fax Number or Confirm URI For more information click He...

Страница 166: ...5 㻝㻢㻢㻌㻛㻌㻣㻟㻡 ...

Страница 167: ...plication For more information see the instruction manual for the application you are using Select the fax driver for your machine and click Print Click the Cover Sheet button and specify each setting Cover Sheet Attachment Select Different Sheet to Each Destination or Same Sheet to All Destinations Style Select a cover sheet from the three preset cover sheets Template 1 to 3 The layout of the sel...

Страница 168: ...een shows an example for when the Logo tab is selected With without logos or signatures Select Print with Logo or Print with Signature if you want to include logos or signatures on the cover sheet Have the bitmap files for logos or signatures ready beforehand Location of logos or signature files Specify the location where logos or signatures files are saved Click Browse to locate the file you are ...

Страница 169: ...hing is correct click OK To modify the contents perform the steps from 3 again The specified cover sheet is attached to the fax when the fax is sent Details tab Include Number of Sheets to Send Select this check box if you want to include the number of sheets that you are going to send in the cover sheet and specify the number of sheets in Number of Sheets to Send The number of sheets to send is n...

Страница 170: ...lications such as Microsoft Excel can be imported into the machine or the Address Book data can be exported to a file for use on other fax machines or applications You cannot use the Address Book if you do not have permission to access the folder where the Address Book is saved Log on as a user who has permission to access the folder or change the save location of the Address Book Changing Locatio...

Страница 171: ...destinations and 3 000 for group destinations You can select and combine registered group destinations and register them as separate group destinations You cannot use the Address Book if you do not have permission to access the folder where the Address Book is saved Log on as a user who has permission to access the folder or change the save location of the Address Book Changing Location to Save Ad...

Страница 172: ...s as necessary Fax Number Enter the fax number s Hyphens can be inserted between numbers as necessary If you want to add explanations of the uses for the fax numbers such as Home or Office enter them in Description Open the printer folder Displaying the Printer Folder Right click the fax driver icon for your machine and click Printing preferences Registering Multiple Destinations as One Destinatio...

Страница 173: ...s to display in Available Destinations from which you can select the destinations to register in Group Dial Person Displays single destinations Group Displays group destinations All Displays all the destinations registered in the Address Book Available Destinations Select the destinations to register in Group Dial and click Add The selected destinations are displayed in Current Group Members To se...

Страница 174: ...To delete a destination from Current Group Members select a destination and click Delete Notes Enter comments as necessary 㻝㻣㻠㻌㻛㻌㻣㻟㻡 ...

Страница 175: ...tion of the Address Book Changing Location to Save Address Book Data Open a document in an application and display the print dialog box How to display the print dialog box differs for each application For more information see the instruction manual for the application you are using Select the fax driver icon for your machine and click Print Click the Select Destination tab Select the Address Book ...

Страница 176: ...You can search for destinations with Address List Clicking Edit Address Book allows you to edit the Address Book 㻝㻣㻢㻌㻛㻌㻣㻟㻡 ...

Страница 177: ... Data Exporting Address Book Data Changing Location to Save Address Book Data You cannot use the Address Book if you do not have permission to access the folder where the Address Book is saved Log on as a user who has permission to access the folder or change the save location of the Address Book Changing Location to Save Address Book Data Open the printer folder Displaying the Printer Folder Righ...

Страница 178: ...arators used in the file The destinations imported from the file are displayed in Address Book Open the printer folder Displaying the Printer Folder Right click the fax driver icon for your machine and click Printing preferences Exporting Address Book Data 5 1 2 㻝㻣㻤㻌㻛㻌㻣㻟㻡 ...

Страница 179: ... is displayed when Security Settings of the Special tab is clicked a dialog box for entering a password is displayed when you click Export For more information click Help on the fax driver screen Specify the location to save the file the file name and the file format and then click Save For a CSV file specify the separators used in the file 3 4 5 㻝㻣㻥㻌㻛㻌㻣㻟㻡 ...

Страница 180: ... the printer folder Displaying the Printer Folder Right click the fax driver icon for your machine and click Printing preferences Click the Select Destination tab Edit Address Book Click Specify a Folder Changing Location to Save Address Book Data 1 2 3 4 㻝㻤㻜㻌㻛㻌㻣㻟㻡 ...

Страница 181: ...ddress Book click New or if you want to copy the existing Address Book to the specified folder click Copy The Address Book is created or copied If an Address Book already exists in the folder selected in step 4 the following message is displayed If you want to use the existing Address Book click Use as is and if you want to use the Address Book of the fax driver click Overwrite 5 6 㻝㻤㻝㻌㻛㻌㻣㻟㻡 ...

Страница 182: ...as TIFF images files to e mail Since a telephone connection is not used you can send faxes to distant locations and send documents with many pages without worrying about communications charges Some advance preparation is required such as specifying the mail server settings Configuring Scan Settings Sending E mail Sending Receiving I Faxes 㻝㻤㻞㻌㻛㻌㻣㻟㻡 ...

Страница 183: ...o delete each character one by one press and hold to delete all the input characters at once To make it easier to specify destinations by using other methods such as the Address Book see Sending Using Registered Destinations E mail I Fax Shared Folder FTP Server If the screen above is not displayed You can only send to your own e mail address To send to other destinations you must configure the se...

Страница 184: ... a one page document on October 17 2015 at 07 00 05 PM 0045_151017190005_001 tif You cannot specify file names yourself Specify the subject body and reply to address for the e mail as necessary The subject is set to Attached Image by default The body is not set by default Enter it as necessary Without the body text only scanned documents are sent The reply to address is not set by default If you w...

Страница 185: ...put modes 4 Tap Message 5 Enter the body using the numeric keys and tap Apply Tapping A a 12 toggles the input modes 6 Tap Apply 1 Tap Reply To 2 Tap Specify from Address Book 3 Select a reply to address from the Address Book For instructions on how to use the Address Book see Specifying from Address Book 㻝㻤㻡㻌㻛㻌㻣㻟㻡 ...

Страница 186: ...ess set to the machine You can clear the mailbox on the server from the Remote UI To clear the mailbox When scanning is complete follow the procedures below 1 If there are additional pages of documents to be scanned place the next document on the platen glass and press B W Repeat this step until you finish scanning all of the pages When there is only one page to be scanned proceed to the next step...

Страница 187: ... E Mail I Fax LINKS Canceling Sending Documents E mail I Fax Shared Folder FTP Server Checking Log for Sent Documents E mail I Fax Shared Folder FTP Server 5 Read the message that is displayed and click OK E mail is deleted from the mailbox When the mailbox is cleared Once OK is clicked in the message window all e mail in the server mailbox is deleted If the machine does not have a special e mail ...

Страница 188: ...ure the machine so that it does not receive I Faxes automatically use the method below to receive I Faxes manually RX Job Check I Fax RX Connect to the server If there is a document on the server printing begins Printout Paper Regardless of the received document size incoming I Faxes are printed at the size specified in RX Print Size If paper of the size specified in RX Print Size is not loaded in...

Страница 189: ...Printing from USB Memory USB Print You can print JPEG TIFF and PDF files stored in a USB memory device by connecting it directly to the machine Using this function you can print without using a computer Printing from USB Memory USB Print MF729Cx MF728Cdw MF724Cdw Only Printing from Mobile Devices Linking mobile devices such as smartphones or tablets to this machine provides a quick and easy way to...

Страница 190: ...ivers and Printer Driver s Help for using print functions For Mac OS Users Depending on the operating system and the type or version of the printer driver you are using the printer driver screens in this manual may differ from your screens If you are using the MF729Cx MF728Cdw MF724Cdw you can use the PCL5c and PCL6 printer driver as well as the UFRII LT printer driver The available print settings...

Страница 191: ...㻝㻥㻝㻌㻛㻌㻣㻟㻡 ...

Страница 192: ...ess of the paper actually loaded However driver settings that do not match the loaded paper size could cause toner stains inside the machine and adversely affect the print results Prioritize Driver Settings When Printing Open a document in an application and display the print dialog box How to display the print dialog box differs for each application For more information see the instruction manual...

Страница 193: ... Auto The paper source is automatically selected according to the specified size and type of the paper to print on and the settings configured in the machine Multi Purpose Tray Paper is fed from the Manual feed slot Drawer 1 Paper is fed from the paper drawer of the machine Drawer 2 Paper is fed from the optional paper drawer Paper Type Specify the setting according to the type and basis weight of...

Страница 194: ...nd use the procedure shown below If you print using this method only a limited number of print settings are available Windows 8 Server 2012 Devices The printer you are using Tap or click Print Windows 8 1 Server 2012 R2 Devices Print The printer you are using Tap or click Print If the message The printer requires your attention Go to the desktop to take care of it is displayed go to the desktop an...

Страница 195: ...r printer icon and click See what s printing or double click the icon of the printer driver for the machine Select the document you want to cancel and click Document Cancel Click Yes Printing of the selected document is canceled Several pages may be output after you cancel printing Canceling from the Remote UI You can cancel printing from the Job Status page on the Remote UI Checking Current Statu...

Страница 196: ... document to cancel Check the print job status before canceling Copy Print Job Job Status Select the document on the Copy Print Job Status screen Cancel Yes Several pages may be output after you cancel printing LINKS Printing a Document Checking the Printing Status and Log From the Operation Panel 㻝㻥㻢㻌㻛㻌㻣㻟㻡 ...

Страница 197: ...t had been printed you may want to see whether an error has occurred Press Tap Copy Print Job Check the print statuses or logs To check the print statuses 1 Tap Job Status 2 Tap the document whose status you want to check Copy Print Job Status Displays a list of the documents that are being processed being copied or are waiting to be processed Details Displays detailed information about the docume...

Страница 198: ... because it was canceled or there was some error Details Displays detailed information about the document selected from the list The displayed document name or user name may not reflect the actual document or user name If the Result column shows a three digit number This number represents an error code When an Error Code Appears LINKS Printing a Document Canceling Prints 㻝㻥㻤㻌㻛㻌㻣㻟㻡 ...

Страница 199: ...Printing MF729Cx MF728Cdw MF724Cdw Collating Printouts by Page Printing Multiple Pages onto One Sheet Printing Posters Printing Booklet MF729Cx MF728Cdw MF724Cdw Printing Borders Printing Dates and Page Numbers Printing Watermarks Setting Color Mode Printing Specific Pages onto Different Paper Selecting Document Type Saving Toner Combining and Printing Multiple Documents 㻝㻥㻥㻌㻛㻌㻣㻟㻡 ...

Страница 200: ...fied Basic Settings tab Select the document size in Page Size Select the paper size in Output Size OK Specifying Print Ratio in Increments of 1 Basic Settings tab Select the Manual Scaling check box Enter the print ratio in Scaling OK Depending on the selected paper size you may not be able to set the optimum enlarging reducing ratio For example there may be large blank spaces on your printout or ...

Страница 201: ...LINKS Printing a Document 㻞㻜㻝㻌㻛㻌㻣㻟㻡 ...

Страница 202: ...ion OK 1 sided 2 sided Booklet Printing Select 1 sided Printing or 2 sided Printing For Booklet Printing see Printing Booklet MF729Cx MF728Cdw MF724Cdw Binding Location Specify the position to bind the printouts with a binding tool such as a stapler Printing orientation will be changed depending on the specified binding position To specify the margin width for the binding position click Gutter Lon...

Страница 203: ...LINKS Printing a Document Printing Multiple Pages onto One Sheet Printing Booklet MF729Cx MF728Cdw MF724Cdw 㻞㻜㻟㻌㻛㻌㻣㻟㻡 ...

Страница 204: ...ents Collate The printouts are grouped into complete sets in sequential page order For example if you are printing three copies of a five page document the printouts will be arranged in the following page order 1 2 3 4 5 1 2 3 4 5 1 2 3 4 5 Group The printouts are not collated For example if you are printing three copies of a five page document the printouts will be arranged in the following page ...

Страница 205: ...ingle sheet In Page Order select the page distribution layout OK Page Layout Select the number of pages to print onto a single sheet from 1 on 1 to 16 on 1 For example to print 16 pages onto a single sheet select 16 on 1 For options such as Poster 2 x 2 see Printing Posters Printing may not be performed properly if you combine this setting with an application setting for collating printouts Page O...

Страница 206: ... your poster for example Poster 2 x 2 OK There are four size settings Poster 1 x 2 Poster 2 x 2 Poster 3 x 3 and Poster 4 x 4 Poster size settings cannot be selected when 2 sided printing is enabled Select 1 sided Printing in 1 sided 2 sided Booklet Printing and then select a poster size setting Select the Print Border check box to add borders on your printouts The borders are helpful if you want ...

Страница 207: ...inting For 1 sided Printing and 2 sided Printing see Switching 1 Sided and 2 Sided Printing MF729Cx MF728Cdw MF724Cdw Booklet The screen below is displayed Booklet Printing Method All Pages at Once Prints all of the pages at once as a single bundle so that you can make a booklet just by folding the printed pages in half Divide into Sets Prints as multiple bundles divided by the number of the pages...

Страница 208: ...LINKS Printing a Document 㻞㻜㻤㻌㻛㻌㻣㻟㻡 ...

Страница 209: ... lines in the margins of printouts Page Setup tab Click Page Options Select the border type in Edging OK OK Edging Select the border type Preview Displays a preview with the selected border LINKS Printing a Document Printing Dates and Page Numbers Printing Watermarks 㻞㻜㻥㻌㻛㻌㻣㻟㻡 ...

Страница 210: ...position to print the print date Print User Name Specify the position to print the user name logon name for the computer used to print the document Print Page Number Specify the position to print the page number Changing the Print Format of Dates and Page Numbers You can change formatting details such as font and font size when printing dates logon names or page numbers Click Format Settings on th...

Страница 211: ...he Watermark check box to display the list of the watermarks in the Watermark Name drop down list Select a watermark from the menu Edit Watermark Displays the screen to create or edit watermarks Add Click to create a new watermark Up to 50 watermarks can be registered Name Enter the created watermark name Attributes Alignment Print Style Click each tab to specify the text color or print position o...

Страница 212: ...LINKS Printing a Document Printing Borders Printing Dates and Page Numbers 㻞㻝㻞㻌㻛㻌㻣㻟㻡 ...

Страница 213: ...ct Auto Color B W the color mode is automatically switched page by page To Specify the Detailed Color Settings You can also specify the detailed color settings such as color adjustment and color matching Quality tab Select the Manual Color Settings check box Click Color Settings Specify the color settings as necessary OK OK Color Adjustment Adjust the tone brightness and contrast Matching Specify ...

Страница 214: ...LINKS Printing a Document For more information click Help on the printer driver screen 㻞㻝㻠㻌㻛㻌㻣㻟㻡 ...

Страница 215: ...ecting Paper Type in Select by enables you to specify the paper type used for printing rather than the paper source Different for First Second Others and Last You can also specify the paper for the following page of the cover as well as specifying the paper in Different for First Others and Last Also selecting Paper Type in Select by enables you to specify the paper type used for printing rather t...

Страница 216: ...oto images in optimal print quality General A versatile option that is suitable when printing most documents Publications Suitable when printing documents that have a mix of photo images charts and graphs Graphics Suitable when printing documents that have charts or graphs Vivid Photo Suitable when printing photo images Designs CAD Suitable when printing design drawings that have many fine lines H...

Страница 217: ...g Document Type Select the document type for which you want to enable the toner save setting Advanced Settings A screen with settings is displayed Click Toner Save and select On from the drop down list on the bottom of the screen You can specify whether to enable the toner save setting for each document type Specify the toner save setting for each document type listed in Objective In the Advanced ...

Страница 218: ...plication and display the print dialog box How to display the print dialog box differs for each application For more information see the instruction manual for the application you are using Select the printer driver for the machine and click Preferences or Properties Select Edit and Preview in Output Method Click OK on the Information pop up screen Click OK at the bottom of the screen Click Print ...

Страница 219: ...step 6 are combined Print Preview Displays a preview of the document to be printed Document List Print Settings Click the Document List tab to display the documents added in steps 1 to 4 You can remove documents by selecting them in the list and clicking Delete from List Click the Print Settings tab to display the screen for specifying print settings such as the number of copies or 1 sided 2 sided...

Страница 220: ... the printer driver There are fewer settings available than when using the ordinary printing method On the Document Name list select the combined document print job you want to print and click Printing starts For instructions on how to cancel printing see Canceling Prints LINKS Printing a Document 8 㻞㻞㻜㻌㻛㻌㻣㻟㻡 ...

Страница 221: ...per Menu Printer Settings Paper Size Override Select Off or On Off Does not perform paper size substitution Printing stops and an error message is displayed when the machine runs out of the paper that has been specified On Performs paper size substitution However if no paper to substitute is loaded in any paper sources the substitution cannot be performed Other Printer Settings There are other pri...

Страница 222: ...nted until the correct PIN is entered on the operation panel of the machine This function is called Secure Print and the document that is protected by a PIN is called a secured document Using Secure Print keeps printouts of confidential documents from being left unattended Before you can use this function you need to complete some procedures Preparing for Using Secure Print 㻞㻞㻞㻌㻛㻌㻣㻟㻡 ...

Страница 223: ...unt Open the printer folder Displaying the Printer Folder Right click your printer icon and click Printer properties or Properties Click the Device Settings tab and make sure that the Allow Use of Secured Print check box is selected If the check box is selected Secure Print is enabled If the check box is not selected select it and click OK LINKS Printing via Secure Print 1 2 3 㻞㻞㻟㻌㻛㻌㻣㻟㻡 ...

Страница 224: ...iffers for each application For more information see the instruction manual for the application you are using Select the printer driver for the machine and click Preferences or Properties Select Secured Print in Output Method Click Yes or No on the Information pop up screen If you want to use the same user name and PIN every time click Yes To change the user name and PIN every time click No If you...

Страница 225: ...o be printed If you selected No at step 3 Enter the Document Name User Name and PIN and click OK The document name is automatically set based on the information from the application If you want to change the document name enter up to 32 alphanumeric characters for a new document name The computer name or logon name is displayed If you want to change the user name enter up to 32 alphanumeric charac...

Страница 226: ...r Secured Documents Press and tap Secure Print You cannot proceed to the next step if the Remote Scanner screen shown below is displayed In this case press to close the screen and tap Secure Print again Select the secured document to print If the Select User screen is displayed If secured documents from two or more users are being held in memory the Select User screen is displayed prior to the Sel...

Страница 227: ...ap Off and restart the machine Specify how long the machine holds secured documents and tap Apply Tap or the numeric keys to enter the time The secured document is erased from the memory of the machine when the time specified here elapses Restart the machine Turn OFF the machine wait for at least 10 seconds and turn it back ON LINKS Preparing for Using Secure Print Checking the Printing Status and...

Страница 228: ...cally displayed on the printer driver screen and you can skip the operations to specify the print settings and print immediately Register the combination of the 2 on 1 and 2 sided Printing settings as a Profile and select this profile whenever you need it Registering Combinations of Frequently Used Print Settings On the printer driver set black and white printing as the default setting From now on...

Страница 229: ...gs that you want to register as a profile and click Add Click the Basic Settings Page Setup Finishing Paper Source or Quality tabs to specify the print settings on each screen as necessary Various Print Settings Enter a profile name in Name select an icon and then click OK Enter comments on the profile in Comment as necessary Click View Settings to see the settings to register Editing a profile By...

Страница 230: ...Changing the settings of the selected profile You can change the settings of a selected profile In addition the changed settings can be registered as another profile LINKS Printing a Document 㻞㻟㻜㻌㻛㻌㻣㻟㻡 ...

Страница 231: ...e whenever you open the printer driver screen and you can eliminate the need to configure the same settings every time you make prints To perform the following procedure log on to your computer with an administrator account Open the printer folder Displaying the Printer Folder Right click your machine icon and click Printing preferences Change the settings on the print setting screen and click OK ...

Страница 232: ...ormat styles FAT16 memory capacity up to 2 GB FAT32 memory capacity up to 32 GB Do not use non standard USB memory devices You may not be able to print the images properly in some USB memory devices Do not connect anything other than a USB memory device USB memory devices cannot be connected via a USB hub or an extension cable Do not use USB memory devices with special functions such as built in s...

Страница 233: ...e files To clear a selection tap the file you have selected marked as To display the contents of a folder select a folder and tap To return to the folder in the upper level press Folders and files lower than the third directory are not displayed When you move to another folder the previous file selections will be cleared To select all files 1 Tap All Items 2 Tap Select All To clear all selections ...

Страница 234: ...s as the default display method Default Display Settings To change the file sort order You can change the sort order of the files in a USB memory device You can specify a sort setting such as Name Ascending or Date Time Ascending as the default setting for the file sort 1 Tap All Items 2 Tap Display Method 3 Tap the display method Details Displays file names and dates You can set whether to displa...

Страница 235: ...f Copies 1 Tap All Items 2 Tap Sort Files 3 Tap the criteria for file sorting When you select Date Time Ascending or Date Time Descending files are sorted based on the modification dates and time of the files Specify the number of copies from 1 to 99 Tap or the numeric keys to enter a quantity and tap Apply 5 6 㻞㻟㻡㻌㻛㻌㻣㻟㻡 ...

Страница 236: ...1 2 on 1 Prints two images onto a single sheet 4 on 1 Prints four images onto a single sheet You can make 2 sided printouts Select the binding position Book Type Prints images in such a way that the printed pages are opened horizontally when bound Calendar Type Prints images in such a way that the printed pages are opened vertically when bound 2 Sided may not be available with some sizes or types ...

Страница 237: ...rint the file name below each image Although Print File Name is not available for Index Print the file name is automatically printed below each image Original Type You can select the type of original depending on the image to print Select Photo Priority or Text Priority Photo Priority Gives priority to printing photo images smoothly Text Priority Gives priority to printing text clearly Brightness ...

Страница 238: ...nish Error Diffusion Prints images with small text or fine lines with a clear finish Specify the default settings of the USB Print function only for PDF files Brightness This setting adjusts the brightness of the overall image The settings can be set between 85 and 115 in increments of 5 Tap to adjust the brightness and tap Apply Prints images darker Prints images brighter Enlarge Reduce to Fit Pa...

Страница 239: ...nting black text over a color background or graphics See Black Overprint for the description of the setting RGB Source Profile Select the source profile for color matching to print RGB data according to the monitor you are using See RGB Source Profile for the description of the setting CMYK Simulation Profile This setting allows you to specify the simulation target to print the CMYK Cyan Magenta Y...

Страница 240: ...rint device dependent CMYK data as composite output All colors used for data are overlaid and printed on one plate so you can check the finished result without separating the colors See Composite Overprint for the description of the setting Advanced Smoothing Select how jagged outlines of text and graphics are smoothed Smooth 2 applies a stronger smoothing effect than Smooth 1 You can apply the se...

Страница 241: ...If you always want to print with the same settings Changing Default USB Print Settings LINKS Memory Media Print Settings 㻞㻠㻝㻌㻛㻌㻣㻟㻡 ...

Страница 242: ...he operations that you perform frequently you can eliminate the need to specify the same settings every time you make prints Menu Memory Media Print Settings Change Default Settings Select the setting Change the default value of the selected item Apply Settings Select the item you want to set and change the default value LINKS Printing from USB Memory USB Print Memory Media Print Settings 㻞㻠㻞㻌㻛㻌㻣㻟...

Страница 243: ...applications you are using the screens in this manual may differ from your screens Scanning from the Machine You can scan and save documents to your computer by using the operation panel of the machine You can also save documents to a USB memory device or send them as e mail attachments Scanning from the Machine Convenient Scanning with a Machine Based Operation Scanning from a Computer You can sc...

Страница 244: ...anner Selector Register by following the procedure below This procedure is not required if the machine and your computer are connected via USB The scan function is not available if the machine and your computer are connected in an IPv6 environment Use IPv4 or a USB connection Click in the system tray Select the check box for the machine and click OK Up to 10 scanners on a network can be registered...

Страница 245: ...ument s Placing Documents Press and tap Scan When the logon screen appears use the numeric keys to enter the user name and password Then select the authentication server and press Logging on to Authorized Send Tap Computer Select the destination computer This screen is not displayed if only a computer is connected to the machine via USB Up to 10 network connected computers can be displayed Select ...

Страница 246: ... in step 1 When scanning is complete the save destination folder is displayed on the computer When placing documents on the platen glass in step 1 About the save destination folder By default the scanned data is saved to the My Documents folder A subfolder named with the scanning date is created and the data is saved to that folder You can change the save destination from the MF Scan Utility Refer...

Страница 247: ...red Folder FTP Server Other useful scanning functions You can save scanned documents to a USB memory device or send them by e mail or as I Faxes The documents can also be saved to shared folders FTP Server You can accomplish these functions directly from the machine Scanning Documents Directly to USB Memory Sending Documents as E mails Directly from the Machine Saving Documents Directly to a Share...

Страница 248: ...cluded with the machine that enables you to scan documents or images to a computer You can forward the scanned data to a specified application or attach it to an e mail message For more information see Instructions on MF Scan Utility If you are a Mac user see Canon Scanner Driver Guide For Mac OS Users Scanning Using an Application You can scan images by using an application such as a word process...

Страница 249: ...he application In such a case place and scan one document at a time When Auto Online for Remote Scan is set to Off you must tap Scan Remote Scanner in the Home Screen to bring the machine online Auto Online for Remote Scan From the application select the start scan command The procedure for selecting the start scan command varies depending on the application For more information see the instructio...

Страница 250: ... Instructions on MF Scan Utility If you are a Mac OS user see Canon Scanner Driver Guide For Mac OS Users Starting from an application You can use ScanGear MF to import images into image processing or word processing software Select ScanGear MF from the image scanning commands Scanning Using an Application You can do the following by using ScanGear MF Previewing the image before scanning Specifyin...

Страница 251: ...ag the cropping frames to specify the areas you want to scan You can specify up to 10 areas Click Scan to scan the areas in the cropping frames as separate images Clear Crop Frame Clears the selected cropping frame Left Rotate Right Rotate Rotates the preview image 90 degrees to the left or right Information Displays the current settings of the scanned image such as the color mode and size of the ...

Страница 252: ... an image that is appropriate for printing on A4 paper select A4 and Print 300dpi for Select Purpose Click to switch between the portrait and landscape orientation This button is not available when Flexible is selected If you select Add Delete you can add new output size settings and delete the added sizes Select Flexible to change the ratio of width to height Drag the area you want to scan on the...

Страница 253: ...ocument on the platen glass and click Preview a preview image is displayed You can specify the area you want to scan and check the effects of image adjustments on the preview image Operating Preview Images Clear Clears the preview image Crop Specifies the cropping area with the cropping frame Click and drag the area you want to crop The cropping area is indicated with a dotted line You can move th...

Страница 254: ...e is displayed You can check the details that are difficult to see with To return the image to its original size click this button again Specifying Settings for Documents and Color Mode Original Input Method Select a setting based on whether you place your documents on the platen glass or in the feeder Platen Glass Select when placing documents on the platen glass ADF 1 sided Select when placing 1...

Страница 255: ...Specifying Resolution and Image Size Output Resolution Select the resolution of the scanned image that suits your intended use If documents are placed in the feeder the maximum resolution is 300 dpi About the output resolution A resolution of 75 dpi is a rough guide for displaying the scanned image on a computer and 300 dpi for printing or creating a searchable PDF If you double the output resolut...

Страница 256: ...n it is scanned with the set Output Resolution and Output Size Adjusting Image Quality Auto Tone Automatically adjusts the color tone of the image Reduce Dust and Scratches Makes dust or scratches on the document less noticeable High makes large scratches and dust less noticeable but may ruin details on the image Fading Correction The setting is available if you select Color for Color Mode Correct...

Страница 257: ...review image so that the brightness balance of the original image is automatically adjusted with the specified part being the average Likewise you can also adjust the balance with the brightness of the medium tone being the average Channel If you select Color for Color Mode you can adjust the Red Green and Blue color channels separately To adjust all three colors at the same time select Master You...

Страница 258: ...phasizes the difference between the light and dark parts of the image Invert the Negative Positive Image Inverts the light and dark parts of the image Final Review The results of all adjustments made to the brightness contrast histogram and tone curve settings are displayed in a tone curve and as numerical values Perform a final check of the color settings Threshold Adjust the threshold value for ...

Страница 259: ...w Images is displayed on the preview image Execute Auto Cropping on Previewed Images Auto Crop is performed based on the scanned document Display the Last Frame on Previewed Images Auto Crop is not performed and the most recently set cropping frame is displayed None Auto Crop is not performed and no cropping frame is displayed Scan Tab Configure the settings that are applied when you scan a docume...

Страница 260: ...you select Color for Color Mode Specifying Settings for Documents and Color Mode If Color Matching is enabled the Fading Correction Adjusting Image Quality setting and the buttons for brightness and color settings Adjusting Brightness and Color are disabled Always Execute the Auto Tone Color tone is automatically adjusted The setting is available if you select Color or Grayscale for Color Mode Mon...

Страница 261: ...en Scanning is Completed The specified sound file is played when scanning is complete Test Scanner You can check whether the scan function of the machine is working properly When the Scanner Diagnostics screen opens click Start Registering Frequently Used Settings Place the document s and click Preview Change the scan settings Select settings to register as necessary Select Add Delete in Favorite ...

Страница 262: ...ew Adjust the brightness or color Adjusting Brightness and Color Select settings to register as necessary Select Add Delete in the drop down list The Add Delete Tone Curve Settings or Add Delete Threshold Settings screen is displayed Enter a name into Setting Name and click Add Save Enter a name for the settings to register Use a name that is easy to find in the drop down list Calling the register...

Страница 263: ...LINKS Configuring Scan Settings in Simple Mode Scanning Using an Application 㻞㻢㻟㻌㻛㻌㻣㻟㻡 ...

Страница 264: ...d send them directly from the machine as e mail attachments You can work more efficiently because this feature eliminates the need to use your computer to send scanned documents Before you can use this function you need to complete some procedures such as specifying the e mail server settings For more information see Configuring Scan Settings Sending E mail Sending Receiving I Faxes Saving Documen...

Страница 265: ...ion cable Do not use USB memory devices with special functions such as built in security functions The USB port on the front of the machine supports USB 2 0 If a folder in a USB memory device has many files saving scanned data will take more time Use your computer to delete unnecessary files on your USB memory device or move them to a different folder Connect a USB memory device to the USB port US...

Страница 266: ...es full of 100 files File Name File names from SCAN0000 XXX to SCAN9999 XXX are given to the scanned data files XXX is the extension for the file format such as JPG For the first two numerical digits the same number is allotted as that of the folder number in which the files are saved For example The fifth JPEG file stored in the SCAN_01 folder is named SCAN0105 JPG Tap Close Disconnect the USB me...

Страница 267: ...ve Memory Media Wait until the message The memory media can be safely removed is displayed 5 Disconnect the USB memory device If you always want to scan with the same settings Changing Default Settings 㻞㻢㻣㻌㻛㻌㻣㻟㻡 ...

Страница 268: ...nce To make it easier to specify destinations by using other methods such as the Address Book see Sending Using Registered Destinations E mail I Fax Shared Folder FTP Server If the screen above is not displayed You can only send to your own E mail address To send to other destinations you must configure the send function authentication settings so that E mail transmission is not restricted Contact...

Страница 269: ...dress and priority for the e mail as necessary The subject and the priority are set to Attached Image and Standard respectively by default The body is not set by default Enter it as necessary Without the body text only scanned documents are sent The reply to address is not set by default If you want to display the reply to address differently from that of the machine specify the address from among...

Страница 270: ...meric keys and tap Apply Tapping A a 12 toggles the input modes 6 Tap Apply 1 Tap Reply To 2 Tap Specify from Address Book 3 Select a reply to address from the Address Book For instructions on how to use the Address Book see Specifying from Address Book 1 Tap Priority 㻞㻣㻜㻌㻛㻌㻣㻟㻡 ...

Страница 271: ...ddress set to the machine You can clear the mailbox on the server from the Remote UI To clear the mailbox 2 Select a priority level When scanning is complete follow the procedures below 1 If there are additional pages of documents to be scanned place the next document on the platen glass and press Repeat this step until you finish scanning all of the pages When there is only one page to be scanned...

Страница 272: ...nt to specify the e mail sender name Register Unit Name E Mail I Fax 4 Click Clear in Clear Mail Box 5 Read the message that is displayed and click OK E mail is deleted from the mailbox When the mailbox is cleared Once OK is clicked in the message window all e mail in the server mailbox is deleted If the machine does not have a special e mail account you should first check whether any e mail in th...

Страница 273: ...LINKS Canceling Sending Documents E mail I Fax Shared Folder FTP Server Checking Log for Sent Documents E mail I Fax Shared Folder FTP Server 㻞㻣㻟㻌㻛㻌㻣㻟㻡 ...

Страница 274: ... on to Authorized Send Tap File Select a destination from the Address Book For instructions on how to use the Address Book see Specifying from Address Book Selecting destinations directly by entering coded dial numbers You can also specify previously used destinations Selecting Destinations Directly by Entering Coded Dial Numbers Specifying Previously Used Destinations If the screen above is not d...

Страница 275: ...the shared folder or FTP Server When placing documents on the platen glass in step 1 If you always want to scan with the same settings Changing Default Settings If you want to register a combination of settings to use when needed Registering Frequently Used Scan Settings E mail I Fax Shared Folder FTP Server LINKS Canceling Sending Documents E mail I Fax Shared Folder FTP Server Checking Log for S...

Страница 276: ...ress to cancel If the screen displays a list of documents when is pressed Documents have been scanned and are waiting to be processed Select the document to cancel Check the transmission status before canceling TX Job Job Status Select the document Cancel Yes Details The number of sending document settings and other details are displayed If you only want to check the details without sending press ...

Страница 277: ...Sending Documents as E mails Directly from the Machine Sending I Faxes Saving Documents Directly to a Shared Folder FTP Server 㻞㻣㻣㻌㻛㻌㻣㻟㻡 ...

Страница 278: ...rove the appearance of scanned documents as well as the basic settings such as specifying the document orientation or scanning size Specifying a Scanning Size Selecting a File Format Adjusting Density Specifying Orientation of Your Document Selecting Document Type Scanning 2 Sided Documents MF729Cx MF728Cdw MF724Cdw Adjusting Sharpness Adjusting Balance between File Size and Image Quality Setting ...

Страница 279: ...ts Scan Tap USB Memory or E Mail I Fax File to specify destinations Scan Size Select the document size LINKS Scanning Documents Directly to USB Memory Sending Documents as E mails Directly from the Machine Saving Documents Directly to a Shared Folder FTP Server Sending I Faxes 㻞㻣㻥㻌㻛㻌㻣㻟㻡 ...

Страница 280: ...ng you to search the text using a computer PDF OCR Converts a scanned document into a text searchable PDF file as PDF Compact OCR with no file size reduction Set PDF Details Select to specify the settings for generating an encrypted PDF with a digital signature Only available for the MF729Cx with the optional Send PDF Security Feature Set enabled Set PDF Details Select the type of PDF format Speci...

Страница 281: ... read by the OCR function OCR Text Searchable Settings Image Quality Settings for PDF Compact and PDF Compact OCR Generate a PDF file compatible with Adobe Acrobat Adobe Reader Adobe Acrobat Reader 10 or later Only either Acrobat 9 0 or Equivalent 256 bit AES or Acrobat 10 0 or Equivalent 256 bit AES appears on the display as an option for generating a 256 bit AES encrypted PDF You can change the ...

Страница 282: ...LINKS Scanning Documents Directly to USB Memory Sending Documents as E mails Directly from the Machine Saving Documents Directly to a Shared Folder FTP Server 㻞㻤㻞㻌㻛㻌㻣㻟㻡 ...

Страница 283: ...SB Memory or E Mail I Fax File to specify destinations Density Adjust the density Apply Decreases the density Increases the density LINKS Scanning Documents Directly to USB Memory Sending Documents as E mails Directly from the Machine Sending I Faxes Saving Documents Directly to a Shared Folder FTP Server Adjusting Sharpness 㻞㻤㻟㻌㻛㻌㻣㻟㻡 ...

Страница 284: ...ecify destinations Original Type Select the document type Portrait Select for documents with portrait orientation Landscape Select for documents with landscape orientation LINKS Scanning Documents Directly to USB Memory Sending Documents as E mails Directly from the Machine Saving Documents Directly to a Shared Folder FTP Server 㻞㻤㻠㻌㻛㻌㻣㻟㻡 ...

Страница 285: ...iginal Type Select the document type Text Suitable when scanning documents that only contain text Text Photo Suitable when scanning documents that contain both text and photos Photo Suitable when scanning documents that contain printed photos such as magazines or pamphlets LINKS Scanning Documents Directly to USB Memory Sending Documents as E mails Directly from the Machine Sending I Faxes Saving ...

Страница 286: ...Fax File to specify destinations 2 Sided Original Select Book Type or Calendar Type Book Type Select for documents whose images on the front and back sides face the same direction Calendar Type Select for documents whose images on the front and back sides face in opposite directions LINKS Scanning Documents Directly to USB Memory Sending Documents as E mails Directly from the Machine Sending I Fax...

Страница 287: ...destinations Sharpness Adjust the sharpness Apply Decreases the sharpness resulting in a softer image Example If you want to improve the appearance of magazine photos Increases the image sharpness Example If you want to sharpen text and lines written in pencil LINKS Scanning Documents Directly to USB Memory Sending Documents as E mails Directly from the Machine Sending I Faxes Saving Documents Dir...

Страница 288: ... or E Mail I Fax File to specify destinations Specify the setting Small Memory Priority The data size is highly compressed and reduced but the image quality becomes low Standard The compression ratio and the image quality are adjusted to an intermediate setting between Small Memory Priority and Large Image Quality Priority Large Image Quality Priority The image quality improves but the data compre...

Страница 289: ...ed files so the files are displayed with brightness true to the original documents For the gamma value of a monitor display see the instruction manual included with the display Menu Scan Settings Output File Image Settings YCbCr TX Gamma Value Select the gamma value LINKS Scanning Documents Directly to USB Memory Sending Documents as E mails Directly from the Machine Sending I Faxes Saving Documen...

Страница 290: ...tinations just like you can when sending normal e mails These destinations can be specified using the Address Book or an LDAP server To specify destinations as Cc or Bcc addresses you need to use the Address Book When specifying destinations for shared folders and FTP Server You cannot specify destinations using the numeric keys or an LDAP server Furthermore only one destinations can be specified ...

Страница 291: ... numeric keys to enter the user name and password Then select the authentication server and press Logging on to Authorized Send Select E Mail I Fax or File If you select File proceed to step 4 Tap Destination Specify from Address Book If the Type screen appears select To Cc or Bcc as a destination type Select a tab using All Displays all the destinations registered in the Address Book For the mark...

Страница 292: ...p to 100 destinations can be specified To delete destinations e mail I Fax If you specified multiple destinations you can delete destinations as necessary 1 Tap Destination Confirm Edit 2 Select a destination you want to delete 3 Tap Remove If you specified destinations in Group Dial in step 2 Number of Destinations is displayed on the screen Selecting this item displays detailed destinations in G...

Страница 293: ...LINKS Sending Documents as E mails Directly from the Machine Sending I Faxes Saving Documents Directly to a Shared Folder FTP Server 㻞㻥㻟㻌㻛㻌㻣㻟㻡 ...

Страница 294: ...on type Use the numeric keys to enter a three digit number 001 to 281 If you enter the wrong characters press Press to delete each character one by one press and hold to delete all the input characters at once If a confirmation screen appears When Coded Dial TX Confirmation is set to On a screen is displayed that shows the destination and the name for the number For Group Dial the destination name...

Страница 295: ...stinations in Group Dial in step 2 Number of Destinations is displayed on the screen Selecting this item displays detailed destinations in Group Dial 4 Tap Yes If you want to easily and quickly delete destinations without displaying a list of destinations Before selecting Confirm Edit in step 1 you can tap to toggle the destinations you specified Display a destination you want to delete and press ...

Страница 296: ...etes the past destinations and disables this feature Limiting Available Destinations When you specify a destination using this feature any destinations that you have already specified are deleted Press and tap Scan When the logon screen appears use the numeric keys to enter the user name and password Then select the authentication server and press Logging on to Authorized Send Tap Destination Reca...

Страница 297: ... numeric keys to enter the user name and password Then select the authentication server and press Logging on to Authorized Send Tap Destination Specify from LDAP Server Select the LDAP server you are using Select the search criteria Personal names fax numbers e mail addresses organization names and Organization Unit names are available criteria for searching destinations Multiple search criteria c...

Страница 298: ...eria are displayed If the authentication screen appears when you tap Start Search enter the user name of the machine and the password registered in the LDAP server and tap Apply Registering LDAP Servers Select a destination and tap Apply Up to 10 destinations can be specified To search for a destination using other search criteria repeat steps 2 to 9 If you have already specified a destination usi...

Страница 299: ...tion you want to delete 3 Tap Remove 4 Tap Yes If you want to easily and quickly delete destinations without displaying a list of destinations Before selecting Confirm Edit in step 1 you can tap to toggle the destinations you specified Display a destination you want to delete and press 㻞㻥㻥㻌㻛㻌㻣㻟㻡 ...

Страница 300: ...TP server The machine comes pre configured with factory default settings Setting Menu List You can change and register the default settings according to your needs Specify PDF Compact as the default file format and register it as the default setting From now on you will not have to change the file format when scanning Changing Default Settings Specify the e mail address of your client with Color a...

Страница 301: ...ettings Change Default Settings Select the setting Change the default value of the selected item Apply Settings Select the item you want to set and change the default value E mail Menu Scan Settings E Mail Settings Change Default Settings Select the setting Change the default value of the selected item Apply Settings Select the item you want to set and change the default value I Fax Settings Menu ...

Страница 302: ...tting Change the default value of the selected item Apply Settings Select the item you want to set and change the default value LINKS Scanning Documents Directly to USB Memory Sending Documents as E mails Directly from the Machine Sending I Faxes Saving Documents Directly to a Shared Folder FTP Server Specifying Detailed Settings Scan Settings 㻟㻜㻞㻌㻛㻌㻣㻟㻡 ...

Страница 303: ...played on the Home Screen Registering Favorite Settings Recalling Favorite Settings Press and tap Scan When the logon screen appears use the numeric keys to enter the user name and password Then select the authentication server and press Logging on to Authorized Send Select E Mail I Fax or File Change the values for the settings you want to register Specifying Detailed Settings To also include the...

Страница 304: ...reen as a shortcut button If the Home Screen is full and the button cannot be added use Home Screen Settings to delete registered buttons or blanks Customizing the Home Screen Registered settings are retained even when the machine is turned OFF To edit or delete registered settings go to Scan Favorite Settings Edit Delete Edit or Delete and then follow the steps below To edit a setting Select the ...

Страница 305: ... the favorite scan settings Simply select the setting combination that suits your purpose from the favorite settings Scan Favorite Settings Select the setting combination to be recalled Once you have recalled the settings the setting combination you can also change the scan settings as needed LINKS Convenient Scanning with a Machine Based Operation Recalling Favorite Settings 㻟㻜㻡㻌㻛㻌㻣㻟㻡 ...

Страница 306: ...When Display Job Log is set to Off you cannot check the logs for sent documents Display Job Log Press Tap TX Job Tap Job Log A list of the documents that were sent is displayed Tap the document whose detailed information you want to check Check the detailed information about the selected document LINKS TX Result Report Communication Management Report 1 2 3 4 5 㻟㻜㻢㻌㻛㻌㻣㻟㻡 ...

Страница 307: ... Printing by Touching a Mobile Device to the Machine NFC MF729Cx Making a Simple Wireless Connection Using Direct Connection Access Point Mode MF729Cx MF728Cdw MF724Cdw MF628Cw Using Remote UI from a Mobile Device Using AirPrint You can print scan or fax without using drivers by sending print data from Apple devices Using AirPrint Using Google Cloud Print You can print without using a printer driv...

Страница 308: ...㻟㻜㻤㻌㻛㻌㻣㻟㻡 ...

Страница 309: ...data stored in a smartphone tablet connected to this machine and send documents scanned with the machine to the connected smartphone tablet For compatible operating systems the detailed setting procedure and operating procedure please see the Canon website at http www canon com 㻟㻜㻥㻌㻛㻌㻣㻟㻡 ...

Страница 310: ...es or contact your manufacturer Install Canon Mobile Application on your mobile device For more information see the Canon website at http www canon com Launch Canon Mobile Application Required Machine Setting To print from NFC compatible devices specify the following settings Set Enable NFC to On Enable NFC Set the IP address in IPv4 format Setting IPv4 Address You can download the application sof...

Страница 311: ... the mobile device is not performed within 5 minutes while the SSID and network key are displayed the connection waiting state terminates If while in communication by Direct Connection a duration when there is no data transmission between the machine and the mobile device lasts for some time the communication may terminate The machine s SSID and network key are changed each time the Direct Connect...

Страница 312: ...nto the Web browser and start the Remote UI Check the IP address set to the machine in advance Viewing Network Settings If you have any questions ask your Network Administrator Start the Web browser on your smartphone or tablet Enter http the IP address of the machine in the address field If you want to use an IPv6 address enclose the IPv6 address with brackets example http fe80 2e9e fcff fe4e dbc...

Страница 313: ... machine and installation location that is used for identifying the machine You can also disable the AirPrint function of the machine Use the Remote UI to change these settings Start the Remote UI and log on in System Manager Mode Starting Remote UI Depending on your Web browser the procedure to start the Remote UI may be different See the instruction manuals for the Web browser you are using Clic...

Страница 314: ...mation is useful if you have more than one AirPrint printer If you change Printer Name If you change Printer Name that you have once specified you may be unable to print any more from the Mac that has been able to be used for printing so far This phenomenon occurs because mDNS Name Configuring DNS of IPv4 is also changed automatically In this case add the machine to the Mac again Restart the machi...

Страница 315: ...hentication Click System Preferences in the Dock on the desktop Printers Scanners Select your printer and click Options Supplies Click Show Printer Webpage Log on to the Remote UI To change AirPrint settings log on in System Manager Mode Apple Bonjour iPad iPhone iPod touch Mac Mac OS and Mac OS X are trademarks of Apple Inc registered in the U S and other countries AirPrint and the AirPrint logo ...

Страница 316: ...o Check Paper Settings Make sure that the machine is turned ON and that it is connected to your Apple device For how to make sure whether the Apple device and the machine are connected via wired wireless LAN see Getting Started Manuals Included with the Machine For how to make sure whether the Apple device and the machine are in Direct Connection see Making a Simple Wireless Connection Using Direc...

Страница 317: ...ration has already been performed for scanning or faxing Open a document in an application and display the print dialog box How to display the print dialog box differs for each application For more information see the instruction manual for the application you are using Select this machine in the print dialog box The printers connected to the Mac are displayed Select this machine in this step Spec...

Страница 318: ...nk Scan to On Configuring Network Link Scan Settings Make sure that the machine is turned ON and that it is connected to the Mac For how to make sure of this see Getting Started Manuals Included with the Machine Add the machine to your Mac from System Preferences Printers Scanners This operation is not necessary if the registration has already been performed for printing or faxing Select this mach...

Страница 319: ...ine state by tapping Scan Remote Scanner in this order from the Home Screen then start the procedure for scanning Remote UI Settings You cannot scan while settings for printing copying or faxing are being made or while the machine is performing an operation whatsoever 㻟㻝㻥㻌㻛㻌㻣㻟㻡 ...

Страница 320: ...d that it is connected to the Mac For how to make sure of this see Getting Started Manuals Included with the Machine Add the machine to your Mac from System Preferences Printers Scanners This operation is not necessary if the registration has already been performed for printing or scanning Open a document in an application and display the print dialog box How to display the print dialog box differ...

Страница 321: ...Make sure that Bonjour on Apple devices is enabled For details see the instruction manual for the device or contact your manufacturer Make sure that the machine is configured to enable printing scanning faxing from a computer even when no department ID and password are entered Setting the Department ID Management for Printing or Faxing from the Computer For printing make sure that the paper is loa...

Страница 322: ...es you to print by connecting a printer directly to the Web For example if you want to print an e mail or files that are attached to an e mail you can print just by using Gmail for mobile You will find your printouts when you go to the machine When registering the machine or when using Google Cloud Print to print documents you must be able to connect the machine to the Internet You are also respon...

Страница 323: ...e Department ID Management is enabled make sure that the machine is configured to enable printing from a computer even when no Department ID and PIN are entered Blocking Jobs When Department ID Is Unknown Enable the Google Cloud Print function of the machine You can also disable the Google Cloud Print function of the machine Tap Menu in the Home Screen Tap System Management Settings If the logon s...

Страница 324: ...nable Google Cloud Print Click Edit select the Use Google Cloud Printing check box and click OK To reregister the machine To reregister the machine if the owner of the machine has changed or for other reasons unregister the machine and register it again Click the link of the URL displayed for URL for Registration 3 4 5 㻟㻞㻠㻌㻛㻌㻣㻟㻡 ...

Страница 325: ...site for information about the latest applications that support Google Cloud Print Registering from a mobile device or Google Chrome You can also register the machine from a mobile device or Google Chrome The machine s display shows the following confirmation screen before completion of the registration Tap Yes to complete the registration For the registration procedure see the instruction manual ...

Страница 326: ...nvolved network settings or routing through an access point or wireless LAN router Connecting to a Computer Viewing the Machine s Network Settings Connecting to a Network Viewing Network Settings Connecting Directly to Mobile Devices Configuring the Settings for Direct Connection Access Point Mode MF729Cx MF728Cdw MF724Cdw MF628Cw Configuring or Preparing for Print PC Fax Scan Functions Configurin...

Страница 327: ...ee the instruction manuals for the devices you are using or contact the device manufacturers Make sure that the network settings have been completed on the computer If the network has not been set up properly you will not be able to use the machine on the network even if you perform the rest of the procedure below Depending on the network you may need to change settings for the communication metho...

Страница 328: ...t the IP address as necessary At the time of purchase the machine is set to automatically acquire an IP address Change this setting if you want to use a specific IP address Setting IP Addresses 㻟㻞㻤㻌㻛㻌㻣㻟㻡 ...

Страница 329: ...ninstall MF Drivers installed on your computer and then reinstall them See the MF Driver Installation Guide for details Tap Menu in the Home Screen Tap Network Settings If the logon screen appears enter the correct ID and PIN using the numeric keys and then press Logging on to the Machine Tap Select Wired Wireless LAN Tap Wired LAN or Wireless LAN LINKS Connecting to a Network Connecting to a Wire...

Страница 330: ...ne to the router Connect a LAN cable Connect the machine to a router by using a LAN cable Push the connector in until it clicks into place Wait approximately 2 minutes While you wait the IP address is set automatically You can set the IP address manually Setting IP Addresses LINKS Connecting to a Network 1 2 㻟㻟㻜㻌㻛㻌㻣㻟㻡 ...

Страница 331: ...low For the wireless security compatibility of your wireless router see the instruction manuals for your networking devices or contact your manufacturer 128 104 64 40 bit WEP WPA PSK TKIP AES CCMP WPA2 PSK TKIP AES CCMP Required devices for wireless LAN connection The machine does not come with a wireless router Have the router ready as necessary The wireless router must conform to IEEE 802 11b g ...

Страница 332: ...ng a Wireless Router Select this setup option if you need to manually set up the connection but want to complete the setup as easily as possible Setting Up Connection by Selecting a Wireless Router Manually Entering the Setup Information If you want to specify security settings in detail such as authentication and encryption settings manually enter the SSID and network key to set up the connection...

Страница 333: ... Do you want to enable the wireless LAN message is displayed tap Yes Read the message that is displayed and tap OK Tap WPS Push Button Mode Tap Yes A PIN code is generated Press and hold the WPS button on the wireless router The button must be pressed within 2 minutes after tapping Yes in step 6 Depending on the networking device you may need to press and hold the button for 2 seconds or longer Se...

Страница 334: ...st signal Signal strength is measured using RSSI Received Signal Strength Indication Reducing power consumption You can set the machine to enter Power Save Mode based on signals emitted from the wireless router Power Save Mode If the IP address of the machine has changed In a DHCP environment the IP address of the machine may be changed automatically If this happens the connection is maintained as...

Страница 335: ... the Operation Panel Tap Menu in the Home Screen Tap Network Settings If the logon screen appears enter the correct ID and PIN using the numeric keys and then press Logging on to the Machine Tap Wireless LAN Settings If the Do you want to enable the wireless LAN message is displayed tap Yes Read the message that is displayed and tap OK Tap WPS PIN Code Mode Tap Yes A PIN code is generated From a C...

Страница 336: ...vailable for connection the machine connects to the device with the strongest signal Signal strength is measured using RSSI Received Signal Strength Indication Reducing power consumption You can set the machine to enter Power Save Mode based on signals emitted from the wireless router Power Save Mode If the IP address of the machine has changed In a DHCP environment the IP address of the machine m...

Страница 337: ...you need to set up the connection using the manual entry method Setting Up Connection by Specifying Detailed Settings Tap Menu in the Home Screen Tap Network Settings If the logon screen appears enter the correct ID and PIN using the numeric keys and then press Logging on to the Machine Tap Wireless LAN Settings If the Do you want to enable the wireless LAN message is displayed tap Yes Read the me...

Страница 338: ...on the operation panel The Wi Fi indicator blinks when a wireless router is detected When the setup is completed the screen below is displayed and approximately 2 seconds later the Wi Fi indicator lights up Wait approximately 2 minutes until the IP address settings of the machine are completed Signal strength When more than one wireless router is available for connection the machine connects to th...

Страница 339: ...vironment the IP address of the machine may be changed automatically If this happens the connection is maintained as long as the machine and the computer belong to the same subnet LINKS Connecting to a Wireless LAN MF729Cx MF728Cdw MF724Cdw MF628Cw 㻟㻟㻥㻌㻛㻌㻣㻟㻡 ...

Страница 340: ...able the wireless LAN message is displayed tap Yes Read the message that is displayed and tap OK Select SSID Settings Enter Manually Enter the SSID that you have written down Enter the SSID using the numeric keys and tap Apply Entering Text Specify the security settings based on the information that you have written down If you do not need to specify the security settings tap None Using WEP 1 Tap ...

Страница 341: ... keys and tap Apply Entering Text 6 Tap Select WEP Key 7 Tap the WEP key you have edited 1 Tap WPA WPA2 PSK 2 Select an encryption method Auto Sets the machine to automatically select AES CCMP or TKIP to match the setting of the wireless router AES CCMP Sets AES CCMP as the encryption method 3 Enter the network key that you have written down Enter the network key using the numeric keys and tap App...

Страница 342: ...al strength When more than one wireless router is available for connection the machine connects to the device with the strongest signal Signal strength is measured using RSSI Received Signal Strength Indication Reducing power consumption You can set the machine to enter Power Save Mode based on signals emitted from the wireless router Power Save Mode If the IP address of the machine has changed In...

Страница 343: ...eed to specify security settings Check the following information Security types WEP WPA PSK WPA2 PSK Authentication method Open System Shared Key Encryption method TKIP AES CCMP Checking the SSID and Network Key from a Computer The SSID or the network key may have been changed If you do not know the SSID or the network key you can check them by using the Canon MF LBP Wireless Setup Assistant inclu...

Страница 344: ...write down all the information that is displayed If wireless routers are not found Click Refresh If nothing happens check that the settings are correctly configured on the computer and the wireless router LINKS Connecting to a Wireless LAN MF729Cx MF728Cdw MF724Cdw MF628Cw Setting Up Connection by Selecting a Wireless Router Setting Up Connection by Specifying Detailed Settings 4 5 㻟㻠㻠㻌㻛㻌㻣㻟㻡 ...

Страница 345: ...o a network requires a unique network IP address Two versions of IP addresses are available IPv4 and IPv6 Configure these settings depending on the network environment To use IPv6 addresses you need to properly configure the IPv4 address settings 㻟㻠㻡㻌㻛㻌㻣㻟㻡 ...

Страница 346: ...ettings IP Address Settings Configure IP address settings Auto Acquire Select to automatically assign an IP address via DHCP protocol When Auto Acquire On is displayed automatic addressing is enabled Manually Acquire Select to configure the IP address settings by manually entering an IP address In order to select this option Auto Acquire must be set to Off Check Settings Select when you want to vi...

Страница 347: ...Turn OFF the machine wait for at least 10 seconds and turn it back ON Checking whether the settings are correct Make sure that the Remote UI screen can be displayed with your computer Starting Remote UI If a computer is not available you can check the connection by using the operation panel Testing the Network Connection Tap Menu in the Home Screen Tap Network Settings If the logon screen appears ...

Страница 348: ...LINKS Setting IPv6 Addresses Viewing Network Settings Configuring WINS 㻟㻠㻤㻌㻛㻌㻣㻟㻡 ...

Страница 349: ... used to communicate with devices beyond a router A link local address is automatically set when the IPv6 function of the machine is enabled Manual address 1 An address that is entered manually When using this address specify the prefix length and default router address Stateless address 6 An address that is generated automatically using the MAC address of the machine and the network prefix that i...

Страница 350: ...s Addresses that start with ff or multicast address cannot be entered Prefix Length Enter a number that indicates how many bits are available for the network address Default Router Address Specify the IPv6 address of the default router as necessary Addresses that start with ff or multicast address cannot be entered Use DHCPv6 Select the check box when using a stateful address When not using DHCPv6...

Страница 351: ...Selecting settings from the operation panel IPv6 settings can also be accessed from Menu in the Home Screen IPv6 Settings LINKS Setting IPv4 Address Viewing Network Settings 㻟㻡㻝㻌㻛㻌㻣㻟㻡 ...

Страница 352: ...y setting a certain interval before the machine starts communicating Setting a Wait Time for Connecting to a Network You can print a list of the current network settings User Data List System Manager Data List Network Information IPv4 Select the setting to view Check the settings Network Information IPv6 Select the setting to view Check the settings Tap Menu in the Home Screen Tap Network Settings...

Страница 353: ... WPA2 PSK information 1 Tap Security Settings 2 Confirm and tap the current security setting If the security settings are not configured None is displayed 3 Select the setting to view WEP WPA WPA2 PSK Wireless LAN Status and Latest Error Information can be viewed from Press Network Information Network Connection Method Connect Info and select the setting to view LINKS Connecting to a Wireless LAN ...

Страница 354: ...Configuring DNS 㻟㻡㻠㻌㻛㻌㻣㻟㻡 ...

Страница 355: ...of a wired LAN or any wireless LAN other than Direct Connection While in Direct Connection sleep mode is not as effective at saving power When both Enable Direct Connection and Enable NFC are set to On sleep mode is not as effective at saving power even if not in Direct Connection Enable NFC Tap Menu in the Home Screen Tap Network Settings If the logon screen appears enter the correct ID and PIN u...

Страница 356: ...ting or faxing from a computer perform the basic setup procedures For more information see MF Driver Installation Guide Printing protocols are rules for delivering document data created on a computer to the machine and can be selected according to the printing purpose or the network environment Ports are gateways for passing document data from a computer to the printer Incorrect port settings are ...

Страница 357: ... LPD RAW and WSD Web Services on Devices To change protocols port numbers see Changing Port Numbers Start the Remote UI and log on in System Manager Mode Starting Remote UI Click Settings Registration Click Network Settings TCP IP Settings Configure printing protocols Configuring LPD or RAW 1 Click Edit in LPD Settings or RAW Settings 2 Configure the settings as necessary 1 2 3 4 㻟㻡㻣㻌㻛㻌㻣㻟㻡 ...

Страница 358: ...eck box is automatically selected when the Use WSD Printing check box is selected Use WSD Scanning Available for Windows Vista 7 8 WSD scanning enables you to scan documents to a computer without installing the scanner driver Select the check box to scan documents via WSD When not using WSD scanning clear the check box Use Computer Scanning Select the check box to use WSD scanning by operating the...

Страница 359: ...AW Settings WSD Settings Setting up WSD network devices on Windows Vista 7 8 The WSD printer and scanner can be added from the printer folder Open the printer folder Displaying the Printer Folder click Add a device or Add a printer and follow the on screen instructions For more information about how to install MF Drivers for the WSD network printer see MF Driver Installation Guide LINKS Configurin...

Страница 360: ...gure the printer port settings on the computer To perform the following procedure log on to your computer with an administrator account Open the printer folder Displaying the Printer Folder Right click your printer icon and click Printer properties or Properties Click the Ports tab and configure the required settings Adding a port If the IP address of the machine has been changed add a new port Ad...

Страница 361: ...AW ports Click Close 3 Click Auto Detect select the machine when it is detected and click Next If the machine is not detected Click Refresh If the problem persists click IP address or MAC address enter the IP address or MAC address of the machine Viewing Network Settings and then click Next 4 Click Add Finish 5 Click Close 1 Click Configure Port 2 Click the LPR or RAW radio button in Protocol Type...

Страница 362: ...LINKS Setting Up Print Server 㻟㻢㻞㻌㻛㻌㻣㻟㻡 ...

Страница 363: ...ing system and the bit architecture 32 bit or 64 bit of the print server and client computers When implementing a print server in a domain environment consult your Network Administrator To carry out Department ID Management when using a print server Canon Driver Information Assist Service must be added during the printer driver installation Refer to the MF Driver Installation Guide for details Ope...

Страница 364: ...003 Windows Server 2003 under Version Windows Vista 7 8 Server 2008 Server 2012 x86 under Processor If you do not know whether your Windows Vista 7 8 Server 2008 Server 2012 is a 32 bit or 64 bit operating system see Checking the Bit Architecture 3 Insert the provided DVD ROM into the drive on the computer click Browse to specify the folder that contains MF Drivers and then click OK If the print s...

Страница 365: ...LINKS Printing from a Computer Double click the shared printer Follow the on screen instructions to install the drivers 2 3 㻟㻢㻡㻌㻛㻌㻣㻟㻡 ...

Страница 366: ...the machine will assist you with the required setup Set the necessary configuration depending on your purpose and network environment Scanning to E mail or I Fax Configuring Scan Settings Sending E mail Sending Receiving I Faxes Scanning to Shared Folders Configuring the Machine for Scanning to Shared Folders Saving to FTP Server Configuring the Machine for Scanning to FTP Server LINKS Specificati...

Страница 367: ... required and the user name and password for authentication For more information about the e mail server settings contact your Internet service provider or Network Administrator Make sure that the computer meets the following system requirements for the Send Setting Tool sending e mail Operating system Windows Vista 7 8 Server 2003 Server 2008 Server 2012 Web browser Microsoft Internet Explorer 7 ...

Страница 368: ...y Start the Send Function Setting Tool Using a Web browser Enter http the IP address of the machine sendsupport_login html in the address field of a Web browser and press the ENTER key Using the provided DVD ROM 1 Insert the provided DVD ROM into the drive on the computer Select a language and click OK if you are prompted to do so 2 Click Start Software Programs If the above screen is not displaye...

Страница 369: ...st Click Search Again If the problem persists click Search by IP Address enter the IP address of the machine and then click OK 6 Confirm the settings and click OK Click Start If the logon screen is displayed enter the appropriate ID and PIN in the corresponding text boxes and then click Logon Click Send to E mail Settings 2 3 㻟㻢㻥㻌㻛㻌㻣㻟㻡 ...

Страница 370: ... want to send your scanned documents to SMTP Server Settings SMTP Server Enter the SMTP server name SMTP Authentication Click the Not Set or Set radio button to match the authentication settings of the SMTP server When Set is selected enter the user name in the User Name text box and password in the Password text box Authentication methods for sending e mails To prevent e mail transmissions by una...

Страница 371: ...information contact your Internet service provider or Network Administrator To enable SSL for e mailing see Configuring E mail I Fax Communication Settings To change port numbers see Changing Port Numbers LINKS Configuring Scan Settings Sending E mail Sending Receiving I Faxes Sending Documents as E mails Directly from the Machine Registering in the Address Book 7 㻟㻣㻝㻌㻛㻌㻣㻟㻡 ...

Страница 372: ...receive I Faxes and the settings for POP authentication and encryption before you send e mail or I Faxes Contact your provider or network administrator for the required settings Start the Remote UI and log on in System Manager Mode Starting Remote UI Click Settings Registration Click Network Settings E Mail I Fax Settings Click Edit Specify the required settings 1 2 3 4 5 㻟㻣㻞㻌㻛㻌㻣㻟㻡 ...

Страница 373: ...s check box and enter up to 32 alphanumeric characters in Password Specify the settings required for I Fax reception Setting up authentication before sending and encrypted communication with the server Configuring authentication for sending prevents unauthorized users from sending e mail and I Faxes Communication with the server can be encrypted POP RX Select the check box to receive I Faxes POP I...

Страница 374: ...Authentication Select the check box to use APOP to encrypt the password during the authentication process Use SMTP Authentication SMTP AUTH To enable authentication on the SMTP server select the check box and enter up to 64 characters in the User Name text box Set Change Password To specify or change the password enter up to 32 characters in the Password text box Use SSL for SMTP Select the check ...

Страница 375: ...d folder If access restrictions are set to the folder the user name and password information is also needed For instructions on how to create a new shared folder see Send Setting Guide included with the provided DVD ROM Make sure that the computer meets the following system requirements for the Send Function Setting Tool Operating system Windows Vista 7 8 Server 2003 Server 2008 Server 2012 Web br...

Страница 376: ... the shared folder by registering the folder to the Address Book The Send Function Setting Tool is helpful for users who want to complete the setup easily Start the Send Function Setting Tool Using a Web browser Enter http the IP address of the machine sendsupport_login html in the address field of a Web browser and press the ENTER key Using the provided DVD ROM 1 Insert the provided DVD ROM into ...

Страница 377: ...lick Search Again If the problem persists click Search by IP Address enter the IP address of the machine and then click OK 6 Confirm the settings and click OK Click Start If the logon screen is displayed enter the appropriate ID and PIN in the corresponding text boxes and then click Logon Click Store to Shared Folder Settings 2 3 㻟㻣㻣㻌㻛㻌㻣㻟㻡 ...

Страница 378: ...estination to be registered Set a name that will be easy for you to find later in the Address Book Store Destination Settings Protocol The protocol that is used for sending scanned documents to a shared folder is displayed Computer Name of Store Destination Enter the name or the IP address of the computer where the shared folder is located Shared Folder Name on Store Destination Computer Enter the...

Страница 379: ...stered User Name text box and password in the Password to Access text box Click Next Confirm the settings and click Register Restart the machine Turn OFF the machine wait for at least 10 seconds and turn it back ON LINKS Configuring the Machine for Scanning to Shared Folders Saving Documents Directly to a Shared Folder FTP Server Registering Address Book from Remote UI 5 6 7 㻟㻣㻥㻌㻛㻌㻣㻟㻡 ...

Страница 380: ...e machine Viewing Network Settings FTP server name Path to the FTP server and folder name User name password only if set If the path folder name user name password etc for the FTP server are unknown contact you Network Administrator Check whether you need to use PASV mode If a firewall is installed between the machine and the FTP server you must set PASV mode Configuring FTP PASV mode Also make su...

Страница 381: ...on the FTP server Whether PASV mode is used for FTP depends on your network environment and the settings on the FTP server to which data is being sent For more information contact your Network Administrator Start the Remote UI and log on in System Manager Mode Starting Remote UI Click Settings Registration Click Network Settings TCP IP Settings Click Edit in FTP PASV Mode Settings 1 2 3 4 㻟㻤㻝㻌㻛㻌㻣㻟...

Страница 382: ...k box and click OK Use FTP PASV Mode Select the check box to use PASV mode If you are not using PASV mode leave the check box clear Restart the machine Turn OFF the machine wait for at least 10 seconds and turn it back ON 5 6 㻟㻤㻞㻌㻛㻌㻣㻟㻡 ...

Страница 383: ... varies depending on the purpose of the network The machine has been designed to be compatible with as many network configurations as possible and it is equipped with a variety of technologies Consult your Network Administrator and set a configuration to suit your network environment 㻟㻤㻟㻌㻛㻌㻣㻟㻡 ...

Страница 384: ...whether to configure Ethernet settings automatically or manually Configuring Ethernet settings automatically Tap On The machine detects and automatically sets the communication mode and the Ethernet type that can be used Configuring Ethernet settings manually 1 Tap Off 2 Select the communication mode Tap Communication Mode tap Half Duplex or Full Duplex Half Duplex Alternately sends and receives c...

Страница 385: ...LINKS Changing the Maximum Transmission Unit Setting a Wait Time for Connecting to a Network 㻟㻤㻡㻌㻛㻌㻣㻟㻡 ...

Страница 386: ...ttings of the machine as necessary For more information contact your Network Administrator Tap Menu in the Home Screen Tap Network Settings If the logon screen appears enter the correct ID and PIN using the numeric keys and then press Logging on to the Machine Select TCP IP Settings MTU Size Select the MTU Restart the machine Turn OFF the machine wait for at least 10 seconds and turn it back ON LI...

Страница 387: ...ely after you change the way that network devices are connected or if you add a new device If this type of problem occurs set a wait time for connecting to the network Tap Menu in the Home Screen Tap Network Settings If the logon screen appears enter the correct ID and PIN using the numeric keys and then press Logging on to the Machine Tap Waiting Time for Connection at Startup Enter the wait time...

Страница 388: ...DHCP option settings as necessary Note that the procedures for configuring DNS are different for IPv4 and IPv6 Start the Remote UI and log on in System Manager Mode Starting Remote UI Click Settings Registration Click Network Settings TCP IP Settings Configure DNS settings Configuring IPv4 DNS 1 Click Edit in IPv4 Settings 2 Configure IPv4 DNS settings 1 2 3 4 㻟㻤㻤㻌㻛㻌㻣㻟㻡 ...

Страница 389: ...s without using DNS Select the check box to enable mDNS and enter the mDNS name in the mDNS Name text box DHCP Option Settings Acquire Host Name Select the check box to enable Option 12 to obtain the host name from the DHCP server DNS Dynamic Update Select the check box to enable Option 81 to dynamically update the DNS records through the DHCP server Acquire DNS Server Address Select the check box...

Страница 390: ...ynamic Update Select the check box to dynamically update the DNS records whenever the machine s IP address is changed To specify the type s of addresses you want to register to the DNS server select the check box for Register Manual Address Register Stateful Address or Register Stateless Address To specify the interval between updates enter the time in hours in the DNS Dynamic Update Interval text...

Страница 391: ...ast 10 seconds and turn it back ON Selecting settings from the operation panel DNS settings can also be accessed from Menu in the Home Screen IPv4 Settings IPv6 Settings LINKS Setting IPv4 Address Setting IPv6 Addresses Viewing Network Settings 5 㻟㻥㻝㻌㻛㻌㻣㻟㻡 ...

Страница 392: ...are used for identifying network connected computers as well as for file sharing and other network services Most computers use the computer name as the NetBIOS name Workgroup Name Workgroup name is a name for grouping multiple computers so that basic network functions such as file sharing become available in a Windows network Specify the workgroup name to identify the group that the machine belong...

Страница 393: ...rkgroup Name Enter up to 15 alphanumeric characters for the name of the workgroup that the machine belongs to NetBIOS names or workgroup names that start with an asterisk cannot be registered to a WINS server Restart the machine Turn OFF the machine wait for at least 10 seconds and turn it back ON LINKS Configuring WINS 5 6 㻟㻥㻟㻌㻛㻌㻣㻟㻡 ...

Страница 394: ...ied In order to specify WINS server settings NetBIOS name and workgroup name are required to be set Configuring SMB The function is not available in an IPv6 network Start the Remote UI and log on in System Manager Mode Starting Remote UI Click Settings Registration Click Network Settings TCP IP Settings Click Edit in WINS Settings Select the WINS Resolution check box specify the required settings ...

Страница 395: ... the WINS server is obtained from a DHCP server the obtained IP address overrides the IP address entered in the WINS Server Address text box Restart the machine Turn OFF the machine wait for at least 10 seconds and turn it back ON Selecting settings from the operation panel WINS settings can also be accessed from Menu in the Home Screen WINS Settings LINKS Setting IPv4 Address 6 㻟㻥㻡㻌㻛㻌㻣㻟㻡 ...

Страница 396: ...Server 2003 Server 2008 Server 2012 Active Directory The machine communicates with LDAP servers using LDAPv3 UTF 8 is the supported character encoding used when the text data is transmitted between the machine and an LDAP server Start the Remote UI and log on in System Manager Mode Starting Remote UI Click Settings Registration Click Network Settings LDAP Server Settings Click Register New Server ...

Страница 397: ...r is available in the network If the IP address is entered for Server Address check whether the DNS server supports only forward lookup If the server supports only forward lookup select Do Not Use or Use for Login Information If you select Use Security Authentication make sure that the DNS server supports reverse lookup Position to Start Search Specify the node in the directory information tree DI...

Страница 398: ...on as When Send Operation Started Set whether the authentication information when the fax or scan function was used is also used when searching This check box is normally displayed selected however it is only valid when the Display Authentication Screen When Searching check box is selected User Name Enter the user name of the machine that was registered to the LDAP server Depending on the type of ...

Страница 399: ...ame entered during authentication of up to 64 alphanumeric characters Example sAMAccountName Not required if Use Security Authentication is selected in login information E Mail Address Attribute Enter the attribute name to be used for obtaining an e mail address from the authentication server of up to 64 alphanumeric characters Example mail Login Information Select Use or Use Security Authenticati...

Страница 400: ...authentication that was enabled The time is adjusted based on Coordinated Universal Time UTC so specify the time zone setting before configuring SNTP Date Time Settings SNTP settings can be specified via the Remote UI The SNTP of the machine supports both NTP version 3 and SNTP versions 3 and 4 servers Start the Remote UI and log on in System Manager Mode Starting Remote UI Click Settings Registra...

Страница 401: ...nterval between one synchronization and the next Specify an interval from 1 to 48 hours Click OK Restart the machine Turn OFF the machine wait for at least 10 seconds and turn it back ON Testing communication with the NTP SNTP server You can view communication status with the registered server by clicking Settings Registration Network Settings TCP IP Settings and then clicking Check NTP Server in ...

Страница 402: ...k in plain text your network will be vulnerable to attacks If you want to ensure network security disable SNMPv1 and use SNMPv3 SNMPv3 With SNMPv3 you can implement network device management that is protected by robust security features Note that SSL must be enabled for the Remote UI before configuring SNMPv3 Enabling SSL Encrypted Communication for the Remote UI The machine does not support the t...

Страница 403: ...Select the check box to specify a community name If you do not need to specify a community name clear the check box Community Name Enter up to 32 alphanumeric characters for the name of the community MIB Access Permission For each community select Read Write or Read Only for the access privileges to MIB objects Read Write Permits both viewing and changing the values of MIB objects Read Only Permit...

Страница 404: ...ttings Authentication Algorithm Click the Authentication On Encryption On or Authentication On Encryption Off for Security Settings for the algorithm that corresponds to your environment Encryption Algorithm Click the Authentication On Encryption On for Security Settings for the algorithm that corresponds to your environment Set Change Password To set or change the password select the check box an...

Страница 405: ...NMP settings from Menu SNMP Settings Enabling Both SNMPv1 and SNMPv3 If both versions of SNMP are enabled it is recommended that MIB access permission in SNMPv1 be set to Read Only MIB access permission can be set independently in SNMPv1 and SNMPv3 and for each user in SNMPv3 Selecting Read Write full access permission in SNMPv1 negates the robust security features that characterize SNMPv3 because...

Страница 406: ... settings and settings for communication between the machine and plug ins for iW Management Console These settings can be specified via Remote UI For more information about iW Management Console contact your local authorized Canon dealer Configuring SLP Communication with Device Management Software Configuring Settings for iW Management Console Plug ins To use iW Management Console plug ins You ne...

Страница 407: ...box and specify the required settings Respond to Discovery Select the check box to set the machine to respond to device management software multicast discovery packets and enable monitoring by device management software Scope Name To include the machine into a specific scope enter up to 32 characters for the scope name 3 Click OK To change the port number for multicast discovery see Changing Port ...

Страница 408: ...t the Notify check box and specify the required settings Notify Select the check box to notify a device management software of the power status of the machine When Notify is selected you can expect the machine to avoid unnecessary communication during sleep mode and reduce the total power consumption Port Number Change the port number for this function according to the network environment Number o...

Страница 409: ...Click Network Settings Settings for Device Settings Management Click Edit Select Use Device Settings Management OK LINKS Entering Sleep Mode 3 4 5 㻠㻜㻥㻌㻛㻌㻣㻟㻡 ...

Страница 410: ... of security functions Set the necessary configuration depending on your network environment You can configure the best security system by building an environment that inhibits access to printers on your in house network via the Internet and using such environment together with the machine s security features Preventing Unauthorized Access Establishing the Basics of Information Security Protecting...

Страница 411: ...from Unauthorized Access Prevent unauthorized third parties from accessing and using the machine You can implement multiple security measures such as managing user access privileges using firewalls and changing port numbers 㻠㻝㻝㻌㻛㻌㻣㻟㻡 ...

Страница 412: ...al network increases On the other hand if a private IP address is assigned your printer multifunction machine is closed to a local area network and can be accessed by only users on your local area network such as a LAN in the company Global IP Address Can be accessed from the users within a local area network Private IP Address Can be accessed from the users within a local area network Basically a...

Страница 413: ...information by setting PIN Setting PIN to Each Function Setting PIN for Using Remote UI For more information see Setting a Remote UI PIN Setting PIN for the System Manager Settings For more information see Setting the System Manager ID Address Book PIN For more information on setting a PIN see Setting a PIN for Address Book Listed above are some examples of security measures for preventing unautho...

Страница 414: ...em Manager ID is an account with full access privileges If you specify a System Manager ID you need to log on to the machine using the System Manager ID information in order to access Network Settings or System Management Settings Set the System Manager ID when you need different access privilege levels for Administrators and general users Only one System Manager ID can be registered Setting the S...

Страница 415: ...anagement Settings If the System Manager ID has already been set If the logon screen appears enter the correct ID and PIN using the numeric keys and then press Logging on to the Machine Select System Manager Information Settings System Manager ID and PIN Specify the System Manager ID and PIN Specify the System Manager ID and then specify the System Manager PIN Enter a number of up to seven digits ...

Страница 416: ... panel The registered information can be viewed on the Device Information page of the Remote UI Checking System Manager Information If PIN is forgotten Do not forget your PIN If you forget your PIN contact your authorized Canon dealer or the Canon help line Logging on to the machine If you try to access Network Settings or System Management Settings when only the System Manager ID is enabled the f...

Страница 417: ...ngs are required if you want to enable Department ID Management for operations from a computer such as printing and PC faxing Registering Editing Department ID and PIN Enabling the Department ID Management Setting the Department ID Management for Printing or Faxing from the Computer Blocking Jobs When Department ID Is Unknown Register a Department ID and set a PIN for it You can also disable funct...

Страница 418: ...ick the corresponding text link under Department ID to edit 2 Change the settings as necessary and click OK Deleting a Department ID Click Delete on the right of the Department ID you want to delete click OK Department ID Page Total You can check the total numbers of pages copied printed scanned or faxed for each Department ID If you want to return the counts to zero click the corresponding text l...

Страница 419: ...t ID Management clear the check box For information on the Allow Print Jobs with Unknown IDs Allow Scan Jobs with Unknown IDs Allow Black White Copy Jobs check boxes see Blocking Jobs When Department ID Is Unknown Using the operation panel You can also switch Department ID Management On Off from Menu in the Home Screen Department ID Management On Off Logging on to the machine When you try to opera...

Страница 420: ...n the printer folder Displaying the Printer Folder Right click your printer or fax icon and click Printer properties or Properties Click the Device Settings tab and specify the required settings 1 Select the Use Department ID Management check box and click Settings on the right of it For the fax driver also select the Allow PIN Setting check box to enable the PIN setting 2 Specify the settings as ...

Страница 421: ...puter are connected via a USB or WSD port 3 Click OK Logging on to the machine When you try to print or fax from a computer when Department ID Management is enabled the following pop up screen is displayed unless the Confirm Department ID PIN When Printing Confirm Department ID PIN when Sending Fax check box is cleared If you do not change the default settings any user can print from a computer sc...

Страница 422: ...n Jobs with Unknown IDs If the check box is selected you can select Computer or Remote Scanner on the main screen and scan documents into a computer anytime If the check box is cleared you cannot scan documents into a computer if Department ID Management is enabled It is not possible to restrict scanning of documents into a computer for individual department IDs Allow Black White Copy Jobs If the ...

Страница 423: ... Management is enabled setting here is not required Setting the Department ID Management Start the Remote UI and log on in System Manager Mode Starting Remote UI Click Settings Registration Click Security Settings Remote UI Settings Click Edit Select the Use Remote UI Access PIN check box and set the PIN 1 2 3 4 5 㻠㻞㻟㻌㻛㻌㻣㻟㻡 ...

Страница 424: ...n digits both in the PIN and Confirm text boxes Click OK If PIN is forgotten Set a new Remote UI Access PIN in the settings menu on the operation panel Remote UI Settings If Remote UI settings are initialized The Remote UI Access PIN is also initialized After an initialization reset the PIN Initializing Menu LINKS Setting Access Privileges Setting the System Manager ID 6 㻠㻞㻠㻌㻛㻌㻣㻟㻡 ...

Страница 425: ...ion can only continue if it is correctly authorized by the LDAP server Use the settings described here to configure LDAP server authentication For more information on registering the server to be used for authentication see Registering LDAP Servers Start the Remote UI and log on in System Manager Mode Starting Remote UI Click Settings Registration Click Security Settings Authentication Settings fo...

Страница 426: ... Allow Permits outgoing e mail and I Faxes Only Allow Sending to Myself Blocks all outgoing e mail and I Faxes other than those to users with authorized e mail addresses The e mail addresses of authorized users must be registered on the LDAP server Authentication Method When Allow or Only Allow Sending to Myself is selected in E Mail Sending this allows you to specify whether an authentication scr...

Страница 427: ...low Sending to Myself or Specified Folder Blocks saving to all shared folders or FTP servers other than specified folders The data is saved to folders registered on the LDAP server or to the folder specified in Specify Destination Folder When Allow is specified in File Sending Authentication Method Allows you to specify whether an authentication screen is shown on the server when sending Display t...

Страница 428: ... Authentication Screen check box displays the authentication screen with this user name and password already entered when you send the data Display the authentication screen without any authentication information Displays the authentication screen with the user name and password fields blank Specify Destination Folder Selecting this check box allows you to specify the folder where the data is save...

Страница 429: ...orized third parties can access computers and other communication devices that are connected to a network To prevent this unauthorized access specify the settings for packet filter a feature that restricts communication to devices with specified IP addresses or MAC addresses 㻠㻞㻥㻌㻛㻌㻣㻟㻡 ...

Страница 430: ...or a range of IP addresses Up to 16 IP addresses or ranges of IP addresses can be specified for both IPv4 and IPv6 The packet filters described in this section control communications over TCP UDP and ICMP Start the Remote UI and log on in System Manager Mode Starting Remote UI Click Settings Registration Click Security Settings IP Address Filter Click Edit for the filter type that you want to use ...

Страница 431: ...ss communication packets only when they are sent to or received from devices whose IP addresses are entered in Exception Addresses Communications with other devices are prohibited Allow Select to block communication packets when they are sent to or received from devices whose IP addresses are entered in Exception Addresses Communications with other devices are permitted 2 Specify address exception...

Страница 432: ...ons Select an IP address and click Delete 3 Click OK Restart the machine Turn OFF the machine wait for at least 10 seconds and turn it back ON Using the operation panel You can also enable or disable IP address filtering from Menu in the Home Screen IPv4 Address Filter IPv6 Address Filter LINKS Specifying MAC Addresses for Firewall Rules 6 㻠㻟㻞㻌㻛㻌㻣㻟㻡 ...

Страница 433: ...navailable when the machine is connected to a wireless LAN Start the Remote UI and log on in System Manager Mode Starting Remote UI Click Settings Registration Click Security Settings MAC Address Filter Click Edit for a filter type Outbound Filter Select to restrict sending data from the machine to a computer by specifying MAC addresses Inbound Filter Select to restrict receiving data from the mac...

Страница 434: ...er devices are prohibited Allow Select to block communication packets when they are sent to or received from devices whose MAC addresses are entered in Exception Addresses Communications with other devices are permitted 2 Specify address exceptions Enter the MAC address in the Address to Register text box and click Add You do not need to delimit the address with hyphens or colons Check for entry e...

Страница 435: ...Using the operation panel You can also enable or disable MAC address filtering from Menu in the Home Screen MAC Address Filter LINKS Specifying IP Addresses for Firewall Rules 㻠㻟㻡㻌㻛㻌㻣㻟㻡 ...

Страница 436: ...port number for LDAP server see Registering LDAP Servers Tap Menu in the Home Screen Tap Network Settings If the logon screen appears enter the correct ID and PIN using the numeric keys and then press Logging on to the Machine Select TCP IP Settings Port Number Settings Select a port Learning more about the ports LPD RAW WSD Multicast Discovery Configuring Printing Protocols and WSD Functions HTTP...

Страница 437: ...house and outside networks but also blocks unauthorized access and consolidates anti virus protection for enhanced security When you use Google Cloud Print to print over the Internet you can enhance security by setting a proxy When setting a proxy make sure that you have the necessary proxy information including the IP address port number and a user name and password for authentication Start the R...

Страница 438: ...e Domain Select this check box to also use the specified proxy server for communication with devices in the same domain Use Proxy Authentication To enable authentication by the proxy server select the check box and enter up to 24 alphanumeric characters for the user name in the User Name text box Set Change Password To set or change the password for the proxy authentication when it is enabled sele...

Страница 439: ...ine can be set to limit its capabilities by partially or completely disabling these functions Restricting Access to Address Book and Sending Functions Restricting Access to Address Book and Sending Functions Restricting USB Functions Restricting USB Functions Disabling HTTP Communication and Remote Management Disabling HTTP Communication Disabling Remote UI 㻠㻟㻥㻌㻛㻌㻣㻟㻡 ...

Страница 440: ... fax and e mail destinations to those registered in the Address Book or LDAP servers or by setting a PIN for the Address Book so that unauthorized users cannot add or edit Address Book entries You can also avoid sending documents to unintended recipients if the machine is set to ask you to enter the fax number twice for confirmation 㻠㻠㻜㻌㻛㻌㻣㻟㻡 ...

Страница 441: ...e PIN for editing the Address Book Enter a number of up to seven digits using numeric keys and tap Apply When PIN Confirm is displayed enter the PIN once again to confirm You cannot set a PIN that consists only of zeros such as 00 or 0000000 To cancel the PIN setting clear the information entered in and tap Apply with the fields blank In addition to setting the Address Book PIN you can further enh...

Страница 442: ...gement Settings If the logon screen appears enter the correct ID and PIN using the numeric keys and then press Logging on to the Machine Select Restrict TX Function Restrict New Destinations Tap On Off Cancels the restriction on new destinations Fax numbers and e mail addresses can be specified by using any method On Restricts input so that the only addresses that can be specified are those regist...

Страница 443: ...ogon screen appears enter the correct ID and PIN using the numeric keys and then press Logging on to the Machine Tap Off Off Disables PC faxing On Enables PC faxing LINKS Sending Faxes from Your Computer PC Fax MF729Cx MF728Cdw MF628Cw Setting the Department ID Management for Printing or Faxing from the Computer Setting a PIN for Address Book Limiting Available Destinations 1 2 3 4 㻠㻠㻟㻌㻛㻌㻣㻟㻡 ...

Страница 444: ...Home Screen Tap System Management Settings If the logon screen appears enter the correct ID and PIN using the numeric keys and then press Logging on to the Machine Select Restrict TX Function Restrict Resending from Log Tap On Off Enables use of previously used destinations On Disables use of previously used destinations LINKS Limiting Available Destinations Prohibiting Sequential Broadcasting MF7...

Страница 445: ...ap On Off Does not display the screen for confirming the fax number On Displays the screen for confirming the fax number When using coded dial numbers to specify destinations you need to remember whose destination or what group is registered in what coded dial number If you do not remember all these numbers perfectly you may send your documents to unintended destinations You can avoid sending data...

Страница 446: ...s of the entered coded dial number On Displays the details of the entered coded dial number LINKS Registering Destinations Specifying from Address Book Fax Specifying from Address Book Registering Address Book from Remote UI 㻠㻠㻢㻌㻛㻌㻣㻟㻡 ...

Страница 447: ... ID and PIN using the numeric keys and then press Logging on to the Machine Select Confirm Sequential Broadcast or Reject Sequential Broadcast Off Enables sequential broadcasting Confirm Sequential Broadcast Displays the confirmation screen when sending a fax via sequential broadcasting Reject Sequential Broadcast Disables sequential broadcasting LINKS Limiting Available Destinations Disabling Use...

Страница 448: ...hing USB memory devices Tap Menu in the Home Screen Tap System Management Settings If the logon screen appears enter the correct ID and PIN using the numeric keys and then press Logging on to the Machine Tap Use as USB Device Tap Off Off Disables the computer connection USB port located on the back side of the machine On Enables the computer connection USB port located on the back side of the mach...

Страница 449: ...System Management Settings If the logon screen appears enter the correct ID and PIN using the numeric keys and then press Logging on to the Machine Tap Memory Media Print On Off Tap Off Off Disables the function to read the data from a USB memory device The data in the USB memory device cannot be printed On Enables the function to print the data stored in a USB memory device Restart the machine Tu...

Страница 450: ...les some of the network capabilities such as the Remote UI WSD printing and printing with Google Cloud Print Tap Menu in the Home Screen Tap Network Settings If the logon screen appears enter the correct ID and PIN using the numeric keys and then press Logging on to the Machine Select TCP IP Settings Use HTTP Tap Off Off Disables HTTP communication On Enables HTTP communication LINKS Using Remote ...

Страница 451: ...e UI to reduce the risk of having your machine controlled remotely over the network by malicious third parties Tap Menu in the Home Screen Tap System Management Settings If the logon screen appears enter the correct ID and PIN using the numeric keys and then press Logging on to the Machine Tap Remote UI Settings Use Remote UI Tap Off Off Disables the Remote UI On Enables the Remote UI Restart the ...

Страница 452: ...as a Web browser or an e mail application IPSec encrypts the whole or payloads of IP packets This enables IPSec to offer a more versatile security system than SSL Configuring IPSec Settings IEEE 802 1X Authentication IEEE 802 1X is a standard and mechanism for blocking unauthorized access to the network by collectively managing user authentication information If a device tries to connect to the 80...

Страница 453: ...hared Key Method IEEE 802 1X authentication TTLS PEAP or SNMPv3 To use SSL for the Remote UI you need to set a key pair and enable the SSL function Generate or install the key pair for SSL before enabling SSL Configuring Settings for Key Pairs and Digital Certificates Start the Remote UI and log on in System Manager Mode Starting Remote UI Click Settings Registration Click Network Settings TCP IP ...

Страница 454: ...tificate by clicking the corresponding text link under Key Name or the certificate icon Verifying Key Pairs and Digital Certificates Enable SSL for the Remote UI 1 Click Security Settings Remote UI Settings 2 Click Edit 3 Select the Use SSL check box and click OK Restart the machine 6 7 㻠㻡㻠㻌㻛㻌㻣㻟㻡 ...

Страница 455: ...eld and then proceed to display the Remote UI screen Starting Remote UI Enabling SSL for e mailing I Faxing If the SMTP server and the POP3 server support SSL you can enable SSL for communication with these servers Configuring E mail I Fax Communication Settings For more information about the SMTP server and the POP3 server contact your Internet service provider or Network Administrator LINKS Gene...

Страница 456: ... both IPSec and DHCPv6 at the same time IPSec is unavailable in networks in which NAT or IP masquerade is implemented Using IPSec with IP address filter IP address filter settings are applied before the IPSec policies Specifying IP Addresses for Firewall Rules IPSec that is supported by the machine conforms to RFC2401 RFC2402 RFC2406 and RFC4305 Operating system Windows Vista 7 8 Server 2003 Serve...

Страница 457: ...f up to 24 alphanumeric characters can be shared with the other devices Enable SSL for the Remote UI before specifying this authentication method Enabling SSL Encrypted Communication for the Remote UI Digital Signature Method The machine and the other devices authenticate each other by mutually verifying their digital signatures Generate or install the key pair beforehand Configuring Settings for ...

Страница 458: ...t you define in the steps below clear the Receive Non Policy Packets check box Click Register New Policy Specify the Policy Settings 1 In the Policy Name text box enter up to 24 alphanumeric characters for a name that is used for identifying the policy 2 Select the Enable Policy check box Specify the Selector Settings 5 6 7 8 㻠㻡㻤㻌㻛㻌㻣㻟㻡 ...

Страница 459: ...ss or the range in the Addresses to Set Manually text box IPv6 Manual Settings Select to specify a single IPv6 address or a range of IPv6 addresses to apply IPSec Enter the IPv6 address or the range in the Addresses to Set Manually text box Addresses to Set Manually If IPv4 Manual Settings or IPv6 Manual Settings is selected for Remote Address enter the IP address to apply the policy You can also ...

Страница 460: ...ou need to generate or install a key pair before selecting Digital Signature Method Configuring Settings for Key Pairs and Digital Certificates Valid for Specify how long a session lasts for IKE SA ISAKMP SA Enter the time in minutes Authentication Encryption DH Group Select an algorithm from the drop down list Each algorithm is used in the key exchange Authentication Select the hash algorithm Enc...

Страница 461: ...d Specify by Time Enter a time in minutes to specify how long a session lasts Specify by Size Enter a size in megabytes to specify how much data can be transported in a session Select Algorithm Select the ESP ESP AES GCM or AH SHA1 check box es depending on the IPSec header and the algorithm used AES GCM is an algorithm for both authentication and encryption If ESP is selected also select algorith...

Страница 462: ...link under Policy Name for the edit screen Deleting a policy Click Delete on the right of the policy name you want to delete click OK Restart the machine Turn OFF the machine wait for at least 10 seconds and turn it back ON Using the operation panel You can also enable or disable IPSec communication from Menu in the Home Screen Use IPSec LINKS Configuring Settings for Key Pairs and Digital Certifi...

Страница 463: ...enticate each other by mutually verifying their certificates A key pair issued by a certification authority CA is required for the client authentication when authenticating the machine For the server authentication a CA certificate installed via the Remote UI can be used in addition to a CA certificate preinstalled in the machine The TLS method cannot be used with TTLS or PEAP at the same time TTL...

Страница 464: ... the check box to enable IEEE 802 1X authentication Login Name Enter up to 24 alphanumeric characters for a name EAP identity that is used for identifying the user Setting TLS 1 Select the Use TLS check box and click Key and Certificate 2 Click Register Default Key on the right of the key pair you want to use for the client authentication 4 5 㻠㻢㻠㻌㻛㻌㻣㻟㻡 ...

Страница 465: ...ificates Setting TTLS PEAP 1 Select the Use TTLS or Use PEAP check box Internal protocol for TTLS You can select MSCHAPv2 or PAP If you want to use PAP click the PAP radio button 2 Click Change User Name Password To specify a user name other than the login name clear the Use Login Name as User Name check box Select the check box if you want to use the login name as the user name 3 Set the user nam...

Страница 466: ... for the new password both in the Password and Confirm text boxes Click OK Restart the machine Turn OFF the machine wait for at least 10 seconds and turn it back ON Using the operation panel You can also enable or disable IEEE 802 1X authentication from Menu in the Home Screen IEEE 802 1X Settings LINKS Configuring Settings for Key Pairs and Digital Certificates 6 7 㻠㻢㻢㻌㻛㻌㻣㻟㻡 ...

Страница 467: ... are used for verifying the device the machine is communicating with for features such as printing with Google Cloud Print or IEEE 802 1X authentication Up to 67 CA certificates can be registered including the 62 certificates that are preinstalled in the machine Using CA issued Key Pairs and Digital Certificates Device Signature Key and Certificate MF729Cx A device signature key and certificate ar...

Страница 468: ...d with key pairs generated in Network Communication With a Key and Certificate Signing Request CSR you can apply for a CA issued digital certificate for the key pair generated by the machine Generate Network Communication Key Generate Key and Certificate Signing Request CSR Start the Remote UI and log on in System Manager Mode Starting Remote UI Click Settings Registration Click Security Settings ...

Страница 469: ...is tighter 512 bit cannot be selected for the key length if SHA384 or SHA512 is selected for Signature Algorithm Certificate Settings Validity Start Date YYYY MM DD Enter the date from which the certificate is valid between 01 01 2000 and 31 12 2037 Validity End Date YYYY MM DD Enter the date to which the certificate is valid between 01 01 2000 and 31 12 2037 A date earlier than Validity Start Dat...

Страница 470: ...ngs Key and Certificate Settings Click Generate Key Deleting a registered key pair Click Delete on the right of the key pair you want to delete click OK A key pair cannot be deleted if it is currently used for some purpose such as when SSL or IEEE 802 1X is displayed under Key Usage In this case disable the function or replace the key pair before deleting it Select Key and Certificate Signing Requ...

Страница 471: ... Settings Country Region Click the Select Country Region radio button and select the country region from the drop down list You can also click the Enter Internet Country Code radio button and enter a country code such as US for the United States State City Enter up to 24 alphanumeric characters for the location as necessary Organization Organization Unit Enter up to 24 alphanumeric characters for ...

Страница 472: ...he Certificate Signing Request CSR until the certificate is registered Once the certification authority has issued the digital certificate register it using the procedure below Start the Remote UI and log on in Administrator mode Starting Remote UI Click Settings Registration Click Security Settings Key and Certificate Settings Click Key Name or Certificate for the certificate to be registered Cli...

Страница 473: ...ertificate signing request and click Register LINKS Using CA issued Key Pairs and Digital Certificates Verifying Key Pairs and Digital Certificates Enabling SSL Encrypted Communication for the Remote UI Configuring IPSec Settings 6 㻠㻣㻟㻌㻛㻌㻣㻟㻡 ...

Страница 474: ... four preinstalled certificates can be registered Start the Remote UI and log on in System Manager Mode Starting Remote UI Click Settings Registration Click Security Settings Key and Certificate Settings or CA Certificate Settings for CA certificates Click Key and Certificate Settings to install a key pair or CA Certificate Settings to install a CA certificate Click Register Key and Certificate or...

Страница 475: ...stall Deleting a key pair or CA certificate Click Delete on the right of the file you want to delete and then click OK Click Browse specify the file to install and click Start Installation The key pair or CA certificate is installed in the machine Register the key pair or CA certificate Registering a key pair 1 Click Register on the right of the key pair you want to register 2 Enter the name of th...

Страница 476: ...A certificate you want to register LINKS Generating Key Pairs Verifying Key Pairs and Digital Certificates Enabling SSL Encrypted Communication for the Remote UI Configuring IPSec Settings Configuring IEEE 802 1X Authentication 㻠㻣㻢㻌㻛㻌㻣㻟㻡 ...

Страница 477: ...into a PDF file A device signature key is generated only once and cannot be deleted An optional Send PDF Security Feature Set is required The device signature key and certificate are valid for five years Renew them when required Start the Remote UI and log on in System Manager Mode Starting Remote UI Click Settings Registration Click Security Settings Key and Certificate Settings Click Generate Ke...

Страница 478: ...Select the Device Signature check box and click OK The device signature key is generated Renewing the Device Signature Key 1 Click Update at the right of Device Signature Key 2 Click OK 5 㻠㻣㻤㻌㻛㻌㻣㻟㻡 ...

Страница 479: ...ure Start the Remote UI and log on in System Manager Mode Starting Remote UI Click Settings Registration Click Security Settings Key and Certificate Settings for key pairs or CA Certificate Settings for CA certificates Click the icon for the key pair or certificate that you want to verify Certificate details can be viewed on this screen Click Verify Certificate 1 2 3 4 5 㻠㻣㻥㻌㻛㻌㻣㻟㻡 ...

Страница 480: ...The result from verifying the certificate is displayed as shown below LINKS Generating Key Pairs Using CA issued Key Pairs and Digital Certificates 㻠㻤㻜㻌㻛㻌㻣㻟㻡 ...

Страница 481: ...emote UI Managing Documents and Checking the Machine Status Setting Up Menu Options from Remote UI Saving Loading Registered Data Registering Address Book from Remote UI Basics of the Remote UI Starting Remote UI Remote UI Screens System Requirements The following environment is required to use the Remote UI In addition set the Web browser to enable Cookies Windows Windows Vista 7 8 Microsoft Inte...

Страница 482: ...n to the Remote UI When the Department ID Management is disabled Select System Manager Mode or General User Mode System Manager Mode You can perform all the Remote UI operations and settings Enter the appropriate ID in System Manager ID and PIN in System Manager PIN Setting the System Manager ID If System Manager ID is not set you do not need to input anything General User Mode You can check the s...

Страница 483: ...Portal Page main page will be displayed Remote UI Screens 4 㻠㻤㻟㻌㻛㻌㻣㻟㻡 ...

Страница 484: ...n Displays paper information and the amount remaining in the toner cartridges Support Link Displays the support link specified in Device Information under System Management Status Monitor Cancel Displays the status of the current print documents and history of print copy send and received documents You can also check the status of the machine Settings Registration Displays Settings Registration pa...

Страница 485: ... scrolled down To Portal Returns to Portal Page main page Menu Click an item the content is displayed in the right page Setting Up Menu Options from Remote UI Breadcrumb Trail Indicates the series of pages you opened to display the currently displayed page You can check what page is currently displayed Top Icon Moves the scroll box up to the top of the page when the page is scrolled down System Ma...

Страница 486: ...u opened to display the currently displayed page You can check what page is currently displayed List Number Specifies the range of coded dial numbers displayed on the page You cannot display List Number in Favorites Top Icon Moves the scroll box up to the top of the page when the page is scrolled down Registering Editing the Address Book You can register or edit the Address Book when you have logg...

Страница 487: ... Status You can delete a document job by clicking Cancel Regardless of the Department ID Management setting all the print documents currently printing and waiting to be printed will be listed If you entered your user name when you logged on in General User Mode your user name will only be displayed on the documents that you printed Click Job Number on the paused documents and secure documents to d...

Страница 488: ...ze and paper type for the paper source toner cartridge model number etc are displayed You can also click Check Consumables Details in the Portal Page main page to display this page Log in to the Remote UI Starting Remote UI Status Monitor Cancel Consumables The maximum print speed and the Secure Print memory capacity and device configuration are displayed Checking Error Information Checking Consum...

Страница 489: ...n the Settings Registration page System Management Settings Log on to the Remote UI Starting Remote UI Status Monitor Cancel Device Information The total number of pages that have been printed by the copy print and fax functions is displayed Log on to the Remote UI Starting Remote UI Status Monitor Cancel Check Counter Checking System Manager Information Checking Print Total Counter 㻠㻤㻥㻌㻛㻌㻣㻟㻡 ...

Страница 490: ...LINKS Remote UI Screens 㻠㻥㻜㻌㻛㻌㻣㻟㻡 ...

Страница 491: ...ager Mode before you can change them Start the Remote UI Starting Remote UI Click Settings Registration Click the menu item you want to set For more information about the settings menu see each item below Menu items Referents Preferences Paper Settings Specifying Paper Size and Type Display Settings Preferences Timer Settings Timer Settings Sound Volume Control Adjusting the Volume Function Settin...

Страница 492: ...tly Used Copy Settings Registering Frequently Used Fax Settings Registering Frequently Used Scan Settings E mail I Fax Shared Folder FTP Server System Management Settings System Management System Management Settings Department ID Management Setting the Department ID Management Network Settings Network Security Settings Security Import Export Saving Loading Registered Data Initialize Setting Inform...

Страница 493: ...s If the machine is turned OFF during the process it may result in damage to data or the machine Do not operate the machine during the export import process Before exporting importing check that no operation such as printing documents is currently processing Settings that cannot be imported exported Settings Location Current Date Time Settings Timer Settings Date Time Settings Forwarding Settings ...

Страница 494: ...tings Start the Remote UI and log on in System Manager Mode Starting Remote UI Click Settings Registration Click Import Export Export Select the settings to export Address Book To export Address Book data select the check box Address Book PIN If the Address Book is code protected enter the code for the Address Book Setting a PIN for Address Book Settings Registration 1 2 3 4 㻠㻥㻠㻌㻛㻌㻣㻟㻡 ...

Страница 495: ...data you must set an encryption password The password is required when exported data is imported Click Start Exporting Follow the on screen instructions to specify the location where the exported setting data is saved The setting data will be saved LINKS Remote UI Screens Registering Address Book from Remote UI Registering in the Address Book Setting Menu List Address Book List 5 6 㻠㻥㻡㻌㻛㻌㻣㻟㻡 ...

Страница 496: ... Import Export Import Select the settings to be imported File Path Click Browse and select the file Decryption Password Enter the password set when the settings were exported Address Book To import Address Book data select the check box Importing Address Book data will overwrite the Address Book entries currently registered on the machine Address Book PIN If the Address Book is code protected ente...

Страница 497: ...K The selected settings data is loaded into the machine Click OK If the Settings Registration check box is selected in step 4 the machine automatically restarts LINKS Remote UI Screens Registering Address Book from Remote UI Registering in the Address Book Setting Menu List Address Book List 5 6 7 㻠㻥㻣㻌㻛㻌㻣㻟㻡 ...

Страница 498: ...isplayed The Address Book is protected by a PIN Enter the PIN and click OK Click Coded Dial You can also register destinations in Favorites In this case click Favorites instead of Coded Dial Registering in the Address Book Click the text link under Number Type or Name for an item named Not Registered You can edit a registered item by clicking the corresponding text link under Number Type or Name Y...

Страница 499: ... using a FTP server Host Name To use a shared folder enter a path to the shared folder up to 120 characters including the computer name or IP address e g swan share or 192 168 2 100 share To use an FTP server enter an IP address up to 120 characters e g 192 168 2 100 share Using a DNS server You can also enter the host name or FQDN instead of the computer name or IP address e g swan organization c...

Страница 500: ... server up to 32 characters Set Password To set a password for the shared folder or FTP server select this check box and enter a Password of up to 32 characters Ensure that the same display language is selected on both the computer and the Remote UI Host Name and Folder Path may not be displayed correctly or may not be referenceable 7 㻡㻜㻜㻌㻛㻌㻣㻟㻡 ...

Страница 501: ... settings in this machine You can adjust each of the settings in detail Access these settings from Menu in the Home Screen You can print the setting menu in list form to check the current settings User Data List System Manager Data List 㻡㻜㻝㻌㻛㻌㻣㻟㻡 ...

Страница 502: ...ou do not need to specify this setting You can switch using the following Wireless LAN Settings Selecting Wired LAN or Wireless LAN MF729Cx MF728Cdw MF724Cdw MF628Cw Wired LAN Wireless LAN Specify settings for connecting the machine to a wireless LAN You can also view the current settings or specify the setting for saving power consumption WPS Push Button Mode Select to automatically configure a w...

Страница 503: ...tted from the wireless router Off On Connection Information Select to view the current wireless LAN settings Viewing Network Settings MAC Address Wireless LAN Status Latest Error Information Channel SSID Settings Security Settings Power Save Mode Set whether to connect directly By enabling this function connecting directly with the machine is possible even in an environment without an access point...

Страница 504: ...ify settings for Domain Name System DNS which provides a host name for IP address resolutions Configuring DNS DNS Server Settings Primary DNS Server 0 0 0 0 Secondary DNS Server 0 0 0 0 DNS Host Name Domain Name Settings Host Name Domain Name DNS Dynamic Update Settings Off On DNS Dynamic Update Interval 0 to 24 to 48 hr mDNS Settings Specify settings for using DNS functions without DNS servers Co...

Страница 505: ...Use DHCPv6 Enable or disable the stateful address that is acquired via DHCPv6 Setting IPv6 Addresses Off On Check Settings Stateful Address Prefix Length DNS Settings Specify settings for Domain Name System DNS which provides a host name for IP address resolutions Configuring DNS DNS Host Name Domain Name Settings Use IPv4 Host Domain Off Host Name Domain Name On DNS Dynamic Update Settings Off On...

Страница 506: ...timeout period after which printing is canceled if print data reception is interrupted Configuring Printing Protocols and WSD Functions LPD Print Settings Off On RX Timeout 1 to 5 to 60 min RAW Settings Enable or disable RAW a Windows specific printing protocol You can also set the reception timeout period after which printing is canceled if print data reception is interrupted Configuring Printing...

Страница 507: ... the machine and configure print settings via the Internet Use IPP Printing Off On Use SSL Off On Use Network Link Scan Set to On if scanning with AirPrint Always be sure to set to On if scanning with AirPrint Using AirPrint Off On Port Number Settings Change port numbers for protocols according to the network environment Changing Port Numbers LPD 1 to 515 to 65535 RAW 1 to 9100 to 65535 WSD Multi...

Страница 508: ...anagement Information Base MIB objects Off On SNMPv3 Settings Enable or disable SNMPv3 Use the Remote UI to specify detailed settings that are applied when SNMPv3 is enabled Off On Acquire Printer Management Information from Host Enable or disable the monitoring of printer management information from a networked computer running SNMP compatible software Off On SNMP Settings Menu Network Settings S...

Страница 509: ...wired LAN MAC Address Check the MAC address of the machine which is a number unique to each communication device Viewing the MAC Address for Wired LAN Auto Detect Select whether to automatically detect or manually select the communication mode and the Ethernet type Configuring Ethernet Settings Off Communication Mode Half Duplex Full Duplex Ethernet Type 10BASE T 100BASE TX On Enable or disable IE...

Страница 510: ...ation on iW Management Console contact your nearest Canon dealer Off On Select to return the Network Settings to the factory defaults Initialize Menu Menu Network Settings IEEE 802 1X Settings Select Off or On Restart the machine Device Settings Management On Off Menu Network Settings Device Settings Management On Off Select Off or On Initialize Network Settings 㻡㻝㻜㻌㻛㻌㻣㻟㻡 ...

Страница 511: ... setting to change the default screen and display the main screen of a different function Home Copy Fax Scan Memory Media Print Home Screen Button Display Settings Configure the settings for the buttons displayed in the Home Screen You can select the settings that will be displayed as shortcut buttons rearrange the order in which the buttons appear and insert or remove spaces Customizing the Home ...

Страница 512: ...erent messages are alternately displayed 1 to 2 to 5 sec Scrolling Speed Adjust the speed for scrolling the screen by selecting from three levels Slow Standard Fast Menu Preferences Display Settings Brightness Tap to adjust the brightness Apply Menu Preferences Display Settings Invert Screen Colors Select Off or On Menu Preferences Display Settings Millimeter Inch Entry Switch Select Millimeter or...

Страница 513: ...oatian Bulgarian Catalan Polish Chinese Simplified Chinese Traditional Korean Latvian Lithuanian Arabic Remote UI Language Select the display language used for the Remote UI screens English Japanese French Spanish German Italian Dutch Finnish Portuguese Norwegian Swedish Danish Czech Hungarian Russian Turkish Polish Chinese Simplified Chinese Traditional Korean Specify the layout of an USB keyboar...

Страница 514: ...USA Layout UK Layout Menu Preferences English Keyboard Layout Select USA Layout or UK Layout 㻡㻝㻠㻌㻛㻌㻣㻟㻡 ...

Страница 515: ... Reset Auto Sleep Time Auto Offline Time Auto Shutdown Time Specify date and time settings including the date format and the 12 or 24 hour clock display setting The date and time that are printed on each fax document report and list are determined by these settings Date Format Select the date format order of year month and day YYYY MM DD MM DD YYYY DD MM YYYY Time Format Select the 12 or 24 hour c...

Страница 516: ...ged accordingly UTC 12 00 International Date Line West to UTC Coordinated Universal Time to UTC 14 00 Christmas Island UTC Coordinated Universal Time UTC is the primary time standard by which the world regulates clocks and time The correct UTC time zone setting is required for Internet communications Daylight Saving Time Settings Enable or disable daylight saving time If daylight saving time is en...

Страница 517: ...ult Function is selected the main screen of the function selected in Default Screen after Startup Restoration is displayed Default Screen after Startup Restoration If Selected Function is selected the display returns to the main screen of the function that was selected Default Function Selected Function If the machine has not been operated or has had no data to process for a specified period of ti...

Страница 518: ...machine becomes offline You can also set the machine to remain online 0 The machine remains online 1 to 5 to 60 min Set a timer to automatically shut down the machine after the specified period of idle time has elapsed since the machine entered the sleep mode Setting Auto Shutdown Time MF724Cdw MF623Cn 0 Auto Shutdown is disabled 1 to 4 to 8 hr Auto Offline Time Menu Timer Settings Auto Offline Ti...

Страница 519: ...the automatic drawer selection feature for the paper sources If automatic drawer selection is set to On when printing documents the machine automatically selects a paper source that is loaded with the appropriate paper size Also when the paper runs out this setting enables continuous printing by switching from one paper source to another that is loaded with the same paper size You can select a fun...

Страница 520: ...r source Select Off or On Apply Functions Select the function for which you want to configure automatic drawer selection Select Other for functions such as printing reports and lists and printing images from a USB memory device Paper Sources Select the paper source for which you want to enable Multi Purpose Tray is not displayed if Printer was selected on the previous screen Automatic drawer selec...

Страница 521: ...rint Side Priority To print on a specific side of paper you do not need to flip over paper in the paper source whether 1 or 2 sided printing is selected If Print Side Priority is set for a paper source that is loaded with paper you cannot use for 2 sided printing Paper Speed Priority is applied to the paper source instead In this case you need to load the paper in the same way as when Speed Priori...

Страница 522: ... factory default settings about copy The selected settings are used as the default settings of the copy function Changing Default Settings Number of Copies 1 to 999 Density Nine Levels Original Type Text Photo Map Speed Text Photo Map Text Photo Map Quality Printed Image Text 2 Sided Off 1 Sided 2 Sided 2 Sided 2 Sided 2 Sided 1 Sided Copy Ratio Custom Ratio 100 1 1 400 Max 200 141 A5 A4 70 A4 A5 ...

Страница 523: ...ls Medium 17 Levels Low 17 Levels Magenta High 17 Levels Medium 17 Levels Low 17 Levels Cyan High 17 Levels Medium 17 Levels Low 17 Levels Black High 17 Levels Medium 17 Levels Low 17 Levels Select this option to restore the default copy settings Initialize Default Settings Menu Copy Settings Initialize Default Settings Yes 㻡㻞㻟㻌㻛㻌㻣㻟㻡 ...

Страница 524: ... fax device Register Unit Telephone Number Register the fax number for the machine Registering the Fax Number and Unit Name Select Line Type Select the telephone line type used for fax transmission Connecting the Telephone Line Pulse Tone Off Hook Alarm Select whether the machine makes an alert sound when the handset of a telephone or the optional handset connected to the machine is not properly s...

Страница 525: ...bps 2400 bps R Key Setting If your machine is connected through a PBX Private Branch Exchange it is necessary to set the access method You can set the PBX type to Prefix or Hooking If you register the outside line access number to the R key you can easily access the outside line PSTN PBX Prefix Hooking Menu Fax Settings Basic Settings Communication Management Settings TX Start Speed Select a commu...

Страница 526: ...stered name is sent as sender information to the destination TX Terminal ID ECM TX Enable or disable error correction mode ECM ECM checks for fax data errors and corrects them To reduce errors on received faxes see ECM RX Off On ECM must be enabled on both the machine and the other fax device because error checks are performed on both the sending and receiving devices Even when ECM is enabled erro...

Страница 527: ...first attempt fails because the line is busy You can specify how many times the machine redials and the interval between redials Off On Number of Times to Redial 1 to 2 to 10 times Redial Interval 2 to 99 min Redial When Error Occurs Off On TX Terminal ID Specify settings for adding the sender information including the fax number and the name of the machine to the fax header The recipient can chec...

Страница 528: ...whether to prohibit sequential broadcasting a feature that sends faxes to multiple destinations in succession Prohibiting Sequential Broadcasting MF729Cx MF728Cdw MF628Cw Menu Fax Settings TX Function Settings TX Terminal ID On Specify the settings Apply Print Position Specifies the position to print the terminal ID information in the sent fax Select Inside Image Area to print the information insi...

Страница 529: ...ke a longer time than usual to process data when ECM is enabled because the error check and corrections are performed while the data is transmitted Incoming Ring Specify settings for sounding a ring to notify you of incoming faxes This feature is only available when Auto or Fax Tel Auto Switch is selected for the receive mode Specify how many times the incoming call rings when the machine receives...

Страница 530: ...anual is selected for the receive mode By using this feature faxes can be received even when no one is available to pick up the handset Off On 1 to 15 to 99 sec Memory Lock Settings Select whether to store received faxes without immediately printing them Stored fax documents can be printed at any time by changing the setting to Off Storing Received Faxes into Memory Memory Reception Off On Memory ...

Страница 531: ...Vertical Horizontal Vertical Only RX Page Footer Select whether to print information including date and time of reception and page numbers on the bottom of received faxes Off On 3 Menu Fax Settings RX Print Settings Print on Both Sides On Menu Fax Settings RX Print Settings Reduce RX Size On Specify the settings Apply Ratio Auto reduces the image by a ratio that is based on the size of the loaded ...

Страница 532: ...in a computer etc as the forwarding destination Forwarding All the Received Documents Automatically Off On Print Images Select whether to print forwarded fax documents You can set the machine to print forwarded documents only when an error occurs Printing Documents to be Forwarded Off On Only When Error Occurs Store Images in Memory Select whether to store fax documents in memory when they are not...

Страница 533: ...Initial Settings for Fax Functions MF729Cx MF728Cdw MF628Cw 㻡㻟㻟㻌㻛㻌㻣㻟㻡 ...

Страница 534: ...to a USB memory device The selected settings are used as the default settings when scanning documents Changing Default Settings Scan Size A4 A5 File Format PDF PDF Compact PDF Compact OCR PDF OCR Set PDF Details PDF Encryption Level None Acrobat 7 0 or Later 128 bit AES Acrobat 9 0 or Equivalent 256 bit AES Acrobat 10 0 or Equivalent 256 bit AES Digital Signatures None Top Left PDF Compact Encrypt...

Страница 535: ...ils PDF Encryption Level None Acrobat 7 0 or Later 128 bit AES Acrobat 9 0 or Equivalent 256 bit AES Acrobat 10 0 or Equivalent 256 bit AES Digital Signatures None Top Left PDF Compact Encryption Level None Acrobat 7 0 or Later 128 bit AES Acrobat 9 0 or Equivalent 256 bit AES Acrobat 10 0 or Equivalent 256 bit AES Digital Signatures None Top Left PDF Compact OCR Encryption Level None Acrobat 7 0 ...

Страница 536: ...he default e mail transmission settings Specify the basic settings for using the machine as a I Fax device TX Function Settings You can change and register the settings used for sending I Faxes Change Default Settings Specify settings used for sending I Fax The selected settings are used as the default settings when scanning documents Changing Default Settings Scan Size A4 A5 Density Nine Levels O...

Страница 537: ...side Image Area Initialize Default Settings Select this option to restore the default I Fax transmission settings RX Print Settings Specify settings for printing received I Faxes Print on Both Sides Specify settings for printing received I Faxes on both sides of paper Off On RX Print Size Specify the paper size to be used for printing 3 Menu Scan Settings I Fax Settings TX Function Settings TX Ter...

Страница 538: ...gital Signatures None Top Left PDF Compact Encryption Level None Acrobat 7 0 or Later 128 bit AES Acrobat 9 0 or Equivalent 256 bit AES Acrobat 10 0 or Equivalent 256 bit AES Digital Signatures None Top Left PDF Compact OCR Encryption Level None Acrobat 7 0 or Later 128 bit AES Acrobat 9 0 or Equivalent 256 bit AES Acrobat 10 0 or Equivalent 256 bit AES Digital Signatures None Top Left PDF OCR Enc...

Страница 539: ...splayed with brightness that is true to the original documents Setting Gamma Values Gamma 1 0 Gamma 1 4 Gamma 1 8 Gamma 2 2 PDF Compact Image Quality Level Adjust the balance between data size and image quality to suit the type of document you are scanning when converting scanned documents into PDF Compact files Data Size Priority makes the compression ratio higher than normal to create smaller fi...

Страница 540: ...Fs with 256 bit AES The encryption level specified here is then selectable as a level for specifying encryption as a PDF Details Acrobat 9 0 or Equivalent Acrobat 10 0 or Equivalent OCR Text Searchable Settings Menu Scan Settings OCR Text Searchable Settings Smart Scan Select Off or On 256 bit AES Settings for Encrypted PDF 1 Menu Scan Settings 256 bit AES Settings for Encrypted PDF Select Acrobat...

Страница 541: ...t Initialize Default Settings Specify the USB Print settings The selected settings are used as the default settings of the USB Print function Changing Default USB Print Settings Number of Copies 1 to 99 Paper Multi Purpose Tray Drawer 1 Drawer 2 N on 1 Off 2 on 1 4 on 1 2 Sided Off Book Type Calendar Type Set JPEG TIFF Details Print Date Off On Print File Name Off On Original Type Photo Priority T...

Страница 542: ...rocess Off On CMYK Pure Black Process Off On Composite Overprint Off On Advanced Smoothing Advanced Smoothing Off Smooth 1 Smooth 2 Apply to Graphics Off On Apply to Text Off On Grayscale Conversion sRGB NTSC Uniform RGB Print Quality Density Density 17 levels Fine Adjust High 17 levels Medium 17 levels Low 17 levels Toner Save Off On Special Smoothing Mode Mode 1 Mode 2 Mode 3 Mode 4 Mode 5 Mode ...

Страница 543: ...elect Details or Images Details Displays file names and dates in list form Images Displays thumbnails for previewing File Sort Default Settings Menu Memory Media Print Settings File Sort Default Settings Select the order of files that are displayed File Name Display Format Menu Memory Media Print Settings File Name Display Format Select Short File Name or Long File Name Short File Name Shortens a ...

Страница 544: ...tory defaults Displays a file name up to 20 characters The number of characters described above does not include the characters in file extensions such as jpg Initialize Default Settings Menu Memory Media Print Settings Initialize Default Settings Yes 㻡㻠㻠㻌㻛㻌㻣㻟㻡 ...

Страница 545: ... in this section except for Paper Size Override Paper Size Override are only available for PCL printing Specifying these settings is unnecessary for example when you print using the UFRII LT printer driver Prioritize Driver Settings When Printing Copies 2 Sided Printing Default Paper Paper Size Override Print Quality Layout Auto Error Skip Timeout Personality Color Mode Gradation Settings Compress...

Страница 546: ...ecify the paper type in the Default Paper Type screen Default Paper Size Select the default setting for the size of the paper to print on A4 A5 B5 LTR LGL STMT EXEC Menu Printer Settings Prioritize Driver Settings When Printing Select the paper source from which paper is preferentially loaded On Select Force Output or Display Error Copies 2 Menu Printer Settings Copies Set the number of copies to ...

Страница 547: ... size in Default Paper Size only Envelope is available as a paper type Select whether to switch between printing on A4 and LTR size paper if one of these paper sizes is loaded but the other is not Configuring Printer Settings on the Machine Off On Specify the print quality such as toner density and image data processing methods Density Specify the print density for each toner color As the value ge...

Страница 548: ...7 Levels Medium 17 Levels Low 17 Levels Black High 17 Levels Medium 17 Levels Low 17 Levels Toner Save Select whether to reduce toner consumption Off On When this setting is enabled fine lines and portions with lighter print density may become blurred Menu Printer Settings Print Quality Density Select the toner color Specify the toner density Apply Apply Menu Printer Settings Print Quality Density...

Страница 549: ... Settings Print Quality Toner Save Select Off or On Menu Printer Settings Print Quality Gradation Select High 1 or High 2 Menu Printer Settings Print Quality Special Smoothing Mode Select the smoothing mode Mode 1 Prints the edges of dark colored text lines and graphics smoothly This setting is recommended for most types of printing Mode 2 Prints both edges and interior halftones of graphics smoot...

Страница 550: ...ng position is on the long edge of the paper When the binding position is on the short edge of the paper Long Edge Short Edge Mode 6 Prints entire objects smoothly When Error Diffusion is enabled for Halftones Halftones Mode 1 Mode 2 Mode 3 and Mode 4 apply the same effect on printouts as Mode 6 does Menu Printer Settings Print Quality Line Control Select Resolution Priority or Gradation Priority ...

Страница 551: ...easing the value moves the print position to the right Decreasing the value moves the print position to the left 50 0 to 0 to 50 0 mm If this setting moves any of the print data outside the printable area the portion outside the printable area will not be printed You can specify this setting in combination with the Offset Long Edge Front Offset Short Edge Back and Offset Long Edge Back By specifyi...

Страница 552: ...sition to the left 50 0 to 0 to 50 0 mm If this setting moves any of the print data outside the printable area the portion outside the printable area will not be printed Offset Long Edge Back Specify the print position by setting the offset value for the long edge on the back side of the paper Increasing the value moves the print position downward Decreasing the value moves the print position upwa...

Страница 553: ... to 15 to 300 sec Provide the machine with enough time to receive all the print data from the computer especially when printing large amounts of data If you specify a time period that is too short the machine may not receive all the print data in time for printing This setting enables the machine to process data received from the host computer in the specified data format Setting the Personality m...

Страница 554: ...ffect than Smooth 1 You can specify this setting separately for graphics and images Gradation Off Smooth 1 Smooth 2 Apply to Graphics Off On Apply to Images Off On Specify how print data should be treated when it is too large to be held in the memory of the machine The machine can either print the data in lower image quality Output or cancel printing and display an error message Display Error Outp...

Страница 555: ...on or Landscape horizontal orientation for the page orientation Portrait Landscape Font Number Specify the font to use by selecting a corresponding font ID number You can print the PCL font list with font samples from the operation panel PCL Font List MF729Cx MF728Cdw MF724Cdw MF729Cx 0 to 104 MF728Cdw MF724Cdw 0 to 54 Menu Printer Settings Compressed Image Output Select Output or Display Error PC...

Страница 556: ...ing is automatically changed according to the settings specified in Default Paper Size and Orientation 5 to 64 to 128 lines Character Code Select the character code that is most suited for the computer you send print data from The specified setting is ignored when the character code is controlled by the font specified in Font Number MF729Cx ARABIC8 DESKTOP GREEK8 HEBREW7 HEBREW8 ISO4 ISO6 ISO11 IS...

Страница 557: ...8DN PC8TK PIFONT PSMATH PSTEXT ROMAN8 VNINTL VNMATH VNUS WIN30 WINBALT WINL1 WINL2 WINL5 Custom Paper Select whether to set a custom paper size Select On to set the dimensions of the paper in X dimension and Y dimension Off On Unit of Measure Select the unit of measurement to use to set a custom paper size Millimeters Inches Menu Printer Settings PCL Character Code Select the character code Menu P...

Страница 558: ...moves to the beginning of the next line when the machine receives an LF code If No is selected the print position moves to the next line just under the received LF code Yes No Enlarge A4 Print Width Select whether to expand the width of the printable area of A4 size paper in portrait orientation to that of LTR size Off On Menu Printer Settings PCL X dimension Specify the dimension Apply Menu Print...

Страница 559: ...y Select Gamma 1 5 Gamma 1 8 or Gamma 2 4 to adjust the gamma value as necessary As the value gets bigger the printout becomes darker You can specify the setting separately for text graphics and images Text sRGB Gamma 1 5 Gamma 1 8 Gamma 2 4 Graphics sRGB Gamma 1 5 Gamma 1 8 Gamma 2 4 Image Menu Printer Settings PCL Enlarge A4 Print Width Select Off or On Menu Printer Settings PS Halftones Specify...

Страница 560: ...g is enabled only when CMS is selected in CMS Matching Gamma Matching Method Select the color matching method to match the color of the printouts to that displayed on the computer display You can specify the setting separately for text graphics and images Text Perceptual Saturation Colorimetric Graphics Perceptual Saturation Colorimetric Image Perceptual Saturation Colorimetric Menu Printer Settin...

Страница 561: ...Text Graphics or Image Select the matching method Perceptual Performs color matching suitable for printing photographic images when Photo for the Output Profile setting has also been selected Saturation Performs color matching for printing vivid graphics such as illustrations and diagrams Colorimetric Performs color matching to minimize the differences in color between originals such as color samp...

Страница 562: ...value to match the brightness of the printouts to that of the original data If the printout looks darker or brighter than original change the gamma correction value As the value gets bigger the printout becomes darker You can apply the setting separately for text graphics and images Text 1 0 1 4 1 8 2 2 Graphics Off Prints gray black and white data by using the yellow magenta cyan and black toner ...

Страница 563: ... machine will generate bar codes when it receives bar code commands from the host computer If Disable is selected bar codes will not be generated even if bar code commands are sent from the host computer Enable Disable To enable the BarDIMM menu it is necessary to activate the Barcode Printing Kit When you are not printing bar codes make sure to disable the BarDIMM menu Otherwise the processing sp...

Страница 564: ...This setting enables you to specify the amount of time before a job times out If a job has not finished within the set time limit the job automatically cancels 0 to 3600 sec Print PS Errors This setting determines whether an error page is printed when an error is encountered Off Menu Printer Settings PCL BarDIMM Select Enable or Disable Menu Printer Settings PCL FreeScape Select an escape code PS ...

Страница 565: ...raphics this setting specifies that black text is overprinted onto the background This enables you to prevent the problem of white knockout in the background behind printed black text objects Menu Printer Settings PS Print PS Errors Select Off or On Menu Printer Settings PS Pure Black Text Select Off or On Off The black text is printed using CMYK toners based on the selected Output Profile setting...

Страница 566: ...e black text is knocked out left blank and the black text is then printed into the knocked out area On When this setting is used together with Pure Black Text the color background is printed first after which black text is printed in 100 Bk on top of the background Menu Printer Settings PS RGB Source Profile Select the source profile sRGB This setting specifies the industry standard definition for...

Страница 567: ...ofile is also applied by the machine When None is selected areas of dark color may be blotchy depending on the data Use Grayscale Profile This setting allows you to define how device dependent gray data is processed Gamma 1 5 Gamma 1 8 and Gamma 2 4 These settings enable you to select the gamma correct level of the RGB data None When this setting is selected device dependent RGB data is converted ...

Страница 568: ...data is reproduced using black K toner only On Device dependent gray data is converted into CMYK data using the Grayscale Profile of the machine The data may be reproduced using only the black K toner depending upon the Pure Black Text process or Output Profile Menu Printer Settings PS Output Profile Select the output profile Normal This setting prints the colors closely matching the ones displaye...

Страница 569: ...nes in the printouts of black or gray data select Off in RGB Pure Black Process and select Photo for Output Profile In combination with certain settings black and gray data with the equivalent ratio of R to G to B may be printed using the black K toner only even if Off is selected The following are examples When On is selected for Pure Black Text When None is selected for RGB Source Profile When T...

Страница 570: ...Halftones Specify the data processing method to reproduce halftones You can select whether to use Error Diffusion and you can also select Resolution or Gradation separately for text graphics and images Error Diffusion Off Menu Printer Settings PS RGB Pure Black Process Select Off or On Off Black and gray data with the equivalent ratio of R to G to B is printed using CMYK toners based on the select...

Страница 571: ... composite output All colors used for data are overlaid and printed on one plate so you can check the finished result without separating the colors Menu Printer Settings PS Halftones Specify the halftones settings Error Diffusion Prints small text and fine lines with a clear finish If this setting is set to On Resolution and Gradation settings that are specified for Text Graphics and Image are dis...

Страница 572: ...Off Smooth 1 Smooth 2 Apply to Graphics Off On Apply to Text Off On This setting allows you to apply smoothing to graphics data and text data Smoothing is not applied to image data Apply to Graphics and Apply to Text can only be selected when Smooth 1 or Smooth 2 is selected for Advanced Smoothing Settings for Apply to Graphics and Apply to Text on the display will be effective only if Printer Def...

Страница 573: ...he results are still not printed smoothly select Smooth 2 By switching the on off for Apply to Graphics and Apply to Text you can select whether to apply smoothing to graphics or text data Menu Printer Settings PS Grayscale Conversion Specify the grayscale conversion sRGB Lets you to calculate the grayscale value by the color conversion method based on sRGB NTSC Lets you to calculate the grayscale...

Страница 574: ...py Image Select whether to automatically perform a quick gradation adjustment or color shift correction after the machine is turned ON Auto Adjust Image Regularly Select when to make an automatic quick gradation adjustment If On is selected quick adjustment is automatically made after the machine is turned ON If Off is selected a quick adjustment is made when the first printing is completed after ...

Страница 575: ...e print results on special types of paper are not satisfactory the following settings may improve the quality of the printouts Special Paper Processing When printing on the back side of printed paper rough paper or envelopes the print results may be improved by adjusting the following settings Manual Back Side Settings for 2 Sided Only If printouts on the back side of printed paper are too light s...

Страница 576: ...r 2 Off On Envelope Cling Prevention If envelope flaps cling to the envelope bodies when printing select On Off On Menu Adjustment Maintenance Special Processing Special Paper Processing Manual Back Side Settings for 2 Sided Only Select the paper source On Menu Adjustment Maintenance Special Processing Special Paper Processing Rough Paper Settings Select the paper source On Menu Adjustment Mainten...

Страница 577: ...cartridge is replaced or if black streaks appear on printouts Fixing Unit Menu Adjustment Maintenance Special Processing Special Paper Processing Envelope Switch Select Envelope 1 or Envelope 2 Envelope 1 Prints on envelopes with normal fixing power Envelope 2 Prints on envelopes with fixing power stronger than Envelope 1 Menu Adjustment Maintenance Special Processing Special Mode P On Clean Fixin...

Страница 578: ...sfer belt inside the machine to prevent the print quality from deteriorating Transfer Belt Clean the feeder rollers if documents become dirty after being fed through the feeder Feeder Clean ITB Clean Feeder 㻡㻣㻤㻌㻛㻌㻣㻟㻡 ...

Страница 579: ...ttings Select Country Region Remote UI Settings Auto Online for Remote Scan Restrict TX Function Display Job Log Use as USB Device Store to USB Memory Memory Media Print On Off Enable Product Extended Survey Program Display Consumables Information RUI Toner Status Enable Canon Mobile Scanning Google Cloud Print Settings Notify to Check Paper Settings Import Export of Settings Secure Print Settings...

Страница 580: ...haracters for the name and the installation location to identify the machine Device Name Location Select whether to use the Department ID Management a feature that uses IDs as user accounts to specify access privileges and maintain information on how the machine is used Setting the Department ID Management Off On Menu System Management Settings Enable NFC Select Off or On Restart the machine Syste...

Страница 581: ...ngs Off On IPv4 Address Filter Enable or disable settings for filtering packets sent to or received from devices with specified IPv4 addresses Specifying IP Addresses for Firewall Rules Outbound Filter Off On Inbound Filter Off On Security Settings Menu System Management Settings Security Settings Use SSL Select Off or On Restart the machine 1 Menu System Management Settings Security Settings Use ...

Страница 582: ...initial power on Austria AT Belarus BY Belgium BE Czech Republic CZ Denmark DK Egypt EG Finland FI France FR Germany DE Greece GR Hungary HU Ireland IE Italy IT Jordan JO Luxembourg LU Netherlands NL Norway NO Poland PL Portugal PT Russia RU Saudi Arabia SA Slovenia SI South Africa ZA Spain ES Sweden SE Switzerland CH Ukraine UA Great Britain GB Other Menu System Management Settings Security Setti...

Страница 583: ...anning from the computer use this to specify whether to automatically go online for remote scanning scan standby mode without using the operation panel Off On Configure restrictions on various methods for assigning destinations when sending E mail I Faxes etc Address Book PIN Specify a PIN and require entering it to add new entries to or edit existing entries in the Address Book Setting a PIN for ...

Страница 584: ... it is selected as a destination Displaying Destinations in Address Book Off On Select whether to display the copying printing faxing and scanning logs on the display of the machine and in the Communication Management Report Off On Enable or disable the USB port that is used for connecting the machine to a computer Restricting the USB Connection with a Computer Off On Select whether to permit stor...

Страница 585: ...er Status for accessing the Web site for purchasing toner cartridges Also set whether to use Toner Status Display Consumables Purchase Button RUI Off On Toner Status Settings Off On Displ Consmbls Purchase Btn Off On Memory Media Print On Off Enable Product Extended Survey Program Menu System Management Settings Enable Product Extended Survey Program Select Off or On Restart the machine Display Co...

Страница 586: ...mport Registered Data Import Export Display Consumables Purchase Button RUI Select Off to prevent a button that accesses sites for purchasing toner cartridges from being displayed in the Remote UI Toner Status Settings If you do not want to use Toner Status select Off To prevent a button that accesses sites for purchasing toner cartridges from being displayed in Toner Status select On and then Off...

Страница 587: ...Plug and Play See the MF Driver Installation Guide for details Network Select a page description language so that the machine is detected as a printer that is compatible with that language when it is detected over the network FAX UFRII LT UFRII LT V4 PCL5 PCL6 PS USB Select a page description language so that the machine is detected as a printer that is compatible with that language when it is con...

Страница 588: ...to check details for the current firmware Via PC Via Internet Version Information Enter a license key for enabling option functions License Registration MF729Cx Menu System Management Settings PDL Selection Plug and Play Select Network or USB Select a page description language Restart the machine FAX Detects and connects the machine as a fax device UFRII LT Detects and connects the machine as a UF...

Страница 589: ...System Management Settings to the factory defaults You can restore all the System Management Settings at once Initializing Menu Network Settings Enable NFC System Manager Information Settings Device Information Settings Department ID Management On Off Security Settings Remote UI Settings Auto Online for Remote Scan Restrict TX Function Register LDAP Server Authentication Settings for Send Function...

Страница 590: ...ssage Appears When an Error Code Appears Common Problems If you suspect that the machine is malfunctioning see the following sections before contacting Canon Common Problems Installation Settings Problems Copying Problems Printing Problems Faxing Telephone Problems MF729Cx MF728Cdw MF628Cw Printing Results are Not Satisfactory If printing results are not satisfactory see When You Cannot Print Prop...

Страница 591: ...drawer Remove the jammed paper Paper Jams in the Paper Drawer When removing the jammed paper do not turn OFF the machine Turning OFF the machine deletes the data that is being printed Be especially careful when receiving fax documents If paper tears Remove all the paper fragments to prevent them from becoming jammed If paper jams repeatedly Tap the paper stack on a flat surface to even the edges o...

Страница 592: ...ve the jammed document from the inner cover inside the feeder 1 Hold the green knob and open the inner cover 2 Gently pull out the document 3 Close the inner cover Return the lever back in place and close the feeder cover Open the front cover Paper Jams in the Front Side 2 3 1 㻡㻥㻞㻌㻛㻌㻣㻟㻡 ...

Страница 593: ...Do not forcibly remove jammed paper from the machine If the jammed paper cannot be removed easily proceed to the next step Remove the jammed paper in the tray 1 Gently pull out the paper 2 Close the tray Remove the jammed paper inside the tray 1 Pull out the paper drawer Paper Jams in the Manual Feed Slot MF729Cx MF728Cdw MF724Cdw 2 3 4 1 2 㻡㻥㻟㻌㻛㻌㻣㻟㻡 ...

Страница 594: ...uching it may deteriorate print quality Hold the green knobs and return the part shown in the figure back in place Return the part shown in the figure back in place until it clicks Set the paper drawer When the screen shown below is displayed tap Yes Pull out the paper drawer Make sure to hold the paper drawer with both hands and pull it out gently Otherwise you may damage the paper drawer by drop...

Страница 595: ...same way Set the paper drawer When the screen shown below is displayed tap Yes Open the rear cover Pull down the green knob toward you and gently pull out the paper Gently pull out the paper Hold the green knobs and firmly close the duplex unit until it clicks Paper Jams in the Back Side 2 3 4 1 2 3 4 㻡㻥㻡㻌㻛㻌㻣㻟㻡 ...

Страница 596: ...laced in the feeder remove them first Then follow the procedure below Open the feeder cover Gently pull out the document Close the feeder cover Lift the operation panel Document Jams in the Feeder MF628Cw MF623Cn Paper Jams in the Front and Back Sides 5 6 1 2 3 1 㻡㻥㻢㻌㻛㻌㻣㻟㻡 ...

Страница 597: ...r Close the rear cover Pull out the paper drawer Make sure to hold the paper drawer with both hands and pull it out gently Otherwise you may damage the paper drawer by dropping it if it slides out too easily Open the cover Paper Jams in the Manual Feed Slot MF628Cw MF623Cn 2 3 4 5 6 1 2 㻡㻥㻣㻌㻛㻌㻣㻟㻡 ...

Страница 598: ...per Hold the green knobs return the part shown in the figure back in place and close the cover Return the part shown in the figure back in place until it clicks Set the paper drawer When the screen shown below is displayed tap Yes LINKS Notify to Check Paper Settings 3 4 5 6 7 㻡㻥㻤㻌㻛㻌㻣㻟㻡 ...

Страница 599: ...ID for which black and white printing is not restricted Contact your Administrator for the Department ID and PIN Setting the Department ID Management Black cartridge has reached the end of its lifetime The toner cartridge has reached the end of its lifetime Replacement of the toner cartridge is recommended How to Replace Toner Cartridges Cannot analyze the authentication server certificate The aut...

Страница 600: ...f the wireless router Cannot print RX data A received document cannot be printed due to the following A cover is open There is no paper loaded The paper or document is jammed The toner cartridges is consumed An error has occurred Check whether the problems above are occurring If messages including causes and solutions appear on the display check the contents Cannot receive the fax Make sure the fa...

Страница 601: ...oxy server is used on the network check whether the proxy settings on the machine and the server are correct For details contact your Network Administrator Setting a Proxy Cannot use these settings Sending to the specified destination is restricted The machine is set up so that the user currently logged in cannot send to the addresses registered in the selected Favorite Settings Change the send re...

Страница 602: ...lor copying is restricted Do you want to make copies in Black White Color copying is disabled in the Department ID Management Select Yes to copy in black and white To copy in color select No and log in using a Department ID for which color copying is not restricted Contact your Administrator for the Department ID and PIN Setting the Department ID Management Color printing is restricted Do you want...

Страница 603: ...ten glass correctly Place the adjustment image on the platen glass with the print side face down and the black stripe toward the back side of the machine Full Adjust Adjust Copy Image Paper jammed during correction Remove the jammed paper and perform correction again Clearing Jams The amount remaining in toner cartridges required for correction is insufficient Corrections require sufficient toner ...

Страница 604: ...se the number of devices clients that are connected to the wireless LAN router For information on the maximum number of devices that can connect see the instruction manual for the wireless LAN router or contact the manufacturer Could not perform Open System authentication Check the WEP settings The authentication method of the machine is set to Open System but that of a wireless router is set to S...

Страница 605: ...If you select Continue Printing Quality Not Guaranteed you can continue printing but the machine may malfunction If the yellow magenta or cyan toner cartridge has reached the end of its lifetime and you select Only Continue Black White Printing you can continue black and white printing only Faxing is restricted Faxing is disabled in the Department ID Management Log on with a Department ID for whic...

Страница 606: ...aper Specifying Paper Size and Type Paper on which received documents can be printed is not loaded Received documents can be printed on A4 or Letter size paper Load A4 or Letter size paper and set its size Also set the paper type to Plain 1 Plain 2 Plain 3 Recycled Color or Thin depending on the loaded paper Loading Paper Specifying Paper Size and Type If you print received documents on paper othe...

Страница 607: ... Loading Paper Check that the paper guides in the paper drawer are set in the correct position Loading Paper Prepare the black cartridge The amount remaining in toner cartridges is running low Have a new toner cartridge ready Consumables When copying or printing you can continue printing If the machine is receiving a fax or automatic report output is set received faxes and reports will be stored i...

Страница 608: ...ent ID Management Log on to the Remote UI in System Manager Mode display the edit screen of the corresponding Department ID and select the Allow Scan Jobs with Unknown IDs check box Blocking Jobs When Department ID Is Unknown Remove tabs pieces of tape from the toner cartridge The sealing tape on the toner cartridges is still attached Remove the sealing tape How to Replace Toner Cartridges Scannin...

Страница 609: ...ed to set Restrict New Destinations to Off For more information contact your Administrator Limiting Available Destinations The authentication server certificate has expired The server certificate sent from the RADIUS server has expired Check the valid period of the server certificate on the RADIUS server Configuring IEEE 802 1X Authentication The authentication server certificate is incorrect Ther...

Страница 610: ...nt or delete it Storing Received Faxes into Memory Memory Reception If sending a document with many pages divide it into multiple sections If sending a fax reduce the resolution to scan the document Adjusting Resolution If scanning change the file format to reduce its file size Selecting a File Format A scanned document could not be stored to memory media due to insufficient memory space Delete un...

Страница 611: ...n by Specifying Detailed Settings The USB memory is restricted The function that stores a scanned document to a USB memory device is disabled Set Store to USB Memory to On Restricting the Scan to USB Function The WEP key is not set correctly Check the WEP settings The network key the WEP key of a wireless router to be connected is not set to the machine correctly Check the network key the WEP key ...

Страница 612: ...her Login Name is set correctly Check whether the Use TLS Use TTLS or Use PEAP check box is selected If using TLS check whether a key pair is registered If using TTLS or PEAP check whether a user name and password are set correctly Configuring IEEE 802 1X Authentication Yellow cartridge has reached the end of its lifetime The toner cartridge has reached the end of its lifetime Replacement of the t...

Страница 613: ...n the Feeder MF628Cw MF623Cn 003 A fax could not be sent or received due to its large data size When sending a fax Reduce the resolution and scan the document Adjusting Resolution When receiving a fax Ask the sender to divide the document into multiple sections or reduce the resolution before sending 005 A fax could not be sent because the recipient s machine did not respond within 35 seconds When...

Страница 614: ...e forwarded remain in memory you can forward it again Registering in the Address Book Printing Resending Deleting Documents that Failed to be Forwarded 037 Memory is full If a sending or printing job is queued wait until the job is completed If a received document is stored to memory print or delete it Storing Received Faxes into Memory Memory Reception If sending a document with many pages divide...

Страница 615: ...FAT32 Printing from USB Memory USB Print 701 Authentication failed because an incorrect Department ID or PIN was entered when the Department ID Management was activated Enter the correct Department ID and PIN Continuing operating without entering a Department ID was attempted even though unknown ID jobs functions that permit operations without a Department ID and PIN were disabled in the Departmen...

Страница 616: ...il I Fax could not be sent because the machine was not connected to a network correctly Check whether the machine is properly installed and correctly connected to the network Installation Settings Problems 753 Scanned data could not be sent as e mail or I Fax nor stored in the shared folder or FTP server because the LAN cable is disconnected Check whether the LAN cable is connected correctly Conne...

Страница 617: ... Check whether the shared folder and the computer that has the shared folder are running correctly The incorrect folder name or password was specified when sending to the file server Check the destination settings 802 The SMTP server name is not set correctly Set the SMTP server name correctly Configuring Basic E mail Settings Configuring E mail I Fax Communication Settings 804 No access privilege...

Страница 618: ...e FTP server Check the FTP server settings Registering Address Book from Remote UI 810 When communicating with the POP server to send an e mail I Fax an error returned from the server Check whether the POP server is set correctly Check whether your mail server and network are running correctly For more information contact your Network Administrator 812 The password that is used for POP authenticat...

Страница 619: ...d a TIFF analysis error occurred Contact the other party and ask them to check the settings and then resend the data 822 An image file in a USB memory device could not be printed because the format of the image file is not supported Check the supported file formats and save the file again Printing from USB Memory USB Print 827 The received data is not supported includes unsupported MIME informatio...

Страница 620: ... the problem persists clear the Use POP Authentication Before Sending check box and set the communication setting to a setting other than POP before SMTP Configuring E mail I Fax Communication Settings When verifying an SSL server certificate to communicate to the POP server a verification error occurred Check that the CA certificate that signed the SSL server certificate on the POP server side is...

Страница 621: ...rint it within the period Printing via Secure Print Printing using Secure Print was attempted when Secure Print was restricted When Secure Print Settings is set to Off you cannot use Secure Print Set the setting to On and print again Printing via Secure Print Print without using Secure Print Printing a Document You tried to print a file that is either corrupted or not supported Check the file and ...

Страница 622: ...ble connected correctly Check whether these cables are connected correctly Use care not to mistake the phone cord s port for the other cables ports Connecting the Telephone Line Parts and Their Functions Is sleep mode activated If you leave the machine unattended for a specific period of time it enters sleep mode for power conservation not allowing you to operate it To cancel sleep mode press Is a...

Страница 623: ...ect to the wireless LAN You are unsure of the set IP address Viewing Network Settings The connection method cannot be switched between a wired LAN and a wireless LAN Did you select a wired LAN or a wireless LAN on the operation panel on the machine as well This selection is required to have the machine switch to your selection Selecting Wired LAN or Wireless LAN MF729Cx MF728Cdw MF724Cdw MF628Cw A...

Страница 624: ...g the power cord and LAN cable correctly plugged in Is the wireless router turned on If the problem persists even after checking the above Turn off the devices and then turn them on again Wait for a while and try again to connect to the network Check whether the machine is turned ON If the machine is turned ON turn it OFF and then turn it back ON Check the installation site of the machine and the ...

Страница 625: ...s router is set as described below change the settings of the router The MAC address packet filtering is set When only IEEE 802 11n is used for the wireless communication WEP is selected or the WPA WPA2 encryption method is set to TKIP The stealth mode is activated 㻢㻞㻡㻌㻛㻌㻣㻟㻡 ...

Страница 626: ...0SCJ 0C0 Copying Problems See Common Problems also Printing results are not satisfactory Paper creases or curls When You Cannot Print Properly 㻢㻞㻢㻌㻛㻌㻣㻟㻡 ...

Страница 627: ...omputer Printing seems to be slow Print or delete data in memory Printing Documents in Memory Checking Deleting Documents in Memory Disabling Secure Print is recommended if you are not using it Changing the Valid Time Period for Secured Documents When the free space in memory is running low the processing speed of the machine becomes slow just as a computer does There is nothing abnormal You canno...

Страница 628: ...he results of a sent fax are not satisfactory Clean the platen glass or feeder If cleaning does not improve the results the recipient s fax machine may be a cause Platen Glass Feeder The results of received fax are not satisfactory Paper creases or curls When You Cannot Print Properly Telephone and fax cannot be switched automatically Check that the receive mode is set to Fax Tel Auto Switch Answe...

Страница 629: ...non dealer or the Canon help line Smudge Marks Appear on the Bottom Edge of Printouts Streaks Appear on Printouts White Streaks Appear Toner Smudges and Splatters Appear Printouts Are Faded A Portion of the Page Is Not Printed Print Density Is Uneven Printouts Become Lightly Colored Paper Creases Paper Curls Printouts Are Skewed Paper Is Not Fed Two or More Sheets Are Fed Together 㻢㻞㻥㻌㻛㻌㻣㻟㻡 ...

Страница 630: ... margin is set to none in the printer driver A margin of 5 mm or less around the edge of paper or 10 mm or less around the edge of envelopes is not printable with the machine Make sure to have margins around the document to print Finishing tab Advanced Settings Expand Print Region and Print Off Streaks Appear on Printouts Are you using appropriate paper Check usable paper and replace with appropri...

Страница 631: ...ize Driver Settings When Printing to Off Prioritize Driver Settings When Printing Printouts Are Faded Is the toner cartridges consumed Check how much the amount remaining in toner cartridges is left and replace the toner cartridges as necessary Replacing Toner Cartridges Are you using appropriate paper Check usable paper and replace with appropriate paper Also specify the paper size and type setti...

Страница 632: ...ing in toner cartridges is left and replace the toner cartridges as necessary Replacing Toner Cartridges Printouts Become Lightly Colored Does the document have background color is it stained or are you copying a document such as a newspaper that is printed on thin paper so that text or images on the other side are visible through the paper Check the document and then adjust the density to the cor...

Страница 633: ...priate paper Loading Paper Are you using appropriate paper Check usable paper and replace with appropriate paper Paper Paper Curls Are you using appropriate paper Check usable paper and replace with appropriate paper Also specify the paper size and type settings properly Paper Loading Paper Specifying Paper Size and Type If the use of the appropriate paper does not solve the problem set Special Mo...

Страница 634: ...ain Loading Envelopes If the envelopes are not fed properly even after you have uncurled them selecting Envelope 2 for Envelope Switch may solve the problem Special Processing Paper Is Not Fed Two or More Sheets Are Fed Together Is paper loaded correctly Fan the paper stack thoroughly so that paper is not stuck together Check whether paper is loaded correctly Loading Paper Check whether the number...

Страница 635: ...When contacting us have the following information ready Product name MF729Cx MF728Cdw MF724Cdw MF628Cw MF623Cn Dealer where you purchased the machine Details about your problem such as what you did and what happened as a result Serial number eight alphanumeric characters long found on the label on the back side of the machine MF729Cx MF728Cdw MF724Cdw MF628Cw MF623Cn Checking the serial number fro...

Страница 636: ...nt Quality Shades of colors on printouts are different from originals see Correcting the Gradation or Adjusting Values for Text Color Reproducibility in Color Documents Color mismatch occurs see Correcting Print Color Mismatch or Adjusting Values for Text Color Reproducibility in Color Documents Printing Reports and Lists Print out reports describing transmission results or a list of Address Book ...

Страница 637: ... and easily Carefully read the safety instructions before you start cleaning Maintenance and Inspections Where to Clean Exterior of the machine and ventilation slots Exterior Rollers inside the feeder Feeder Internal fixing unit and transfer belt Fixing Unit Transfer Belt Platen glass and the underside of the feeder Platen Glass 㻢㻟㻣㻌㻛㻌㻣㻟㻡 ...

Страница 638: ...ere received by using the Memory Reception function faxes that are waiting to be sent and reports that are automatically printed after sending and receiving faxes are not deleted Clean the exterior of the machine and the ventilation slots Use a soft well wrung out cloth dampened with water or a mild detergent diluted with water To locate the ventilation slots see Front Side and Back Side Wait for ...

Страница 639: ... and reports that are automatically printed after sending and receiving faxes are not deleted Open the feeder Clean the platen glass and the underside of the feeder Clean the areas with a cloth dampened with water Then wipe the area with a soft dry cloth In addition to the platen glass and underside of the feeder make sure to clean and wipe the white strip of plate and the transparent plastic area...

Страница 640: ...o be sent and reports that are automatically printed after sending or receiving faxes are not deleted Open the feeder cover Wipe the rollers in the feeder Wipe the rollers with a cloth that has been moistened with water and wrung out Then wipe with a dry cloth Close the feeder cover Plug the machine back into the power outlet and switch it on Automatic feeder cleaning uses paper loaded in the feed...

Страница 641: ...Tap Start Cleaning starts When the Finished message is displayed approximately 1 minute later press to return to the Home Screen 4 㻢㻠㻝㻌㻛㻌㻣㻟㻡 ...

Страница 642: ...rawer or manual feed slot Loading Paper in the Paper Drawer Loading Paper in the Manual Feed Slot before performing the following procedure Cleaning consumes the toner cartridge Make sure that there is sufficient toner cartridge remaining beforehand Checking the Amount Remaining in the Toner Cartridges Press and tap Menu Tap Adjustment Maintenance Tap Clean Fixing Assembly Read the message that is...

Страница 643: ...elt perform the following procedure Note that you cannot clean the transfer belt when the machine has documents waiting to be printed Press and tap Menu Tap Adjustment Maintenance Tap Clean ITB Tap Start Cleaning starts When the Finished message is displayed approximately 1 to 2 minutes later press to return to the Home Screen 1 2 3 4 㻢㻠㻟㻌㻛㻌㻣㻟㻡 ...

Страница 644: ...displayed When copying or printing you can continue printing the document If the Prepare the black cartridge message is displayed when the machine is receiving a fax or automatic report output is set received faxes and reports will be stored in the machine so that they do not appear faded after they are printed To avoid prints that do not appear clear or vibrant set Continue Print When Cart Low to...

Страница 645: ... Cartridges Use the procedure below to check the amount remaining in the toner cartridges It is particularly important to check whether you need to have a new toner cartridge ready before starting a large print job Device Status Amount Remaining in Cartridge Checking the amount remaining in the toner cartridges Amount Remaining in Cartridge Displays the amount remaining in the toner cartridges Oth...

Страница 646: ...Cn Pull the toner cartridge straight up and out of the machine Remove the replacement toner cartridge from the protective bag Shake the toner cartridge 5 or 6 times as shown below to evenly distribute the toner inside the cartridge and then place it on a flat surface In this step do not remove the drum protective cover Pull the sealing tape straight out The full length of the sealing tape is appro...

Страница 647: ...l it is completely removed Remove the drum protective cover Install the toner cartridge Each toner cartridge color has its own slot in the toner cartridge tray and this tray is indicated with a corresponding color label Place the toner cartridge into the slot that corresponds to its color Make sure that the drum avoids contact with the frame of the toner cartridge tray because the bottom surface o...

Страница 648: ...n the machine remove the handset from its mounting MF729Cx MF728Cdw MF724Cdw Power plug Power cord LAN cable USB cable USB keyboard Telephone cable External telephone Handset MF628Cw MF623Cn When transporting the machine across a long distance remove the toner cartridges How to Replace Toner Cartridges Pull out the paper drawer Make sure to hold the paper drawer with both hands and pull it out gen...

Страница 649: ...28Cw MF623Cn Carefully place the machine at the new installation site For information about how to install the machine after relocating it see Getting Started Manuals Included with the Machine 6 㻢㻠㻥㻌㻛㻌㻣㻟㻡 ...

Страница 650: ...tion to improve color reproducibility There are three types of adjustments Full Adjust Quick Adjust and Adjust Copy Image Correcting the Gradation Correct Print Color Mismatch If the colors in printouts become blurry perform Correct Print Color Mismatch This problem may be caused by a color mismatch Correcting Print Color Mismatch Black Text Processing for Color You can specify which cartridges to...

Страница 651: ...ing When the machine performs full adjustment it obtains information to optimize color reproducibility The machine maintains this information until the next time you perform full adjustment For making full adjustment an adjustment image will be printed twice and scanned twice Note that you cannot perform this adjustment while performing some functions including scanning and printing This adjustmen...

Страница 652: ...ment starts In approximately 1 to 2 minutes the adjustment is finished Open the feeder and remove the second adjustment image Gently close the feeder If the Correction failed message is displayed Did you load plain or recycled A4 or Letter size paper into the paper drawer Did you place the adjustment image with the print side face down with the black stripe toward the back side of the machine Has ...

Страница 653: ...y 1 to 2 minutes the adjustment is finished You can set the machine to perform this adjustment automatically after the power is turned ON Auto Correction Settings This adjustment improves the result of copies and printing from a USB memory device For correcting copy images an adjustment image will be printed and scanned Note that you cannot perform this adjustment while performing some functions i...

Страница 654: ...s finished Open the feeder and remove the adjustment image Gently close the feeder If the Correction failed message is displayed Did you load plain or recycled A4 or Letter size paper into the paper drawer Did you place the adjustment image with the print side face down with the black stripe toward the back side of the machine Has a paper jam occurred Clearing Jams Is the amount remaining in toner...

Страница 655: ...etimes performed automatically such as when toner cartridges are replaced When color shifts occur When color shifts do not occur This adjustment is not available when Only Continue Black White Printing is selected on the screen displaying the message End of Toner Cart Lifetime Press and tap Menu Tap Adjustment Maintenance Tap Correct Print Color Mismatch Tap Start Adjustment starts You can set the...

Страница 656: ...an be set independently in the feeder and platen glass The settings are applied to color copies when Original Type is set to Text Photo Map or Text Selecting Document Type Menu Adjustment Maintenance Black Text Processing for Color Select Feeder or Platen Glass Adjust the value Apply Color Text Makes black or blackish text in a copy match more closely with the original Black Text Enhances the clar...

Страница 657: ...You can check the list of destinations registered in the Address Book Address Book List User Data List System Manager Data List You can check the list of the settings Setting Menu List as well as the content that has been registered in the machine User Data List System Manager Data List IPSec Policy List You can check the list of policy names and the content of the IPSec settings that are register...

Страница 658: ...rint a TX Result Report only when a sending error occurs Example Fax sending MF729Cx MF728Cdw MF628Cw Example Scanning to e mail I Fax shared folder FTP Server Result OK indicates that the transmission was completed successfully while NG and three digits an error code indicates that the transmission failed When an Error Code Appears Department ID The Department ID is shown when Department ID Manag...

Страница 659: ...To print a part of a fax document on the report When you select On or Only When Error Occurs a part of a fax document can be included in the report Set Include TX Image to On 㻢㻡㻥㻌㻛㻌㻣㻟㻡 ...

Страница 660: ...nt the report automatically Separate TX RX Select On to print sent and received reports separately or Off to print both reports on one sheet Print the Report Manually Menu Output Report Print List Communication Management Report Check that the size and type of paper displayed on the screen is loaded in the machine Yes Example Result OK indicates that the transmission was completed successfully whi...

Страница 661: ...gs RX Result Report Select the print setting Off Select if you do not want to print RX Result Reports On Select to print an RX Result Report every time you receive a document Only When Error Occurs Select to print an RX Result Report only when a receiving error occurs Example Result OK indicates that the transmission was completed successfully while NG and three digits an error code indicates that...

Страница 662: ...y printing a Department ID Management Report By checking the printout totals you can better manage your paper and toner cartridge supplies Menu Output Report Print List Department ID Management Report Check that the size and type of paper displayed on the screen is loaded in the machine Yes Example LINKS Setting the Department ID Management 㻢㻢㻞㻌㻛㻌㻣㻟㻡 ...

Страница 663: ...ng an Address Book List Menu Output Report Print List Address Book List Select the setting you want to print out Check that the size and type of paper displayed on the screen is loaded in the machine Yes Example Coded Dial Example Favorites Example Group Dial LINKS Registering in the Address Book Registering Address Book from Remote UI 㻢㻢㻟㻌㻛㻌㻣㻟㻡 ...

Страница 664: ...port and RX Result Report Menu Output Report Print List User Data List or System Manager Data List Check that the size and type of paper displayed on the screen is loaded in the machine Yes Example The User Data List does not include the setting lists of Network Settings System Management Settings or a portion of Fax Settings To check all the settings items including Network Settings System Manage...

Страница 665: ...d the IPSec settings registered in the machine by printing an IPSec Policy List Menu Output Report Print List IPSec Policy List Check that the size and type of paper displayed on the screen is loaded in the machine Yes Example LINKS Configuring IPSec Settings 㻢㻢㻡㻌㻛㻌㻣㻟㻡 ...

Страница 666: ... the consumables status installed in the machine Menu Output Report Print List Consumables Status Report Check that the size and type of paper displayed on the screen is loaded in the machine OK Yes Example LINKS Replacing Toner Cartridges 㻢㻢㻢㻌㻛㻌㻣㻟㻡 ...

Страница 667: ...List You can print a list to check the fonts available in PCL mode Menu Output Report Print List PCL Font List Check that the size and type of paper displayed on the screen is loaded in the machine Yes Example 㻢㻢㻣㻌㻛㻌㻣㻟㻡 ...

Страница 668: ... List You can print a list to check the fonts available in PS mode Menu Output Report Print List PS Font List Check that the size and type of paper displayed on the screen is loaded in the machine Yes Example 㻢㻢㻤㻌㻛㻌㻣㻟㻡 ...

Страница 669: ...er of pages printed Counters Select the counter to check the counter value Items have different defaults depending on the country or region of purchase Counter Value You can check the count of the selected item MF728Cdw MF724Cdw MF628Cw MF623Cn Device Status Check Counter Color Total or Black White Total Counters Select the counter to check the counter value Items have different defaults depending...

Страница 670: ...e machine is turned OFF during the process it may result in damage to data or the machine Do not operate the machine during the export import process Before exporting importing check that no operations such as printing documents are currently in progress In situations where you want to selectively import or export settings data e g only export Address Book entries run the procedure from the Remote...

Страница 671: ...ttings If the logon screen appears enter the correct ID and PIN using the numeric keys and then press Logging on to the Machine Tap Import Export of Settings Export Enter the password and tap Apply Enter a password for the export data up to 32 alphanumeric characters This password will be required when you import the data to the machine Importing Registered Data from a USB Memory Device Enter the ...

Страница 672: ...emory device from the USB port USB2 0 1 Press 2 Press 3 Tap Device Status 4 Tap Remove Memory Media Wait until the The memory media can be safely removed message is displayed 5 Disconnect the USB memory device 7 㻢㻣㻞㻌㻛㻌㻣㻟㻡 ...

Страница 673: ...he USB memory device while data is being imported or exported Press and tap Menu Tap System Management Settings If the logon screen appears enter the correct ID and PIN using the numeric keys and then press Logging on to the Machine Tap Import Export of Settings Import Check the message and tap Yes Enter the password and tap Apply Enter the password that was set when exporting the data Importing s...

Страница 674: ...emory device from the USB port USB2 0 1 Press 2 Press 3 Tap Device Status 4 Tap Remove Memory Media Wait until the The memory media can be safely removed message is displayed 5 Disconnect the USB memory device 7 㻢㻣㻠㻌㻛㻌㻣㻟㻡 ...

Страница 675: ...0SCJ 0E8 Initializing Settings You can restore the following settings Initializing Menu Initializing Key and Certificate Initializing Address Book 㻢㻣㻡㻌㻛㻌㻣㻟㻡 ...

Страница 676: ...if necessary Items for initializing Select the setting you want to initialize When System Management Settings is selected Select the specific system management settings that you want to initialize and tap Yes Settings to be initialized Select the settings to be initialized Initialize All Initializes all the system management settings If Remote UI settings are initialized The Remote UI PIN is also ...

Страница 677: ... Initializes all the settings on the machine You can use the procedure below to restore the default Network Settings Select Menu Network Settings Initialize Network Settings Yes and then restart the machine 㻢㻣㻣㻌㻛㻌㻣㻟㻡 ...

Страница 678: ...ificates will be deleted after initializing After initializing functions that require key pairs such as SSL encrypted communication and TLS of the IEEE 802 1X authentication are not available To use these functions configure the settings for the key pairs and activate the functions again Menu System Management Settings Initialize Key and Certificate Yes LINKS Configuring Settings for Key Pairs and...

Страница 679: ... of the Address Book Note that all the information registered in the Address Book will be deleted after initializing Menu System Management Settings Initialize Address Book Yes LINKS Registering in the Address Book Registering Address Book from Remote UI 㻢㻣㻥㻌㻛㻌㻣㻟㻡 ...

Страница 680: ... 0ER Appendix This chapter contains technical specifications of this machine instructions on how to use the e Manual disclaimers copyright information and other important information for customers 㻢㻤㻜㻌㻛㻌㻣㻟㻡 ...

Страница 681: ...eature Highlights Give the features that are described in this section a try The features are grouped under four headings Going Green and Saving Money Improving Efficiency Going Digital and So Much More 㻢㻤㻝㻌㻛㻌㻣㻟㻡 ...

Страница 682: ...9Cx MF728Cdw MF724Cdw To print 2 Sided incoming faxes Print on Both Sides To really start saving paper shrink multiple pages onto a single sheet 2 or 4 pages for copies and up to 16 pages for print jobs sent from your computer This is even more effective when used together with 2 sided printing 2 sided printing is only available for MF729Cx MF728Cdw MF724Cdw To copy multiple pages of a document on...

Страница 683: ... paper to fax Those old paper printouts you always make are a thing of the past Send documents by fax just as they are created on your computer It s paperless so it s fast And received documents are first stored in memory allowing you to print out only those needed and eliminating worry about paper getting used on direct mailings etc For more information about this function see Sending Faxes from ...

Страница 684: ... or to export Address Book addresses that are saved on your computer to the machine Saving Loading Registered Data To save Address Book addresses on your USB stick or to export Address Book addresses that are saved on your USB stick to the machine Using a USB Memory Device to Export Import Registered Data Always making 2 sided copies in black and white Always scanning in the same format and to the...

Страница 685: ...hine Configure settings and keep an eye on the machine s status with an intuitive easy to understand Web browser interface that you ll master immediately Save your time and energy for things other than taking care of the machine For more information about this function see Using Remote UI You can easily specify the page layout as well as binding position switching between 1 sided and 2 sided print...

Страница 686: ...there s just no other way to go For more information about this function see Saving Documents Directly to a Shared Folder FTP Server What if you re scanning a whole page of a newspaper but all you re really interested in is a headline and a photo Use ScanGear MF You can select what you want from a preview and then have the scanner disregard the rest Otherwise you ll have to use an editing program ...

Страница 687: ...heet or Word document in Microsoft Office Eliminate the need to type in customer data addresses etc from scratch For more information about this function see Selecting a File Format For more information see Instructions on MF Scan Utility Some applications work with the machine to let you easily import scanned images directly into documents you re working on This way you can skip the steps of open...

Страница 688: ...ionality made for this age of speed For more information see Can Be Used Conveniently with a Mobile Device Hook up to Google Cloud Print with your laptop or cell phone send your data and out come your printed documents With this machine Google Cloud Print and your mobile device print whenever you want from wherever you want For more information about this function see Using Google Cloud Print Norm...

Страница 689: ...about this function see Connecting to a Wireless LAN MF729Cx MF728Cdw MF724Cdw MF628Cw Never worry about missing a fax when you re out of the office Set a forwarding destination and any fax that comes in on the machine will go right to you Better yet make the forwarding destination the e mail address for your tablet or mobile For more information about this function see Forwarding Received Faxes B...

Страница 690: ...For more information about this function see Printing Booklet MF729Cx MF728Cdw MF724Cdw 㻢㻥㻜㻌㻛㻌㻣㻟㻡 ...

Страница 691: ...machine Machine Specifications Wireless LAN Specifications MF729Cx MF728Cdw MF724Cdw MF628Cw Document Type Scan Area Paper Copy Specifications Fax Specifications MF729Cx MF728Cdw MF628Cw Scanner Specifications Printer Specifications Specifications for E mail Sending Specifications for Scanning to Shared Folders 㻢㻥㻝㻌㻛㻌㻣㻟㻡 ...

Страница 692: ...nmental Conditions Temperature 10 to 30 C Humidity 20 to 80 RH no condensation Host Interface 100BASE TX 10BASE T Hi Speed USB USB IEEE 802 11b g n Infrastructure mode Noise measured in accordance with ISO 7779 declared noise emission in accordance with ISO 9296 LwAd Declared A weighted sound power level 1 B 10 dB During standby mode 3 9 B or less During printing 6 5 B or less LpAm Declared A weig...

Страница 693: ...ISO 7779 declared noise emission in accordance with ISO 9296 LwAd Declared A weighted sound power level 1 B 10 dB During standby mode Inaudible During printing 6 2 B or less Color During printing 6 3 B or less B W LpAm Declared A weighted emission sound pressure level Bystander position During standby mode Inaudible During printing Approx 48 dB Color Compatibility Full Color Gradation 256 gradatio...

Страница 694: ...smission Scheme DS SS System OFDM System Frequency Range 2 412 to 2 472 MHz Maximum Radio Frequency Power Transmitte 15 98 dBm Communication Mode Infrastructure Mode Security WEP WPA PSK TKIP AES CCMP WPA2 PSK TKIP AES CCMP Connection Method WPS Wi Fi Protected Setup Manual setup 㻢㻥㻠㻌㻛㻌㻣㻟㻡 ...

Страница 695: ...ypes of paper for example tracing paper transparencies etc Booklet Up to 20 mm thickness Plain paper one page document Multi page documents of the same size thickness and weight Size W x L Up to 215 9 x 297 mm Maximum size 215 9 x 355 6 mm Minimum size 139 7 x 128 mm Weight Up to 2 kg 50 to 105 g m Paper Capacity 1 sheet Up to 50 sheets A4 80 g m 㻢㻥㻡㻌㻛㻌㻣㻟㻡 ...

Страница 696: ...he scan area for copying may differ from the printable area Printable Area The scan area for copying may differ from the printable area Printable Area Fax MF729Cx MF728Cdw MF628Cw Scan Saving in a Computer Saving in a Computer The whole document can be scanned Saving in a USB Memory Sending by E mail Sending by I Fax Sending to a File Server Sending to a FTP Server Saving in a USB Memory Sending b...

Страница 697: ... 162 x 229 mm Envelope DL 110 x 220 mm Custom Paper Size Automatic 2 sided printing is available without replacing paper The machine can print received fax documents You can load Envelope Monarch only in the manual feed slot Custom paper size of 100 to 215 9 mm in width and 148 to 355 6 mm in length can be loaded in the paper drawer Custom paper size of 76 2 to 215 9 mm in width and 127 to 355 6 m...

Страница 698: ...Capacity Chlorine free paper can be used with this machine MF729Cx MF728Cdw MF724Cdw Paper Type Paper Capacity for Paper Drawer Paper Capacity for Manual Feed Slot Plain paper 60 to 90 g m 250 sheets 50 sheets Heavy paper 86 to 119 g m 200 sheets 30 sheets 120 to 163 g m 150 sheets 20 sheets Recycled paper 60 to 74 g m 250 sheets 50 sheets Color paper 60 to 74 g m 250 sheets 50 sheets Coated paper...

Страница 699: ...per 100 to 110 g m 100 sheets 1 sheet 111 to 130 g m 131 to 160 g m 161 to 220 g m Thin Paper 60 g m 150 sheets 1 sheet Transparency 50 sheets 1 sheet Label 50 sheets 1 sheet Index Card 15 sheets 1 sheet Envelope 10 sheets 1 sheet Use laser printer transparencies Paper Type and Setting for the Machine Loading Paper Printable Area The shaded areas in the image below indicate the printable area of t...

Страница 700: ...m B W 14 cpm Continuous Copying Capacity Maximum 999 copies First Copy Time A4 MF729Cx MF728Cdw MF724Cdw Platen glass Color 16 2 seconds or less Platen glass B W 15 5 seconds or less Feeder Color 16 7 seconds or less Feeder B W 16 4 seconds or less MF628Cw MF623Cn Platen glass Color 19 seconds or less Platen glass B W 19 seconds or less Feeder Color 19 seconds or less Feeder B W 19 seconds or less...

Страница 701: ... 400 dpi Dialing Favorites 19 destinations Coded dialing 281 destinations Group dialing 299 destinations Address Book dialing Regular dialing with numeric keys Automatic redialing Manual redialing Sequential broadcast 310 destinations Receiving Automatic reception Manual reception Remote reception by telephone Default ID 25 Reports TX Result Report Communication Management Report By default auto o...

Страница 702: ...tion Optical resolution Platen glass up to 600 x 600 dpi Feeder up to 300 x 300 dpi Software interpolation resolution 9 600 x 9 600 dpi Scan Speed A4 300 x 600 dpi Color 10 sheets minute Black and White 20 sheets minute Driver TWAIN WIA 2 0 Windows Vista 7 8 ICA Mac OS X 10 6 x or later The communication time is not included 1 1 㻣㻜㻞㻌㻛㻌㻣㻟㻡 ...

Страница 703: ... ppm MF729Cx MF728Cdw MF724Cdw 2 sided printing Color up to 10 ppm pages per minute 5 spm sheets per minute B W up to 10 ppm pages per minute 5 spm sheets per minute MF628Cw MF623Cn Color 14 ppm B W 14 ppm First Print Time A4 MF729Cx MF728Cdw MF724Cdw Color 14 5 seconds or less B W 14 5 seconds or less MF628Cw MF623Cn Color 18 seconds or less B W 18 seconds or less Output Resolution 600 x 600 dpi ...

Страница 704: ...00 dpi TIFF 300 dpi JPEG Compression PDF PDF OCR 200 dpi JPEG Compression PDF Compact PDF Compact OCR Text 300 dpi Background 150 dpi System Environment Windows Vista 7 8 Server 2003 Server 2008 Server 2012 Solaris Version 2 6 or later with Samba 2 2 or later Mac OS X Red Hat Linux 7 2 or later with Samba 2 2 or later Interface 100BASE TX 10BASE T Color Mode Color Black White Inputted Image Text T...

Страница 705: ...Text 300 dpi Background 150 dpi Color JPEG 300 dpi TIFF 300 dpi JPEG Compression PDF PDF OCR 200 dpi JPEG Compression PDF Compact PDF Compact OCR Text 300 dpi Background 150 dpi System Environment Windows Vista 7 8 Server 2003 Server 2008 Server 2012 Solaris Version 2 6 or later with Samba 2 2 or later Mac OS X Red Hat Linux 7 2 or later with Samba 2 2 or later Interface 100BASE TX 10BASE T Color ...

Страница 706: ...er cartridge yield for monochromatic electrophotographic printers and multi function devices that contain printer components issued by ISO International Organization for Standardization when printing A4 size paper with the default print density setting MF729Cx MF728Cdw MF724Cdw Black 1 200 sheets Composite Y Yellow M Magenta and C Cyan 1 400 sheets MF628Cw MF623Cn Black 800 sheets Composite Y Yell...

Страница 707: ...When replacing toner cartridges see How to Replace Toner Cartridges 㻣㻜㻣㻌㻛㻌㻣㻟㻡 ...

Страница 708: ...acity 250 sheets 60 to 90 g m Available Paper Paper Power Supply From main unit Dimensions W x L x H 430 x 454 x 102 mm Weight Approx 4 kg The card control system simplifies the logon process of Department ID Management by using the control card instead of entering the department ID You can log on to the machine by inserting a control card and log off by removing it Card slot Insert the control ca...

Страница 709: ...ignature to PDF files or to create encrypted PDF files when scanning documents To activate certain system options you need to obtain a license key and register the key to the machine Obtaining a License Key You can obtain a license key by using a web browser Access the License Management System http www canon com lms license and follow the procedure As a part of the procedure you are required to e...

Страница 710: ...ation starts Wait until the Installation complete Effective after the main power is turned OFF and ON message is displayed If the Registering Do not turn the main power OFF message is displayed enable the functions that are required to activate the option and register the license key again Tap Close 4 5 6 㻣㻝㻜㻌㻛㻌㻣㻟㻡 ...

Страница 711: ... for troubleshooting when configuring the settings Read this manual with Getting Started e Manual This Manual This manual describes all the functions of the machine in a manual that is viewed using a Web browser You can browse information by category or enter a keyword to search for pages on a specific topic Using e Manual MF Driver Installation Guide This manual describes how to install the MF dr...

Страница 712: ...those results You can also enter phrases such as connecting to a network The keyword search also supports the AND Boolean to search for multiple keywords Search Tab Search the site map Click Site Map on the top part of the screen and a list of all the e Manual topics is displayed From there you can find the topic you are looking for Site Map System Requirements To use the e Manual the following We...

Страница 713: ...a language and click OK if you are prompted to do so Click Custom Installation If the above screen is not displayed see Displaying the Software Programs Manuals Setup Screen If AutoPlay is displayed click Run MInst exe Select USB Connection and click Next Select USB Connection even if connected using a network Clear all the check boxes except for Manuals and click Install 1 2 3 4 㻣㻝㻟㻌㻛㻌㻣㻟㻡 ...

Страница 714: ...nt and click Yes to agree Select a language and click NEXT Select the folder to install to and click Install The installation begins Wait a moment This process may take some time Click Exit Click Next Exit 5 6 7 8 9 㻣㻝㻠㻌㻛㻌㻣㻟㻡 ...

Страница 715: ...ctly from the provided DVD ROM 1 Insert the provided DVD ROM into the drive on the computer Select a language and click OK if you are prompted to do so If the Software Programs Manuals Setup screen does not appear remove the provided DVD ROM from the drive and then insert it again or see Displaying the Software Programs Manuals Setup Screen 2 Click Manuals 3 Click e Manual 㻣㻝㻡㻌㻛㻌㻣㻟㻡 ...

Страница 716: ... the drive on the computer Select a language and click OK if you are prompted to do so Click Start Software Programs If the above screen is not displayed see Displaying the Software Programs Manuals Setup Screen If AutoPlay is displayed click Run MInst exe Click Start for Manual Uninstaller Click Next Uninstall begins Wait a moment This process may take some time Click Exit 1 2 3 4 5 㻣㻝㻢㻌㻛㻌㻣㻟㻡 ...

Страница 717: ...Click Back Exit 6 㻣㻝㻣㻌㻛㻌㻣㻟㻡 ...

Страница 718: ... the top page Contents tab Search tab Click to toggle the display between the table of contents and search Contents The titles of chapters are displayed Place the mouse pointer over one of the titles and topics of the chapter are displayed on the right Click a topic and its page is displayed Top Click to return to the top page Site map Click to display all the e Manual topics 㻣㻝㻤㻌㻛㻌㻣㻟㻡 ...

Страница 719: ...ature Highlights Quick Help Troubleshooting Maintenance Click to view how to solve problems or maintain the machine For Mac OS Users Click to view precautions when using Mac OS Notice Click to view important information you should know when using the machine Office Locations Click to display contact information for any inquiries about the machine Feature Highlights Provides a variety of practical ...

Страница 720: ...sections of that topic Click to close the expanded topic Print all All pages of the selected chapter are opened in a separate window The chapter can be printed if necessary Navigation See what chapter topic you are currently viewing Click to return to the page top Click to display the previous or following topic Click to jump to the corresponding page To return to the previous page click Back on y...

Страница 721: ...can efficiently search for topics by narrowing the search scope The search scope selector is especially useful when you can predict the general location of the topic that you are looking for Search options selector Select the check box to make your search case sensitive Search with these conditions Click to display the search results with the conditions specified with and Search result list Displa...

Страница 722: ...lick to jump to the topic of the selected chapter Title Topic Displays titles and topics Click a title or topic to jump to the page Click to return to the page top Click to go to the previous or next chapter 㻣㻞㻞㻌㻛㻌㻣㻟㻡 ...

Страница 723: ...rification of an operation or contains additional explanations for a procedure Indicates useful functions or tips for using the machine Keys and Buttons Used in this Manual Keys on the operation panel and buttons on the computer display appear in the following notation Type Example Keys on the operation panel B W Settings displayed on the operation panel Timer Settings Specify the destination Butt...

Страница 724: ...0SCJ 0FU Others This section describes basic Windows operations and includes disclaimers copyright information and other information 㻣㻞㻠㻌㻛㻌㻣㻟㻡 ...

Страница 725: ... Panel Printer Windows 7 Server 2008 R2 Start select Devices and Printers Windows 8 Server 2012 Right click the lower left corner of the screen select Control Panel View devices and printers Windows 8 1 Server 2012 R2 Right click Start select Control Panel View devices and printers Windows Server 2003 Start select Printers and Faxes Windows Server 2008 Start select Control Panel double click Print...

Страница 726: ...Start Search press the ENTER key Windows 8 Server 2012 Right click the lower left corner of the screen Run Enter D MInst exe click OK Windows 8 1 Server 2012 R2 Right click Start Run Enter D MInst exe click OK Windows Server 2003 Start Run enter D MInst exe click OK Printing a Test Page in Windows You can check whether the printer driver is operational by printing a test page in Windows Load A4 si...

Страница 727: ... Windows 8 Server 2012 Right click the lower left corner of the screen select Control Panel Windows 8 1 Server 2012 R2 Right click Start select Control Panel Display System Windows Vista 7 8 Server 2008 R2 Server 2012 Click System and Maintenance or System and Security System Windows Server 2008 Double click System Check the bit architecture For 32 bit versions 32 bit Operating System is displayed...

Страница 728: ...tart select Control Panel 2 Display System Windows Vista 7 8 Server 2008 R2 Server 2012 Click System and Security or System and Maintenance System Windows Server 2008 Double click System Windows Server 2003 1 Start select Control Panel 2 Click the System 3 Click the Computer Name tab 4 Click Change Checking the LPR RAW Printer Port Open the printer folder Displaying the Printer Folder Right click ...

Страница 729: ...Check the port settings Click the Ports tab Make sure that the correct port is selected for the printer 3 㻣㻞㻥㻌㻛㻌㻣㻟㻡 ...

Страница 730: ...Started MF Driver Installation Guide Canon MF Printer Driver Guide Using each feature Driver s Help Canon MF Printer Driver Guide Fax function Installing the Driver Getting Started MF Driver Installation Guide Canon Fax Driver Guide Using each feature Driver s Help Canon Fax Driver Guide Scan function Installing the Driver Getting Started MF Driver Installation Guide Canon Scanner Driver Guide Sca...

Страница 731: ...y sealed within the protective housing and external cover No radiation can leak from the machine in the normal operation of the product by the user This machine is classified as a Class 1 Laser Product under IEC60825 1 2007 EN60825 1 2007 220 to 240 V Model The label shown below is attached to the laser scan unit on the machine This machine has been classified under IEC60825 1 2007 EN60825 1 2007 ...

Страница 732: ...ional program that promotes energy saving through the use of computers and other office equipment The program backs the development and dissemination of products with functions that effectively reduce energy consumption It is an open system in which business proprietors can participate voluntarily The targeted products are office equipment such as computers displays printers facsimiles and copiers...

Страница 733: ...therwise stated The name PostScript also is used as a product trademark for Adobe Systems implementation of the PostScript language interpreter Except as otherwise stated any reference to a PostScript printing device PostScript display device or similar item refers to a printing device display device or item respectively that contains PostScript technology created or licensed by Adobe Systems Inco...

Страница 734: ...ither registered trademarks or trademarks of Adobe Systems Incorporated in the United States and or other countries All other trademarks are the property of their respective owners All other product and brand names are registered trademarks trademarks or service marks of their respective owners 㻣㻟㻠㻌㻛㻌㻣㻟㻡 ...

Страница 735: ...7 U S A CANON EUROPA N V Bovenkerkerweg 59 1185 XB Amstelveen The Netherlands CANON CHINA CO LTD 2F Jinbao Building No 89 Jinbao Street Dongcheng District Beijing 100005 PRC CANON SINGAPORE PTE LTD 1 Fusionopolis Place 15 10 Galaxis Singapore 138522 CANON AUSTRALIA PTY LTD Building A The Park Estate 5 Talavera Road Macquarie Park NSW 2113 Australia CANON GLOBAL WORLDWIDE SITES http www canon com 㻣...

Страница 736: ...㻝㻌㻛㻌㻠㻣 ...

Страница 737: ...stalling from the Supplied DVD ROM 8 Installing after Downloading from the Canon Website 22 Installing to Use WSD 29 Uninstalling 34 Troubleshooting 37 Appendix 38 Using the Installation Guide 39 Screen Configuration of the Installation Guide 40 Viewing the Installation Guide 43 Other 44 Basic Windows Operations 45 Notice 47 㻞㻌㻛㻌㻠㻣 ...

Страница 738: ...ll the MF Drivers and MF Scan Utility so the machine is ready to print from a computer Installing Uninstalling This section explains how to uninstall the MF Drivers or MF Scan Utility Uninstalling Troubleshooting This section explains how to resolve problems that may occur during installation and uninstallation of the MF Drivers or MF Scan Utility Troubleshooting Appendix This section explains how...

Страница 739: ... scanner driver MF Scan Utility The MF Scan Utility provides a group of commands for you to open a scanned image in an application send it as an e mail attachment file store it on the hard disk etc Toner Status This application informs you with the amount of cartridge consumption on the computer it is installed on pop up display You can also access a site for purchasing cartridges directly from th...

Страница 740: ...er PCL5 Printer driver PCL6 Printer driver PS Fax driver Scanner driver Network Scanner Selector MF Scan Utility Toner Status Canon MF LBP Wireless Setup Assistant Presto PageManager 1 Supported only over network connection 2 Supported only with Windows 8 1 3 Supported only with Windows Server 2012 R2 4 Supported only over wireless LAN connection 5 These software may not be supplied depending on y...

Страница 741: ...ing the numeric keys and then press Logging on to the Machine e Manual Tap System Management Settings Tap PDL Selection Plug and Play Tap Network or USB Select the driver you are using Selectable page description language Network FAX UFRII LT UFRII LT V4 PCL5 PCL6 PS USB UFRII LT UFRII LT V4 PCL5 PCL6 PS Restart the machine If you selected USB in step 4 turn OFF the machine and wait for at least 1...

Страница 742: ...drivers Installing from the Supplied DVD ROM Installing after Downloading from the Canon Website The latest MF Driver and MF Scan Utility versions are available for downloading from the Canon website Download the MF Drivers or MF Scan Utility if for example the drivers on the DVD ROM do not support the operating system of your computer Installing after Downloading from the Canon Website Adding a W...

Страница 743: ...cable is connected before the drivers are installed remove the cable and re install the drivers A USB cable is not included with the machine Prepare one separately The options to be displayed differ depending on your country or region Prepare to Install USB Connection Turn OFF the machine Wired Wireless LAN Connection Connect the machine to a computer via the network Before starting installation o...

Страница 744: ...e Select the connection method with the computer USB Connection Select USB Connection and click Next Wired Wireless LAN Connection Select Network Connection and click Next In Server 2003 Server 2008 Server 2012 this screen is not displayed Proceed to the following procedure Click Install Read the License Agreement and click Yes to agree 5 6 7 㻥㻌㻛㻌㻠㻣 ...

Страница 745: ...t Follow the on screen instructions to install the drivers USB Connection 1 Follow the on screen instructions to connect the machine and a computer via USB cable and turn ON the machine 2 Click Exit 8 9 㻝㻜㻌㻛㻌㻠㻣 ...

Страница 746: ...nd computer are connected The screen below may appear in instances such as when it took time to connect the machine with a computer via USB cable Turn OFF the machine reconnect the cable and then turn ON the machine again 1 When the following screen appears click Yes 2 Select the machine and click Next 㻝㻝㻌㻛㻌㻠㻣 ...

Страница 747: ...ept and click Next If no machines are displayed in Device List Check the computer and machine connection and IP address settings Viewing Network Settings e Manual and click Update Device List If the machine is still not displayed at all click Search by IP Address enter the IP address set on the machine OK 3 Check the settings and click Start Installation of the drivers is complete 10 11 12 㻝㻞㻌㻛㻌㻠㻣...

Страница 748: ...he Restart Computer Now Recommended check box and click Restart after removing the DVD ROM Prepare to Install USB Connection Turn OFF the machine Wired Wireless LAN Connection Connect the machine to a computer via the network Before starting installation of the drivers configure network settings For more information about how to configure network settings see Getting Started Log on to the computer...

Страница 749: ...ay is displayed click Run MInst exe Select the connection method with the computer USB Connection Select USB Connection and click Next Wired Wireless LAN Connection Select Network Connection and click Next In Server 2003 Server 2008 Server 2012 this screen is not displayed Proceed to the following procedure Select the check box next to the application you want to install and click Install 5 6 㻝㻠㻌㻛...

Страница 750: ...nd click Yes to agree Click Next Follow the on screen instructions to install the drivers USB Connection 1 Follow the on screen instructions to connect the machine and a computer via USB cable and turn ON the machine 7 8 9 㻝㻡㻌㻛㻌㻠㻣 ...

Страница 751: ...onfirm that the machine and computer are connected The screen below may appear in instances such as when it took time to connect the machine with a computer via USB cable Turn OFF the machine reconnect the cable and then turn ON the machine again 1 When the following screen appears click Yes 㻝㻢㻌㻛㻌㻠㻣 ...

Страница 752: ...t displayed at all click Search by IP Address enter the IP address set on the machine OK 3 Select the drivers to install and click Next To obtain device information for using a print server Select the Canon Driver Information Assist Service check box 4 Select the check box for the printer driver being installed and click Next This screen is not displayed depending on the model you are using Procee...

Страница 753: ...where you are performing the installation as a print server Setting Up Print Server e Manual Shared Name Change the shared name as necessary Drivers to Add If you have selected the Use as Shared Printer Use as Shared Fax check box install additional drivers as necessary Select the operating system and click OK to install additional drivers 6 Check the displayed information and click Start 㻝㻤㻌㻛㻌㻠㻣 ...

Страница 754: ...following screen carefully select Accept or Do Not Accept and click Next 7 Configure the machine normally used and make a test print To configure the machine as the machine normally used select the driver and click Next To print a test page check the driver 8 Click Exit In Windows Server 2003 Server 2008 Server 2012 MF Scan Utility is not installed Proceed to step 11 Installation of the drivers is...

Страница 755: ...the DVD ROM You can check whether the MF Drivers MF Scan Utility e Manual and etc are installed correctly or not by whether the icons appear Printer driver When the printer driver is installed correctly an icon for the installed printer appears in the printer folder Displaying the Printer Folder Fax driver When the fax driver is installed correctly an icon for the installed fax appears in the prin...

Страница 756: ...work Scanner Selector icon appears in the taskbar e Manual When the e Manual is installed correctly an e Manual icon appears on the desktop If you install the e Manual with Custom Installation the icon does not appear Toner Status When Toner Status is installed correctly a Toner Status icon appears in the taskbar If the icon is not displayed Uninstall the drivers Uninstalling the MF Drivers and re...

Страница 757: ...o the following appears when installing the new version and installation is canceled Uninstall the older version before installing the new version Uninstalling Prepare to Install USB Connection Turn OFF the machine Wired Wireless LAN Connection Connect the machine to a computer via the network Before starting installation of the drivers configure network settings For more information about how to ...

Страница 758: ...nstructions to install the drivers USB Connection 1 Select USB Connection and click Next 2 Follow the on screen instructions to connect the machine and a computer via USB cable and turn ON the machine 3 Click Exit 6 㻞㻟㻌㻛㻌㻠㻣 ...

Страница 759: ...computer are connected The screen below may appear in instances such as when it took time to connect the machine with a computer via USB cable Turn OFF the machine reconnect the cable and then turn ON the machine again 1 Select Network Connection and click Next 2 When the following screen appears click Yes 㻞㻠㻌㻛㻌㻠㻣 ...

Страница 760: ... List If the machine is still not displayed at all click Search by IP Address enter the IP address set on the machine OK 4 Select the drivers to install and click Next If you did not select either Printer or Fax proceed to step 6 To obtain device information for using a print server Select the Canon Driver Information Assist Service check box 5 Select the printer drivers to install and click Next ...

Страница 761: ...where you are performing the installation as a print server Setting Up Print Server e Manual Shared Name Change the shared name as necessary Drivers to Add If you have selected the Use as Shared Printer Use as Shared Fax check box install additional drivers as necessary Select the operating system and click OK to install additional drivers 7 Check the displayed information and click Start 㻞㻢㻌㻛㻌㻠㻣 ...

Страница 762: ...the MF Drivers are installed correctly or not by whether the icons appear Printer driver When the printer driver is installed correctly an icon for the installed printer appears in the printer folder Displaying the Printer Folder 8 Configure the machine normally used and make a test print To configure the machine as the machine normally used select the driver and click Next To print a test page ch...

Страница 763: ...nner driver is installed correctly an icon for the installed scanner appears in the Scanners and Cameras or Scanners and Cameras Properties folder MF Scan Utility When MF Scan Utility is installed correctly an MF Scan Utility icon appears in the MF Scan Utility folder located in the Canon folder on the start menu Network Scanner Selector When Network Scanner Selector is installed correctly a Netwo...

Страница 764: ...printer driver and then add a network printer Installing the MF Drivers Adding a Network Printer Log on to the computer with an administrator account Open the printer folder Displaying the Printer Folder Click Add a printer or Add Printer Click Add a local printer Check that LPT1 is selected under Use an existing port and click Next Click Have Disk Installing the MF Drivers 1 2 3 4 5 6 㻞㻥㻌㻛㻌㻠㻣 ...

Страница 765: ...S XXXX 32bit or x64 Driver folders of the DVD ROM or downloaded file PCL5 intdrv PCL XXXX 32bit or x64 Driver pcl5e_5c folders of the DVD ROM or downloaded file PCL6 intdrv PCL XXXX 32bit or x64 Driver pcl6 folders of the DVD ROM or downloaded file Fax intdrv FAX XXXX 32bit or x64 Driver folders of the DVD ROM or downloaded file You must select the drivers to use beforehand on the machine About th...

Страница 766: ...ter make sharing settings for the printer added with Adding a Network Printer Setting Up Print Server e Manual Click Finish To set the printer as the normally used printer select the Set the default printer check box Installation is complete and an icon for the installed printer is displayed in the printer folder 11 12 13 㻟㻝㻌㻛㻌㻠㻣 ...

Страница 767: ...art File Explorer select Network Right click the newly added printer icon and click Install Installation for using WSD is complete when an icon for the printer is added to the printer folder Deleting unneeded printer icons When you have finished installing the network printer the icon added in step 13 of Installing the MF Drivers is no longer needed To delete the icon right click it and select Rem...

Страница 768: ...㻟㻟㻌㻛㻌㻠㻣 ...

Страница 769: ...e uninstaller starts If you cannot find the drivers that you want to uninstall Uninstalling the MF Drivers Start the uninstaller from the supplied DVD ROM or from the MF Drivers file that you downloaded 1 Insert the supplied DVD ROM into the drive on the computer To start the uninstaller from the MF Drivers file that you downloaded carry out the following step 2 Open the folder where the uninstall...

Страница 770: ... Programs Select the Canon MF Scan Utility and click Uninstall Change or Change Remove The uninstaller starts Click Yes Click OK Log on to the computer with an administrator account Display Programs and Features or Add or Remove Programs Displaying Programs and Features or Add or Remove Programs Uninstalling the MF Scan Utility Uninstalling the Product Extended Survey Program 4 5 1 2 3 4 5 1 2 㻟㻡㻌...

Страница 771: ...k OK Log on to the computer with an administrator account Display Programs and Features or Add or Remove Programs Displaying Programs and Features or Add or Remove Programs Select Toner Status and click Uninstall or Remove The uninstaller starts Click Uninstall Click OK Uninstalling the Toner Status 3 4 1 2 3 4 5 㻟㻢㻌㻛㻌㻠㻣 ...

Страница 772: ...it again Uninstalling the MF Drivers Installing the MF Drivers Quit all running applications and install the software again Applications installed from the DVD ROM supplied with the machine are not properly registered in the MF Scan Utility Applications are automatically registered to the MF Scan Utility once they have been installed They are not however if installed while the MF Scan Utility is o...

Страница 773: ...0UFE 00A Appendix The Appendix provides information you should know such as how to use the Installation Guide disclaimers and copyright information 㻟㻤㻌㻛㻌㻠㻣 ...

Страница 774: ...Page Search by keyword You can search by entering keywords such as USB or environment Pages containing the keywords are displayed You can also enter phrases such as install the MF Drivers The search will find topics containing all of the words in the phrase AND search Search Tab Search the site map Click Site Map on the top part of the screen to display a list of all the Installation Guide topics ...

Страница 775: ...f chapters Place the mouse pointer over one of the titles to display the topics in that chapter on the right Click a topic to display its page Top Click to return to the top page from any other page Site Map Click to display the titles of all Installation Guide topics Help Click to display information on how to view the Installation Guide how to perform a search and other information Print Click t...

Страница 776: ...sections of that topic Click to close an expanded topic Print all All pages of the selected chapter are opened in a separate window You can print them as necessary Navigation This shows which chapter topic you are currently viewing Click to return to the page top Click to display the previous or next topic Click to jump to the corresponding page To return to the previous page click the Back button...

Страница 777: ...x to make your search case sensitive Search with these conditions and specify the conditions After setting them press this to perform the search and display the results in the Result list Result list This displays pages that contain the specified keywords From the results locate the page you are looking for and click the topic title of the page If the results cannot be displayed on one page click ...

Страница 778: ...void damage to the printer or property Indicates a clarification of an operation or contains additional explanations for a procedure Buttons Buttons on the computer display are indicated with the following notation Example from the Installation Guide Next Computer Screens Depending on the operating system you are using the appearance of the displays in this guide may differ slightly from the displ...

Страница 779: ...0UFE 00H Other This section describes basic Windows operations and includes disclaimers copyright information and other information 㻠㻠㻌㻛㻌㻠㻣 ...

Страница 780: ...ample uses D as the name of the DVD ROM drive The DVD ROM drive name may be different on your computer Windows Vista 7 Server 2008 Server 2008 R2 Start enter D MInst exe in Search programs and files or Start Search press the ENTER key on the keyboard Windows 8 Server 2012 Right click the lower left corner of the screen select Run enter D MInst exe click OK Windows 8 1 Server 2012 R2 Right click St...

Страница 781: ...ndows Vista 7 Server 2008 R2 Start Control Panel select Uninstall a Program Windows 8 Server 2012 Right click the lower left corner of the screen Control Panel select Uninstall a Program Windows 8 1 Server 2012 R2 Right click Start Control Panel select Uninstall a Program Windows Server 2003 Start Control Panel select Add or Remove Programs Windows Server 2008 Start select Control Panel double cli...

Страница 782: ...TING FROM THE USE OF THIS MATERIAL Copyright Copyright CANON INC 2015 No part of this publication may be reproduced transmitted transcribed stored in a retrieval system or translated into any language or computer language in any form or by any means electronic mechanical magnetic optical chemical manual or otherwise without the prior written permission of Canon Inc Trademarks Microsoft Windows Win...

Отзывы: