background image

20

Macintosh

5

3

4

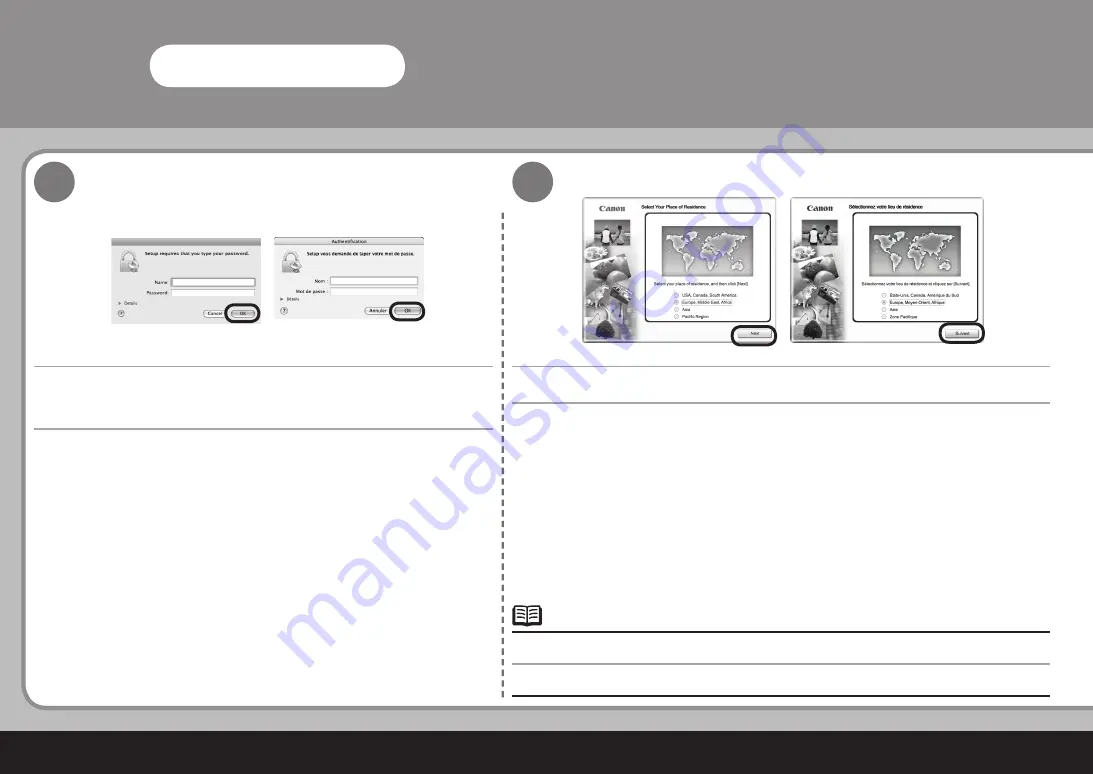
Entrez votre nom d'administrateur et votre mot de passe. Cliquez sur  

OK

 .

Si vous ne connaissez pas votre nom d'administrateur ou votre mot de passe, cliquez sur 


Aide 

, puis suivez les instructions à l'écran.

Lorsque l'écran  

Sélectionnez votre lieu de résidence  

apparaît, sélectionnez votre lieu 

de résidence, puis cliquez sur


Suivant 

.

Si l'écran  

Sélectionner la langue  

s'affi che, sélectionnez une langue, puis cliquez sur


Suivant

 .

Enter your administrator name and password. Click  

OK 

.

If you do not know your administrator name or password, click  

Help

 , then follow the on-screen 

instructions.

When the  

Select Your Place of Residence  

screen appears, select your place of 

residence, then click  

Next 

.

If the  

Select Language  

screen appears, select a language, then click


Next

 .

Содержание iP3600 - PIXMA Color Inkjet Printer

Страница 1: ...Prenez soin de lire ce manuel avant d utiliser la machine Conservez le ensuite à portée de main pour référence ultérieure Getting Started Make sure to read this manual before using the printer Please keep it in hand for future reference ...

Страница 2: ...s dommages matériels Descriptions d opérations qui prennent du temps Numéro de modèle K10322 iP3600 Installation des logiciels Installation des réservoirs d encre Symbols Additional explanations The following symbols are used to mark important instructions Observe these instructions Instructions that must be observed for safe operation Instructions that if ignored could result in personal injury o...

Страница 3: ...n retirez tous les rubans orange et les feuilles protectrices Un câble USB est nécessaire pour relier l imprimante à l ordinateur Check the Included Items Manuals Setup CD ROM containing the drivers applications and on screen manuals Warranty Before turning on the printer remove all the orange tapes and the protective sheets A USB cable is necessary to connect the printer with your computer ...

Страница 4: ...n Vérifiez que le témoin ALIMENTATION B est allumé en vert L imprimante peut émettre des bruits de fonctionnement Il s agit du fonctionnement normal Turn the Power On Plug in the power cord on the left side at the back of the printer and connect the other end to the wall outlet Do NOT connect the USB cable at this stage Press the ON button A to turn on the printer Confirm that the POWER lamp B lig...

Страница 5: ...le lui appliquer une pression excessive ou la faire tomber Le support de la tête d impression émet un bruit en se déplaçant Il s agit du fonctionnement normal Open the Paper Output Tray A and the Top Cover B Install the Print Head The Print Head Holder C comes out This is where you install the Print Head Do not handle the Print Head roughly such as applying them excessive pressure or dropping them...

Страница 6: ...z fermement le levier de verrouillage de la tête d impression jusqu à ce qu il s arrête Le levier de verrouillage de la tête d impression peut sembler lourd Installation de la tête d impression Remove the Print Head from the silver package There may be some transparent or light blue ink on the inside of the bag the Print Head comes in or the inside of the protective cap this has no effect on print...

Страница 7: ...ier de verrouillage de la tête d impression et abaissez le lentement Une fois la tête d impression installée ne la retirez pas si ce n est pas nécessaire Tilt the Print Head and set it in place Lower the Print Head Lock Lever D completely Do not to knock the Print Head against the sides of the Holder Pinch the Print Head Lock Lever firmly and lower it gently Once you have installed the Print Head ...

Страница 8: ... réservoirs d encre avec brusquerie par exemple lui appliquer une pression excessive ou la faire tomber Installation des réservoirs d encre Pull the orange tape 1 in the direction of the arrow to peel off the protective film and remove the film 2 completely If the Print Head Holder moves to the right close and reopen the Top Cover Be sure to use the supplied ink tanks Do not handle the ink tanks r...

Страница 9: ...rouge Faites correspondre les étiquettes lors de l installation Installez le réservoir d encre Ne tenez pas les côtés du réservoir d encre de l encre pourrait sortir While pressing down with your left thumb twist off the orange protective cap A located on the bottom of the ink tank Press the PUSH mark on the ink tank until it clicks into place Make sure the Ink lamp lights red Match the labels whe...

Страница 10: ...ession Il Si un témoin Alarme B clignote en orange vérifiez que la tête d impression et les réservoirs d encre sont installés correctement Installation des réservoirs d encre Install all the other ink tanks in the same way Install all the ink tanks Make sure all the Ink lamp lights red Once you have installed the ink tanks do not remove them unnecessarily Close the Top Cover Wait until the POWER l...

Страница 11: ...tions reportez vous à la section 6 Chargement du papier page 26 Fermez le bac de sortie papier pour faciliter la sortie de la cassette Load three or more sheets of A4 or Letter sized plain paper into the Cassette C For details refer to 6 Loading Paper on page 26 Close the Paper Output Tray to make it easier to pull out the Cassette ...

Страница 12: ... Les écrans suivants correspondent aux systèmes d exploitation Windows Vista Ultimate Edition ci après dénommé Windows Vista et Mac OS X v 10 5 x Allez à la page 11 Allez à la page 19 Install the Software To use the printer by connecting it to a computer software including the drivers needs to be copied installed to the computer s hard disk The screens below are based on Windows Vista operating sy...

Страница 13: ...ît Passez à l étape Déconnectez le câble USB branché à votre ordinateur et reconnectez le L écran peut se fermer Dans ce cas passez à l étape If the Found New Hardware or Found New Hardware Wizard screen appears Click Cancel to quit the screen Proceed from Remove the USB cable connected to your computer The screen may close In this case proceed from ...

Страница 14: ... Passez à l étape Passez à l étape Si le programme ne s exécute pas automatiquement double cliquez sur l icône de CD ROM sur l ordinateur Lorsque le contenu du CD ROM apparaît double cliquez sur MSETUP4 EXE Press the ON button A to TURN OFF THE PRINTER and turn on the computer then insert the Setup CD ROM into the CD ROM drive Operating noise continues for about 30 seconds until the printer turns ...

Страница 15: ...ieu de résidence apparaît sélectionnez votre lieu de résidence puis cliquez sur Suivant Si l écran Sélectionner la langue s affiche sélectionnez une langue puis cliquez sur Suivant AutoPlay screen appears click Run Msetup4 exe User Account Control screen appears click Continue If the same screen reappears in subsequent steps click Continue When the Select Your Place of Residence screen appears sel...

Страница 16: ...tentivement l écran Contrat de licence et cliquez sur Oui L installation débute Suivez les instructions à l écran pour installer les logiciels Click Easy Install The drivers application software and on screen manuals are installed automatically If you want to select particular items to install click Custom Install and follow the on screen instructions to proceed with the installation Click Install...

Страница 17: ...n message apparaît à l écran Si vous ne pouvez pas passer à la procédure suivante après 10 minutes cliquez sur Aide et confirmez le message When the Printer Connection screen appears connect one end of the USB cable to the computer the other to the printer then TURN THE PRINTER ON The USB port is located on the right side at the back of the printer It takes about 20 seconds for the POWER lamp to l...

Страница 18: ...rger du papier ordinaire dans la cassette apparaît chargez du papier ordinaire dans la cassette et cliquez sur Suivant Pour plus d informations reportez vous à la section 6 Chargement du papier page 26 Click Next For better print results it is recommended that you align the Print Head before printing photos To align the Print Head click Execute then go to step 4 in Aligning the Print Head on page ...

Страница 19: ...on à Internet est requise Les frais de connexion sont applicables Internet connection is required Connection fees apply Pour vous enregistrer plus tard cliquez sur Annuler L enregistrement de l utilisateur peut être lancé depuis l icône Solution Menu Pour plus d informations reportez vous à la section Solution Menu page 32 L écran Enregistrement utilisateur apparaît uniquement lorsque Europe Moyen...

Страница 20: ...ateur retirez le Setup CD ROM CD ROM d installation et conservez le dans un endroit sûr Cliquez sur Quitter Lisez ensuite 6 Chargement du papier page 26 When the Extended Survey Program screen appears confirm the message If you can agree click Agree If you click Do not agree the Extended Survey Program will not be installed This has no effect on the printer s functionality If Restart is displayed ...

Страница 21: ...reau Double cliquez sur l icône Setup Le port USB est situé du côté droit à l arrière de l imprimante Vérifiez que l imprimante est sous tension Connect one end of the USB cable to the computer and the other to the printer then turn on the computer and insert the Setup CD ROM into the CD ROM drive If the CD ROM folder does not open automatically double click the CANON_IJ icon on the desktop Double...

Страница 22: ...sélectionnez votre lieu de résidence puis cliquez sur Suivant Si l écran Sélectionner la langue s affiche sélectionnez une langue puis cliquez sur Suivant Enter your administrator name and password Click OK If you do not know your administrator name or password click Help then follow the on screen instructions When the Select Your Place of Residence screen appears select your place of residence th...

Страница 23: ...des programmes particuliers cliquez sur Installation personnalisée et suivez les instructions à l écran pour poursuivre l installation Move the cursor over items to display explanations Click Install Click Easy Install The drivers application software and on screen manuals are installed automatically If you want to select particular items to install click Custom Install and follow the on screen in...

Страница 24: ... base Cliquez sur Suivant L installation débute Lisez attentivement l écran Contrat de licence et cliquez sur Oui Suivez les instructions à l écran pour installer les logiciels Click Next For better print results it is recommended that you align the Print Head before printing photos To align the Print Head click Execute then go to step 6 in Aligning the Print Head on page 38 You can perform Print ...

Страница 25: ...araît chargez du papier ordinaire dans la cassette et cliquez sur Suivant Pour plus d informations reportez vous à la section 6 Chargement du papier page 26 Click Next The Setup Complete screen will only be displayed when Europe Middle East Africa is selected on the Select Your Place of Residence screen When the Load plain paper into the cassette screen appears load plain paper in the Cassette and...

Страница 26: ...niquement si vous avez sélectionné Europe Moyen Orient Afrique dans l écran Sélectionnez votre lieu de résidence Une connexion à Internet est requise Les frais de connexion sont applicables Click Next If connected to the Internet the user registration page appears Follow the on screen instructions to register your product You will need your product serial number which is located on the inside of t...

Страница 27: ...teur redémarré retirez le Setup CD ROM CD ROM d installation et conservez le dans un endroit sûr Lisez ensuite 6 Chargement du papier page 26 Next read 6 Loading Paper on page 26 Click Restart Click Restart to restart the computer After restarting the computer remove the Setup CD ROM and keep it in a safe place ...

Страница 28: ...aki D veillez à le charger dans le réceptacle arrière B Chargez dans la cassette Tirez la languette F dans la direction de la flèche et étendez la cassette Pull out the Cassette A and remove the Cover E Loading Paper This section explains how to load paper in the Cassette A and Rear Tray B The Cassette A supports plain paper C only To print on Photo Paper Hagaki D be sure to load it in the Rear Tr...

Страница 29: ...rrêtera une fois aligné sur la marque correspondante de taille de papier Il peut exister un léger espace entre le guide papier et la pile de papier Move the Paper Guides G and H to both edges Load paper Load paper with the printing side facing down Slide the Paper Guide H to align with the mark of paper size The Paper Guide H will stop when it aligns with the corresponding mark of paper size There...

Страница 30: ...z à le charger dans le réceptacle arrière Placez le capot E et insérez la cassette dans l imprimante jusqu à ce qu elle s enclenche en place Loading Paper Do not exceed the Load Limit Mark I To print on speciality paper be sure to load it in the Rear Tray Slide the Paper Guide G against left edge of the paper Attach the Cover E and insert the Cassette into the printer until it clicks into place ...

Страница 31: ...e J et tirez vers le haut le support papier K Chargez le papier dans le réceptacle arrière Déplacez les guides papier L vers les deux bords Open the Rear Tray Cover J and pull up the Paper Support K Load paper in the Rear Tray Move the Paper Guides L to both edges ...

Страница 32: ... Chargement du papierdans le manuel en ligne Guide d utilisation de base Ne dépassez pas le repère de limite de chargement M L installation de l imprimante est maintenant terminée Loading Paper Load paper in portrait orientation with the printing side facing up Load paper in the center of the Rear Tray Slide the left and right Paper Guides L against both edges of the paper For details on media siz...

Страница 33: ...l imprimante Inclut également des informations de Dépannage pour votre imprimante Guide d utilisation avancée manuel en ligne Après l installation de l imprimante After Installing the Printer Safety Precautions For proper use read safety precautions before using the product Manuals Safety and Environment Information Describes how to set up and use your printer Introduces the printer and its functi...

Страница 34: ...sées par l imprimante Les boutons affichés dépendent du pays ou de la région d achat Exemple Windows Vista Après l installation de l imprimante Solution Menu Solution Menu is a gateway to functions and information that allow you to make full use of the printer Open various applications and on screen manuals with a single click You can start Solution Menu from the Solution Menu icon on the desktop ...

Страница 35: ...r etc Pour des détails sur les procédures d utilisation et les fonctions consultez les manuels en ligne Maintenant utilisons l imprimante Using Your Printer This printer allows you to print in various ways using the printer driver and application software installed on the computer For example you can print borderless photos and create your own calendar etc easily For detailed operating procedures ...

Страница 36: ...utilisation avancée Sélectionnez l image à imprimer dans dossier puis cliquez sur Présent Impr Lorsqu une photo est sélectionnée le nombre de copies est défini sur 1 Print Photos from a Computer Easy PhotoPrint EX allows you to print photos easily This section explains how to print borderless photos using 4 x 6 size Photo Paper Plus Glossy II The screens are based on Windows Vista In Solution Menu...

Страница 37: ...ace à imprimer vers le haut L impression va commencer Sur Macintosh si l écran Imprimer est affiché cliquez sur Imprimer pour lancer l impression Load a sheet of photo paper in the Rear Tray A in portrait orientation Click Print For details refer to 6 Loading Paper on page 26 Load paper with the printing side facing up Printing will start On Macintosh if the Print screen is displayed click Print t...

Страница 38: ...P3600 et sélectionnez Propriétés Sélectionnez Configuration Préférences système depuis le menu Apple et cliquez sur Impression et fax Double cliquez sur l icône de votre imprimante et cliquez sur Utilitaire Sélectionnez votre modèle depuis Produit et cliquez sur Maintenance Aligning the Print Head This section explains how to align the Print Head The screens are based on Windows Vista To cancel Pr...

Страница 39: ...an et cliquez sur Aligner tête d impression Lorsqu un message apparaît après avoir cliqué sur Aligner tête d impression cliquez sur OK L impression du premier motif commence Select Print Head Alignment on the Maintenance tab of the printer properties dialog box For Macintosh select Print Head Alignment for Test Print on the Canon IJ Printer Utility Do not open the Top Cover while printing Make sur...

Страница 40: ...ticales plus visibles Rayures blanches horizontales moins visibles Rayures blanches horizontales plus visibles Alignement de la tête d impression After the pattern is printed click Yes Look at the first printout and enter the number of the pattern that has the least noticeable vertical or horizontal streaks for columns A to G then click OK Send for Macintosh If it is difficult to pick the best pat...

Страница 41: ...ssage suivant L impression du deuxième motif commence Rayures blanches verticales moins visibles Rayures blanches verticales plus visibles Look at the second printout and enter the number of the pattern that has the least noticeable vertical streaks for columns H to Q then click OK Send for Macintosh Do not open the Top Cover while printing Confirm the displayed message and click OK Click OK in th...

Страница 42: ...de confirmation cliquez sur OK Cliquez sur OK dans le message suivant L impression du troisième motif commence Alignement de la tête d impression Look at the third printout and enter the number of the pattern that has the least noticeable horizontal stripes for columns a to j then click OK Send for Macintosh If it is difficult to pick the best pattern pick the setting that produces the least notic...

Страница 43: ...etournez à l étape de la section 5 Installation des logiciels page 16 Retournez à l étape de la section 5 Installation des logiciels page 23 Click OK Quit for Macintosh Return to the software installation procedure Return to step in 5 Install the Software on page 16 Return to step in 5 Install the Software on page 23 ...

Страница 44: ...x 41 0 dB A When printing in the standard print quality mode on Photo Paper Plus Glossy II Operating environment Temperature 5 to 35 C 41 to 95 F Humidity 10 to 90 RH no condensation Storage environment Temperature 0 to 40 C 32 to 104 F Humidity 5 to 95 RH no condensation Power supply AC 100 240 V 50 60 Hz Power consumption Printing Approx 16 W Standby minimun Approx 1 3 W OFF Approx 0 5 W USB con...

Страница 45: ...sion directe PictBridge Un ordinateur compatible USB Hi Speed est requis Dans la mesure où l interface USB Hi Speed est entièrement rétrocompatible avec la norme USB 1 1 elle peut fonctionner à la vitesse de l USB 1 1 Largeur d impression 8 pouces 203 2 mm pour impression à bord perdu 8 5 pouces 216 mm Niveau de bruit acoustique Env 41 0 dB A Pour le mode de qualité d impression standard sur du Ph...

Страница 46: ...canon ca QT5 1606 V01 XXXXXXXX CANON INC 2008 PRINTED IN VIETNAM IMPRIME AU VIETNAM Les réservoirs d encre suivants sont compatibles avec ce produit The following ink tanks are compatible with this product ...

Отзывы: