background image

Changing the Copy (Zoom) Ratio

3-16

3

Basic Cop

y

ing

 a

nd Mail Bo

F

e

atures

NOTE


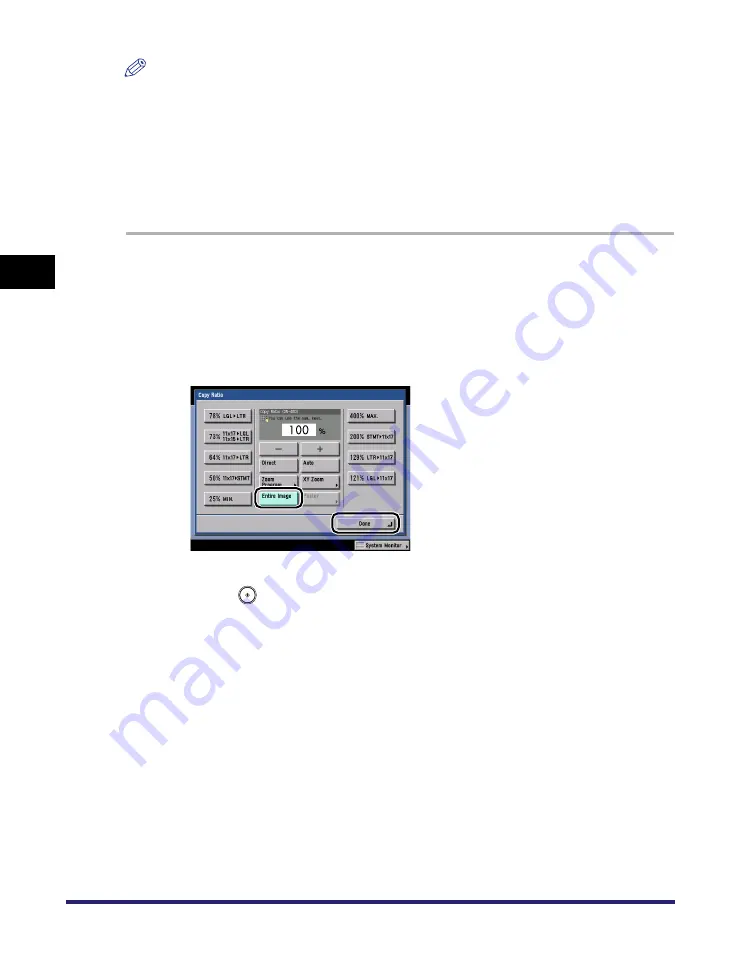
The Entire Image mode is available for the Copy function only.

The reduction ratios when the Entire Image mode is specified are:

- 11" x 17": 98.1% (12" x 18": 100%)

- LGL: 97.7%

- LTR: 97.1%

- STMT: 96.3%

To cancel this setting, press [Copy Ratio] 

 [Entire Image].

1

Place your originals 

 press [Copy Ratio].

If necessary, see the screen shot in step 1 of "Copying" in "Preset Zoom," on p. 
3-9.

2

Press [Entire Image] 

 [Done].

3

Press  

(Start).

Содержание imageRUNNER C3480

Страница 1: ...Please read this guide before operating this product After you finish reading this guide store it in a safe place for future reference ENG Copying and Mail Box Guide Copying and Mail Box Guide...

Страница 2: ......

Страница 3: ...Color imageRUNNER C3480 C3480i C3080 C3080i C2550 Copying and Mail Box Guide 0 Ot...

Страница 4: ...functions of the machine Tutorial CD CD ROM Precautions for Using Your Machine Troubleshooting Specifications Support Guide Basic Operations Reference Guide CD ROM Copying and Mail Box Instructions C...

Страница 5: ...ac UFR II Driver Guide CD ROM Fax Driver Installation and Instructions Fax Driver Guide CD ROM Installing MEAP Applications and Using the Login Service MEAP SMS Administrator Guide CD ROM To view the...

Страница 6: ...Documents Using the Inboxes Chapter 7 Using the Express Copy Basic Features Screen Chapter 8 Customizing Settings Chapter 9 Appendix Includes the color copy samples combination of functions chart and...

Страница 7: ...ching the Copy Basic Features Screen 1 2 Various Copying Features 1 3 Flow of Copy Operations 1 6 Paper Selection 1 12 Canceling a Copy Job 1 18 Using the Touch Panel Display 1 18 Using the Stop Key 1...

Страница 8: ...cument 2 48 Checking a Document s Detailed Information 2 49 Erasing a Document 2 51 Printing Lists 2 52 Moving Duplicating a Document 2 53 Editing Checking the Contents of a Document 2 55 Checking an...

Страница 9: ...th Different XY Copy Zoom Ratios XY Zoom 3 20 Setting the X and Y Axes Independently 3 21 Copying 3 23 Mail Box Scan 3 24 Poster 3 25 Determining the Copy Ratio and Number of Sheets Needed 3 26 Specif...

Страница 10: ...Mail Box Features for Scanning 4 5 Specifying the Special Mail Box Features for Printing 4 7 2 Page Separation 4 9 Copying 4 10 Mail Box Scan 4 10 Cover Sheet Insertion 4 11 Copying 4 13 Mail Box Pri...

Страница 11: ...Image Creation Modes 4 56 Inverting Images Nega Posi 4 56 Copying 4 56 Mail Box Scan 4 57 Image Repeat 4 57 Mirror Image 4 61 Area Designation 4 62 Using the Edit Pen 4 63 Using the Numeric Keys 4 67...

Страница 12: ...01 Printing a Watermark and Date 4 102 Watermark Printing 4 103 Copying 4 103 Mail Box Print 4 104 Date Printing 4 105 Copying 4 105 Mail Box Print 4 106 Combining Multiple Batches of Originals with D...

Страница 13: ...ending a Document 6 12 Chapter 7 Using the Express Copy Basic Features Screen Switching to the Express Copy Basic Features Screen 7 3 Various Features of the Express Copy Basic Features Screen 7 4 Ope...

Страница 14: ...Recall 7 36 Registering Frequently Used Copy Settings in Memory Mode Memory 7 37 Storing Copy Settings 7 37 Registering a Memory Key Name 7 38 Recalling a Copy Mode 7 39 Erasing a Copy Mode 7 39 Scan...

Страница 15: ...around the Original Original Frame Erase 7 73 Making Copies by Erasing the Book Frame Book Frame Erase 7 74 Making Copies by Erasing Binding Holes Binding Erase 7 75 Making Copies with Sheets of Paper...

Страница 16: ...Initializing Standard Settings 8 11 Restoring the Default Copy Settings 8 11 Customizing Mail Box Settings 8 12 Mail Box Settings Table 8 12 Setting Storing a User Inbox 8 13 Initializing a User Inbo...

Страница 17: ...ates a warning concerning operations that may lead to death or injury to persons if not performed correctly To use the machine safely always pay attention to these warnings CAUTION Indicates a caution...

Страница 18: ...FAX Board Finisher Z1 and Cassette Feeding Unit Y3 Note that functions that cannot be used depending on the model or options are not displayed on the touch panel display The keys which you should pres...

Страница 19: ...in this manual are those displayed when the Color imageRUNNER C3480i has the following optional equipment attached to it the Finisher Z1 and Cassette Feeding Unit Y3 Trademarks Product and company nam...

Страница 20: ...isclaimers The information in this document is subject to change without notice CANON INC MAKES NO WARRANTY OF ANY KIND WITH REGARD TO THIS MATERIAL EITHER EXPRESS OR IMPLIED EXCEPT AS PROVIDED HEREIN...

Страница 21: ...Be sure to check the ingredients of the adhesive before you use it Test some adhesives with an unwanted color copy before you use it with a valuable copy Inserting Copies Between Printed Pages When co...

Страница 22: ...xx...

Страница 23: ...Basic Features Screen 1 2 Various Copying Features 1 3 Flow of Copy Operations 1 6 Paper Selection 1 12 Canceling a Copy Job 1 18 Using the Touch Panel Display 1 18 Using the Stop Key 1 18 Using the...

Страница 24: ...opying function You can press Copy or Express Copy to switch the Copy Basic Features screen The Express Copy Basic Features screen simplifies the copying procedures of the Regular Copy Basic Features...

Страница 25: ...olor Selection Drop Down List Press to select the color mode for copying b Direct Press to make copies in the same size as your original c Copy Ratio Press to reduce or enlarge the copy size d Finishi...

Страница 26: ...e copies of several originals to form a booklet d Transparency Interleaving Press to insert a sheet between each transparency when copying transparencies You can make the same prints on the interleaf...

Страница 27: ...sulting output is copied d Mode Memory Press to store or recall copy modes e Recall Press to recall previously set copy modes f Sharpness Press to sharpen or soften the image of the original on the co...

Страница 28: ...ance See Chapter 7 Routine Maintenance in the Reference Guide If you are using a login service log in and log out using the procedure for the login service you are using before and after operating the...

Страница 29: ...from the Additional Functions screen is set to On the Collate or the Offset Collate mode is automatically set when you place your originals in the feeder See Auto Collate on p 8 9 3 Gently close the f...

Страница 30: ...Full Color See Changing Color Modes on p 3 56 If the originals contain a few color sections If the color sections are located only on the left side within 3 8 10 mm from the left edge of the original...

Страница 31: ...tions on the Special Features screen see Chapters 4 through 5 6 Press numeric keys to enter the desired copy quantity 1 to 999 If you make a mistake when entering values press Clear enter the correct...

Страница 32: ...ch as the copy quantity and paper size while the machine is copying NOTE If there is a current job the machine scans the original and waits to print it Printing starts when the current job is complete...

Страница 33: ...copies press Interrupt NOTE For instructions on interrupting a copy job see Interrupt Mode on p 1 29 If you want to start copying the next original while a previous original is printing Press Done pl...

Страница 34: ...e size paper at a copy ratio of 100 the periphery of the original image may be cut off slightly on the copy For more information on how much may be cut off look under the margin areas in the Specifica...

Страница 35: ...als Copy these originals using the Manual Paper Selection mode Nonstandard size originals Highly transparent originals such as transparencies Originals with an extremely dark background STMT STMTR or...

Страница 36: ...4 Customizing Settings in the Reference Guide indicates that the paper is loaded vertically and indicates that the paper is loaded horizontally The suffix R such as in LTRR used in paper size designa...

Страница 37: ...ed sheet press 2nd Side of 2 Sided Page NOTE Transparency can be selected only if LTR is selected as the paper size You can register paper types that are not displayed on the detailed settings list in...

Страница 38: ...o the paper press Plain Ppr Print Set If too much toner is being applied to the paper press Thin If not enough toner is being applied to the paper press Heavy If the desired paper type is not displaye...

Страница 39: ...s Envelope Select the desired envelope type press OK IMPORTANT If the envelope type is not set correctly a paper jam will occur If you use envelopes that have glue attached to their flaps the glue may...

Страница 40: ...up screen that appears while the machine is scanning printing or waiting to print The copy job is canceled NOTE If you cancel a copy job during scanning be sure to remove the original for that job Usi...

Страница 41: ...d cancel them all at once Select and cancel one job at a time The copy job is canceled 3 Press Resume Copying Copying resumes IMPORTANT When you press Stop while copying in the Store In User Inbox mod...

Страница 42: ...that you want to cancel press Cancel You cannot select multiple jobs and cancel them all at once Select and cancel one job at a time 4 Press Yes The copy job is canceled NOTE The canceled job is displ...

Страница 43: ...fy copy settings or scan originals while the machine is in the waiting state such as when the power is just turned ON or after a paper jam is cleared Copying automatically begins when the machine is r...

Страница 44: ...the Copy function press Done Copy to display the Regular Copy Basic Features screen 2 Place your originals set the desired copy modes and paper source 3 Press Start If you specify a reserved copy job...

Страница 45: ...If the type of paper is not set correctly it could adversely affect the quality of the image Moreover the fixing unit may become dirty or the paper could jam and a service repair may be needed NOTE I...

Страница 46: ...from the Additional Functions screen is set to On and the paper size type have been stored the selected paper size type are displayed on the screen See Chapter 4 Customizing Settings in the Reference...

Страница 47: ...that key beforehand For instructions on registering a paper size see Chapter 4 Customizing Settings in the Reference Guide Press Next Select the desired paper type press OK If you want to adjust the...

Страница 48: ...job using the stack bypass The subsequent steps show you how to load paper into the stack bypass and complete the scanning and printing process of the reserved job 5 Press Start 6 When it is time for...

Страница 49: ...IMPORTANT Set the paper size to the same size as the paper loaded in the stack bypass If you want to select a standard paper size Select the desired paper size press Next NOTE To select an A or B seri...

Страница 50: ...ed paper type press OK If you want to adjust the thickness of the toner applied to the paper press Plain Ppr Print Set If too much toner is being applied to the paper press Thin If not enough toner is...

Страница 51: ...ly set copy modes press Reset The Interrupt mode itself is not canceled 1 Press Interrupt If you want to make copies after changing the Department ID while Department ID Management is enabled press Lo...

Страница 52: ...o the Copy Functions 4 Once the originals are scanned remove them from the machine IMPORTANT If you want to continue making interrupt copies wait until the current interrupt copy job is complete end o...

Страница 53: ...r original in the Collate Offset Collate Rotate Collate Staple Cover Sheet Insertion Booklet or Transparency Interleaving mode Sample Set does not appear if the Group or Offset Group mode is set NOTE...

Страница 54: ...If you select Specified Pages specify the page numbers of the output Note that the page numbers of the output may be different from those of the original If you select Specified Pages the Staple Hole...

Страница 55: ...See Paper Selection on p 2 25 To collate the copies press Finishing See Collating Copies Prints on p 3 32 To set a margin for binding press Margin See Margin Mode on p 4 38 To make color balance adjus...

Страница 56: ...on 2 Check the settings If the desired modes are set skip to step 4 Otherwise press the key of the copy mode to be changed or canceled NOTE A right triangle on a copy mode setting key indicates that m...

Страница 57: ...election 2 25 Canceling a Job 2 30 While Scanning 2 30 While Printing 2 31 Reserving Jobs 2 33 Storing Originals While Printing 2 33 Reserving Print Jobs 2 34 Sample Print 2 43 Storing Print Settings...

Страница 58: ...a which is scanned by this machine and the data sent from a personal computer as if storing documents in binders The documents data stored in an inbox can be kept confidential by setting a password an...

Страница 59: ...inbox Press Change Pr Settings to change the print settings See Printing Documents Stored in an Inbox on p 2 19 Documents forwarded by Fax I Fax are stored and displayed here Fax I Fax documents recei...

Страница 60: ...Confidential Fax Inboxes An Inbox Selection screen is available for each type of inbox Inbox numbers names and available memory are displayed for each inbox In addition an icon appears on the key of e...

Страница 61: ...ne are stored in the Memory RX Inbox or Divided Data RX Inbox The stored documents can be printed or sent to computers at anytime using the desired settings c Confidential Fax Inbox If a document rece...

Страница 62: ...ng the conditions with which each document was scanned or saved is displayed For more information on the icons displayed in User Inboxes see Checking a Document s Detailed Information on p 2 49 The fo...

Страница 63: ...to send a document stored in the User Inbox or the Memory RX Inbox j I Fax Memory Lock Press to turn the I Fax Memory Lock mode On or Off for the Memory RX Inbox in order to receive I faxes in memory...

Страница 64: ...The screen that appears varies depending on the type of inbox selected a Color Selection Drop Down List Press to select the color mode for printing b Change Pr Settings Press to change the print setti...

Страница 65: ...per source d Finishing Press to select or cancel the Collate Group or Staple mode e 2 Sided Printing Press to make two sided prints f Original Settings Press to cancel the settings that you have chang...

Страница 66: ...he scanning size of the original d 2 Sided Original Press if you are scanning a two sided original e Document Name Press to assign the document a name f Document Size Select Press to set the size of t...

Страница 67: ...e destination list d Erase Press to delete the destination selected in the destination list e Cc Bcc Press to specify addresses destinations for the Cc and Bcc addresses when sending an e mail f Delet...

Страница 68: ...the optional Card Reader C1 see Chapter 3 Optional Equipment in the Reference Guide If you are using Department ID Management see Chapter 2 Basic Operations in the Reference Guide If you are performi...

Страница 69: ...ox number using numeric keys make sure to enter a two digit number press OK If you make a mistake when entering the User Inbox number press Clear enter the correct number NOTE If a document is stored...

Страница 70: ...enter the password using numeric keys press OK Enter the password set for the selected User Inbox See Setting Storing a User Inbox on p 8 13 If a password is not set for the selected User Inbox this s...

Страница 71: ...ons are located only on the left side within 3 8 10 mm from the left edge of the originals when loading the originals in the feeder If the color sections of the originals are close to black If the ori...

Страница 72: ...ith an image that extends all the way to the edges without the periphery of the original being cut off place the original on the platen glass and press 11 x 17 See Chapter 2 Basic Operations in the Re...

Страница 73: ...Done When scanning is complete the scanned data is stored in the selected inbox IMPORTANT You cannot change settings such as the document size or the scanning ratio while the machine is scanning The s...

Страница 74: ...Flow of Mail Box Operations 2 18 2 Introduction to the Mail Box Functions NOTE If you want to cancel scanning press Cancel or Stop 8 When scanning is complete remove your originals...

Страница 75: ...beforehand See Moving Duplicating a Document on p 2 53 If you do not change the print settings when printing out documents stored in inboxes from a computer or using the Store In User Inbox mode of t...

Страница 76: ...g numeric keys make sure to enter a two digit number press OK If you make a mistake when entering the User Inbox number press Clear enter the correct number NOTE If a document is stored in an inbox th...

Страница 77: ...print press Print If there are seven or more stored documents press or to display the other documents You can select multiple documents stored in the User Inbox To select all of the documents up to 1...

Страница 78: ...hange Pr Settings To change the number of prints enter the desired number using numeric keys If multiple documents are selected you can change the number of prints by pressing Change The Copies If you...

Страница 79: ...ide You can set the color selection paper selection 2 Sided printing finishing and special features on the Change Print Settings screen 7 Press Start Print When one document is selected When multiple...

Страница 80: ...size you can try to eliminate this error by making a Zoom Fine Adjustment in Adjustment Cleaning from the Additional Functions screen See Chapter 4 Customizing Settings in the Reference Guide You can...

Страница 81: ...may be needed NOTE For information on paper types see Chapter 2 Basic Operations in the Reference Guide For instructions on entering values in inches see Chapter 2 Basic Operations in the Reference Gu...

Страница 82: ...in the Reference Guide If you want to set the machine to automatically select a paper size Press Auto If you selected Transparency press Overhead Project Type and select either Transmissive or Reflec...

Страница 83: ...rved job press Stack Bypass Settings to specify the desired paper size type Select the desired paper size press Next NOTE To select an A or B series paper size press A B size Select the desired paper...

Страница 84: ...etailed settings list in Selecting the Paper Type For more information on storing the paper type see Chapter 6 System Manager Settings in the Reference Guide If you want to select a nonstandard paper...

Страница 85: ...Side of 2 Sided Page IMPORTANT If you select a nonstandard size paper the Rotate Collate Rotate Group Offset Collate Offset Group Staple Hole Punch 2 Sided Printing Booklet Cover Sheet Insertion or C...

Страница 86: ...p on the control panel However the printing of a document stored in an inbox can only be canceled from the touch panel display and System Monitor screen While Scanning Using the Touch Panel Display 1...

Страница 87: ...ction to the Mail Box Functions While Printing Using the Touch Panel Display 1 Press Cancel on the pop up screen that appears while the machine is printing The job is canceled Using the System Monitor...

Страница 88: ...t job that you want to cancel press Cancel You cannot select multiple jobs and cancel them all at once Select and cancel one job at a time 4 Press Yes The print job is canceled NOTE The canceled job i...

Страница 89: ...ch reserved job A User Inbox is used as an example in this section Storing Originals While Printing You can scan and store an original while the machine is printing 1 Press Done on the pop up screen t...

Страница 90: ...print settings while the machine is in the waiting state such as when the power is just turned ON or after a paper jam is cleared Printing automatically begins when the machine is ready NOTE You can s...

Страница 91: ...is printing If the screen displayed on the touch panel display is from a function other than the Mail Box function press Done Mail Box to display the Inbox Selection screen 2 Select the desired User...

Страница 92: ...s Press No if you want to cancel printing altogether If the machine can no longer accept any more reserved jobs the screen below is displayed Press OK try reserving the job again after the current job...

Страница 93: ...r the fixing unit may become dirty or the paper could jam and a service repair may be needed NOTE If Stack Bypass Standard Settings in Common Settings from the Additional Functions screen is set to On...

Страница 94: ...u want to adjust the thickness of the toner applied to the paper press Plain Ppr Print Set If too much toner is being applied to the paper press Thin If not enough toner is being applied to the paper...

Страница 95: ...lope type press OK IMPORTANT If the envelope type is not set correctly a paper jam will occur If you use envelopes that have glue attached to their flaps the glue may melt due to the heat and pressure...

Страница 96: ...does not start if paper of a different size or type is loaded 7 Select the desired paper size If the following screen is displayed adjust the width of the slide guides specify the paper size press OK...

Страница 97: ...er size Press Irreg Size Press X horizontal axis enter a value Press Y vertical axis enter a value Press OK You can also press a size key in which a paper size is registered S1 to S5 instead of enteri...

Страница 98: ...an envelope size Press Envelope Select the desired envelope type press OK IMPORTANT If the envelope type is not set correctly a paper jam will occur If you use envelopes that have glue attached to the...

Страница 99: ...u set to make multiple prints of the document in the Collate Offset Collate Rotate Collate Staple Cover Job Separator Cover Sheet Insertion or Booklet mode Sample Print does not appear if the Group or...

Страница 100: ...hat the page numbers of the output may be different from those of the stored document If you select Specified Pages the Staple Hole Punch or Booklet mode cannot be set You cannot change All Pages to S...

Страница 101: ...See Paper Selection on p 2 25 To collate the prints press Finishing See Collating Copies Prints on p 3 32 To make 2 Sided prints press 2 Sided Printing See Two Sided Copying Printing on p 3 45 To chan...

Страница 102: ...rint settings and modes the number of printouts paper select 2 Sided Printing Finishing Cover Sheet Insertion Booklet Margin Secure Watermark Page Copy Set Numbering and Watermark Print Date If Erase...

Страница 103: ...n to overwrite the previous settings Press Yes NOTE The document for which the print settings are stored is overwritten its name is changed to the current date and time and the document moves to the e...

Страница 104: ...ging the Name of a Document IMPORTANT You cannot change the name of documents stored in the Memory RX Inbox or Confidential Fax Inboxes 1 Select the desired User Inbox number select the document whose...

Страница 105: ...press Details To select a document from the Memory RX Inbox refer to step 1 of Printing a Document in the Memory RX inbox on p 6 5 To select a document from the Confidential Fax Inbox refer to step 1...

Страница 106: ...re icons without print settings 1 If the document is stored in inboxes from the PS driver the color format will be CMYK The CMYK documents cannot be sent from the inbox To print full color CMYK docume...

Страница 107: ...step 1 of Printing a Document in the Confidential Fax Inbox on p 6 11 To select all of the documents up to 100 documents from the top in the User Inbox press Select All Max 100 doc If a document is al...

Страница 108: ...x 17 LGL LTR or LTRR paper plain recycled or color paper is loaded in a paper source that is set to On when you press Other to select a paper source in Drawer Eligibility For APS ADS in Common Settin...

Страница 109: ...the Memory RX Inbox or any Confidential Fax Inbox 1 Select the desired User Inbox number select the document that you want to move or duplicate press Move Duplicate To select all of the documents up...

Страница 110: ...or duplication cannot be performed If the document cannot be moved or duplicated to the selected inbox it remains in the original User Inbox If an error occurs while multiple documents are being moved...

Страница 111: ...t which has been stored in the Memory RX Inbox or a Confidential Fax Inbox Checking an Image in a Document 1 Select the desired User Inbox number select the document whose contents you want to view pr...

Страница 112: ...combine multiple documents in the same inbox as one document to create a new document IMPORTANT You cannot use the Merge and Save mode if the resolutions of the selected documents differ Documents wit...

Страница 113: ...January 15 2007 its name will be 20070115133541 If print settings have been stored for the selected documents the settings are not carried over to the new document 3 Press Done Inserting a Document i...

Страница 114: ...ted document becomes the document that is inserted 2 Select the document you want to insert A checkmark is displayed to the left of the selected document You can cancel a selection by selecting the do...

Страница 115: ...f a document is created at 1 35 PM 41 seconds on January 15 2007 its name will be 20070115133541 If print settings have been stored for the selected documents the settings are not carried over to the...

Страница 116: ...be erased using and You can check image stored in the document you have selected by pressing View Page See Checking an Image in a Document on p 2 55 If Erase Pages Consecutively is selected Press Fir...

Страница 117: ...set Zoom 3 9 Zoom by Percentage 3 11 Auto Zoom 3 13 Entire Image 3 15 Reducing Enlarging Using the Original and Copy Record Sizes 3 17 Setting the X and Y Axes Independently 3 21 Poster 3 25 Collating...

Страница 118: ...see Combination of Functions Chart on p 9 6 NOTE You can change the exposure while the machine is printing Manual Exposure Adjustment You can manually adjust the exposure to the most appropriate leve...

Страница 119: ...ollowing four original type modes are available IMPORTANT If you make copies of an original containing halftones such as a printed photo the moir effect a shimmering wavy pattern may occur If this hap...

Страница 120: ...wn originals can also be copied scanned clearly Copying 1 Place your originals press the original type drop down list select the original type Text Photo Map Printed Image Photo or Text If you want to...

Страница 121: ...ally adjust the exposure to the level best suited to the quality of the original NOTE There are two types of automatic scan exposure adjustments the Remove Background mode which enables you to scan by...

Страница 122: ...ing 1 Place your originals press A NOTE An automatic copy exposure adjustment may not work with transparencies In this case adjust the exposure manually by pressing or 2 Press Start Mail Box Scan 1 Se...

Страница 123: ...or Confidential Fax Inboxes You cannot change the print exposure while printing in the Secure Watermark mode Copying 1 Press or on the screen that is displayed while the machine is Copying Press to m...

Страница 124: ...not adjust the exposure when CMYK format documents are selected If you change the exposure when scanning an original into an inbox the selected exposure may be modified by the machine if you select to...

Страница 125: ...standard paper record size IMPORTANT Place the originals horizontally in the following cases If you are enlarging LTR originals to 11 x 17 If you are enlarging STMT originals to 11 x 17 when the orig...

Страница 126: ...e preset copy zoom ratios for enlarging originals are Maximum 400 STMT 11 x 17 200 LTR 11 x 17 129 LGL 11 x 17 121 Copying 1 Place your originals press Copy Ratio IMPORTANT The Paper Select setting mu...

Страница 127: ...press Scan Copy Ratio 2 Specify the zoom ratio and scan originals in accordance with steps 2 and 3 of Copying on p 3 10 Zoom by Percentage You can reduce or enlarge originals by any copy zoom ratio i...

Страница 128: ...ing in Preset Zoom on p 3 9 2 Press or to set a copy ratio press Done 3 Press Start Mail Box Scan 1 Select the desired User Inbox number place your originals press Scan Copy Ratio If necessary see the...

Страница 129: ...Zoom or Zoom by Percentage mode instead To use the Auto setting on the Copy Zoom Ratio screen your originals must conform to one of the standard paper sizes 11 x 17 LGL LTR LTRR STMT or STMTR You can...

Страница 130: ...ect a paper size manually If you do not select a paper size the copy ratio is automatically set to match the size of paper loaded in paper drawer 1 2 Press Auto Done 3 Press Start NOTE If the original...

Страница 131: ...hen Start is pressed Entire Image If you are copying an original with an image that extends all the way to the edges onto the same size paper at a copy ratio of 100 the periphery of the original image...

Страница 132: ...only The reduction ratios when the Entire Image mode is specified are 11 x 17 98 1 12 x 18 100 LGL 97 7 LTR 97 1 STMT 96 3 To cancel this setting press Copy Ratio Entire Image 1 Place your originals p...

Страница 133: ...are available NOTE The specified sizes are converted into a copy zoom ratio by the machine using the formula below The result is rounded to the closest integer Copy zoom ratio copy record size origina...

Страница 134: ...ifferent copy zoom ratios for the horizontal X and vertical Y axes Making Copies Scanning with the Same XY Copy Zoom Ratio Zoom Copying 1 Place your originals press Copy Ratio If necessary see the scr...

Страница 135: ...tered however the original image may be cut off slightly depending on the paper record size If the computation results in a zoom ratio less than 25 or greater than 400 a message appears telling you th...

Страница 136: ...e Same XY Copy Zoom Ratio Zoom on p 3 18 3 Press XY Zoom 4 Use the numeric keys on the touch panel display to enter values for the original size and copy record size Press X horizontal axis for Origin...

Страница 137: ...Box Scan in Preset Zoom on p 3 9 2 Specify the Zoom Program XY Zoom mode and scan originals in accordance with steps 2 to 5 of Copying on p 3 20 For the Mail Box function enter the Original Size and R...

Страница 138: ...with the XY Zoom mode the image of the original may be rotated before being printed on the paper depending on the outcome of the computation executed by the machine using the original size and the sp...

Страница 139: ...io is set to match the size of the paper loaded in that drawer If you set the copy zoom ratio in the Auto XY Zoom mode Auto Orientation is not performed NOTE The Auto XY Zoom mode is available for the...

Страница 140: ...al axis enter a value Press OK To have the copy ratios automatically specified Auto XY Zoom Press Auto XY Zoom OK 4 Press Start Mail Box Scan 1 Select the desired User Inbox number place your original...

Страница 141: ...used if the original is placed in the feeder If you set the Poster mode while the color mode is set to Auto Color Select the color mode is automatically set to Full Color The Poster mode cannot be us...

Страница 142: ...e indicated in the table You can create a poster with copy ratios that are not listed in the table However the size of the original must not be larger than 11 x 17 and the copy ratio cannot exceed 400...

Страница 143: ...ress Copy Ratio s Next 4 Use the numeric keys or press or on the touch panel display to enter a copy ratio press OK 5 Press Start NOTE If you press Stop while copying is in progress to cancel the copy...

Страница 144: ...ng in Preset Zoom on p 3 9 2 Press Poster If necessary see the screen shot in step 2 of Specifying the Copy Ratio in Percentage on p 3 26 3 Press Number Of Output Pages Next 4 Press Paper Select 5 Sel...

Страница 145: ...ess than what you have selected depending on a combination of factors that determine the most appropriate number of pages These factors include the size of the original the selected paper size and the...

Страница 146: ...4 x 3 are output Size of Original Orientation of Original Copy Size Orientation of Copy 11 x 17 Horizontal 22 x 34 Horizontal The image of the original is automatically divided into 12 sections each o...

Страница 147: ...created by the Poster mode overlap slightly When pasting the sheets together trim the overlapping portions leaving an adequate amount of overlap to apply the glue The width of the overlapping portion...

Страница 148: ...is printed on will always be output face down The Hole Punch mode is available only if the optional Finisher Y1 or Saddle Finisher Y2 and Puncher Unit M1 are attached to the Color imageRUNNER C3480 C3...

Страница 149: ...ray J1 LTR LTRR Finisher Y1 11 x 17 LGL LTR LTRR STMT EXEC 11 x 17 LGL LTRR 30 sheets LTR EXEC 50 sheets 11 x 17 LTR LTRR 30 sheets LTR EXEC 50 sheets Finisher Y1 and Puncher Unit M1 11 x 17 LGL LTR L...

Страница 150: ...the Staple Mode Is Set The copies are automatically collated into sets arranged in page order and stapled The output is as follows If you select Corner Top Left If you select Double Left Originals Set...

Страница 151: ...de the original stored document must already be in booklet form as shown in the illustration above See Booklet Mode on p 4 19 and Booklet Scanning on p 4 26 If No Finishing Mode Is Set If the Collate...

Страница 152: ...ally collated into sets arranged in page order and are output in alternating directions as follows If the Offset Mode Is Set The copies are slightly offset vertically in the output tray as follows You...

Страница 153: ...Collate mode is automatically set when you place your originals in the feeder See Auto Collate on p 8 9 2 Press Collate Page order If you want to make hole punches press Hole Punch The optional Finish...

Страница 154: ...ttings from the Additional Functions screen set to On See Chapter 4 Customizing Settings in the Reference Guide When you have selected Automatic Paper Selection for the Rotate Mode make sure to select...

Страница 155: ...ngs from the Additional Functions screen is set to On the Collate or Offset Collate mode is automatically set when you place your originals in the feeder See Auto Collate on p 8 9 2 Press Group Same p...

Страница 156: ...t to On See Chapter 4 Customizing Settings in the Reference Guide When you have selected Automatic Paper Selection for the Rotate Mode make sure to select a paper size which can be rotated Otherwise o...

Страница 157: ...irty or the paper could jam and a service repair may be needed Copying 1 Place your originals press Finishing If necessary see the screen shot in step 1 of Copying in Page Order Collate on p 3 36 NOTE...

Страница 158: ...addle Finisher Y2 is attached Press Next Select the stapling type Corner Double or Saddle Stitch If you want to select Corner or Double Press Corner or Double select the stapling position press OK If...

Страница 159: ...IMPORTANT Make sure to use the same paper size for the cover and the main document If you select No for Select whether to print on covers Heavy 1 or Heavy 2 can be selected Only 17 to 28 lb bond 64 t...

Страница 160: ...t the desired User Inbox number and the document to print press Print Change Pr Settings Finishing If necessary see the screen shot in step 1 of Mail Box Print in Page Order Collate on p 3 36 2 Specif...

Страница 161: ...edge of the platen glass by the arrow in the top left corner or with the back edge of the feeder The 2 Sided mode you have selected is displayed above 2 Sided on the Regular Copy Basic Features scree...

Страница 162: ...laced vertically the back side of the copy is printed upside down You can place STMTR originals only on the platen glass NOTE If there are an odd number of originals the back side of the last copy is...

Страница 163: ...the 2 Sided Printing mode is used together with the Automatic Paper Selection mode and the pages that you want to print are of different size the different sized documents will be printed as one sided...

Страница 164: ...inals If a two sided original is placed in the feeder it is automatically turned over so that both sides of the original are copied onto the front and back sides of a copy sheet IMPORTANT 2 2 Sided co...

Страница 165: ...late on p 8 9 2 Press 2 2 Sided To set the orientation of the originals and the copies press Option select the type of two sided orientation for the originals and the copies press Done Original Copy 3...

Страница 166: ...rtically the back side of the copy is printed upside down You can place STMTR originals only on the platen glass NOTE The 2 1 Sided mode is available for the Copying function only If you want to place...

Страница 167: ...Book to 2 Sided This feature enables you to make two sided copies from facing pages or from the front and back sides of a page in bound originals such as books and magazines Left Right Two sided This...

Страница 168: ...lace your original on the platen glass The Book 2 Sided mode cannot be used when the original is placed in the feeder NOTE The Book 2 Sided mode is available for the Copying function only 1 Place your...

Страница 169: ...page of the original place your original on the platen glass press Start 5 When scanning is complete press Done Left Right 2 Sided The facing pages of a book or bound original are copied onto the fron...

Страница 170: ...Functions Chart on p 9 6 When you are scanning originals with a horizontal landscape orientation such as LTRR and STMTR make sure to place them horizontally in the feeder If these originals are placed...

Страница 171: ...2 Select the type of original press OK Details of each item are shown below 3 Press Start Book Type The front and back sides of the original have the same top bottom orientation Calendar Type The fro...

Страница 172: ...ndard Settings from the Additional Functions screen See Changing the Current Standard Settings on p 8 10 You can set to display a shortcut key for the Black mode next to the color selection drop down...

Страница 173: ...unctions screen is set to Off the Full Color mode is not displayed See Chapter 6 System Manager Settings in the Reference Guide If a black and white original is copied or scanned in the Full Color mod...

Страница 174: ...ble to detect whether your originals are color or black and white NOTE If you set the Poster mode while the color mode is set to Auto Color Select the color mode is automatically set to Full Color 1 P...

Страница 175: ...g and Mail Box Features 2 Press Start Mail Box Scan 1 Select the desired User Inbox number place your originals press Scan 2 Press the color selection drop down list press Auto Color Select Full Color...

Страница 176: ...the document to print press Print 2 Press the color selection drop down list press Auto Color Select Black Single Color or Two Colors You can also press Change Pr Settings and then select the desired...

Страница 177: ...nd data sent from one or more computers using the Two sided Printing mode IMPORTANT For information on the modes which cannot be set in combination with this mode see Combination of Functions Chart on...

Страница 178: ...100 documents from the top in the User Inbox press Select All Max 100 doc If a document is already selected this key appears as Clear Selection instead To cancel all documents press Clear Selection Cl...

Страница 179: ...4 7 2 Page Separation 4 9 Copying 4 10 Mail Box Scan 4 10 Cover Sheet Insertion 4 11 Copying 4 13 Mail Box Print 4 15 Cover Job Separator 4 16 Booklet Mode 4 19 Copying 4 21 Mail Box Print 4 25 Bookl...

Страница 180: ...mage Quality Adjustment 4 70 Adjusting the Color 4 73 One Touch Color Mode 4 82 Adjusting the Contrast Sharpness 4 85 Copying 4 86 Mail Box Scan 4 86 Composing Images 4 87 Copying 4 88 Mail Box Print...

Страница 181: ...modes are modes for performing various kinds of editing according to your needs when copying printing or storing documents in an inbox IMPORTANT Depending on the mode some combinations of modes will n...

Страница 182: ...ending on the mode you may have to place your original on the platen glass or in the feeder See the corresponding section on each mode for detailed information NOTE If the desired setting is not displ...

Страница 183: ...the bottom right of their key Example Frame Erase Press Special Features Frame Erase Cancel For modes which do not have a right triangle on the bottom right of their key Example Job Build Press Speci...

Страница 184: ...art If the original is placed on the platen glass follow the instructions that appear on the touch panel display press Start once for each original When scanning is complete press Done Scanning starts...

Страница 185: ...Change Pr Settings If necessary see the screen shots in steps 1 to 5 of Printing Documents Stored in an Inbox on p 2 19 The Change Print Settings screen is displayed 2 Press Special Features 3 Select...

Страница 186: ...d in the queue and is printed after the current or reserved job is complete Printing starts NOTE To cancel this setting follow the procedure below Example Booklet Press Special Features Booklet Cancel...

Страница 187: ...IMPORTANT For information on the modes which cannot be set in combination with this mode see Combination of Functions Chart on p 9 6 Place your original on the platen glass The 2 Page Separation mode...

Страница 188: ...wn making sure that their top edge is aligned with the back edge of the platen glass by the arrow in the top left corner 2 Press Start To scan the next two facing pages turn the page of the original p...

Страница 189: ...rtion mode when you select multiple documents In this case set the Cover Job Separator mode If you select the Staple mode when an optional finisher is attached you cannot staple more than 30 sheets of...

Страница 190: ...g inserts a sheet of paper between copies prints The Sheet Insertion mode is useful when you want to use a blank sheet to help sort out the copies prints You may also copy print on the sheet insertion...

Страница 191: ...ess Done IMPORTANT Select the same size paper for Front Cover Back Cover and Sheet Insertion or Chapter Page If you try to set a different paper size for one feature the paper sizes for the other feat...

Страница 192: ...opy on Both Sides for the front and or back cover and or sheet insertion the machine inserts a sheet of paper from the paper source that you selected in step 3 and prints your original on its front si...

Страница 193: ...ox Features Mail Box Print 1 Select the desired User Inbox number and document to print press Print Change Pr Settings Special Features Cover Sheet Insertion 2 Specify the Cover Sheet Insertion settin...

Страница 194: ...set the Cover Job Separator mode only if you select multiple documents and set the Merge Documents mode See Merging Documents on p 3 61 You cannot print on the job separator sheets If you select the...

Страница 195: ...rder that you want to print press Print Change Pr Settings Merge Documents Special Features Cover Job Separator Merge Documents is displayed only when the multiple documents are selected 2 Select the...

Страница 196: ...de s to be printed for the front and or back cover press OK NOTE The screens that appear on your machine may differ depending on the setting in step 2 If you select Leave Blank for the front and or ba...

Страница 197: ...in such a way that the copies prints are made into a booklet For the Booklet Scanning mode of the Mail Box function see Booklet Scanning on p 4 26 Booklet This mode enables you to copy print one sided...

Страница 198: ...and center page of the booklet 8 7 6 5 4 3 2 1 16 15 14 13 12 11 10 9 3 7 1 Originals Copies Prints Number of Sheets to Divide 1 In the above example illustration the number of sheets is two 1 After...

Страница 199: ...pending on the type and quantity of paper When printing on special types of paper such as heavy paper or transparencies be sure to correctly set the paper type especially if you are using heavy paper...

Страница 200: ...rce to use for the main document press Next Only 12 x 18 11 x 17 LGL or LTRR paper can be used for the Booklet mode If you selected the paper to use for the main document from Stack Bypass Settings se...

Страница 201: ...for the cover sheets you can only print on the inside of the front cover or inside of the back cover Only 17 to 28 lb bond 64 to 105 g m2 paper can be used for the main document Only the following pa...

Страница 202: ...sher Y2 is not attached Press Do not correct or Auto or Manual press OK If you select Manual press or to adjust the correction width IMPORTANT The maximum number of sheets including cover sheets that...

Страница 203: ...ng paper sizes LTR LTRR STMT or STMTR The Booklet mode cannot be set if multiple documents are selected and their record sizes are different The Booklet mode cannot be used with documents with resolut...

Страница 204: ...3480i C3080i For information on the modes which cannot be set in combination with this mode see Combination of Functions Chart on p 9 6 Make sure to place originals with a vertical portrait orientatio...

Страница 205: ...2 Sided Original cannot be selected if STMTR is the selected original size 3 Select the booklet layout size press OK NOTE To select an A or B series paper size press A B size Book Type The front and...

Страница 206: ...use any of the Finishing modes with the Transparency Interleaving mode Only LTR is available for the Transparency Interleaving mode NOTE The Transparency Interleaving mode is available for the Copyin...

Страница 207: ...lternately 1 Place your originals press Special Features Transparency Interleaving 2 Select the paper source for transparencies press Next If you selected Transparency press Overhead Project Type and...

Страница 208: ...4 Customizing Settings in the Reference Guide Set Register Paper Type for the selected paper source to Transparency Set the paper type setting to Transparency if Stack Bypass Standard Settings is set...

Страница 209: ...Combination mode with the Different Size Originals mode For the Copy function you can change or specify the number of copies or 2 Sided Original mode before scanning the next batch of originals i e be...

Страница 210: ...d Original select the type of two sided original press OK Next Details of each item are shown below NOTE To select an A or B series paper size press A B size 2 Sided Original cannot be selected if STM...

Страница 211: ...ding on the selected paper size If you set the Image Combination mode the Center Shift mode is also automatically set Mail Box Scan 1 Select the desired User Inbox number place your originals press Sc...

Страница 212: ...et at 100 the image of the original is not shifted If you use the numeric keys to enter the shift position the original image may be partially cut off on the copy depending on the size of the original...

Страница 213: ...t the original image moved to if you first visualize the original image as being face up and appearing in the center of the copy page Using the Numeric Keys The No Key Entry setting enables you to shi...

Страница 214: ...o Key Entry press Settings under Front Side or Back Side NOTE Back side settings are only valid when making two sided copies prints 3 Use numeric keys to enter the shift position Select the shift dire...

Страница 215: ...right Enter the shift value 4 Press OK Mail Box Print 1 Select the desired User Inbox number and the document to print press Print Change Pr Settings Special Features Shift 2 Press Settings under Fron...

Страница 216: ...modes which cannot be set in combination with this mode see Combination of Functions Chart on p 9 6 The Margin mode shifts the entire original image by the designated width Therefore an original whos...

Страница 217: ...et the margin for the back only 2 2 Sided You do not need to set a margin Proceed to make copies in the usual way 2 1 Sided Set the margin for the back only If you are using the Margin and 2 Sided mod...

Страница 218: ...ify the Margin settings in accordance with steps 2 and 3 of Copying on p 4 39 IMPORTANT If you are using the Margin and 2 Sided Printing modes together and printing a document that already has a margi...

Страница 219: ...TANT For information on the modes which cannot be set in combination with this mode see Combination of Functions Chart on p 9 6 Original Frame Erase This mode erases the dark borders and frame lines t...

Страница 220: ...ou want to set the top left right and bottom widths independently Press Adjust Each Dim Select the desired frame erase borders press or to set their respective frame erase widths press Next To return...

Страница 221: ...Specify the Frame Erase settings in accordance with steps 2 to 4 of Copying on p 4 42 Book Frame Erase This mode erases the dark border as well as center and contour lines that appear if you are copy...

Страница 222: ...s Next If you want to set the top left center right and bottom widths independently Press Adjust Each Dim Select the desired frame erase borders press or to set their respective frame erase widths pre...

Страница 223: ...to 4 of Copying on p 4 44 Binding Erase This mode erases the shadows that appear on copies scanned image from binding holes on originals IMPORTANT Make sure you place your original on the platen glas...

Страница 224: ...holes are located The border is where the binding holes are located on the original if you visualize the original as being face up 3 Press or to set the frame erase width press OK Mail Box Scan 1 Sele...

Страница 225: ...mail address in the Address Book See Chapter 10 Storing Editing Address Book Settings in the Sending and Facsimile Guide NOTE The Job Done Notice is available for the Copying function only 1 Place yo...

Страница 226: ...multiple destinations at one time Once copying is complete a job done notice is sent to the selected destination To display the Access Number key set Access Number Management to On To access the Acce...

Страница 227: ...following combinations Other combinations may damage the originals 11 x 17 and LGL LTR and LGL LTR and LTRR If you place originals with different widths in the feeder the originals may move slightly...

Страница 228: ...nals press OK If you are placing originals with the same width press Same Width If you are placing originals with different widths press Different Width Mail Box Scan 1 Select the desired User Inbox n...

Страница 229: ...to the type of originals or the desired result If you place your originals in the feeder remove the originals from the original output area when the scanning of each batch is complete When copying you...

Страница 230: ...of two sided originals set the 2 Sided Original mode accordingly Thereafter you have to manually set or cancel the 2 Sided Original mode for each batch of originals that you scan When storing a docum...

Страница 231: ...ided Original mode press 2 Sided Original Cancel Repeat this step as necessary 4 After the last batch of originals is scanned press Done Mail Box Scan 1 Select the desired User Inbox number place your...

Страница 232: ...be set in combination with this mode see Combination of Functions Chart on p 9 6 When 1 2 Sided is set two sided copying is not performed and the machine copies each original at a time The originals m...

Страница 233: ...f you want to change the copy settings make the changes before pressing Start You can adjust the exposure and the image quality See Exposure and Original Type Settings on p 3 2 You can change the numb...

Страница 234: ...eation modes Nega Posi Image Repeat Mirror Image and Area Designation modes IMPORTANT For information on the modes which cannot be set in combination with this mode see Combination of Functions Chart...

Страница 235: ...the Image Repeat mode IMPORTANT To use Area Designation Framing with the Image Repeat mode first specify the Image Repeat mode and then designate the desired area Only one area can be designated Even...

Страница 236: ...s 1 Place your originals press Special Features Image Creation If you are designating the area to repeat using the edit pen place the original on the platen glass To copy multiple originals using the...

Страница 237: ...e to repeat IMPORTANT The repeated images may overlap or have gaps between them depending on the number of repeats that you set 4 If you want only a designated area on the original to be repeated pres...

Страница 238: ...st manually measure the size and position of the area that you want to designate on the original When you measure the XY values always start measuring from the image out to the right side edge of the...

Страница 239: ...ess OK To return to the screen for setting the same amount of space for all four sides press Uniform Margin 8 Press OK If you need to designate the same area for multiple originals using the edit pen...

Страница 240: ...d then designate the desired area Only one area can be designated The designated area is too small the color original may be scanned in the Black mode even if the color mode is set to Auto Color Selec...

Страница 241: ...TANT You can designate only one polygonal area at a time You cannot designate a rectangular area and a polygonal area at the same time You cannot copy or scan documents with the Area Designation mode...

Страница 242: ...n IMPORTANT You cannot designate a rectangular area and a polygonal area at the same time NOTE To clear the last point entered press Erase Point Once an area is designated Erase Point changes to Clear...

Страница 243: ...t areas select the area by pressing the appropriate area key select Framing or Blanking 6 Press Preview check the designated area press Done NOTE If the designated area is rectangular and you want to...

Страница 244: ...r Shift settings specified within the Area Designation mode are deleted when the area settings are canceled 8 Press OK If you need to designate the same area for multiple originals remove the original...

Страница 245: ...Features Using the Numeric Keys NOTE For instructions on entering values in inches see Chapter 2 Basic Operations in the Reference Guide Original X2 X1 Y1 Y2 Area Designate an Area Copy Framing Blanki...

Страница 246: ...to the top of the original These measurements tell the machine the desired framed area s size and position 3 Press X1 X2 Y1 and Y2 use numeric keys to specify the respective measurements X1 The distan...

Страница 247: ...hift center or Do not shift center If only Blanking is selected this step is unnecessary Skip to step 6 NOTE If the Center Shift mode is already specified beforehand the Center Shift Settings screen d...

Страница 248: ...re on the Scan screen or the Copy Basic Features screen pressing Image Qual Adjustment and making fine adjustments cancels the automatic copy scan exposure setting Similarly if you select A Auto for t...

Страница 249: ...al remains press next to Yellow to adjust the density Adjusting Yellow automatically adjusts the levels of Red and Green to the same level as Yellow However Adjusting the levels of Red or Green sets Y...

Страница 250: ...f bleeding that you want to prevent press OK Details of each item are shown below NOTE If you make fine adjustments to the density the automatic copy exposure setting is canceled and the original is s...

Страница 251: ...4 72 Adjusting the Color You can make fine adjustments to the color by varying the relative strength and density of yellow magenta cyan and black The color adjustments that you make can be stored and...

Страница 252: ...lor You can also press Recall Store to recall and change the previously stored color balance settings See Recalling Color Balance Settings on p 4 79 4 Specify Saturation Hue and Density If Saturation...

Страница 253: ...of all the colors press Counter Clockwise or Clockwise To adjust the hue level of each color press More Red More Green More Yellow More Cyan More Blue or More Magenta for each color If Density Fine A...

Страница 254: ...dance with steps 3 to 5 of Copying on p 4 73 Storing Color Balance Settings You can store color balance settings and then recall them for future use Up to four different settings can be stored Copying...

Страница 255: ...tings are displayed If you select a key without settings A screen appears asking for your confirmation to store the settings Press Yes If you select a key that already has settings stored in it A scre...

Страница 256: ...lor Balance 3 Press Recall Store 4 Select a key C1 to C4 to name press Register Name NOTE Keys that already have settings stored in them are displayed with a colored triangle in the lower right corner...

Страница 257: ...ult C1 to C4 6 Press Cancel OK Mail Box Print 1 Select the desired User Inbox number and the document to print press Print Change Pr Settings Special Features Color Balance 2 Name a Color Balance Sett...

Страница 258: ...r balance settings stored in it or press Cancel NOTE Recalling color balance settings from memory cancels the current color balance settings You can make changes to the recalled color balance settings...

Страница 259: ...ou want to erase press Erase IMPORTANT Make sure to check the settings first before erasing them NOTE Keys that already have settings stored in them are displayed with a colored triangle in the lower...

Страница 260: ...not set the Retro Photo Image mode to documents in an inbox that have been received from a computer If you press Start Printing with the Retro Photo Image mode set a message prompting you to reset the...

Страница 261: ...by increasing the exposure of areas that have a low exposure Retro Photo Image This setting enables you to make copies or prints that look like old fashioned photographs Copying 1 Place your originals...

Страница 262: ...l Box Features Mail Box Print 1 Select the desired User Inbox number and the document to print press Print Change Pr Settings Special Features One Touch Color 2 Specify the One Touch Color mode settin...

Страница 263: ...h cannot be set in combination with this mode see Combination of Functions Chart on p 9 6 Low If you make copies or scan an original containing halftones such as a printed photograph using the Printed...

Страница 264: ...harpness press OK To copy text or lines clearly the setting should be towards High To copy originals containing printed photographs or other halftones the setting should be towards Low Mail Box Scan 1...

Страница 265: ...used with other copy modes to process images However copy modes other than the Shift mode can only be used for copying images and not for stored image forms Up to 100 image forms can be stored However...

Страница 266: ...ress Same as Front Side 3 Select the image form to be superimposed over the original press Next To check images stored as forms press Check Print to print a sample of the image Image forms stored in t...

Страница 267: ...e form is CMYK only Auto Color Select can be selected NOTE For copying if Use Auto Color Select in Color Mode for Copy in System Settings from the Additional Functions screen is set to Off the Auto Co...

Страница 268: ...ation of Functions Chart on p 9 6 You cannot change the copy print exposure while copying printing in the Secure Watermark mode The embedded hidden text may not appear as specified even if the copy wi...

Страница 269: ...D User Name If you select Watermark Select a preset watermark press Next If you select Watermark Create Press Enter enter the text press OK OK You can also select the text which has been registered in...

Страница 270: ...p down list press Next NOTE There are six different date formats that you can select in the drop down list If you do not specify a date the date set in Date and Time Settings in System Settings from t...

Страница 271: ...Serial Number is the number which is displayed at the bottom left of the screen when you press Counter Check on the control panel If you select ID User Name Press Next NOTE The current ID or user name...

Страница 272: ...agenta Cyan or Black for the color of the text To change the orientation of characters press Print Characters Vertically To use white letters on a colored background press White Letters on Colored Bac...

Страница 273: ...If you select Numbered Chapters in combination with the Cover Sheet Insertion Sheet Insertion or Chapter Page mode or the Cover Job Separator mode for the Mail Box function the chapter numbers are co...

Страница 274: ...cuments can be copied with page numbers numbers only numbers enclosed with hyphens with chapter numbers or with the total page number Copy Set Numbering This mode enables you to copy or print a docume...

Страница 275: ...mbers with Hyphens Numbered Chapters or Total Page Numbering 4 Select the orientation and the position of the page numbers press Next Orientation Vertical Prints the page number vertically Horizontal...

Страница 276: ...ecify to have the page numbers start on the left side 1 to 9 999 and the total page number starts on the right side 1 to 20 000 To set the total page number automatically press Auto NOTE If Total Page...

Страница 277: ...Watermark in Common Settings from the Additional Functions screen Set the position of the text press Next 6 Set the size and color of the page numbers press OK Select the size of the page numbers from...

Страница 278: ...cations to select all five print positions NOTE If Copy Set Numbering Option Settings in System Settings from the Additional Functions screen is set to On Full Surface and Numbers in 5 Locations are g...

Страница 279: ...an Black Red Green or Blue for the specified text NOTE If Copy Set Numbering Option Settings in System Settings from the Additional Functions screen is set to On the size of the page numbers becomes S...

Страница 280: ...with documents whose resolution is less than 600 x 600 dpi Printing performance may not be optimal in the Watermark Print Date mode depending on the selected document and combination of printing mode...

Страница 281: ...rk Print Date 2 Press Watermark 3 Set the watermark orientation and position press Next Orientation NOTE If you set any two of the Page Numbering Copy Set Numbering Watermark or Print Date modes to pr...

Страница 282: ...Register Characters for Page No Watermark in Common Settings from the Additional Functions screen 5 Specify the text size print type and color press OK Select the size of the watermark from Small Medi...

Страница 283: ...Date modes to print in the same position a message asking for your confirmation is displayed when you press Start If Adjust Position is selected Press X and Y press or to set their respective position...

Страница 284: ...or Overlay for the print type If Transparent is selected you can also adjust the halftone density by pressing Light or Dark You can select Yellow Magenta Cyan Black Red Green or Blue for the specified...

Страница 285: ...nt them as one document You can set copy settings for example the Job Separator and Page Numbering modes for the combined document You can also store the combined document in a User Inbox 1 1 4 3 2 1...

Страница 286: ...upt copy while copying with the Job Block Combination mode You cannot store the Job Block Combination mode in Standard Settings You cannot store the Job Block Combination mode in Mode Memory You canno...

Страница 287: ...e or specify the Color 2 Sided Original Copy Ratio Original Type or Copy Exposure mode before scanning the next batch of originals i e between batches If you want to continue to scan another batch of...

Страница 288: ...u want to combine them To view the detailed information of a batch of originals select the batch of originals press Details To erase a batch of originals select the batch of originals press Erase To m...

Страница 289: ...ode for the combined document in step 2 Press Print Store The combined document will be stored in the selected User Inbox at the same time as printing To store the combined document without printing p...

Страница 290: ...t be set in combination with this mode see Combination of Functions Chart on p 9 6 When you press Stop while copying in the Store In User Inbox mode and if the Store In User Inbox Copy upon Storing mo...

Страница 291: ...a name the machine automatically assigns the document a name using the year month day and time the document was scanned For example if a document is stored at 1 35 PM 41 seconds on January 15 2007 it...

Страница 292: ...Storing Scanned Originals with Copy Settings in a User Inbox 4 114 4 Special Copying and Mail Box Features...

Страница 293: ...This chapter describes the memory features Recalling Previous Copy Jobs 5 2 Memory Keys 5 4 Storing Scan Print Copy Settings 5 4 Naming a Memory Key 5 6 Recalling Scan Print Copy Settings 5 7 Erasing...

Страница 294: ...ettings from the Additional Functions screen has elapsed If you recall copy settings stored in Mode Memory Therefore if you make settings but do not press the control panel power switch Start or Reset...

Страница 295: ...Recalling Previous Copy Jobs 5 3 5 Memory Features 3 Verify the settings press OK NOTE You can change the recalled copy settings before making copies...

Страница 296: ...ful for storing frequently used scan print and copy settings NOTE The scan print and copy settings stored in memory are not erased even if the power is turned OFF Storing Scan Print Copy Settings IMPO...

Страница 297: ...it A screen appears asking for your confirmation to overwrite the previous settings Press Yes 4 Press Cancel NOTE You can assign a name to the memory key by pressing Register Name Mail Box Scan 1 Spe...

Страница 298: ...ngs stored in them are displayed with a colored triangle in the lower right corner of the key If you select a key that already has settings stored in it the settings are displayed You can also name ke...

Страница 299: ...o 4 of Copying on p 5 6 Mail Box Print 1 Select the desired User Inbox number and a document press Print Change Pr Settings Special Features Mode Memory 2 Name a memory key in accordance with steps 2...

Страница 300: ...can make changes to the recalled settings If you press another key the settings stored in that key are recalled Mail Box Scan 1 Select the desired User Inbox number place your originals press Scan Spe...

Страница 301: ...Make sure to check the settings first before erasing them NOTE Keys that already have settings stored in them are displayed with a colored triangle in the lower right corner of the key If you select...

Страница 302: ...Features Mode Memory 2 Erase the scan settings in accordance with steps 2 to 4 of Copying on p 5 9 Mail Box Print 1 Select the desired User Inbox number and a document press Print Change Pr Settings...

Страница 303: ...cuments received by fax and or I fax in the Memory RX Inbox and Confidential Fax Inboxes Memory RX Inbox 6 2 Memory RX Inbox 6 2 Divided Data RX Inbox 6 6 Confidential Fax Inboxes 6 9 Receiving Confid...

Страница 304: ...ry RX Receive Inbox is an inbox for receiving and storing documents received by Fax and I Fax Documents received in the Memory RX Inbox are stored without being printed You can print or send the store...

Страница 305: ...k and Fax Memory Lock modes see Chapter 11 System Manager Settings in the Sending and Facsimile Guide The following messages are displayed while Memory Lock is being set to On I Fax Memory RX is on I...

Страница 306: ...ayed when you set Fax I Fax Memory Lock to On and the time at which Memory Lock will automatically switch On is displayed when you set Memory Lock to Off If I Fax Memory Lock is set to Off documents r...

Страница 307: ...is automatically deleted after it is printed NOTE You can print only one document at a time You cannot print multiple documents stored in the Memory RX Inbox simultaneously If Fax Memory Lock and I F...

Страница 308: ...Data RX Inbox stores the divided data and automatically combines it into a single I fax document After the document has been combined it is printed forwarded or stored in memory in the same way as whe...

Страница 309: ...RX Inbox You can check the status of divided data and the remaining capacity of the Divided Data RX Inbox 1 Press Memory RX Inbox on the Inbox Selection screen press Divided Data RX Inbox 2 Select the...

Страница 310: ...ment which is being erased only the data which has already been received is combined to form the document Data which can be combined to form complete pages is printed and any remaining data is erased...

Страница 311: ...ches the specified forwarding conditions it is stored in a Confidential Fax Inbox without being printed This feature is useful for receiving confidential documents You can print the documents stored i...

Страница 312: ...tions screen See Chapter 11 System Manager Settings in the Sending and Facsimile Guide It is necessary to inform the other party of the forwarding conditions beforehand Receiving Confidential Document...

Страница 313: ...ents were received NOTE You can print only one document at a time You cannot print multiple documents stored in Confidential Fax Inboxes simultaneously 1 Press Conf Fax Inbox on the Inbox Selection sc...

Страница 314: ...ocuments stored in a Confidential Fax Inbox 1 Select the desired User Inbox number select the document that you want to send press Send To select all of the documents up to 100 documents from the top...

Страница 315: ...Settings from the Additional Functions screen you cannot enter a destination in New Address You have to select a stored destination by pressing Address Book Network Add Book or One touch Buttons If y...

Страница 316: ...Sending a Document 6 14 6 Sending and Receiving Documents Using the Inboxes...

Страница 317: ...ulating the Copy Ratio Based on the Original and Copy Paper Sizes Zoom Program 7 15 Enlarging Reducing Originals with Copy Ratios Set Independently for the X and Y Axes XY Zoom 7 17 Enlarging an Image...

Страница 318: ...t Originals to Fit on a Single Copy Sheet Image Combination 7 64 Composing Images Form Composition 7 65 Embedding Hidden Text in the Background 7 67 Making Copies of a Designated Area Area Designation...

Страница 319: ...ular Copy Basic Features screen After changing the copy settings even if you switch to the Express Copy Basic Features screen from the Regular Copy Basic Features screen or vice versa the copy setting...

Страница 320: ...on the Regular Copy Basic Features screen by pressing Special Features This screen enables you to set basic copying modes You can adjust the exposure set basic copying modes such as the Collate mode...

Страница 321: ...e sided copies from two sided originals See Making Two Sided Copies from One Sided Originals 1 to 2 Sided on p 7 22 Making Two Sided Copies from Two Sided Originals 2 to 2 Sided on p 7 23 Making One S...

Страница 322: ...You can make booklets add page numbers and set finishing modes for scanned images See Book Page Edit Shift Settings on p 7 46 o Scan Originals You can make various settings for the scanning of bound o...

Страница 323: ...appear on the Express Copy Basic Features screen when you press certain keys Press or any point outside the pop up display to close the pop up displays Example The pop up display which appears when E...

Страница 324: ...can be used in combination with other copy modes Depending on the copy modes you have selected some copy modes which are not selected may be displayed with a You cannot select these copy modes in com...

Страница 325: ...e However the machine may scan the color originals in the Black mode under the following conditions To avoid this set the color mode to Full Color If the originals contain a few color sections If the...

Страница 326: ...olor Adjusting Copy Exposure For instructions on this procedure using the Regular Copy Basic Features screen see Manual Exposure Adjustment on p 3 2 1 Press or Auto Density to adjust the copy exposure...

Страница 327: ...effect by using the Sharpness mode See Making Sharp Contrast Copies Sharpness on p 7 81 1 Select the image quality Text Text Photo or Photo If you want to adjust the text photo map processing priorit...

Страница 328: ...fying the Copy Ratio by Percentage Zoom by Percentage For instructions on this procedure using the Regular Copy Basic Features screen see Zoom by Percentage on p 3 11 1 Set the copy ratio by pressing...

Страница 329: ...our originals horizontally in the following cases If you are enlarging LTR originals to 11 x 17 If you are enlarging STMT originals to 11 x 17 when the original is placed on the platen glass If you ar...

Страница 330: ...NT You cannot copy highly transparent originals such as transparencies in the Auto Zoom mode Use the Preset Zoom or Zoom by Percentage modes To use the Auto Zoom mode your originals must conform to a...

Страница 331: ...using the Regular Copy Basic Features screen see Entire Image on p 3 15 1 Press Entire Image Calculating the Copy Ratio Based on the Original and Copy Paper Sizes Zoom Program For instructions on thi...

Страница 332: ...sage appears telling you that the ratio will be adjusted to 25 If it is more than 400 a message appears telling you that the ratio will be adjusted to 400 Making Copies with Different XY Copy Ratios X...

Страница 333: ...s such as transparencies in the Auto XY Zoom mode To make such copies specify the copy ratio If you set the Auto XY Zoom mode select the paper size using the Manual Paper Selection mode If you do not...

Страница 334: ...automatically set to Full Color The Poster mode cannot be used to make copies on nonstandard size paper envelopes and transparencies 1 Press Other Ratio Settings Poster 2 Press Copy Ratio s or Number...

Страница 335: ...paper or transparencies be sure to correctly set the paper type especially if you are using heavy paper If the type of paper is not set correctly it could adversely affect the quality of the image Mo...

Страница 336: ...ckground STMT STMTR or smaller originals however STMT originals can be detected when placed in the feeder If you select stack bypass settings Press All Press Stack Bypass Settings Select the paper siz...

Страница 337: ...pe select the envelope type press OK To select an A or B series paper size press A B size Select the desired paper type press OK NOTE Transparency can be selected only if LTR is selected as the paper...

Страница 338: ...e 1 to 2 Sided on p 3 46 IMPORTANT You may not be able to make 2 sided copies on some types of paper depending on the paper Make sure to place originals with a horizontal landscape orientation such as...

Страница 339: ...he Regular Copy Basic Features screen see 2 to 2 Sided on p 3 48 IMPORTANT You may not be able to make 2 sided copies on some types of paper depending on the paper 2 2 Sided copying is available only...

Страница 340: ...copies on some types of paper depending on the paper 2 1 Sided copying is available only if the optional Feeder DADF L1 is attached standard equipped for the Color imageRUNNER C3480i C3080i Make sure...

Страница 341: ...e to make 2 sided copies on some types of paper depending on the paper When using this feature select LTR size paper When copying with the Front Back 2 Sided mode the front side of the first two sided...

Страница 342: ...e the side of the paper which is printed on will always be output face down The Hole Punch mode is available only if the optional Finisher Y1 or Saddle Finisher Y2 and Puncher Unit M1 are attached to...

Страница 343: ...selected only in the following cases When the available paper size is selected manually When the available paper size is loaded in both the horizontal and vertical directions The selected paper sourc...

Страница 344: ...ode the side of the paper which is printed on will always be output face down The Hole Punch mode is available only if the optional Finisher Y1 or Saddle Finisher Y2 and Puncher Unit M1 are attached t...

Страница 345: ...selected only in the following cases When the available paper size is selected manually When the available paper size is loaded in both the horizontal and vertical directions The selected paper sourc...

Страница 346: ...h mode the side of the paper which is printed on will always be output face down The Saddle Stitch mode is available only if the optional Saddle Finisher Y2 is attached to the Color imageRUNNER C3480...

Страница 347: ...paper type and press OK press Done If you want to add a cover press Add Cover Select whether to print on the cover and the paper source to use for the cover press OK If you selected the paper to use f...

Страница 348: ...Basic Features Screen on p 8 6 1 Press Register frequently used keys 2 Select the number of Standard Keys that are displayed on the Express Copy Basic Features screen Up to 5 Set Keys Displaying maxim...

Страница 349: ...ures Screen 7 33 7 Using the Express Copy Basic Features Screen 5 Select the desired mode to be stored as a Standard Key press OK The five stored Standard Keys are displayed as shown below The ten sto...

Страница 350: ...led press Log In Out enter the Department ID and password using numeric keys See Chapter 6 System Manager Settings in the Reference Guide 2 Place your originals select the desired copy modes Sample Se...

Страница 351: ...ncel or Change Settings To make the remaining copies press Start Print To cancel copying press Cancel To change the copy settings press Change Settings change the necessary settings press Done To chan...

Страница 352: ...gs the machine will print from the first set with the new settings If you want to check the changes that you have made press Sample Set repeat the procedure from step 2 Recalling a Previous Copy Setti...

Страница 353: ...g Frequently Used Copy Settings in Memory Mode Memory For instructions on this procedure using the Regular Copy Basic Features screen see Memory Keys on p 5 4 Storing Copy Settings IMPORTANT You canno...

Страница 354: ...y key registering the copy mode is highlighted and the registered settings are displayed If you select an occupied memory key settings have been stored Press Yes when the confirmation message appears...

Страница 355: ...ures Screen Recalling a Copy Mode 1 Press Mode Memory select a memory key that registers the copy settings you want to use Erasing a Copy Mode 1 Press Mode Memory Register 2 Select a memory key to be...

Страница 356: ...Making a Copy With the Express Copy Basic Features Screen 7 40 7 Using the Express Copy Basic Features Screen 4 Press Done...

Страница 357: ...s mode and so on Press Scan Originals to set these modes IMPORTANT For information on the modes which cannot be set in combination with these modes see Combination of Functions Chart on p 9 6 NOTE To...

Страница 358: ...2 Sided copying feature in the 2 Sided mode See Making Two Sided Copies from Facing Pages in a Book Book to 2 Sided on p 7 25 1 Press Scan Originals 2 Page Separation 2 Press Set 3 Press Done c Differ...

Страница 359: ...f originals and the desired result If you place the originals in the feeder remove each original from the original output area when scanning is complete When copying you can change or specify the foll...

Страница 360: ...cing originals with different widths Set different size originals with different widths and lengths in the following combinations Other combinations may damage the originals 11 x 17 and LGL LTR and LG...

Страница 361: ...he Regular Copy Basic Features screen see Scan Image Check on p 4 54 IMPORTANT When 1 2 Sided is set two sided copying is not performed and the machine copies each original at a time The originals mus...

Страница 362: ...on of Functions Chart on p 9 6 NOTE The Book Page Edit Shift screen consists of a list of individual settings Press or to scroll to the desired setting To cancel the settings for each function press D...

Страница 363: ...background on each page See Copy Set Numbering on p 7 55 f Watermark This mode enables you to copy a watermark and user defined text onto the output See Watermark on p 7 56 g Print Date This mode ena...

Страница 364: ...Sheet Insertion on p 4 11 IMPORTANT If you select the Staple mode when an optional finisher is attached you cannot staple more than 30 sheets of 11 x 17 LGL or LTRR paper or 50 sheets of LTR or EXEC...

Страница 365: ...another size the other two features are changed However you may change the paper drawer for one feature without affecting the others as long as the paper size is the same Select whether to copy on the...

Страница 366: ...as the front and back covers When you select Front Cover Back Cover Sheet Insertion or Chapter Page if the paper size for one feature is changed to another size the other two features are changed How...

Страница 367: ...number of sheets Make sure to place originals with a vertical portrait orientation vertically If these originals are placed horizontally the even numbered pages will be printed upside down When print...

Страница 368: ...inside of the back cover 17 to 28 lb bond 64 to 105 g m2 paper can be used for the main document Only the following paper can be used for the cover pages if you are printing on the cover pages If Prin...

Страница 369: ...paper jam NOTE If the optional Saddle Finisher Y2 is not attached this step is unnecessary 4 Press Done Page and Copy Set Numbering Page Numbering Copy Set Numbering For instructions on this procedure...

Страница 370: ...age numbering press OK You can also select the text which has been registered in Register Characters for Page No Watermark in Common Settings from Additional Functions beforehand If you want to adjust...

Страница 371: ...Shift Copy Set Numbering 2 Press Set specify each setting Select the orientation and print position of the copy set numbers If you want to adjust the print position press Adjust Position press X and Y...

Страница 372: ...esired preset watermark and the color If you want to create a user defined watermark press Create from the Watermark Type drop down list press Enter enter the text press OK You can also select the tex...

Страница 373: ...n Select the number size date format and character color Specify the date Press Print Type select the desired printing type You can select Transparent or Overlay for the print type If Transparent is s...

Страница 374: ...original is not shifted If you use the numeric keys to enter the shift position the original image may be partially cut off on the copy depending on the size of the original the size of the copy paper...

Страница 375: ...ge Shifted Using the Numeric Keys NOTE For instructions on entering values in inches see Chapter 2 Basic Operations in the Reference Guide 1 Press Book Page Edit Shift Shift 2 Press No Key Entry press...

Страница 376: ...et the margin width Press or to set the margin width 1 15 16 to 1 15 16 50 mm to 50 mm of the front and back side of the paper IMPORTANT If you are using the Margin and 2 Sided modes together and copy...

Страница 377: ...Book Page Edit Shift Settings 7 61 7 Using the Express Copy Basic Features Screen 3 Press Done...

Страница 378: ...modes see Combination of Functions Chart on p 9 6 NOTE The Process Layout screen consists of a list of individual settings Press or to scroll to the desired setting To cancel the settings for each fun...

Страница 379: ...ge Repeated Image Repeat on p 7 71 f Frame Erase This mode erases shadows and lines that appear when copying various types of originals See Erasing Shadows and Frame Lines from Copies Frame Erase on p...

Страница 380: ...size You cannot use the Image Combination mode with the Different Size Originals mode Before scanning the next original between jobs you can set or change settings for the number of copy sets and 2 Si...

Страница 381: ...are effective on the copied images and not on the stored image forms Up to 100 image forms can be stored However this number varies depending on the capacity of the hard disk Printing performance may...

Страница 382: ...image forms are indicated with a color icon If you press Details the detailed information of the image form is displayed If Check Print is pressed Select the paper size press Start Print Press Cancel...

Страница 383: ...rinting performance may not be optimal in the Secure Watermark mode depending on the selected document and combination of printing modes 1 Press Process Layout Secure Watermark 2 Select the type of Se...

Страница 384: ...nation on p 4 62 IMPORTANT To use Area Designation Framing with the Image Repeat mode first specify the Image Repeat mode and then designate the desired area Only one area can be designated If the des...

Страница 385: ...ultipoints You can designate up to 10 points IMPORTANT If you select Multi point only one area can be designated at a time An area that is designated by selecting Multi point cannot be modified using...

Страница 386: ...o designate on the original When you measure the XY values always start measuring from the image out to the right side edge of the original and up to the top of the original These measurements tell th...

Страница 387: ...necessary Skip to step 6 6 Press OK Done Making Copies by the Original Image Repeated Image Repeat For instructions on this procedure using the Regular Copy Basic Features screen see Image Repeat on p...

Страница 388: ...automatically set select the paper size The original image is then copied so that the maximum number of images possible fits onto the selected paper size Press or to set the number of times the image...

Страница 389: ...Erase 2 Press Original Frame Erase select the original size set the frame width area to erase by pressing or The frame area is erased evenly based on the value you set around each edge of the origina...

Страница 390: ...Sides set the frame width to erase by using or The frame area to be erased is uniformly set for all sides of the original To set the value independently for all sides of the original press Adjust Eac...

Страница 391: ...ay damage the originals When using the Binding Erase mode the borders you do not select are also erased by 1 8 4 mm 1 Press Process Layout Frame Erase IMPORTANT Place your original on the platen glass...

Страница 392: ...egular Copy Basic Features screen see Transparency Interleaving on p 4 28 IMPORTANT Even if an optional finisher is attached you cannot use any of the Finishing modes with the Transparency Interleavin...

Страница 393: ...he Reference Guide Set Register Paper Type for the selected paper source to Transparency Set the paper type setting to Transparency if Stack Bypass Standard Settings is set to On IMPORTANT Make sure t...

Страница 394: ...ess Copy Basic Features Screen Inverting Original Images Nega Posi For instructions on this procedure using the Regular Copy Basic Features screen see Inverting Images Nega Posi on p 4 56 1 Press Proc...

Страница 395: ...g the Express Copy Basic Features Screen Making Copies with the Original Image Reversed Mirror Image For instructions in Copy Basic Features Screen see Mirror Image on p 4 61 1 Press Process Layout Mi...

Страница 396: ...ions Chart on p 9 6 NOTE To cancel the settings for each function press Do Not Set Modes in Image Adjustment a Sharpness This mode enables you to make copies of original images with a sharper contrast...

Страница 397: ...sic Features screen see Adjusting the Contrast Sharpness on p 4 85 1 Press Image Adjustment Sharpness 2 Adjust the sharpness by pressing Low or High 3 Press Done d One Touch Color This mode enables yo...

Страница 398: ...fine adjustments cancels the automatic copy scan exposure setting Similarly if you select A Auto for the scan copy exposure setting when image quality adjustments have been made the Image Quality Adju...

Страница 399: ...t the strength of each color If you want to adjust the saturation level press Saturatn specify the setting If you want to adjust the hue level press Hue specify the setting If you want to make fine ad...

Страница 400: ...he Image One Touch Color For instructions on this procedure using the Regular Copy Basic Features screen see One Touch Color Mode on p 4 82 IMPORTANT One Touch Color mode settings are actually preset...

Страница 401: ...gs for each function press Do Not Set Modes in Others a Job Block Combination This mode enables you to scan multiple batches of originals with different copy settings and print them as one document Se...

Страница 402: ...uild mode is automatically set for each batch of originals You cannot use the Job Build mode for the combined document You cannot make an Interrupt copy while copying with the Job Block Combination mo...

Страница 403: ...olor Mode 2 Sided Original Copy Ratio Original Type or Copy Exposure mode before scanning the next batch of originals i e between batches If you want to continue to scan another batch of originals wit...

Страница 404: ...h of originals select the batch of originals press Erase To make a sample print of a selected batch of originals or the combined document press Sample Print To make a sample print of a selected batch...

Страница 405: ...the job is not paused but canceled You cannot store documents in the Memory RX Inbox or a Confidential Fax Inbox For instructions on storing documents in the Memory RX Inbox and Confidential Fax Inbo...

Страница 406: ...you need to store e mail addresses in the Address Book beforehand See Chapter 10 Storing Editing Address Book Settings in the Sending and Facsimile Guide 1 Press Others Job Done Notice 2 Press Set sel...

Страница 407: ...ting the Standard Keys for the Regular Copy Basic Features Screen 8 6 Setting the Standard Keys for the Express Copy Basic Features Screen 8 7 Auto Collate 8 9 Auto Orientation 8 9 Changing the Curren...

Страница 408: ...m the Additional Functions screen are never changed when you press Reset 1 Press Additional Functions The Additional Functions screen is displayed 2 Select an Additional Functions setting 3 Press a mo...

Страница 409: ...Settings NOTE The Copy Settings screens consist of a list of individual settings Press or to scroll to the desired setting 4 Specify the desired mode press OK The selected mode is set 5 Press Done rep...

Страница 410: ...cable Page Paper Select Key Size for Express Copy Screen Large 1 Four paper sources maximum Stack Bypass Stack Bypass Settings 1 Paper Drawer 1 2 Paper Drawer 2 3 Paper Drawer 3 4 Paper Drawer 4 5 Pap...

Страница 411: ...nstructions on setting the Device Information Delivery Settings mode see Chapter 6 System Manager Settings in the Reference Guide Setting the Paper Select Key Size for the Express Copy Basic Features...

Страница 412: ...addition to the Copy Ratio Finishing and 2 Sided Mode keys on the Regular Copy Basic Features screen the Special Features screen and the memory keys containing stored copy settings in Mode Memory 1 Pr...

Страница 413: ...ic Features Screen This feature is useful when you want to store frequently used copy functions on the Express Copy Basic Features screen 1 Press Additional Functions Copy Settings Standard Key Settin...

Страница 414: ...be stored as Standard Keys by pressing or select the desired function To cancel the Standard Key setting already stored and press No Settings 5 Select the desired mode to be stored as a Standard Key...

Страница 415: ...ns Copy Settings Auto Collate 2 Select On or Off press OK Auto Orientation If Auto Orientation is set to On the machine uses information such as the size of the original and the zoom ratio to determin...

Страница 416: ...gs NOTE The default settings are Copy Quantity 1 Paper Selection Auto Exposure Manual Original Type Text Photo Map Copy Ratio Direct Copy Function 1 1 Sided Copy Color Mode Auto Color Select Storing N...

Страница 417: ...Functions Copy Settings Standard Settings 2 Press Initialize 3 Verify the settings press Yes Restoring the Default Copy Settings Modes that have been changed in Copy Settings from the Additional Func...

Страница 418: ...Information that is delivered when the Device Information Delivery Settings mode is set is marked with a Yes in the Delivered column For instructions on setting the Device Information Delivery Setting...

Страница 419: ...ox is optional 1 Press Additional Functions Mail Box Settings User Inboxes Settings 2 Select the desired User Inbox number If you enter User Inbox number using numeric keys make sure to enter a two di...

Страница 420: ...n IMPORTANT Since there is no way to check a stored password make sure that you write down the password that you enter and keep it in a safe place If a password is already set for each User Inbox you...

Страница 421: ...their default settings IMPORTANT You cannot initialize a User Inbox if there are documents still remaining in it 1 Press Additional Functions Mail Box Settings User Inboxes Settings 2 Select the User...

Страница 422: ...default settings NOTE The default settings are Document Size Auto Record Size Auto Original Type Text Photo Map Copy Ratio Direct Color Mode Auto Color Select Storing the Standard Scan Settings You c...

Страница 423: ...zing Settings Initializing the Standard Scan Settings You can restore the Standard Scan Settings to their default settings 1 Press Additional Functions Mail Box Settings Standard Scan Settings 2 Press...

Страница 424: ...Inboxes The numbers for Confidential Fax Inboxes are 00 to 49 Setting a name for a Confidential Fax Inbox is optional Setting a password for a Confidential Fax Inbox is optional 1 Press Additional Fun...

Страница 425: ...o the Confidential Fax Inbox in which the document is stored you can check or perform operations on the document in the Confidential Fax Inbox using the Remote UI User Interface of the machine If you...

Страница 426: ...OTE You cannot initialize a Confidential Fax Inbox if there are documents still remaining in it 1 Press Additional Functions Mail Box Settings Confidential Fax Inboxes Settings 2 Select the Confidenti...

Страница 427: ...provides the color copy samples and index Color Copy Samples 9 2 Color Balance 9 2 One Touch Color 9 3 Image Quality Adjustments 9 4 Single Color 9 5 Two Colors 9 5 Combination of Functions Chart 9 6...

Страница 428: ...e produced using different color adjustment modes Color Balance This mode enables you to make fine adjustments to the color by varying the relative strength and density of yellow magenta cyan and blac...

Страница 429: ...x One Touch Color This mode enables you to make copies prints by selecting the look of the image with just one touch of a key Original Vivid Colors Tranquil Colors Darken Image Lighten Image Highlight...

Страница 430: ...nts by erasing the background color of the original This mode is especially useful for copying scanning originals such as catalogues and paper that have turned yellow from age Prevent Bleeding This mo...

Страница 431: ...opy Samples 9 5 9 Appendix Single Color This mode enables you to make copies prints in one specific color only Two Colors This mode enables you to make copies prints in two colors Original Copy Origin...

Страница 432: ...e charts show the available combinations of settings when you want to set more than one function at a time IMPORTANT The following modes may not available depending on the machine you use and the opti...

Страница 433: ...2 Sided 2 1 Sided Book 2 Sided Function to Be Set Priority to Image Combination and Booklet Modes Ratio can be changed Combination Available Combination Unavailable Priority to Latest Set Mode F u n c...

Страница 434: ...ng Erase Margin Shift Using the Arrow Keys Shift Using the Numeric Keys Front Cover Back Cover Sheet Insertion Printed Leave Blank Chapter Page Transparency Interleaving Booklet Booklet Saddle Stitch...

Страница 435: ...up Rotate Collate Rotate Group Offset Collate Offset Group Staple Saddle Stitch Add Cover Print Leave Blank Hole Punch Interrupt Copy Reserve Copy 1 2 Sided 2 2 Sided 2 1 Sided Book 2 Sided Function t...

Страница 436: ...One Touch Color Remove Background Prevent Bleed thru Form Composition Page Numbering Copy Set Numbering Watermark Print Date Scan Image Check Job Block Combination Store In User Inbox Store In User In...

Страница 437: ...Color Selection Full Color Black Sharpness Nega Posi Framing Blanking P la te n G la ss S ca n n in g F e e d e r S ca n n in g D o cu m e n t S iz e A u to S e le ct D o cu m e n t S iz e M a n u a...

Страница 438: ...r Page Numbering Copy Set Numbering Watermark Print Date Form Composition Margin Shift Secure Watermark Watermark Secure Watermark Date Secure Watermark Copy Set Numbering Secure Watermark Serial Numb...

Страница 439: ...8 Auto Collate 8 9 Auto Orientation 8 9 Auto XY Zoom 3 22 Auto Zoom 3 13 7 14 Automatic color selection 3 56 7 9 Automatic exposure adjustment 3 5 B Back cover copy 4 12 Back cover print 4 16 Binding...

Страница 440: ...re Image 3 15 Poster 3 25 Preset Zoom 3 9 Zoom Program 3 17 Zoom by percentage 3 11 Copy Set Numbering 7 53 Copy settings 5 4 Recalling 5 7 Copy settings table 8 4 Copying with different XY copy ratio...

Страница 441: ...operations 1 6 Flow of mail box operations 2 12 Form Composition 7 65 Frame Erase 4 41 7 73 Binding Erase 4 45 7 75 Book Frame Erase 4 43 7 74 Original Frame Erase 4 41 7 73 Framing 4 62 Image Repeat...

Страница 442: ...Y zoom ratio 3 18 Manual exposure adjustment 3 2 Margin mode 4 38 7 60 Memory keys naming 5 6 Memory RX inbox function 6 3 Memory RX Inbox 6 2 6 4 Merge Documents 3 61 Mirror Image 4 61 7 79 Mode Memo...

Страница 443: ...cuments 6 10 Receiving documents through Fax or I Fax 6 3 Regular Copy Basic Features Screen 1 3 Register Inbox Name 8 19 Remove Background 4 70 Reserving Copy Jobs 1 21 While the machine is printing...

Страница 444: ...8 7 Standard scan settings 8 16 Standard settings 8 10 Staple 3 34 3 41 7 30 Corner 3 34 Double 3 34 Saddle Stitch 3 35 Start key 1 10 Start Send 6 13 Status 1 20 Stop a copy job Using the Stop Key 1...

Страница 445: ...9 19 9 Appendix X XY Zoom 3 22 7 17 automatically 3 22 manually 3 22 Z Zoom 3 17 Zoom by percentage 3 11 7 12 Zoom program 3 17 7 15 Different XY copy zoom ratio 3 18 3 20 Same XY copy zoom ratio 3 17...

Страница 446: ...Index 9 20 9 Appendix...

Страница 447: ......

Страница 448: ...tp www canon europe com for details on your regional dealer CANON LATIN AMERICA INC 703 Waterford Way Suite 400 Miami Florida 33126 U S A CANON AUSTRALIA PTY LTD 1 Thomas Holt Drive North Ryde Sydney...

Отзывы: