


41
A
pp
en
dix
A
pp
en
dix
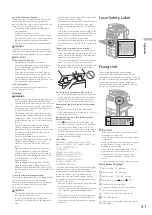
Laser Safety Label
Fixing Unit
When removing jammed paper or when
inspecting the inside of the machine, do not
expose yourself to the heat emitted from the fixing
unit and its surroundings for a prolonged period of
time. Doing so may result in low temperature
burns, even though you did not touch the fixing
unit and its surroundings directly.
IMPORTANT
•
Follow the instructions on the caution label
attached to this machine.
•
Do not subject the machine to strong shocks
or vibration.
•
Do not forcibly open and close doors, covers,
and other parts. Doing so may result in
damage to the machine.
•
Do not turn the main power switch OFF or
open the covers while the machine is in
operation. This may result in paper jams.
•
Use a modular cable that is shorter than 3
meters.
•
Use a USB cable that is shorter than 3 meters.
Safety-Related Symbols
Power switch: “ON” position
Power switch: “OFF” position
Power switch: “STAND-BY” position
Push-push switch
“ON”
“OFF”
Protective earthing terminal
Dangerous voltage inside. Do not open
covers other than instructed.
CAUTION: Hot surface. Do not touch.
Class II equipment
Moving parts: Keep body parts away from
moving parts
•
Use caution when opening and closing covers
to avoid injury to your hands.
•
Keep hands and clothing away from the rollers
in the output area. If the rollers catch your
hands or clothing, this may result in personal
injury.
•
The inside of the machine and the output slot
are very hot during and immediately after use.
Avoid contact with these areas to prevent
burns. Also, printed paper may be hot
immediately after being output, so use caution
when handling it. Failure to do so may result in
burns.
Feeder (only for products with a feeder)
•
Do not press down hard on the feeder when
using the platen glass to make copies of thick
books. Doing so may damage the platen glass
and result in personal injury.
•
Close the feeder gently to avoid catching your
hands, as this may result in personal injury.
•
Be careful not to put your hands or fingers into
the feeder. Otherwise, you may be injured.
Finisher (only for products with a finisher)
•
Do not place your hands in the part of the tray
where stapling is performed (near the rollers),
especially pay careful attention to the sharp
staples, as this may result in personal injury.
Paper drawer (only for products with a paper
drawer)
•
Do not insert your hand into the machine
while the paper drawer is removed, as this may
result in personal injury.
Energy Saver key (only for products with an
Energy Saver key)
•
Press (Energy Saver) for safety when the
machine will not be used for a long period of
time, such as overnight. Also, turn OFF the
main power switch, and disconnect the power
cord for safety when the machine will not be
used for an extended period of time, such as
during consecutive holidays.
Laser Safety
This product is confirmed as a Class 1 laser
product in IEC60825-1:2014 and EN60825-1:2014.
CLASS 1 LASER PRODUCT
LASER KLASSE 1
APPAREIL À LASER DE CLASSE 1
APPARECCHIO LASER DI CLASSE 1
PRODUCTO LÁSER DE CLASE 1
APARELHO A LASER DE CLASSE 1
LUOKAN 1 LASER-TUOTE
LASERPRODUKT KLASS 1
The laser beam can be harmful to human bodies.
Since radiation emitted inside the product is
completely confined within protective housings
and external covers, the laser beam cannot
escape from the machine during any phase of
user operation. Read the following remarks and
instructions for safety.
•
Never open covers other than those instructed
in the manuals for this machine.
•
If the laser beam should escape and enter your
eyes, exposure may cause damage to your
eyes.
•
Use of controls, adjustments, or performance
of procedures other than those specified in
this manual may result in hazardous radiation
exposure.
Avoid the following situations:
If excessive stress is applied to the connection
part of the power cord, it may damage the
power cord or the wires inside the machine may
disconnect. This could result in a fire.
•
Connecting and disconnecting the power
cord frequently.
•
Tripping over the power cord.
•
The power cord is bent near the connection
part, and continuous stress is being applied to
the power outlet or the connection part.
•
Applying excessive force on the power plug.
CAUTION
Install this machine near the power outlet and
leave sufficient space around the power plug so
that it can be unplugged easily in an emergency.
IMPORTANT
When connecting power
•
Do not connect the power cord to an
uninterruptible power source. Doing so may
result in malfunction of or damage to the
machine at power failure.
•
If you plug this machine into an AC power
outlet with multiple sockets, do not use the
remaining sockets to connect other devices.
•
Do not connect the power cord to the auxiliary
AC power outlet on a computer.
Other precautions
Electrical noise may cause this machine to
malfunction or lose data.
Handling
WARNING
•
Immediately unplug the power plug from the
AC power outlet and contact an authorized
Canon dealer if the machine makes an unusual
noise, emits an unusual smell, or emits smoke
or excessive heat. Continued use may result in
a fire or electrical shock.
•
Do not disassemble or modify this machine.
There are high-voltage and high-temperature
components inside the machine. Disassembly
or modification may result in a fire or electrical
shock.
•
Place the machine where children will not
come in contact with the power cord and
other cables or gears and electrical parts inside
the machine. Failure to do so may result in
unexpected accidents.
•
Do not use flammable sprays near this
machine. If flammable substances come into
contact with electrical parts inside this
machine, it may result in a fire or electrical
shock.
•
When moving this machine, be sure to turn
OFF the power of this machine, and then
unplug the power plug and interface cables.
Failure to do so may damage the power cord
or interface cables, resulting in a fire or
electrical shock.
•
When plugging or unplugging a USB cable
when the power plug is plugged into an AC
power outlet, do not touch the metal part of
the connector, as this may result in an electrical
shock.
If you are using a cardiac pacemaker
This machine generates a low level magnetic flux
and ultrasonic waves. If you use a cardiac
pacemaker and feel abnormalities, please move
away from this machine and consult your
physician immediately.
CAUTION
•
Do not place heavy objects on this machine as
they may fall, resulting in injury.
•
For safety, unplug the power plug if the
machine will not be used for a long period of
time.
Содержание imageRUNNER ADVANCE C356iF
Страница 1: ...What is Your Question FAQ Guide English P 3 Espa ol P 51...
Страница 2: ......
Страница 48: ......
Страница 50: ......
Страница 95: ......