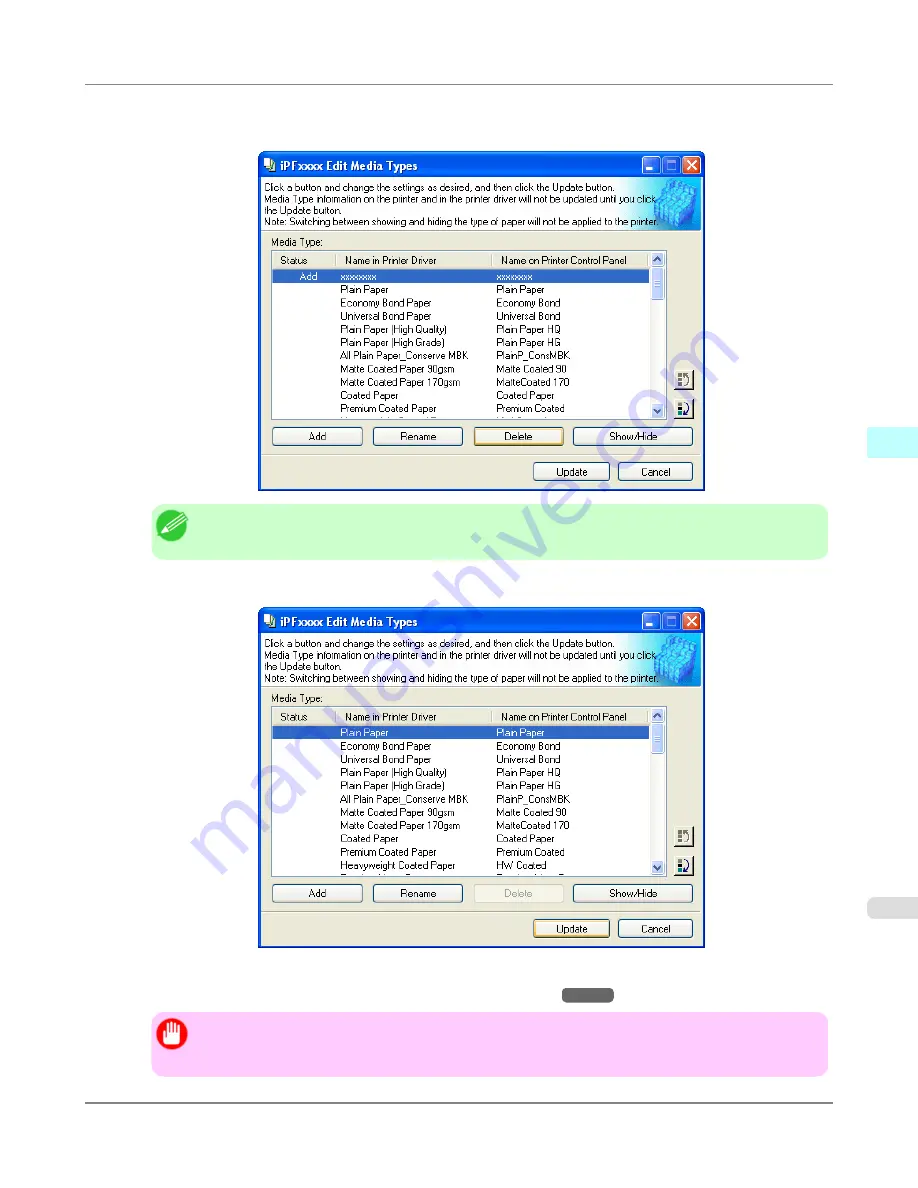
Canon imagePROGRAF iPF815 Скачать руководство пользователя страница 433

2.

In the 

Media Type

 list, select the name of the media to delete.

Click the 

Delete

 button.

Note

Only paper for which 

Status

 in the 

Media Type

 is 

Add

 can be deleted.

3.

In the 

Edit Media Types

 dialog box, click the 

Update

 button.

The 

Update Media Types

 wizard is started at this point. For details on the procedure to update paper information

using the 

Update Media Types

 wizard, 

see "

Updating Media Types

."

→P.421

Important

Be sure to click the Update button. If you do not, your changes will not be applied to the printer and
printer driver.

Windows Software 

>

 Media Configuration Tool 

>

iPF815

Deleting Media Types You Have Added

4

417

Содержание imagePROGRAF iPF815

Страница 1: ...nhanced Printing Options 45 3 Windows Software 201 4 Mac OS X Software 424 5 Print Jobs 562 6 Handling Paper 616 7 Adjustments for Better Print Quality 667 8 Printer Parts 684 9 Network Setting 770 10 Maintenance 802 11 Troubleshooting 849 12 Error Message 890 13 Appendix 920 14 ver1 00 2010 09 10 ENG ...

Страница 2: ...erted from the HTML format instruction manual included on the User Manuals CD ROM supplied with the printer Thus there are descriptions that are applied only in HTML format and functions video display function etc that cannot be used We appreciate your understanding ...

Страница 3: ...L 2 Printing 28 Printing Photos and Images 30 Printing Photos and Images 30 Printing Photos and Images Windows 31 Printing Photos and Images Mac OS X 33 Printing Office Documents 38 Printing Office Documents 38 Printing Office Documents Windows 39 Printing Office Documents Mac OS X 40 Enhanced Printing Options 45 Adjusting Images 46 Adjusting the Color in the Printer Driver 46 Fine Tuning Colors o...

Страница 4: ...ng banners or at other non standard sizes 115 Printing Vertical or Horizontal Banners Large Format Printing 115 Printing Vertical or Horizontal Banners Large Format Printing Windows 116 Printing Vertical or Horizontal Banners Large Format Printing Mac OS X 120 Printing on Non Standard Paper Sizes 124 Printing on Non Standard Paper Sizes Windows 124 Printing on Non Standard Paper Sizes Mac OS X 129...

Страница 5: ... Roll Paper After Printing 196 Cutting Roll Paper After Printing Windows 196 Cutting Roll Paper After Printing Mac OS X 198 Windows Software 201 Printer Driver 202 Printer Driver Settings 202 Specifying Paper in the Printer Driver 204 Confirming Print Settings 206 Checking the Layout in a Preview Before Printing 207 Using Favorites 209 Accessing the Printer Driver Dialog Box from Applications 211 ...

Страница 6: ...Rotating an Object 275 Laying out Objects Automatically 276 Aligning Objects 276 Changing the Object Overlapping Order 278 Pasting a Copied or Cut Object 280 Folded Duplex Window 281 Finished Size Settings Dialog Box 282 Binding Settings Dialog Box 283 Prints using Folded Duplex 284 Color imageRUNNER Enlargement Copy 286 The Features of Color imageRUNNER Enlargement Copy 286 Operating Environment ...

Страница 7: ...368 Opening from the Start Menu 369 Plotter Configuration Editor Dialog Box 371 Media Source and Media Size Settings 372 Graphics Settings 373 Opening the Custom Properties Dialog Box 376 Custom Properties dialog box 378 Paper Detailed Settings 380 Output Method Dialog Box 382 Color Compatibility Dialog Box 382 Printing 383 Status Monitor 387 The Features of imagePROGRAF Status Monitor 387 Job Man...

Страница 8: ...418 Changing the Display Order of Media Types 419 Updating Media Types 421 Mac OS X Software 424 Printer Driver 425 Printer Driver Settings 425 Specifying Paper in the Printer Driver 427 Confirming Print Settings 429 Checking the Layout in a Preview Before Printing 431 Using Favorites 432 Accessing the Printer Driver Dialog Box from Applications 432 Main Pane 433 Paper Information on Printer Dialo...

Страница 9: ...l 491 Color Adjustment 492 Matching 495 Driver Matching Mode 497 ICC Matching Mode 498 ColorSync 499 Preferences Dialog Box 500 Page Setup Dialog Box 501 Zoom Dialog Box 502 Format Dialog Box 503 Laying out a Multiple File Document on One Page 504 Laying out a Document Created with Multiple Application Programs on One Page 504 Selecting an Object 505 Changing the Object Size 505 Moving an Object 5...

Страница 10: ...Adding Media Types 549 Changing Media Names 551 Deleting Media Types You Have Added 553 Switching Media Types Display Show Hide 555 Changing the Display Order of Media Types 557 Updating Media Types 559 Print Jobs 562 Basic Print Job Operations 563 Saved Print Jobs 563 Saving Print Jobs 565 Managing Queued Jobs Deleting or Preempting Other Jobs 568 Printing Saved Jobs 572 Deleting Saved Jobs 577 M...

Страница 11: ...58 Stationary Output Stacker 658 Using the Stationary Output Stacker 659 Stowing the Stationary Output Stacker 661 Wheeled Output Stacker 663 Using the Wheeled Output Stacker 663 Adjustments for Better Print Quality 667 Adjusting the Printhead 668 Adjusting the Printhead 668 Automatic Straightening of Lines and Colors Auto Head Adj 668 Manual Straightening of Lines and Colors Manual Head Adj 670 A...

Страница 12: ... Network Environment 771 Configuring the IP Address on the Printer 773 Configuring the IP Address Using the Printer Control Panel 774 Configuring the IP Address Using ARP and PING Commands 775 Using RemoteUI 776 Configuring the Printer s TCP IP Network Settings 777 Specifying Printer Related Information 778 Configuring the Communication Mode Manually 780 Email Notification When Printing is Finishe...

Страница 13: ...her Maintenance 841 Preparing to Transfer the Printer 841 Updating the Firmware 847 Troubleshooting 849 Frequently Asked Questions 850 Frequently Asked Questions 850 Problems Regarding Paper 852 Clearing Jammed Roll Paper 852 Clearing a Jammed Sheet 856 Troubleshooting When Paper Jams are not Found 858 Roll paper cannot be inserted into the Paper Feed Slot 860 Cannot Load Sheets 861 Paper is not c...

Страница 14: ...8 Cannot print over a NetWare network 879 Cannot print over AppleTalk or Bonjour networks 879 Installation problems 880 Removing Installed Printer Drivers 880 HP GL 2 problems 882 Lines or images are missing in the HP GL 2 data that was printed 882 Lines Are Printed Too Thick or Thin During HP GL 2 Printing 882 HP GL 2 jobs are printed in monochrome or color 882 Printed Colors in Line Drawings are...

Страница 15: ...5 Ink tank is empty 905 Not much ink is left 905 No ink tank loaded 906 Wrong ink tank 906 Messages regarding printing or adjustment 907 Use another paper 907 Cannot print as specified 907 Borderless printng not possible Paper stretched or shrank 907 Before borderless printing move the blue platen switch 908 Blue platen switch is dirty 908 Messages regarding printheads 909 Cannot adjust printhead ...

Страница 16: ... out of range 916 GL2 W0504 This command is not supported 916 Other Messages 917 GARO Wxxxx x represents a number 917 ERROR Exxx xxxx x represents a letter or number 917 Hardware error xxxxxxxx xxxx x represents a letter or number 917 Top cover is open 918 Prepare for parts replacement 918 Parts replacement time has passed 918 Unknown file 918 Multi sensor error 919 Appendix 920 How to use this ma...

Страница 17: ...Basic Printing Workflow Printing procedure 2 Canceling print jobs 13 Basic Printing Workflow iPF815 1 1 ...

Страница 18: ...rom familiar applications such as Microsoft Office applications See Printing Vertical or Horizontal Banners Large Format Printing P 115 Borderless printing Print without a margin border around posters or photos See Borderless Printing on Paper of Equivalent Size P 100 See Borderless Printing by Resizing Originals to Fit the Roll Width P 107 See Borderless Printing at Actual Size P 91 Banner printi...

Страница 19: ... Roll Paper Left P 639 Steps 6 and 7 are unnecessary if ManageRemainRoll is On and a barcode has been printed on the roll Step 7 is unnecessary if ManageRemainRoll is Off When Width Detection in the printer menu is Off after you have selected the type of paper in step 6 you will need to enter the roll width See Main Menu Settings P 722 For details on supported sizes and types of rolls see Paper Si...

Страница 20: ...ecting the Paper Source P 631 3 Remove any loaded paper that will not be used Rolls See Removing the Roll from the Printer P 634 Sheets See Removing Sheets P 656 Basic Printing Workflow Printing procedure Loading and Printing on Rolls iPF815 1 4 ...

Страница 21: ...the roll in the printer See Loading Rolls in the Printer P 628 Note Before borderless printing make sure the blue Switch on the platen is set toward the side See Setting the Blue Switch on the Platen P 872 Basic Printing Workflow Printing procedure iPF815 Loading and Printing on Rolls 1 5 ...

Страница 22: ...ying the Paper Length Roll P 633 8 Complete settings in the printer driver for the type of paper and other details Specifying Paper in the Printer Driver Windows P 204 Specifying Paper in the Printer Driver Mac OS X P 427 Basic Printing Workflow Printing procedure Loading and Printing on Rolls iPF815 1 6 ...

Страница 23: ...does not match an error message is displayed and the printing quality may be affected or printing may not be possible The paper is too small P 894 Papr Type Mismatch P 893 9 Send the print job Printing in Windows P 10 Printing from Mac OS X P 11 Basic Printing Workflow Printing procedure iPF815 Loading and Printing on Rolls 1 7 ...

Страница 24: ...or the Paper Reference Guide See Paper Sizes P 620 See Types of Paper P 617 1 Turn the printer on See Turning the Printer On and Off P 694 2 Remove any loaded paper that will not be used See Removing Sheets P 656 3 Complete settings in the printer driver for the type of paper and other details Specifying Paper in the Printer Driver Windows P 204 Basic Printing Workflow Printing procedure Loading a...

Страница 25: ...automatically shows a menu for selection of the type of paper on the control panel Display Screen Select the type of paper at this point See Selecting the Paper Type Sheet P 650 If you select a type of paper for which Media Width Detection is deactivated Off is selected you must advance the paper manually to the position for printing See Manually Loading Paper to the Position for Printing P 654 Ba...

Страница 26: ...tions before printing Running several applications while printing may interrupt the transfer of print data and affect printing quality 1 In the source application select Print from the File menu to display the dialog box for printing conditions Basic Printing Workflow Printing procedure Printing in Windows iPF815 1 10 ...

Страница 27: ...printer driver dialog box There are two ways to access the printer driver dialog box as follows From the application See Accessing the Printer Driver Dialog Box from Applications Windows P 211 From the operating system menu See Accessing the Printer Driver Dialog Box from the Operating System Menu Windows P 213 Printing from Mac OS X Print from the application menu after registering the printer Im...

Страница 28: ...box includes basic printing options and enables you to choose the printer specify the range of pages number of copies and so on 2 Select the printer in the Printer list 3 Click Print to start printing As shown in the following illustration you can switch to other panes in this dialog box to complete settings for vari ous methods of printing including enlarged and reduced printing borderless printi...

Страница 29: ...Menu mode Printer operation varies depending on the status when you hold down the Stop button for a second or more during printing If you press the Stop button before printing starts Holding down the Stop button for a second or more before printing cancels the print job and brings the printer online When the roll is selected as the paper source the printer goes online and when sheet is selected th...

Страница 30: ...el jobs that are being sent to the printer Using imagePROGRAF Status Monitor you can cancel print jobs that have already been received by the printer or that are currently being printed 1 Click the printer icon in the taskbar to display the printer window Note You can also display this window by double clicking the printer icon in the Printers and Faxes or Printers folder accessible through the Wi...

Страница 31: ...monitor if they have been received by the printer or are current ly being printed Note Print jobs are shown in the printer window while they are being sent from the computer After transmission jobs are not displayed even during printing Print jobs are displayed in the imagePROGRAF Printmonitor window from the moment the printer starts re ceiving the print data until the moment printing is finished...

Страница 32: ...no jobs in the printer window that can be canceled that is if the print data has already been sent to the printer click Utility to display imagePROGRAF Printmonitor Basic Printing Workflow Canceling print jobs Canceling Print Jobs from Mac OS X iPF815 1 16 ...

Страница 33: ...t to the printer is canceled 5 Exit imagePROGRAF Printmonitor In the printer window click Start Jobs Important Always follow these steps if you cancel print jobs from imagePROGRAF Printmonitor If you do not restart job processing the next job cannot be printed Basic Printing Workflow Canceling print jobs iPF815 Canceling Print Jobs from Mac OS X 1 17 ...

Страница 34: ...Working With Various Print Jobs Printing CAD Drawings 19 Printing Photos and Images 30 Printing Office Documents 38 Working With Various Print Jobs iPF815 2 18 ...

Страница 35: ...r details on the HDI driver see the HDI Driver P 354 For instructions on CAD printing refer to the following topics as appropriate for your computer and operating system Printing Line Drawings and Text Windows P 20 Printing Line Drawings and Text Mac OS X P 22 Printing Line Drawings and Text Printing is easy when you simply choose the type of original to print Easy Settings Simply choose the print...

Страница 36: ...ting quality High Choose this setting to print at high resolution when quality is most important Printing takes longer and consumes more ink than in Standard or Draft modes but this mode offers exceptional printing quality Standard Choose this setting to print at standard resolution when quality and speed are both important Printing takes less time than in Highest or High mode Draft Choose this se...

Страница 37: ...ke sure the Main sheet is displayed 4 In the AMedia Type list select the type of paper that is loaded In this case click Plain Paper 5 After confirming that DEasy Settings is selected click CAD Color Line Drawing or CAD Monochrome Line Drawing in the EPrint Target list Note You can check the settings values selected in the EPrint Target list by clicking GView Settings Working With Various Print Jo...

Страница 38: ... on available printing conditions see Printer Driver Settings Windows P 202 11 Confirm the print settings and print as desired Note For tips on confirming print settings see Confirming Print Settings Windows P 206 Printing Line Drawings and Text Mac OS X This topic describes how to print line drawings based on the following example Document CAD drawing Page size A3 297 0 420 0 mm 11 7 16 5 in Pape...

Страница 39: ...are configured in the upper part of the printer driver displayed when you select Print from the application software menu 2 Select the printer in the APrinter list 3 In the FPaper Size list click the size of the original In this case click ISO A3 4 If you configured the settings using the Page Attributes dialog box click FOK to close the dialog box and then select Print from the application softwa...

Страница 40: ...tings is selected click CAD Color Line Drawing or CAD Monochrome Line Drawing in the EPrint Target list Note You can check the settings values selected in the EPrint Target list by clicking GView set 8 Make your selection in the FPrint Quality list Working With Various Print Jobs Printing CAD Drawings Printing Line Drawings and Text Mac OS X iPF815 2 24 ...

Страница 41: ...s displayed in the BRoll Width list in this case ISO A2 A3 420 0mm Note If the width of the roll loaded in the printer is not shown in BRoll Width click LPrinter Informa tion on the Main pane to update the printer information Working With Various Print Jobs Printing CAD Drawings iPF815 Printing Line Drawings and Text Mac OS X 2 25 ...

Страница 42: ... when Color CAD is selected in Color Mode Colors can be adjusted before printing as follows when Color Compatibility is selected Note Color CAD is displayed when you select Advanced Settings on the Main sheet and set Print Priority to Line Drawing Text Color Compatibility Color Setting Item Color Setting Description Color CAD 1 Print in standard colors Color CAD 2 Print in brighter colors Color CA...

Страница 43: ...For instructions on configuring Color Compatibility refer to the following topics Specifying Colors and Printing CAD Drawings Windows P 27 Specifying Colors and Printing CAD Drawings Windows You can complete color settings when Color CAD is selected in Color Mode Note Color CAD is displayed when you select Advanced Settings on the Main sheet and set Print Priority to Line Drawing Text 1 Click star...

Страница 44: ... refer to the following topic Choosing the Document Type and Printing Conditions Windows P 58 HP GL 2 Printing This printer supports the original Canon GARO printer control language as well as HP GL 2 and HP RTL 1 P 29 emulation 2 P 29 When printing from applications that support HP GL 2 output specify HP GL 2 in the applica tion s plotter output settings Note For instructions on configuring these...

Страница 45: ...e the following printers using HP GL 2 emulation Emulated Printers Canon W3000 and W3050 3 P 29 Hewlett Packard Designjet 450c Designjet 750c Plus and Designjet 750c 1 HP GL 2 Hewlett Packard Graphics Language 2 HP RTL Hewlett Packard Raster Transfer Language 2 It may not be possible to print jobs with excessively large amounts of data correctly 3 Layout templates are not supported Working With Va...

Страница 46: ...igh impact colors Photo Color Suitable for printing photographic images captured with a digital camera Faithful Color Reproduc tion Prints by minimizing color differences Suitable for when the printing results are too vivid or when printing scanned images Caution Depending on the Media Type setting some Print Target options may not be available Note You can check the settings values for each print...

Страница 47: ...de Draft Choose this setting to print faster Printing in draft mode can help you work more efficiently when checking layouts For instructions on printing photos and images refer to the following topics as appropriate for your computer and operating system Printing Photos and Images Windows P 31 Printing Photos and Images Mac OS X P 33 Printing Photos and Images Windows This topic describes how to ...

Страница 48: ... and related software as well as on the Control Panel is updated when you install the Media Configuration Tool from the User Software CD ROM or if you change paper information by using the Media Configuration Tool For details see Media Configura tion Tool P 406 5 After confirming that DEasy Settings is selected click Photo Color in the EPrint Target list Note You can check the settings values sele...

Страница 49: ...ble printing conditions see Printer Driver Settings Windows P 202 11 Confirm the print settings and print as desired Note For instructions on confirming print settings see Confirming Print Settings Windows P 206 Printing Photos and Images Mac OS X This topic describes how to print photos based on the following example Document Photo image from a digital camera Page size 10 12 inches 254 0 304 8 mm...

Страница 50: ...are configured in the upper part of the printer driver displayed when you select Print from the application software menu 2 Select the printer in the APrinter list 3 In the FPaper Size list click the size of the original In this case click 10 x12 4 If you configured the settings using the Page Attributes dialog box click FOK to close the dialog box and then select Print from the application softwa...

Страница 51: ... CD ROM or if you change paper information by using the Media Configuration Tool For details see Media Con figuration Tool P 539 7 After confirming that DEasy Settings is selected click Photo Color in the EPrint Target list Note For information on settings optimized for printing photos and images see Printing Photos and Im ages P 30 You can check the settings values selected in the EPrint Target l...

Страница 52: ... is displayed in the BRoll Width list in this case 10 in 254 0mm Note If the width of the roll loaded in the printer is not shown in BRoll Width click LPrinter Informa tion on the Main pane to update the printer information Working With Various Print Jobs Printing Photos and Images Printing Photos and Images Mac OS X iPF815 2 36 ...

Страница 53: ...l printing conditions For details on available printing conditions see Printer Driver Settings Mac OS X P 425 14 Confirm the print settings and then click MPrint to start printing Note For tips on confirming print settings see Confirming Print Settings Mac OS X P 429 Working With Various Print Jobs Printing Photos and Images iPF815 Printing Photos and Images Mac OS X 2 37 ...

Страница 54: ... Elements and Colors for Printing P 55 Print Quality Choose the print quality The printing mode is determined by a combination of the print quality and resolution Print Quality Description Highest A setting for printing at the highest resolution when quality is most important Printing takes longer and consumes more ink than in other modes but this mode offers superior printing quality High Choose ...

Страница 55: ...r spreadsheet programs Page size A4 210 0 297 0 mm 8 3 11 7 in Paper Sheets Paper type Plain Paper Paper size A4 210 0 297 0 mm 8 3 11 7 in 1 Choose Print in the application menu 2 Select the printer in the dialog box and then display the printer driver dialog box See Accessing the Printer Driv er Dialog Box from Applications Windows P 211 3 Make sure the Main sheet is displayed 4 In the AMedia Ty...

Страница 56: ...ditional printing conditions For details on available printing conditions see Printer Driver Settings Windows P 202 10 Confirm the print settings and print as desired Note For tips on confirming print settings see Confirming Print Settings Windows P 206 Printing Office Documents Mac OS X This topic describes how to print office documents based on the following example Document Office document crea...

Страница 57: ...ttings are configured in the upper part of the printer driver displayed when you select Print from the application software menu 2 Select the printer in the APrinter list 3 In the FPaper Size list click the size of the original In this case click ISO A4 for Paper Tray Large Mar gins 4 If you configured the settings using the Page Attributes dialog box click FOK to close the dialog box and then sel...

Страница 58: ...rming that DEasy Settings is selected click Office Document in the EPrint Target list Note You can check the settings values selected in the EPrint Target list by clicking GView set 8 Make your selection in the FPrint Quality list Working With Various Print Jobs Printing Office Documents Printing Office Documents Mac OS X iPF815 2 42 ...

Страница 59: ...selected in CPaper Size in the Page Attributes dialog box in this case ISO A4 for Paper Tray Large Margins 12 Specify additional printing conditions For details on available printing conditions see Printer Driver Settings Mac OS X P 425 Working With Various Print Jobs Printing Office Documents iPF815 Printing Office Documents Mac OS X 2 43 ...

Страница 60: ...and then click MPrint to start printing Note For tips on confirming print settings see Confirming Print Settings Mac OS X P 429 Working With Various Print Jobs Printing Office Documents Printing Office Documents Mac OS X iPF815 2 44 ...

Страница 61: ... at full size 85 Borderless Printing 100 Printing banners or at other non standard sizes 115 Tiling and multiple pages per sheet 133 Centering originals 154 Conserving roll paper 167 Using PosterArtist to Compose Originals 181 Checking Images Before Printing 184 Other useful settings 186 Enhanced Printing Options iPF815 3 45 ...

Страница 62: ...lor CAD A color mode optimized for line drawings 2D CAD Lines in red yellow and other colors are printed especially clearly You can adjust the color balance Monochrome BK ink A color mode for printing line drawings Only Black ink is used You can adjust the color balance Monochrome Bitmap Print in a color mode for CAD using Color Ink with all non white portions printed in black No color adjustment ...

Страница 63: ... profiles for digital cameras and scanners ICC pro files created using the profile creation tool etc Driver ICM Mode Enables color matching by the printer driver using the ICM function of printer driver Select this if you want to print by only specifying the matching method Available when using Windows Host ICM Mode Enables color matching by the host computer using the ICM function of Windows Sele...

Страница 64: ...sure to calibrate your monitor colors correctly if you adjust the colors for printing If monitor colors are not calibrated correctly you may not obtain the desired printing results For instructions on monitor calibra tion refer to the documentation for your monitor and operating system For instructions on color adjustment refer to the following topics as appropriate for your computer and operating...

Страница 65: ... AMedia Type list select the type of paper that is loaded 5 Click DAdvanced Settings to switch the print mode 6 Click Color in the GColor Mode list Enhanced Printing Options Adjusting Images iPF815 Fine Tuning Colors of Photos and Images Windows 3 49 ...

Страница 66: ...gion or from the list HBrightness Adjust the brightness of printed images while keeping the darkest and lightest por tions intact IContrast Adjust the contrast of the darkest and lightest portions relative to each other For soft gradation decrease the contrast For hard gradation increase the contrast JSaturation Adjust the level of color saturation in a range from subdued to vivid Note Click Objec...

Страница 67: ...ngs of APage Size LPaper Source and so on 12 Confirm the print settings and print as desired Note For tips on confirming print settings see Confirming Print Settings Windows P 206 Enhanced Printing Options Adjusting Images iPF815 Fine Tuning Colors of Photos and Images Windows 3 51 ...

Страница 68: ... the settings are configured by opening the Page Attributes dialog box from Page Setup If it is not displayed the settings are configured in the upper part of the printer driver displayed when you select Print from the application software menu 2 Select the printer in the APrinter list 3 Choose the original size in the FPaper Size list 4 If you configured the settings using the Page Attributes dia...

Страница 69: ...ype list select the type of paper that is loaded 7 Click DAdvanced Settings to switch the print mode 8 Click Color in the HColor Mode list Enhanced Printing Options Adjusting Images iPF815 Fine Tuning Colors of Photos and Images Mac OS X 3 53 ...

Страница 70: ...the list HBrightness Adjust the brightness of printed images while keeping the darkest and lightest por tions intact IContrast Adjust the contrast of the darkest and lightest portions relative to each other For soft gradation decrease the contrast For hard gradation increase the contrast JSaturation Adjust the level of color saturation in a range from subdued to vivid Note Click Object Adjustment ...

Страница 71: ...r printing results that appear just as expected for your original you can specify which graphic elements and colors to prioritize for printing Note Easy Settings are also available providing convenient presets To use the presets simply choose the printing application For details on Easy Settings refer to the following topics Printing Photos and Images P 30 Printing Line Drawings and Text P 19 Prin...

Страница 72: ...e highest resolution when quality is most important Printing takes longer and consumes more ink than in other modes but this mode offers superior printing quality Image High Choose this setting to print at high resolution when quality is most important Printing takes longer and consumes more ink than in Standard or Draft modes but this mode offers exceptional printing quality Image Line Drawing Te...

Страница 73: ...f lines are printed crooked or images are uneven However this takes more time than regular printing Thicken Fine Lines Choose this option to make fine lines clearer in CAD drawings or similar docu ments Sharpen Text Choose this option to print intricate text more distinctly Reduce Print Unevenness 1 Choose this option to counteract uneven printing Economy Printing When this mode is selected less i...

Страница 74: ... lines and text 1 Choose Print in the application menu 2 Select the printer in the dialog box and then display the printer driver dialog box See Accessing the Printer Driv er Dialog Box from Applications Windows P 211 3 Make sure the Main sheet is displayed 4 In the AMedia Type list select the type of paper that is loaded Enhanced Printing Options Adjusting Images Choosing the Document Type and Pr...

Страница 75: ...e FPrint Quality list vary depending on the paper type 8 Click Color CAD in the GColor Mode list 9 To adjust the color click HColor Settings Note For instructions on adjusting color see Adjusting the Color in the Printer Driver P 46 10 Select the KSharpen Text check box Enhanced Printing Options Adjusting Images iPF815 Choosing the Document Type and Printing Conditions Windows 3 59 ...

Страница 76: ... APage Size LPaper Source and so on 13 Confirm the print settings and print as desired Note For tips on confirming print settings see Confirming Print Settings Windows P 206 Enhanced Printing Options Adjusting Images Choosing the Document Type and Printing Conditions Windows iPF815 3 60 ...

Страница 77: ...pplication menu the settings are configured by opening the Page Attributes dialog box from Page Setup If it is not displayed the settings are configured in the upper part of the printer driver displayed when you select Print from the application software menu 2 Select the printer in the APrinter list 3 Choose the original size in the FPaper Size list 4 If you configured the settings using the Page...

Страница 78: ...lect the type of paper that is loaded 7 Click DAdvanced Settings to switch the print mode 8 Click Line Drawing in the EPrint Priority list Enhanced Printing Options Adjusting Images Choosing the Document Type and Printing Conditions Mac OS X iPF815 3 62 ...

Страница 79: ...ns on adjusting color see Adjusting the Color in the Printer Driver P 46 12 Access the Page Setup pane 13 Confirm the settings of APaper Source and CPage Size 14 Confirm the print settings and then click MPrint to start printing Note For tips on confirming print settings see Confirming Print Settings Mac OS X P 429 Enhanced Printing Options Adjusting Images iPF815 Choosing the Document Type and Pr...

Страница 80: ...ype specified on the printer Although you can print under these conditions the printing results may not be suitable If the paper type is not listed for selection If the type of paper loaded cannot be selected try specifying glossy paper or proofing paper as a special paper Special 1 to Special 5 in this order BK Black Ink is used as the black ink Try specifying other types of paper as Special 6 to...

Страница 81: ...er driver as desired Fit Paper Size Enlarge or reduce the original to match the size of the paper you are using For instructions on resizing originals to match the paper size refer to the following topics as appropriate for your computer and operating system Resizing Originals to Match the Paper Size Windows P 65 Resizing Originals to Match the Paper Size Mac OS X P 67 Note For better printing res...

Страница 82: ...printer driver dialog box See Accessing the Printer Driver Dialog Box from Applications Windows P 211 3 Make sure the Main sheet is displayed 4 In the AMedia Type list select the type of paper that is loaded In this case click Plain Paper 5 Select the printing application in the EPrint Target list Enhanced Printing Options Printing enlargements or reductions Resizing Originals to Match the Paper S...

Страница 83: ...11 Select the DFit Paper Size check box 12 Click ISO A3 in the GPaper Size list 13 Confirm the print settings and print as desired Note For tips on confirming print settings see Confirming Print Settings Windows P 206 Resizing Originals to Match the Paper Size Mac OS X This topic describes how to enlarge originals before printing to match the paper size based on the following example Document Any ...

Страница 84: ...t displayed the settings are configured in the upper part of the printer driver displayed when you select Print from the application software menu 2 Select the printer in the APrinter list 3 In the FPaper Size list click the size of the original In this case click ISO A4 4 If you configured the settings using the Page Attributes dialog box click FOK to close the dialog box and then select Print fr...

Страница 85: ...Paper 7 Make your selection in the EPrint Target list 8 Make your selection in the FPrint Quality list 9 Access the Page Setup pane 10 Select and click a roll paper in the APaper Source list Enhanced Printing Options Printing enlargements or reductions iPF815 Resizing Originals to Match the Paper Size Mac OS X 3 69 ...

Страница 86: ...n the Main pane to update the printer information 12 Make sure CPage Size on the Page Setup pane shows the original size as specified in CPaper Size in the Page Attributes dialog box in this case ISO A4 13 Select the DEnlarged Reduced Printing check box 14 Make sure EFit Paper Size is selected Enhanced Printing Options Printing enlargements or reductions Resizing Originals to Match the Paper Size ...

Страница 87: ...er width refer to the following topics as appropriate for your computer and operating system Resizing Originals to Fit the Roll Width Windows P 71 Resizing Originals to Fit the Roll Width Mac OS X P 74 Note For better printing results when enlarging photos from a digital camera in TIFF or JPEG format use an im age editing application software such as Adobe Photoshop to specify an image resolution ...

Страница 88: ... See Accessing the Printer Driv er Dialog Box from Applications Windows P 211 3 Make sure the Main sheet is displayed 4 In the AMedia Type list select the type of paper that is loaded In this case click Plain Paper 5 Select the printing application in the EPrint Target list Enhanced Printing Options Printing enlargements or reductions Resizing Originals to Fit the Roll Width Windows iPF815 3 72 ...

Страница 89: ... specified in the application In this case click ISO A4 or Letter 8 5 x11 9 Select the CEnlarged Reduced Printing check box Note If the CEnlarged Reduced Printing check box is not displayed on the Page Setup sheet clear the BBorderless Printing check box Enhanced Printing Options Printing enlargements or reductions iPF815 Resizing Originals to Fit the Roll Width Windows 3 73 ...

Страница 90: ...esired Note For tips on confirming print settings see Confirming Print Settings Windows P 206 Resizing Originals to Fit the Roll Width Mac OS X This topic describes how to enlarge originals before printing to match the roll width based on the following example Document Any Type Page size A4 210 0 297 0 mm 8 3 11 7 in Paper Roll paper Paper type Plain Paper Roll paper width 16 inches 406 4 mm Enhan...

Страница 91: ...igured in the upper part of the printer driver displayed when you select Print from the application software menu 2 Select the printer in the APrinter list 3 In the FPaper Size list click the size of the original In this case click ISO A4 4 If you configured the settings using the Page Attributes dialog box click FOK to close the dialog box and then select Print from the application software menu ...

Страница 92: ... Paper 7 Make your selection in the EPrint Target list 8 Make your selection in the FPrint Quality list 9 Access the Page Setup pane 10 Select and click a roll paper in the APaper Source list Enhanced Printing Options Printing enlargements or reductions Resizing Originals to Fit the Roll Width Mac OS X iPF815 3 76 ...

Страница 93: ...s case ISO A4 13 Select the DEnlarged Reduced Printing check box 14 Click FFit Roll Paper Width 15 Confirm the print settings and then click MPrint to start printing Note For tips on confirming print settings see Confirming Print Settings Mac OS X P 429 Resizing Originals by Entering a Scaling Value You can freely adjust the size of originals by enlarging or reducing them as desired Enlarged Reduc...

Страница 94: ...re at actual size Resizing Originals by Entering a Scaling Value Windows This topic describes how to enlarge originals before printing by entering a scaling value based on the following example Document Any Type Page size A4 210 0 297 0 mm 8 3 11 7 in Paper Roll paper Paper type Plain Paper Roll paper width A2 A3 roll 420 0 mm 16 5 in Important In borderless printing you cannot resize originals by...

Страница 95: ...that is loaded In this case click Plain Paper 5 Select the printing application in the EPrint Target list 6 Click the Page Setup tab to display the Page Setup sheet Enhanced Printing Options Printing enlargements or reductions iPF815 Resizing Originals by Entering a Scaling Value Windows 3 79 ...

Страница 96: ...ges of the paper will not be printed If the original size after enlargement or reduction is smaller than the paper size the original is printed in the upper left corner In this case you can center originals by selecting EPrint Centered on the Layout sheet 13 Confirm the print settings and print as desired Note For tips on confirming print settings see Confirming Print Settings Windows P 206 Resizi...

Страница 97: ...from Page Setup If it is not displayed the settings are configured in the upper part of the printer driver displayed when you select Print from the application software menu 2 Select the printer in the APrinter list 3 In the FPaper Size list click the size of the original In this case click ISO A4 4 If you configured the settings using the Page Attributes dialog box click FOK to close the dialog b...

Страница 98: ...per 7 Make your selection in the EPrint Target list 8 Make your selection in the FPrint Quality list 9 Access the Page Setup pane 10 Select and click a roll paper in the APaper Source list Enhanced Printing Options Printing enlargements or reductions Resizing Originals by Entering a Scaling Value Mac OS X iPF815 3 82 ...

Страница 99: ... LPrinter Informa tion on the Main pane to update the printer information 12 Make sure the CPage Size setting matches the original size as selected in CPaper Size in the Page Attributes dialog box in this case ISO A4 13 Select the DEnlarged Reduced Printing check box Enhanced Printing Options Printing enlargements or reductions iPF815 Resizing Originals by Entering a Scaling Value Mac OS X 3 83 ...

Страница 100: ...an the paper size the original is printed in the upper left corner In this case you can center originals by selecting the JPrint Centered check box 15 Confirm the print settings and then click MPrint to start printing Note For tips on confirming print settings see Confirming Print Settings Mac OS X P 429 Enhanced Printing Options Printing enlargements or reductions Resizing Originals by Entering a...

Страница 101: ...rgin Note If you prepare an original for printing without a margin and print it on paper of regular size the image near the edge will not be printed Oversize The margin required by the printer is added around the outside of a regular paper size For example when printing a A4 sized original 210 297 mm you have the following options a Regular paper size Gray area not printed b Page Size c Oversized ...

Страница 102: ...ting at Full Size Windows P 86 Printing at Full Size Mac OS X P 87 Printing at Full Size Windows This topic describes how to print at full size based on the following example Oversized Printing Document Any Type Page Size A4 210 0 297 0 mm Letter 8 3 11 7 in Paper Roll Paper type Plain Paper Roll paper width A2 A3 roll 420 0 mm 16 5 in 1 Choose Print in the application menu 2 Select the printer in...

Страница 103: ...ersize ISO A4 in the APage Size list 10 Select and click a roll paper in the LPaper Source list 11 Select the width of the loaded roll in the MRoll Paper Width list in this case ISO A2 A3 Roll 420 0mm 12 Confirm the print settings and print as desired Note For tips on confirming print settings see Confirming Print Settings Windows P 206 Printing at Full Size Mac OS X This topic describes how to pr...

Страница 104: ...ributes dialog box from Page Setup If it is not displayed the settings are configured in the upper part of the printer driver displayed when you select Print from the application software menu 2 Select the printer in the APrinter list 3 In FPaper Size click the size of the original In this case click ISO A4 Oversize 4 If you configured the settings using the Page Attributes dialog box click FOK to...

Страница 105: ...case click Plain Paper 7 Make your selection in the EPrint Target list 8 Make your selection in the FPrint Quality list 9 Access the Page Setup pane 10 Select and click a roll paper in the APaper Source list Enhanced Printing Options Printing at full size iPF815 Printing at Full Size Mac OS X 3 89 ...

Страница 106: ...in pane to update the printer information 12 Make sure CPage Size shows the original size as specified in CPaper Size in the Page Attributes dialog box in this case ISO A4 Oversize 13 Confirm the print settings and then click MPrint to start printing Note For tips on confirming print settings see Confirming Print Settings Mac OS X P 429 Enhanced Printing Options Printing at full size Printing at F...

Страница 107: ...g Rotate Page 90 degrees Conserve Paper cannot be selected When borderless printing is used the edge of the paper is cut during printing Thus ink density may be un even at the edges If you require higher image quality specify No in Auto Cut in the printer driver In this case the paper can be printed without borders on the left and right sides only After ejecting and cutting the printed document us...

Страница 108: ...puter and operating system Borderless Printing at Actual Size Windows P 92 Borderless Printing at Actual Size Mac OS X P 95 Borderless Printing at Actual Size Windows This topic describes how to print borderlessly at actual size based on the following example Document Any type Page size 10 12 inches 254 0 304 8 mm Paper Roll Paper type Heavyweight Coated Paper Roll paper width 10 inches 254 0 mm 1...

Страница 109: ...om Applications Windows P 211 4 Make sure the Main sheet is displayed 5 In the AMedia Type list select the type of paper that is loaded In this case click Heavyweight Coated Paper 6 Select the print target in the EPrint Target list Enhanced Printing Options Printing at full size iPF815 Borderless Printing at Actual Size Windows 3 93 ...

Страница 110: ...nal as specified in the source application In this case click 10 x12 9 Select and click a roll paper in the LPaper Source list 10 Select the BBorderless Printing check box to display the Information dialog box Enhanced Printing Options Printing at full size Borderless Printing at Actual Size Windows iPF815 3 94 ...

Страница 111: ...e For tips on confirming print settings see Confirming Print Settings Windows P 206 Borderless Printing at Actual Size Mac OS X This topic describes how to print borderlessly at actual size based on the following example Document Any Type Page size 10 12 inches 254 0 304 8 mm Borderless Paper Roll paper Paper type Heavyweight Coated Paper Roll paper width 10 inches 254 0 mm Enhanced Printing Optio...

Страница 112: ...ver displayed when you select Print from the application software menu 2 Select the printer in the APrinter list 3 In the FPaper Size list choose a paper size supported for borderless printing Here click 10 x12 Borderless Note Paper sizes supported for borderless printing are indicated by Borderless 4 If you configured the settings using the Page Attributes dialog box click FOK to close the dialog...

Страница 113: ...avyweight Coated Paper 7 Make your selection in the EPrint Target list 8 Make your selection in the FPrint Quality list 9 Access the Page Setup pane 10 Select and click a roll paper in the APaper Source list Enhanced Printing Options Printing at full size iPF815 Borderless Printing at Actual Size Mac OS X 3 97 ...

Страница 114: ...oll loaded in the printer is not shown in BRoll Width click LPrinter Informa tion on the Main pane to update the printer information 12 Make sure the CPage Size setting matches the original size as selected in CPaper Size in the Page Attributes dialog box in this case 10 x12 Borderless Enhanced Printing Options Printing at full size Borderless Printing at Actual Size Mac OS X iPF815 3 98 ...

Страница 115: ...and then click MPrint to start printing Note For tips on confirming print settings see Confirming Print Settings Mac OS X P 429 Enhanced Printing Options Printing at full size iPF815 Borderless Printing at Actual Size Mac OS X 3 99 ...

Страница 116: ...ination with borderless printing special page layouts centering origi nals and printing cut lines on rolls If Fit Paper Size or Print Image with Actual Size Windows only is selected when performing borderless printing Rotate Page 90 degrees Conserve Paper cannot be selected When borderless printing is used the edge of the paper is cut during printing Thus ink density may be slightly uneven at the ...

Страница 117: ...he Paper Size Windows This topic describes how to enlarge originals before borderless printing to match the paper size based on the following example Document Any type Page size 10 12 inches 254 0 304 8 mm Paper Roll Paper type Heavyweight Coated Paper Roll paper width 10 inches 254 0 mm 1 In the application create an original that takes up the entire space of the paper size Note If you can specif...

Страница 118: ...is loaded In this case click Heavyweight Coated Paper 6 Select the print target in the EPrint Target list 7 Click the Page Setup tab to display the Page Setup sheet Enhanced Printing Options Borderless Printing Borderless Printing by Resizing Originals to Match the Paper Size Windows iPF815 3 102 ...

Страница 119: ...rless Printing Method click DFit Paper Size 14 Click Match Page Size in the GPaper Size list 15 Confirm the print settings and print as desired Note For tips on confirming print settings see Confirming Print Settings Windows P 206 Borderless Printing by Resizing Originals to Match the Paper Size Mac OS X This topic describes how to enlarge originals before borderless printing to match the paper si...

Страница 120: ...the upper part of the printer driver displayed when you select Print from the application software menu 2 Select the printer in the APrinter list 3 In the FPaper Size list click the size of the original In this case click 10 x12 Note All sizes are available in borderless printing if you resize originals to match the paper size 4 If you configured the settings using the Page Attributes dialog box c...

Страница 121: ...d Paper 7 Make your selection in the EPrint Target list 8 Make your selection in the FPrint Quality list 9 Access the Page Setup pane 10 Select and click a roll paper in the APaper Source list Enhanced Printing Options Borderless Printing iPF815 Borderless Printing by Resizing Originals to Match the Paper Size Mac OS X 3 105 ...

Страница 122: ...e to update the printer information 12 Make sure the CPage Size setting matches the original size as selected in CPaper Size in the Page Attributes dialog box in this case 10 x12 13 On the Page Setup pane select the DEnlarged Reduced Printing check box 14 Select the HBorderless Printing check box Enhanced Printing Options Borderless Printing Borderless Printing by Resizing Originals to Match the P...

Страница 123: ...nals and printing cut lines on rolls If Fit Paper Size or Print Image with Actual Size Windows only is selected when performing borderless printing Rotate Page 90 degrees Conserve Paper cannot be selected When borderless printing is used the edge of the paper is cut during printing Thus ink density may be un even at the edges If you require higher image quality specify No in Auto Cut in the printe...

Страница 124: ...s to Fit the Roll Width Windows This topic describes how to enlarge originals before borderless printing to match the roll width based on the following ex ample Document Any type Page size A4 210 0 297 0 mm Letter 8 3 11 7 in Paper Roll Paper type Heavyweight Coated Paper Roll paper width 10 inches 254 0 mm 1 In the application create an original that takes up the entire space of the paper size No...

Страница 125: ... is loaded In this case click Heavyweight Coated Paper 6 Select the print target in the EPrint Target list 7 Click the Page Setup tab to display the Page Setup sheet Enhanced Printing Options Borderless Printing iPF815 Borderless Printing by Resizing Originals to Fit the Roll Width Windows 3 109 ...

Страница 126: ...inting Method make sure EScale to fit Roll Paper Width is selected 14 Confirm the print settings and print as desired Note For tips on confirming print settings see Confirming Print Settings Windows P 206 Borderless Printing by Resizing Originals to Fit the Roll Width Mac OS X This topic describes how to enlarge originals before borderless printing to match the roll width based on the following ex...

Страница 127: ...nter driver displayed when you select Print from the application software menu 2 Select the printer in the APrinter list 3 In the FPaper Size list click the size of the original In this case click ISO A4 Note All sizes are available in borderless printing if you resize originals to fit the roll width 4 If you configured the settings using the Page Attributes dialog box click FOK to close the dialo...

Страница 128: ...ed Paper 7 Make your selection in the EPrint Target list 8 Make your selection in the FPrint Quality list 9 Access the Page Setup pane 10 Select and click a roll paper in the APaper Source list Enhanced Printing Options Borderless Printing Borderless Printing by Resizing Originals to Fit the Roll Width Mac OS X iPF815 3 112 ...

Страница 129: ...12 Make sure the CPage Size setting matches the original size as selected in CPaper Size in the Page Attributes dialog box in this case ISO A4 13 Select the DEnlarged Reduced Printing check box 14 Select the HBorderless Printing check box This ensures that FFit Roll Paper Width is automatically selected in DEnlarged Reduced Printing Enhanced Printing Options Borderless Printing iPF815 Borderless P...

Страница 130: ... MPrint to start printing Note For tips on confirming print settings see Confirming Print Settings Mac OS X P 429 Enhanced Printing Options Borderless Printing Borderless Printing by Resizing Originals to Fit the Roll Width Mac OS X iPF815 3 114 ...

Страница 131: ...rs by automatically enlarging or reducing originals to fit the full width of rolls Note The maximum supported roll length is 18 0 m or 19 7 yd For instructions on printing vertical or horizontal banners refer to the following topics as appropriate for your computer and operating system Printing Vertical or Horizontal Banners Large Format Printing Windows P 116 Printing Vertical or Horizontal Banne...

Страница 132: ...e 100 500 mm 3 9 19 7 in is registered 2 In the application create an original in the size you registered 3 Print the banner using the settings that correspond to banners Registering a Custom Paper Size This example describes how to register a paper size that is horizontally elongated and suitable for banners in either horizon tal or vertical format 1 Display the printer driver dialog box See Acce...

Страница 133: ...oose Page Setup from the File menu to display the Page Setup dialog box 3 Under Paper Size click the Custom Paper Size you registered My Horizontal Banner in this example Important If My Horizontal Banner is not listed make sure this printer is selected as the printer to use In applications such as Microsoft PowerPoint that do not enable you to choose registered paper sizes use the custom paper si...

Страница 134: ...lick Plain Paper 5 After confirming that DEasy Settings is selected click Poster in the EPrint Target list 6 Click the Page Setup tab to display the Page Setup sheet Enhanced Printing Options Printing banners or at other non standard sizes Printing Vertical or Horizontal Banners Large Format Printing Windows iPF815 3 118 ...

Страница 135: ...rce list 10 After you click EFit Roll Paper Width the Information dialog box is displayed 11 Select the width of the loaded roll in the Roll Paper Width list In this case click 16 in Roll 406 4mm and then click OK 12 Confirm the print settings and print as desired Note For tips on confirming print settings see Confirming Print Settings Windows P 206 Enhanced Printing Options Printing banners or at...

Страница 136: ... Format Printing Mac OS X This topic describes how to print a banner about five times as long as the roll width based on the following example Document An original designed for a horizontal banner Page Size Non standard 100 500 mm 3 9 19 7 in Paper Roll Paper type Plain Paper Roll paper width 16 inches 406 4 mm Enhanced Printing Options Printing banners or at other non standard sizes Printing Vert...

Страница 137: ...ote The following procedures are based on Mac OS X 10 5 The method of setting up non standard paper sizes varies depending on the version of Mac OS X Register a Custom Page Sizes This example describes how to register and print using a page size that is horizontally elongated and suitable for banners in either horizontal or vertical format 1 Create the document in the application 2 Choose Print in...

Страница 138: ... the original In this case click 100 500 the size you registered 10 In DOrientation click the icon of the document in landscape orientation 11 Click FOK to close the dialog box Print the banner Follow the steps below to print the banner using the corresponding banner settings 1 Choose Print in the application menu 2 Access the Main pane 3 In the AMedia Type list select the type of paper that is lo...

Страница 139: ...06 4mm Note If the width of the loaded roll is not displayed in BRoll Width click LPrinter Information on the Main pane and update the printer information 9 In CPage Size make sure 100 500 is displayed as registered in Page Setup Enhanced Printing Options Printing banners or at other non standard sizes iPF815 Printing Vertical or Horizontal Banners Large Format Printing Mac OS X 3 123 ...

Страница 140: ...ter driver the sizes will not be available after you exit the appli cation If you want to set up a non standard paper size so that it will always be available we recommend registering the paper size in the printer driver Note These temporary paper sizes you register on the printer are called Custom Sizes in Windows This can only be configured in Windows For instructions on specifying non standard ...

Страница 141: ...inter in the dialog box and then display the printer driver dialog box See Accessing the Printer Driv er Dialog Box from Applications Windows P 211 4 Make sure the Main sheet is displayed 5 In the AMedia Type list select the type of paper that is loaded 6 After confirming that DEasy Settings is selected select from the EPrint Target list Enhanced Printing Options Printing banners or at other non s...

Страница 142: ...red Note For tips on confirming print settings see Confirming Print Settings Windows P 206 Printing by using Custom Paper Size This section describes how to print using Custom Paper Size based on the following example First register a non standard paper size called 430 mm Square as a Custom Paper Size Document Any Type Page Size A square sheet 430 430 mm 16 9 16 9 in Paper Sheets Media Type Any ty...

Страница 143: ...ccessing the Printer Driv er Dialog Box from Applications Windows P 211 4 Make sure the Main sheet is displayed 5 In the AMedia Type list select the type of paper that is loaded 6 After confirming that DEasy Settings is selected select from the EPrint Target list Enhanced Printing Options Printing banners or at other non standard sizes iPF815 Printing on Non Standard Paper Sizes Windows 3 127 ...

Страница 144: ... in either Width or Height the other value will be automatically applied based on the original aspect ratio 12 Click Add to register 430 mm Square 13 Click OK to close the Paper Size Options dialog box 14 Click Cut Sheet in the LPaper Source list 15 In the APage Size list click the size you added 430 mm Square 16 Confirm the print settings and print as desired Note For tips on confirming print set...

Страница 145: ...et 430 430 mm 16 9 16 9 in Paper Sheets Media Type Any type Paper Size A square sheet 430 430 mm 16 9 16 9 in Note The following procedures are based on Mac OS X 10 5 The method of setting up non standard paper sizes varies depending on the version of Mac OS X 1 Create the document in the application 2 Load the square paper 430 430 mm 16 9 16 9 in in the printer 3 Choose Print in the application m...

Страница 146: ... the list at left in the Custom Page Sizes dialog box and enter the paper name in this case 430 430 9 Click OK to close the Custom Page Sizes dialog box 10 In the CPaper Size list click the size of the original In this case click 430 430 the size you registered 11 If you configured the settings using the Page Attributes dialog box click FOK to close the dialog box and then select Print from the ap...

Страница 147: ...Easy Settings is selected select from the EPrint Target list 15 Make your selection in the FPrint Quality list 16 Access the Page Setup pane 17 Click Cut Sheet in the APaper Source list Enhanced Printing Options Printing banners or at other non standard sizes iPF815 Printing on Non Standard Paper Sizes Mac OS X 3 131 ...

Страница 148: ...firm the print settings and then click MPrint to start printing Note For tips on confirming print settings see Confirming Print Settings Mac OS X P 429 Enhanced Printing Options Printing banners or at other non standard sizes Printing on Non Standard Paper Sizes Mac OS X iPF815 3 132 ...

Страница 149: ...inting Posters in Sections 150 Printing Large Posters Windows 151 Printing Multiple Originals Next to Each Other By arranging originals from word processing or spreadsheet programs or web browser screen shots next to each other on single sheets you can create highly expressive presentation materials easy to understand meeting materials and a variety of other printed documents Free Layout Windows B...

Страница 150: ...dows P 134 Printing Multiple Originals Next to Each Other Mac OS X P 136 Printing Multiple Originals Next to Each Other Windows This topic describes how to arrange multiple originals using the Free Layout function Important Free Layout cannot be used in 64 bit version of Windows 1 Choose Print in the application menu 2 Select the printer in the dialog box and then display the printer driver dialog...

Страница 151: ...e Layout tab to display the Layout sheet 5 Select the APage Layout check box 6 Click Free Layout in the APage Layout list Enhanced Printing Options Tiling and multiple pages per sheet iPF815 Printing Multiple Originals Next to Each Other Windows 3 135 ...

Страница 152: ...ructions on editing and rearranging images refer to the imagePROGRAF Free Layout help topic 9 Print from the imagePROGRAF Free Layout menu Note For details on imagePROGRAF Free Layout functions refer to Free Layout P 256 Printing Multiple Originals Next to Each Other Mac OS X This topic describes how to use the Free Layout function to arrange multiple originals next to each other before printing 1...

Страница 153: ...lect the NFree Layout check box 4 Click MPrint 5 The Canon imagePROGRAF Free Layout window is displayed Enhanced Printing Options Tiling and multiple pages per sheet iPF815 Printing Multiple Originals Next to Each Other Mac OS X 3 137 ...

Страница 154: ...rint multiple pages as a single continuous image without margins between pages Roll paper banner Important This feature is only available with rolls It cannot be used when printing on sheets During banner printing settings for conserving paper number of copies borderless printing enlargement or reduction and other layout related settings are disregarded For instructions on borderless printing of p...

Страница 155: ...orderless printing enlargement or reduction and other layout related settings are disregarded 1 Choose Print in the application menu 2 Select the printer in the dialog box and then display the printer driver dialog box See Accessing the Printer Driv er Dialog Box from Applications Windows P 211 3 Make sure the Main sheet is displayed 4 In the AMedia Type list click the type of paper that is loaded...

Страница 156: ...display the Roll Paper Options dialog box 8 Select the BBanner Printing check box 9 Click OK 10 Confirm the print settings and print as desired Note For tips on confirming print settings see Confirming Print Settings Windows P 206 Enhanced Printing Options Tiling and multiple pages per sheet Printing Multiple Pages Continuously Windows iPF815 3 140 ...

Страница 157: ... OS and application software you are using If Page Setup is displayed in the application menu the settings are configured by opening the Page Attributes dialog box from Page Setup If it is not displayed the settings are configured in the upper part of the printer driver displayed when you select Print from the application software menu 2 Select the printer in the APrinter list 3 Click the original...

Страница 158: ...tion in the EPrint Target list 8 Make your selection in the FPrint Quality list 9 Access the Page Setup pane 10 In the APaper Source list click Roll Paper 1 Banner or Roll Paper 2 Banner Enhanced Printing Options Tiling and multiple pages per sheet Printing Multiple Pages Continuously Mac OS X iPF815 3 142 ...

Страница 159: ...ndary lines as desired Important This function cannot be combined with the following options Borderless Printing Scaling Originals Windows Banner Printing Windows When printing using this function the Print Centered setting is disabled For instructions on printing multiple pages per sheet refer to the following topics as appropriate for your computer and operating system Printing Multiple Pages Pe...

Страница 160: ...ng the Printer Driver Dialog Box from Applications Windows P 211 3 Make sure the Main sheet is displayed 4 In the AMedia Type list select the type of paper that is loaded In this case click Plain Paper 5 Make your selection in the EPrint Target list 6 Make your selection in the FPrint Quality list Enhanced Printing Options Tiling and multiple pages per sheet Printing Multiple Pages Per Sheet Windo...

Страница 161: ...ion software In this case click ISO A3 or Letter 8 5 x11 9 Select and click a roll paper in the LPaper Source list 10 Select the width of the loaded roll in the MRoll Paper Width list in this case ISO A2 A3 Roll 420 0mm Enhanced Printing Options Tiling and multiple pages per sheet iPF815 Printing Multiple Pages Per Sheet Windows 3 145 ...

Страница 162: ... print as desired Note For tips on confirming print settings see Confirming Print Settings Windows P 206 Printing Multiple Pages Per Sheet Mac OS X This topic describes how to print four pages of an original on a single sheet based on the following example Document Any Type Page size A3 297 0 420 0 mm 11 7 16 5 in Paper Roll paper Paper type Plain Paper Roll paper width A2 A3 roll 420 0 mm 16 5 in...

Страница 163: ...onfigured in the upper part of the printer driver displayed when you select Print from the application software menu 2 Select the printer in the APrinter list 3 In the FPaper Size list click the size of the original In this case click ISO A3 4 If you configured the settings using the Page Attributes dialog box click FOK to close the dialog box and then select Print from the application software me...

Страница 164: ... Direc tion and CBorder 7 Access the Main pane 8 In the AMedia Type list select the type of paper that is loaded In this case click Plain Paper 9 Make your selection in the EPrint Target list 10 Make your selection in the FPrint Quality list Enhanced Printing Options Tiling and multiple pages per sheet Printing Multiple Pages Per Sheet Mac OS X iPF815 3 148 ...

Страница 165: ...played in the BRoll Width list in this case ISO A2 A3 420 0mm Note If the width of the roll loaded in the printer is not shown in BRoll Width click LPrinter Informa tion on the Main pane to update the printer information Enhanced Printing Options Tiling and multiple pages per sheet iPF815 Printing Multiple Pages Per Sheet Mac OS X 3 149 ...

Страница 166: ...heets By assembling the printed sheets you can create a post er larger than the maximum supported paper size of the printer Page Layout Choose poster printing Important When printing using this function the Print Centered Watermark No Spaces at Top or Bottom Con serve Paper and Page Options settings are disabled For instructions on printing large posters refer to the following topics as appropriat...

Страница 167: ...e following example Document Poster Page size A2 420 0 594 0 mm 16 5 23 4 in Paper Sheets Paper Size A2 420 0 594 0 mm 16 5 23 4 in 1 Choose Print in the application menu 2 Select the printer in the dialog box and then display the printer driver dialog box See Accessing the Printer Driv er Dialog Box from Applications Windows P 211 3 Make sure the Main sheet is displayed 4 In the AMedia Type list ...

Страница 168: ...the size of the original as specified in the application In this case click ISO A2 8 Click Cut Sheet in the LPaper Source list 9 Click the Layout tab to display the Layout sheet Enhanced Printing Options Tiling and multiple pages per sheet Printing Large Posters Windows iPF815 3 152 ...

Страница 169: ...the Pages to Print dialog box On the Pages to Print dialog box clear the check boxes of the portion you do not want to print Click OK to close the Pages to Print dialog box 12 Confirm the print settings and print as desired Note For tips on confirming print settings see Confirming Print Settings Windows P 206 Enhanced Printing Options Tiling and multiple pages per sheet iPF815 Printing Large Poste...

Страница 170: ... with the center of the roll relative to the width For instructions on centering originals when printing on rolls refer to the following topics as appropriate for your computer and operating system Printing Originals Centered on Rolls Windows P 154 Printing Originals Centered on Rolls Mac OS X P 156 Printing Originals Centered on Rolls Windows This topic describes how to center originals before pr...

Страница 171: ...e type of paper that is loaded In this case click Plain Paper 5 Select the print target in the EPrint Target list 6 Click the Page Setup tab to display the Page Setup sheet Enhanced Printing Options Centering originals iPF815 Printing Originals Centered on Rolls Windows 3 155 ...

Страница 172: ...e EPrint Centered check box 12 Confirm the print settings and print as desired Note For tips on confirming print settings see Confirming Print Settings Windows P 206 Printing Originals Centered on Rolls Mac OS X This topic describes how to center originals before printing on rolls based on the following example Document Any Type Page size A4 210 0 297 0 mm 8 3 11 7 in Paper Roll paper Paper type P...

Страница 173: ... are configured in the upper part of the printer driver displayed when you select Print from the application software menu 2 Select the printer in the APrinter list 3 In the FPaper Size list click the size of the original In this case click ISO A4 4 If you configured the settings using the Page Attributes dialog box click FOK to close the dialog box and then select Print from the application softw...

Страница 174: ...ick Plain Paper 7 Make your selection in the EPrint Target list 8 Make your selection in the FPrint Quality list 9 Access the Page Setup pane 10 Select and click a roll paper in the APaper Source list Enhanced Printing Options Centering originals Printing Originals Centered on Rolls Mac OS X iPF815 3 158 ...

Страница 175: ...l Width click LPrinter Informa tion on the Main pane to update the printer information 12 Make sure the CPage Size setting matches the original size as selected in CPaper Size in the Page Attributes dialog box in this case ISO A4 13 Select the JPrint Centered check box Enhanced Printing Options Centering originals iPF815 Printing Originals Centered on Rolls Mac OS X 3 159 ...

Страница 176: ...enter of the sheet For instructions on centering originals when printing on sheets refer to the following topics as appropriate for your com puter and operating system Printing Originals Centered on Sheets Windows P 160 Printing Originals Centered on Sheets Mac OS X P 163 Printing Originals Centered on Sheets Windows This topic describes how to reduce an original 50 for printing centered on a shee...

Страница 177: ...the type of paper that is loaded In this case click Plain Paper 5 Make your selection in the EPrint Target list 6 Click the Page Setup tab to display the Page Setup sheet Enhanced Printing Options Centering originals iPF815 Printing Originals Centered on Sheets Windows 3 161 ...

Страница 178: ...ce list 12 Click the Layout tab to display the Layout sheet 13 Select the EPrint Centered check box 14 Confirm the print settings and print as desired Note For tips on confirming print settings see Confirming Print Settings Windows P 206 Important If you have selected Cut Sheet as the paper source follow the instructions on the printer control pan el to enter the paper size Enhanced Printing Optio...

Страница 179: ...oftware you are using If Page Setup is displayed in the application menu the settings are configured by opening the Page Attributes dialog box from Page Setup If it is not displayed the settings are configured in the upper part of the printer driver displayed when you select Print from the application software menu 2 Select the printer in the APrinter list 3 In the FPaper Size list click the size ...

Страница 180: ...ation software menu 5 Access the Main pane 6 In the AMedia Type list select the type of paper that is loaded In this case click Plain Paper 7 Make your selection in the EPrint Target list 8 Make your selection in the FPrint Quality list Enhanced Printing Options Centering originals Printing Originals Centered on Sheets Mac OS X iPF815 3 164 ...

Страница 181: ...n the Page Attributes dialog box in this case ISO A4 Cut Sheet 12 Select the JPrint Centered check box 13 Confirm the print settings and then click MPrint to start printing Note For tips on confirming print settings see Confirming Print Settings Mac OS X P 429 Enhanced Printing Options Centering originals iPF815 Printing Originals Centered on Sheets Mac OS X 3 165 ...

Страница 182: ... selected Cut Sheet as the paper source follow the instructions on the printer control panel to enter the paper size Enhanced Printing Options Centering originals Printing Originals Centered on Sheets Mac OS X iPF815 3 166 ...

Страница 183: ...ees before printing if it fits within the roll width This enables you to conserve paper Important If the page would exceed the roll paper width after rotation use this function with Scale to fit Roll Paper Width to print rotated pages For tips on conserving roll paper refer to the following topics as appropriate for your computer and operating system Conserving Roll Paper by Rotating Originals 90 ...

Страница 184: ...the application menu 2 Select the printer in the dialog box and then open the printer driver dialog box See Accessing the Printer Driver Dialog Box from Applications Windows P 211 3 Make sure the Main sheet is displayed 4 In the AMedia Type list select the type of paper that is loaded In this case click Plain Paper Enhanced Printing Options Conserving roll paper Conserving Roll Paper by Rotating O...

Страница 185: ...check box 10 Confirm the print settings and print as desired Note For tips on confirming print settings see Confirming Print Settings Windows P 206 Conserving Roll Paper by Rotating Originals 90 Degrees Mac OS X This topic describes how to conserve roll paper by rotating originals 90 degrees before printing based on the following example Document Any Type Page size A4 210 0 297 0 mm 8 3 11 7 in Pa...

Страница 186: ...red by opening the Page Attributes dialog box from Page Setup If it is not displayed the settings are configured in the upper part of the printer driver displayed when you select Print from the application software menu 2 Select the printer in the APrinter list 3 In the FPaper Size list click the size of the original In this case click ISO A4 4 If you configured the settings using the Page Attribu...

Страница 187: ...of paper that is loaded In this case click Plain Paper 7 Access the Page Setup pane 8 Select and click a roll paper in the APaper Source list Enhanced Printing Options Conserving roll paper iPF815 Conserving Roll Paper by Rotating Originals 90 Degrees Mac OS X 3 171 ...

Страница 188: ...LPrinter Informa tion on the Main pane to update the printer information 10 Make sure the CPage Size setting matches the original size as selected in CPaper Size in the Page Attributes dialog box in this case ISO A4 11 Select the LRotate Page 90 degrees check box Enhanced Printing Options Conserving roll paper Conserving Roll Paper by Rotating Originals 90 Degrees Mac OS X iPF815 3 172 ...

Страница 189: ...he top and bottom margins Printing without the top and bottom margins may cause inconsistency in the size of printed documents de pending on the layout of images or text in your originals For tips on conserving roll paper refer to the following topics as appropriate for your computer and operating system Conserving Roll Paper by Printing Originals Without Top and Bottom Margins Windows P 173 Conse...

Страница 190: ...he Printer Driv er Dialog Box from Applications Windows P 211 3 Make sure the Main sheet is displayed 4 In the AMedia Type list select the type of paper that is loaded In this case click Plain Paper Enhanced Printing Options Conserving roll paper Conserving Roll Paper by Printing Originals Without Top and Bottom Margins Windows iPF815 3 174 ...

Страница 191: ...In this case click ISO A4 or Letter 8 5 x11 7 Select and click a roll paper in the LPaper Source list 8 Select the width of the loaded roll in the MRoll Paper Width list in this case ISO A3 A4 Roll 297 0mm Enhanced Printing Options Conserving roll paper iPF815 Conserving Roll Paper by Printing Originals Without Top and Bottom Margins Windows 3 175 ...

Страница 192: ...Printing Originals Without Top and Bottom Margins Mac OS X This topic describes how to conserve roll paper when printing originals that have a top and bottom margin based on the following example Document Any Type Page size A4 210 0 297 0 mm 8 3 11 7 in Paper Roll paper Paper type Plain Paper Roll paper width A3 A4 roll 297 0 mm 11 7 in Enhanced Printing Options Conserving roll paper Conserving Ro...

Страница 193: ...he upper part of the printer driver displayed when you select Print from the application software menu 2 Select the printer in the APrinter list 3 In the FPaper Size list click the size of the original In this case click ISO A4 4 If you configured the settings using the Page Attributes dialog box click FOK to close the dialog box and then select Print from the application software menu Enhanced Pr...

Страница 194: ...hat is loaded In this case click Plain Paper 7 Access the Page Setup pane 8 Select and click a roll paper in the APaper Source list Enhanced Printing Options Conserving roll paper Conserving Roll Paper by Printing Originals Without Top and Bottom Margins Mac OS X iPF815 3 178 ...

Страница 195: ...orma tion on the Main pane to update the printer information 10 Make sure the CPage Size setting matches the original size as selected in CPaper Size in the Page Attributes dialog box in this case ISO A4 11 Select the KNo Spaces at Top or Bottom check box Enhanced Printing Options Conserving roll paper iPF815 Conserving Roll Paper by Printing Originals Without Top and Bottom Margins Mac OS X 3 179...

Страница 196: ...t to start printing Note For tips on confirming print settings see Confirming Print Settings Mac OS X P 429 Enhanced Printing Options Conserving roll paper Conserving Roll Paper by Printing Originals Without Top and Bottom Margins Mac OS X iPF815 3 180 ...

Страница 197: ...pose originals from multiple applications creating a poster layout for printing Important This function is only supported in Windows PosterArtist sold separately must be installed to use this function 1 Choose Print in the application menu 2 Select the printer in the dialog box and then open the printer driver dialog box See Accessing the Printer Driver Dialog Box from Applications Windows P 211 3...

Страница 198: ...in the APage Layout list 7 When you attempt to print PosterArtist starts up and the PageCapture window is displayed At this point the docu ment will not be printed yet 8 Choose the page to load in PosterArtist Enhanced Printing Options Using PosterArtist to Compose Originals Using PosterArtist to Compose Originals iPF815 3 182 ...

Страница 199: ...eat steps 1 8 to arrange originals from multiple applica tions on the same page Note For instructions on editing and rearranging images refer to the PosterArtist Manual 10 Print from the PosterArtist menu Enhanced Printing Options Using PosterArtist to Compose Originals iPF815 Using PosterArtist to Compose Originals 3 183 ...

Страница 200: ...Open Preview When Print Job Starts Windows While viewing the preview screen you can also adjust orientation or other settings and your changes will be instantly ap plied on the preview screen Note Under some settings and in some environments PageComposer may be started Enhanced Printing Options Checking Images Before Printing Checking the Layout in a Preview Before Printing iPF815 3 184 ...

Страница 201: ...eview screen For instructions on how to check the layout before printing refer to the following topics Checking the Layout in a Preview Before Printing Windows P 207 Checking the Layout in a Preview Before Printing Mac OS X P 431 Enhanced Printing Options Checking Images Before Printing iPF815 Checking the Layout in a Preview Before Printing 3 185 ...

Страница 202: ...s You can add watermarks background images to documents that require special handling Watermark Watermarks are applied to all pages of your document Important Watermarks are not printed if you select poster as the type of page layout The following watermarks are provided CONFIDENTIAL COPY DRAFT FILE COPY FINAL PRELIMINARY PROOF TOP SECRET You can also create your own watermarks Specify the followi...

Страница 203: ...h Watermarks COPY FILE COPY and so on Windows This topic describes how to print with watermarks based on the following example of printing with a FILE COPY water mark Document Any type Page size A2 420 0 594 0 mm 16 5 23 4 in Paper Roll paper Paper type Plain Paper Roll paper width A2 A3 roll 420 0 mm 16 5 in 1 Choose Print in the application menu 2 Select the printer in the dialog box and then di...

Страница 204: ...lick the Page Setup tab to display the Page Setup sheet 7 In APage Size click the size of the original as specified in the application software In this case click ISO A2 8 Select and click a roll paper in the LPaper Source list 9 Select the width of the loaded roll in the MRoll Paper Width list in this case ISO A2 A3 Roll 420 0mm Enhanced Printing Options Other useful settings Printing with Waterm...

Страница 205: ...k dialog box In the Edit Watermark dialog box you can create custom watermarks and change the position and angle of watermarks 13 Confirm the print settings and print as desired Note For tips on confirming print settings see Confirming Print Settings Windows P 206 Enhanced Printing Options Other useful settings iPF815 Printing with Watermarks COPY FILE COPY and so on Windows 3 189 ...

Страница 206: ...system Making the Original Orientation Match the Paper Orientation Windows P 190 Making the Original Orientation Match the Paper Orientation Mac OS X P 192 Making the Original Orientation Match the Paper Orientation Windows This topic describes how to print an original in landscape orientation after matching the paper orientation based on the fol lowing example Document An original in landscape or...

Страница 207: ...e of paper that is loaded In this case click Plain Paper 5 Make your selection in the EPrint Target list 6 Make your selection in the FPrint Quality list Enhanced Printing Options Other useful settings iPF815 Making the Original Orientation Match the Paper Orientation Windows 3 191 ...

Страница 208: ...s and print as desired Note For tips on confirming print settings see Confirming Print Settings Windows P 206 Making the Original Orientation Match the Paper Orientation Mac OS X This topic describes how to print an original in landscape orientation after matching the paper orientation based on the fol lowing example Document An original in landscape orientation Page size A4 210 0 297 0 mm 8 3 11 ...

Страница 209: ...driver displayed when you select Print from the application software menu 2 Select the printer in the APrinter list 3 In the FPaper Size list click the size of the original In this case click ISO A4 4 In DOrientation click the icon of the document in landscape orientation 5 If you configured the settings using the Page Attributes dialog box click FOK to close the dialog box and then select Print f...

Страница 210: ...er 8 Make your selection in the EPrint Target list 9 Make your selection in the FPrint Quality list 10 Access the Page Setup pane 11 Select and click a roll paper in the APaper Source list Enhanced Printing Options Other useful settings Making the Original Orientation Match the Paper Orientation Mac OS X iPF815 3 194 ...

Страница 211: ...printer information 13 Make sure the CPage Size setting matches the original size as selected in CPaper Size in the Page Attributes dialog box in this case ISO A4 14 Confirm the print settings and then click MPrint to start printing Note For tips on confirming print settings see Confirming Print Settings Mac OS X P 429 Enhanced Printing Options Other useful settings iPF815 Making the Original Orie...

Страница 212: ... the Paper Reference Guide See Types of Paper P 617 Automatic Cutting Roll paper is cut automatically after printing If you prefer you can print continuously without cutting the roll or you can print a cut line For instructions on cutting roll paper after printing refer to the following topics as appropriate for your computer and oper ating system Cutting Roll Paper After Printing Windows P 196 Cu...

Страница 213: ...Automatic Cutting list If you prefer to cut the paper later yourself click Print Cut Guideline 7 Click OK to close the Roll Paper Options dialog box 8 Confirm the print settings and print as desired Note For tips on confirming print settings see Confirming Print Settings Windows P 206 Roll paper will be automatically cut after printing Enhanced Printing Options Other useful settings iPF815 Cutting...

Страница 214: ...depending on the OS and application software you are using If Page Setup is displayed in the application menu the settings are configured by opening the Page Attributes dialog box from Page Setup If it is not displayed the settings are configured in the upper part of the printer driver displayed when you select Print from the application software menu 2 Select the printer in the APrinter list 3 Ch...

Страница 215: ...nd click a roll paper in the APaper Source list 7 Access the Main pane 8 In the AMedia Type list select the type of paper that is loaded Enhanced Printing Options Other useful settings iPF815 Cutting Roll Paper After Printing Mac OS X 3 199 ...

Страница 216: ...automatic cut function has been deactivated on the printer change the auto cut setting on the printer Control Panel 11 Click OK to close the Paper Detailed Settings dialog box 12 Confirm the print settings and then click MPrint to start printing Note For tips on confirming print settings see Confirming Print Settings Mac OS X P 429 Enhanced Printing Options Other useful settings Cutting Roll Paper...

Страница 217: ... Free Layout 256 Color imageRUNNER Enlargement Copy 286 Print Plug In for Office 301 HDI Driver 354 Status Monitor 387 Accounting 390 Digital Photo Front Access 402 Device Setup Utility 403 Media Configuration Tool 406 Windows Software iPF815 4 201 ...

Страница 218: ...ustment dialog box Color 223 Matching Sheet 224 Color Adjustment Sheet Monochrome 226 Object Adjustment dialog box Monochrome 227 Page Setup Sheet 228 Output Method dialog box 231 Paper Size Options Dialog Box 232 Layout Sheet 233 Page Options Dialog Box 235 Special Settings Dialog Box 236 Favorites Sheet 237 Utility Sheet 239 Support Sheet 240 Settings Summaries Dialog Box 241 Device Settings She...

Страница 219: ...ng enlargement or reduction the orientation the paper size and feed source and automatic cutting Output Method dialog box P 231 Paper Size Options Dialog Box P 232 Layout Sheet P 233 You can specify the page layout watermarks the orientation the number of copies and print processing options Page Options Dialog Box P 235 Special Settings Dialog Box P 236 Favorites Sheet P 237 Groups of print settin...

Страница 220: ...etails see Color imageRUNNER Enlargement Copy P 286 Important Color imageRUNNER Enlargement Copy and imagePROGRAF Free Layout cannot be used on 64 bit version of Windows Specifying Paper in the Printer Driver If you have replaced the paper you must complete the following settings in the printer driver Important Always specify the same type and size of paper in the printer menu and printer driver 1...

Страница 221: ...Paper Information on Printer dialog box On the Paper Information on Printer dialog box you can obtain information on the paper in the printer and configure printer driver settings for the feed source and type of paper This function requires that the Status Monitor be installed Windows Software Printer Driver iPF815 Specifying Paper in the Printer Driver 4 205 ...

Страница 222: ... select the width of the loaded roll in MRoll Paper Width Note A variety of settings are available in the printer driver to suit different printing applications For details on available printing conditions see Printer Driver Settings P 202 Confirming Print Settings There are two ways to confirm the print settings as follows Checking a preview of the settings Checking a print preview Windows Softwa...

Страница 223: ...urce orientation borderless printing selection and other settings information Note To confirm the Print Target specified in Easy Settings click GView Settings on the Main sheet to display the View Settings dialog box Checking a print preview You can check an image of the original just as it will be printed When you activate this feature imagePROGRAF Preview or PageComposer is started before printi...

Страница 224: ...s displayed 4 Select the LOpen Preview When Print Job Starts check box 5 After you click OK when you print a job the imagePROGRAF Preview window will be displayed Note If PageComposer is running access the Special Settings dialog box from the Layout sheet and clear Enable Preview Switching Windows Software Printer Driver Checking the Layout in a Preview Before Printing iPF815 4 208 ...

Страница 225: ...his section describes the procedure for registering printing settings that have been changed in the driver as Favorites 1 Choose Print in the application menu 2 Select the printer in the dialog box and then display the printer driver dialog box Refer to Accessing the Printer Driver Dialog Box from Applications P 211 3 Perform normal printing settings The favorite is registered from here 4 Click th...

Страница 226: ...og box The favorite you have added is now displayed in AFavorites Note To save a favorite as a file click JExport and specify the file to save Printing using the favorite Follow the steps below to print using the favorite you have registered 1 Choose Print in the application menu 2 Select the printer in the dialog box and then display the printer driver dialog box See Accessing the Printer Driv er...

Страница 227: ...g the Printer Driver Dialog Box from Applications 1 Choose Print from the File menu to display the dialog box for printing conditions 2 Select the printer and then display the printer driver dialog box Note The dialog box for specifying printing conditions varies depending on the source application In some cases when you select the printer a sheet for configuring the printer driver is added to the...

Страница 228: ...ge Setup Layout Favorites Utility and Support Note The titles of dialog boxes may vary depending on the application and sheets other than these six sheets may be displayed Windows Software Printer Driver Accessing the Printer Driver Dialog Box from Applications iPF815 4 212 ...

Страница 229: ...log box from the Windows system menu To use the settings continuously in all applications open the printer driver from the system menu to make the settings See Accessing the Printer Driver Dialog Box from the Operating System Menu P 213 Accessing the Printer Driver Dialog Box from the Operating System Menu 1 Click start Printers and Faxes or Printers 2 Select the printer and then display the print...

Страница 230: ...ice Settings sheet is also an extension of the printer driver See Device Settings Sheet P 242 Six sheets of print settings are displayed by the printer driver Main Page Setup Layout Favorites Utility and Support Windows Software Printer Driver Accessing the Printer Driver Dialog Box from the Operating System Menu iPF815 4 214 ...

Страница 231: ...ote On the Main sheet choose Easy Settings to specify basic print settings based on the particular printing ap plication or switch to Advanced Settings to complete more detailed settings as desired Common Items AMedia Type Select the type of paper For information on the types of paper the printer supports refer to the Paper Reference Guide See Types of Pa per P 617 BGet Information Displays Paper ...

Страница 232: ...Preview Before Printing P 184 MStatus Monitor Starts imagePROGRAF Status Monitor You can check the printer status job status and other conditions You can also set up email notification if printer errors occur by completing the Email Notice settings For details refer to the Status Monitor help file NAbout Displays version information for the printer driver SDefaults Restores all settings on the she...

Страница 233: ... the Print Target setting values You can view and change the order of Print Target setting values View Settings Dialog Box for the Printing Application P 221 Configuration using Advanced Settings EPrint Priority Choose the graphic elements that you want to emphasize for printing Giving Priority to Particular Graphic Elements and Colors for Printing P 55 FPrint Quality Choose the level of print qua...

Страница 234: ...istinctly JUnidirectional Printing Select this checkbox to prevent problems such as misaligned lines and improve the print quality However the printing speed becomes slower KSharpen Text Activate this option to print text more sharply TEconomy Printing Select this checkbox to reduce the amount of ink consumed during printing However the print quality is worse than for normal printing Select this m...

Страница 235: ...y Media Type See Main Sheet P 215 APaper Source Shows the paper source supported by the printer as well as information about the loaded paper To update the paper source and media type settings in the printer driver select the desired Paper Source option and click OK Paper Detailed Settings Dialog Box The Paper Detailed Settings dialog box offers the following settings For details on settings items...

Страница 236: ... printing the next line as needed DRoll Paper Margin for Safety You can specify the length of a margin on the leading edge of paper to ensure that paper susceptible to curling is held firmly against the Platen ENear End Margin Specify the length of the Near End Margin the leading edge margin of the roll as needed FCut Speed Select the speed of automatic cutting as needed You can adjust this settin...

Страница 237: ...hows all Print Target options settings items for the printing application BName Identifies the item selected in Print Target by its name and an icon CDetails Here you can confirm detailed settings values for each listed item for the selected Print Target Color Adjustment Sheet Color If the color tone as printed is not as you expected you can adjust it on the Color Adjustment sheet Windows Software...

Страница 238: ...ach color GGray Tone Adjust the color tone of grays as desired Choose Cool Black tinged with blue or Warm Black tinged with red HBrightness Adjust the overall image brightness as desired You can adjust the brightness if the printed document is lighter or darker than the original image that is the original photo that was scanned or the original graphic as it appears on the computer screen IContrast...

Страница 239: ...he Printer Driver P 46 Object Adjustment dialog box Color In the Object Adjustment dialog box you can specify what type of print jobs to apply color adjustment to If an original comprises images graphics and text you can specify which portion to apply color adjustment to Note To display the Object Adjustment dialog box click Object Adjustment on the Color Adjustment sheet AImage Select this option...

Страница 240: ...splayed Driver Matching Mode The following options are available when you select Driver Matching Mode in the AMatching Mode list AMatching Mode Select the color matching mode to use as desired Normally select Driver Matching Mode For color matching based on ICC profiles select ICC Matching Mode Driver ICM Mode or Host ICM Mode depending on your color matching system BMatching Method Select the col...

Страница 241: ... Various options are available depending on your selected Matching Mode To apply the same input profile automatically for Graphics and Text select Use the Same Profile for All Objects To apply separate input profiles to Graphics and Text clear Use the Same Profile for All Objects and specify the individual settings CPrinter Profile Settings Specify the printer profile as desired Normally select Au...

Страница 242: ... Color Pattern Select this checkbox to display the color pattern CApply to Sample Select this checkbox to apply the changed settings to the sample image DCyan EMagenta FYellow Not available GGray Tone Not available HBrightness Adjust the overall image brightness as desired You can adjust the brightness if the printed document is lighter or darker than the original image that is the original photo ...

Страница 243: ...tails on settings items see Adjusting the Color in the Printer Driver P 46 Object Adjustment dialog box Monochrome In the Object Adjustment dialog box you can specify what type of print jobs to apply color adjustment to If an original comprises images graphics and text you can specify which portion to apply color adjustment to Note To display the Object Adjustment dialog box click Object Adjustmen...

Страница 244: ...application For details on available page sizes see Paper Sizes P 620 BBorderless Printing Borderless printing is available if roll paper is selected in the LPaper Source list Choose from the following options when this setting is activated Borderless Printing on Paper of Equivalent Size P 100 Borderless Printing by Resizing Originals to Fit the Roll Width P 107 Borderless Printing at Actual Size ...

Страница 245: ...tible with borderless printing are shown in the list CEnlarged Reduced Printing Choose from the following options when this setting is activated Resizing Originals to Match the Paper Size P 65 Resizing Originals to Fit the Roll Width P 71 Resizing Originals by Entering a Scaling Value P 77 DFit Paper Size Scales the document image to match the paper size EFit Roll Paper Width Scales the document i...

Страница 246: ...isplay the Roll Paper Options dialog box Under AAutomatic Cutting you can specify Yes or No and Print Cut Guideline Cutting Roll Paper After Printing P 196 Select BBanner Printing when printing multiple pages continuously Printing Multiple Pages Continuously P 138 POutput Method Click to display the Output Method dialog box which enables you to complete the Output Method and Name of data to be sav...

Страница 247: ...ting has finished If Save in mail box is selected the print job is saved to the printer hard disk If you choose Save in mail box also specify the destination personal box in the Mail box list If the Save data before printing check box is selected printing starts after the print job has finished being saved in the temporary save box BName of data to be saved To use the file name choose Use file nam...

Страница 248: ...tup Sheet P 228 APaper Size List Shows the names and sizes of paper that can be used with the printer driver BDelete Custom paper sizes created by users can be deleted from the APaper Size List as needed However they cannot be deleted in the following situations If a standard paper size of the printer driver is selected If an oversized paper size is selected If a paper size marked with a red circl...

Страница 249: ...Size Paper Size and Paper Size List Layout Sheet The following settings are available on the Layout sheet For details on settings items refer to the printer driver help APage Layout Activate this setting to select a particular page layout Printing Multiple Pages Per Sheet P 143 Printing Posters in Sections P 150 Printing Multiple Originals Next to Each Other P 133 Using PosterArtist to Compose Ori...

Страница 250: ...printing GNo Spaces at Top or Bottom Conserve Paper Activate this setting to print the next image skipping blank areas above and below printable data in documents which ena bles you to conserve the paper Conserving Roll Paper by Printing Originals Without Top and Bottom Margins P 173 HCopies Enter the number of copies to print in a range of 1 999 Reverse Order Activate this option to print pages i...

Страница 251: ...ayout Sheet P 233 APrint Date Select where the date is printed as desired To print the time as well select BPrint Time Also CPrint User Name Select where the user name is printed as desired DPrint Page Number Select where the page number is printed as desired EFormat Settings Click to display the Format Settings dialog box which enables you to complete format related settings Windows Software Prin...

Страница 252: ...ormat printing Normally choose Auto If documents are not printed correctly on large for mat paper it may help to select Yes and if fine lines are not visible or if images are distorted when printed it may help to select No BApplication Color Matching Priority You can give applications priority in color management CEnable Preview Switching When this option is selected PageComposer starts if you pri...

Страница 253: ... may appear broken Favorites Sheet The following settings are available on the Favorites sheet For details on settings items refer to the printer driver help AFavorites Printing favorites you have created are listed with Default Settings favorites Using Favorites P 196 BSettings Details Displays details of the favorite selected in the AFavorites CComment Displays notes registered in the favorite D...

Страница 254: ...ich enables you to change the name and icon for the favorite selected in the AFavorites list HAdd Click to display the Add dialog box which enables you to add the current print settings as a favorite IImport Click to display the Open dialog box which enables you to import favorite settings saved as a file JExport Click to display the Save As dialog box which enables you to save the favorite settin...

Страница 255: ...ejecting outlet cleaning Head alignment adjustment Feed amount adjustment BColor imageRUNNER Enlargement Copy Click to launch Color imageRUNNER Enlargement Copy iR enlargement copy which enables you to create hot folders used for Color imageRUNNER Enlargement Copy and assign print settings to hot folders Printing Enlargements of Scanned Originals from a Color imageRUNNER P 298 For details see Colo...

Страница 256: ...nsumables check for printer driver updates and browse other information BUser Manual Click to view the printer user s manual This function requires the user s manual to be installed on your computer CSettings Summaries Click to display the View Settings dialog box which enables you to confirm the settings for the Main Page Setup Lay out and Favorites sheets Windows Software Printer Driver Support ...

Страница 257: ...tings for the Main Page Setup Layout and Favorites sheets ACopy Click to copy the settings information to the clipboard You can paste the settings information into a file created with a text editor or similar application Windows Software Printer Driver iPF815 Settings Summaries Dialog Box 4 241 ...

Страница 258: ... following settings are available on the Device Settings sheet AColor Compatibility Click to display the Color Compatibility dialog box which enables you to adjust colors if you have selected Color Mode Color CAD For details on color settings see Specifying Colors and Printing CAD Drawings P 26 BAbout You can display version information for the printer driver Windows Software Printer Driver Device...

Страница 259: ...ied on the preview screen and you can print the preview screen as it is seen Note The media type image size detailed media settings and the printer settings can cause the actual print output to differ from the Preview settings Operating Environment You can use the Preview in the following environments Compatible Operating System Windows 2000 Windows XP Windows Server 2003 Windows Vista Windows Ser...

Страница 260: ...x Click the OK button to save the settings Note Your printer is depicted in the lower left area of this screen 4 On the Print dialog box in the apllication software click the Print button 5 Preview main window is displayed Windows Software Preview Starting Preview iPF815 4 244 ...

Страница 261: ...nd dialog area and status bar Note You can use the View menu to show or hide the tool bar Menu Bar This allows you to select menus required for operations Tool Bar This allows you to select tool buttons required for major operations Windows Software Preview iPF815 Preview Main Window 4 245 ...

Страница 262: ...Preview Area You can check the settings you made in this area Dialog Area This allows you to set the print conditions and perform a print job Windows Software Preview Preview Main Window iPF815 4 246 ...

Страница 263: ...For more information about Dialog Area see Dialog Area P 248 Status Bar This shows the message Pages and Output Size Windows Software Preview iPF815 Preview Main Window 4 247 ...

Страница 264: ...y selecting the layout For more information about Layout Selection see Printing with Selecting the Layout P 252 Center Originals Across Roll You can print on the center of the media loaded in the printer For more information about Center Originals Across Roll see Print on the Center P 254 Note Available only if rolls are selected in Paper Source Windows Software Preview Dialog Area iPF815 4 248 ...

Страница 265: ... information with connecting to the printer Status Monitor Button Click the button to start Status Monitor Enlarge Reduce the screen display You can enlarge or reduce the screen display when you select Zoom from the View menu Setting Details Fit Screen Display all Fit to Width Display to the width of the paper Reduce Display at half of the standard size Standard Display at the standard size Enlarg...

Страница 266: ...ler unit You can set the ruler unit when you select Units from the View menu Setting Details mm Use mm as the ruler unit inch Use inches as the ruler unit Priority setting for rotating 90 degrees You can select Rotate 90 Degrees If Possible or Use Driver Settings from the Options menu Setting Details Rotate 90 Degrees If Possible Rotates pages in portrait orientation 90 degrees before printing Pag...

Страница 267: ...90 Degrees If Possible or Placing a checkmark for Rotate Page 90 degrees Conserve Paper on the printer driver Selecting Use Driver Settings Windows Software Preview iPF815 Priority setting for rotating 90 degrees 4 251 ...

Страница 268: ...y selecting the layout 1 In Layout Selection click the layout button to use Button Details Upper Button Turn at the position of Right Button Turn at the position of Left Button Turn at the position of Windows Software Preview Printing with Selecting the Layout iPF815 4 252 ...

Страница 269: ...ft Button you can save paper by printing in landscape orientation on roll paper You can select only Upper Button or Lower Button if Cut Sheet is selected Button Details The button is selected currently The button can be selected The button can not be selected 2 Click the Print Button Printing on the selected layout begins Windows Software Preview iPF815 Printing with Selecting the Layout 4 253 ...

Страница 270: ...e media loaded in the printer 1 Click the Center Originals Across Roll check box on 2 Click the Print button Printing on the center begins Note Available only if rolls are selected in Paper Source Windows Software Preview Print on the Center iPF815 4 254 ...

Страница 271: ...he empty spaces when the print data contains spaces at the top or bottom 1 Click the No Spaces at Top or Bottom check box on 2 Click the Print button Printing on the settings with no spaces at top or bottom begins Windows Software Preview iPF815 Not Print Spaces at the Top Bottom 4 255 ...

Страница 272: ... 278 Pasting a Copied or Cut Object 280 Folded Duplex Window 281 Finished Size Settings Dialog Box 282 Binding Settings Dialog Box 283 Prints using Folded Duplex 284 The Features of Free Layout The main features of Free Layout are as follows Allows you to lay out at will and print a document created with application software You can not only lay out multiple pages on one page but also lay out and ...

Страница 273: ...008 Windows 7 Software that requires installation imagePROGRAF Printer Driver Note This function is not available on 64 bit version of Windows Starting Free Layout Follow the procedure below to start the Free Layout 1 Start the apllication software which you use 2 From the application software s File menu select the printer setup menu to open the Print dialog box Note Normally select Print from th...

Страница 274: ...nd select Free Layout from the list Click the OK button to save the settings Note When you select Free Layout all other setting items will be disabled 5 On the Print dialog box in the apllication software click the Print button Free Layout main window is displayed Windows Software Free Layout Starting Free Layout iPF815 4 258 ...

Страница 275: ...ea and status bar Note You can use the View menu to show or hide the tool and status bar Menu Bar This allows you to select menus required for operations Tool Bar This allows you to select tool buttons required for major operations Windows Software Free Layout iPF815 Free Layout Main Window 4 259 ...

Страница 276: ...his allows you to lay out objects and edit the object size and orientation Status Bar This shows the paper size unit of length and number of objects Windows Software Free Layout Free Layout Main Window iPF815 4 260 ...

Страница 277: ...atch the type of media loaded in the printer Refer to Printer Driver P 202 for details on the printer driver Note When you select the Detailed Settings the only three sheets displayed are the Main sheet the Page Setup sheet and the Layout sheet Some of the printer driver settings may be disabled Windows Software Free Layout iPF815 Detailed Settings 4 261 ...

Страница 278: ...tween 10 0 and 200 0 mm between 0 39 and 7 88 inch You can change the numbers by clicking either button or button Divisions You can change the number of divisions of grid lines so that they serve as a guide to laying out objects Note You can input between 1 and 10 You can change the numbers by clicking either button or button Grid Color Select the grid line color Auto Arrange Spacing Change the ob...

Страница 279: ...he frame style Dotted Line You can print the dotted line as the frame style Dashed Line You can print the dashed line as the frame style Crop Marks You can print with the crop marks Page Options Dialog Box This dialog box appears when you select Page Options from the File menu This allows you to configure the roll paper length object layout order and margins of Free Layout Roll Paper Length Set th...

Страница 280: ...per Right to Left The objects are laid out from upper right to left Lower Left to Top The objects are laid out from lower left to top Note When you have selected Roll Paper Length Auto Settings and Paper Orientation Vertical you can choose Upper Left to Right or Upper Right to Left When you have selected Roll Paper Length Auto Settings and Paper Orientation Horizontal you can choose Upper Left to ...

Страница 281: ...nlarge or reduce an object Note When the objects are not selected you can not select Format Rotate When you place a checkmark here you can select Rotate Right or Rotate Left Setting Details Rotate Right Rotates the object 90 degrees clockwise Rotate Left Rotates the object 90 degrees counterclockwise Note When several objects are selected you cannot select Rotate Windows Software Free Layout iPF81...

Страница 282: ...t Photo Size Prints all of the objects at the specified photo size Note You can input between 25 and 600 You can change the numbers by clicking either button or button Position Sheet You can rotate enlarge or reduce an object Note When the objects are not selected you can not select Format Object Position You can move the object position by changing the values Setting Details Vertical Pos You can ...

Страница 283: ...ize Laying out a Multiple File Document on One Page You can lay out and print a multiple file document on one page 1 From the application software s File menu select the printer setup menu to open the Print dialog box Note Normally select Print from the File menu 2 Click Properties to open the Properties dialog box Windows Software Free Layout iPF815 Laying out a Multiple File Document on One Page...

Страница 284: ...te Your printer is depicted in the lower left area of this screen 4 In the Layout sheet click on the Page Layout check box and select Free Layout from the list Windows Software Free Layout Laying out a Multiple File Document on One Page iPF815 4 268 ...

Страница 285: ...Click the OK button to save the settings 6 In the Print dialog box select the pages to print and the number of copies and click the OK button Free Layout starts laying out the document created with application software in the layout area as an object Windows Software Free Layout iPF815 Laying out a Multiple File Document on One Page 4 269 ...

Страница 286: ... and print a document created with multiple application programs on one page 1 From the application software s File menu select the printer setup menu to open the Print dialog box Note Normally select Print from the File menu 2 Click Properties to open the Properties dialog box Windows Software Free Layout Laying out a Document Created with Multiple Application Programs on One Page iPF815 4 270 ...

Страница 287: ...r is depicted in the lower left area of this screen 4 In the Layout sheet click on the Page Layout check box and select Free Layout from the list Windows Software Free Layout iPF815 Laying out a Document Created with Multiple Application Programs on One Page 4 271 ...

Страница 288: ...utton to save the settings 6 In the Print dialog box select the pages to print and the number of copies and click the OK button Free Layout starts laying out the document created with application software in the layout area as an object Windows Software Free Layout Laying out a Document Created with Multiple Application Programs on One Page iPF815 4 272 ...

Страница 289: ...te To select an object click that object To select multiple successive objects click them while holding down the Shift key To select multiple arbitrary objects click them while holding down the Ctrl key To select all objects select Select All from the Edit menu When you specify the area with dragging the mouse the object in the area is selected Windows Software Free Layout iPF815 Selecting an Obje...

Страница 290: ...around the object to show the arrow handle and drag this handle to change the object size Resizing by specifying a scaling value 1 Select an object Click on the Enl Red checkbox in the Format Dialog Box P 265 and select Scaling 2 You either enter numbers directly Note You can input between 25 and 600 You can change the numbers by clicking either button or button 3 Click the OK button Moving an Obj...

Страница 291: ...Horizontal Pos and Page Pos in the Format Dialog Box P 265 Rotating an Object You can rotate the object 1 Select an object 2 Select Rotate Left 90 Degrees or Rotate Right 90 Degrees from the toolbar Alternatively you may click on the Rotate check box in the Format Dialog Box P 265 then select Rotate Right or Rotate Left and click the OK button Windows Software Free Layout iPF815 Rotating an Object...

Страница 292: ...der varies depending on the Order setting in the Page Options Dialog Box P 263 dialog box Aligning Objects You can align objects systematically 1 Select multiple objects 2 Click the align button from the toolbar Alternatively you may select the align menu from the Object menu Align Top Lays out the objects justifying them to the top Windows Software Free Layout Laying out Objects Automatically iPF...

Страница 293: ...e objects justifying them to the vertical center Align Bottom Lays out the objects justifying them to the bottom Align Left Lays out the objects justifying them to the left Windows Software Free Layout iPF815 Aligning Objects 4 277 ...

Страница 294: ...lapping Order You can change the object overlapping order 1 Select an object 2 Select the Overlapping Order menu from the Object menu Note The order of overlapping affects the order of objects automatically laid out You can also select by clicking the right button of the mouse on an object Windows Software Free Layout Changing the Object Overlapping Order iPF815 4 278 ...

Страница 295: ... object to the frontmost position Send to Back Moves the object to the backmost position Bring Forward Moves the object one position to the front Windows Software Free Layout iPF815 Changing the Object Overlapping Order 4 279 ...

Страница 296: ...y you may select Paste from the Edit menu Note The copied or cut object is laid out at the end of the page You can also select by clicking the right button of the mouse on an object In order to paste an object on any position that you like you can paste the object with Pointed Paste by clicking the right button of the mouse on any position that you want Windows Software Free Layout Pasting a Copie...

Страница 297: ...dded The Folded Duplex window consists of the menu and tool bars layout area and status bar Note The toolbar and status bar can be toggled between hidden and displayed from the View menu Menu Bar This allows you to select menus required for operations Tool Bar This allows you to select tool buttons required for major operations Windows Software Free Layout iPF815 Folded Duplex Window 4 281 ...

Страница 298: ...idth and output size Finished Size Settings Dialog Box This dialog box is displayed when you select Finished Size Settings from the Edit menu This allows you to configure finished size settings Finished Size Selects the method for setting the finished size Windows Software Free Layout Finished Size Settings Dialog Box iPF815 4 282 ...

Страница 299: ...ated and are not rotated if they will not fit within the roll paper width Binding Settings Dialog Box This is displayed when you select Binding Settings from the Edit menu This allows you to configure the binding edge settings Binding Edge Configures the binding edge when folding paper The following settings are available for the binding edge Setting Details Bottom Prints by placing the binding ma...

Страница 300: ... Edges checkbox Prints using Folded Duplex Allows you to produce duplex printing by combining two pages and folding them 1 Select two objects from the layout area of Free Layout 2 Select Folded Duplex from the Edit menu of Free Layout Open the Folded Duplex window and arrange the selected objects in the layout area 3 Open the Finished Size Settings dialog box from the Edit menu 4 Select Fit Roll P...

Страница 301: ... the Only Print Center and Edges checkbox is selected fold lines are only printed at the three locations of the center and both edges 10 Click OK to save the settings 11 Confirm the print setting and begin printing Windows Software Free Layout iPF815 Prints using Folded Duplex 4 285 ...

Страница 302: ...s without growing through the printer driver Note The media type image size detailed media settings and the printer settings can cause the actual print output to differ from the Color imageRUNNER Enlargement Copy settings Operating Environment You can use the Color imageRUNNER Enlargement Copy in the following environments Compatible Operating System Windows 2000 Windows XP Windows Server 2003 Win...

Страница 303: ...Color imageRUNNER Enlargement Copy dialog box displays Note If you click on the Add to Startup folder check box in the Color imageRUNNER Enlargement Copy dialog box the icon of Color imageRUNNER Enlargement Copy utility will appear on the task bar when starting Windows thereafter Windows Software Color imageRUNNER Enlargement Copy iPF815 Starting Color imageRUNNER Enlargement Copy 4 287 ...

Страница 304: ...plays Color imageRUNNER Enlargement Copy Dialog Box The explanation below is on the Color imageRUNNER Enlargement Copy dialog box Note For the step to open the Color imageRUNNER Enlargement Copy dialog box see Starting Color image RUNNER Enlargement Copy P 286 Hot Folder The hot folder list appears Windows Software Color imageRUNNER Enlargement Copy Color imageRUNNER Enlargement Copy Dialog Box iP...

Страница 305: ...egister the application in the Windows startup menu Save Printed Data Automatically saves printed data About Button Click the button to display the name and the version number of the utility Operation Guide Button Click the button to display the Color imageRUNNER Enlargement Copy Setup Manual Hot Folder Hot folder refers to a folder used for Color imageRUNNER Enlargement Copy When transferred to t...

Страница 306: ...he Add button Note For the step to open the Color imageRUNNER Enlargement Copy dialog box see Starting Color imageRUNNER Enlargement Copy P 286 2 The Easy Setup Wizard dialog box displays Click the Next button Windows Software Color imageRUNNER Enlargement Copy Creating a New Hot Folder iPF815 4 290 ...

Страница 307: ...e media type to print Note If the Borderless Printing checkbox is checked only media types that can be used for borderless printing are displayed in the list Click the Next button Windows Software Color imageRUNNER Enlargement Copy iPF815 Creating a New Hot Folder 4 291 ...

Страница 308: ...receive a document scanned with the Color imageRUNNER you need to share a folder Enter the folder shared name in Shared Name Click the Next button Note This shared name is used as the name of the hot folder You cannot use the Back button after clicking the Next button here Windows Software Color imageRUNNER Enlargement Copy Creating a New Hot Folder iPF815 4 292 ...

Страница 309: ...8 Click Finish button to close the Easy Setup Wizard dialog box Windows Software Color imageRUNNER Enlargement Copy iPF815 Creating a New Hot Folder 4 293 ...

Страница 310: ...he folder you want to specify as a hot folder 2 Open the Color imageRUNNER Enlargement Copy dialog box and then click the Add button Note For the step to open the Color imageRUNNER Enlargement Copy dialog box see Starting Color imageRUNNER Enlargement Copy P 286 Windows Software Color imageRUNNER Enlargement Copy Specifying an Existing Shared Folder as a Hot Folder iPF815 4 294 ...

Страница 311: ...e Add Edit Hot Folder dialog box displays Enter the hot folder name in Name Click the Browse botton with selecting Specify a folder to set the existing shared folder Windows Software Color imageRUNNER Enlargement Copy iPF815 Specifying an Existing Shared Folder as a Hot Folder 4 295 ...

Страница 312: ...k the OK button 6 As necessary set the print conditions in the hot folder See Setting the Print Parameters P 297 Click the OK button to close the Add Edit Hot Folder dialog box Windows Software Color imageRUNNER Enlargement Copy Specifying an Existing Shared Folder as a Hot Folder iPF815 4 296 ...

Страница 313: ...Folder dialog box The printer driver is used to configure basic settings to match the type of media loaded in the printer Refer to Printer Driver P 202 for details on the printer driver Note The only three sheets displayed are the Main sheet the Page Setup sheet and the Layout sheet Some of the printer driver settings may be disabled Windows Software Color imageRUNNER Enlargement Copy iPF815 Setti...

Страница 314: ...mputer Register a hot folder on your computer for storing scanned originals from the Color imageRUNNER and complete the settings for enlargement copy 2 Complete the scanning settings on the Color imageRUNNER Configure the Color imageRUNNER to send scanned originals to the hot folder After these settings are complete you can print enlarged copies of scanned originals from the Color imageRUNNER Regi...

Страница 315: ...geRUNNER For instructions on assigning scanning settings and destinations to a Favorites button refer to the setting manual displayed by clicking Color imageRUNNER Enlargement Copy Setup Manual button of Color imageRUNNER Enlargement Copy utility or refer to the Color imageRUNNER manual Scanning the original and print an enlargement Follow the steps below to scan an original on the Color imageRUNN...

Страница 316: ...press Done on the touch panel display Scanned originals are sent to the hot folder and automatically enlarged and printed following the conditions you specified for the folder Windows Software Color imageRUNNER Enlargement Copy Printing Enlargements of Scanned Originals from a Color imageRUNNER iPF815 4 300 ...

Страница 317: ... Print Selected Area Excel 348 Configuring Binding Excel 351 Configuring Special Settings 352 Print Plug In for Office features Print Plug In for Office is a Plug In that enables easy printing from Microsoft Office It is displayed on the toolbar ribbon so it is easily accessible It can be set by just selecting from the Wizard Large Format Printing custom media size can also be set in the Wizard fr...

Страница 318: ...orrectly If you are editing an embedded object or link object the software will not run correctly If you added the imagePROGRAF Print Plug In ribbon to the Microsoft Office 2007 2010 Quick Access toolbar the software will not run correctly Steps to install Below are the steps to install Print Plug In for Office Note You must log into Windows as an Administrator before the installation 1 Insert Use...

Страница 319: ...2 Click the Install Individual Software button 3 Click Install in imagePROGRAF Print Plug In for Office Windows Software Print Plug In for Office iPF815 Steps to install 4 303 ...

Страница 320: ...4 Click the Next button 5 Read the License Agreement and click the Yes button Windows Software Print Plug In for Office Steps to install iPF815 4 304 ...

Страница 321: ...6 Click the Start button 7 Click the Yes button 8 Click the Exit button The installation for Print Plug In for Office is complete Windows Software Print Plug In for Office iPF815 Steps to install 4 305 ...

Страница 322: ...e steps to uninstall Print Plug In for Office 1 If Microsoft Office is open close it 2 Select Control Panel from the start menu 3 Open Add or Remove Programs 4 Select imagePROGRAF Print Plug In and click the Remove button Note You cannot uninstall Print Plug In for Office if an Office application is running When a message appears select Cancel and close all Office applications that are running Whe...

Страница 323: ...tion Re install Print Plug In for Office as follows 1 Close Microsoft Office if it is open 2 Install Print Plug In for Office For information about instsalling see Steps to install P 302 Enabling Print Plug In for Office for items disabled in Office applications If a problem occurs such as the system or an application terminating abnormally the Microsoft Office application disables add ins as a sa...

Страница 324: ...geprograf print plug in ipfaddinif dll is displayed in the Disabled Items dialog box select it and click the Enable button 5 Close all the dialog boxes and restart the Office application Windows Software Print Plug In for Office When Print Plug In for Office is not displayed iPF815 4 308 ...

Страница 325: ...name options button 2 From the list on the left side of the application name options dialog box select Add ins 3 Select Disabled Items in the Manage combo box and click the Go button Windows Software Print Plug In for Office iPF815 When Print Plug In for Office is not displayed 4 309 ...

Страница 326: ...box select it and click the Enable button 5 Close all the dialog boxes and restart the Office application For Microsoft Office 2003 1 Click About application name in the Help menu of application Windows Software Print Plug In for Office When Print Plug In for Office is not displayed iPF815 4 310 ...

Страница 327: ...n the Disabled Items dialog box select it and click the Enable button 4 Close all the dialog boxes and restart the Office application To start from Microsoft Word Below are the steps to start Print Plug In for Office from Microsoft Word 1 Start Microsoft Word Windows Software Print Plug In for Office iPF815 To start from Microsoft Word 4 311 ...

Страница 328: ...an change the settings using the Special Settings dialog box Refer to Configuring Special Settings P 352 for details Printer list Select Printer If you select Show All Printers the imagePROGRAF printers will be displayed again Select this when you want to display all printer drivers or update the display Print Button The print Wizard is displayed The settings Print Matching Roll Width Borderless P...

Страница 329: ...ile or application while the Printing Wizard is open close the Printing Wizard dialog box Otherwise you may not be able to change displays or operate the toolbar Large Format Printing Wizard dialog box Windows Software Print Plug In for Office iPF815 To start from Microsoft Word 4 313 ...

Страница 330: ...u can print large exhibits and posters and also print Portrait and Landscape orienta tions made in Large Format Printing Wizard 1 Start Microsoft Word 2 If Start imagePROGRAF Print Plug In is displayed click it 3 Click Print from the imagePROGRAF Print Plug In toolbar ribbon The Printing Wizard dialog box is displayed Important If you want to change the display to another file or application while...

Страница 331: ...int Matching Roll Width 5 Select Roll Paper Width that is set in the printer 6 Select image size 7 Select layout 8 Select Next Windows Software Print Plug In for Office iPF815 Print Matching Roll Width Word 4 315 ...

Страница 332: ...g Press the Print Preview button to display the preview screen You can check and make changes to the layout in the preview screen When you print to the edge of the roll width the maximum length will be the lesser of 5 587 times the roll paper width or 18 0m 12 Press Print to start printing Borderless Printing Word Prints up to the border of the media Photos and posters can be printed without worry...

Страница 333: ...f you want to change the display to another file or application while the Printing Wizard is open close the Printing Wizard dialog box Otherwise you may not be able to change displays or operate the toolbar ribbon 4 Click Borderless Printing Windows Software Print Plug In for Office iPF815 Borderless Printing Word 4 317 ...

Страница 334: ...ected in Choose how to proceed and press OK Note To adjust the data select Return to application and press OK Exit Print Plug In for Office and return to the application 6 Select Roll Paper Width that is set in the printer 7 Select Layout Windows Software Print Plug In for Office Borderless Printing Word iPF815 4 318 ...

Страница 335: ...nting using the same settings Press the Print Preview button to display the preview screen You can confirm and make changes to the layout in the preview screen The maximum length for Borderless Printing is the lesser of 5 587 times the roll paper width or 18 0m 12 Press Print to start printing Multi Page Printing Word Prints multiple pages as one page You can print handouts into a single page or p...

Страница 336: ...g Wizard dialog box is displayed Important If you want to change the display to another file or application while the Printing Wizard is open close the Printing Wizard dialog box Otherwise you may not be able to change displays or operate the toolbar ribbon Windows Software Print Plug In for Office Multi Page Printing Word iPF815 4 320 ...

Страница 337: ...e Printing 5 Select the Roll Paper Width that is set in the printer 6 Select layout from Layout Selection 7 Select Next 8 Select Media Type Windows Software Print Plug In for Office iPF815 Multi Page Printing Word 4 321 ...

Страница 338: ... Printing is the lesser of 5 587 times the roll paper width or 18 0m 11 Press Print to start printing Register the settings Word If you are going to print multiple times using the same setting you can select One Touch Registration Registered settings can be recalled from Print Using Registered Settings 1 Set up to the Print screen from Print Matching Roll Width Borderless Printing or Multi Page Pr...

Страница 339: ...icking Cancel in the Print screen will not delete the registered settings Print Using Registered Settings Word Prints using the registered settings 1 Start Microsoft Word 2 If Start imagePROGRAF Print Plug In is displayed click it 3 Click Print from the imagePROGRAF Print Plug In toolbar ribbon The Printing Wizard dialog box is displayed Windows Software Print Plug In for Office iPF815 Print Using...

Страница 340: ...d is open close the Printing Wizard dialog box Otherwise you may not be able to change displays or operate the toolbar ribbon 4 Click Print Using Registered Settings 5 Click the Next button 6 Select Media Type Windows Software Print Plug In for Office Print Using Registered Settings Word iPF815 4 324 ...

Страница 341: ...scape or Portrait Orientation Page Sizes made in the Large Format Printing Wizard Create Page Size in Portrait or Landscape Orientation Use the Large Format Printing Wizard to create portrait page sizes for Potrait Orientation and landscape page sizes for Landscape Orientation 1 Start Microsoft Word 2 If Start imagePROGRAF Print Plug In is displayed click it 3 Click Paper Settings from the imagePR...

Страница 342: ... taken to create a Portrait Page Size will be used as an example to explain the procedure 5 Adjust Length from the list box or slide bar 6 Click the Create Page button Windows Software Print Plug In for Office Portrait Orientation Landscape Orientation Word iPF815 4 326 ...

Страница 343: ...a again To start from Microsoft PowerPoint Below are the steps to start Print Plug In for Office from Microsoft PowerPoint 1 Start Microsoft PowerPoint 2 If Start imagePROGRAF Print Plug In is displayed on the toolbar ribbon click it Important If the imagePROGRAF Print Plug In toolbar ribbon is not displayed refer to the following When Print Plug In for Office is not displayed P 306 3 Check that t...

Страница 344: ...ching Roll Width Borderless Printing Multi Page Printing and Print Using Registered Settings can be set Paper Settings Button Large Format Wizard is displayed Settings for Portrait or Landscape Orientation can be set Printing Wizard dialog box Important If you want to change the display to another file or application while the Printing Wizard is open close the Printing Wizard dialog box Otherwise ...

Страница 345: ...that is the case modify the data again Note If you open a password protected document as read only the Large Format Printing Wizard cannot be run Remove the password protection Print Matching Roll Width PowerPoint Prints to the edge of the roll width You can print large exhibits and posters and also print Portrait and Landscape orienta tions made in Large Format Printing Wizard 1 Start Microsoft P...

Страница 346: ... another file or application while the Printing Wizard is open close the Printing Wizard dialog box Otherwise you may not be able to change displays or operate the toolbar ribbon 4 Click Print Matching Roll Width 5 Select Roll Paper Width that is set in the printer Windows Software Print Plug In for Office Print Matching Roll Width PowerPoint iPF815 4 330 ...

Страница 347: ...tered when the One Touch Registration is pressed This is convenient if you to need print multiple times using the same setting Press the Print Preview button to display the preview screen You can check and make changes to the layout in the preview screen When you print to the edge of the roll width the maximum length will be the lesser of 14 22 times the roll paper width or 18 0m 12 Press Print to...

Страница 348: ...t 3 Click Print from the imagePROGRAF Print Plug In toolbar ribbon The Printing Wizard dialog box is displayed Important If you want to change the display to another file or application while the Printing Wizard is open close the Printing Wizard dialog box Otherwise you may not be able to change displays or operate the toolbar ribbon Windows Software Print Plug In for Office Borderless Printing Po...

Страница 349: ...g in is selected in Choose how to proceed and press OK Note To adjust the data select Return to application and press OK Exit Print Plug In for Office and return to the application 6 Select Roll Paper Width that is set in the printer 7 Select Layout Windows Software Print Plug In for Office iPF815 Borderless Printing PowerPoint 4 333 ...

Страница 350: ...ing using the same settings Press the Print Preview button to display the preview screen You can confirm and make changes to the layout in the preview screen The maximum length for Borderless Printing is the lesser of 14 22 times the roll paper width or 18 0m 12 Press Print to start printing Multi Page Printing PowerPoint Prints multiple pages as one page You can print handouts into a single page ...

Страница 351: ...izard dialog box is displayed Important If you want to change the display to another file or application while the Printing Wizard is open close the Printing Wizard dialog box Otherwise you may not be able to change displays or operate the toolbar ribbon Windows Software Print Plug In for Office iPF815 Multi Page Printing PowerPoint 4 335 ...

Страница 352: ...rinting 5 Select the Roll Paper Width that is set in the printer 6 Select layout from Layout Selection 7 Select Next 8 Select Media Type Windows Software Print Plug In for Office Multi Page Printing PowerPoint iPF815 4 336 ...

Страница 353: ...he lesser of 14 22 times the roll paper width or 18 0m 11 Press Print to start printing Register the settings PowerPoint If you are going to print multiple times using the same setting you can select One Touch Registration Registered settings can be recalled from Print Using Registered Settings 1 Set up to the Print screen from Print Matching Roll Width Borderless Printing or Multi Page Printing o...

Страница 354: ...ncel in the Print screen will not delete the registered settings Print Using Registered Settings PowerPoint Prints using the registered settings 1 Start Microsoft PowerPoint 2 If Start imagePROGRAF Print Plug In is displayed click it 3 Click Print from the imagePROGRAF Print Plug In toolbar ribbon The Printing Wizard dialog box is displayed Windows Software Print Plug In for Office Print Using Reg...

Страница 355: ...s open close the Printing Wizard dialog box Otherwise you may not be able to change displays or operate the toolbar ribbon 4 Click Print Using Registered Settings 5 Click the Next button 6 Select Media Type Windows Software Print Plug In for Office iPF815 Print Using Registered Settings PowerPoint 4 339 ...

Страница 356: ...18 0m 9 Press Print to start printing Portrait Orientation Landscape Orientation PowerPoint Print to the edge of the roll width You can print large exhibits and posters or print the Landscape or Portrait Orientation Page Sizes made in the Large Format Printing Wizard Create Page Size in Portrait or Landscape Orientation Use the Large Format Printing Wizard to create portrait page sizes for Potrait...

Страница 357: ...ormat Printing Wizard is open close the Large Format Printing Wizard dialog box Otherwise you may not be able to change displays or operate the toolbar ribbon 4 Click Portrait Orientation or Landscape Orientation Note The steps taken to create a Portrait Page Size will be used as an example to explain the procedure Windows Software Print Plug In for Office iPF815 Portrait Orientation Landscape Ori...

Страница 358: ... collapse if you create a form using existing data If that is the case modify the data again Note Printing is done in Print Matching Roll Width of the Printing Wizard For details on Print Match ing Roll Width refer to see Print Matching Roll Width PowerPoint P 329 Windows Software Print Plug In for Office Portrait Orientation Landscape Orientation PowerPoint iPF815 4 342 ...

Страница 359: ...toolbar ribbon is displayed 4 Click the buttons on the toolbar ribbon according to the items you want to set Icon Contents Menu Displays the About Help and Special Settings dialog boxes See Configuring Special Settings P 352 Printer list Select Printer If you select Show All Printers the imagePROGRAF printers will be displayed again Select this when you want to display all printer drivers or updat...

Страница 360: ...e dialog box will appear asking if you want to continue printing If you click No you will return to the application If you click the Print button with a page break set a message dialog box will appear asking if you want to continue printing If you click No you will return to the application If you do not use the set page break check the page break preview and change the setting If you click the Pr...

Страница 361: ... Print from the imagePROGRAF Print Plug In toolbar ribbon Important When more than one worksheet is selected the Printing Wizard cannot be run Select only one worksheet and click Print again If a print area is set a confirmation message dialog box will appear To print the entire sheet cancel the setting of the print area The Printing Wizard dialog box is displayed Windows Software Print Plug In fo...

Страница 362: ... The Layout menu will appear automatically Note If data analysis requires time a message dialog will appear If you select No you will return to the application 5 Select Roll Paper Width that is set in the printer Windows Software Print Plug In for Office Print Entire Sheet Excel iPF815 4 346 ...

Страница 363: ...can check and make changes to the layout in the preview screen When you print to the edge of the roll width the maximum print length is 18 0m 12 If the upper and lower margins are too wide check No Spaces at Top or Bottom Conserve Paper The upper and lower margins can be checked in Print Preview 13 Press Print to start printing Important If divided into plural pages try reducing the data size or t...

Страница 364: ...Click Print from the imagePROGRAF Print Plug In toolbar ribbon Important When more than one worksheet is selected the Printing Wizard cannot be run Select only one worksheet and click Print again If a print area is set a confirmation message dialog box will appear To print the selected area cancel the setting of the print area The Printing Wizard dialog box is displayed Windows Software Print Plug...

Страница 365: ...ear informing you that analysis is in progress The Layout menu will appear automatically Important If the range selected in Excel 2007 2010 is too large it will not be possible to analyze the data Select a smaller range and then run the analysis Windows Software Print Plug In for Office iPF815 Print Selected Area Excel 4 349 ...

Страница 366: ...t 10 Select Media Type 11 Enter Copies Note When Print in Draft mode is selected printing is fast but the print quality is poor Press the Print Preview button to display the preview screen You can check and make changes to the layout in the preview screen When you print to the edge of the roll width the maximum print length is 18 0m 12 If the upper and lower margins are too wide check No Spaces at...

Страница 367: ...t Selected Area Refer to Print Entire Sheet Excel P 345 and Print Selected Area Excel P 348 for the configuration methods 2 Click the Binding Settings button Important You cannot click the Binding Settings button in the following situations When the Image Size is set to 100 When a graph is selected When page breaks have been set When a sheet or cell is protected Open the Binding Settings dialog bo...

Страница 368: ...the item you want to change on or off Item Details Show progress indicator during plug in startup When this setting is off hides the progress indicator that appears while the plug in is starting up Center sheets and print areas When this setting is off printing is performed without changing the position When this setting is on printing is performed with the top bottom left and right margins layed ...

Страница 369: ...the quality of photos etc This function is only valid in Microsoft PowerPoint Correct the print area when analyzing For data that cannot be processed with usual data analysis the print area is corrected and then the data is processed When data analysis fails you may be able to print by turning on this checkbox This function is only valid in Microsoft Excel 3 Click OK to close the Special Settings ...

Страница 370: ...fter referred to together as AutoCAD You can set up the print job with the most appropriate settings for the media and print clear sharp printouts of plans and diagrams created with AutoCAD Operating Environment The HDI driver operating environment is as follows Compatible Operating System Windows XP Windows Vista Windows 7 Compatible AutoCAD Version AutoCAD 2005 AutoCAD LT2005 AutoCAD 2006 AutoCA...

Страница 371: ... Software CD ROM provided with the printer Follow the procedure below to perform the installation from this screen 1 Mount the User Software CD ROM in the CD ROM drive and start the Canon installer Note If the Canon installer screen does not appear double click the CD ROM icon from the My Comput er to open the installer screen 2 Select Install Individual Software in the Canon installer Setup Menu ...

Страница 372: ...tallation List appears Click the Install button of the imagePROGRAF HDI Driver The driver setup screen appears Click the Next button Windows Software HDI Driver Installing with the Canon Installer iPF815 4 356 ...

Страница 373: ...irm that the installed AutoCAD is compatible with your computer environment Click the OK button Note Confirm that the installed AutoCAD is compatible with your computer environment 5 The Ready to Install the Program screen opens Click the Install button Windows Software HDI Driver iPF815 Installing with the Canon Installer 4 357 ...

Страница 374: ...s are stored Click the Finish button This completes the setup of the HDI driver 7 After AutoCAD starts select Plotter Manager from the File menu The Plotters window opens Click the Add A Plotter Wizard icon Windows Software HDI Driver Installing with the Canon Installer iPF815 4 358 ...

Страница 375: ...pen the Add A Plotter Wizard you can also click Start Control Panel Autodesk Plotter Manager and then double click the Plotter Wizard icon in the Plotters window 9 Add Plotter Begin screen opens Select My Computer then click the Next button Windows Software HDI Driver iPF815 Installing with the Canon Installer 4 359 ...

Страница 376: ...e of the print er that you want to install then click the Next button 11 The Add Plotter Import Pcp or Pc2 screen opens Click the Next button Note If you want the installer to read plotter information from previously stored PCP or PC2 files click the Import File button Windows Software HDI Driver Installing with the Canon Installer iPF815 4 360 ...

Страница 377: ... Ports screen it is recommended to select Network Port If you select Local Port the AutoCAD warning message may appear when printing 13 The Add Plotter Plotter Name screen opens Click the Next button Note You can change the Plotter Name setting here but you will normally leave it as it is and go to Step 14 Windows Software HDI Driver iPF815 Installing with the Canon Installer 4 361 ...

Страница 378: ...ser Software CD ROM from the CD ROM drive Installing with the Add A Plotter Wizard Follow the procedure below to use the Add A Plotter Wizard to install the HDI driver without the Canon installer 1 After AutoCAD starts select Plotter Manager from the File menu The Plotters window opens Click the Add A Plotter Wizard icon Windows Software HDI Driver Installing with the Add A Plotter Wizard iPF815 4...

Страница 379: ...t Control Panel Autodesk Plotter Manager and then click the Add A Plotter Wizard icon in the Plotters window 3 The Add Plotter Begin screen opens Select My Computer then click the Next button 4 The Add Plotter Plotter Model screen opens Mount the User Software CD ROM in the CD ROM drive Windows Software HDI Driver iPF815 Installing with the Add A Plotter Wizard 4 363 ...

Страница 380: ...ox select the CD ROM drive and then browse to the folder that holds the hif file Select the hif file then click the Open button Note The hif format file is contained in the following folder HDI Driver English 2007 AutoCAD Version 2007 Windows Software HDI Driver Installing with the Add A Plotter Wizard iPF815 4 364 ...

Страница 381: ...e printer for Models and then click the Next button 8 The Add Plotter Import Pcp or Pc2 screen opens Click the Next button Note If you want the installer to read plotter information from previously stored PCP or PC2 files click the Import File button Windows Software HDI Driver iPF815 Installing with the Add A Plotter Wizard 4 365 ...

Страница 382: ...rts screen it is recommended to select Network Port If you select Local Port the AutoCAD warning message may appear when printing 10 The Add Plotter Plotter Name screen opens Click the Nextbutton Note You can change the Plotter Name setting here but you will normally leave it as it is and go to Step 11 Windows Software HDI Driver Installing with the Add A Plotter Wizard iPF815 4 366 ...

Страница 383: ...e the User Software CD ROM from the CD ROM drive Opening the Plotter Configuration Dialog Box You can open the Plotter Configuration Editor dialog box by two ways Opening from the AutoCAD File Menu P 368 Opening from the Start Menu P 369 Windows Software HDI Driver iPF815 Opening the Plotter Configuration Dialog Box 4 367 ...

Страница 384: ... Name setting under Printer plotter and confirm that iPFxxxx pc3 the name of the printer you use is displayed Click the Properties button Note If any other printer name is selected select the name of the printer that you want to use from the Name list The names of the printers installed when the HDI driver was installed are in the Name list Windows Software HDI Driver Opening from the AutoCAD File...

Страница 385: ... the Start Menu Follow the procedure below to open the Plotter Configuration Editor dialog box from the Start menu 1 Click the Start button then select Control Panel The Control Panel window opens Windows Software HDI Driver iPF815 Opening from the Start Menu 4 369 ...

Страница 386: ...r icon The Plotters window opens Double click the iPFxxxx pc3 icon the icon name is the name of the printer you use to open 3 The Plotter Configuration Editor dialog box opens Windows Software HDI Driver Opening from the Start Menu iPF815 4 370 ...

Страница 387: ...rform the main printing settings The settings for each item are shown in a tree structure on this sheet When you select an item the screen display changes so you make changes for the resolution and other graphic settings the media type the color matching and Custom Properties settings the drying time and the roll paper margin for safety and other detailed media settings The available settings are ...

Страница 388: ...t presents the media source and size settings 2 From the Source list select the media source 3 From the Size list select the media size Note When you change the Source setting the Size setting returns automatically to its default settings Ev ery time you adjust the Source setting you should also re adjust the Size setting 4 Click the OK button Windows Software HDI Driver Media Source and Media Siz...

Страница 389: ...w Graphics The Device and Document Settings sheet opens and switches to the Vector Graphics settings 2 Select Color or Monochrome 3 Select a setting for Color Depth from the list Color Depth presents the following items for selection Setting Details Color 16777216 24 bit colors Monochrome 16777216 Level grayscale Windows Software HDI Driver iPF815 Graphics Settings 4 373 ...

Страница 390: ...results 5 Select Dithering Setting Details Hardware Dithering Perform dithering on the printer 6 Click the OK button Raster Graphics settings PUse these settings to adjust the balance between the print quality memory consumption and the print speed of raster graphics 1 Click the Raster Graphics below Graphics The Device and Document Settings sheet opens and switches to the Raster Graphic settings ...

Страница 391: ...E object If set to None you cannot print OLE objects Printing time will take longer the higher you set the Best set ting Trade off Use these settings to lower the print quality by a certain degree if the print job can not be completed at the best quality 3 Click the OK button Merge Control Settings Use thse settings to merge intersecting lines 1 Click the Merge Control below Graphics The Device an...

Страница 392: ...select and open the Device and Document Settings sheet Note For more details about how to open the Plotter Configuration Editor dialog box see Opening the Plotter Configuration Dialog Box P 367 2 Click Custom Properties 3 The Device and Document Settings sheet opens and switches to the display that presents the custom properties set tings Click the Custom Properties button Windows Software HDI Dri...

Страница 393: ...4 The Custom Properties dialog box opens Windows Software HDI Driver iPF815 Opening the Custom Properties Dialog Box 4 377 ...

Страница 394: ...t quality to suit the print job Setting Details Image This mode achieves the best results for printing photographic images and illustra tions Line Drawing This mode is best for printing CAD drawings with fine lines or wall newssheet or other documents that contain large amounts of text However you may not achieve the quality you expect with printing photographs or other images with many filled are...

Страница 395: ...y of settings depends on the print priority and media type selections Color Matching You can select a color matching to suit the print job Setting Details Perceptual This item does color matching with priority on color tones to reproduce the best results in printing photographic images Colorimetric This item places priority on reducing the differences between the color tones you seen on the comput...

Страница 396: ...case Output Method Button Click the button to open the Output Method dialog box and you can specify the output method for HDI Driver For more information about the output method see Output Method Dialog Box P 382 Color Compatibility button Click the button to open the Color Compatibility dialog box and you can set color for when Color CAD is selected in Color Mode For more information on setting c...

Страница 397: ...er the set time For the media type that has problems such as ink smears on the page or colors that seem uneven during borderless printing etc increase the value for this setting Roll Paper Margin for Safety Near End Margin This sets the length of the near end margin of the roll paper Setting Details Printer Default The settings of the printer operating panel are applied 3mm Print at a standard siz...

Страница 398: ... job data is stored temporarily in the box as the job prints Save in mail box The print data is saved in the mail box on the HDD without printing Sets the number of the destination mail box for saving The name of the data to be saved is displayed Color Compatibility Dialog Box Color Compatibility dialog box appears when you click the Color Compatibility button on the Main sheet in the Custom Prope...

Страница 399: ... Light Color CAD 3 Canon BJ W3000 W3050 BJ W3000 W3050 are not sold domestically in Japan Color CAD 4 HP Designjet 500 800 Color CAD 5 HP Designjet 1000 Color CAD 6 HP Designjet 4000 4500 Printing This section describes how to execute a print job with the HDI driver Note The description below uses printing with the AutoCAD 2007 as an example 1 Start AutoCAD and open the image file Windows Software...

Страница 400: ...pc3 the name of the printer you use is displayed Click the Properties button Note If any other printer name is selected select the name of the printer that you want to use from the Name list The names of the printers installed when the HDI driver was installed are in the Name list Windows Software HDI Driver Printing iPF815 4 384 ...

Страница 401: ...r the print job Click the OK button to close the Plotter Configuration Editor dialog box Note For more details about how to perform the settings in the Plotter Configuration Editor dialog box see Plotter Configuration Editor Dialog Box P 371 Windows Software HDI Driver iPF815 Printing 4 385 ...

Страница 402: ... the resolution or reduce the number of colors If this occurs click the OK button to cancel the print job and then lower the resolution or reduce the number of colors Some media may not allow printing with certain resolution settings If you have selected a resolution setting that cannot be used for printing then a dialog box will open and prompt you to change the resolution If this occurs click th...

Страница 403: ...tus and managing print jobs Two screens are available in imagePROGRAF Status Monitor Printer List shows a list of printers and Status Monitor shows details for each printer You can view a list of the printers for which printer drivers have been installed on your computer printers connected to your computer and printers found on the network Windows Software Status Monitor iPF815 The Features of ima...

Страница 404: ... you designate in advance You can check the status of the hard disk and the documents saved on the hard disk You can use the Accounting Manager to collect the print job logs for the printers and check information such as the printing costs For details of the Accounting Manager see Accounting Manager P 390 Note For details refer to the imagePROGRAF Status Monitor help Job Management Using imagePROG...

Страница 405: ...k the Resume button Note Once all the print data for a print job has been sent to the printer the job can no longer be paused resumed Canceling Print Jobs Selecting a print job and clicking the Cancel Job button cancels printing of the selected job Note You cannot cancel other users print jobs Windows Software Status Monitor iPF815 Job Management Using imagePROGRAF Status Monitor 4 389 ...

Страница 406: ...tion This allows you to check which documents were printed from each printer who printed them and when Calculation of the Total Pages Used and the Total Cost This allows you to use the collected print job logs to calculate totals for items such as the number of pages printed the amount of paper used and the printing costs incurred Regular Data Acquisition for Print Jobs This automatically logs pri...

Страница 407: ...elect Accounting in the Accounting menu Or open the Accounting sheet and click the Accounting button Accounting Manager Main Window The Accounting Manager main window consists of a title bar menu bar toolbars listed job selection area job list area totals area and status bar Windows Software Accounting iPF815 Launching the Accounting Manager 4 391 ...

Страница 408: ...the View menu Listed Job Selection Area You can use this area to select which job log is displayed If you are using regular data acquisition this area allows you to view the collective job logs for each specified period For more information on how to select the job logs displayed see Switching Between Displaying Jobs on Printer and Regularly Acquired Jobs P 399 Job List Area This area lists the de...

Страница 409: ...e Unit Cost of Ink or Paper have not been set is displayed in the Job Cost field Totals Area Displays the total costs for the selected job and the amounts of paper and ink consumed Note If you are viewing regularly acquired print jobs selecting a period on the left side of the window displays the total costs for that period and the amounts of paper and ink consumed Windows Software Accounting iPF8...

Страница 410: ...utomatically Acquiring Print Job Logs at Regular Inter vals P 399 4 Specify the jobs to be listed For details of how to select the job logs displayed see Switching Between Displaying Jobs on Printer and Regu larly Acquired Jobs P 399 This displays the required print job logs and lists the details Configuring Unit Costs in Accounting Manager Select Unit Costs in the Settings menu to open the Unit C...

Страница 411: ...r all ink checkbox 2 Enter the Tank Capacity and corresponding Price 3 Click the OK button Important Your settings are not applied until you click the OK button To set different unit costs for each ink color 1 Select the ink color to be costed 2 Enter the Tank Capacity and corresponding Price Windows Software Accounting iPF815 Setting the Unit Cost for Ink 4 395 ...

Страница 412: ...per sheet Set the unit cost for paper in this sheet 1 Select a media type from the Media Type list 2 Enter the Width and Length of the paper and the Price per area for the configured width x height 3 Click the Add button To change the unit cost for a media type you have already set click the Overwrite button 4 Click the OK button Windows Software Accounting Setting the Unit Cost for Paper iPF815 4...

Страница 413: ...ny name in the Name field 2 Enter a value in Unit Cost 3 Use Allocated to specify whether the costs are allocated as being incurred by the print job 4 Click the Add button To change the unit cost for a media type you have already set click the Overwrite button 5 Click the OK button Note You can set unit costs for up to 5 items Windows Software Accounting iPF815 Setting the Unit Cost for Items Othe...

Страница 414: ...cates the year MM the month and DD the day Currency Unit Enter the currency unit Enter a text string up to 3 characters long 1000 Separator Use this option to select the symbol used as a separator in numbers The symbol is inserted every 3 digits Decimal Symbol Use this option to select the symbol used as a decimal point Ink Consumed Use this option to select the unit used for ink consumption Paper...

Страница 415: ...int job logs as CSV files see Exporting Print Job Data as a CSV File P 400 Important Print job log collection is not performed when Set Adj Menu Printer Info Show Job Log of the con trol panel is Off However even if Show Job Log is set to Off regularly acquired jobs that already have been retrieved at that time are displayed Canceling Regular Print Job Log Acquisition You can use this procedure to...

Страница 416: ...ach month set Period to Monthly and set Starting Date to 1 Note Up to 10 000 regularly acquired jobs are displayed for each printer Exporting Print Job Data as a CSV File You can export the collected print job data in the form of a CSV file by selecting Export Job Cost Data in the File menu Note You can also select Export Job Cost Data using the icon in the toolbar Selected Jobs Exports the data f...

Страница 417: ...Unit Cost Data Select a destination folder using Save Unit Cost Data in the File menu The unit cost data for items such as the selected ink and paper is saved as a file Load Unit Cost Data Selecting Load Unit Cost Data in the File menu loads saved unit cost data Showing the Total Amount of Ink and Paper Consumed Select Show Ink and Paper Consumed in the File menu to open the Show Ink and Paper Con...

Страница 418: ... Front Access In short Digital Photo Front Access can help you manage images in many ways from editing to printing as an effective way to work with other applications Digital Photo Front Access also enables image retouching For automatic retouching select an image for retouching and click Image Adjustment Because this application automates the workflow from retouching to display for all of your im...

Страница 419: ...pe You can see which printers are online in the network by checking the printer list Communication between your com puter and these printers is possible Note We recommend that your network or printer administrator complete the setup work using imagePROGRAF Device Setup Utility For details refer to the imagePROGRAF Device Setup Utility help Installing imagePROGRAF Device Setup Utility Install image...

Страница 420: ...k settings you must be logged in with administrative rights such as Administrator ac count We recommend that your network administrator configure the network settings For instructions on installing imagePROGRAF Device Setup Utility see Installing imagePROGRAF De vice Setup Utility P 403 1 Start imagePROGRAF Device Setup Utility from the start menu 2 In the Device Name list displayed select the pri...

Страница 421: ... the Confirmation message dialog box is displayed 7 Exit imagePROGRAF Device Setup Utility Note To configure the IP address automatically choose Auto in the Setting IP Address list and select DHCP BOOTP or RARP You can also specify the subnet mask and default gateway Windows Software Device Setup Utility iPF815 Configuring the IP Address Using imagePROGRAF Device Setup Utility 4 405 ...

Страница 422: ...ormation files amf and med files You can rearrange lists of the types of paper on the printer control panel and in printer driver dialog boxes and rename them in addition to other functions Important The Media Configuration Tool is normally installed when you install the printer driver from the User Soft ware CD ROM by selecting Install Printer Driver and media information is registered at this ti...

Страница 423: ...tall the printer driver from the User Soft ware CD ROM by selecting Install Printer Driver and media information is registered at this time You must be logged in as Administrator when installing software in Windows 1 Start the Media Configuration Tool installer Click the Next button 2 The next screen presents selections for the country or area where the printer is used Select a country or territor...

Страница 424: ...cept the terms of the license agreement and click the Next button 4 The Choose Destination Location screen appears Select the destination folder then click the Next button Windows Software Media Configuration Tool Installation Procedures iPF815 4 408 ...

Страница 425: ... Click the Finish button This completes the installation of Media Configuration Tool Starting the Media Configuration Tool Follow the procedure below to start Media Configuration Tool From the start menu go to Programs iPFxxxx Media Configuration Tool iPFxxxx Media Configuration Tool Windows Software Media Configuration Tool iPF815 Starting the Media Configuration Tool 4 409 ...

Страница 426: ... Configuration Tool main window see Starting the Media Configuration Tool P 409 Edit Media Type Information Button Click the button to open the Edit Media Types dialog box and you can edit the media types For more information about Edit Media Type Information see Editing Media Type Information P 411 Windows Software Media Configuration Tool Media Configuration Tool Main Window iPF815 4 410 ...

Страница 427: ...ck the Edit Media Type Information button in the Media Configuration Tool main window to display the Edit Media Types dialog box This dialog box presents functions for the following tasks Adding Media Types P 412 Changing Media Names P 414 Deleting Media Types You Have Added P 416 Switching Media Types Display Show Hide P 418 Changing the Display Order of Media Types P 419 Note It may not be possi...

Страница 428: ... Types 1 Open the Edit Media Types dialog box and then click the Add button 2 The Add Media Type dialog box displays Click the Browse button Windows Software Media Configuration Tool Adding Media Types iPF815 4 412 ...

Страница 429: ...es of media information files in the folder you selected in the Browse for Folder dialog box are displayed under Media Information File in the Add Media Type dialog box Select the check boxes of paper to add and click the OK button 5 Click OK when the confirmation message is displayed Windows Software Media Configuration Tool iPF815 Adding Media Types 4 413 ...

Страница 430: ...date paper information using the Update Media Types wizard see Updating Media Types P 421 Important Be sure to click the Update button If you do not your changes will not be applied to the printer and printer driver Changing Media Names 1 Open the Edit Media Types dialog box Windows Software Media Configuration Tool Changing Media Names iPF815 4 414 ...

Страница 431: ...ton 3 The Rename Media dialog box is displayed Edit the names in Name in Printer Driver and Name on Control Panel and click the OK button Note To restore the original names click the Restore button Windows Software Media Configuration Tool iPF815 Changing Media Names 4 415 ...

Страница 432: ...rmation using the Update Media Types wizard see Updating Media Types P 421 Important Be sure to click the Update button If you do not your changes will not be applied to the printer and printer driver Deleting Media Types You Have Added 1 Open the Edit Media Types dialog box Windows Software Media Configuration Tool Deleting Media Types You Have Added iPF815 4 416 ...

Страница 433: ...Update button The Update Media Types wizard is started at this point For details on the procedure to update paper information using the Update Media Types wizard see Updating Media Types P 421 Important Be sure to click the Update button If you do not your changes will not be applied to the printer and printer driver Windows Software Media Configuration Tool iPF815 Deleting Media Types You Have Ad...

Страница 434: ...he name of the media to switch off or on for display Click the Show Hide button The selected paper is alternately shown or hidden Note The names of media switched for non display appear grayed out in the Media Type list Windows Software Media Configuration Tool Switching Media Types Display Show Hide iPF815 4 418 ...

Страница 435: ...ating Media Types P 421 Important Be sure to click the Update button If you do not your changes will not be applied to the printer and printer driver Switching between showing and hiding the type of paper will not be applied to the printer Changing the Display Order of Media Types 1 Open the Edit Media Types dialog box Windows Software Media Configuration Tool iPF815 Changing the Display Order of ...

Страница 436: ...box click the Update button The Update Media Types wizard is started at this point For details on the procedure to update paper information using the Update Media Types wizard see Updating Media Types P 421 Important Be sure to click the Update button If you do not your changes will not be applied to the printer and printer driver Windows Software Media Configuration Tool Changing the Display Orde...

Страница 437: ...ption that Media Configuration Tool is updated or you have a media information file for print media that is to be updated 1 Confirm the printer where media type information is to be updated to be displayed in Printer in the Update Media Types Select Printer dialog box and then click the Next button Note If the printer driver is not installed the following dialog box is displayed Select how the pri...

Страница 438: ...pdate Media Types Confirm Update Confirm the information received from the printer To update click the Execute button Important When setting a data to the printer that differs from the data to be updated the selected media informa tion file is updated When you would like to remain the data that is set to the printer click the Cancel button 4 Communication with the printer starts and the following ...

Страница 439: ...cannot communicate with the printer the following warning message is displayed 5 After the media information file is updated successfully the screen switches to the Update Media Types Finish dialog box Click Finish to close the Update Media Types wizard Windows Software Media Configuration Tool iPF815 Updating Media Types 4 423 ...

Страница 440: ...Mac OS X Software Printer Driver 425 Preview 452 Free Layout 481 Color imageRUNNER Enlargement Copy 513 Printmonitor 538 Media Configuration Tool 539 Mac OS X Software iPF815 5 424 ...

Страница 441: ...Utility Pane 449 Additional Settings Pane 450 Support Pane 451 Printer Driver Settings For instructions on accessing the Mac OS X printer driver refer to the following topics Accessing the Printer Driver Dialog Box from Applications P 432 For information on the Mac OS X printer driver settings refer to the following topics Main Pane P 433 You can specify the media type color processing print quali...

Страница 442: ...upport Pane P 451 You can view support information and the user s manual With the imagePROGRAF Free Layout feature you can arrange originals from various source applications on a single page before printing For details see Free Layout P 481 With the imagePROGRAF Preview feature you can check the layout before printing and adjust layout or size settings while viewing a preview screen For details se...

Страница 443: ...by opening the Page Attributes dialog box from Page Setup If it is not displayed the settings are configured in the upper part of the printer driver displayed when you select Print from the application software menu 2 Select the printer in the APrinter list 3 Choose the original size in the FPaper Size list 4 If you configured the settings using the Page Attributes dialog box click FOK to close th...

Страница 444: ...he AMedia Type list select the type of paper that is loaded 7 Access the Page Setup pane 8 In the APaper Source list select how paper is supplied Mac OS X Software Printer Driver Specifying Paper in the Printer Driver iPF815 5 428 ...

Страница 445: ...l Width click LPrinter Informa tion on the Main pane to update the printer information Note A variety of settings are available in the printer driver to suit different printing applications For details on available printing conditions see Printer Driver Settings P 425 Confirming Print Settings There are two ways to confirm what printing conditions have been specified as follows Checking a preview ...

Страница 446: ...ize and method and percentage of enlargement or reduction is displayed Pane displayed when the ISize tab is clicked Paper size details are indicated numerically Pane with printer and paper illus trations Illustrations indicate the paper source orientation borderless printing selection and other settings information Note To confirm the Print Target specified in Easy Settings click GView set on the ...

Страница 447: ... the layout before printing using the Canon imagePROGRAF Preview function 1 Choose Print in the application menu 2 Access the Main pane 3 Select the OPrint Preview check box 4 Click MPrint Mac OS X Software Printer Driver iPF815 Checking the Layout in a Preview Before Printing 5 431 ...

Страница 448: ...he printing dialog box click Save As in the Presets list to save the current print settings This is a stand ard feature of the operating system For details refer to the Mac OS documentation Accessing the Printer Driver Dialog Box from Applications 1 In the application software select Print from the File menu to display the dialog box for printing conditions Note This dialog box includes basic prin...

Страница 449: ...ng enlarged and reduced printing borderless printing and so on Main Pane The following settings are available on the Main pane For details on settings items refer to the printer driver help Note On the Main pane choose Easy Settings to specify basic print settings based on the print target or switch to Advanced Settings to complete more detailed settings as desired Mac OS X Software Printer Driver...

Страница 450: ...Paper Detailed Settings You can configure the printing settings to match the type of media such as the ink dry ing time Paper Detailed Settings Dialog Box P 438 OPrint Preview If you turn this on imagePROGRAF Preview starts before printing This allows you to check on screen previews of documents before printing Important This cannot be selected if Free Layout is enabled in the Page Setup panel Che...

Страница 451: ... Office Documents P 38 FPrint Quality Choose the level of print quality GView set Click to display the View settings dialog box which enables you to confirm the settings for the selected item from the EPrint Target list or change the order of items listed in EPrint Target View settings Dialog Box for the Printing Application P 439 Mac OS X Software Printer Driver iPF815 Main Pane 5 435 ...

Страница 452: ... Mode Choose the color mode Giving Priority to Particular Graphic Elements and Colors for Printing P 55 ISet Click to display the Color Settings dialog box for more advanced color settings Adjusting the Color in the Printer Driver P 46 JUnidirectional Printing Select this checkbox to prevent problems such as misaligned lines and improve the print quality However the printing speed becomes slower Q...

Страница 453: ...epending on the Media Type and Print Quality settings this mode may not be available Paper Information on Printer Dialog Box On the Paper Information on Printer dialog box you can obtain information on the paper in the printer and configure printer driver media type setting Note To display the Paper Information on Printer dialog box on the Main pane click Get Information by Media Type See Main Pan...

Страница 454: ...inter supports refer to the Paper Reference Guide See Types of Pa per P 617 BDrying Time Specify the time that the printer waits for ink to dry as needed The Drying Time setting is only valid for rolls See Specifying the Ink Drying Time for Rolls P 640 CBetween Pages Specify the time the printer waits after printing a page until ejecting the paper as needed DBetween Scans Specify the time the prin...

Страница 455: ...te or deactivate automatic cutting and printing of cut lines as desired In this list specify Printer Default None or Print Cut Guideline JMirror Specify whether to print a mirror image as needed Select this option to print a version of the document or image with the left and right sides inverted View settings Dialog Box for the Printing Application In the View settings dialog box you can check det...

Страница 456: ...an specify color matching to compensate for differences in the appearance of colors on various devices Important If No color correction is selected under Color Mode the Matching pane is not displayed Note To display the Matching pane on the Main pane click Color Settings in Color Mode in Advanced Set tings and then click the Matching tab Refer to Main Pane P 433 Driver Matching Mode AMatching Mode...

Страница 457: ...ne click Color Settings by Color Mode in Advanced Set tings and then click the Matching tab See Main Pane P 433 AMatching Mode Select the color matching mode to use as desired BInput Profile Settings You can choose Input Profile Various options are available depending on your selected AMatching Mode CMatching Method You can choose CMatching Method Various options are available depending on your se...

Страница 458: ...t as you expected you can adjust it on the Color Adjustment pane Note To display the Color Adjustment pane on the Main pane click Color Settings by Color Mode in Ad vanced Settings See Main Pane P 433 ASample Type Choose a sample image from Standard Portrait Landscape or Graphics BView Color Pattern Select this checkbox to display the color pattern CApply to Sample Select this checkbox to apply th...

Страница 459: ...easing the Saturation setting makes colors more vivid and reducing the Satura tion makes colors more subdued Note For details on settings items see Adjusting the Color in the Printer Driver P 46 KObject Adjustment Select this option to display the Object Adjustment dialog box in which you can specify objects subject to color adjust ment Object Adjustment dialog box Color P 443 Object Adjustment di...

Страница 460: ...r Settings pane for monochrome printing Color Adjustment pane Monochrome On the Color Adjustment pane for monochrome printing you can adjust the brightness and contrast Note To display the Color Adjustment pane on the Main pane click Color Settings in Advanced Settings See Main Pane P 433 ASample Type Choose a sample image from Standard Portrait Landscape or Graphics BView Color Pattern Select thi...

Страница 461: ...een IContrast Adjust the contrast of the darkest and lightest portions relative to each other as desired Increasing the IContrast makes images sharper and reducing the IContrast softens images JSaturation Not available Note For details on settings items see Adjusting the Color in the Printer Driver P 46 KObject Adjustment Select this option to display the Object Adjustment dialog box in which you ...

Страница 462: ...r adjustment to Note To display the Object Adjustment dialog box click Object Adjustment on the Color Adjustment panel AImages Select this option to apply color adjustment to image areas such as photos BGraphics Select this option to apply color adjustment to graphics such as lines and circles CText Select this option to apply color adjustment to text Mac OS X Software Printer Driver Object Adjust...

Страница 463: ...er width CPage Size Displays the size of the original as specified in the page settings of the application For details on page sizes available in the application see Paper Sizes P 620 DEnlarged Reduced Printing Select this checkbox to choose the following options Resizing Originals to Match the Paper Size P 65 Resizing Originals to Fit the Roll Width P 71 Resizing Originals by Entering a Scaling V...

Страница 464: ...document images in the center of the paper Printing Originals Centered on Rolls P 154 Printing Originals Centered on Sheets P 160 KNo Spaces at Top or Bottom Select this checkbox to print the next image skipping blank areas above and below printable data in documents which ena bles you to conserve the paper Conserving Roll Paper by Printing Originals Without Top and Bottom Margins P 173 LRotate Pa...

Страница 465: ...ejecting outlet cleaning Head alignment adjustment Feed amount adjustment BView Click to start imagePROGRAF Printmonitor which enables you to view the status of print jobs CSet Click to complete the settings for Color imageRUNNER Enlargement Copy iR enlargement copy For details see Color imageRUNNER Enlargement Copy P 513 Mac OS X Software Printer Driver iPF815 Utility Pane 5 449 ...

Страница 466: ...d Print Data Immediately to Printer CSend All Print Data as Batch to Printer DSend job to You can configure the method for saving print jobs to the printer hard disk EPrint FPrint auto delete GSave in mail box HSave data before printing Jobs are printed after they are saved on the hard disk Mac OS X Software Printer Driver Additional Settings Pane iPF815 5 450 ...

Страница 467: ...inter driver updates and browse other information BUser Manual Click to view the printer user s manual This function requires the user s manual to be installed on your computer CSettings The settings can be saved as a file Click to display the Export dialog box which enables you to specify where to save the file DAbout You can display version information for the printer driver Mac OS X Software Pr...

Страница 468: ... Display with Actual Size 479 Moving a Page 479 The Features of Preview The main features of Preview are as follows While viewing this screen you can adjust layout settings of a document created with application software You can not only adjust layout settings but also your changes will be instantly applied on the preview screen and you can print the preview screen as it is seen Note The media typ...

Страница 469: ...ile menu select the printer setup menu to open the Print dialog box Note Normally select Print from the File menu 3 Click Print Preview in the Main panel to attach a checkmark 4 Click the Print button in the Print dialog box Note Your printer is depicted in the lower left area of this screen Mac OS X Software Preview iPF815 Starting Preview 5 453 ...

Страница 470: ...review Main Window The Preview main window consists of the menu and tool bars and preview dialog drawer and status area Note You can use the View menu to show or hide the tool bar Mac OS X Software Preview Preview Main Window iPF815 5 454 ...

Страница 471: ...ect menus required for operations Tool Bar This allows you to select tool buttons required for major operations Preview Area You can check the settings you made in this area Mac OS X Software Preview iPF815 Preview Main Window 5 455 ...

Страница 472: ... perform a print job Drawer Area This allows you to display the thumbnails of a document This area appears when you click Drawer from the tool bar Alternatively you may select Drawer from the View menu Mac OS X Software Preview Preview Main Window iPF815 5 456 ...

Страница 473: ... type that is actually set in the printer When the media you chose is different from the media set in the printer you may not receive the desired print results Easy Settings Advanced Settings Two modes are available to provide the optimum print settings for jobs The settings available on each mode are as follows Easy Settings P 459 Advanced Settings P 460 Mac OS X Software Preview iPF815 Paper Set...

Страница 474: ...ailable only if rolls are selected in Paper Source Copies You can input the number of print copies in numerical characters Note The maximum value is 999 You can change the numbers by clicking either button or button Restore Defaults Button Click the button to reset to the setting when starting Preview Print Button Click the button to begin printing Update Printer Info Button Click the button to ac...

Страница 475: ...e documents for which print clarity is key Poster The best setting for posters Prints using vivid and high impact colors CAD Color Line Drawing Prints the fine lines of CAD drawings and other such documents sharp and clear CAD B W Line Drawing Suitable for printing CAD drawings with sharp dark lines Perspective GIS Suitable for attractive printing of 3D CAD drawings perspective drawings and GIS dr...

Страница 476: ...esolution 1200dpi 600dpi 300dpi Note The availability of settings is determined by the media type and print priority selections Printing time is longer and more ink is consumed with High than with Draft however print quality is high er Printing time is shorter and less ink is consumed with Draft than with High however print quality is lower Advanced Settings Presents detailed settings for the prin...

Страница 477: ...tc so they are easy to read Note The number of settings available for selection depends on the media type Print Quality Selecting print quality strikes a balance between the quality of the printed image and printing speed The level of the print quality and resolution settings are displayed in the following combinations Setting Details Print Quality Highest High Standard Draft Resolution 1200dpi 60...

Страница 478: ...l paper with the page width Make sure that the width of the roll paper in the printer is set correctly for Roll Paper Width in the Paper Settings panel Displayed only if rolls are selected in Paper Source Scaling Enlarges reduces the whole page by the scaling rate as specified Input the scaling value in numerical characters You can specify a range between 5 and 600 You can change the numbers by cl...

Страница 479: ...top or bottom For more information about No Spaces at Top or Bottom see Not Print Spaces at the Top Bottom P 475 Note Available only if rolls are selected in Paper Source Rotate Page Select the method for rotating page The following settings are available for rotating page Setting Details Rotate Right 90 Degrees Rotates the portrait page right 90 degrees and print in landscape orientation When the...

Страница 480: ...ct a color mode to suit the print job Setting Details Color Enables color printing Monochrome Disables color printing and converts image from continuous color to grayscaled monochrome Color CAD Prints lines in the best color possible so they are easy to see Monochrome Bitmap Prints all colors other than white in black Monochrome BK ink Select to print all lines with black ink Mac OS X Software Pre...

Страница 481: ...d matching Color Adjustment P 465 Matching P 468 Restore Defaults Button Click the button to reset to the setting when starting Preview Print Button Click the button to begin printing Update Printer Info Button Click the button to acquire printer information Color Adjustment You can set the color adjustment Adjusting Color Normally colors should be adjusted in the software application but if you s...

Страница 482: ...l photo before scanning and graphics created on the display or when you want to print in different degrees of brightness use this feature Contrast Adjusts the relative brightness between the brightest and darkest portions of the im age For soft gradation decrease the contrast For hard gradation increase the contrast Saturation Adjusts the hues for vivid color or dark color Gray Tone Adjusts gray f...

Страница 483: ...hen the results of the printout are brighter than the original images such as the original photo before scanning and graphics created on the display or when you want to print in different degrees of brightness use this feature Contrast Adjusts the relative brightness between the brightest and darkest portions of the im age For soft gradation decrease the contrast For hard gradation increase the co...

Страница 484: ...is if you want to print by spec ifying the input profile printer profile and matching method in detail This allows you to use ICC profiles for digital cameras and scanners ICC profiles created using the profile creation tool etc ColorSync P 472 Enables color matching by using the ColorSync function of Mac OS Select this if you want to perform soft proofing using ColorSync before printing Note You ...

Страница 485: ...Note Using Mac OS X 10 3 9 10 4 You can select only after ICC Matching Mode or ColorSync has been se lected in Matching Mode Using Mac OS X 10 5 or later You can select only after ICC Matching Mode has been selected in Match ing Mode Soft Proof When you place a checkmark here ColorSync applies to the preview area Note You can select only after ColorSync has been selected in Matching Mode Mac OS X ...

Страница 486: ...o an easy to use mode when performing color adjust ment using application software Saturation Color matching optimized for printing posters etc vividly Colorimetric Color matching optimized for printing image data with accurate colors in input col or space This is the easiest to use mode when you want to adjust the color and print However gradation may be lost for colors of wider range than the co...

Страница 487: ...ors in input col or space This is the easiest to use mode when you want to adjust the color and print However gradation may be lost for colors of wider range than the color re production range of the printer Generally this is also called relative colorimetric Colorimetric No White Point Correction The processing method of color matching is identical to Colorimetric Use this when you want to furthe...

Страница 488: ...s check the Soft Proof check box Preferences Dialog Box This dialog box appears when you select Preferences from the imagePROGRAF Advanced Preview menu You can set the preferences for Preview Units Set the unit for paper length margins and so on Mac OS X Software Preview ColorSync iPF815 5 472 ...

Страница 489: ... Go to Page if the document is only one page Page Input the page number in numerical characters to display in the preview area Note You can change the numbers in the range of the page of the documents Print with No Borders You can use the borderless printing function to print without margins surrounding the image Note With some media borderless printing can be performed only between two edges To u...

Страница 490: ...Click the Borderless Printing check box on 5 Click the Print button Borderless printing begins Print on the Center You can print on the center of the media loaded in the printer Note This is not displayed when a checkmark is placed in Borderless Printing Mac OS X Software Preview Print on the Center iPF815 5 474 ...

Страница 491: ...p Bottom You can save paper on not to feed roll paper for the empty spaces when the print data contains spaces at the top or bottom Note This is not displayed when a checkmark is placed in Borderless Printing 1 On the Paper Settings Panel P 457 select Roll Paper in Paper Source Mac OS X Software Preview iPF815 Not Print Spaces at the Top Bottom 5 475 ...

Страница 492: ...no spaces at top or bottom begins Print Page Rotated 90 Degrees You can save paper by printing in landscape orientation on roll paper 1 On the Paper Settings Panel P 457 select Roll Paper in Paper Source 2 On the Output Settings panel click the Rotate Page check box on Mac OS X Software Preview Print Page Rotated 90 Degrees iPF815 5 476 ...

Страница 493: ...n Printing on rotating 90 degrees begins Display with Fitting to the Width of the Paper In the preview area you can display to the width of the paper 1 Select Fit Roll Paper Width from the tool bar Mac OS X Software Preview iPF815 Display with Fitting to the Width of the Paper 5 477 ...

Страница 494: ...to the width of the paper it is displayed Display with All In the preview area you can display all 1 Select Fit Screen from the tool bar 2 All is displayed Mac OS X Software Preview Display with All iPF815 5 478 ...

Страница 495: ... bar 2 Actual size is displayed Moving a Page You can move a page to display in the preview area 1 Select each button in Go to Page on the tool bar Setting Details Go to the first page Go to the previous page Go to the next page Go to the last page Mac OS X Software Preview iPF815 Display with Actual Size 5 479 ...

Страница 496: ...2 The target page appears Note You can also move a page by clicking the page on the thumbnails Mac OS X Software Preview Moving a Page iPF815 5 480 ...

Страница 497: ...ing Objects 508 Changing the Object Overlapping Order 510 Pasting a Copied or Cut Object 512 The Features of Free Layout The main features of Free Layout are as follows Allows you to lay out at will and print a document created with application software You can not only lay out multiple pages on one page but also lay out and print a multiple file document on one page or lay out and print a documen...

Страница 498: ... menu select the printer setup menu to open the Print dialog box Note Normally select Print from the File menu 3 Click on Free Layout in the Page Setup panel to attach a checkmark 4 Click the Print button in the Print dialog box Note Your printer is depicted in the lower left area of this screen Mac OS X Software Free Layout Starting Free Layout iPF815 5 482 ...

Страница 499: ... Free Layout Main Window The Free Layout main window consists of the menu and tool bars layout area and dialog areas Note You can use the View menu to show or hide the tool Mac OS X Software Free Layout iPF815 Free Layout Main Window 5 483 ...

Страница 500: ...d for operations Tool Bar This allows you to select tool buttons required for major operations Layout Area This allows you to lay out objects and edit the object size and orientation Mac OS X Software Free Layout Free Layout Main Window iPF815 5 484 ...

Страница 501: ...Dialog Area This allows you to set the print conditions and perform a print job Mac OS X Software Free Layout iPF815 Free Layout Main Window 5 485 ...

Страница 502: ...printer you may not receive the desired print results Easy Settings Advanced Settings Two modes are available to provide the optimum print settings for jobs The settings available on each mode are as follows Easy Settings P 488 Advanced Settings P 489 Paper Source You can select the paper source The following settings are available for paper source Setting Details Cut Sheet Select to print on the ...

Страница 503: ... number of print copies in numerical characters Note The maximum value is 999 You can change the numbers by clicking either button or button Restore Defaults Button Click the button to reset to the setting when starting Free Layout Print Button Click the button to begin printing Update Printer Info Button Click the button to acquire printer information Mac OS X Software Free Layout iPF815 Paper Se...

Страница 504: ...documents for which print clarity is key Poster The best setting for posters Prints using vivid and high impact colors CAD Color Line Drawing Prints the fine lines of CAD drawings and other such documents sharp and clear CAD B W Line Drawing Suitable for printing CAD drawings with sharp dark lines Perspective GIS Suitable for attractive printing of 3D CAD drawings perspective drawings and GIS draw...

Страница 505: ...tion 1200dpi 600dpi 300dpi Note The availability of settings is determined by the media type and print priority selections Printing time is longer and more ink is consumed with High than with Draft however print quality is high er Printing time is shorter and less ink is consumed with Draft than with High however print quality is lower Advanced Settings Presents detailed settings for the print pri...

Страница 506: ... so they are easy to read Note The number of settings available for selection depends on the media type Print Quality Selecting print quality strikes a balance between the quality of the printed image and printing speed The level of the print quality and resolution settings are displayed in the following combinations Setting Details Print Quality Highest High Standard Draft Resolution 1200dpi 600d...

Страница 507: ...me Bitmap Prints all colors other than white in black Monochrome BK ink Select to print all lines with black ink No color correction Prints without performing color matching in the printer driver Select this when color matching is performed by the application such as Adobe Photoshop or when you want to print color charts using the profile creation tool Note The availability of settings depends on ...

Страница 508: ...o begin printing Update Printer Info Button Click the button to acquire printer information Color Adjustment You can set the color adjustment Adjusting Color Normally colors should be adjusted in the software application but if you see colors in the printout that do not match colors on the screen you can perform color adjustments 1 Select Color on Color Mode in the Color Settings panel Mac OS X So...

Страница 509: ...photo before scanning and graphics created on the display or when you want to print in different degrees of brightness use this feature Contrast Adjusts the relative brightness between the brightest and darkest portions of the im age For soft gradation decrease the contrast For hard gradation increase the contrast Saturation Adjusts the hues for vivid color or dark color Gray Tone Adjusts gray fro...

Страница 510: ...n the results of the printout are brighter than the original images such as the original photo before scanning and graphics created on the display or when you want to print in different degrees of brightness use this feature Contrast Adjusts the relative brightness between the brightest and darkest portions of the im age For soft gradation decrease the contrast For hard gradation increase the cont...

Страница 511: ... if you want to print by spec ifying the input profile printer profile and matching method in detail This allows you to use ICC profiles for digital cameras and scanners ICC profiles created using the profile creation tool etc ColorSync P 499 Enables color matching by using the ColorSync function of Mac OS Select this if you want to perform soft proofing using ColorSync before printing Note You ne...

Страница 512: ...ote Using Mac OS X 10 3 9 10 4 You can select only after ICC Matching Mode or ColorSync has been se lected in Matching Mode Using Mac OS X 10 5 or later You can select only after ICC Matching Mode has been selected in Match ing Mode Soft Proof When you place a checkmark here ColorSync applies to the layout area Note You can select only after ColorSync has been selected in Matching Mode Mac OS X So...

Страница 513: ...an easy to use mode when performing color adjust ment using application software Saturation Color matching optimized for printing posters etc vividly Colorimetric Color matching optimized for printing image data with accurate colors in input col or space This is the easiest to use mode when you want to adjust the color and print However gradation may be lost for colors of wider range than the colo...

Страница 514: ...s in input col or space This is the easiest to use mode when you want to adjust the color and print However gradation may be lost for colors of wider range than the color re production range of the printer Generally this is also called relative colorimetric Colorimetric No White Point Correction The processing method of color matching is identical to Colorimetric Use this when you want to further ...

Страница 515: ...ColorSync 1 Check that ColorSync is selected in Matching Mode 2 Place a checkmark on Soft Proof to simulate the output product in Layout Area Mac OS X Software Free Layout iPF815 ColorSync 5 499 ...

Страница 516: ...laying out objects Note You can input between 10 0 and 200 0 mm between 0 39 and 7 87 inch You can change the numbers by clicking either button or button Divisions You can change the number of divisions of grid lines so that they serve as a guide to laying out objects Note You can input between 1 and 10 You can change the numbers by clicking either button or button Grid Color Select the grid line ...

Страница 517: ... Auto Arrange Spacing Change the object to object spacing to be applied in the operation of laying out objects automatically Note You can input between 0 0 and 100 0 mm between 0 00 and 3 94 inch You can change the numbers by clicking either button or button Page Setup Dialog Box This dialog box appears when you select Page Setup from the File menu This dialog box provides selections for setting t...

Страница 518: ...cking either button or button Order Set the object layout order The following settings are available for order Setting Details Upper Left to Right The objects are laid out from upper left to right Upper Left to Bottom The objects are laid out from upper left to bottom Note When you have selected Roll Paper Length Auto Settings and Paper Orientation Vertical you can choose only Upper Left to Right ...

Страница 519: ...you can not select Format Rotate When you place a checkmark here you can select Rotate Right or Rotate Left Setting Details Rotate Right Rotates the object 90 degrees clockwise Rotate Left Rotates the object 90 degrees counterclockwise Note When several objects are selected you cannot select Rotate Scaling You can input the value for enlargement or reduction of the obeject in numerical characters ...

Страница 520: ...t running open other files with the application software and repeat the above steps Laying out a Document Created with Multiple Application Programs on One Page You can lay out and print a document created with multiple application programs on one page 1 From the application software s File menu select the printer setup menu to open the Print dialog box Note Normally select Print from the File men...

Страница 521: ...rary objects click them while holding down the command key To select all objects select Select All from the Edit menu Changing the Object Size You can change the object size by means of mouse operation or by specifying a scaling value Note The vertical to horizontal ratio remains unchanged when the object is enlarged or reduced Resizing by means of mouse operation 1 Select an object Mac OS X Softw...

Страница 522: ...object 2 Open the Format Dialog Box P 503 3 Use Scaling to set the magnification for enlargement or reduction You either enter numbers directly Note You can input between 25 and 400 You can change the numbers by clicking either button or button 4 Click the OK button Moving an Object You can move the object position 1 Select an object Mac OS X Software Free Layout Moving an Object iPF815 5 506 ...

Страница 523: ...he object 1 Select an object 2 Select Rotate Left or Rotate Right from the toolbar Alternatively you may click on the Rotate check box in the Format Dialog Box P 503 then select Rotate Right or Rotate Left and click the OK button Note When several objects are selected you cannot select Rotate Mac OS X Software Free Layout iPF815 Rotating an Object 5 507 ...

Страница 524: ...ct menu Note The object layout order varies depending on the Order setting on the Page Setup Dialog Box P 501 Aligning Objects You can align objects systematically 1 Select multiple objects 2 Select the align menu from the Object menu Align Top Lays out the objects justifying them to the top Mac OS X Software Free Layout Laying out Objects Automatically iPF815 5 508 ...

Страница 525: ... objects justifying them to the vertical center Align Bottom Lays out the objects justifying them to the bottom Align Left Lays out the objects justifying them to the left Mac OS X Software Free Layout iPF815 Aligning Objects 5 509 ...

Страница 526: ...ght Lays out the objects justifying them to the right Changing the Object Overlapping Order You can change the object overlapping order 1 Select an object 2 Select the overlapping order menu from the Object menu Mac OS X Software Free Layout Changing the Object Overlapping Order iPF815 5 510 ...

Страница 527: ... object to the frontmost position Send to Back Moves the object to the backmost position Bring Forward Moves the object one position to the front Mac OS X Software Free Layout iPF815 Changing the Object Overlapping Order 5 511 ...

Страница 528: ...Cut from the toolbar Alternatively you may select Copy or Cut from the Edit menu 2 Click Paste from the toolbar Alternatively you may select Paste from the Edit menu Note The copied or cut object is laid out at the end of the page Mac OS X Software Free Layout Pasting a Copied or Cut Object iPF815 5 512 ...

Страница 529: ...or imageRUNNER Enlargement Copy are as follows Allows the document scanned with the Color imageRUNNER to be automatically enlarged and printed You can perform basic printer settings such as printer selection media type and output profile selection and matching methods in addition to borderless printing and enlargement reduction process without growing through the printer driver Note The media type...

Страница 530: ...o start the Color imageRUNNER Enlargement Copy 1 Open the Utility panel of the Print dialog box Note Your printer is depicted in the lower left area of this screen Mac OS X Software Color imageRUNNER Enlargement Copy Starting Color imageRUNNER Enlargement Copy iPF815 5 514 ...

Страница 531: ... app icon in Applications Canon Utilities iR Enlargement Copy Color imageRUNNER Enlargement Copy Dialog Box The explanation below is on the Color imageRUNNER Enlargement Copy dialog box Note For the step to open the Color imageRUNNER Enlargement Copy dialog box see Starting Color image RUNNER Enlargement Copy P 514 Mac OS X Software Color imageRUNNER Enlargement Copy iPF815 Color imageRUNNER Enlar...

Страница 532: ...om the Hot Folder list select a hot folder and click this button to open the Add Edit Hot Folder dialog box that allows you to edit the hot folder Monitor Hot Folder Constantly If you click on the check box the icon of Color imageRUNNER Enlargement Copy utility will appear on the Dock when starting OS X thereafter Hot Folder Hot folder refers to a folder used for Color imageRUNNER Enlargement Copy...

Страница 533: ...rgement Copy dialog box see Starting Color imageRUNNER Enlargement Copy P 514 2 Click the Add button in Enlarged Copy Settings to open the Destination Selection dialog box 3 From the printer list in Destination select the printer of destination Mac OS X Software Color imageRUNNER Enlargement Copy iPF815 Creating a New Hot Folder 5 517 ...

Страница 534: ...he name to display in the Hot Folder list 6 In Hot Folder enter the Hot Folder name 7 Click the OK button The created Hot Folder is listed in the Color imageRUNNER Enlargement Copy dialog box Mac OS X Software Color imageRUNNER Enlargement Copy Creating a New Hot Folder iPF815 5 518 ...

Страница 535: ...nd folders using FTP and Share files and folders using SMB to make shared settings Note You can create up to 10 hot folders Editing a Hot Folder Setting Print Conditions 1 Open the Color imageRUNNER Enlargement Copy dialog box 2 Select the Hot Folder from the Hot Folder list 3 From Enlarged Copy Settings click Edit button to open the Add Edit Hot Folder dialog box Mac OS X Software Color imageRUNN...

Страница 536: ...4 Make the necessary settings in the Paper Settings Panel P 524 Mac OS X Software Color imageRUNNER Enlargement Copy Editing a Hot Folder Setting Print Conditions iPF815 5 520 ...

Страница 537: ...5 Make the necessary settings in the Output Settings Panel P 529 Mac OS X Software Color imageRUNNER Enlargement Copy iPF815 Editing a Hot Folder Setting Print Conditions 5 521 ...

Страница 538: ...the check box labeled File Sharing and click the Options button 10 Select the check box labeled Share files and folders using FTP and Share files and folders using SMB to make shared settings Note If you ve made shared settings when you created a new Hot Folder you do not need to execute steps 8 to 10 Mac OS X Software Color imageRUNNER Enlargement Copy Editing a Hot Folder Setting Print Condition...

Страница 539: ...essag e and then click the OK button Note Select Delete files in the folder to delete only files in the hot folder Setting the Print Parameters You can set the print conditions in the setting panels within the Add Edit Hot Folder dialog box The settings available on each panel are as follows Paper Settings Panel P 524 Output Settings Panel P 529 Color Settings Panel P 531 Mac OS X Software Color i...

Страница 540: ...e Note Always select media type that is actually set in the printer When the media you chose is different from the media set in the printer you may not receive the desired print results Paper Source You can select the paper source The following settings are available for paper source Setting Details Cut Sheet Select to print on the cut sheet Roll Paper Select to print on roll paper Mac OS X Softwa...

Страница 541: ...e printer operation panel takes priority None Each page is not cut after it is printed and printing continues without interruption Print Cut Guideline A print cut guideline is printed after each page and printing continues without inter ruption Note Available only if rolls are selected in Paper Source Copies You can input the number of print copies in numerical characters Note The maximum value is...

Страница 542: ...or which print clarity is key Poster The best setting for posters Prints using vivid and high impact colors CAD Color Line Drawing Prints the fine lines of CAD drawings and other such documents sharp and clear CAD B W Line Drawing Suitable for printing CAD drawings with sharp dark lines Perspective GIS Suitable for attractive printing of 3D CAD drawings perspective drawings and GIS drawings includ...

Страница 543: ...i 600dpi 300dpi Note The availability of settings is determined by the media type and print priority selections Printing time is longer and more ink is consumed with High than with Draft however print quality is high er Printing time is shorter and less ink is consumed with Draft than with High however print quality is lower Advanced Settings Presents detailed settings for the print priority the p...

Страница 544: ...e easy to read Note The number of settings available for selection depends on the media type Print Quality Selecting print quality strikes a balance between the quality of the printed image and printing speed The level of the print quality and resolution settings are displayed in the following combinations Setting Details Print Quality Highest High Standard Draft Resolution 1200dpi 600dpi 300dpi N...

Страница 545: ...n the Paper Settings panel Displayed only if rolls are selected in Paper Source Scaling Enlarges reduces the whole page by the scaling rate as specified Input the scaling value in numerical characters You can specify a range between 5 and 600 You can change the numbers by clicking either button or button Although Scaling can be set to make the image larger than the media size the part that does no...

Страница 546: ... Paper Source Rotate Page Select the method for rotating page The following settings are available for rotating page Setting Details Rotate Right 90 Degrees Rotates the portrait page right 90 degrees and print in landscape orientation When the rotated page can fit in the width of roll paper the page is rotated automatically and when it can not fit in the width of roll paper the page is not rotated...

Страница 547: ...ing jobs in the temporary storage space select Save data before printing Color Settings Panel Color Mode You can select a color mode to suit the print job Setting Details Color Enables color printing Monochrome Disables color printing and converts image from continuous color to grayscaled monochrome Color CAD Prints lines in the best color possible so they are easy to see Monochrome Bitmap Prints ...

Страница 548: ...ng ICC profiles Select this if you want to print by spec ifying the input profile printer profile and matching method in detail This allows you to use ICC profiles for digital cameras and scanners ICC profiles created using the profile creation tool etc ColorSync P 535 Enables color matching by using the ColorSync function of Mac OS Select this if you want to perform soft proofing using ColorSync ...

Страница 549: ...se mode when performing color adjust ment using application software Saturation Color matching optimized for printing posters etc vividly Colorimetric Color matching optimized for printing image data with accurate colors in input col or space This is the easiest to use mode when you want to adjust the color and print However gradation may be lost for colors of wider range than the color re product...

Страница 550: ...when you want to adjust the color and print However gradation may be lost for colors of wider range than the color re production range of the printer Generally this is also called relative colorimetric Colorimetric No White Point Correction The processing method of color matching is identical to Colorimetric Use this when you want to further reproduce the target paper material color of the image d...

Страница 551: ...nd printed automatically after enlargement according to printing conditions you specify for that folder This processing sequence is called the Color imageRUNNER Enlargement Copy function To use Color imageRUNNER Enlargement Copy first complete these settings in the following order 1 Register a hot folder on your computer Register a hot folder on your computer for storing scanned originals from the...

Страница 552: ...N NER Enlargement Copy app icon after navigating to Canon Utilities iR Enlargement Copy in the Applica tions folder or click Set in the Utility pane Note Your printer is depicted in the lower left area of this screen 2 In Enlarged Copy Settings click Add or Edit and either create or modify the hot folder For instructions on registering and modifying hot folders refer to the help file for Color ima...

Страница 553: ...ument feeder of the Color imageRUNNER 2 Press Send to display the screen for transmission 3 Press Favorites and then press the Favorites button assigned to the hot folder 4 Press Start on the control panel If you scan originals on the platen glass after scanning all originals press Done on the touch panel display Scanned originals are sent to the hot folder and automatically enlarged and printed f...

Страница 554: ...s not shown in imagePROGRAF Printmonitor select the printer again as follows 1 Make sure the printer is on and connected to the network or to a local port 2 In the Printer menu select the name of the desired printer After the printer is detected the printer status is shown 3 If information about the printer is not shown in step 2 choose Search Printer in the Printer menu 4 Select the zone to searc...

Страница 555: ...rinter control panel and in the printer driver through the use of relevant media information files amf and med files You can rearrange lists of the types of paper on the printer control panel and in printer driver dialog boxes and rename them in addition to other functions Important The Media Configuration Tool is normally installed when you install the printer driver from the User Soft ware CD RO...

Страница 556: ...edia information is registered at this time 1 Double click the MCT Installer iPFxxxx for X icon to start the Media Configuration Tool installer Note The iPFxxxx in the icon will be the printer name in use 2 Input the administrator name and password and click the OK button 3 The next screen presents selections for the country or area where the printer is used Select a country or territory then clic...

Страница 557: ...r you have read Canon Software License Agreement click the Continue button 5 Click the Agree button 6 Select Easy Install then click the Install button Mac OS X Software Media Configuration Tool iPF815 Procedures for Installing 5 541 ...

Страница 558: ...ion Tool folder is saved in the following folder Applications Canon Utilities iPFxxxx Media Configuration Tool The iPFxxxx in the folder above will be the printer name in use Procedures for Uninstalling 1 Double click the MCT Installer iPFxxxx for X icon to start the Media Configuration Tool installer Note The iPFxxxx in the icon will be the printer name in use Mac OS X Software Media Configuratio...

Страница 559: ...d click the OK button 3 The next screen presents selections for the country or area where the printer is used Select a country or territory then click the OK button Mac OS X Software Media Configuration Tool iPF815 Procedures for Uninstalling 5 543 ...

Страница 560: ... displayed After you have read Canon Software License Agreement click the Continue button 5 Click the Agree button 6 Select Uninstall Mac OS X Software Media Configuration Tool Procedures for Uninstalling iPF815 5 544 ...

Страница 561: ...ontinue button when another application is running 9 When the following message is displayed click the Quit button Media Configuration Tool has been uninstalled Mac OS X Software Media Configuration Tool iPF815 Procedures for Uninstalling 5 545 ...

Страница 562: ...Txxxx app Media Configuration Tool main window is displayed Note If a compatible printer driver is not installed the Media Configuration Tool will not start If you attempt to start the Media Configuration Tool when a printer driver is not installed the warning message below is dis played Mac OS X Software Media Configuration Tool Starting the Media Configuration Tool iPF815 5 546 ...

Страница 563: ... media types For more information about Edit Media Type Information see Editing Media Type Information P 548 Support Information Button Click this button to access the Canon support webpage where you can find the latest printer information check for software updates and browse other information User Manual Button Click this button to display the printer user manual This function requires that the ...

Страница 564: ... the following tasks Adding Media Types P 549 Changing Media Names P 551 Deleting Media Types You Have Added P 553 Switching Media Types Display Show Hide P 555 Changing the Display Order of Media Types P 557 Note It may not be possible to deleting showing hiding and changing the display order under some conditions Mac OS X Software Media Configuration Tool Editing Media Type Information iPF815 5 ...

Страница 565: ...Types 1 Open the Edit Media Types dialog box and then click the Add button 2 The Add Media Type dialog box displays Click the Browse button Mac OS X Software Media Configuration Tool iPF815 Adding Media Types 5 549 ...

Страница 566: ...nformation files in the folder you selected in the Open dialog box are displayed under Media Information File in the Add Media Type dialog box Select the check boxes of paper to add and click the OK button 5 Click OK when the confirmation message is displayed Mac OS X Software Media Configuration Tool Adding Media Types iPF815 5 550 ...

Страница 567: ...date paper information using the Update Media Types wizard see Updating Media Types P 559 Important Be sure to click the Update button If you do not your changes will not be applied to the printer and printer driver Changing Media Names 1 Open the Edit Media Types dialog box Mac OS X Software Media Configuration Tool iPF815 Changing Media Names 5 551 ...

Страница 568: ...on 3 The Rename Media dialog box is displayed Edit the names in Name in Printer Driver and Name on Control Panel and click the OK button Note To restore the original names click the Restore button Mac OS X Software Media Configuration Tool Changing Media Names iPF815 5 552 ...

Страница 569: ...rmation using the Update Media Types wizard see Updating Media Types P 559 Important Be sure to click the Update button If you do not your changes will not be applied to the printer and printer driver Deleting Media Types You Have Added 1 Open the Edit Media Types dialog box Mac OS X Software Media Configuration Tool iPF815 Deleting Media Types You Have Added 5 553 ...

Страница 570: ... delete Click the Delete button Note Only paper for which Status in the Media Type is Add can be deleted 3 In the Edit Media Types dialog box click the Update button Mac OS X Software Media Configuration Tool Deleting Media Types You Have Added iPF815 5 554 ...

Страница 571: ...s wizard see Updating Media Types P 559 Important Be sure to click the Update button If you do not your changes will not be applied to the printer and printer driver Switching Media Types Display Show Hide 1 Open the Edit Media Types dialog box Mac OS X Software Media Configuration Tool iPF815 Switching Media Types Display Show Hide 5 555 ...

Страница 572: ...e button The selected paper is alternately shown or hidden Note The names of media switched for non display appear grayed out in the Media Type list 3 In the Edit Media Types dialog box click the Update button Mac OS X Software Media Configuration Tool Switching Media Types Display Show Hide iPF815 5 556 ...

Страница 573: ...nt Be sure to click the Update button If you do not your changes will not be applied to the printer and printer driver Switching between showing and hiding the type of paper will not be applied to the printer Changing the Display Order of Media Types 1 Open the Edit Media Types dialog box Mac OS X Software Media Configuration Tool iPF815 Changing the Display Order of Media Types 5 557 ...

Страница 574: ...ox click the Update button The Update Media Types wizard is started at this point For details on the procedure to update paper information using the Update Media Types wizard see Updating Media Types P 559 Important Be sure to click the Update button If you do not your changes will not be applied to the printer and printer driver Mac OS X Software Media Configuration Tool Changing the Display Orde...

Страница 575: ...the assumption that Media Configuration Tool is updated or you have a media information file for print media that is to be updated 1 Confirm the printer where media type information is to be updated to be displayed in Printer in the Update Media Types Select Printer dialog box and then click the Next button 2 Communication with the printer starts and the following dialog box is displayed Important...

Страница 576: ...ation received from the printer To update click the Execute button Important When setting a data to the printer that differs from the data to be updated the selected media informa tion file is updated When you would like to remain the data that is set to the printer click the Cancel button 4 Communication with the printer starts and the following dialog box is displayed Mac OS X Software Media Con...

Страница 577: ...am cannot communicate with the printer the following warning message is displayed 5 After the media information file is updated successfully the screen switches to the Update Media Types Finish dialog box Click Finish to close the Update Media Types wizard Mac OS X Software Media Configuration Tool iPF815 Updating Media Types 5 561 ...

Страница 578: ...Print Jobs Basic Print Job Operations 563 Advanced Print Job Operations 589 Print Jobs iPF815 6 562 ...

Страница 579: ...ater without the need to use a computer again Simplify reprinting if any errors occur If errors occur in the middle of printing as when paper runs out you can resume printing after clearing the error with out resending the print job from a computer Streamline printing work Without using a computer you can select print jobs and print in the desired quantity You can also select multiple print jobs t...

Страница 580: ...being saved received prepared for processing processed or printed or jobs that have been interrup ted or are being deleted Common Box Jobs sent from a computer for which you have selected Print in Output Method in Windows or Send job to in Mac OS X are saved in the common box There is one Common Box numbered 00 A password cannot be set for the Common Box Up to 100 print jobs can be saved here but ...

Страница 581: ...thod button on the Output Settings sheet Using imagePROGRAF Preview Windows Printer driver settings will be used for the format of saved print jobs See Using the printer driver Windows P 566 Using the printer driver Mac OS P 567 Using Free Layout Mac OS Printer driver settings will be used for the format of saved print jobs See Using the printer driver Mac OS P 567 Using Color imageRUNNER Enlargem...

Страница 582: ...Using the printer driver Windows 1 Access the Page Setup sheet 2 Click Output Method to display the Output Method dialog box Print Jobs Basic Print Job Operations Saving Print Jobs iPF815 6 566 ...

Страница 583: ...Name to display personal box names in the Mail box list as acquired from the printer Save data before printing This option is available in combination with Print Print auto delete and Save in mail box Print jobs are saved on the hard disk and then printed 4 In Name of data to be saved specify how to name saved print jobs To use the file name choose Use file name Otherwise choose Enter name and ent...

Страница 584: ... Click OK to close the Destination dialog box Note Save data before printing This option is available in combination with Print Print auto delete and Save in mail box Print jobs are saved on the hard disk and then printed Managing Queued Jobs Deleting or Preempting Other Jobs Print jobs can be deleted or their printing order changed to print them immediately depending on their status You can deter...

Страница 585: ...mptive printing You can manage queued print jobs as follows Using the Control Panel P 569 Using RemoteUI P 570 Using imagePROGRAF Status Monitor Windows P 570 Using imagePROGRAF Printmonitor Macintosh P 571 Using the Control Panel 1 Press the Menu button to display Menu Durng Prtng Print Jobs Basic Print Job Operations iPF815 Managing Queued Jobs Deleting or Preempting Other Jobs 6 569 ...

Страница 586: ... select Print Job and then press the button 3 Press or to select the job to print first and then press the button 4 Press or to select Preempt Jobs and then press the OK button Using RemoteUI On the Print Job page select the job to manage and how to manage it For details refer to the RemoteUI help Using imagePROGRAF Status Monitor Windows On the Job sheet select the job and the desired function Th...

Страница 587: ...e select the job and the desired function The following functions are available Preempting other jobs Pausing printing Resuming printing Canceling print jobs For details refer to the imagePROGRAF Printmonitor help file Print Jobs Basic Print Job Operations iPF815 Managing Queued Jobs Deleting or Preempting Other Jobs 6 571 ...

Страница 588: ...d then press the button 2 Press or to select Stored Job and then press the button 3 Press or to select the box number in the range 00 29 and then press the button 4 Enter a password if one has been set and then press the OK button 5 Press or to select Job List and then press the button 6 Press or to select the saved job to print and then press the button 7 Press or to select Print and then press t...

Страница 589: ...eUI 1 On the Stored Job page choose the mail box Note Enter a password if one has been set 2 Select the print job in the list and click Print Print Jobs Basic Print Job Operations iPF815 Printing Saved Jobs 6 573 ...

Страница 590: ...tity to print in Copies and click OK For details refer to the RemoteUI help Using imagePROGRAF Status Monitor 1 On the Hard Disk sheet select a mail box in the list and click Open Print Jobs Basic Print Job Operations Printing Saved Jobs iPF815 6 574 ...

Страница 591: ...been set 2 In the Documents dialog box select the print job in the list and click Print 3 In the Print dialog box enter the quantity to print in Copies and click OK Print Jobs Basic Print Job Operations iPF815 Printing Saved Jobs 6 575 ...

Страница 592: ...s the time it took to print one copy during the previous print job multiplied by the number of copies For details refer to the imagePROGRAF Status Monitor help file Using imagePROGRAF Printmonitor 1 In the Hard Disk pane click next to Inbox No Name to list saved jobs Note Enter a password if one has been set Print Jobs Basic Print Job Operations Printing Saved Jobs iPF815 6 576 ...

Страница 593: ...r to the imagePROGRAF Printmonitor help file Deleting Saved Jobs You can delete saved jobs in the box shared among all users and in each personal box Delete stored print jobs as follows Using the Control Panel Using RemoteUI Using imagePROGRAF Status Monitor Windows Using imagePROGRAF Printmonitor Mac OS Print Jobs Basic Print Job Operations iPF815 Deleting Saved Jobs 6 577 ...

Страница 594: ... and then press the button 4 Enter a password if one has been set and then press the OK button 5 Press or to select Job List and then press the button 6 Press or to select the saved job to delete and then press the button 7 Press or to select Delete and then press the button 8 Confirm the print job for deletion and press the OK button Using RemoteUI 1 On the Stored Job page choose the mail box Pri...

Страница 595: ...ote Enter a password if one has been set 2 Select the saved job in the list and click Delete For details refer to the RemoteUI help Print Jobs Basic Print Job Operations iPF815 Deleting Saved Jobs 6 579 ...

Страница 596: ...magePROGRAF Status Monitor 1 On the Hard Disk sheet select a mail box in the list and click Open Note Enter a password if one has been set Print Jobs Basic Print Job Operations Deleting Saved Jobs iPF815 6 580 ...

Страница 597: ... list and click Delete For details refer to the imagePROGRAF Status Monitor help file Using imagePROGRAF Printmonitor 1 On the Hard Disk pane click next to Inbox No Name to list saved jobs Print Jobs Basic Print Job Operations iPF815 Deleting Saved Jobs 6 581 ...

Страница 598: ...here are more than 100 saved jobs in the common box and job queue combined If the temporary storage area becomes full during reception of print jobs for which you have selected Print or Print auto delete in Output Method in Windows or Send job to in Mac OS X If the temporary and permanent storage areas no longer have enough space during reception of print jobs for which you have selected Save in m...

Страница 599: ...ng imagePROGRAF Status Monitor Windows Using imagePROGRAF Printmonitor Mac OS Note Jobs saved in personal boxes cannot be moved to the common box Using RemoteUI 1 On the Stored Job page choose the mail box Note Enter a password if one has been set Print Jobs Basic Print Job Operations iPF815 Moving Saved Jobs 6 583 ...

Страница 600: ...ove 3 On the Move Document page select the name or number of the destination personal box in the Destination mail box list and click OK For details refer to the RemoteUI help file Print Jobs Basic Print Job Operations Moving Saved Jobs iPF815 6 584 ...

Страница 601: ...ePROGRAF Status Monitor Windows 1 On the Hard Disk sheet select a mail box in the list and click Open Note Enter a password if one has been set Print Jobs Basic Print Job Operations iPF815 Moving Saved Jobs 6 585 ...

Страница 602: ...print job in the list and click Move 3 In the Move dialog box select the destination personal box and click OK For details refer to the imagePROGRAF Status Monitor help file Print Jobs Basic Print Job Operations Moving Saved Jobs iPF815 6 586 ...

Страница 603: ...itor Mac OS 1 In the Hard Disk pane click next to Inbox No Name to list saved jobs Note Enter a password if one has been set The password is a four digit number Print Jobs Basic Print Job Operations iPF815 Moving Saved Jobs 6 587 ...

Страница 604: ...list and click Move 3 In the Move Document dialog box select the destination personal box and click OK For details refer to the imagePROGRAF Printmonitor help file Print Jobs Basic Print Job Operations Moving Saved Jobs iPF815 6 588 ...

Страница 605: ...river provided with the printer complete the Out put Method and Save and Print settings in the printer menu Important Contact the software or system developer for information about support for this printer function Specifying Output Method 1 Press the Menu button to display MAIN MENU 2 Press or to select System Setup and then press the button 3 Press or to select Output Method and then press the b...

Страница 606: ... select On print jobs are saved on the hard disk and then printed Printing Without Saving Jobs in the Common Box If you have selected Print in Output Method in Windows or Send job to in Mac OS X in the printer driver as the format for print jobs sent from the computer the jobs are saved in the common box See Saved Print Jobs P 563 You can select Save Shared Box Off in the printer menu so that prin...

Страница 607: ...er security you can set passwords for each personal box After you set a password it will be required to modify the personal box settings as well as to display print delete move and modify jobs saved in the personal box Note A password cannot be set for the common box Enter a four digit number as the password in the range 0001 9999 Even if you have set passwords they are not required to access pers...

Страница 608: ...ssword Select the check box Password Enter the password This field is limited to four digits in the range 0001 9999 Confirmation Number Re enter the password to confirm it For details refer to the RemoteUI help Print Jobs Advanced Print Job Operations Setting Passwords for Personal Boxes iPF815 6 592 ...

Страница 609: ...ws 1 On the Hard Disk sheet select a listed personal box for a password and click Open Note Enter a password if one has been set for the personal box Print Jobs Advanced Print Job Operations iPF815 Setting Passwords for Personal Boxes 6 593 ...

Страница 610: ...d Select the check box Password Enter the password This field is limited to four digits in the range 0001 9999 Re enter to confirm Re enter the password to confirm it For details refer to the imagePROGRAF Status Monitor help file Print Jobs Advanced Print Job Operations Setting Passwords for Personal Boxes iPF815 6 594 ...

Страница 611: ... dialog box specify the password and click OK Set password Select the check box Password Enter the password This field is limited to four digits in the range 0001 9999 Verify Re enter the password to confirm it For details refer to the imagePROGRAF Printmonitor help file Print Jobs Advanced Print Job Operations iPF815 Setting Passwords for Personal Boxes 6 595 ...

Страница 612: ...sonal box as follows Using RemoteUI Using imagePROGRAF Status Monitor Windows Using imagePROGRAF Printmonitor Mac OS Using RemoteUI 1 On the Stored Job page select the personal box to identify Note Enter a password if one has been set for the personal box Print Jobs Advanced Print Job Operations Naming Personal Boxes iPF815 6 596 ...

Страница 613: ...3 In the Set Register User s Inbox dialog box enter the personal box name in Inbox Name and click OK For details refer to the RemoteUI help Print Jobs Advanced Print Job Operations iPF815 Naming Personal Boxes 6 597 ...

Страница 614: ...tor Windows 1 On the Hard Disk sheet select a listed personal box to identify and click Open Note Enter a password if one has been set for the personal box Print Jobs Advanced Print Job Operations Naming Personal Boxes iPF815 6 598 ...

Страница 615: ...box click Settings 3 In the Settings dialog box enter the personal box name and click OK For details refer to the imagePROGRAF Status Monitor help file Print Jobs Advanced Print Job Operations iPF815 Naming Personal Boxes 6 599 ...

Страница 616: ... Hard Disk pane click next to Inbox No Name to list saved jobs Select a saved job and click Set Note Enter a password if one has been set The password is a four digit number Print Jobs Advanced Print Job Operations Naming Personal Boxes iPF815 6 600 ...

Страница 617: ...ist of stored print jobs as follows Using the Control Panel Using RemoteUI Using imagePROGRAF Status Monitor Windows Using imagePROGRAF Printmonitor Mac OS Using the Control Panel 1 Press the Menu button to display MAIN MENU 2 Display a list of saved print jobs 1 Press or to select Job Management and then press the button 2 Press or to select Stored Job and then press the button Print Jobs Advance...

Страница 618: ...5 Press the or button to select Job List Using RemoteUI Choose a mail box on the Stored Job page to display a list of jobs saved in that mail box Note Enter a password if one has been set Jobs saved in the mail box are listed For details refer to the RemoteUI help Print Jobs Advanced Print Job Operations Displaying a List of Saved Jobs iPF815 6 602 ...

Страница 619: ... Status Monitor Windows On the Hard Disk sheet select a mail box in the list and click Open Note Enter a password if one has been set Print Jobs Advanced Print Job Operations iPF815 Displaying a List of Saved Jobs 6 603 ...

Страница 620: ...log box For details refer to the imagePROGRAF Status Monitor help file Using imagePROGRAF Printmonitor Mac OS On the Hard Disk pane click next to Inbox No Name to list saved jobs Print Jobs Advanced Print Job Operations Displaying a List of Saved Jobs iPF815 6 604 ...

Страница 621: ...s or to select Job Management and then press the button 2 Press or to select Stored Job and then press the button 3 Press or to select the box number in the range 00 29 and then press the button 4 Enter a password if one has been set and then press the OK button 5 Press or to select Print Job List and then press the button 6 Press or to select Yes and then press the OK button Displaying Details of...

Страница 622: ...Using RemoteUI 1 On the Stored Job page choose the mail box Note Enter a password if one has been set 2 Select the saved job in the list and click Details Print Jobs Advanced Print Job Operations Displaying Details of Saved Jobs iPF815 6 606 ...

Страница 623: ...splayed For details refer to the RemoteUI help Using imagePROGRAF Status Monitor Windows 1 On the Hard Disk sheet select a mail box in the list and click Open Print Jobs Advanced Print Job Operations iPF815 Displaying Details of Saved Jobs 6 607 ...

Страница 624: ...ents dialog box select the saved job in the list and click Properties The Properties dialog box is displayed For details refer to the imagePROGRAF Status Monitor help file Print Jobs Advanced Print Job Operations Displaying Details of Saved Jobs iPF815 6 608 ...

Страница 625: ...as been set The password is a four digit number For details refer to the imagePROGRAF Printmonitor help file Renaming Saved Jobs You can rename stored print jobs as follows Using RemoteUI Using imagePROGRAF Status Monitor Windows Using imagePROGRAF Printmonitor Mac OS Print Jobs Advanced Print Job Operations iPF815 Renaming Saved Jobs 6 609 ...

Страница 626: ...I 1 On the Stored Job page choose the mail box Note Enter a password if one has been set 2 Select the saved job in the list and click Details Print Jobs Advanced Print Job Operations Renaming Saved Jobs iPF815 6 610 ...

Страница 627: ...ument page click Change Document 4 On the Rename Saved Document page enter the new job name in Document Name and click OK For details refer to the RemoteUI help Print Jobs Advanced Print Job Operations iPF815 Renaming Saved Jobs 6 611 ...

Страница 628: ...OGRAF Status Monitor Windows 1 On the Hard Disk sheet select a mail box in the list and click Open Note Enter a password if one has been set Print Jobs Advanced Print Job Operations Renaming Saved Jobs iPF815 6 612 ...

Страница 629: ...ved job in the list and click Properties 3 In the Properties dialog box enter the new job name and click OK For details refer to the imagePROGRAF Status Monitor help file Print Jobs Advanced Print Job Operations iPF815 Renaming Saved Jobs 6 613 ...

Страница 630: ...r Mac OS 1 On the Hard Disk pane click next to Inbox No Name to list saved jobs Note Enter a password if one has been set The password is a four digit number Print Jobs Advanced Print Job Operations Renaming Saved Jobs iPF815 6 614 ...

Страница 631: ... name and click OK Documents cannot be renamed unless a password has been set In this case specify a password After renaming you can cancel the password as needed For details refer to the imagePROGRAF Printmonitor help file Print Jobs Advanced Print Job Operations iPF815 Renaming Saved Jobs 6 615 ...

Страница 632: ...Handling Paper Paper 617 Handling rolls 623 Handling sheets 650 Output Stacker 658 Handling Paper iPF815 7 616 ...

Страница 633: ...Tool from the imagePROGRAF website you can make sure the paper information indicated in the Paper Reference Guide on the printer Control Panel and in the printer driver is up to date Accessing the Paper Reference Guide from imagePROGRAF Support Information The Paper Reference Guide can also be accessed from imagePROGRAF Support Information Follow these instructions as appropriate for your operatin...

Страница 634: ...ed Mac OS X 1 Click the iPF Support icon in the Dock The imagePROGRAF Support Information window is displayed 2 Click the Paper Reference Guide button The Paper Reference Guide is displayed Handling Paper Paper Types of Paper iPF815 7 618 ...

Страница 635: ...ant When you use the Media Configuration Tool to update information about paper the types of paper on the printer Control Panel in the printer driver and in related software are updated Windows 1 Double click the iPFxxxx Support desktop icon iPFxxxx indicates the printer model The imagePROGRAF Support Information window is displayed 2 Click Visit the imagePROGRAF webpage The default browser on you...

Страница 636: ...m Yes 841 0 mm 33 11 in ISO A0 A1 Roll 841 0mm Yes 762 0 mm 30 00 in 30 in Roll 762 0mm No 728 0 mm 28 66 in JIS B1 B2 Roll 728 0mm No 609 6 mm 24 00 in 24 in Roll 609 6mm Yes 594 0 mm 23 39 in ISO A1 A2 Roll 594 0mm Yes 515 0 mm 20 28 in JIS B2 B3 Roll 515 0mm Yes 431 8 mm 17 00 in 17 in Roll 431 8mm Yes 420 0 mm 16 54 in ISO A2 A3 Roll 420 0mm No 406 4 mm 16 00 in 16 in Roll 406 4mm No 355 6 mm ...

Страница 637: ...in JIS B4 257 0 364 0 mm 10 12 14 33 in 34 x44 ANSI E 863 6 1117 6 mm 34 00 44 00 in 28 x40 ANSI F 711 2 1016 0 mm 28 00 40 00 in 22 x34 ANSI D 558 8 863 6 mm 22 00 34 00 in 17 x22 ANSI C 431 8 558 8 mm 17 00 22 00 in 11 x17 Ledger 279 4 431 8 mm 11 00 17 00 in 13 x19 Super B 330 2 482 6 mm 13 00 19 00 in Letter 8 5 x11 215 9 279 4 mm 8 50 11 00 in Legal 8 5 x14 215 9 355 6 mm 8 50 14 00 in 36 x48...

Страница 638: ...7 6 1574 8 mm 44 00 62 00 in 13 x22 329 0 558 0 mm 12 95 21 97 in Poster 300x900mm 300 0 900 0 mm 11 81 35 43 in Custom Paper Size 203 2 203 2 mm 8 00 8 00 in 1118 0 1600 0 mm 44 02 62 99 in Note In the printer driver paper sizes are categorized into groups based on the Display Series such as ISO A or JIS In Windows some size systems are not available by default Follow these steps to make them ava...

Страница 639: ...er Automatically 647 Reducing Dust from Cutting Rolls 648 Roll Holder Set 649 Attaching the Roll Holder to Rolls When printing on rolls attach the Roll Holder to the roll Rolls have a two or three inch paper core Use the correct attachment for the paper core The printer comes equipped with the 2 Inch Paper Core Attachment installed Using the 2 Inch Paper Core Attachment Using the 3 Inch Paper Core...

Страница 640: ...eeding problems Caution Set the roll on a table or other flat surface so that it does not roll or fall Rolls are heavy and dropping a roll may cause injury Note For details on supported sizes and types of rolls see Paper Sizes or the Paper Reference Guide See Paper Sizes P 620 See Types of Paper P 617 After pressing the Load Eject button you can refer to instructions on the Display Screen as you l...

Страница 641: ... Stopper at the position indica ted b remove it from the Roll Holder 2 When using a 3 inch paper core align the tips a of 3 Inch Paper Core Attachment 1 with the holes b of the Roll Holder and insert it firmly Handling Paper Handling rolls iPF815 Attaching the Roll Holder to Rolls 7 625 ...

Страница 642: ...nt When loading a roll be careful to avoid hitting the printer hard with the roll This may damage the Roll Holder 4 Insert the attachments for the roll paper core on the Holder Stopper Align the tips a of the attachment with the holes b of the Holder Stopper and insert it firmly 3 Inch Paper Core Attachment 2 Handling Paper Handling rolls Attaching the Roll Holder to Rolls iPF815 7 626 ...

Страница 643: ...oll Holder as shown Holding it at the position shown b push it firmly in until the flange a of the Holder Stopper touches the roll Lock the Holder Stopper lever c by pushing it down toward the shaft side Handling Paper Handling rolls iPF815 Attaching the Roll Holder to Rolls 7 627 ...

Страница 644: ...inside the Top Cover See Cleaning Inside the Top Cover P 837 After pressing the Load Eject button you can refer to instructions on the Display Screen as you load the paper See Checking Instructions During Printer Operations P 743 1 Confirm that a roll is selected as the paper source See Selecting the Paper Source P 631 2 Open the Top Cover and lift the Ejection Guide Handling Paper Handling rolls ...

Страница 645: ...nto the grooves b on both ends of the Roll Holder Slot Caution Be careful not to pinch your fingers between the Roll Holder shaft a and the guide grooves b when loading rolls Note For instructions on attaching the Roll Holder to rolls see Attaching the Roll Holder to Rolls P 623 Handling Paper Handling rolls iPF815 Loading Rolls in the Printer 7 629 ...

Страница 646: ...roll paper as you insert it in the slot This may affect the printing quality We recommend wearing clean cloth gloves when handling rolls to protect the print ing surface If the paper is wrinkled or warped straighten it out before loading it Load the roll so that there is no gap between the right edge of the paper and the Roll Holder Handling Paper Handling rolls Loading Rolls in the Printer iPF815...

Страница 647: ...he type of paper See Selecting the Paper Type Roll P 632 Selecting the Paper Source When advancing paper press the Feeder Selection button and select the source You can determine the selected source by checking which lamp is lit either the Roll Media lamp a or the Cut Sheet lamp b Roll Media lamp Selected when printing on Roll Media Cut Sheet lamp Selected when printing on Sheets Handling Paper Ha...

Страница 648: ...ant For best printing results the printer fine tunes the feed amount for each type of paper Be sure to select the type of paper to use correctly before printing Because the printer fine tunes the feed amount for each type of paper the margins and the size of printed images may vary depending on the type of paper used If margins and the size of images are not as you ex pected adjust the paper feed ...

Страница 649: ...r for which width detection is deactivated Off is selected you must advance the paper manually to the position for printing See Manually Loading Paper to the Position for Printing P 654 5 Press the Online button to bring the printer online Specifying the Paper Length Roll When changing the length of paper after the paper has been advanced specify the length as follows Note When you specify the rol...

Страница 650: ...e printer as follows Note If you need to cut a printed roll select Paper Cutting in the printer menu and cut the roll at the desired position See Specifying the Cutting Method for Rolls P 642 If you have selected Media Menu ManageRemainRoll On in the printer menu a barcode indicating the amount of paper left is printed on the leading edge of the roll However barcodes are not printed on some types ...

Страница 651: ...al of the roll 2 Press the OK button The roll can now be removed 3 Open the Top Cover and lift the Ejection Guide 4 Using both hands rotate the Roll Holder in the direction of the arrow to rewind the roll Handling Paper Handling rolls iPF815 Removing the Roll from the Printer 7 635 ...

Страница 652: ... Roll Holder from rolls see Removing the Roll Holder from Rolls P 637 6 Lower the Ejection Guide and close the Top Cover Note To load new paper in the printer at this point see Loading Rolls in the Printer P 628 Handling Paper Handling rolls Removing the Roll from the Printer iPF815 7 636 ...

Страница 653: ...Holder Stopper at the position indica ted b remove it from the Roll Holder 2 Remove the Roll Holder from the roll 3 When removing attachments push the tips a in as you remove the attachment 3 Inch Paper Core Attachment 1 Roll Holder side Handling Paper Handling rolls iPF815 Removing the Roll Holder from Rolls 7 637 ...

Страница 654: ...ting surface may become scratched which may affect the printing quality when you use it again Feeding Roll Paper Manually When the printer is offline you can advance or retract the roll on the Platen by pressing or 1 Press the Online button to bring the printer offline 2 Confirm that a roll is selected as the paper source See Selecting the Paper Source P 631 Handling Paper Handling rolls Feeding R...

Страница 655: ... paper and amount left are automatically detected after rolls are loaded The barcode will be cut off after it has been read Note If the document is not cut but kept in the printer only the text message is printed Important Because this function is not compatible with clear film an error message may be displayed The roll is empty after you load clear film For this reason deactivate the function bef...

Страница 656: ...red onto the paper surface during ejection soiling it You can prevent problems by adjusting the drying time after printing before the paper is cut Windows 1 Display the printer driver dialog box See Accessing the Printer Driver Dialog Box from the Operating System Menu Windows P 213 2 Select the Main sheet and click CAdvanced Settings in AMedia Type Handling Paper Handling rolls Specifying the Ink...

Страница 657: ...en Pages and CBetween Scans in ADrying Time and then click OK See Paper Detailed Settings Dialog Box Windows P 219 Mac OS X 1 Choose Print in the application menu 2 Select the Main pane and click CSettings in AMedia Type Handling Paper Handling rolls iPF815 Specifying the Ink Drying Time for Rolls 7 641 ...

Страница 658: ...rinter settings Cutting Method Menu Settings Driver Setting Automatic The roll is automatically cut by the Cutter Unit following printer driver settings Cutting Mode Automat ic Auto Cut Yes Eject P 643 Choose this setting if you prefer not to have documents dropped immediately after printing as when waiting for ink to dry To cut the roll using the Cutter Unit hold down the Stop button for a second...

Страница 659: ...d only when you have specified Auto Cut Yes in the printer driver With Eject printing does not resume after a series of jobs have been printed continuously until the roll is cut Cut rolls manually in the following cases Eject waiting for ink to dry after printing Important When cutting wide printed documents after ejection have two people support the documents If the paper drops printed documents ...

Страница 660: ...ied cut position and then automatically stopped 7 As you support the printed document to prevent it from dropping hold down the Stop button for at least a second to cut the roll Manual when using media that cannot be cut using the Cutter Unit 1 Press the Menu button to display MAIN MENU 2 Press or to select Paper Details and then press the button Handling Paper Handling rolls Specifying the Cuttin...

Страница 661: ...rt printing The printer stops advancing the paper after printing 7 Press the Online button Roll paper is fed to the specified cut position and then automatically stopped 8 Cut the roll paper manually with scissors or the like 9 Press the Online button The roll is rewound and rewinding stops automatically Handling Paper Handling rolls iPF815 Specifying the Cutting Method for Rolls 7 645 ...

Страница 662: ...on to display MAIN MENU 3 Press or to select Paper Cutting and then press the button 4 Press or to select Yes and then press the OK button After the roll paper is cut it is rewound automatically Caution If paper would be short when cut at a particular position the roll may automatically be advanced in some cases before cutting Handling Paper Handling rolls Specifying the Cutting Method for Rolls i...

Страница 663: ... state of the leading edge Off The edge is not cut and scraps are not removed This setting is Off for most types of paper by default For more infor mation see the Paper Reference Guide See Types of Paper P 617 On The leading edge is cut off when you load a roll and scraps are removed The amount of paper cut off from the leading edge varies depending on the paper type For more information see the P...

Страница 664: ...is function to be activated for some types of paper When this function is activated black lines are printed at the leading and trailing edges of documents Important Do not activate the function to reduce cutting dust for paper that wrinkles easily such as Plain Paper or light weight paper This may impair cutting and cause paper jams Borderless printing is not available when this function is activa...

Страница 665: ...se with both 2 inch and 3 inch paper cores Use the correct attachment for the particular paper core See Attaching the Roll Holder to Rolls P 623 Roll Holder Set RH2 44 Roll Holder for 2 and 3 inch paper cores Attachments Using the 2 Inch Paper Core Attachment Using the 3 Inch Paper Core Attachment 2 Inch Paper Core Attachment 3 Inch Paper Core Attachment 1 3 Inch Paper Core Attachment 2 Handling P...

Страница 666: ...ss the button 3 Press or to select Cut Sheet Type and then press the button 4 Press or to select the type of paper loaded in the printer and then press the OK button Note For details on paper types see the Paper Reference Guide See Types of Paper P 617 Plain Paper is selected by factory default If you move the Release Lever the setting automatically reverts to Plain Paper Be sure to select the cor...

Страница 667: ...Top Cover before loading paper See Cleaning Inside the Top Cov er P 837 After pressing the Load Eject button you can refer to instructions on the Display Screen as you load the paper See Checking Instructions During Printer Operations P 743 1 If you send a print job from a computer beforehand the type and size of paper are shown on the Display Screen Lift the Release Lever and open the Top Cover H...

Страница 668: ...and printing side up insert it between the Platen a and the Paper Retainer b Align the edges of the sheet as follows 1 Align the sheet with the Paper Alignment Line c at right 2 Align the inserted edge of the sheet with the leading edge of the Paper Alignment Line d as shown Handling Paper Handling sheets Loading Sheets in the Printer iPF815 7 652 ...

Страница 669: ... does not indicate a problem If the noise is distract ing try moving the paper over slightly to the left or right up to 1 mm 0 039 in while keeping it parallel to the Paper Alignment Line The suction remains on for about 30 seconds during loading If you cannot finish loading a sheet dur ing this time pull the sheet away and reinsert it to start the suction again 3 Lower the Release Lever and close...

Страница 670: ... manually load paper at the position for printing Instructions for manually loading paper at the position for printing when Width Detection is set to Off are as follows 1 If you send a print job from a computer beforehand the type and size of paper are shown on the Display Screen Lift the Release Lever and open the Top Cover Important Do not touch the Linear Scale a Carriage Shaft b or Ink Tube St...

Страница 671: ... position 3 Lower the Release Lever and close the Top Cover 4 If no print job has been received from the computer press or to select of the type of paper loaded and then press the OK button 5 When Width Detection OFF OK to continue is shown on the Display Screen press or to select Leave OFF and then press the OK button 6 Check the position of the loaded paper and press the OK button 7 Press or to ...

Страница 672: ...button Note Paper cannot be ejected by using the Load Eject button when print jobs are in progress or during the ink drying period Before ejecting paper press the Stop button to cancel printing print job process ing or ink drying 2 Press the OK button to eject the paper The paper is ejected from the front of the printer Handling Paper Handling sheets Removing Sheets iPF815 7 656 ...

Страница 673: ...3 As you hold the sheet lift the Release Lever and remove the sheet 4 Lower the Release Lever Handling Paper Handling sheets iPF815 Removing Sheets 7 657 ...

Страница 674: ...ejected documents b White tag A point of reference for attaching the Output Stacker in the right direction c Basket Arm R and Basket Arm L Holds the Basket Rod tag side attached to the Output Stacker When the Output Stacker is not used push it down and store it next to the Stand Leg d Basket Rod tag side and Basket Rod cord side Holds the cloth Output Stacker securely in specific positions Handlin...

Страница 675: ... Stacker may be the standard stacker in some sales regions If the Wheeled Output Stacker has been provided as the standard stacker the Stationary Output Stacker is not included For more information about the Wheeled Output Stacker see Wheeled Output Stacker P 663 Using the Stationary Output Stacker The Stationary Output Stacker can be used in three positions as shown When storing printed documents...

Страница 676: ...pped into the Output Stacker and the printed surface may become soiled The Output Stacker can accommodate one sheet When printing multiple pages remove each sheet after it is printed Before using the Output Stacker remove the Rewind Spool If you do not it may prevent printed documents from being held correctly and they may be scratched The Output Stacker can hold printed documents from rolls that ...

Страница 677: ...t Stacker is in the position used when storing printed documents a lift the front Basket Rod gently to release the lock lower the stacker toward the front b and push it all the way back 2 Remove the front Basket Rod from the left and right Basket Arms Roll up the Basket Cloth and put it at the back of the Bottom Stand Stay Handling Paper Output Stacker iPF815 Stowing the Stationary Output Stacker ...

Страница 678: ...et Cloth and Basket Rod so they do not interfere with the Media Take up Sensor indicated by the dashed line 3 Push in the left and right Basket Arm toward the back all the way until they stop Handling Paper Output Stacker Stowing the Stationary Output Stacker iPF815 7 662 ...

Страница 679: ...Stacker see the setup guide provided with the Wheeled Output Stacker The printer can be used with either a Stationary Output Stacker or a separate mobile Wheeled Output Stack er The Wheeled Output Stacker is normally provided as an optional accessory but it may be the standard stack er in some sales regions If the Wheeled Output Stacker has been provided as the standard stacker the Sta tionary Out...

Страница 680: ...eeled Output Stacker by the printer 1 Holding the Output Stacker Ejection Guides a move the stacker between the printer Stand 2 Lock the casters Handling Paper Output Stacker Using the Wheeled Output Stacker iPF815 7 664 ...

Страница 681: ...ote If there is not enough space to move the Wheeled Output Stacker remove any printed documents inside the Output Stacker and fold the Output Stacker up 1 Release the caster lock Handling Paper Output Stacker iPF815 Using the Wheeled Output Stacker 7 665 ...

Страница 682: ...2 Holding the Output Stacker Ejection Guides a move the stacker away from the printer Handling Paper Output Stacker Using the Wheeled Output Stacker iPF815 7 666 ...

Страница 683: ...Adjustments for Better Print Quality Adjusting the Printhead 668 Adjusting the feed amount 676 Adjustments for Better Print Quality iPF815 8 667 ...

Страница 684: ...ightening of Lines and Colors Auto Head Adj P 668 or see Manual Straightening of Lines and Colors Manual Head Adj P 670 Printed lines are misaligned Execute Head Inc Adj to adjust the angle of inclination of the printhead Even slight misalignment can be corrected For adjustment instructions see Adjusting Line Misalignment Head Inc Adj P 672 Paper rubs against the printhead or image edges are blurr...

Страница 685: ...ng Paper CAD Translucent Matte Film or CAD Clear Film If adjustment is not possible as expected using highly transparent film or similar media try another type of pa per or try adjust the Printhead alignment manually See Manual Straightening of Lines and Colors Manual Head Adj P 670 Paper to Prepare Rolls An unused roll at least 10 inches wide Sheets Standard Adj One sheet of unused paper of at le...

Страница 686: ...r if you are using special paper try manual adjustment For instructions on straightening lines and colors automatically see Automatic Straightening of Lines and Colors Auto Head Adj P 668 Note If Manual Head Adj is not available although displayed in the menu choose Advanced Adj in Auto Head Adj Manual Head Adj is available in the menu after you try Advanced Adj once Always make sure the loaded pa...

Страница 687: ...and determine the number of the pattern with straight lines Note If lines seem straightest in two patterns but you cannot decide which one is better choose an inter mediate value For example choose 11 if you cannot decide whether pattern 10 or 12 is better 9 Press or to select the pattern number and then press the OK button 10 Repeat steps 7 and 9 to specify the adjustment value for D 2 to D 5 and...

Страница 688: ...der to Rolls P 623 Loading Rolls in the Printer P 628 Loading Sheets in the Printer P 651 Note When loading paper specify the type of paper correctly Using paper that you have not specified on the printer may cause feeding problems and affect the printing quality We recommend loading a type of paper that you use often 2 Press the Menu button to display MAIN MENU 3 Press or to select Adjust Printer...

Страница 689: ... the Top Cover 7 Align the Angle Adjustment Lever with the red square and close the Top Cover Adjustments for Better Print Quality Adjusting the Printhead iPF815 Adjusting Line Misalignment Head Inc Adj 8 673 ...

Страница 690: ...es 9 Open the Top Cover and move the Angle Adjustment Lever to match the number or the square of the straightest set of lines If no single set of lines is perfectly straight move the Angle Adjustment Lever to a position between the numbers or between the number and the square of the two sets of lines that are least misaligned Adjustments for Better Print Quality Adjusting the Printhead Adjusting L...

Страница 691: ...re blurred it may help to lower the Printhead 1 Press the Menu button to display MAIN MENU 2 Press or to select Paper Details and then press the button 3 Press or to select the type of paper and then press the button 4 Press or to select Head Height and then press the button 5 Press or to select the Printhead height and then press the OK button Adjustments for Better Print Quality Adjusting the Pr...

Страница 692: ...l fine tuning is necessary after Auto Band Adj or Manual Band Adj use Fine Band Adj in the Menu Durng Prtng See Banding Adjustment During Printing Fine Band Adj P 680 Selecting a Feed Amount Adjustment Method Feed Priority Methods of adjusting the amount paper is fed are set for each type of paper in the Feed Priority setting Adjust the Feed Priority setting to suit your particular printing applic...

Страница 693: ...s adjust the amount that paper is fed Auto Band Adj offers two modes Standard Adj and Advanced Adj Use Advanced Adj if Standard Adj does not eliminate banding or when using paper other than genuine Canon paper or paper for purposes other than checking output Always check the Feed Priority setting before using Auto Band Adj See Selecting a Feed Amount Adjustment Method Feed Priority P 676 Note When...

Страница 694: ... or to select Yes and then press the OK button A test pattern is printed for band adjustment Adjustment is now finished if you have printed on a roll or on sheets of A2 size or larger 7 If you are printing on sheets smaller than A2 size for Standard Adj a confirmation message is shown on the Dis play Screen requesting you to continue printing Press the OK button and follow the instructions on the ...

Страница 695: ...eets in the Printer P 651 Note Always make sure the loaded paper matches the type of paper specified Adjustment cannot be com pleted correctly unless the setting value matches the loaded paper 2 Press the Menu button to display MAIN MENU 3 Press or to select Adjust Printer and then press the button 4 Press or to select Manual Band Adj and then press the button 5 Press or to select Yes and then pre...

Страница 696: ...olors appears at 50 mm 2 in intervals try adjusting the feed amount as follows The results of adjustment are applied to printing in progress enabling you to check the results immediately However note that because printing is paused colors may be slightly different Use Fine Band Adj after Auto Band Adj or Manual Band Adj if finer adjustment is required See Auto Band Adjust ment Auto Band Adj P 677 ...

Страница 697: ...eck the Feed Priority setting before using Adjust Length See Selecting a Feed Amount Adjustment Method Feed Priority P 676 Note Use paper of the same type and size for adjustment as you will use for printing If you have selected Easy Settings on the printer follow these steps to confirm the Print Quality setting Windows Click View Settings on the Main tab to display the View Settings dialog box Ma...

Страница 698: ...nted in black when you choose A High or in magenta if you choose B Standard Draft To cancel printing the test pattern for adjustment hold down the Stop button for a second or more and then go to step 7 7 Measure the length of the adjustment pattern Calculate the difference between the measured length and actual length Enter it as a percentage and press the OK button You can adjust the value in 0 0...

Страница 699: ...e results 1 Press the Menu button to display MAIN MENU 2 Press or to select Paper Details and then press the button 3 Press or to select the type of paper and then press the button 4 Press or to select VacuumStrngth and then press the button 5 Press or to select the level of suction against paper on the Platen and then press the OK button Adjustments for Better Print Quality Adjusting the feed amo...

Страница 700: ...Printer Parts Printer parts 685 Control Panel 692 Hard Disk 746 Optional accessories 752 Printer Specifications 765 Printer Parts iPF815 9 684 ...

Страница 701: ...rinter as needed See Top Cover Inside P 688 b Ejection Guide Guides printed documents as they are ejected Open this guide when loading a roll c Roll Holder Slot Slide the Roll Holder into this slot d Roll Holder Load the roll on this holder e Ejection Support Prevents printed documents from winding around the Roll Holder or being drawn into the Paper Feed Slot Printer Parts Printer parts iPF815 Fr...

Страница 702: ...aintenance purposes such as head cleaning is absorbed Replace the cartridge when it is full m Carrying Handles When carrying the printer have six people hold it by these handles under both sides n Maintenance Cartridge Cover Open this cover to replace the Maintenance Cartridge o Stand A stand that holds the printer Equipped with casters to facilitate moving it p Stand L The left leg of the Stand q...

Страница 703: ...nect an Ethernet cable to this port The lamp is lit if the Ethernet cable is connected correctly and communication is possible between the computer and printer d USB Port Connect a USB cable to this port The printer is compatible with Hi Speed USB connections e Manual Pocket Store printer manuals in this pocket f Power Supply Connector Connect the power cord to this connector Printer Parts Printer...

Страница 704: ...jected b Paper Alignment Line Align paper with this line when loading it c Carriage Moves the Printhead The carriage serves a key role in printing See Carriage P 689 d Carriage Shaft The Carriage slides along this shaft e Paper Retainer Important in supplying the paper This retainer holds paper as it is fed Printer Parts Printer parts Top Cover Inside iPF815 9 688 ...

Страница 705: ...key role in detecting the Carriage position Be careful not to touch this part when cleaning inside the Top Cover or clearing paper jams l Switch Set the switch to the side opposite if the edges of printed images are blurred Set the switch to the side before borderless printing See Setting the Blue Switch on the Platen P 872 Carriage a Printhead Fixer Cover Holds the Printhead in place b Printhead ...

Страница 706: ...nk Lamp Red Indicates the state of the Ink Tank as follows when the Ink Tank Cover is opened On The Ink Tank is installed correctly Off No Ink Tank is installed or the ink level detection function is disabled Flashing Slowly Not much ink is left Flashing Rapidly Ink tank is empty d Ink Color Label Load an Ink Tank that matches the color and name on this label e Ink Set An Ink Tank that can be used...

Страница 707: ...Printer Parts Printer parts iPF815 Ink Tank Cover Inside 9 691 ...

Страница 708: ...inting 734 Submenu Display 735 Status Print 736 Checking Instructions During Printer Operations 743 Control Panel a Online Button Green Switches the printer online and offline See Switching Modes P 702 On The printer is online Flashing The printer is switching modes Off The printer is offline b Menu Button Displays the main menu of the printer See Main Menu Settings P 722 Printer Parts Control Pan...

Страница 709: ...a sheet is selected as the paper source 2 Cut Sheet lamp Green On Indicates that a sheet is selected as the paper source Off Indicates that a roll is selected as the paper source f Feeder Selection Button Switches the paper source Each time you press this button the paper source switches between the roll and the sheet and the corresponding lamp on the Paper Source Section is lit g Display Screen S...

Страница 710: ...Submenu Dis play P 735 You can also hold down this button for three seconds to clean the Printhead Head Cleaning A p Power Button Turns the printer on and off See Turning the Printer On and Off P 694 q Load Eject Button By pressing this button you can check instructions on loading and removing paper Instructions for loading paper are shown on the Display Screen if pressed when no paper is loaded a...

Страница 711: ... even once and nothing appears on the Display Screen Make sure the printer is plugged in correctly Check the connection at the plug and electrical outlet No paper is loaded Load paper See Loading and Printing on Rolls P 3 See Loading and Printing on Sheets P 8 Important Starting the printer when it is connected via the USB cable to a Macintosh computer that is off may cause the computer to start u...

Страница 712: ...button for more than a second After Shut Down Please Wait is shown on the Display Screen the printer shuts off Printer Modes Printer modes are classified as follows and described in this topic Modes P 696 Mode transition P 698 Online and state of the Control Panel P 699 Offline and state of the Control Panel P 699 Menu mode and state of the Control Panel P 701 Submenu mode and state of the Control...

Страница 713: ...layed regarding ink and paper information Jobs can be received and printing is possible while sub menus are displayed and the printer is online In other modes any jobs sent from the computer are held without being printed while submenus are displayed Sleep mode The printer is in power saving mode The printer automatically enters Sleep mode to conserve power if it is idle for a specific period by f...

Страница 714: ...Mode transition The printer mode transitions are as follows Printer Parts Control Panel Printer Modes iPF815 9 698 ...

Страница 715: ... printing Printing in progress receiving or processing print jobs Display Screen Top Line of the Display Screen The printer status is displayed here The selected paper source is indicated by an icon to the left of the type of paper Middle Level of the Display Screen The first and second lines display the paper type and size Any warning messages are displayed here on lines 2 4 Take the appropriate ...

Страница 716: ...n can be taken Top Line of the Display Screen Error messages are dis played Bottom Line of the Display Screen Here the remaining ink level is indicated See Checking Ink Tank Levels P 815 Top Line of the Display Screen Error messages are dis played Bottom Line of the Display Screen The corrective actions are displayed here Top Line of the Display Screen The error message is displayed with the fol l...

Страница 717: ... settings are dis played on the second and subse quent lines See Main Menu Operations P 705 The menu of options available during printing top figure can be displayed by pressing the button when the main menu is displayed left figure Display Screen Menus available during printing are displayed if you press the Menu button during printing If you select a menu the title of the selected menu is displa...

Страница 718: ...Online printing Switches offline and printing is paused When printing is paused the Printing menu is available Offline If paper has been advanced the printer goes online and the Online lamp is lit Offline when an error message is displayed In the case of error messages other than those shown below or if paper is not loaded the printer remains offline until you solve the problem The Online lamp rem...

Страница 719: ...witches to that menu mode Offline Switches to Menu mode Offline printing Menus available during printing are displayed Offline when an error message is displayed You cannot access Menu mode until the problem is solved Press the Information button to display the submenus Press the Information button to display the Maintenance Cartridge capacity and remaining ink levels as well as informa tion on th...

Страница 720: ...ription of specific items available in the main menu see Main Menu Settings P 722 For instructions on selecting and setting main menu items see Main Menu Operations P 705 Note By default main menu settings apply to all print jobs However for settings that are also available in the printer driver the values specified in the printer driver take priority Main menu operations during printing The Menu ...

Страница 721: ...acity Ink levels Information on the loaded paper Printer information HP GL 2 setting information For a description of specific items displayed in submenus see Submenu Display P 735 Main Menu Operations Press the Menu button to display the main menu For details see Main Menu Settings P 722 Main menu displayed if you press the Menu button when printing is not in progress Menu selection if you press ...

Страница 722: ... by function Menus are displayed with the upper line selected Use the buttons on the Control Panel to access each menu Press to access a higher level menu on the same screen and press to access a lower one If not all menus can be displayed on the screen at once press and to scroll the menu Items you select are highlighted The scroll bar at right indicates the current position in the overall menu L...

Страница 723: ...on The check box at left is selected and the setting is confirmed After two seconds the display reverts to the upper level menu 3 Press the Online button to bring the printer online Note If a confirmation message is displayed regarding the setting you entered press the OK button The setting is applied and the printer goes online Specifying numerical values Follow these steps to enter numbers In th...

Страница 724: ... you enter for the printer is not the same as any computer IP address in your network 7 Repeat steps 5 and 6 to continue entering numbers 8 Press the Online button to bring the printer online Note If a confirmation message is displayed regarding the setting you entered press the OK button The setting is applied and the printer goes online Executing menu commands Follow these steps to execute menu ...

Страница 725: ...of the main menu is as follows Values at right indicated by an asterisk are the defaults For instructions on menu operations see Main Menu Operations P 705 For details on menu items see Main Menu Settings P 722 First Level Second Level Third Lev el Fourth Level Fifth Level Sixth Level Seventh Level Eighth Level Paper Cutting 1 P 720 No Yes Rep Ink Tank No Yes Head Cleaning Head Cleaning A Head Cle...

Страница 726: ...paper type is displayed here 5 P 720 Roll Length Set 1 P 720 2 P 720 m feet 13 P 721 ManageR emainRoll Off On Paper De tails The paper type is dis played here 5 P 720 Roll Dry ingTime Off 30 sec 1 min 3 min 5 min 10 min 30 min 60 min Scan Wait Time Dry time Off 1 sec 3 sec 5 sec 7 sec 9 sec Area 14 P 721 Entire area Leading edge Feed Pri ority Automatic Band Joint Print Length Printer Parts Contro...

Страница 727: ... Height Automatic Highest High Standard Low Lowest Skew Check Lv Standard Loose Off Vac uumStrng th Automatic Strongest Strong Standard Weak Weakest Width De tection Off On NearEnd RollMrgn 3mm 20mm Cut Speed Fast Standard Slow Trim Edge First Automatic Off On Cutting Mode Automatic Eject Manual Bordless Margin Automatic Fixed CutDus tReduct Off On NearEnd Sht Mrgn 3mm 20mm Printer Parts Control P...

Страница 728: ...o Yes Job Log Choose from infor mation about the latest three print jobs Document Name User Name Page Count Job Status OK CANCELED Print Start Time yyyy mm dd hh mm Print End Time yyyy mm dd hh mm Print Time xxxsec Print Size xxxxxxxxsq mm Media Type Interface USB Network Ink Con sumed The total amount of ink con sumed and ink colors are dis played here xxx xxx ml HDD In formation HDDSpace xx x GB...

Страница 729: ...per Source Automatic Roll Paper Cut Sheet Margin 3mm Standard 5mm Conserve Paper Off On Auto Ro tate Off On Nesting Use Nest ing Off On Nesting WaitTime xx min Cut Lines Off On Line Pen Man ager Enable merge Off On Pen Setup Select Pa lette Software Palette A Palette B Factory Define Pa lette Palette A Select the pen num ber Width Indicates the value of Width Color 0 255 Line At tributes No Settin...

Страница 730: ...he pen num ber Indicates Width Color and Line Attributes Reset Pa lette All Palette Palette A Palette B Smoothing Software Smooth Thicken FineLines Off On Adjust FaintLines Off On Processin gOption Warning Off On On the Fly Off On PageSize Process1 Off On PageSize Process2 Off On Adjust Printer Auto Head Adj Standard Adj No Yes Advanced Adj No Yes Auto Print Off On Manual Head Adj 10 P 721 No Yes ...

Страница 731: ... EOP Tim er 15 P 721 10 sec 30 sec 1 min 2 min 5 min 10 min 30 min 60 min TCP IP 15 P 721 IP Mode 15 P 721 Automatic Manual Protocol 4 P 720 15 P 721 DHCP 15 P 721 On Off BOOTP 15 P 721 On Off RARP 15 P 721 On Off IP Setting 12 P 721 16 P 721 IP Ad dress 0 0 0 0 255 255 255 255 Subnet Mask 0 0 0 0 255 255 255 255 Default G W 0 0 0 0 255 255 255 255 NetWare 15 P 721 NetWare 15 P 721 On Off Printer ...

Страница 732: ...thernet 802 3 Ethernet SNAP Print Service 6 P 721 15 P 721 BinderyPServer RPrinter NDSPServer NPrinter AppleTalk 15 P 721 On Off Ethernet Driver 15 P 721 Auto De tect 15 P 721 On Off Comm Mo de 7 P 721 15 P 721 Half Duplex Full Duplex Ethernet Type 7 P 721 15 P 721 10 Base T 100 Base TX Spanning Tree 15 P 721 Not Use Use MAC Ad dress 15 P 721 000085XXXXXX Printer Parts Control Panel Menu Structure...

Страница 733: ... No Yes Move Printer Level 1 Level 2 Level 3 System Setup Warning Buzzer Off On Detect Mismatch Pause Warning None Skip Take Up Err 9 P 721 Off On Keep Pa per Size Off On Paper Size Basis Sht Selec tion 1 ISO A3 13 x19 Super B Sht Selec tion 2 ISO B1 28 x40 ANSI F TrimEdge Reload Automatic Off On Noz Check Freq Off 1 page 10 pages Automatic Carria geS canWdth Automatic Fixed Printer Parts Control ...

Страница 734: ...h Unit meter feet inch Time Zone 15 P 721 0 London GMT 1 Paris Rome 2 Athens Cairo 3 Moscow 4 Eerevan Baku 5 Islamabad 6 Dacca 7 Bangkok 8 Hong Kong 9 Tokyo Seoul 10 Canberra 11NewCaledonia 12 Wellington 12 Eniwetok 11 Midway is 10Hawaii AHST 9 Alaska AKST 8 Oregon PST 7 Arizona MST 6 Texas CST 5 NewYork EST 4 Santiago 3 Buenos Aires 2 1 Cape Verde Printer Parts Control Panel Menu Structure iPF815...

Страница 735: ...mm dd dd mm yyyy mm dd yyyy Date Time 15 P 721 Date yyyy mm dd 8 P 721 Time hh mm Language Contrast Adj 4 3 2 1 0 1 2 3 4 Reset Papr Setngs 15 P 721 No Yes Erase HDD Data High Speed 15 P 721 No Yes Secure High Spd 15 P 721 No Yes Secure 15 P 721 No Yes Output Method Print Print Auto Del Printer Parts Control Panel iPF815 Menu Structure 9 719 ...

Страница 736: ...xxxxx xxxx 1 Available only if a roll is loaded 2 Available only if ManageRemainRoll is On 3 Available if Feed Priority is Automatic or Print Length 4 Not displayed if IP Mode is Manual 5 For information on the types of paper the printer supports refer to the Paper Reference Guide See Types of Paper P 617 The paper type setting in the printer driver and related software as well as on the Control P...

Страница 737: ... of the printer driv er 15 Viewing and configuration is possible for administrators and only viewing for other users 16 Viewing and configuration is possible for administrators only 17 Default setting for the time to enter the power save mode Sleep mode is recommended Caution Only the following menus are displayed during printing Choose this menu to display Head Cleaning Fine Band Adj and Informat...

Страница 738: ...xxxx 2 xxxxxxxx xxxx Main Menu Settings Main menu items are described in the following tables For instructions on selecting or setting menu items see Main Menu Operations P 705 For details on menu levels and values see Menu Structure P 709 Setting Item Description Instructions Paper Cutting This command is available only if a roll is loaded Choose Yes to cut the roll at the current position Howeve...

Страница 739: ...ignment or amount of feed by printing a test pattern See Adjust Printer P 729 Interface Setup Configure the EOP timer and network settings See Interface Setup P 730 Maintenance Access maintenance settings when replacing the Printhead or preparing to move the print er See Maintenance P 731 System Setup Specify the printer system settings including the date format and display language See System Set...

Страница 740: ...Amount of Roll Paper Left P 639 1 For information on the types of paper the printer supports refer to the Paper Reference Guide See Types of Paper P 617 The types of paper indicated in the printer driver and related software as well as on the Control Panel are updated when you install the printer driver from the User Software CD ROM or if you up date paper information by using the Media Configurat...

Страница 741: ...s paper against the Platen See Adjusting the Vacuum Strength Vac uumStrngth P 683 Width Detection Specify this option to print inside boundaries or in other cases when specifying a particular starting position for printing Paper width and skew are not detected if you se lect Off If paper is loaded askew note that paper jams or Platen soiling may occur NearEnd RollMrgn Specify the minimum margin at...

Страница 742: ...t the leading edge and affect feeding accuracy The printed surface may be scratched and ink may adhere to the leading edge Return Defaults Choose Yes to restore Paper Details to the default values 1 For information on the types of paper the printer supports refer to the Paper Reference Guide See Types of Paper P 617 The types of paper indicated in the printer driver and related software as well as...

Страница 743: ...nk costs is 15 Canon does not guarantee the accuracy of these estimates Estimates may vary depending on condi tions of use Calculation of these estimates does not include ink consumed when cleaning printheads by forceful ejection of ink GL2 Settings Setting Item Description Instructions Quality Man ager Color Mode Monochrome Print in monochrome Color CAD 1 Print in standard colors Color CAD 2 Prin...

Страница 744: ...th instead of printing each print job as it is received Nesting Wait Time Specify a time to wait until printing as desired Cut Lines Select On to print cut lines between each document on the roll Line Pen Manager Enable merge Specify whether to merge or print over colors where lines overlap Choose Off to print the second line over the first Choose On to merge all overlapping colors Pen Setup Selec...

Страница 745: ...would not start until later However images may be incomplete in some cases so be sure to check the printing results PageSizeProcess1 Normally the area available for printing excludes a margin required by the printer and images are positioned according ly Selecting On in this setting eliminates any misalignment of the printing position if the image itself includes a border PageSizeProcess2 Selectin...

Страница 746: ...d by Canon Choose Yes to have the printer print and read a band ad justment test pattern for automatic adjustment of the feed amount Note that this function takes more time and re quires more ink than Standard Adj See Auto Band Adjustment Auto Band Adj P 677 Manual Band Adj Choose Yes to print a test pattern for adjusting the feed amount based on the type of paper See Manual Band Adjustment Manual...

Страница 747: ...packets are supported over the LAN MAC Address Displays the MAC address Return Defaults Return Defaults Execute is displayed if you press the button Choose OK to restore the network settings to the de fault values Maintenance Setting Item Description Instructions Repl maint cart When replacing the Maintenance Cartridge choose Yes and follow the instructions on the screen See Replac ing the Mainten...

Страница 748: ...per size setting as the basis for printing instead of other settings The margin setting of the printer menu will be used instead of the margin setting of the printer driver if the latter is smaller which may pre vent text or images in the margin from being printed Choose Off to use the printer driver settings instead Even if the margin setting of the printer driver is smaller than that of the prin...

Страница 749: ...ayed for Roll Length Set and the remaining paper amount displayed in the sub menu Time Zone Specify the time zone Time zone options indicate a main city in this time zone and the difference from Greenwich Mean Time Date Format Specify the date format Date Time Date Set the current date Time Set the current time Available only if the Date setting is specified Language Specify the language used on t...

Страница 750: ...on of the boot ROM MIT Displays the version of the MIT database format s n Displays the printer s serial number MAC Displays the MAC address of the printer IP Displays the printer s IP address Error Log Displays the most recent error messages up to two Main Menu Settings During Printing Main menu items during printing are described in the following tables For instructions on selecting or setting m...

Страница 751: ...ation Each time you press the Information button the following submenus are displayed Note Press any button other than the Information button to restore the previous mode After you display a submenu the printer will revert to the previous mode in about ten seconds if no print job is received or if you do not operate the printer Remaining Maintenance Cartridge capacity and ink levels The remaining ...

Страница 752: ... settings information is displayed on three screens Status Print You can print a Status Print report indicating the current status of the printer With Status Print information is printed regarding the printer firmware version various settings and the utilization level of consumables Printing Status Print Reports 1 Load paper If using sheets load paper A4 Letter sized You will need at least four sh...

Страница 753: ...irmware version Boot Boot ROM version MIT DBF MIT database format version MIT DB MIT database version S N Printer serial number MAC Printer MAC address IP Printer IP address Ink Info MC Maintenance Cartridge capacity C M Y MBK BK Ink levels The remaining ink is displayed in a five level scale Takeup Reel Status of the Media Take up Unit Media Menu Information on the loaded paper Cut Sheet Type Rol...

Страница 754: ... Address Subnet Mask Default G W NetWare NetWare settings NetWare Frame Type 1 P 738 Print Serv ice 1 P 738 AppleTalk Values that specify whether AppleTalk is active or not Ethernet Driver Ethernet Driver settings Auto Detect Comm Mode 2 P 738 Ethernet Type 2 P 738 Spanning Tree MAC Address 1 Display when NetWare is set to On 2 Display when Auto Detect is set to On System Setup System settings War...

Страница 755: ... Length Unit Time Zone Date Format Language Contrast Adj Output Method Current output method setting Save and Print Save Shared Box Information System Info Error Log The past five error codes GL2 Settings HP GL 2 setting values Quality Manager Color Mode Print Quality Input Resolution Print Economy Paper Manager Paper Source Margin Conserve Paper Auto Rotate Nesting Use Nesting Nesting Wait Time C...

Страница 756: ...ry Pen 0 Width Pen 1 Width Pen 2 Width Pen 3 Width Pen 4 Width Pen 5 Width Pen 6 Width Pen 7 Width Pen 8 Width Pen 9 Width Pen 10 Width Pen 11 Width Pen 12 Width Pen 13 Width Pen 14 Width Pen 15 Width Define Palette Palette A Pen 0 Width Pen 1 Width Pen 2 Width Pen 3 Width Pen 4 Width Pen 5 Width Pen 6 Width Pen 7 Width Pen 8 Width Pen 9 Width Printer Parts Control Panel Status Print iPF815 9 740 ...

Страница 757: ...dth Pen 7 Width Pen 8 Width Pen 9 Width Pen 10 Width Pen 11 Width Pen 12 Width Pen 13 Width Pen 14 Width Pen 15 Width Smoothing ThickenFineLines AdjustFaintLines Network RemoteUI Current network settings used by RemoteUI TCP IP Frame Type Use DHCP Use BOOTP Use RARP Enable DNS Dynamic Update Use Zeroconf Function IP Address Subnet Mask Gateway Address Printer Parts Control Panel iPF815 Status Prin...

Страница 758: ...cast DNS Service Name NetWare NetWare settings Frame Type IPX External Network Number Node Number Print Service Tree Name Context Name Print Serv er Name Print Serv er Pass word Polling In terval Current AppleTalk settings Phase Type Name Network Number Zone HEAD LOT NUMBER Printhead lot number LOT PARTS STATUS Utilization status of replacement parts that require servic ing COUNTER A Y Printer Par...

Страница 759: ...rinter control panel when loading paper replacing ink tanks or performing other oper ations How to view instructions Once you complete an action described in the instructions the printer detects the action and switches to the next instruction screen In the case of actions the printer cannot detect instruction screens are switched every four seconds and the sequence of operations is shown repeatedl...

Страница 760: ...When all actions in the sequence are finished the instruction screen for the next step is displayed Printer Parts Control Panel Checking Instructions During Printer Operations iPF815 9 744 ...

Страница 761: ...ed Press the OK button to display the instruction screen for the next step Viewing instructions for loading or removing rolls 1 Press the Load Eject button 2 Press or to select Load Roll or Remove Roll and then press the OK button Instructions are now displayed Viewing instructions for loading or removing sheets 1 Press the Load Eject button Instructions are now displayed Printer Parts Control Pan...

Страница 762: ...PROGRAF Free Layout image PROGRAF Status Monitor Remo teUI Control Panel image PROG RAF HDI Driver Color im ageRUN NER En largement Copy Mac OS Printer driver Color im ageRUN NER En largement Copy image PROGRAF Printmoni tor Operation Availability Availability Availability Availabil ity Availabili ty Saving print jobs Print Yes Yes No No No Print auto delete Yes Yes No No No Save in mail box Yes N...

Страница 763: ... saved jobs No No Yes Yes No Modify mail boxes No No Yes Yes No Print a list of saved jobs No No No No Yes Display a list of saved jobs No No Yes Yes Yes Other operations Display free hard disk space No No Yes Yes Yes Initialize hard disk No No No No Yes Display the time of printing No No Yes No No Display error messages No No Yes Yes Yes 1 This option is available in combination with Print Print ...

Страница 764: ...le hard disk space in the submenu indicating printer information Press the Information button to display the submenus See Submenu Display P 735 Using RemoteUI To view the box list select Stored Job in Job Management On the Stored Job page the free hard disk space is shown in the upper right corner when boxes are listed For details refer to the RemoteUI help Printer Parts Hard Disk Checking the Fre...

Страница 765: ...Sheet in imagePROGRAF Status Monitor For details refer to the imagePROGRAF Status Monitor help file Using imagePROGRAF Printmonitor The Hard Disk pane shows the free hard disk space Hard Disk Pane in imagePROGRAF Printmonitor Printer Parts Hard Disk iPF815 Checking the Free Hard Disk Space 9 749 ...

Страница 766: ...k with 00 FF and random data one time each Verification is performed to check if the data was correctly written Choose this method to erase especially confidential data It is virtually impossible to recover the overwritten data Conforms to the DoD5220 22 M standard of the U S Department of Defense Note For a more secure method of preventing data recovery we recommend physically or magnetically des...

Страница 767: ...Note As for the time required for deletion confirm it on the Control Panel However when High Speed is selected this finishes in several seconds 6 Press or to select Yes and then press the OK button to start erasure Printer Parts Hard Disk iPF815 Erasing Data on the Printer s Hard Disk 9 751 ...

Страница 768: ...r large format printing or when printing large volume jobs continuously Media Take up Unit TU 06 Note For instructions on installing the Media Take up Unit refer to the Media Take up Unit Setup Guide For information on the types of paper compatible with the Media Take up Unit refer to the Paper Reference Guide See Types of Paper P 617 For Media Take up Unit instructions see Using the Media Take up...

Страница 769: ...apter to the Rewind Spool e Media Take up Sensor A sensor for automatically rewinding rolls Weight a Weight Roll 6 Weights required when rewinding rolls Use one weight roll or combine two with a Weight Joint depending on the roll width b Weight Joint Fastens two weight rolls c Weight Flange 2 sets Attached to the ends of Weight Roll to adjust the weight Use Weight Flange 1 or Weight Flange 2 depen...

Страница 770: ... humid environments documents printed on relatively insubstantial media such as Fabric Banner Synthet ic Paper or lightweight Coated Paper may not be retracted evenly by the unit In this case take steps to con trol humidity in the operating environment or adjust the Roll DryingTime or Scan Wait Time settings so that printed documents are retracted after the ink has fully dried See Main Menu Settin...

Страница 771: ...es at both ends 4 Insert the paper core which serves as the spindle for rewinding a roll on the Rewind Spool Important On the Rewind Spool always use a paper core that is the same size as the roll to be rewound Printer Parts Optional accessories iPF815 Using the Media Take up Unit 9 755 ...

Страница 772: ...t steps 2 4 6 Load the Rewind Spool on the Media Take up Unit so that the gear of the Rewind Spool a meshes with the gear of the Right Media Take up Unit b Important If you attempt to load the Rewind Spool with the left and right ends inverted by mistake the Media Take up Unit cannot be turned on If the gear of the Rewind Spool a does not mesh with the gear of the Right Media Take up Unit b the Me...

Страница 773: ...roll is now advanced to the Media Take up Unit 12 Hold the roll paper by the middle of the leading edge and align the right edge with the right edge of the paper core of the Rewind Spool With the left and right edges of the roll paper evenly taut tape the middle to the paper core to fasten it 13 Making sure the roll paper is not slack tape the left and right side of the leading edge to the paper c...

Страница 774: ...turn it on Press the button on the Media Take up Unit to rewind the roll so that it is nearly taut Important Rewind the paper so that the paper core makes at least two revolutions If the paper is not rewound two full revolutions repeat steps 14 and 15 Do not manually force the Rewind Spool or paper core to rotate them This may damage them To rewind or unwind rolls press or on the Media Take up Uni...

Страница 775: ...can use A Color Label is applied to each Weight Roll Weight Roll Roll Width Weight Roll to Use B2 Width 515 0 mm 20 3 in D B1 Width 728 0 mm 28 7 in A E B0 Width 1 030 0 mm 40 6 in A G A1 Width 594 0 mm 23 4 in E A0 Width 841 0 mm 33 1 in B E 431 8 mm 17 in C 609 6 mm 24 in E 762 0 mm 30 in B D 914 4 mm 36 in G 1 066 8 mm 42 in C E 1 117 6 mm 44 in D E Printer Parts Optional accessories iPF815 Usi...

Страница 776: ...eight Flange 2 When using Weight Flange 2 adjust the paper feed amount by execut ing Auto Band Adj See Auto Band Adjustment Auto Band Adj P 677 Note Do not use combinations other than those identified here Insert the Weight Flange and Weight Joint firmly on the Weight Roll Use identical Weight Flange on the left and right ends Insert matching Weight Flanges 1 or 2 on both ends of the Weight Roll K...

Страница 777: ...een Removing Printed Documents from the Media Take up Unit Remove printed documents from the Media Take up Unit as follows 1 Press the Online button to bring the printer offline 2 Hold down the button on the Control Panel to advance the roll a little To protect the paper that has been rewound advance it an amount longer than the outer circumference Printer Parts Optional accessories iPF815 Removin...

Страница 778: ...K button The roll is now cut Important Always hold the trailing edge of printed documents when cutting rolls If you do not hold the docu ments they may fall on the floor and the printed surface may become soiled 7 Hold the trailing edge of the printed document and press the button on the Media Take up Unit to rewind the printed documents Printer Parts Optional accessories Removing Printed Document...

Страница 779: ...it by pushing in the Rewind Mode Switch 9 Press the Menu button to display MAIN MENU 10 Press or to select Take up Reel and then press the button 11 Press or to select Disable and then press the OK button 12 Remove the Rewind Spool from the Media Take up Unit Printer Parts Optional accessories iPF815 Removing Printed Documents from the Media Take up Unit 9 763 ...

Страница 780: ... at once 13 Unlock the flange on the left side of the Rewind Spool by lifting the lever a from the shaft side Remove the flange 14 Remove the entire paper core with the rewound printed documents from the Rewind Spool Note You can leave the Rewind Spool on the Media Take up Unit even when it is not used for rewinding rolls Printer Parts Optional accessories Removing Printed Documents from the Media...

Страница 781: ...45 0 in Weight Printer and Stand not including the Printhead and Ink Tank Approx 138 kg 304 2 lb Space for installation W D H Printer and Stand not including the Printhead and Ink Tank 2 293 1675 1 500 mm 90 3 65 9 59 1 in Applicable standards International Energy Star Program Law on Promoting Green Purchasing GPN RoHS Eco Declaration WEEE U S presidential directives 1 The printer uses a trace amo...

Страница 782: ...ent ink PFI 303MBK 330 ml 11 2 fl oz or PFI 703MBK 700 ml 23 7 fl oz BK Ink Tank Black Ink Dye ink PFI 303BK 330 ml 11 2 fl oz or PFI 703BK 700 ml 23 7 fl oz C Ink Tank Cyan Ink Dye ink PFI 303C 330 ml 11 2 fl oz or PFI 703C 700 ml 23 7 fl oz M Ink Tank Magenta Ink Dye ink PFI 303M 330 ml 11 2 fl oz or PFI 703M 700 ml 23 7 fl oz Y Ink Tank Yellow Ink Dye ink PFI 303Y 330 ml 11 2 fl oz or PFI 703Y ...

Страница 783: ...300x900mm Print area Normal size Printable area Rolls 3 mm 0 12 in from each side Sheets 3 mm 0 12 in from the top 23 mm 0 91 in from the bottom and 3mm 0 12 in from the left and right sides For information on the recommended print area see Print Area P 768 Borderless printing 2 P 767 Printable area rolls 0 mm from the top 0 from the bottom and 0 mm from the left and right sides Supported width fo...

Страница 784: ...size that includes the required margin See Printing on Oversized Paper P 85 Margins of Printable Area Margins of Recommended Print Area Top Edge Bottom Edge Sides Top Edge Bottom Edge Sides Sheets 3 mm 0 12 in 23 mm 0 91 in 3 mm 0 12 in 20 mm 0 79 in 23 mm 0 91 in 5 mm 0 20 in Rolls 0 3 mm 0 0 12 in 0 3 mm 0 0 12 in 0 3 mm 0 0 12 in 20 mm 0 79 in 5 mm 0 20 in 5 mm 0 20 in Sheets Printable Area a m...

Страница 785: ... is 0 mm For information on paper compatible with borderless printing see the Paper Reference Guide See Types of Paper P 617 Recommended Print Area A margin of 20 mm 0 79 in on top 5 mm 0 20 in on bottom and 5 mm 0 20 in on left and right sides is required Printer Parts Printer Specifications iPF815 Print Area 9 769 ...

Страница 786: ...Network Setting Network Setting 771 Network Setting Windows 783 Network Setting Mac OS X 793 Network Setting iPF815 10 770 ...

Страница 787: ...g over a TCP IP network Compatible operating systems Windows 2000 Professional or Server Windows XP Home Edition or Professional Windows Server 2003 Standard Edition Windows Vista Home Basic Business Ultimate Windows Server 2008 Standard Edition or Enterprise Edition Windows 7 Windows XP Professional x64 Edition Windows Server 2003 x64 Edition Windows Vista x64 Windows Server 2008 x64 Windows 7 x6...

Страница 788: ...e 4 2 5 1 6 0 Compatible clients Windows 2000 Professional or Server Windows XP Professional Compatible computer A computer that runs one of the above operating systems Note In NetWare 6 0 iPrint is not supported Network Environment After confirming what type of network environment you will connect the printer to set up the printer and computers as needed Example of a Windows network In Windows ne...

Страница 789: ...CP IP network The printer s IP address is configured automatically when you install the printer driver following the instructions in the Set up Guide Configure the IP address by using imagePROGRAF Device Setup Utility the printer Control Panel or ARP or PING com mands if the IP address is changed or if you change the printer connection mode to a network connection For details on configuring the IP...

Страница 790: ...ddress even if you will use the printer in networks other than TCP IP networks Configuring the printer s IP address enables you to use RemoteUI to configure the network settings and manage the printer with a web browser For details on RemoteUI see Using RemoteUI P 776 Configuring the IP Address Using the Printer Control Panel This topic describes how to configure the printer s IP address on the Co...

Страница 791: ... check the settings and correct any invalid values To cancel the setup process hold down the Stop button for a second or more Configuring the IP Address Using ARP and PING Commands This topic describes how to configure the IP address using ARP and PING commands To use the ARP and PING commands you will need to know the printer s MAC address You can confirm the MAC ad dress on the Control Panel 1 C...

Страница 792: ...twork settings For details on RemoteUI see Using RemoteUI P 776 Using RemoteUI Enter the printer s IP address in a web browser to display the RemoteUI page After you log on to RemoteUI from the page you can check and change the status of the printer and print jobs and configure network settings To access RemoteUI start the web browser and enter the following URL in the Location or Address box to d...

Страница 793: ...enter the password 4 Click Network in the Device Manager menu at left to display the Network page 5 Click Edit in the upper right corner of the TCP IP group to display the Edit TCP IP Protocol Settings page 6 Refer to the TCP IP Settings Items table to complete the settings TCP IP Settings Items Item Details Default Setting Use DHCP Activate this setting to use DHCP for configuring the IP address ...

Страница 794: ...cast DNS service name 1 63 charac ters This name will be displayed when Bonjour functions are used Canon iPFxxxx xxxxxx 7 Click OK to display the Network page Note If you specify to configure the IP address using DHCP BOOTP or RARP there must be a server that sup ports such protocol running in the network If you specify to configure the IP address using DHCP BOOTP or RARP the IP address obtained b...

Страница 795: ...Administrator Enter the administrator s name 0 32 characters blank Phone Enter the administrator s contact information 0 32 characters blank Comments E mail Enter any comments regarding the administrator 0 32 characters blank Security Settings Item Details Default Setting Old Password Enter the current device password 0 14 characters blank New Password Enter the new password 0 14 characters blank ...

Страница 796: ... Ethernet Driver menu 6 Press or to select Comm Mode and then press the button 7 Press or to select the communication mode and then press the OK button Return to the Ethernet Driver menu 8 Press or to select Ethernet Type and then press the button 9 Press or to select the Ethernet type and then press the OK button Return to the Ethernet Driver menu 10 Press or to select Spanning Tree and then pres...

Страница 797: ...e to replace consumables For detailed instructions see Specifying Printer Related Information P 778 Note For details on email notification using imagePROGRAF Status Monitor in Windows refer to the image PROGRAF Status Monitor help Mail server authentication is only supported with imagePROGRAF Status Monitor Initializing the Network Settings Use RemoteUI to restore the network settings to the defau...

Страница 798: ...ettings in the lower right corner of the Network Interface group 6 After confirming the message click OK to restore the network settings to the default values Note You can also use imagePROGRAF Device Setup Utility or the Control Panel to restore the default network settings If you use the Control Panel to initialize the network settings press the Menu button to display MAIN MENU and then press an...

Страница 799: ...nfiguring the IP Address on the Printer P 773 1 Open the Printers and Faxes or Printers window 2 Right click the icon of this printer and choose Properties to open the printer properties window 3 Click the Port tab to display the Port sheet 4 Click Add Port to display the Printer Ports dialog box 5 In the Available Port list select Standard TCP IP Port 6 Click New Port After the wizard starts a wi...

Страница 800: ...Burst Mode Activate this setting to use NCP Burst Mode This mode supports fast data transfer when printing in queue server mode Normally leave the setting On On Print Application Choose the print service Bindery PServer RPrinter NDS PServer NPrinter NDS PSer ver Packet Signature Select If Requested by Server to use packet signature If Reques ted by Server Bindery PServer File Server Name Specify t...

Страница 801: ...inter and computers on your network specify the Ethernet frame type in your Net Ware environment Follow the steps below to specify the frame type by using imagePROGRAF Device Setup Utility or the printer Control Panel Note You can specify the frame type by using RemoteUI if the printer s IP address is configured Important Before specifying the frame type make sure the printer is on and connected t...

Страница 802: ...y MAIN MENU 2 Press or to select Interface Setup and then press the button 3 Press or to select NetWare and then press the button 4 Press or to select NetWare and then press the button 5 Press or to select On and then press the OK button Return to the NetWare menu 6 Press or to select Frame Type and then press the button 7 Press or to select the frame type to use and then press the OK button Retur...

Страница 803: ...ient the Novell NetWare client soft ware must be installed as the client software application NetWare networking is unsupported in Windows Vista This topic gives instructions for configuring NetWare print services The order of this procedure may vary depending on the environment Choosing the type of print services Before completing print service settings choose the type of print service Refer to t...

Страница 804: ... an existing print server click the button at right and choose the name from the list 3 Enter a desired printer name in Name 4 To use the printer in queue server mode choose Other Unknown in Type To use the printer in remote printer mode choose Parallel in Type click Communications and set Ports to LPT1 and Connection Type to Manual Load 5 Enter a desired queue name in Name 6 In Volume enter the v...

Страница 805: ...4 Specify the printer type 1 To use the printer in queue server mode choose Other Unknown in Type To use remote printer mode set Printer Type to Parallel and Position to Manual Load 2 Press the Esc key 3 After the confirmation message is displayed choose Yes and press the Enter key 5 Set a password 1 In Available Options select Print Servers and press the Enter key 2 Select the print server create...

Страница 806: ...equested by Server in Packet Signature 10 Complete the following settings based on the selected service If you have selected Bindery PServer Queue Server Mode Using a Bindery Print Server 1 In File Server Name enter the file server name 2 In Print Server Name enter the name of the print server created in Specifying NetWare Print Serv ices P 787 3 In Print Server Password enter the password of the ...

Страница 807: ... and computers For instructions see Specifying the Printer s Frame Type P 785 2 Specify the NetWare print services including the print server and queue For instructions see Specifying NetWare Print Services P 787 3 Specify NetWare protocol details besides the frame type For instructions see Specifying NetWare Protocols P 789 After you have completed the steps above configure each computer for prin...

Страница 808: ...4 As the destination port specify the print queue created by configuring the NetWare print service settings Network Setting Network Setting Windows Configuring NetWare Network Settings iPF815 10 792 ...

Страница 809: ... below to configure the AppleTalk network settings 1 Start the web browser and enter the following URL in the Location or Address box to display the RemoteUI page http printer IP address or name Example http xxx xxx xxx xxx 2 Select Administrator Mode and click Logon 3 If a password has been set on the printer enter the password 4 Click Network in the Device Manager menu at left to display the Net...

Страница 810: ...fault zone as it is If you enter a network zone name that does not match created zones the printer will not be detected by Macintosh computers Consult your network administrator for informa tion on zone names 7 Click OK to display the Network page Configuring the Destination for AppleTalk Networks To print over an AppleTalk network activate the AppleTalk protocol and configure the destination as f...

Страница 811: ... by AppleTalk as well as the printer zone name For details on RemoteUI see Using RemoteUI P 776 Configuring the destination Mac OS X Important AppleTalk is supported in Mac OS X 10 2 8 10 4 Note The following procedures are based on Mac OS X 10 4 The method of configuring the destination varies depending on the version of Mac OS X 1 In System Preferences click Network to display the Network window...

Страница 812: ...indow and save the settings 4 Choose Utilities or Applications in the Go menu of Finder 5 Click Printer Setup Utility or Print Center in the Utilities folder 6 If the printer name is not displayed in Printer List click Add Network Setting Network Setting Mac OS X Configuring the Destination for AppleTalk Networks iPF815 10 796 ...

Страница 813: ...he IP Address Using the Printer Control Panel P 774 Configuring the Destination Mac OS X Note The following procedures are based on Mac OS X 10 4 The method of configuring the destination varies depending on the version of Mac OS X If you use other versions refer to the help for the Printer Setup Utility or the Print Center 1 Choose Utilities or Applications in the Go menu of Finder 2 Click Printe...

Страница 814: ...3 Click Add to display the Printer Browser window 4 Click More Printers Network Setting Network Setting Mac OS X Configuring the Destination for TCP IP Network iPF815 10 798 ...

Страница 815: ...st of connection methods click Canon IP iPF 6 Enter the printer s IP address in Printer s Address and click Add Network Setting Network Setting Mac OS X iPF815 Configuring the Destination for TCP IP Network 10 799 ...

Страница 816: ...etwork groups that require a rout er for connection Make sure the computer and printer are on the same network For information about net work settings ask your network administrator By default Bonjour is activated on the printer The printer name as displayed in Printer Setup Utility or Print Center in Mac OS X is predefined as the Multicast DNS Service Name You can activate or deacti vate the Bonj...

Страница 817: ...4 Select the printer from the list in the Printer Browser window and click Add Network Setting Network Setting Mac OS X iPF815 Configuring the Destination for Bonjour Network 10 801 ...

Страница 818: ...Maintenance Ink Tanks 803 Printheads 817 Maintenance Cartridge 827 Cleaning the Printer 837 Other Maintenance 841 Maintenance iPF815 11 802 ...

Страница 819: ... 303MBK BK Ink Tank PFI 303BK C Ink Tank PFI 303C M Ink Tank PFI 303M Y Ink Tank PFI 303Y 700 ml 23 7 fl oz MBK Ink Tank PFI 703MBK BK Ink Tank PFI 703BK C Ink Tank PFI 703C M Ink Tank PFI 703M Y Ink Tank PFI 703Y Note For instructions on ink tank replacement see Replacing Ink Tanks P 803 Replacing Ink Tanks Compatible ink tanks Replacement ink tanks in 330 ml 11 2 fl oz and 700 ml 23 7 fl oz capa...

Страница 820: ...d the ink supply section of ink tanks you remove Handle ink tanks carefully during replacement The ink may stain clothing We recommend using up an Ink Tank in the course of printing within six months after breaking the seal Printing quality may be affected if you use older ink tanks Do not leave the printer without ink tanks installed for extended periods a month or more Residual ink may become cl...

Страница 821: ...k Tank replacement Note This step is not necessary if a message requests you to replace ink tanks Check the message on the Display Screen and press the OK button Remove the Ink Tank at this point 1 Press the Menu button to display MAIN MENU 2 Press or to select Rep Ink Tank and then press the button 3 Press or to select Yes and then press the OK button A message on the Display Screen requests you ...

Страница 822: ...o ink left 2 Lift the stopper a of the Ink Tank Lock Lever for the color to replace Lift the Ink Tank Lock Lever until it stops and then push it down to the front Note Push the Ink Tank Lock Lever down until it locks Make sure the Ink Tank Lock Lever does not return to the original position Maintenance Ink Tanks Replacing Ink Tanks iPF815 11 806 ...

Страница 823: ...e is still ink in the Ink Tank you removed store it with the ink holes a facing up Otherwise ink may leak and cause stains Put the Ink Tank in a plastic bag and seal it Note Dispose of used ink tanks according to local regulations Maintenance Ink Tanks iPF815 Replacing Ink Tanks 11 807 ...

Страница 824: ...o ink left 2 Lift the stopper a of the Ink Tank Lock Lever for the color to replace Lift the Ink Tank Lock Lever until it stops and then push it down to the front Note Push the Ink Tank Lock Lever down until it locks Make sure the Ink Tank Lock Lever does not return to the original position Maintenance Ink Tanks Replacing Ink Tanks iPF815 11 808 ...

Страница 825: ...on Caution If there is still ink in the Ink Tank you removed store it in the box with the ink holes a facing up Otherwise ink may leak and cause stains Note Dispose of used ink tanks according to local regulations Maintenance Ink Tanks iPF815 Replacing Ink Tanks 11 809 ...

Страница 826: ... may sediment which may affect printing quality 2 Open the pouch and remove the Ink Tank Important Never touch the ink holes or electrical contacts This may cause stains damage the Ink Tank and affect printing quality Do not remove and agitate ink tanks that have already been installed in the printer Ink may leak out Maintenance Ink Tanks Replacing Ink Tanks iPF815 11 810 ...

Страница 827: ...nk Tank does not fit in the holder do not force it into the holder Make sure the color of the Ink Tank Lock Lever matches the color of the Ink Tank and check the orientation of the Ink Tank before reloading it 4 Lift the Ink Tank Lock Lever until it stops and then push it down until it clicks into place 5 Make sure the Ink Lamp is lit in red Maintenance Ink Tanks iPF815 Replacing Ink Tanks 11 811 ...

Страница 828: ...d the ink tank 700 ml 1 Before opening the pouch hold the new Ink Tank with both hands and tilt it to the left and right as shown shaking gently it seven or eight times Important If you do not agitate the Ink Tank the ink may sediment which may affect printing quality Maintenance Ink Tanks Replacing Ink Tanks iPF815 11 812 ...

Страница 829: ... out 3 Press the OK button and insert the Ink Tank into the holder with the ink holes facing down as shown Note Ink tanks cannot be loaded in the holder if the color or orientation is incorrect If the Ink Tank does not fit in the holder do not force it into the holder Make sure the color of the Ink Tank Lock Lever matches the color of the Ink Tank and check the orientation of the Ink Tank before r...

Страница 830: ... push it down until it clicks into place 5 Make sure the Ink Lamp is lit in red Note If the Ink Lamp is not lit in red reload the tank 6 Close the Ink Tank Cover The printer will go online or offline Maintenance Ink Tanks Replacing Ink Tanks iPF815 11 814 ...

Страница 831: ...isplayed above the ink level if ink is low if no ink is left and if you have deactivated ink level detection The remaining ink level is indicated as shown below If the Display Screen indicates to replace the Ink Tank replace the Ink Tank If a message is displayed indicating to check the remaining ink levels or after tasks that consume a lot of ink such as large format printing or head cleaning che...

Страница 832: ... lot of ink If little ink is left there may not be enough for large format printing head cleaning and maintenance which require a lot of ink In this case replace or prepare to replace the Ink Tank before maintenance If a message for ink replacement is shown on the Display Screen When ink runs out the Message lamp flashes a message regarding Ink Tank replacement is shown on the Display Screen and p...

Страница 833: ...If printing is faint or streaked in different colors make sure the Printhead nozzles are clear by printing a test pattern to check the nozzles Note You can specify a number of pages in the printer s Noz Check Freq menu for automatic nozzle checking every time you finish printing that quantity See Main Menu Settings P 722 1 Load unused paper Attaching the Roll Holder to Rolls P 623 Loading Rolls in...

Страница 834: ...ts the test pattern on the bottom line If the horizontal lines are not faint or incomplete the nozzles are clear If some sections of the horizontal lines are faint or incomplete the nozzles for those colors are clogged If horizontal lines are faint or incomplete follow the steps below and check again for nozzle clogging 1 Clean the Printhead See Cleaning the Printhead P 819 2 Print a test pattern ...

Страница 835: ...ay have reached the end of its useful life Contact your Canon dealer Caution Do not remove the Maintenance Cartridge or Ink Tank during cleaning 1 Press the Menu button to display MAIN MENU 2 Press or to select Head Cleaning and then press the button 3 Press or to select the type of cleaning and then press the OK button Head Cleaning A Use Head Cleaning A if printing is faint or contains foreign s...

Страница 836: ...ly before installation After removing the Printhead from the pouch install it right away If the Printhead is left after the pouch is opened the nozzles may dry out which may affect printing quality If you need to put a Printhead somewhere temporarily before installation do not keep the nozzles and metal contacts P 824 facing down If the nozzles or metal contacts are damaged it may affect the print...

Страница 837: ...o select Replace P head and then press the button 6 Press or to select Yes and then press the OK button Ink is now filled After about two minutes a message is shown on the Display Screen instructing you to open the Top Cover 7 Open the Top Cover Instructions are now shown on the Display Screen regarding Printhead replacement Maintenance Printheads iPF815 Replacing the Printhead 11 821 ...

Страница 838: ...e wrung out completely to wipe it clean Important Do not touch the Linear Scale a Carriage Shaft b or Ink Tube Stabilizer c Touching these parts may damage them Never touch the metal contacts of the Carriage This may damage the printer Maintenance Printheads Replacing the Printhead iPF815 11 822 ...

Страница 839: ... out of the way manually if the Carriage is concealing the ventilation duct and then clean the duct 10 Pull the Printhead Fixer Lever forward all the way to open it completely 11 Pull up the Printhead Fixer Cover to open it completely 12 Remove the used Printhead Maintenance Printheads iPF815 Replacing the Printhead 11 823 ...

Страница 840: ...ad always hold it by the grips a Never touch the nozzles b or metal contacts c This may damage the Printhead and affect printing quality 14 While firmly holding the Printhead you have removed use your other hand to remove the orange Safety Cap 1 a Squeeze the grips c of Safety Cap 2 b and pull it down to remove it Maintenance Printheads Replacing the Printhead iPF815 11 824 ...

Страница 841: ...rounding area If ink accidentally spills wipe off the ink with a dry cloth Do not reattach the Safety Cap or protective material Dispose of these materials in accordance with local regulations 15 With the nozzles facing down and the metal contacts toward the back insert the Printhead into the Carriage Careful ly push the printhead firmly into the Carriage ensuring that the nozzles and metal contac...

Страница 842: ... you to load paper Important Never remove an Ink Tank while the system is filling with ink If Auto Print is Off in the printer menu the Printhead alignment will not be adjusted In this case adjust the alignment after Printhead replacement by accessing Advanced Adj in Auto Head Adj See Automatic Straightening of Lines and Colors Auto Head Adj P 668 Maintenance Printheads Replacing the Printhead iPF...

Страница 843: ... 827 Precautions when handling the Maintenance Cartridge Take the following precautions when handling the Maintenance Cartridge Caution For safety keep the Maintenance Cartridge out of the reach of children If ink is accidentally ingested contact a physician immediately Important Do not remove the Maintenance Cartridge except to replace it To prevent ink from leaking from a used Maintenance Cartri...

Страница 844: ...ntenance Cartridge during initialization immediately after turning on the printer during Print head cleaning or while ink is being drawn out If you pause printing to replace the Maintenance Cartridge it may cause the printed images to be blurry 2 Press the Menu button to display MAIN MENU 3 Press or to select Maintenance and then press the button 4 Press or to select Repl maint cart and then press...

Страница 845: ...rtant Used maintenance cartridges are heavy Always grasp the cartridge firmly and keep the cartridge lev el during removal and storage If you drop a used Maintenance Cartridge or store it at an angle ink may leak and cause stains The remaining Maintenance Cartridge capacity is recorded on each printer Do not install a used Maintenance Cartridge in another printer Maintenance Maintenance Cartridge ...

Страница 846: ...artridge b Important Never touch the metal contacts a This may damage the Maintenance Cartridge 9 Keep the used Maintenance Cartridge level as you put it in the plastic bag Expel excess air from the plastic bag and seal the zipper Maintenance Maintenance Cartridge Replacing the Maintenance Cartridge iPF815 11 830 ...

Страница 847: ...and cause stains In accordance with corporate environmental protection policies Canon collects used maintenance cartridges Follow the instructions provided with the new Maintenance Cartridge that describe how to process the used Maintenance Cartridge 11 Wipe away any soiling on the Maintenance Cartridge Cover Important Support the Maintenance Cartridge Cover from underneath as you wipe it Maintena...

Страница 848: ...n The printer now initializes the Maintenance Cartridge Next replace the Shaft Cleaner Replacing the Shaft Cleaner Replace the Shaft Cleaner when you replace the Maintenance Cartridge New Shaft Cleaner is included with replacement Maintenance Cartridge Maintenance Maintenance Cartridge Replacing the Maintenance Cartridge iPF815 11 832 ...

Страница 849: ...ss the button 4 Press or to select Yes and then press the OK button After the Carriage is moved the Display Screen indicates Open Upper Cover Note If you do not respond within two minutes shaft cleaner replacement is canceled and the printer goes online automatically In this case repeat the procedure 5 Open the Top Cover Note Do not open the Printhead Fixer Lever toward the front Accidentally open...

Страница 850: ...the Linear Scale a Carriage Shaft b or Ink Tube Stabilizer c Touching these parts may damage them 7 After removing the cap of the new Shaft Cleaner hold it by the grips a and attach it to the Carriage Push the Shaft Cleaner until it clicks into place Maintenance Maintenance Cartridge Replacing the Maintenance Cartridge iPF815 11 834 ...

Страница 851: ...the Information button to display the remaining capacity of the Maintenance Cartridge on the Display Screen If the Display Screen indicates to replace the Maintenance Cartridge replace the Maintenance Cartridge If a message is displayed indicating to check the remaining capacity of the Maintenance Cartridge or before tasks that deplete much of the capacity such as head cleaning or preparations to ...

Страница 852: ...e printer deplete much of the Maintenance Car tridge capacity In particular preparing to move the printer depletes a lot of the capacity To check the remaining Maintenance Cartridge capacity press the Information button Replace the Maintenance Cartridge and perform related maintenance as needed If a message for the Maintenance Cartridge replacement is shown on the Display Screen When the Maintenan...

Страница 853: ...parts with a dry cloth Caution Never use flammable solvents such as alcohol benzene or thinner If these substances come into con tact with electrical components inside the printer there is a risk of fire or electrical shock Important If the Ejection Guide is dirty it may soil the edge of the paper when the paper is cut We recommend cleaning the Ejection Guide even if it does not appear dirty becau...

Страница 854: ...mmend cleaning the Platen after borderless printing or printing on small paper If the Ejection Guide is dirty it may soil the edge of the paper when the paper is cut We recommend clean ing the Ejection Guide even if it does not appear dirty because it may actually be covered with paper dust 1 Open the Top Cover 2 If paper dust has accumulated in the Vacuum holes a on the Platen or in the Borderles...

Страница 855: ... or Ink Tube Stabilizer c Touching these parts may damage them Avoid cleaning where the Carriage is retracted in position d or e Note If the Cleaning Brush is dirty rinse it in water Maintenance Cleaning the Printer iPF815 Cleaning Inside the Top Cover 11 839 ...

Страница 856: ...erless Printing Ink Grooves g and so on Important Do not use a dry cloth to wipe inside the Top Cover This may create a static charge which may at tract dust and affect the printing quality Never use flammable solvents such as alcohol benzene or thinner If these substances come into con tact with electrical components inside the printer there is a risk of fire or electrical shock Do not touch the ...

Страница 857: ...ing of the remaining capacity Replace the Maintenance Cartridge before transfer prepara tions See Replacing the Maintenance Cartridge P 827 Depending on the state of the printer part replacement may be necessary when preparing to transfer the printer that is when you execute the printer menu item to prepare for transfer Ink must be drained before Level 2 or Level 3 printer transfer as described in...

Страница 858: ... Always contact service before preparing to move the printer is shown on the Display Screen press the OK button The Display Screen indicates Please Wait If you have selected Level 1 in step 5 after processing in preparation to move the printer is finished the mes sage Finished preparing to move printer Turn off printer is shown on the Display Screen Go to step 14 When you are finished preparing to...

Страница 859: ...8 Lift the stopper a of the Ink Tank Lock Lever a Lift the Ink Tank Lock Lever until it stops and then push it down to the front 9 Remove the Ink Tank Maintenance Other Maintenance iPF815 Preparing to Transfer the Printer 11 843 ...

Страница 860: ... may leak and cause stains 10 Repeat steps 8 and 9 to remove all ink tanks 11 Push down the release lever a as shown as you gently return all ink tank lock levers to the original position 12 Close the Ink Tank Cover Maintenance Other Maintenance Preparing to Transfer the Printer iPF815 11 844 ...

Страница 861: ...ug it It may damage the printer if you unplug it before it is off and transfer it in that state If you accidentally unplug the printer plug it in again reinstall the Ink Tank wait until the printer comes online and follow this procedure again 14 Disconnect the power cord interface cable and Media Take up Unit Power Inlet 15 Open the Top Cover and lift the Ejection Guide 16 Remove the four ejection...

Страница 862: ...ere the Belt Stopper is the one that was removed and stored after initial installation Neglecting to attach the Belt Stopper may damage the printer Do not touch the Linear Scale a Carriage Shaft b or Ink Tube Stabilizer c Touching these parts may damage them Maintenance Other Maintenance Preparing to Transfer the Printer iPF815 11 846 ...

Страница 863: ...ge the Stand by following the installation procedure in reverse 23 Repack the Roll Holder Holder Stopper and printer in shipping materials and then package them in a shipping box Updating the Firmware Update the printer firmware to take advantage of new and improved printer functions Confirming the firmware version 1 Press the Menu button to display MAIN MENU 2 Press or to select Information and t...

Страница 864: ... the Canon website If the firmware available online is newer than the installed firmware update the printer firmware For details on downloading and updating the firmware visit the Canon website Maintenance Other Maintenance Updating the Firmware iPF815 11 848 ...

Страница 865: ... Regarding Paper 852 Printing does not start 863 The printer stops during a print job 865 Problems with the printing quality 866 Cannot print over a network 878 Installation problems 880 HP GL 2 problems 882 Other problems 884 Troubleshooting iPF815 12 849 ...

Страница 866: ...ng You can wait until ink dries before cutting the roll and you can cut rolls at a desired posi tion Specifying the Cutting Method for Rolls P 642 How do I print without borders Borderless printing is possible on rolls You can also specify borderless printing in the print er driver by adjusting the original size to match the paper size Before borderless printing set the blue Switch on the platen t...

Страница 867: ...thicker to make them easier to see Giving Priority to Particular Graphic Elements and Colors for Printing P 55 How do I modify how colors are printed You can adjust colors as desired in the printer driver before printing Adjusting the Color in the Printer Driver P 46 How do I use printer driver settings again in subsequent jobs By saving settings information in a favorite you can apply the setting...

Страница 868: ...ntinues Rotating 861 The size of clear film cannot be detected 862 Clearing Jammed Roll Paper If roll paper jams follow the steps below to remove jams Note If you do not find any scraps or jams see Troubleshooting When Paper Jams are not Found P 858 1 Turn the printer off See Turning the Printer On and Off P 694 2 Open the Top Cover 3 If the Carriage is out move the Carriage out of the way away fr...

Страница 869: ...If the Cutter is out move the Cutter to the right side away from the paper Important If the Cutter is on the left side be sure to move it to the right If the Cutter is on the left side when you turn the printer on the printer may rip the paper Troubleshooting Problems Regarding Paper iPF815 Clearing Jammed Roll Paper 12 853 ...

Страница 870: ...ammed portion out toward the front Use a scissors or cutting tool to cut away the printed or wrinkled portion Caution When cutting paper be careful to avoid injury and damaging the printer Troubleshooting Problems Regarding Paper Clearing Jammed Roll Paper iPF815 12 854 ...

Страница 871: ...t evenly to the position of the Ejection Guide a Align the right side of the roll paper with the Paper Alignment Line b keeping this side parallel to the line and then lower the Release Lever Important Do not force the roll paper into alignment with the Paper Alignment Line b This may prevent the paper from being advanced straight If you pull out too much of the roll an excessive amount will be cu...

Страница 872: ...ly by selecting Paper Cutting in the printer menu See Specifying the Cutting Method for Rolls P 642 Clearing a Jammed Sheet If a sheet jams follow the steps below to remove it 1 Turn the printer off See Turning the Printer On and Off P 694 2 Open the Top Cover 3 If the Carriage is out move the Carriage out of the way away from the paper Troubleshooting Problems Regarding Paper Clearing a Jammed Sh...

Страница 873: ...ale a Carriage Shaft b or Ink Tube Stabilizer c Touching these parts may damage them 4 Lift the Release Lever 5 Hold the paper and pull it out toward the front Troubleshooting Problems Regarding Paper iPF815 Clearing a Jammed Sheet 12 857 ...

Страница 874: ...n the left a Carriage error may occur when you turn on the printer 7 Lower the Release Lever and close the Top Cover 8 Turn the printer on See Turning the Printer On and Off P 694 Troubleshooting When Paper Jams are not Found If you cannot find a paper jam search for the paper as follows 1 Turn the printer off See Turning the Printer On and Off P 694 Troubleshooting Problems Regarding Paper Troubl...

Страница 875: ...ere by pushing it to the floor with your fingers 3 Lift the Release Lever 4 Open the Top Cover and if there is a paper jam at the position shown push it inside with your fingers Troubleshooting Problems Regarding Paper iPF815 Troubleshooting When Paper Jams are not Found 12 859 ...

Страница 876: ...times insert it through the gap of the Platen a and the Paper Retainer b and push the jammed paper out 5 Lower the Release Lever and close the Top Cover 6 Turn the printer on See Turning the Printer On and Off P 694 Roll paper cannot be inserted into the Paper Feed Slot Cause Corrective Action The roll paper is warped Straighten out curls and reload the roll Troubleshooting Problems Regarding Pape...

Страница 877: ...ter driver In MAIN MENU Eject or Manual is specified in Cutting Mode Specify Automatic in Cutting Mode in MAIN MENU Rolls are not cut when you are using the Media Take up Unit Either execute Paper Cutting in the Control Panel or lift the Re lease Lever and cut the roll with scissors See Removing Printed Documents from the Media Take up Unit P 761 The Media Take up Unit Continues Rotating Cause Cor...

Страница 878: ...ct the Media Take up Sen sor cord from the Right Media Take up Unit and reconnect it firmly all the way in 3 Turn the printer on See Using the Media Take up Unit P 754 If the Media Take up Unit continues ro tating contact your Canon dealer for as sistance The size of clear film cannot be detected Cause Corrective Action The Platen is soiled with ink or other substances Open the Top Cover and clean...

Страница 879: ...b as follows 1 Select the printer icon in the Printers and Faxes or Printers window 2 Clear Pause Printing in the File menu to restart the print job In Mac OS X restart the print job as follows 1 Click Print Fax This is identified as Printer Setup Utility or Print Center in other versions of Mac OS X 2 Select the printer and then Resume Printer or Start Jobs in the Printers menu to restart the pri...

Страница 880: ...or agitation varies depending on how long the printer has been turned off Between about a minute and a half to twenty minutes During agitation you can print or do other opera tions after the printer goes Online Troubleshooting Printing does not start The display screen indicates Agitating iPF815 12 864 ...

Страница 881: ...ten it and ejects the scraps when Trim Edge First in the printer menu is On or when Trim Edge First is Automatic and the leading edge is slanted The printer is ready to print after this initial preparation When Off is selected under Trim Edge First the edge is not cut and scraps are not removed The Printhead nozzles are clog ged Print a test pattern to check the nozzles and make sure the Printhead...

Страница 882: ...rinter was left without ink tanks installed for some time ink has become clogged in the ink supply system After the ink tanks have been installed for 24 hours run Head Cleaning B See Cleaning the Printhead P 819 Paper is jammed inside the Top Cover Follow the steps below to remove the jammed piece of paper inside the Top Cover 1 Press the Online button to bring the printer offline 2 Open the Top C...

Страница 883: ...ght Coated Paper or other paper based media choose a VacuumStrngth setting of Strong or Strongest If paper still rubs against the printhead try raising the Printhead by setting Head Height to Highest See Adjusting the Vacuum Strength VacuumStrngth P 683 See Troubleshooting Paper Abrasion and Blurry Images Head Height P 675 When printing on CAD Tracing Paper or other film based media choose a Vac u...

Страница 884: ...lurry Images Head Height P 675 You are printing on heavyweight paper or paper that curls or wrin kles easily after absorbing ink When printing on Heavyweight Coated Paper or other paper based media choose a VacuumStrngth setting of Strong or Strongest If paper still rubs against the printhead try raising the Printhead by setting Head Height to Highest See Adjusting the Vacuum Strength VacuumStrngt...

Страница 885: ... 837 Printed colors are inaccurate Cause Corrective Action Color adjustment has not been activated in the Ad vanced Settings of the printer driver In the Advanced Settings of the printer driver access Color Set tings in Color Mode to adjust colors Colors have not been adjusted on the computer or monitor Refer to the computer and monitor documentation to adjust the colors Adjust the settings of the...

Страница 886: ... 668 The Printhead nozzles are clogged Print a test pattern to check the nozzles and see if they are clogged See Checking for Nozzle Clogging P 817 Streaks may occur if you set the Print Quality too low Choose a higher level of Print Quality in the Advanced Settings of the printer driver and try printing again Printing in Draft or Standard mode is faster and consumes less ink than in Highest or Hi...

Страница 887: ...nt ing P 55 The Printhead is out of alignment Adjust the Printhead alignment See Automatic Straightening of Lines and Colors Auto Head Adj P 668 Drying documents stacked on each other may cause uneven colors To avoid uneven colors we recommend drying each sheet separately Color density may be uneven if you use Glossy Paper art paper or Coat ed Paper In Advanced Settings of the printer driver choos...

Страница 888: ...ter driver as you have loaded in the printer 1 Hold down the Stop button for a second or more to cancel printing 2 Change the type of paper in the printer driver and try printing again Setting the Blue Switch on the Platen If printed documents exhibit the following symptoms adjust the setting of the blue Switch on the Platen Image edges are blurred Image edges are affected by white banding Importa...

Страница 889: ...ove the Cleaning Brush 4 Using the back of the Cleaning Brush move the first Switch to the side opposite Troubleshooting Problems with the printing quality iPF815 Setting the Blue Switch on the Platen 12 873 ...

Страница 890: ...610 mm 24 in 7 ISO A0 ISO A1 841 mm 33 in 8 36 x48 ARCH E 24 x36 ARCH D 914 mm 36 in 9 JIS B0 JIS B1 1030 mm 40 5 in 10 Poster 42 x60 1 067 mm 42 in 6 Using the back of the Cleaning Brush move the Switch to the side opposite corresponding to the size of the paper for printing In this case note that you will move the switch in the opposite direction from the direction in step 4 7 Close the Top Cove...

Страница 891: ...Amount P 676 You can adjust the feed amount in 0 02 increments See Main Menu Settings P 722 The type of paper specified in the printer driver does not match the type loaded in the printer Load paper of the same type as you have specified in the printer driver See Loading Rolls in the Printer P 628 See Loading Sheets in the Printer P 651 Make sure the same type of paper is specified in the printer ...

Страница 892: ... as you have specified in the printer driver See Loading Rolls in the Printer P 628 See Loading Sheets in the Printer P 651 Make sure the same type of paper is specified in the printer driver as you have loaded in the printer 1 Hold down the Stop button for a second or more to cancel printing 2 Change the type of paper in the printer driver and try printing again Lines are misaligned Cause Correct...

Страница 893: ...er For paper specific troubleshooting tips to improve the printing quality refer to the Paper Reference Guide See Types of Paper P 617 Troubleshooting Problems with the printing quality iPF815 Problems with the printing quality caused by the type of paper 12 877 ...

Страница 894: ... mode with the hub Although the printer normally detects the hub communication mode and transmission rate automatically in auto negotiation mode sometimes the hub settings cannot be detected In this case configure the connection method manually specifying the communication mode in use See Configuring the Communication Mode Manually P 780 Cannot print over a TCP IP network Cause Corrective Action T...

Страница 895: ...ailable 4 If data transmission to a printer on another subnet fails deactivate NCP burst mode in that printer s network protocol settings 5 If the printer is used in queue server mode specify Other Unknown as the printer type Cannot print over AppleTalk or Bonjour networks Cause Corrective Action The AppleTalk protocol is not enabled on the printer Activate AppleTalk on the printer See Configuring...

Страница 896: ...t and then click Exit Removing printer drivers and imagePROGRAF Printmonitor Macintosh Remove the printer driver or imagePROGRAF Printmonitor as follows 1 Insert the User Software CD ROM provided with the printer in the CD ROM drive 2 Start the printer driver installer included in the User Software CD ROM Open the OS X folder and double click iPF Driver Installer X 3 In the upper left menu choose ...

Страница 897: ...ows 1 From the Windows start menu select Programs imagePROGRAF Device Setup Utility Uninstaller image PROGRAF Device Setup Utility to start the wizard 2 In the wizard window click Delete and then click Next 3 Follow the instructions on the screen to remove imagePROGRAF Device Setup Utility Troubleshooting Installation problems iPF815 Removing Installed Printer Drivers 12 881 ...

Страница 898: ...to Rotate to Off before attempting to print again See Main Menu Settings P 722 Lines Are Printed Too Thick or Thin During HP GL 2 Printing Cause Corrective Action The Line Width setting in the main menu is incorrect Confirm the selection in Line Width If fine lines are printed faint setting ThickenFi neLines to On in the main menu will print the lines more distinctly See Main Menu Settings P 722 H...

Страница 899: ...serve Paper to On The layout will be changed to the optimal layout See Main Menu Settings P 722 HP GL 2 printing takes a long time Cause Corrective Action Large print jobs with a lot of data take longer to print On the printer Control Panel set Input Resolution to 300dpi See Main Menu Settings P 722 The printer stops when printing a HP GL 2 job the carriage stops moving Cause Corrective Action The...

Страница 900: ...r consumes a lot of ink 886 Ink level detection 886 The printer does not go on Cause Corrective Action The printer is unplugged Plug the power cord into the outlet and then turn on the printer The specified voltage is not supplied Check the voltage of the outlet and breaker See Specifications P 765 Troubleshooting Other problems The printer does not go on iPF815 12 884 ...

Страница 901: ...the tone for ink agitation At regular intervals to ensure optimal printing quality the ink is agitated automatically even if the printer is in Sleep mode Ink agitation takes about a minute and a half The ink is also agitated automatically under the following conditions Note that other operations are not possible while Agitating is displayed on the control panel After the printer is turned on The t...

Страница 902: ...load ink tanks once emptied Ink level detection Ink tanks specified for this printer feature an ink level detection function to prevent the ink from running out during print ing which prevents printer damage See Ink Tanks P 803 This function will not work correctly if you use refill ink tanks As a result printing stops Thus before using refill ink tanks you must cancel the ink level detection Prin...

Страница 903: ...ssage is shown on the Display Screen about disabling ink level detection After checking the mes sage press the button 4 After checking the message press the button 5 Press or to select Yes and then press the OK button Troubleshooting Other problems iPF815 Ink level detection 12 887 ...

Страница 904: ...press the button 8 Press or to select Yes and then press the OK button 9 A confirmation message about updating ink information is shown on the Display Screen After checking the mes sage press the button Troubleshooting Other problems Ink level detection iPF815 12 888 ...

Страница 905: ...10 Press or to select Yes and then press the OK button Ink level detection is now disabled and the printer goes online Troubleshooting Other problems iPF815 Ink level detection 12 889 ...

Страница 906: ...sages regarding ink 904 Messages regarding printing or adjustment 907 Messages regarding printheads 909 Messages regarding the maintenance cartridge 912 Messages regarding the hard disk 914 Messages regarding HP GL 2 916 Other Messages 917 Error Message iPF815 13 890 ...

Страница 907: ...a letter or number 917 Ink insufficient 904 Ink tank is empty 905 Insert the maintenance cartridge 912 Insufficient paper for job 896 Mail box full Now printing without saving data 914 Mail box nearly full 915 Maintenance cartridge full 912 Maintenance cartridge problem 913 Maximum jobs stored 915 Media take up unit ready 902 Multi sensor error 919 No ink left 904 No ink tank loaded 906 No Mainten...

Страница 908: ... is selected 899 Sheet removed 899 The mail box is full 914 The paper is too small 894 The roll is empty 897 This paper cannot be used 897 This type of paper is not compatible with HP GL 2 916 Too many jobs for mail box 915 Top cover is open 918 Turn on the media take up unit 903 Unknown file 918 Use another paper 907 Wrong ink tank 906 Wrong maintenance cartridge 912 Wrong printhead 910 Error Mes...

Страница 909: ...djustment on several sheets but sheets of different types of paper were used Hold down the Stop button for a second or more to cancel printing When printing a test pattern use sheets of the same type of paper Lift the Release Lever and load a sheet of the same type of paper See Loading and Printing on Sheets P 8 PaprTypeMismatch Cause Corrective Action When the Detect Mismatch menu is set to Pause...

Страница 910: ... Online button to resume printing However note that this error may cause paper jams and affect the printing quality Adjust the paper size setting in the printer driver to match the size loaded in the printer as follows 1 Hold down the Stop button for a second or more to cancel print ing 2 Change the paper size setting in the printer driver to the size loa ded in the printer and try printing again ...

Страница 911: ...ing jobs is shown on the Display Screen press the OK button Printing will resume starting from the page on which the error occurred See Loading Rolls in the Printer P 628 If this error recurs after you reload the roll re move the Roll Holder from the printer push the roll firmly in until it touches the Roll Holder flange and reload the Roll Holder in the printer See Attaching the Roll Holder to Ro...

Страница 912: ...s in use Press the Online button to resume printing However the roll paper may run out during the print job and you may not be able to print all of the document Hold down the Stop button for a second or more to cancel printing Either change the printer driver Paper Source setting or the GL2 Settings Paper Source setting in the printer menu or replace the roll with a roll that has enough pa per for...

Страница 913: ...is selected Cause Corrective Action You have attempted to print a job sent from a computer or a test print sheet or other printer status information on a roll but no roll is loaded Load a roll and try printing again To print on a sheet instead hold down the Stop button for more than a second to cancel printing load a sheet and then print See Loading and Printing on Sheets P 8 Roll printing is sele...

Страница 914: ...rint Quality in the Advanced Settings of the printer driver See Giving Priority to Particular Graphic Elements and Colors for Printing P 55 Press OK Cause Corrective Action The roll is empty Follow these steps to replace the used roll with a new roll of the same type and size 1 Press the OK button and remove the roll See Removing the Roll from the Printer P 634 See Removing the Roll Holder from Ro...

Страница 915: ...g load a roll and then print See Loading and Printing on Rolls P 3 Regular printing is selected but a roll is loaded Cause Corrective Action A print job for printing on sheets was sent when a roll is loaded Hold down the Stop button for a second or more to cancel printing Remove the roll and load a sheet of the type and size of paper you have specified in the printer driver See Removing the Roll f...

Страница 916: ... page on which the error occurred Paper loaded askew Cause Corrective Action Paper is loaded askew Follow these steps to reload the roll 1 Lift the Release Lever 2 Open the Top Cover 3 Adjust the right edge of the roll to make it parallel to the right Paper Alignment Line 4 Lower the Release Lever 5 Close the Top Cover See Loading Rolls in the Printer P 628 If this error recurs after you reload th...

Страница 917: ...ll resume starting from the page on which the error occurred You are not using the print er under the recommended environmental conditions for the paper Use the printer only where the recommended environmental conditions for the paper are met Note that various environmental conditions are recommended for various types of paper For details on the recommended environmental conditions for paper see t...

Страница 918: ...d the roll cannot be de tected Wipe the sensor with a dry cloth to clean it The roll is out of range of detection by the Media Take up Unit sen sor Reload the roll See Loading Rolls in the Printer P 628 The Media Take up Unit sensor is damaged Contact your Canon dealer for assistance A paper jam has occurred and the roll cannot be rewound Remove the paper from the Media Take up Unit Press the Onli...

Страница 919: ...the width of the ink groove for borderless printing Insert the roll firmly until it touches the flange of the Roll Holder See Attaching the Roll Holder to Rolls P 623 If you press the Online button and continue printing the document will be printed with a border Check supported paper Cause Corrective Action The print job received specifies a type or width of paper that is not compatible with borde...

Страница 920: ...ank that is low with a new Ink Tank See Replacing Ink Tanks P 803 No ink left Cause Corrective Action There is no ink left Open the Ink Tank Cover and replace the Ink Tank for which the Ink Lamp is flashing See Replacing Ink Tanks P 803 Remaining level of the ink cannot be correctly detected Cause Corrective Action Ink level detection cannot work cor rectly if you use refill ink tanks The refill i...

Страница 921: ... Tank Cover and replace the Ink Tank for which the Ink Lamp is flashing See Replacing Ink Tanks P 803 Not much ink is left Cause Corrective Action Not much ink is left Prepare a new Ink Tank We recommend replacing the Ink Tank with a new Ink Tank at this point if you plan to print large format or high quantity jobs Error Message Messages regarding ink iPF815 Close Ink Tank Cover 13 905 ...

Страница 922: ...nk Tanks P 803 There is a problem with the Ink Tank Replace it with a new Ink Tank See Replacing Ink Tanks P 803 Wrong ink tank Cause Corrective Action The Ink Tank in the printer is incompatible Load an Ink Tank specified for use with the printer See Replacing Ink Tanks P 803 Error Message Messages regarding ink No ink tank loaded iPF815 13 906 ...

Страница 923: ...s specified Lift the release lever and replace paper with A4 LTR vertical or larger Cause Corrective Action The loaded paper is too small Switch to paper A4 Letter vertical or larger Lift the release lever and replace roll with 10 in wide or larger roll Cause Corrective Action The loaded paper is too small Load a roll 10 inches wide or larger Borderless printng not possible Paper stretched or shra...

Страница 924: ...set the blue Switch on the platen to the side See Setting the Blue Switch on the Platen P 872 Blue platen switch is dirty Cause Corrective Action The blue Switch on the platen is dirty Open the Top Cover and clean the blue Switch on the platen See Cleaning Inside the Top Cover P 837 Error Message Messages regarding printing or adjustment Before borderless printing move the blue platen switch iPF81...

Страница 925: ...paper that you often use other than film for Printhead adjust ment See Automatic Straightening of Lines and Colors Auto Head Adj P 668 The Printhead is in stalled crooked Straighten the Printhead as follows and then execute Auto Head Adj again 1 Press the Online button to clear the error 2 Use Head Inc Adj to adjust the angle of inclination of the Printhead See Adjusting Line Misalignment Head Inc...

Страница 926: ...execute Head Cleaning B once or twice contact your Canon dealer for assistance Wrong printhead Cause Corrective Action An incompatible Printhead has been installed Open the Top Cover and replace the Printhead with a new one See Replacing the Printhead P 820 Problem with Printhead Cause Corrective Action The Printhead nozzles are becoming clogged If printing is faint clean the Printhead See Cleanin...

Страница 927: ...e Printhead 1 Hold down the Stop button for a second or more to cancel printing 2 Printhead cleaning options See Cleaning the Printhead P 819 If this message is still displayed replace the Printhead See Replacing the Printhead P 820 Error Message Messages regarding printheads iPF815 Execute printhead cleaning 13 911 ...

Страница 928: ...epare for maint cart replacement Cause Corrective Action The Maintenance Cartridge is almost full You can continue to print but prepare a new Maintenance Cartridge to use when the message for replacement is displayed No Maintenance Cartridge capacity Cause Corrective Action The Maintenance Cartridge cannot absorb enough ink for Printhead cleaning or other operation After confirming that the printe...

Страница 929: ...or used Maintenance Cartridge has been installed Install an unused Maintenance Cartridge specified for use with the printer See Replacing the Maintenance Cartridge P 827 Error Message Messages regarding the maintenance cartridge iPF815 Maintenance cartridge problem 13 913 ...

Страница 930: ...upted Restart the printer Only the corrupted files will be deleted and the printer will restart The mail box is full Cause Corrective Action There is no more space on the printer s hard disk Press the Stop button to cancel the print job Delete print jobs from the queue See Managing Queued Jobs Deleting or Preempting Other Jobs P 568 Delete unneeded jobs stored in personal boxes box numbers in the ...

Страница 931: ...ox Delete unneeded jobs stored in personal boxes See Deleting Saved Jobs P 577 Too many jobs for mail box Cause Corrective Action Saved jobs exceed the personal box capaci ty Press the Stop button to cancel the print job Delete print jobs from the queue See Managing Queued Jobs Deleting or Preempting Other Jobs P 568 Delete unneeded jobs stored in personal boxes box numbers in the range 01 29 See ...

Страница 932: ...n paper compatible with HP GL 2 refer to the Paper Reference Guide See Types of Paper P 617 Press the Online button to resume printing However note that this error may cause paper jams and affect the printing quality GL2 Wxxxx The memory is full xxxx is 0501 0903 or 0904 Cause Corrective Action The printer memory became full while processing the job received Check the print job and the printing re...

Страница 933: ...ror code and message turn off the printer and con tact your Canon dealer for assistance Hardware error xxxxxxxx xxxx x represents a letter or number Cause Corrective Action The last portion of roll paper was used during a print job The paper was not advanced because the trailing edge is taped to the roll Turn off the printer and remove the roll from the print er before restoring power Fastening ta...

Страница 934: ...an continue to use the printer for some time until Parts replacement time has passed will be displayed Contact your Canon dealer for assistance Parts replacement time has passed Cause Corrective Action It is past the recommended time to replace consumables for which service is required Contact your Canon dealer for assistance Unknown file Cause Corrective Action Data sent to keep the printer up to...

Страница 935: ...ensure the printer is not used when exposed to direct sunlight or strong lighting The performance of a sensor inside the printer may be impaired Turn off the printer and wait at least three seconds before restoring the power If the message is displayed again contact your Canon dealer for as sistance Error Message Other Messages iPF815 Multi sensor error 13 919 ...

Страница 936: ...Appendix How to use this manual 921 Disposal of the product 931 Appendix iPF815 14 920 ...

Страница 937: ...Example Press the OK button Control panel messages Example Head Cleaning is displayed Software interface items Menus and Buttons Example Click OK Keyboard keys Example Press the Tab key Part names Names of printer parts are indicated as follows in this User Manual Printer part names Example Open the Top Cover Cross reference Other pages or manuals that provide related information are indicated as ...

Страница 938: ...ized reproduction of this User Manual in whole or part is prohibited May we request Thank you for understanding the following points The information in this User Manual is subject to change without notice We strive to ensure accuracy of information in this User Manual but if you notice errors or omissions please contact us Searching Topics You can find information in topics of this User Manual by ...

Страница 939: ... read The terms you searched for will be highlighted in the topic To review multiple topics at once select the check box of desired topics and click the Apply button Appendix How to use this manual iPF815 Searching Topics 14 923 ...

Страница 940: ...ow as an example Printing a group of topics in the manual When you access printable HTML versions of the content from section titles in the table of contents you can specify a group of topics to print 1 Click a section title in the table of contents Here Basic Printing Workflow is used as an example 2 Click Access to the HTML for printing in the title area Appendix How to use this manual HTML Vers...

Страница 941: ...nting Workflow are displayed together in HTML format ready for printing 3 Clear the sections you will not print and click the Apply button Appendix How to use this manual iPF815 HTML Version of the Manual for Printing 14 925 ...

Страница 942: ...n the table of contents you can specify a group of topics to print 1 Click a section title in the table of contents Here Basic Printing Workflow is used as an example 2 Under Basic Printing Workflow click Printing Procedure Appendix How to use this manual HTML Version of the Manual for Printing iPF815 14 926 ...

Страница 943: ...o the HTML for printing in the title area The topics in Printing Procedure are displayed together in HTML format ready for printing Appendix How to use this manual iPF815 HTML Version of the Manual for Printing 14 927 ...

Страница 944: ...cess the printing dialog box as follows depending on your computer s operating system Windows In Windows right click anywhere in the explanation area except on a figure or a link In the shortcut menu click Print to display the Print dialog box Appendix How to use this manual HTML Version of the Manual for Printing iPF815 14 928 ...

Страница 945: ...figure or a link while holding the Ctrl key In the shortcut menu click Print Frame to display the Print dialog box 2 Specify conditions as needed and then click Print Windows or Print Macintosh Windows Appendix How to use this manual iPF815 HTML Version of the Manual for Printing 14 929 ...

Страница 946: ... Macintosh Note To print only individual topics that are displayed use this method Appendix How to use this manual HTML Version of the Manual for Printing iPF815 14 930 ...

Страница 947: ...Disposal of the product WEEE Directive 932 Appendix Disposal of the product iPF815 14 931 ...

Страница 948: ...WEEE Directive Appendix Disposal of the product WEEE Directive iPF815 14 932 ...

Страница 949: ...Appendix Disposal of the product iPF815 WEEE Directive 14 933 ...

Страница 950: ...Appendix Disposal of the product WEEE Directive iPF815 14 934 ...

Страница 951: ...Appendix Disposal of the product iPF815 WEEE Directive 14 935 ...

Страница 952: ...Appendix Disposal of the product WEEE Directive iPF815 14 936 ...

Страница 953: ...Appendix Disposal of the product iPF815 WEEE Directive 14 937 ...

Страница 954: ...Appendix Disposal of the product WEEE Directive iPF815 14 938 ...

Страница 955: ...Appendix Disposal of the product iPF815 WEEE Directive 14 939 ...

Страница 956: ...Appendix Disposal of the product WEEE Directive iPF815 14 940 ...

Страница 957: ...3 Main Sheet 215 Main menu 704 705 722 734 Maintenance Cartridge 835 912 Media Take up Unit 687 861 N NetWare network 784 Nozzle 239 449 668 817 O Online 695 Open Preview 184 208 216 236 244 Orientation 190 192 325 340 Output Method 231 382 P Page Setup Pane 447 Page Setup Sheet 228 PosterArtist 181 Power 687 Print Job Log 390 399 Print area 85 Printer Driver Settings 202 425 Printer modes 696 Pri...

Страница 958: ...Transfer 841 U Utility Sheet 239 V Vacuum Strength 683 W When to replace 820 ...

Страница 959: ......

Страница 960: ... CANON INC 2010 ...

Отзывы: