


Windows
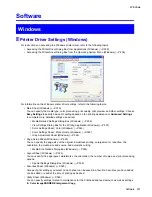
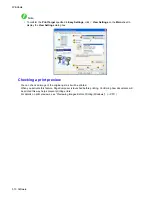
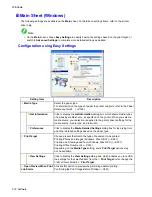
Conguration using Advanced Settings
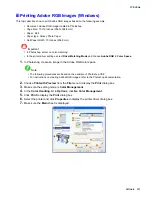
Setting Item
Description
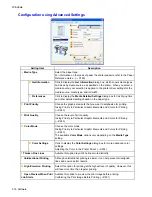
A
Media Type
Select the paper type.
For information on the types of paper the printer supports, refer to the Paper
Reference Guide . (→P.169)
B
Get Information
Click to display the
Get Information
dialog box, which shows media types
and sizes by media source, as specied on the printer. When you select a
media source, your selection is applied to the printer driver settings for the
media source, media type, and roll width.
C
Preferences
Click to display the
Media Detailed Settings
dialog box for ink drying time
and other detailed settings based on the paper type.
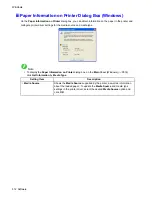
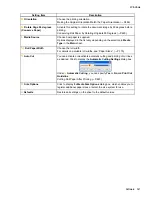
E
Print Priority
Choose the graphic elements that you want to emphasize for printing.
Giving Priority to Particular Graphic Elements and Colors for Printing
(→P.243)
F
Print Quality
Choose the level of print quality.
Giving Priority to Particular Graphic Elements and Colors for Printing
(→P.243)
G
Color Mode
Choose the color mode.
Giving Priority to Particular Graphic Elements and Colors for Printing
(→P.243)
The available
Color Mode
options vary depending on the
Media Type
setting.
H
Color Settings
Click to display the
Color Settings
dialog box for more advanced color
settings.
Adjusting the Color in the Printer Driver (→P.254)
I
Thicken Fine Lines
Activate this option to print ne lines more distinctly.
J
Unidirectional Printing
Although unidirectional printing is slower, it can help prevent misaligned
lines and ensure better results.
K
High-Precision Printing
Select this option for printing at the highest level of quality. However, this
will take more time than regular printing.
L
Open Preview When Print
Job Starts
Activate this option to preview the print image before printing.
Conrming the Print Image Before Printing (→P.551)
518 Software
Содержание imagePROGRAF iPF8100
Страница 1: ...User Manual ENG Large Format Printer ...
Страница 2: ......
Страница 106: ...Hard Disk Note Enter a password if one has been set 2 Select the print job in the list and click Move 92 Printer Parts ...
Страница 125: ...Hard Disk 2 Select the saved job in the list and click Delete For details refer to the RemoteUI help Printer Parts 111 ...
Страница 241: ...Output Stacker 3 Push in the left and right Basket Arms toward the back all the way until they stop Handling Paper 227 ...
Страница 733: ...Cleaning the Printer 4 Plug the power cord into the outlet Maintenance 719 ...
Страница 813: ......
Страница 814: ... CANON INC 2007 ...