


Chapter 1
1-140
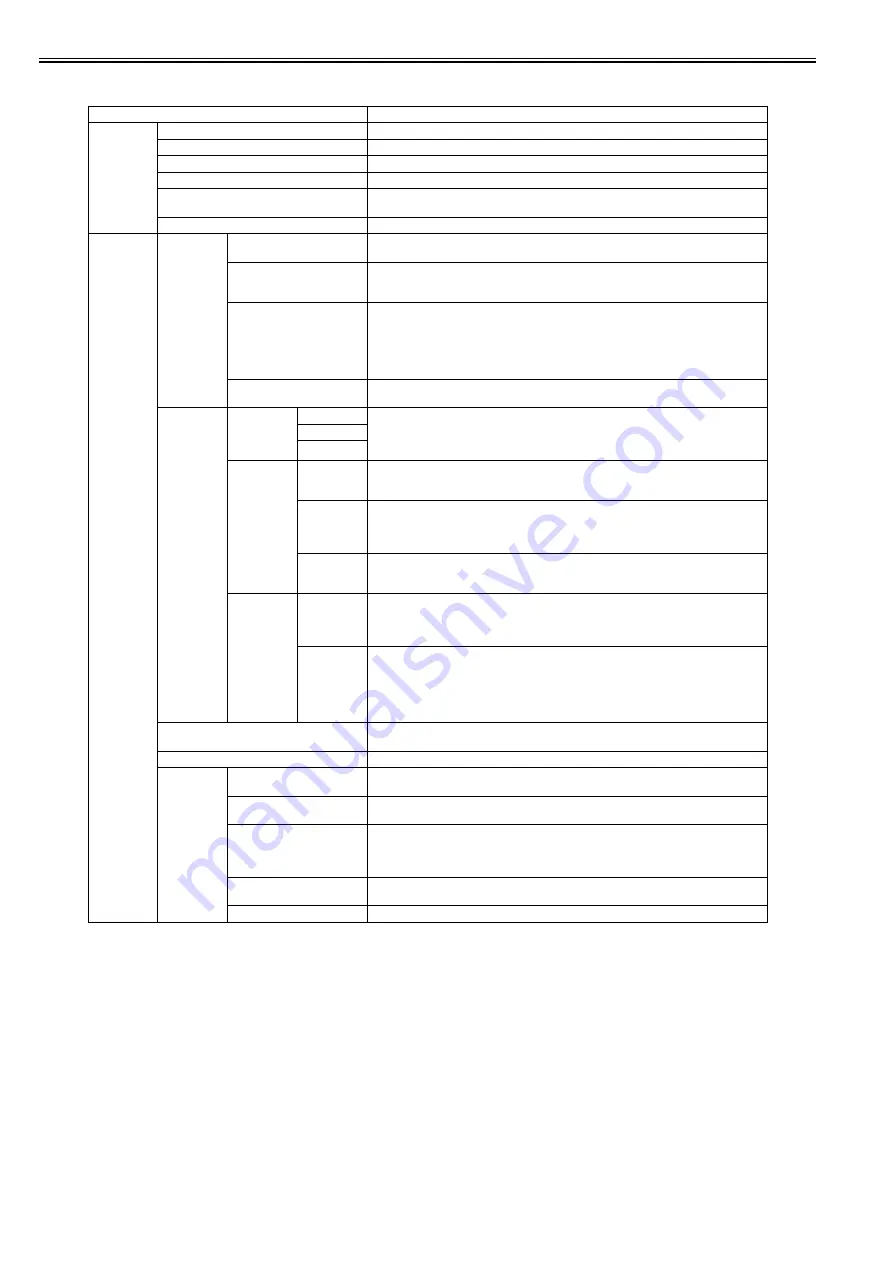
[Set./Adj. Menu]
T-1-102
Setting Item
Description/Instructions
[Test Print]
[Nozzle Check]
Print a nozzle check pattern.
[Status Print]
Print the printer information.
[Interface Print]
Print the interface settings.
[Paper Details]
Prints the paper settings set with [Paper Details].
[Print Job Log]
Print print job information such as paper type, size, and ink consumption. Ink consumption is
the approximate amount of ink used to print one sheet.
[Menu Map]
Print the menu list.
[Adjust
Printer]
[Head Posi.
Adj.]
[Auto(Standard)]
The printer prints and reads a test pattern for automatic adjustment of Printhead alignment
relative to the printing direction.
[Auto(Advanced)]
The printer prints and reads a test pattern for automatic adjustment of Printhead alignment
relative to the printing direction and spacing between nozzles and colors.
Try adjustment in this mode if "Auto(Standard)" does not improve printing.
[Auto(Expansion)]
The printer prints and reads a test pattern for automatic adjustment of Printhead alignment
relative to the printing direction and spacing between nozzles and colors. Adjustment is
performed at a higher level of precision than Auto(Advanced).
Try adjustment in this mode if vertical lines are warped or colors are out of alignment when the
printer driver option "High-Precision Printing" or "Priority on dot placement accuracy" is
selected.
[Manual]
Print a test pattern for adjustment of Printhead alignment relative to the printing direction. Enter
the adjustment value manually based on the resulting pattern.
[Feed Priority] [Adj. Priority]
[Automatic]
Set the priority feed precision. Normally select [Automatic]. Select [Print Quality] to print at
high quality. Select [Print Quality] to reduce horizontal streaks. Select [Print Length] to
accurately control the feed amount. However, selecting [Print Length] may cause colors to
become slightly uneven in the carriage scan direction.
[Print Quality]
[Print Length]
[Adj. Quality]
[Auto(Genuine
Ppr)]
Set when using paper described in the paper reference guide.
A pattern to adjust the paper feed amount is printed, and the feed amount is automatically
adjusted from the printed result.
[Auto(OtherPa
per)]
Set when using paper not described in the paper reference guide.
A pattern to adjust the paper feed amount is printed, and the feed amount is automatically
adjusted from the printed result.
This takes longer than [Auto (GenuinePpr)] to print and consumes more ink.
[Manual]
Select for paper that cannot be adjusted by [Auto(GenuinePpr)] or [Auto(OtherPaper)], such as
highly transparent paper.
Print a pattern to adjust the paper feed amount according to the type of paper.
[Adjust
Length]
[AdjustmentPr
int]-[A:High]/
[B:Standard/
Draft]
Print a test pattern for adjustment relative to paper stretching or shrinkage, after which you can
enter the amount of adjustment.
[Change
Settings]-
[A:High]/
[B:Standard/
Draft]
Displayed when [Print Length] is selected as [Adj. Priority] for [Feed Priority].
Adjust the expansion rate of the currently loaded paper.
Enter the result adjusted with [AdjustmentPrint] or the difference with your own measurement
in %.
Increase the adjustment value to increase the feed amount for paper that tends to expand, and
reduce it for paper that tends to shrink.
[Adj. Fine Feed]
Displayed when you have selected Feed Priority >Adj. Priority >Automatic or Print Quality.
Fine-tune the feed amount manually during printing.
[Adj Far Ed Feed]
Choose Yes to adjust the feed amount for the trailing edge.
[Calibration]
[Auto Adjust]
Choose Yes for automatic adjustment of the adjustment value after a test pattern for color
calibration is printed. The new color calibration adjustment value is applied in all print jobs.
[Calibration Log]
Check the date when color calibration was executed, as well as the type of paper used and the
adjustment type, as shown on the Display Screen.
[Use Adj. Value]
Choose Disabled >OK if you prefer not to apply the color calibration adjustment value in print
jobs. The printer driver settings will be used instead.
Choose Enabled >OK to apply the color calibration adjustment value in print jobs. However,
printer driver settings are given priority.
[Set Exec. Guide]
Choose On if you want to be displayed the message at the recommended timing of the
calibration.
[Return Defaults]
Clear the color calibration adjustment value and the execution log.
Содержание imagePROGRAF iPF6200
Страница 1: ...Mar 7 2011 Service Manual iPF6000 series ...
Страница 2: ......
Страница 6: ......
Страница 14: ...Contents ...
Страница 15: ...Chapter 1 PRODUCT DESCRIPTION ...
Страница 16: ......
Страница 109: ...Chapter 1 1 91 6 Color calibration print chart The following chart sample is printed when executing Calibration F 1 52 ...
Страница 129: ...Chapter 1 1 111 6 Color calibration print chart The following chart sample is printed when executing Calibration F 1 53 ...
Страница 174: ...Chapter 1 1 156 ...
Страница 175: ......
Страница 176: ......
Страница 177: ...Chapter 2 TECHNICAL REFERENCE ...
Страница 178: ......
Страница 276: ......
Страница 277: ...Chapter 3 INSTALLATION ...
Страница 278: ......
Страница 280: ......
Страница 305: ...Chapter 4 DISASSEMBLY REASSEMBLY ...
Страница 306: ......
Страница 308: ......
Страница 402: ......
Страница 403: ...Chapter 5 MAINTENANCE ...
Страница 404: ......
Страница 406: ......
Страница 421: ...Chapter 6 TROUBLESHOOTING ...
Страница 422: ......
Страница 507: ...Chapter 7 SERVICE MODE ...
Страница 508: ......
Страница 510: ......
Страница 643: ......
Страница 644: ......
Страница 645: ...Chapter 8 ERROR CODE ...
Страница 646: ......
Страница 648: ......
Страница 690: ......
Страница 691: ...Mar 7 2011 ...
Страница 692: ......


