background image

9

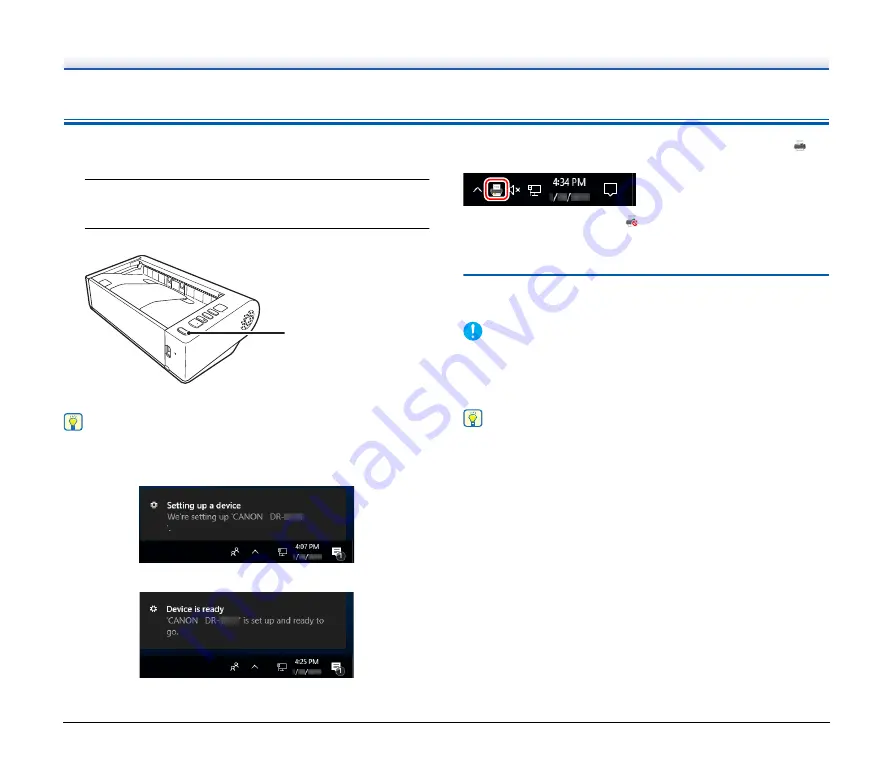
Turning the Power ON

The power of the scanner can be turned ON and OFF with the power 
button on the front of the scanner.

1

Make sure that the scanner and computer are connected 
properly.

2

Press the power button.

The power button lights blue when the power turns ON.

Hint

A balloon message such as shown below appears on the task bar. If 
you wait a while, automatic scanner recognition will end and the 
scanner will become ready to use.

When the scanner is properly connected to the computer, the 


(CaptureOnTouch) icon appears on the taskbar as follows.

If the taskbar icon appears as 

, the scanner is not properly 

connected to the computer. Check the status of the power switch and 
USB cable.

Turning Off the Power

Press and hold the power button until the indicator goes out.

IMPORTANT

• After turning the scanner off, wait at least 10 seconds before turning 

it back on.

• If you will not be using the scanner for an extended period, you 

should disconnect the power cord from the AC outlet for safety.

Hint

The scanner’s auto power off setting is enabled by default, and the 
scanner will turn off automatically if it is not operated for 4 hours.
For details on how to disable this setting

see “About the Canon 

imageFORMULA Driver Setting Tool” on p. 54

.

Power button

Содержание imageFORMULA DR-M140II

Страница 1: ...User Manual Please read this manual before operating this scanner After you finish reading this manual store it in a safe place for future reference ...

Страница 2: ...mits in Subpart B of Part 15 of FCC Rules Do not make any changes or modifications to the equipment unless otherwise specified in the manual If such changes or modifications should be made you could be required to stop operation of the equipment Canon U S A Inc ONE CANON PARK MELVILLE NY 11747 U S A Tel No 516 328 5000 RADIO INTERFERENCE REGULATIONS For 120 V models This digital apparatus does not...

Страница 3: ...opyright Copyright 2022 by CANON ELECTRONICS INC All rights reserved No part of this publication may be reproduced or transmitted in any form or by any means electronic or mechanical including photocopying and recording or by any information storage or retrieval system without the prior written permission of CANON ELECTRONICS INC Reproduction Warning This device is designed to be used in a legal m...

Страница 4: ...LIABLE FOR ANY DIRECT INCIDENTAL OR CONSEQUENTIAL DAMAGES OF ANY NATURE OR LOSSES OR EXPENSES RESULTING FROM THE USE OF THIS MATERIAL CANON ELECTRONICS INC IS NOT LIABLE FOR THE STORAGE AND HANDLING OF DOCUMENTS SCANNED WITH THIS PRODUCT OR THE STORAGE AND HANDLING OF RESULTING SCANNED IMAGE DATA IF YOU INTEND TO DISCARD THE ORIGINALS OF SCANNED DOCUMENTS YOU THE CUSTOMER ARE RESPONSIBLE FOR INSPE...

Страница 5: ...safe place for future reference Manuals for the Scanner Documentation for this scanner consists of the following manuals Product Safety Guide Before using the scanner be sure to read and follow these instructions Setup Guide This describes setup procedures for the scanner Read this manual when you first use the scanner User Manual this manual This manual contains the operating procedures of the sc...

Страница 6: ...s pay attention to these warnings CAUTION Indicates a caution concerning operations that may lead to injury to persons or damage to property if not performed correctly To use the scanner safely always pay attention to these cautions IMPORTANT Indicates operational requirements and restrictions Be sure to read these items carefully to operate the scanner correctly and avoid damaging the scanner Hin...

Страница 7: ... Skewed Documents 29 Scanning methods 31 Scanning with CaptureOnTouch 31 What is CaptureOnTouch 31 Setting the Scanner Driver 32 Configuration and Functions of the Scanner Driver 32 Setting Basic Scanning Conditions 35 More Advanced Scanning Methods 45 Batch Separation Insert blank page 45 Using a Patchcode for Scanning 45 Maintenance 48 Daily Maintenance 48 Cleaning the Scanner 48 Cleaning the In...

Страница 8: ... However normal operation is not guaranteed with all USB interfaces even if present as standard equipment on the computer For details consult your local authorized Canon dealer Scanning speeds are lower if your computer s standard USB interface is USB Full Speed equal to USB 1 1 The USB cable you are using should be the one originally included with the scanner If the CPU memory interface card and ...

Страница 9: ...on the taskbar as follows If the taskbar icon appears as the scanner is not properly connected to the computer Check the status of the power switch and USB cable Turning Off the Power Press and hold the power button until the indicator goes out IMPORTANT After turning the scanner off wait at least 10 seconds before turning it back on If you will not be using the scanner for an extended period you ...

Страница 10: ...may result in a noticeable degradation in scanning quality The following conditions are recommended for optimal scanning quality Room temperature 10 C to 32 5 C 50 F to 90 5 F Humidity 20 to 80 RH Avoid installing the scanner near equipment that generates a magnetic field e g speakers televisions or radios AC Adapter Connect only to a power outlet of the rated voltage and power supply frequency 12...

Страница 11: ... is dangerous Do not use flammable spray near the scanner When cleaning the scanner push the power button to turn it OFF and disconnect the power cord from the power supply Clean the scanner using a slightly dampened cloth which has been well wrung out Never use alcohol benzene paint thinner or any other flammable substances If the scanner makes strange noises or gives off smoke heat or strange od...

Страница 12: ...ctric shock Doing so might cause a fire or electric shock Push the power button to turn the scanner OFF for safety when not using the scanner for a long period of time such as overnight Also push the power switch to turn it OFF and disconnect the power cord from the power outlet for safety when the machine will not be used for an extended period of time such as during consecutive holidays Do not b...

Страница 13: ...ze Detection The scanner automatically detects the size of a scanned document and eliminates any unnecessary space around the edges of the image when storing the image even when storing a document of irregular size Auto Color Detection The scanner detects whether the scanned document is in color grayscale or black and white and saves the image accordingly Full Auto Mode A Full Auto Mode is provide...

Страница 14: ...anner is equipped with a Prescan function that allows you to adjust the contrast and brightness of a prescanned image and then send the adjusted image to the application software without needing to scan the document again Character Line Emphasis Function If characters and lines in scanned images are not clearly visible you can use this function to adjust their thickness during scanning Skew Detect...

Страница 15: ...ent feeds straightly F Ventilation Holes These cool the interior of the scanner Do not block the ventilation holes as doing so might cause overheating G Operating Panel A range of scanning operations can be performed with this such as starting and stopping scans executing registered jobs and cancelling double feed detection See p 16 H Power button Press this to turn on the scanner The button remai...

Страница 16: ...t here C USB Connector Connect the supplied USB cable to this connector D Power Connector Connect the supplied AC adapter to this connector Operating Panel A Job No Indicator This displays the number of the job selected with the operating panel errors and other information B Job Select Button This selects registered jobs Every time the button is pressed the Job No displayed in the Job No Indicator...

Страница 17: ...ath tray is opened or closed the eject method is displayed in the Job No Indicator displayed when the upper unit is open displayed when a paper jam is detected displayed when a double feed is detected while scanning displayed when a skewed document is detected displayed for other errors flashes during straight path mode animates during U turn path mode ...

Страница 18: ...that they cover the entire span of the feed rollers by aligning the centers and leading edges of the documents It is recommended that documents exceeding 356 mm 14 size are fed one sheet at a time Scanning documents before the ink is dry can cause problems with the scanner Always make sure that the ink on a document is dry before scanning it Scanning documents that are written in pencil or similar...

Страница 19: ...ds in the stack Card plastic Size 54 mm x 86 mm 2 12 x 3 37 ISO standard Card thickness 0 76 mm 0 03 or less 1 4 mm 0 055 or less for the embossment Orientation Vertical feeding only Eject method Straight path only Loading capacity 3 cards non embossed 1 card embossed CAUTION Use the straight path when scanning cards Embossed cards may not be able to be scanned correctly depending on the type of e...

Страница 20: ...er is closed and the straight path is used when it is opened U turn path Straight path Standard feeding is used when the feed selection lever at the front of the scanner is lowered and non separation feeding is used when it is raised Standard feeding Non separation feeding Document type Feed method Eject method Remarks Plain paper Either Either Business cards Either Straight path Place cards verti...

Страница 21: ...t page separation place the documents one page at a time one set in the case of bound or fastened paper For details on the feed methods for each document type see p 20 2 Open the document feed tray 3 Switch the eject method based on the type of document you are scanning Ordinarily you should scan with the straight path tray at the rear of the scanner closed U turn path When scanning business cards...

Страница 22: ...cord from the power outlet to stop scanning Always smooth out any folds or curls in your documents before placing them into the feeder If the leading edge of a document is curled it may cause a paper jam If feeding stops due to a system error or paper jam while the scanner is scanning resolve the problem make sure that the scanned image of the last page that was successfully fed has been stored an...

Страница 23: ...nning cards clear the Detect by Ultrasonic check box in the Error Detection tab on the scanner driver settings screen See p 26 Placing Folded Documents Folio Scan enables you to scan documents that are larger than LTR A4 and therefore do not fit in the feeder To use the function fold the document in half lengthwise and place it into the feeder The DR M140II will scan both sides and combine the sca...

Страница 24: ...ocuments of up to 5 588 mm 220 in length can be scanned Note the following when using the Long Document mode When scanning in the Long Document mode if the document is placed on the scanner in a skewed position it may hit the edges of the feeding area and be damaged Be careful to place the document so that it is not skewed When scanning with the Long Document mode paper jam detection may react slo...

Страница 25: ...Click the Start button and then click Canon DR M140II Series and Canon imageFORMULA Driver Setting Tool imageFORMULA Driver Setting Tool starts 2 Click the Control tab 3 Click the Setting button of Hardware ...

Страница 26: ...ve been fed at the same time You can also specify whether to save the scanned image after scanning has finished and continue scanning the document double feed detection ignore function To use the double feed detection function you must first open the scanner driver settings screen and enable double feed detection It is also necessary to set Rapid recovery system to use the double feed detection ig...

Страница 27: ...ted When not using the double feed detection ignore function If a document double feed is detected during scanning document feeding stops when the double fed documents are ejected When this happens the following error code is displayed in the Job No Indicator of the operating panel Also a message screen is displayed to notify you that a double feed has been detected When this happens stop the scan...

Страница 28: ...covery System screen appears to enable you to specify whether to continue scanning Double feed detection error code Buttons of Rapid Recovery System Screen Buttons of Operating Panel Description SAVE CONTINUE DFR button Saves the preview image as a scanned image and scans the rest of the document STOP Stop button Discards the preview image and stops scanning DISCARD CONTINUE Start button Discards ...

Страница 29: ...s Detail Settings screen See p 32 2 Click the Error Detection tab 3 Select the Skew Detection check box 4 Click the OK button to close the settings screen 5 Place the document as described in Placing Documents see p 21 IMPORTANT When this function is enabled small documents and documents that have been placed to the left or right of the center of the feed inlet may be detected as skewed and the sc...

Страница 30: ... recovery system is enabled in the Others tab of the scanner driver settings screen the following screen appears instead of the above message screen In such cases reload the document and click Yes to continue scanning ...

Страница 31: ...Touch What is CaptureOnTouch CaptureOnTouch is a scanning application that enables you to scan a document with a simple operation merely by selecting the screen panel For details about the operations and functions see the help of CaptureOnTouch ...

Страница 32: ...open the scanner driver and configure the scanning conditions and other settings This section describes the configuration and functions of the scanner driver Configuration and Functions of the Scanner Driver The scanner driver consists of the following tabs Hint For details on the setting screen see the Help of the scanner driver Click the Help button of the driver to display help related to the c...

Страница 33: ... the functions provided by the scanner driver other than scanning conditions will be displayed on the Basic tab Brightness tab Adjust the brightness and contrast of scanned images In addition you can also click Gamma and set the gamma correction value for scanned images Image processing tab Set the processing method for scanned images Image control tab Set the image control method for the scanned ...

Страница 34: ...t the items to be detected as errors during the scan Others tab Configure special scan method and image processing settings User s Guide Informs you about the settings changed automatically by the driver In addition displays the image for which settings were currently made in the illustrations ...

Страница 35: ...nts such as photocopies at once Brightness related properties are automatically adjusted based on the text and background of the whole image enabling consistent reproduction of light characters and removal of background stains Advanced Text Enhancement II removes or processes the background color and background surrounding text to enhance the text for easy reading Detect automatically detects whet...

Страница 36: ... blank pages are deleted when images are saved Scanning Documents of Unregistered Page Sizes You can register a non standard page size that has not been registered as a page size by naming and registering it as a custom page size in the Custom Paper Size dialog box which is opened from the Save button on the Basic tab Specifying the Scan Area Configure the following settings when you want to speci...

Страница 37: ...lected the Setting button is enabled and you can adjust the level for judging whether pages are blank When you do not want to scan colored lines and text Specify the color red green blue all colors to be ignored dropped out in the color drop out settings on the Image processing tab and that color will be removed from the scanned image When you want to enhance a particular color Specify the color r...

Страница 38: ...eet allows you to reduce the moire patterns that are generated when color photos are scanned at low resolutions Hint Moire reduction is enabled when the resolution is 300 dpi or less and High Quality Moire Reduction is displayed when the resolution is 240 dpi or less When you want to reduce the color unevenness Check the check box of Color unevenness reduction on the Image control tab to reduce th...

Страница 39: ...at once such as those with thin light text or stains For example you can batch process documents such as photocopies at once Brightness related properties are automatically adjusted based on the text and background of the whole image enabling consistent reproduction of light characters and removal of background stains Advanced Text Enhancement is suitable for a document with a light background col...

Страница 40: ...n each page is detected and the scanned image is rotated in 90 degree increments to correct the orientation When you want to rotate the images of a document placed horizontally to correct the orientation Specify the rotation angle in Document Orientation on the Others tab When you want to use batch separation for scanning When you want to divide and scan a document you can separate a batch at the ...

Страница 41: ...ers tab to display the setting items related to multistream and then configure the setting items in the following order A When you want to specify different scanning conditions for the front and back pages of a document select Skip Blank Page or Both for Scanning Side on the Basic tab in advance B Specify the number of scanning conditions to apply in Stream count of Front Up to three can be specif...

Страница 42: ...the Erase Notch check box to remove notches that protrude from object outlines in scanned images When you want to save a scanner driver setting When you finish configuring a setting click the Save button of User Preference to save the setting The saved setting is registered to the list You can delete a setting from the list with the Delete button and save or load a configuration file with the Back...

Страница 43: ... Contrast Detect Automatically O Black and White O Error Diffusion O Advanced Text Enhancement X Advanced Text Enhancement II O Active Threshold O 256 level Gray O 24 bit Color O Setting value Prescan Detect Automatically X Black and White O Error Diffusion O Advanced Text Enhancement O Advanced Text Enhancement II O Active Threshold O 256 level Gray O 24 bit Color O Setting value Color drop out C...

Страница 44: ...ns are met Detection mode in the Auto Image Type Detection Settings dialog box is set to Color or Gray Mode in case of binary in the Settings for in case of binary tab is set to Error Diffusion 3 Not available for setting if Detection mode is set to Color or Gray in the Auto Image Type Detection Settings dialog box Setting value Edge emphasis Background smoothing Prevent Bleed Through Remove Backg...

Страница 45: ...ch separation automatic file separation functions by using patchcodes By tucking patchcode sheets supplied with this scanner into a document and scanning it the scanner can automatically separate files by images of documents containing patchcode sheets or documents after the patchcode sheet Hint Patchcodes are included with this product in PDF format An application that can read PDF files is requi...

Страница 46: ...pying provided patchcodes to create different sized patchcodes ensure that the patchcode fits inside the effective range shown in the following diagram Also when copying patchcodes ensure that they are the same size and shade as the original Keep the patchcode sheet clean Take particular care to keep the patchcode detection range area clean Also do not bend fold or crease the sheet 2 Place the doc...

Страница 47: ...47 3 In an application specify a patchcode as a type of batch separation Open the scanner driver settings screen and select Patchcode in Batch Separation on the Others tab ...

Страница 48: ...ide of the scanner wipe off any dirt with a cloth that has been dampened with water and thoroughly wrung out and then wipe the scanner dry with a clean dry cloth Cleaning the Inside of the Scanner Dust or paper particles inside the scanner may cause lines or smudges to appear on scanned images Use compressed air to periodically clean dust and paper particles from the document feed opening and the ...

Страница 49: ... IMPORTANT Scratches on the sensor glass may cause marks on the images as well as feeding errors If there are scratches on the sensor glass contact your local authorized Canon dealer or service representative 5 Clean the rollers Clean the rollers while turning them Wipe the rollers with a cloth that has been dampened with water and thoroughly wrung out and then use a clean dry and soft cloth to wi...

Страница 50: ...water and thoroughly wrung out 8 Reattach the retard roller and feeding roller See p 52 p 53 9 Close the upper unit by gently pushing down on the left and right sides Push until it clicks into place to make sure that it is completely closed 10 Close the document feed tray ...

Страница 51: ...yed when the computer is started If this message begins to be displayed at startup purchase an exchange roller kit and replace the worn parts with the consumable parts included in the kit feed roller and retard roller See p 64 for details about the exchange roller kit Furthermore the counter in the scanner that records the number of pages fed also needs to be reset when you replace the rollers See...

Страница 52: ...the left and right sides Push until it clicks into place to make sure that it is completely closed 4 Close the document feed tray Replacing the Retard Roller 1 Unlock the roller cover and open it 2 Remove the retard roller 3 Install the new retard roller ...

Страница 53: ... securing lever for the feed roller forward 2 Slide the securing lever for the feed roller to the left 3 Remove the feed roller detaching the left side first 4 Install the new feed roller attaching the right side first 5 Slide the securing lever for the feed roller to the right ...

Страница 54: ... s version information and scanner information Maintenance tab You can reset the counter of the roller or carry out the shrinkage rate control Control tab You can carry out the control settings of hardware and drivers and perform the read or write of the control settings From the configuration of the hardware you can set the automatic power off function Diagnostic tab You can output or delete the ...

Страница 55: ...ve been scanned since roller cleaning clean the rollers If documents still feed askew roller replacement or other maintenance may be needed See Maintenance on p 48 for roller replacement procedures Problem 4 Documents are not scanned according to the settings configured in the scanner driver Solutions When you scan using Select document panel registered with CaptureOnTouch the CaptureOnTouch setti...

Страница 56: ...file PPTX Multi page images are always saved to a single file TIFF PDF You can save multiple pages to a single file by clicking and selecting Save all pages as one file in the displayed dialog box Problem 10 Scanned images of multiple pages cannot be saved in a single JPEG or BMP PICT file Solutions Multiple scanned images cannot be saved in a single JPEG or BMP PICT file Save the images in either...

Страница 57: ... the cable with the supplied compliant cable 6 When the scanner is connected to the computer via a USB hub that is not Hi Speed USB 2 0 compliant remove the hub and connect the scanner directly to the computer If scanned image files cannot be opened in an application 1 Scanned images saved as multi page TIFF files can be opened only by programs that support this file format 2 Images saved as compr...

Страница 58: ... on this screen You can set the file names of scanned images by setting all or some of the three items shown below A sample file name is displayed as the File name in the File name settings dialog box How do I scan half folded documents folio scanning Fold the document in half and set it in the scanner with the fold at the right Specify half size document the size after folding and select Folio fo...

Страница 59: ...installing the plug in the scanned image can be printed attached in an e mail or shared using various cloud services The plug in can be installed by selecting its checkbox when installing CaptureOnTouch The available output destinations vary depending on the installed plug in How can I attach scanned data to an e mail or send it as e mail For both Standard Scanning and Scanning Shortcut select Att...

Страница 60: ...rs during scanning use the following procedures to clear them CAUTION Be careful when removing jammed paper take care not to cut your hand on the edges of the paper 1 Remove the document that is not jammed and remains on the document feed tray 2 Raise the OPEN lever and open the upper unit Hint The C error code appears in the operating panel when the upper unit is open 3 Remove the jammed document...

Страница 61: ... removing the jammed paper check to see if the last page was scanned correctly and then continue scanning Hint When the Rapid recovery system check box is enabled in the scanner driver settings screen you can resume a scanning operation even if it is interrupted by a paper jam by removing the document and resuming from the document that was being fed when the interruption occurred As the image of ...

Страница 62: ...p Guide IMPORTANT Log on to Windows as an Administrator 1 From the Windows task bar click Start button click Windows System click Control Panel The Control Panel appears 2 Click Uninstall a program 3 From the Programs list select the software you want to remove and then click Remove The delete confirmation screen appears 4 Click Yes Uninstallation of the software is now complete ...

Страница 63: ...kness 0 76 mm 0 03 or less 1 4 mm 0 055 or less for the embossment Orientation Vertical feeding only Eject method Straight path only Loading capacity 3 cards non embossed 1 card embossed Scanning Sensor Contact image sensor Light source LED Scanning Side Simplex duplex Scanning modes Black and White Error Diffusion 256 level Grayscale Advanced Text Enhancement Advanced Text Enhancement II Active T...

Страница 64: ... Connecting the unit to this scanner enables you to use this scanner as a flatbed scanner with an automatic document feeder Specifications are subject to change without notice due to product improvements About the Flatbed Scanner Unit The optional Flatbed Scanner Unit can be connected to and used with this scanner System requirements The computer must comply with the necessary system requirements ...

Страница 65: ...65 Dimensions 181 mm 7 13 313 mm 12 32 250 mm 9 84 165 mm 6 5 ...

Страница 66: ...ble Feed Detection 26 F Flatbed scanner unit 64 J Job No Indicator 16 Job Select Button 16 L Long Document Mode 24 M Multi stream setting 41 O Operating Panel 16 P Patchcode 45 Power 9 R Reset Counter 54 Rollers Cleaning 48 Replacing 51 S Scanner Driver Basic Settings 35 Configuring Settings According to Purpose 37 Scanning Glass Cleaning 48 Skew Detection 29 Start Button 16 Stop Button 16 System ...

Страница 67: ...ipment EEE Improper handling of this type of waste could have a possible negative impact on the environment and human health due to potentially hazardous substances that are generally associated with EEE At the same time your cooperation in the correct disposal of this product will contribute to the effective usage of natural resources For more information about where you can drop off your waste e...

Страница 68: ...ungsabfall getrennten Erfassung zuzuführen Altbatterien und Altakkumulatoren die nicht von Altgerät umschlossen sind sowie Lampen die zerstörungsfrei aus dem Altgerät entnommen werden können vor der Abgabe an einer Erfassungsstelle vom Altgerät zerstörungsfrei zu trennen personenbezogener Daten auf den Altgeräten vor der Entsorgung zu löschen Die Bedeutung von dem Symbol der durchgestrichenen Abfa...

Страница 69: ...evaarlijke stoffen die veel voorkomen in elektrische en elektronische apparatuur EEA Bovendien werkt u door een juiste afvoer van dit product mee aan het effectieve gebruik van natuurlijke hulpbronnen Voor meer informatie over waar u uw afgedankte apparatuur kunt inleveren voor recycling kunt u contact opnemen met het gemeentehuis in uw woonplaats de reinigingsdienst of het afvalverwerkingsbedrijf...

Страница 70: ...Europeiska unionen och EES Norge Island och Liechtenstein Den här symbolen visar att produkten enligt WEEE direktivet 2012 19 EU och nationell lagstiftning inte får sorteras och slängas som hushållsavfall Den här produkten ska lämnas in på en därför avsedd insamlingsplats t ex på en återvinningsstation auktoriserad att hantera elektrisk och elektronisk utrustning EE utrustning eller hos handlare s...

Страница 71: ...ήτων Ηλεκτρικού και Ηλεκτρονικού Εξοπλισμού ΗΗΕ Ο ακατάλληλος χειρισμός αυτού του τύπου αποβλήτων μπορεί να έχει αρνητικό αντίκτυπο στο περιβάλλον και την υγεία του ανθρώπου λόγω δυνητικώς επικίνδυνων ουσιών που γενικά συνδέονται με τον ΗΗΕ Ταυτόχρονα η συνεργασία σας όσον αφορά τη σωστή απόρριψη αυτού του προϊόντος θα συμβάλει στην αποτελεσματική χρήση των φυσικών πόρων Για περισσότερες πληροφορί...

Страница 72: ...é zariadenia obsahujú potenciálne nebezpečné látky Spoluprácou na správnej likvidácii produktu prispejete k účinnému využívaniu prírodných zdrojov Ďalšie informácie o mieste recyklácie opotrebovaných zariadení získate od miestneho úradu úradu životného prostredia zo schváleného plánu OEEZ alebo od spoločnosti ktorá zaisťuje likvidáciu komunálneho odpadu Viac informácií nájdete aj na webovej stránk...

Страница 73: ... direktivo OEEO obiščite www canon europe com sustainability approach Hrvatski Samo za Europsku uniju i EEA Norveška Island i Lihtenštajn Ovaj simbol pokazuje da se ovaj proizvod ne smije odlagati s komunalnim i ostalim otpadom sukladno WEEE Direktivi 2012 19 EC i Pravilniku o gospodarenju otpadnim električnim i elektroničkim uređajima i opremom Ovaj proizvod je potrebno predati ovlaštenom skuplja...

Страница 74: ... atkritumu apsaimniekošanā sekmēs efektīvu dabas resursu izmantošanu Lai saņemtu pilnīgāku informāciju par vietām kur izlietoto iekārtu var nodot pārstrādei sazinieties ar vietējo pašvaldību atkritumu savākšanas atbildīgo dienestu pilnvarotu EEIA struktūru vai sadzīves atkritumu apsaimniekošanas iestādi Lai saņemtu plašāku informāciju par elektrisko un elektronisko iekārtu nodošanu pārstrādei apme...

Страница 75: ... zakonima Ovaj proizvod treba predati određenom centru za prikupljanje npr na osnovi staro za novo kada kupujete sličan novi proizvod ili ovlašćenom centru za reciklažu istrošene električne i elektronske opreme EEE Nepravilno rukovanje ovom vrstom otpada može da ima moguće negativne uticaje po životnu sredinu i ljudsko zdravlje usled potencijalno opasnih materijala koje se uglavnom vezuju za EEE U...

Страница 76: ...utsch Schalter Aus Español Interruptor apagado Nederlands Schakelaar Off Türkçe Anahtar Kapalı Power off no standby current Hors tension pas de courant de veille Alimentazione assente nessuna corrente di standby Ausgeschaltet ohne Ruhestromaufnahme Máquina apagada sin corriente en espera Uit geen stand byverbruik Güç kapalı bekleme akımı yok English Switch Standby Français Commutateur Veille Sous ...

Страница 77: ...ançais Italiano Apparecchio classe II Deutsch Gerät der Schutzklasse II Español Equipo de clase II Nederlands KlasseII apparatuur Türkçe Sınıf II ekipman Équipement de classe II Indicates this is Class II equipment Indica che questo è un apparecchio di classe II Gibt an dass das Gerät der Schutzklasse II entspricht Indica que se trata de un equipo de clase II Geeft aan dat deze apparatuur in Klass...

Страница 78: ... önlemi English Français Symbole CC DC symbol Indicates direct current Italiano Simbolo corrente continua C C Indica la corrente continua Deutsch Gleichstrom Symbol Español Símbolo CC Nederlands DC pictogram Türkçe DC sembolü Indique qu il s agit de courant continu Kennzeichnet Gleichstrom Indica corriente continua Geeft gelijkstroom aan Düz akımı gösterir English Français Italiano Deutsch Español...

Страница 79: ...RKERWEG 59 1185 XB AMSTELVEEN THE NETHERLANDS CANON AUSTRALIA PTY LTD BUILDING A THE PARK ESTATE 5 TALAVERA ROAD MACQUARIE PARK NSW 2113 AUSTRALIA CANON SINGAPORE PTE LTD 1 FUSIONOPOLIS PLACE 14 10 GALAXIS SINGAPORE 138522 CANON KOREA INC 607 TEHERAN RO GANGNAM GU SEOUL KOREA CANON INDIA PVT LTD 7TH FLOOR TOWER B DLF CYBER TERRACES DLF PHASE III GURGAON 122002 HARYANA INDIA CANON ELECTRONICS INC 2...

Отзывы: