background image

12

Documents

The flatbed can scan documents up to 8.5" (216 mm) in width and 
14.0" (356 mm) in length.

Placing Documents

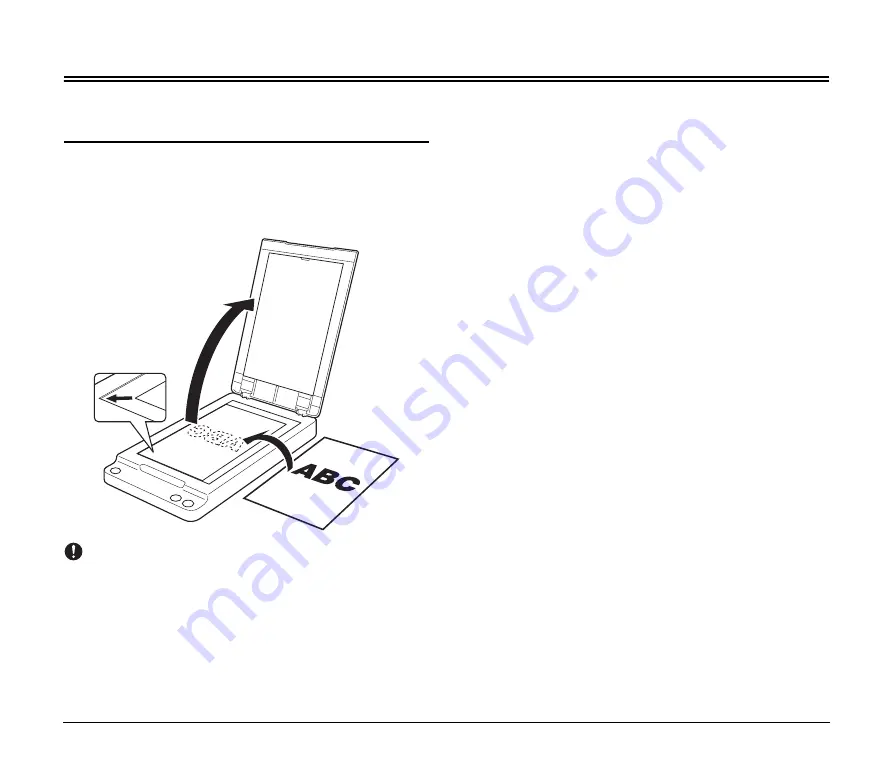
Open the document cover, and place the document on the scanning 
glass, as shown below, with the scanning side facing down. Make sure 
to align the bottom right corner of the scanning side with the bottom 
left corner of the scanning glass.

IMPORTANT

• Do not place objects other than the document to be scanned onto 

the scanning glass. Doing so may result in a malfunction or 
personal injury.

• Open and close the document cover gently. Excessive force may 

result in damage to the cover or breaking the scanning glass and 
personal injury.

• You cannot scan film.

• Make sure to straighten wrinkled or curled documents before 

placing them on the flatbed, and gently press down on the 
document cover while scanning is in progress.

Содержание ImageFORMULA 102

Страница 1: ...User Manual Please read this manual before operating this scanner After you finish reading this manual store it in a safe place for future reference ...

Страница 2: ... by any information storage or retrieval system without the prior written permission of CANON ELECTRONICS INC Reproduction Warning This device is designed to be used in a legal manner in accordance with all applicable laws including but not limited to counterfeit and copyright laws as well as laws pertaining to national security Any person s found to have reproduced any of the following materials ...

Страница 3: ... antenna Increase the separation between the equipment and receiver Connect the equipment into an outlet on a circuit different from that to which the receiver is connected Consult the dealer or an experienced radio TV technician for help Use of shielded cable is required to comply with Class B limits in Subpart B of Part 15 of FCC Rules Do not make any changes or modifications to the equipment un...

Страница 4: ...es 10 Names and Functions of Parts 11 Documents 12 Placing Documents 12 Scanning Methods 13 Feeder Scanning 13 Limitations 13 Supported Functions 13 Scanning with CapturePerfect 15 Other Methods for Scanning 19 Changing the Feeding Option for Scanning 19 Using Two Scanners 21 Troubleshooting 22 Common Problems and Solutions 22 Appendix 23 Routine Cleaning 23 Auto Power OFF Setting 24 Specification...

Страница 5: ...setup menu does not start up automatically execute setup exe from the setup disc If the User Account Control screen appears click Yes or Allow 2 Click Typical Installation and follow the instructions on the screen to complete installation 3 Click Exit to close the setup menu Items included in this manual are subject to change without notice You must keep the machine s packaging and packing materia...

Страница 6: ...e USB cables supplied with each scanner Do not connect scanners other than the Canon document scanner that will be used in conjunction with the flatbed to the computer regardless of whether they are compatible with the flatbed If you do so the flatbed or the Canon document scanner may not operate properly Power button This completes the setup ...

Страница 7: ...plain procedures restrictions handling precautions and instructions that should be observed for safety WARNING Indicates a warning concerning operations that may lead to death or injury to persons if not performed correctly To use the machine safely always pay attention to these warnings CAUTION Indicates a caution concerning operations that may lead to injury to persons or damage to property if n...

Страница 8: ...Room temperature 50 F to 90 5 F 10 C to 32 5 C Humidity 20 to 80 RH Avoid installing the flatbed near equipment that generates a magnetic field e g speakers televisions or radios AC Adapter Connect the AC adapter only to a power outlet of the rated voltage and power supply frequency 120 V 60 Hz or 220 240 V 50 60 Hz depending on your region Do not connect other electrical equipment to the same pow...

Страница 9: ...nces Disconnect the power cord from the power outlet regularly and clean the area around the base of the power plug s metal pins and the power outlet with a dry cloth to ensure that all dust and grime is removed If the power cord is connected for a long period of time in a damp dusty or smoky location dust can build up around the power plug and become damp This may cause a short circuit and result...

Страница 10: ...cuments to be scanned onto the scanning glass Doing so may result in a malfunction or personal injury When using the flatbed in cold temperatures wait a few moments after turning the power switch ON Failure to do so may result in a condensation error Disposal When disposing the flatbed or AC adapter make sure to follow the local ordinances and laws or consult with your local authorized Canon deale...

Страница 11: ... automatically turns the flatbed OFF if it is not operated for 4 hours is enabled under default conditions For details on disabling this setting Auto Power OFF Setting p 24 D Start Button Press this button to start scanning the document placed on the scanning glass E Stop Button Press this button to stop scan procedures in progress F Lock Switch Use this to lock the internal scanning unit into pla...

Страница 12: ...tom left corner of the scanning glass IMPORTANT Do not place objects other than the document to be scanned onto the scanning glass Doing so may result in a malfunction or personal injury Open and close the document cover gently Excessive force may result in damage to the cover or breaking the scanning glass and personal injury You cannot scan film Make sure to straighten wrinkled or curled documen...

Страница 13: ... scanner while it is turned ON even if the flatbed is turned OFF When the conditions for scanning require a large amount of the computer s memory scanning may not be possible if the memory is insufficient If a memory error appears during scanning exit the application and change the scanning conditions before attempting to scan again Supported Functions To scan using the functions supported by the ...

Страница 14: ... out No Back side settings when MultiStream is enabled No Custom color Enhance No Moire Reduction Yes Barcode Yes Character Emphasis Yes 2D code Yes Background smoothing Yes Imprinter No Addon No Functions Use on the flatbed Functions Use on the flatbed ...

Страница 15: ...erfect 3 0 NOTE For details on other scanning methods refer to the CapturePerfect Operation Guide 1 From the Windows Taskbar click Start and select All Programs CapturePerfect 3 1 and CapturePerfect 3 1 CapturePerfect starts 2 Select Select Scanner from the Scan menu The Select Scanner dialog box appears 3 Select the name of the Canon document scanner you are using which should be followed by w FS...

Страница 16: ...on to open the settings dialog box for the Canon document scanner When you finish configuring settings click OK to close the dialog box For details on each setting refer to the Help 9 Configure the scanning conditions For details on settings p 17 10 Specify the file name and format for the image file to be saved For details on other settings in the Scan Batch to File Setting dialog box refer to th...

Страница 17: ...settings User Preference Enter a name and click Save You can recall the name and its configurations in the settings dialog box whenever necessary Main Scanner Flatbed Select Flatbed to scan the document placed on the flatbed Select Main Scanner to scan documents placed in the feeder of the connected Canon document scanner If you select Auto any documents placed in the feeder will be scanned If the...

Страница 18: ...ed images Scanning Side When scanning documents placed in the feeder of the connected Canon document scanner select which sides of a document to scan Automatically straightens skewed images Click to ensure that if a document is scanned at an angle the slant is detected and straightened out in the scanned image Area Click this to display a dialog box for specifying the area of the document to scan ...

Страница 19: ...tional documents are placed after a document finishes feeding the scanner automatically detects these documents and continues scanning This feeding option can only be selected when Main Scanner Flatbed is set to Main Scanner Configuring the Feeding Option This section describes how to set Feeding Option to Panel Feeding 1 Open the scanner settings dialog box from your application When using Captur...

Страница 20: ...er or the flatbed to continue scanning 11 Repeat steps 9 and 10 until all documents are scanned 12 Press the stop button on the scanner when all documents have been scanned This completes the scan procedure NOTE Depending on the application you are using and whether the flatbed is connected scanner operations when scanning with the Feeding Option set to Panel Feeding may differ as follows When sca...

Страница 21: ...Feeding Option Standard Example 2 Scan different document types to a single image file By configuring the following settings you can scan multiple documents of different types e g multiple pages of a book and multiple document sheets to a single file Main Scanner Flatbed Auto Feeding Option Panel Feeding For example perform the following to scan a multipage application form and a passport 1 Start ...

Страница 22: ... though Text Enhanced Mode is specified Solution This flatbed only supports Advanced Text Enhancement II When you open the Canon document scanner s ISIS TWAIN driver settings dialog box from the flatbed s ISIS TWAIN driver settings dialog box you can specify text enhancement modes other than Advanced Text Enhancement II However Advanced Text Enhancement II will always be used when scanning from th...

Страница 23: ...c shock Cleaning the Flatbed Use a cloth dampened with water and thoroughly wrung out to clean the outside of the flatbed and use a clean dry cloth to wipe the flatbed dry Cleaning the Scanning Glass and Pressure Board If dirt appears in scanned images or if scanned documents become dirty the scanning glass and pressure board may be dirty Be sure to clean them regularly 1 Open the document cover g...

Страница 24: ...tings dialog box from your application When using CapturePerfect for example select Scanner Setting from the Scan menu For details on how to open the settings dialog box from other applications refer to the operation manual of the application 2 Click About The version information dialog box appears 3 Disable the Turn off automatically after 4 hours check box 4 Click OK to close the version informa...

Страница 25: ...ately 5 5 lb 2 5 kg Power Supply using AC adapter DC 16 V 0 4 A Power Consumption Scanning Maximum 7 W In Sleep mode Maximum 1 7 W With power turned OFF Maximum 0 5 W Noise Not more than 59 dB Operating Environment Temperature 10 C to 32 5 C 50 F to 90 5 F Humidity 20 to 80 RH AC Adapter 100 to 240 V type Model Number MG1 5042 Input AC100 to 240V 50 60 Hz 0 57 to 0 32 A Output DC16V 1 6A Weight Ap...

Страница 26: ...26 External Dimensions Diagram 10 51 267 mm 2 52 64 mm 18 94 481 mm 19 84 504 mm 18 35 466 mm ...

Страница 27: ...A CANON EUROPA N V BOVENKERKERWEG 59 1185 XB AMSTELVEEN THE NETHERLANDS CANON AUSTRALIA PTY LTD BUILDING A THE PARK ESTATE 5 TALAVERA ROAD MACQUARIE PARK NSW 2113 AUSTRALIA CANON SINGAPORE PTE LTD 1 FUSIONOPOLIS PLACE 15 10 GALAXIS SINGAPORE 138522 CANON INDIA PVT LTD 7TH FLOOR TOWER B DLF CYBER TERRACES DLF PHASE III GURGAON 122002 HARYANA INDIA PUB CE IM 0995 E1 00 CANON ELECTRONICS INC 2016 ...

Отзывы: