background image

25

Installing/Uninstalling Software

Installation Procedure

Perform the following procedure to install the printer, fax, and scanner drivers. If you install these drivers, 
you can print and send faxes from your computer, and scan documents into your computer. Printer drivers 
are divided into two types: PCL and UFRII LT.

PCL: This is the Hewlett-Packard’s PCL printer driver, which includes the PCL5c, PCL5e, and PCL6 
drivers. The PCL5c printer driver is for color printers, while the PCL5e and PCL6 printer drivers are for 
black-and-white printers. PCL6 is an advanced version of PCL5e and offers superior printing quality and 
speed. This machine supports the PCL5e and PCL6 printer drivers.

UFRII LT: This is the Canon UFRII LT printer driver. Using this driver, the various data processing tasks 
conventionally executed within the printer are appropriately divided between the host PC and the printer 
to greatly reduce the overall printing time. The workload can be delegated to match the output data, 
thus realizing a significant increase in speed through optimization.

NOTE

The scanner driver is available only through a USB connection.

Before Installation:

System Requirements

Microsoft Windows 98/98SE

CPU: Intel Pentium/90 MHz or faster
Memory: 128 MB or more

Microsoft Windows Me

CPU: Intel Pentium/150 MHz or faster
Memory: 128 MB or more

Microsoft Windows 2000
(32-bit version)

CPU: Intel Pentium/133 MHz or faster
Memory: 128 MB or more

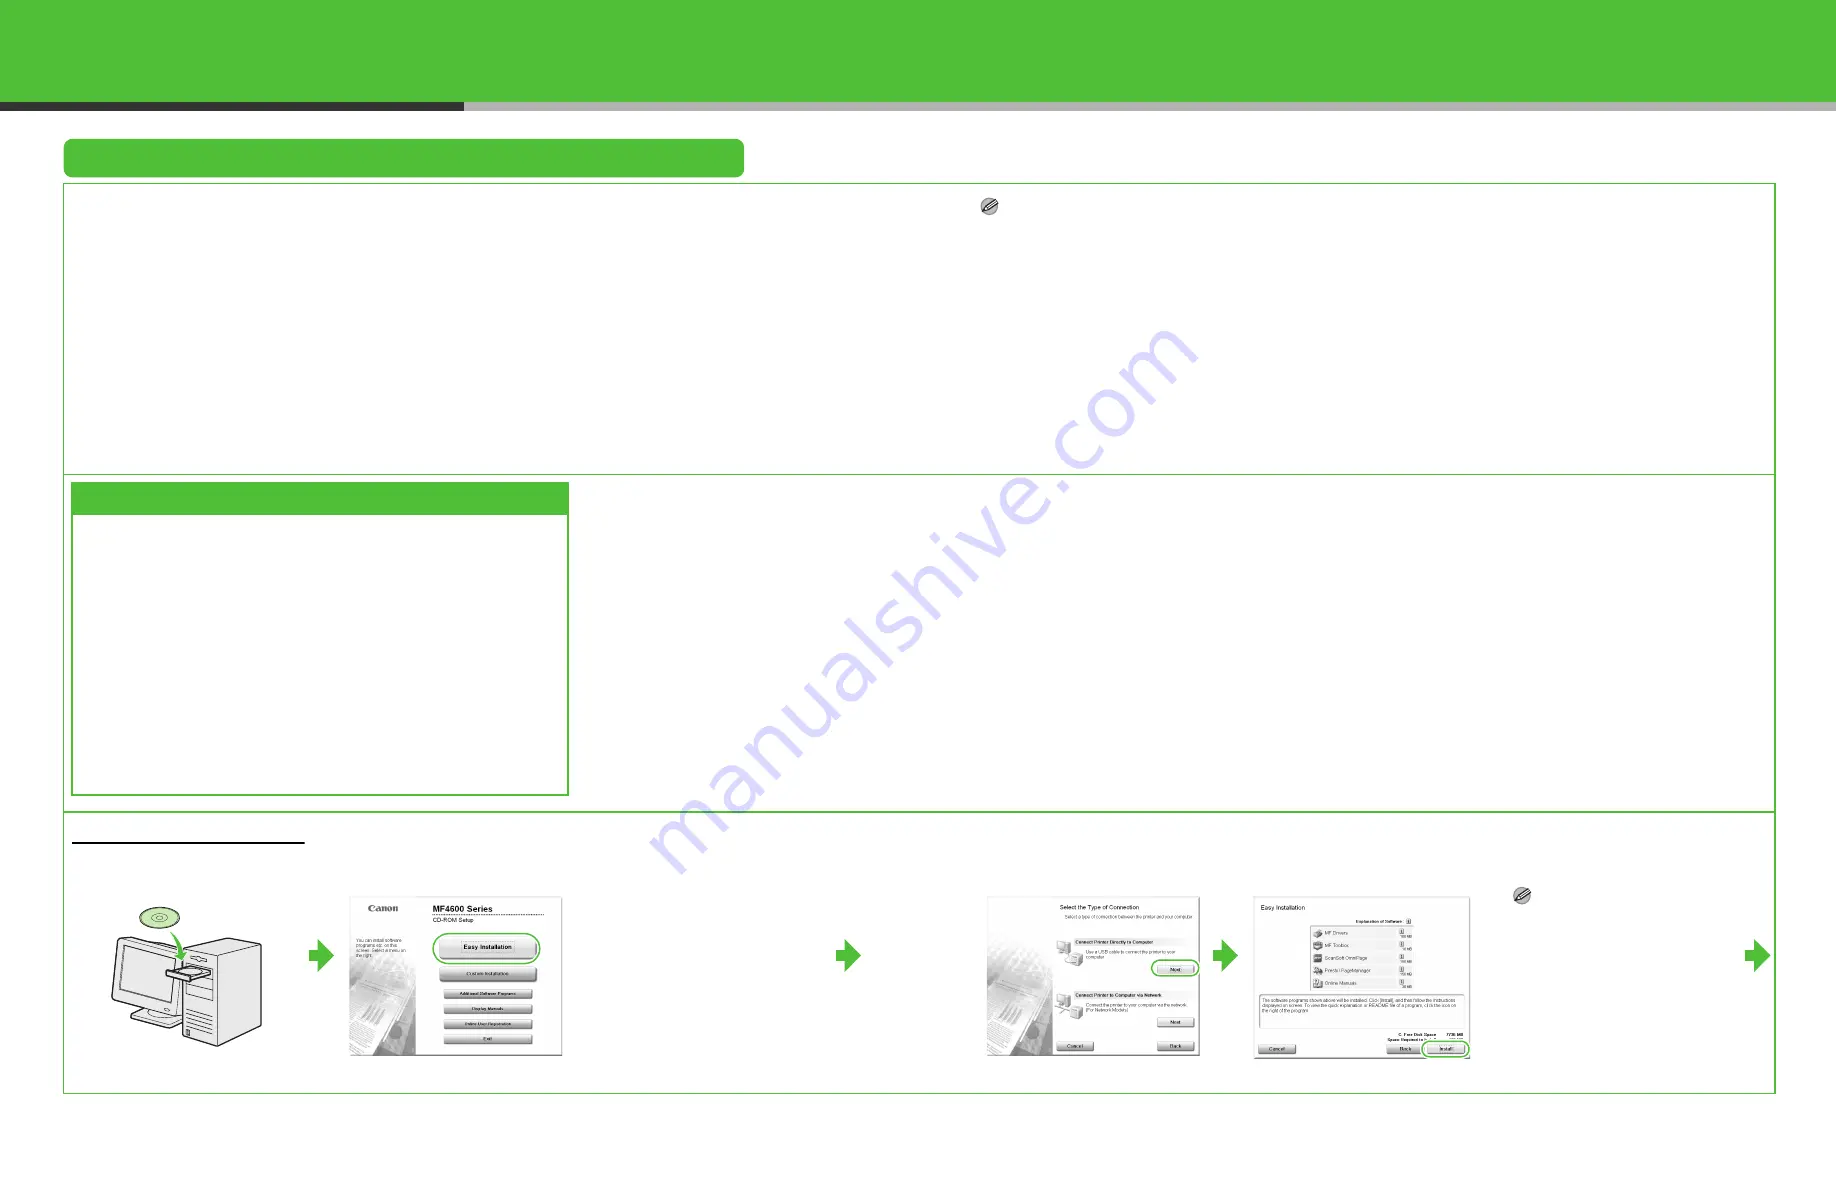
• Do not connect the USB cable before installing the 

software. If you connect the USB cable before installing 
the software and the Found New Hardware Wizard 
screen appears, click [Cancel].

• For Windows 2000/XP/Server 2003/Vista, logon as 

Administrator to install the software.

• Make sure the machine is turned on before connecting 

the USB cable.

• On the screen shown at each step, click on the circled 

button to proceed.

• The machine does not come with a USB cable.

Microsoft Windows XP
(32-bit version)

CPU: Intel Pentium/Celeron series 
300 MHz or faster
Memory: 128 MB or more

Microsoft Windows Server 2003 
(32-bit version)*

CPU: Intel Pentium/Celeron series 
133 MHz or faster
Memory: 128 MB or more
* Only for network connection.

Microsoft Windows Vista
(32-bit version)

CPU: Intel Pentium 800MHz or faster
Memory: 512MB or more

USB Connection

1

2

If the MF4600 Series CD-ROM 
Setup screen is not displayed, 
click [start] on the Windows task 
bar 

 [My Computer]. Windows 

Vista: click [start] on the 
Windows task bar 

 [Computer]. 

Windows 98/Me/2000: double-
click [My Computer] on the 
Windows desktop.
Open the CD-ROM icon, then 
double-click [MInst] ([MInst.exe]).

3

4

NOTE

If the disk space is insufficient to
install the software, an error
message is displayed. Free the
disk space, and then try again.

26

Содержание ImageCLASS MF4690

Страница 1: ...ENG Starter Guide Please read this guide before operating this product After you finish reading this guide store it in a safe place for future reference...

Страница 2: ...pe and packing material from the machine When moving the machine grip the handles on both left and right sides of the machine and lift it carefully as shown in the illustration right The shapes of you...

Страница 3: ...ced features system monitor and reports and lists Scanner Driver Guide located on the User Software CD Scanner settings from a computer Machine Document Feeder Tray Power Cord Destination Labels Telep...

Страница 4: ...ab A which covers over on dent 6 Hold the toner cartridge by its handle A 7 Insert the cartridge so that the protrusion on the right side of the toner cartridge A fits into the guide B located on the...

Страница 5: ...f the paper cassette engage the protrusions B inside the machine 3 Open the front panel of the paper cassette 4 Slide the paper guide rail A and then pinch and slide the side paper guides B to match t...

Страница 6: ...tray extension on the front of the machine and lift the paper stopper 11 Attach the document feeder tray on the document feeder NOTE The default paper size type setting is LTR and PLAIN PAPER When yo...

Страница 7: ...ower cord into the rear socket on the back side of the machine and the wall outlet and press the I side of the main power switch to ON The machine enters the standby mode What if TONER COVER OPEN CLOS...

Страница 8: ...to select 8 TIMER SETTINGS then press OK 3 Press or to select 1 DATE TIME SETTING then press OK 7 Press Stop Reset to return to the standby mode 4 Use the numeric keys to enter the date month day year...

Страница 9: ...peatedly until the required character appears Press to enter symbols Press to switch among input modes a Letter mode 1 Number mode Press to move the cursor position right Press Clear or to delete the...

Страница 10: ...keys to enter your fax telephone number max 20 digits including spaces then press OK 7 Press Additional Functions twice 8 Press or to select 1 TX RX COMMON SET then press OK 9 Press or to select 1 TX...

Страница 11: ...se the machine to receive voice calls No FaxOnly Answers all calls as faxes Do you intend to use an answering machine with the machine Yes AnsMode Receives faxes automatically and records voice messag...

Страница 12: ...to enable communication between the machine and a computer NOTE It is recommended that the network administrator perform the following procedures Before performing the following procedure make sure th...

Страница 13: ...o enter the subnet mask then press OK 11 Press or to select 4 GATEWAY ADDRESS then press OK 12 Use the numeric keys to enter the gateway address number then press OK 13 Turn off the main power on the...

Страница 14: ...MB or more Microsoft Windows Me CPU Intel Pentium 150 MHz or faster Memory 128 MB or more Microsoft Windows 2000 32 bit version CPU Intel Pentium 133 MHz or faster Memory 128 MB or more Do not connect...

Страница 15: ...Now recommended button you can restart your computer by clicking the Restart button 15 After restarting your computer connect the machine and your computer with a USB cable A NOTE If you are using Win...

Страница 16: ...ar Computer Windows 98 Me 2000 double click My Computer on the Windows desktop Open the CD ROM icon then double click MInst MInst exe 3 While installing the software on a computer running Windows Serv...

Страница 17: ...f there is the Canon MF Toolbox 4 9 icon on the Windows desktop If the Canon MF Toolbox 4 9 icon is displayed on the Windows desktop installation of the MF Toolbox 4 9 has been successful Uninstallati...

Страница 18: ...paper documents and images from image files into editable text for use in your favorite computer applications For details see online help for this program Presto PageManager Presto PageManager makes i...

Страница 19: ...help file provided with the driver software In the Properties dialog box you can click Help to display information about every feature and option in the drivers In the help dialog box you can click C...

Страница 20: ...ion of Canon Inc Disclaimers The information in this document is subject to change without notice CANON INC MAKES NO WARRANTY OF ANY KIND WITH REGARD TO THIS MATERIAL EITHER EXPRESS OR IMPLIED EXCEPT...

Страница 21: ...de DDDD DDDD DDDD DDDD 4 CCCC CCCC CCCC CCCC 3 BBBB BBBB BBBB BBBB 2 AAAA AAAA AAAA AAAA 1 AAAA AAAA AAAA AAAA 1 AAAA AAAA AAAA AAAA 1 AAAA AAAA AAAA AAAA 1 AAAA AAAA AAAA AAAA 1 2 on 1 Combination 1...

Страница 22: ...K LTD Woodhatch Reigate Surrey RH2 8BF United Kingdom CANON DEUTSCHLAND GmbH Europark Fichtenhain A10 47807 Krefeld Germany CANON ITALIA S p A Via Milano 8 20097 San Donato Milanese MI Italy CANON ESP...

Отзывы: