


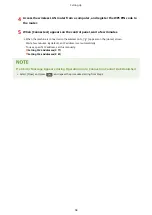


8
Enter the gateway address, and press [Apply].
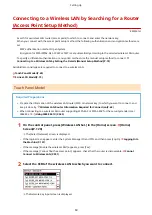
When Assigning an IP Address Automatically
1
Press [Auto Acquire].
➠
The [Auto Acquire] screen is displayed.
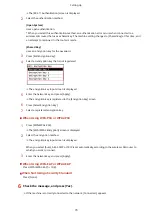
2
Configure the Auto Acquire setting, as needed.
[Select Protocol]
Normally, set to [DHCP]. However, when [DHCP] is set in an environment where DHCP cannot be used,
the machine will continue to confirm Auto Acquire in the network, creating unnecessary communication.
When not using DHCP, set this to [Off].
[Auto IP]
Normally, set to [On]. Although priority is given to the IP address allocated with DHCP, if there is no
response from DHCP, Auto IP will be used.
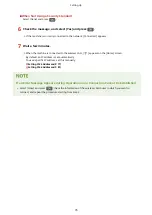
3
Press [Apply].
4
Restart the machine. Restarting the Machine(P. 113)
➠
The settings are applied.
Perform a connection test to check whether the IPv4 address is correctly configured. Checking the
Network Status and Settings(P. 96)
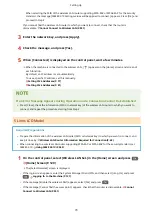
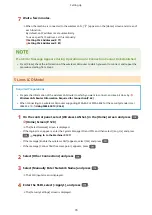
Checking the Currently Set IP Address
●
On the screen in Step 3, press [Check Settings] to check the current IP address setting. If the IP address is
displayed as "0.0.0.0," it is not correctly configured.
If the IP Address Is Changed after Installing the Printer Driver
●
In Windows, you must add a new port. Configuring a Printer Port (Windows)(P. 203)
- If you are using an MFNP port, the connection is maintained as long as the machine and computer belong
to the same subnet, so no action is required on the computer.
- If you are using a standard TCP/IP port, you must add a new port. Adding a Port(P. 203)
If you do not know which port is being used, see the following:
Viewing the Printer Port(P. 665)
●
In macOS, you must re-register the machine on the Mac. For details about registering the machine, see the
manual of the driver at the online manual site.
https://oip.manual.canon/
* If you are using DHCP to automatically obtain the IP address of the machine, the IP address may be changed
automatically.
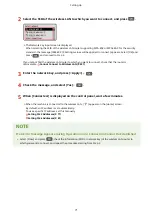
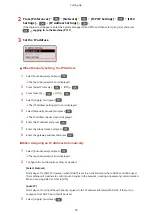
5 Lines LCD Model
1
Press
on the control panel. Control Panel(P. 14)
Setting Up
78
Содержание imageCLASS MF264dw
Страница 72: ... Shared Key Encryption for WPA WPA2 TKIP AES CCMP IEEE 802 1X Authentication Setting Up 63 ...
Страница 96: ...7 Click OK 8 Restart the machine Restarting the Machine P 113 The settings are applied Setting Up 87 ...
Страница 139: ...Basic Operations 130 ...
Страница 160: ...Paper with logo in portrait orientation Paper with logo in landscape orientation Basic Operations 151 ...
Страница 165: ... You can change the paper size displayed on the screen in Step 3 Hiding Unused Paper Sizes P 166 Basic Operations 156 ...
Страница 201: ...Press on the control panel Function Settings Copy Initialize Default Settings Yes Basic Operations 192 ...
Страница 204: ... The volume is adjusted Basic Operations 195 ...
Страница 319: ... To reduce moire vertical pattern noise in photos Press on the control panel 3 Press Copying 310 ...
Страница 333: ...Copying 324 ...
Страница 368: ...8 Log out from Remote UI Security 359 ...
Страница 501: ... Confirm Destination Scan PC Settings Menu Items 492 ...
Страница 538: ...10 Plug the power cord into the outlet and turn ON the machine Turning ON the Machine P 111 Maintenance 529 ...