0F40-067
Portal page
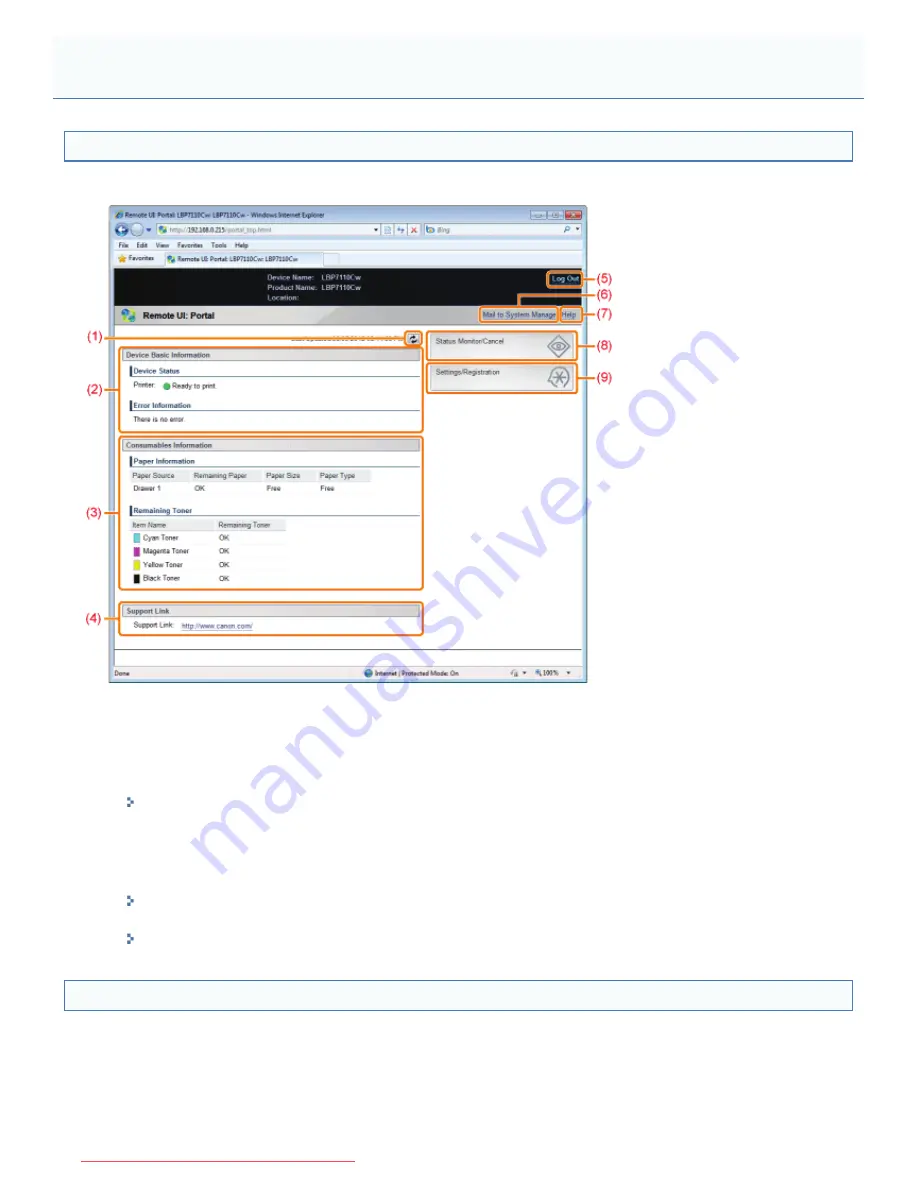
The following screen displayed when you log in to the Remote UI is called the "portal page."
(1) Updates the information in the currently displayed page to the latest one.
(2) Displays the current status of the printer and error information.
Displays the link to the error information when an error occurs.
(3) Displays information related to the paper and the remaining toner.
(4) Displays the support link specified with [Device Information].
"Displaying or Changing the Support Link"
(5) Logs out and displays the top page (login screen) of the Remote UI.
(6) Creates an e-mail to the system manager specified with [System Manager Information].
(7) Displays Help for the currently displayed page in a new window.
(8) Displays the status, history, and so on for printer jobs.
"[Status Monitor/Cancel] page"
(9) Displays/changes the information about the settings of the printer.
"[Settings/Registration] page"
[Status Monitor/Cancel] page
Screen Layout of the Remote UI
㻟㻝㻞㻌㻛㻌㻡㻝㻠
Downloaded from ManualsPrinter.com Manuals
Содержание imageCLASS LBP7110Cw
Страница 1: ...㻝㻌㻛㻌㻡㻝㻠 Downloaded from ManualsPrinter com Manuals ...
Страница 81: ...㻤㻝㻌㻛㻌㻡㻝㻠 Downloaded from ManualsPrinter com Manuals ...
Страница 83: ...It takes approximately 60 seconds 㻤㻟㻌㻛㻌㻡㻝㻠 Downloaded from ManualsPrinter com Manuals ...
Страница 88: ...㻤㻤㻌㻛㻌㻡㻝㻠 Downloaded from ManualsPrinter com Manuals ...
Страница 119: ...㻝㻝㻥㻌㻛㻌㻡㻝㻠 Downloaded from ManualsPrinter com Manuals ...
Страница 121: ... 2 Click Next ĺ Proceed to the Printer Information Screen 㻝㻞㻝㻌㻛㻌㻡㻝㻠 Downloaded from ManualsPrinter com Manuals ...
Страница 124: ...㻝㻞㻠㻌㻛㻌㻡㻝㻠 Downloaded from ManualsPrinter com Manuals ...
Страница 153: ...㻝㻡㻟㻌㻛㻌㻡㻝㻠 Downloaded from ManualsPrinter com Manuals ...
Страница 183: ...3 Click OK Then the Page Setup sheet reappears 㻝㻤㻟㻌㻛㻌㻡㻝㻠 Downloaded from ManualsPrinter com Manuals ...
Страница 204: ... Low 㻞㻜㻠㻌㻛㻌㻡㻝㻠 Downloaded from ManualsPrinter com Manuals ...
Страница 249: ...㻞㻠㻥㻌㻛㻌㻡㻝㻠 Downloaded from ManualsPrinter com Manuals ...
Страница 255: ...㻞㻡㻡㻌㻛㻌㻡㻝㻠 Downloaded from ManualsPrinter com Manuals ...
Страница 282: ...6 Click Close 7 Click Apply 8 Click OK NOTE 㻞㻤㻞㻌㻛㻌㻡㻝㻠 Downloaded from ManualsPrinter com Manuals ...
Страница 286: ...㻞㻤㻢㻌㻛㻌㻡㻝㻠 Downloaded from ManualsPrinter com Manuals ...
Страница 303: ...9 Click Finish 㻟㻜㻟㻌㻛㻌㻡㻝㻠 Downloaded from ManualsPrinter com Manuals ...
Страница 317: ... 2 Click OK 㻟㻝㻣㻌㻛㻌㻡㻝㻠 Downloaded from ManualsPrinter com Manuals ...
Страница 323: ...㻟㻞㻟㻌㻛㻌㻡㻝㻠 Downloaded from ManualsPrinter com Manuals ...
Страница 353: ...㻟㻡㻟㻌㻛㻌㻡㻝㻠 Downloaded from ManualsPrinter com Manuals ...
Страница 355: ...4 Click Edit 5 Configure the SNMPv1 protocol 㻟㻡㻡㻌㻛㻌㻡㻝㻠 Downloaded from ManualsPrinter com Manuals ...
Страница 362: ...4 Click Generate Key 5 Specify a key to be created 㻟㻢㻞㻌㻛㻌㻡㻝㻠 Downloaded from ManualsPrinter com Manuals ...
Страница 366: ...4 Click Register Key and Certificate 5 Click Install 㻟㻢㻢㻌㻛㻌㻡㻝㻠 Downloaded from ManualsPrinter com Manuals ...
Страница 372: ...8 Click Register 㻟㻣㻞㻌㻛㻌㻡㻝㻠 Downloaded from ManualsPrinter com Manuals ...
Страница 378: ...㻟㻣㻤㻌㻛㻌㻡㻝㻠 Downloaded from ManualsPrinter com Manuals ...
Страница 389: ...㻟㻤㻥㻌㻛㻌㻡㻝㻠 Downloaded from ManualsPrinter com Manuals ...
Страница 393: ...6 Enter a login name 7 Select the Use TLS check box 㻟㻥㻟㻌㻛㻌㻡㻝㻠 Downloaded from ManualsPrinter com Manuals ...
Страница 397: ...4 Click Edit 5 Select the Use IEEE 802 1X check box 㻟㻥㻣㻌㻛㻌㻡㻝㻠 Downloaded from ManualsPrinter com Manuals ...
Страница 401: ...㻠㻜㻝㻌㻛㻌㻡㻝㻠 Downloaded from ManualsPrinter com Manuals ...
Страница 436: ...7 Disconnect the USB cable from the computer then restart Windows 㻠㻟㻢㻌㻛㻌㻡㻝㻠 Downloaded from ManualsPrinter com Manuals ...


