


Chapter 4
4-1
4.1 Overview/Configuration
4.1.1 Overview
0018-4900
F-4-1
T-4-1
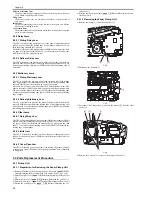
In response to a print command, the DCNT board turns on the main motor to
drive the photosensitive drum, developing cylinder, primary charging roller,
and transfer charging roller.
Thereafter, the machine uses the primary charging roller to charge the sur-
face of the photosensitive drum to an even, negative potential and, at the
same time, directs the laser beam across the surface of the photosensitive
drum. (The laser beam is modulated to according to the incoming video sig-
nals.)
The image thus formed on the photosensitive drum is a static, latent image;
it is turned into a visible image by means of the toner from the developing
cylinder. The resulting toner image is then transferred to paper by the work
of the transfer charging roller, and the paper is sent to the fixing assembly.
The surface of the photosensitive drum is cleaned by the cleaning blade so
that it is free of residual toner; after cleaning, the primary charging roller
once again charges the surface to an even, negative potential to prepare for
the formation of a new static, latent image.
Drum Cover Shutter
If the surface of the photosensitive drum is exposed to strong light, it
develops what is know as "photo memory," which can cause white
spots or black lines in images. To protect the drum against light, the
machine is equipped with a drum cover shutter. The drum cover
shutter must never be opened unless doing so proves to be absolutely
necessary.
4.2 Toner Cartridge
4.2.1 Display the message
0018-5781
If the toner level comes near approx.100 sheets (standard original), the fol-
lowing message is shown on the display.
When the toner cover is opend, the message will disappear.
[TONER LOW/PREPARE NEW TONER]
Å@If the toner cartridge is not exchanged, the message is shown again
when the toner cover is closed.
If the toner is running out, the following message is shown on the display.
[OUT OF TONER/CHANGE TONER]
If the machine is copying or printing when the above message is shown, it
keep printing the active job.
The machine will not print and stores all documents in memory if it receives
fax data/
4.3 Parts Replacement Procedure
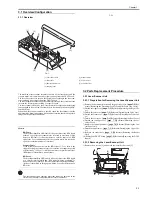
4.3.1 Transfer Charging Roller
4.3.1.1 Removing the Transfer Charging Roller
0018-4184
1) Open the document feeder tray.
2) Open the cartridge cover.
3) Free the 2 claws [1] of the Transfer charging roller.
4) Free the 2 claws [2] of the Transfer guide.
5) Detach the Transfer charging roller [4] together with the transfer guide
[3].
6) Detach the Transfer charging roller [4] from the transfer guide [3].
F-4-2
[1]
[4]
[5]
[6]
[7]
[8]
[2]
[3]
[1] Laser/scanner assembly
[5] Photosensitive drum
[2] Laser beam
[6] Transfer charging roller
[3] Blade
[7] Primary charging roller
[4] Developing cylinder
[8] Cleaning blade
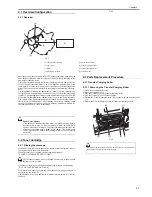
When removing the transfer roller from the machine, free its right side ([1]
in the figure), and pull it out toward the right.
[1]
[1]
[2]
[2]
[3]
[4]
Содержание FaxPhone L90
Страница 1: ...Feb 6 2008 Service Manual L90 L140 L160 L230 Series FAX L140 ...
Страница 2: ......
Страница 6: ......
Страница 12: ...Contents ...
Страница 13: ...Chapter 1 Introduction ...
Страница 14: ......
Страница 16: ......
Страница 23: ...Chapter 2 Document Feed and Exposure System ...
Страница 24: ......
Страница 26: ......
Страница 33: ...Chapter 3 Laser Exposure ...
Страница 34: ......
Страница 36: ......
Страница 38: ......
Страница 39: ...Chapter 4 Image Formation ...
Страница 40: ......
Страница 42: ......
Страница 44: ......
Страница 45: ...Chapter 5 Pickup and Feed System ...
Страница 46: ......
Страница 48: ......
Страница 53: ...Chapter 6 Fixing System ...
Страница 54: ......
Страница 56: ......
Страница 61: ...Chapter 7 External and Controls ...
Страница 62: ......
Страница 72: ......
Страница 73: ...Chapter 8 Maintenance and Inspection ...
Страница 74: ......
Страница 76: ......
Страница 80: ......
Страница 81: ...Chapter 9 Measurement and Adjustments ...
Страница 82: ......
Страница 84: ......
Страница 87: ...Chapter 10 Correcting Faulty Images ...
Страница 88: ......
Страница 90: ......
Страница 93: ...Chapter 11 Error Code ...
Страница 94: ......
Страница 95: ...Contents Contents 11 1 Error Code 11 1 11 1 1 Error Code 11 1 ...
Страница 96: ......
Страница 100: ......
Страница 101: ...Chapter 12 Service Mode ...
Страница 102: ......
Страница 104: ......
Страница 121: ...Chapter 13 Service Tools ...
Страница 122: ......
Страница 123: ...Contents Contents 13 1 Service Tools 13 1 13 1 1 Solvent Oil List 13 1 ...
Страница 124: ......
Страница 126: ......
Страница 127: ...Feb 6 2008 ...
Страница 128: ......


