background image

j

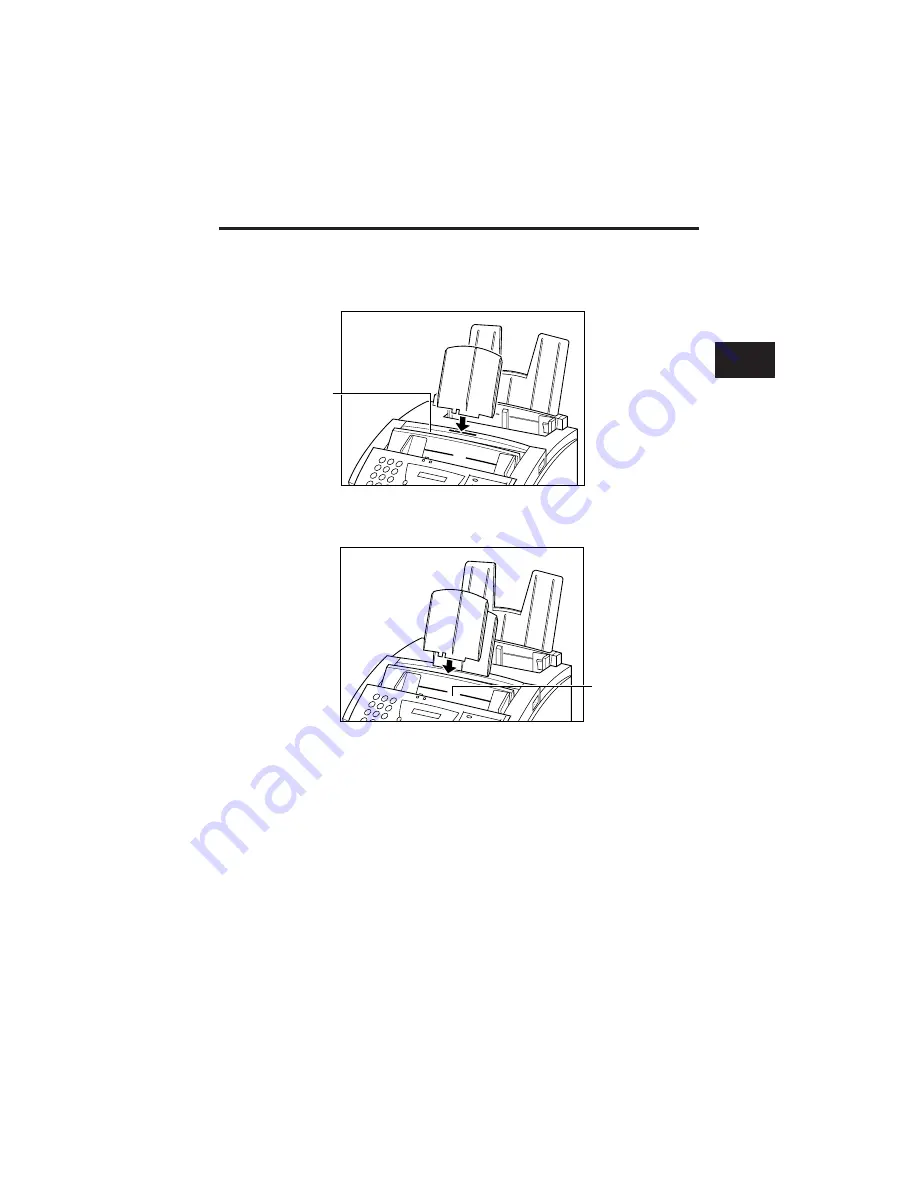
Attaching the Support Trays

There are two identical support trays. One of the support trays holds paper as it comes out of the

face-down delivery slot. To install this support, insert the tabs into the corresponding slots above the

face-down delivery slot, making sure that the smaller tab is on the left.

The other support tray holds documents as they are fed into the Automatic Document Feeder (ADF).

To install this support, insert the tabs into the corresponding slots above the Automatic Document

Feeder (ADF), making sure that the smaller tab is on the left.

FACE-DOWN DELIVERY

SLOT

AUTOMATIC
DOCUMENT FEEDER
(ADF)

Assembling the FAX-L250

2

2

2

2

2

2

2

2

2

2-13

Содержание FAX-L250

Страница 1: ...FAX L250 User s Guide ...

Страница 2: ...p This CE Marking shows compliance of this equipment with Directive 73 23 EEC and Directive 89 336 EEC as amended by Directive 92 31 EEC both as amended by Directive 93 68 EEC Canon Inc Canon Europa N V Copyright Copyright r 1997 by Canon Inc All rights reserved No part of this publication may be reproduced transmitted transcribed stored in a retrieval system or translated into any language or com...

Страница 3: ...ark of Canon Inc Other brand and product names may be trademarks or registered trademarks of their respective companies As an Energy Star Partner Canon has determined that the FAX L250 meets the Energy Star guidelines for energy efficiency EPA POLLUTION PREVENTER iii ...

Страница 4: ...onnected If required a suitable adaptor approved under Approval Number NS G 23 L 100005 for connections between the fax machine and any piece of approved telecommunications apparatus is available from your Canon supplier UK This socket is intended for connection of a telephone the optional handset an answering machine or similar device Voltage and current available at these sockets is determined b...

Страница 5: ... accessible The fact that the equipment operates satisfactorily does not imply that the power point is earthed and the installation is completely safe For your safety if in any doubt about the effective earthing of the power point consult a qualified electrician Caution New Zealand only 1 This equipment may not necessarily provide for the effective hand over of a call to or from a telephone connec...

Страница 6: ...he power source 3 Reconnect the equipment to the power source 4 Reconnect the equipment to the Telecom connection 5 If the supply cord of this equipment is damaged it must be replaced by the special cord Parts No HH2 1910 6 Not all standard telephones will respond to incoming ringing when connected to the extension socket vi ...

Страница 7: ...user no radiation can leak from the machine This fax is classified as Class 1 laser product under IEC 825 and as for the USA is classified as Class 1 under the Code of Federal Regulation 1040 10 of Title 21 Use of controls adjustments or performance of procedures other than those specified in this user s guide may result in hazardous radiation exposure This label is attached to the laser scanner u...

Страница 8: ... Have Everything 2 5 Lifting the FAX L250 2 7 Removing Shipping Materials 2 8 Replaceable Parts 2 10 Assembling the FAX L250 2 11 Attaching Components 2 11 Attaching the Paper Rest 2 11 Attaching the Paper Loading Label 2 12 Attaching the Extension Tray 2 12 Attaching the Support Trays 2 13 Making Connections 2 14 Connecting the Telephone Line 2 14 Connecting the Optional Handset a Telephone or An...

Страница 9: ...enu System 3 6 Personalising Your FAX L250 3 8 Identifying Your Documents 3 9 Entering the Date and Time 3 9 Registering Your Fax Number and Name 3 10 Setting the Telephone Line 3 12 Chapter 4 SPEED DIALLING 4 1 Speed Dialling Methods 4 2 One Touch Speed Dialling 4 3 Storing Numbers for One Touch Speed Dialling 4 3 Changing a Number Name Stored under a One Touch Speed Dialling Button 4 6 Using One...

Страница 10: ... Document Feeder ADF 5 20 Cancelling Sending 5 21 Removing the Document from the Automatic Document Feeder ADF 5 22 Redialling 5 24 Manual Redialling 5 24 Automatic Redialling with Memory Sending 5 24 Cancelling Automatic Redialling 5 25 Setting Up Automatic Redialling 5 26 Sequential Broadcasting 5 29 Sending a Document to More than One Destination 5 29 Sending a Document Using Group Dialling 5 3...

Страница 11: ...stem Operation 6 15 Documents Received in Memory 6 16 Messages Displayed When Documents are Received in Memory 6 16 Printing Documents Received in Memory 6 17 Receiving while Registering Copying or Printing 6 17 Cancelling an Incoming Fax 6 18 Polling to Receive Faxes 6 19 Polling a Fax Machine 6 19 Chapter 7 SPECIAL FEATURES 7 1 Special Dialling 7 2 Dialling Through a Switchboard 7 2 Registering ...

Страница 12: ...TLY ASKED QUESTIONS 10 1 If You Cannot Solve the Problem 10 2 Problems Index 10 3 Paper Jams 10 5 Jams in the Automatic Document Feeder ADF 10 5 Jams in the Output Slots 10 8 Jams Inside the Unit 10 9 Jams in the Front Area of the Unit 10 14 After Clearing a Paper Jam 10 17 Problems Feeding Paper Into the FAX L250 Sheet Feeder 10 18 Faxing Problems 10 20 Sending Faxes 10 20 Receiving Faxes 10 22 T...

Страница 13: ...ER SETTINGS Menu 12 4 Accessing the REPORT SETTINGS Menu 12 6 Accessing the TX SETTINGS Menu 12 8 Accessing the RX SETTINGS Menu 12 10 Accessing the FAX PRINTER Menu 12 12 Accessing the SYSTEM SETTINGS Menu 12 14 Appendix A SPECIFICATIONS A 1 General A 2 Plain Paper Fax A 4 Copier A 6 Telephone A 6 Document Sizes A 7 Printing Area A 8 Appendix B OPTIONS B 1 Optional Handset B 2 Package Contents B ...

Страница 14: ...This page is intentionally blank ...

Страница 15: ... of the documentation that comes with the unit and gives important safety instructions Welcome 1 2 The Main Features of the FAX L250 1 3 Plain Paper Fax Features 1 4 Copier Features 1 5 Telephone Features 1 5 How to Use this User s Guide 1 6 Type Conventions Used in this User s Guide 1 7 Customer Support 1 8 Safety Instructions 1 9 ...

Страница 16: ...The FAX L250 is a G3 facsimile unit that allows you to send documents at high speed in the shortest time possible We are sure that your FAX L250 will help meet your fax and phone requirements easily and conveniently as well as your copying needs FAX L250 1 2 ...

Страница 17: ...ages per minute allows you to work more effectively Simple maintenance The FX 3 toner cartridge for the FAX L250 contains both the toner and the drum making installation and replacement simple Convenient paper handling The FAX L250 sheet feeder holds up to 100 sheets of plain A4 letter or legal size paper Economy toner saving printing The FAX L250 includes an economy printing mode that uses up to ...

Страница 18: ...L250 uses G3 data encoding methods that increase transmission speed to approximately 6 seconds per page Memory sending receiving The FAX L250 can store up to 90 fax pages either received or to be sent in its built in memory and can receive faxes while printing Reduced size printing The FAX L250 automatically scales received faxes to fit the size of the paper loaded into the sheet feeder So if your...

Страница 19: ...e Telephone Features Automatic dialling The FAX L250 s three automatic dialling methods one touch speed dialling coded speed dialling and group dialling can be used to store phone numbers and fax numbers for easy and efficient calling Connection for the optional handset an answering machine or a telephone Connecting the optional handset or a telephone to the FAX L250 allows you to use it to make a...

Страница 20: ...g faxes and making copies and to learn more about its special features such as restricting use of the unit and special dialling features If your FAX L250 begins operating improperly use Chapter 10 Frequently Asked Questions to try to solve the problem Look over Chapter 11 Maintaining Your FAX L250 to become familiar with procedures for cleaning your FAX L250 and replacing the toner cartridge Refer...

Страница 21: ...250 Notes provide advice for using your FAX L250 more effectively describe operating restrictions and tell how to avoid minor operating difficulties In addition this user s guide uses bold capital letters to show the names of buttons and switches on the FAX L250 such as FUNCTION STOP and START COPY Text that appears in the unit s display is shown in plain capital letters such as RECEPTION OK How t...

Страница 22: ...le free operation If you have a problem with the unit s operation try to solve it by using the information in Chapter 10 Frequently Asked Questions If you cannot solve the problem or if you think your FAX L250 needs service contact your local authorised Canon dealer or service centre 1 8 ...

Страница 23: ...ventilation To keep the FAX L250 from overheating which can cause it to operate abnormally and create a fire risk take care not to block or cover these openings Do not operate the unit on a bed sofa rug or other similar soft surface or near a radiator or other heat source Do not place the FAX L250 in a cupboard or cabinet or on shelves unless adequate ventilation is available See Choosing a Locati...

Страница 24: ...er supply UPS Always unplug the FAX L250 before moving or cleaning it Whenever you unplug the FAX L250 wait at least five seconds before you plug it back in Keep the FAX L250 away from direct sunlight as this can damage it If you have to place it near a window install heavy curtains or blinds Do not expose the FAX L250 to extreme temperature fluctuations Install the unit in a place with temperatur...

Страница 25: ...it If the FAX L250 does not operate normally when you follow the operating instructions Adjust only those controls that are covered by the operating instructions in this user s guide or you can damage the unit and require extensive repair work If the FAX L250 is dropped or its cabinet damaged If the FAX L250 begins performing poorly and you cannot correct the problem by following the procedures in...

Страница 26: ...This page is intentionally blank ...

Страница 27: ...e FAX L250 2 11 Attaching Components 2 11 Attaching the Paper Rest 2 11 Attaching the Paper Loading Label 2 12 Attaching the Extension Tray 2 12 Attaching the Support Trays 2 13 Making Connections 2 14 Connecting the Telephone Line 2 14 Connecting the Optional Handset a Telephone or Answering Machine 2 15 Connecting the Power Cord 2 16 Getting Acquainted with Your FAX L250 2 18 Front View 2 18 Ins...

Страница 28: ...Loading Recording Paper 2 33 Testing the FAX L250 2 36 The Paper Path 2 37 Selecting Paper Delivery 2 38 Face Down Delivery 2 39 Face Up Delivery 2 40 2 2 ...

Страница 29: ...ty is always between 20 and 85 Keep the FAX L250 away from direct sunlight If possible place the FAX L250 near an existing telephone outlet to allow for an easy connection of the telephone line to the unit Place the FAX L250 near an electrical wall outlet that provides 200 240 volt AC 50 60 Hz power Do not plug the FAX L250 into the same circuit as an appliance such as an air conditioner electric ...

Страница 30: ...to allow paper to flow freely into and out of the unit The figure below shows the minimum space required for the unit If you need help installing your FAX L250 or have any questions about it please contact your local authorised Canon dealer or service centre TOP VIEW SIDE VIEW BOTTOM VIEW Setting Up Your FAX L250 2 4 ...

Страница 31: ...the carton and packing material in case you want to move or ship the unit in the future 1 Carefully remove all items from the box You should have someone help by holding the box while you lift the FAX L250 and its protective packaging out of the carton FX 3 TONER CARTRIDGE FAX L250 UNIT DOCUMENTATION SUPPORT TRAYS PAPER REST POWER CORD TELEPHONE LINE EXTENSION TRAY 2 2 2 2 2 2 2 2 2 2 2 2 2 2 2 2 ...

Страница 32: ...e of the power cord varies depending on the country of purchase The shape of the telephone line varies depending on the country of purchase FAX L250 UNIT PAPER REST SUPPORT TRAYS POWER CORD TELEPHONE LINE FX 3 TONER CARTRIDGE FAX L250 USER S GUIDE This book PAPER LOADING LABEL M LABEL UK Only EXTENSION TRAY Setting Up Your FAX L250 2 6 ...

Страница 33: ...enever you plan to move the FAX L250 be sure to Hold the unit firmly and keep it level Always grip the sides of the unit The recessed areas on each side of the unit serve as handles Unpacking Your FAX L250 2 2 2 2 2 2 2 2 2 7 ...

Страница 34: ...t has been packed with protective material that you must remove before using Follow these steps 1 Remove all pieces of shipping tape from the outside of the FAX L250 2 Open the operation panel by grasping it with both hands and gently pulling it towards you Setting Up Your FAX L250 2 8 ...

Страница 35: ...rom the Automatic Document Feeder ADF then gently close the operation panel by pressing it down from the centre until it clicks 4 Peel the clear protective sheet off the LCD display Unpacking Your FAX L250 2 2 2 2 2 2 2 2 2 2 2 2 2 2 2 9 ...

Страница 36: ...r replacement is the FX 3 toner cartridge Although Canon manufactures many types of toner cartridges the FX 3 toner cartridge is the only one designed to be used with your FAX L250 The FX 3 toner cartridge can be purchased at any Canon authorised dealer Setting Up Your FAX L250 2 10 ...

Страница 37: ...bled see Getting Acquainted with Your FAX L250 on page 2 18 Attaching Components j Attaching the Paper Rest The paper rest helps keep paper or other media straight in the sheet feeder To attach the paper rest insert the two side tabs diagonally into the corresponding slots above the sheet feeder and then straighten it 2 2 2 2 2 2 2 2 2 2 2 2 2 2 2 11 ...

Страница 38: ...is included with your FAX L250 unit Attach the label to the left of the sheet feeder as shown below j Attaching the Extension Tray Lift the FAX L250 unit as shown and slide the extension tray into the rails on the bottom of the unit Setting Up Your FAX L250 2 12 ...

Страница 39: ... the face down delivery slot making sure that the smaller tab is on the left The other support tray holds documents as they are fed into the Automatic Document Feeder ADF To install this support insert the tabs into the corresponding slots above the Automatic Document Feeder ADF making sure that the smaller tab is on the left FACE DOWN DELIVERY SLOT AUTOMATIC DOCUMENT FEEDER ADF Assembling the FAX...

Страница 40: ...e Telephone Line Connect the FAX L250 to a telephone line as follows 1 Connect one end of the supplied telephone line to the jack marked on the back of the FAX L250 2 Connect the other end of the line to your wall telephone jack 2 14 ...

Страница 41: ...he optional handset telephone or answering machine to the jack marked on the back of the FAX L250 If you connect an answering machine to the FAX L250 be sure to read Using an Answering Machine ANS MACHINE MODE on page 6 11 Users in the UK Only To connect a telephone or answering machine to the FAX L250 you may need to connect the optional B T adaptor Contact your Canon supplier for more informatio...

Страница 42: ...d with an appliance such as an air conditioner computer electric typewriter or copier These devices generate electrical noise which can interfere with the operation of the FAX L250 Make sure nothing is laying on the power cord and that the cord cannot be walked on or tripped over Do not overload the electrical outlet Make sure the total amperage used by all the machines plugged into the outlet doe...

Страница 43: ... the FAX L250 is warming up the message PLEASE WAIT appears in the LCD display When the time and receive mode appear the FAX L250 is in standby mode and ready for use If the toner cartridge has not been installed yet the message CHECK COVER CART alternates with the standby mode display PLEASE WAIT 13 00 FaxOnly CHECK COVER CART 13 00 FaxOnly Making Connections 2 2 2 2 2 2 2 2 2 2 2 2 2 2 2 2 2 2 2...

Страница 44: ...es to become familiar with the unit s components and their functions Front View SUPPORT TRAYS AUTOMATIC DOCUMENT FEEDER ADF DOCUMENT GUIDES OPERATION PANEL PAPER DELIVERY SELECTOR PAPER REST SHEET FEEDER PAPER GUIDE FACE DOWN DELIVERY SLOT RELEASE LATCH FRONT COVER FACE UP DELIVERY SLOT EXTENSION 2 18 ...

Страница 45: ...Inside View FIXING ASSEMBLY PAPER RELEASE LEVER FX 3 TONER CARTRIDGE COMPARTMENT TRANSFER CHARGING ROLLER FRONT COVER Getting Acquainted with Your FAX L250 2 2 2 2 19 ...

Страница 46: ... View The Handset Option For details on the optional handset see Appendix B POWER CONNECTOR RELEASE LATCH OPTIONAL HANDSET TELEPHONE ANSWERING MACHINE JACK TELEPHONE LINE JACK Setting Up Your FAX L250 2 20 ...

Страница 47: ...play The LCD display shows messages and prompts during operation and displays selections text numbers and names when registering information ALARM lamp This lamp flashes when an error occurs or when the FAX L250 is out of paper or toner REDIAL PAUSE DOCUMENT FEED LEVER LCD DISPLAY ALARM NUMERIC BUTTONS CODED DIAL RECEIVE MODE START COPY RESOLUTION STOP ONE TOUCH SPEED DIAL SPECIAL FUNCTION BUTTONS...

Страница 48: ...alls ANS MACHINE MODE or to automatically switch between telephone and fax receiving depending on the type of call Fax Tel Mode START COPY button Press this button to begin sending receiving scanning copying or other operations or to select functions when registering information RESOLUTION button Press this button to select the resolution the FAX L250 will use for the document you want to fax or s...

Страница 49: ... to send a document using a password and subaddress based on the ITU T standard MEMORY REF button 03 Use this button to delete or resend documents stored in memory or to print a list of documents in memory REPORT button 04 Use this button to print activity reports 02 03 01 04 06 07 05 08 10 11 09 12 14 15 13 16 FUNCTION DELAYEDTX PWD SUBADD MEMORYREF REPORT D T TONE R Getting Acquainted with Your ...

Страница 50: ...dialling temporarily when your unit is set for pulse dialling Press also to enter a sign when registering your fax telephone number Arrow buttons 10 and 12 Use these buttons to scroll through menu selections or to move the cursor when registering data button 16 Press this button to dial an outside line access number when the unit is connected through a switchboard PBX Setting Up Your FAX L250 2 24...

Страница 51: ...it even by shaking the cartridge Keep the cartridge away from computer screens disc drives and floppy discs The magnet inside the cartridge may harm these items Never touch the drum protective shutter When holding the cartridge avoid touching the drum protective shutter with your hands Do not store the cartridge in direct sunlight Avoid locations subject to high temperature high humidity or rapid ...

Страница 52: ...ective bag You may need to repack and transport the cartridge at a later date Do not store the cartridge in salty air or where there are corrosive gases such as from aerosol sprays Do not remove the cartridge from the FAX L250 unless necessary DO NOT PLACE THE CARTRIDGE IN FIRE TONER POWDER IS FLAMMABLE Setting Up Your FAX L250 2 26 ...

Страница 53: ...istribute the toner If after doing this the message remains displayed or the print quality is low replace the cartridge as described below Canon makes numerous cartridges The FX 3 toner cartridge has been designed specially for the FAX L250 and is the only one Canon recommends that you use 1 Remove any documents and or printed pages from the unit 2 Make sure the FAX L250 is plugged in 3 Open the f...

Страница 54: ...he front cover without pressing the release latches as this may cause damage to your unit 4 If replacing a used cartridge hold the cartridge by its handle and remove it as shown HANDLE Setting Up Your FAX L250 2 28 ...

Страница 55: ...s in You may need to repack the cartridge later 6 Gently rock the cartridge from side to side several times to distribute the toner evenly inside the cartridge Poor print quality may result if the toner becomes unequally distributed inside the cartridge The Toner Cartridge 2 2 2 2 2 2 2 2 2 2 2 2 2 2 2 29 ...

Страница 56: ...nd Remove the seal by gently pulling on the plastic tab with your other hand Use a firm even pull to remove the plastic seal To avoid breaking the seal do not jerk on it unevenly SIDE VIEW TOP VIEW PULL IN THIS DIRECTION PULL IN THIS DIRECTION Setting Up Your FAX L250 2 30 ...

Страница 57: ...ge with the guides inside the unit Slide the unit into position Always hold the cartridge by its handle when inserting it in the unit 9 Gently press the cartridge into the unit as far as it will go Press down and back on the cartridge s handle The Toner Cartridge 2 2 2 2 2 2 2 2 2 2 2 2 2 2 2 2 2 2 31 ...

Страница 58: ...10 Close the front cover Use both hands to lift the cover back into the closed position Setting Up Your FAX L250 2 32 ...

Страница 59: ...ly textured or extremely smooth or shiny paper does not print well The laser printing process uses high temperatures to fuse toner to the paper Use paper that will not melt vaporise discolour or emit dangerous fumes at temperatures near 170 C For example do not use vellum paper in a laser printer Make sure any letterhead or coloured paper you use can withstand high temperatures Make sure the paper...

Страница 60: ...der Let the paper run out before you refill the sheet feeder 1 Before loading paper stack it so that the leading edge and sides of the paper are even 2 Open the paper guides to the approximate width of the stack of paper Setting Up Your FAX L250 2 34 ...

Страница 61: ...st the paper guides to the width of the paper Make sure there is no space between the paper guides and the stack of paper Your FAX L250 is now ready to print Let the paper run out before you refill the sheet feeder Avoid mixing new paper with paper remaining in the sheet feeder Loading Recording Paper 2 2 2 2 2 2 2 2 2 2 2 2 2 2 2 2 2 2 2 2 2 2 2 2 35 ...

Страница 62: ...make sure the FAX L250 is printing properly by making several copies of a document For instructions see Chapter 8 Making Copies Note the following If the printed sheets are curled as they exit the FAX L250 remove them from the output slot immediately to avoid paper jams Make sure your text or graphics fall within the printable area 2 36 ...

Страница 63: ...from the front or top When you are printing follow these guidelines Always set the paper delivery selector before starting to print Do not switch the paper delivery selector until the printout completely comes out of the delivery slot Otherwise a paper jam may occur Make sure there is enough room for the paper to exit from the face up delivery slot Never pull the paper as it comes out of the unit ...

Страница 64: ... Delivery Received faxes and copies can be delivered through the face up or face down delivery slots Choose paper delivery according to the job the FAX L250 is performing and the type of print media you are using 2 38 ...

Страница 65: ... plain paper only 64 to 90 g m2 Printed pages are stacked in the order printed in the face down delivery slot This slot holds up to 50 sheets of plain paper 75 g m2 Move the paper delivery selector up to the mark FACE DOWN DELIVERY Selecting Paper Delivery 2 2 2 2 2 2 2 2 39 ...

Страница 66: ...edge of a table so that printed pages can come out without blocking the face up delivery slot 1 Move the paper delivery selector down to the mark When using face up delivery make sure that the unit is placed as shown above so that the pages can drop away from the unit If you do not place the unit as shown and prefer to use the extension tray be sure to remove each page as it is delivered to avoid ...

Страница 67: ...ormation 3 2 Entering Numbers Letters and Symbols 3 3 Editing Information 3 5 Using the One Touch Speed Dial Special Function Buttons 3 6 Using the Menu System 3 6 Personalising Your FAX L250 3 8 Identifying Your Documents 3 8 Entering the Date and Time 3 9 Registering Your Fax Number and Name 3 10 Setting the Telephone Line Type 3 12 ...

Страница 68: ...50 rings while you are entering information press the STOP button and lift the handset The FAX L250 will automatically save all the information you have entered up to the last time you pressed the START COPY button If you hear nothing or a slow beep someone is trying to send a fax press the START COPY button If you hear a voice you are receiving a normal telephone call If your FAX L250 is set to r...

Страница 69: ... When you are in number mode 1 appears on the right of the LCD display When you are in uppercase letter mode A appears on the right of the LCD display When you are in lowercase mode a appears on the right of the LCD display To enter a symbol press repeatedly until the symbol you want appears Press any other button or to enter the symbol and move the cursor Button Uppercase Lowercase c Uppercase c ...

Страница 70: ... same group To enter two letters from the same group you have to use the right arrow button For example you would enter AA like this 1 Press until an A appears on the right of the LCD display 2 Press 2 once to display the first A on the left of the LCD display 3 Press to enter the A and move the cursor to the right 4 Press 2 until the second A is displayed _ a _ b a _ A _ A A A_ A A_ A A Registeri...

Страница 71: ... Use the button to scroll to the incorrect character 2 Press the button once to erase the character above the cursor The cursor moves one space to the left 3 Press the button to move back to the empty space and type in the correct character Guidelines for Entering Information 3 3 3 3 3 3 3 3 3 3 3 3 3 3 3 3 3 5 ...

Страница 72: ...TION button that allows you to select operation settings and to enter user information The system includes these items TEL REGISTRATION Lets you register numbers for one touch speed dialling coded speed dialling and group dialling USER SETTINGS Lets you enter the information that prints on the faxes you send to set scanning contrast and to enter other basic data Enter these settings when you plug ...

Страница 73: ...pter 12 The Menu System You ll use the arrow buttons to display and select items from the menu system as follows 1 Press FUNCTION 2 Use or to change the menu display Press the button to display the next item in the menu The list will wrap from the last item in the list back to the first Press the button to display the previous item in the menu The list will wrap from the first item in the list bac...

Страница 74: ...ments you send the receiving party can recognise your fax messages at a glance Here is a sample document with the identifying information If you send a fax using speed dialling the top line also includes the name registered under the speed dialling button or code you entered You can enter this information into the FAX L250 by following the instructions on the pages below THE DATE AND TIME YOU SENT...

Страница 75: ...he correct date and time Use the DD MM YY format for the date and use the 24 hour clock for the time so 2 30 p m would be 14 30 for example 5 Press START COPY to save the date and time 6 Press STOP to return to standby mode FUNCTION FUNCTION USER SETTINGS DATE TIME _ 23 11 98 14 30 UNIT TELEPHONE 14 30 Manual Personalising Your FAX L250 3 3 3 3 3 3 3 3 3 3 3 3 3 3 3 3 3 3 3 3 3 3 3 3 3 3 3 3 3 3 3...

Страница 76: ... 3 Press START COPY 4 Use or to select UNIT TELEPHONE 5 Press START COPY then enter your fax telephone number using the numeric buttons You can enter up to 20 digits for your fax number You can enter spaces with the button to make the number easier to read FUNCTION FUNCTION USER SETTINGS DATE TIME UNIT TELEPHONE TEL 541 766 3452 Registering Information in the FAX L250 3 10 ...

Страница 77: ...usiness name For more details on entering letters see page 3 3 You can enter up to 24 characters for your name or business name 8 Press START COPY to save the name 9 Press STOP to return to standby mode UNIT NAME CANO_ N A TX TERMINAL ID 14 30 FaxOnly Personalising Your FAX L250 3 3 3 3 3 3 3 3 3 3 3 3 3 3 3 3 3 3 3 3 3 3 3 3 3 11 ...

Страница 78: ...LINE TYPE 5 Press START COPY then use or to select the correct telephone line type 6 Press START COPY to save the telephone line type 7 Press STOP to return to standby mode The factory default setting is ROTARY PULSE for all countries except the UK and Singapore The factory default setting for the UK and Singapore is TOUCH TONE FUNCTION FUNCTION USER SETTINGS DATE TIME TEL LINE TYPE TOUCH TONE ROT...

Страница 79: ...ouch Speed Dialling 4 3 Changing a Number Name Stored under a One Touch Speed Dialling Button 4 6 Using One Touch Speed Dialling 4 9 Coded Speed Dialling 4 11 Storing Numbers for Coded Speed Dialling 4 11 Changing a Number Name Stored under a Coded Speed Dialling Code 4 14 Using Coded Speed Dialling 4 17 Group Dialling 4 19 Creating Groups for Group Dialling 4 19 Using Group Dialling 4 22 ...

Страница 80: ...y pressing the one touch speed dialling button that the number is assigned to Coded speed dialling Dial a fax telephone number by pressing the CODED DIAL button followed by a two digit code assigned to that number Group dialling Send a document to a pre defined group of fax numbers The numbers must already be stored as one touch speed dialling numbers or coded speed dialling numbers 4 2 ...

Страница 81: ...ect a one touch speed dialling button between 01 and 16 If a number is already stored under the button you select that number appears If the button you select is registered for group dialling GROUP DIAL appears Users in the UK only If you have set the M KEY SETTING in the USER SETTINGS to ON M KEY will be displayed if you select the one touch speed dialling button 16 You cannot use this button for...

Страница 82: ...staken entry press the button To enter a pause in the number press the REDIAL PAUSE button one or more times 7 Press START COPY 8 Press START COPY again then use the numeric buttons to store the name that goes with the number For details on entering letters see page 3 3 You can store up to 16 characters for the name Users in the UK can only enter one pause between digits in telephone fax numbers T...

Страница 83: ...continue registering numbers and names repeat steps 4 to 9 or If you have finished registering numbers and names press STOP to return to standby mode 05 14 30 FaxOnly One Touch Speed Dialling 4 4 4 4 4 4 4 4 4 4 4 4 4 4 4 4 4 5 ...

Страница 84: ...se or to select the one touch speed dialling button you want to change between 01 and 16 If the button you select is registered for group dialling GROUP DIAL appears 5 Press START COPY twice Users in the UK only If you have set the M KEY SETTING in the USER SETTINGS to ON M KEY will be displayed if you select the one touch speed dialling button 16 You cannot use this button for one touch speed dia...

Страница 85: ...or name 6 To change the number use the numeric buttons to enter the new number over the previous number The telephone fax number can be up to 120 digits long If you only want to change the name ignore this step and go to step 7 7 Press START COPY twice to display the registered name TEL 14 30 FaxOnly Ex TEL 2 50921 NAME _ Canon EUROPA A One Touch Speed Dialling 4 4 4 4 4 4 4 4 4 4 4 4 4 4 4 4 4 4 ...

Страница 86: ...s for the name If you want to keep the same name do not enter a new name and go to step 9 9 Press START COPY twice to display the registered name 10 To change additional numbers and or names repeat steps 4 to 9 or If you have finished changing numbers and or names press STOP to return to standby mode Ex Canon ITALI_ A A 05 1 432 2060 14 30 FaxOnly Speed Dialling 4 8 ...

Страница 87: ...ll be displayed If you mistakenly press the wrong one touch speed dialling button press the STOP button then press the correct button If no fax number is assigned to the one touch dialling button you press the LCD displays NO TEL If this happens make sure you pressed the correct button and that the number you want to dial is registered under that button 3 Press START COPY If you do not press the S...

Страница 88: ...You can also use one touch speed dialling to send a document to more than one location at a time For details see Sequential Broadcasting on page 5 29 Speed Dialling 4 10 ...

Страница 89: ...STRATION 3 Press START COPY then use or to select CODED SPEED DIAL 4 Press START COPY 5 Use or to select a two digit code 00 99 in the display If a number is already registered under the code you select that number is displayed If the code you select is registered for group dialling GROUP DIAL appears FUNCTION FUNCTION TEL REGISTRATION CODED SPEED DIAL 00 01 4 4 4 4 4 4 4 4 4 4 4 4 4 4 4 4 4 4 4 4...

Страница 90: ...press the button To enter a pause in the number press the REDIAL PAUSE button one or more times 8 Press START COPY 9 Press START COPY again then use the numeric buttons to store the name that goes with the number For details on entering letters see page 3 3 You can store up to 16 characters for the name Users in the UK can only enter one pause between digits in telephone fax numbers TELEPHONE NUMB...

Страница 91: ...ontinue registering numbers and names repeat steps 5 to 10 or If you have finished registering numbers and names press STOP to return to the standby mode 02 14 30 FaxOnly Coded Speed Dialling 4 4 4 4 4 4 4 4 4 4 4 4 4 4 4 4 4 13 ...

Страница 92: ...UNCTION 2 Use or to select TEL REGISTRATION 3 Press START COPY then use or to select CODED SPEED DIAL 4 Press START COPY 5 Use or to select the coded speed dialling code you want to change between 00 and 99 If the button you select is registered for group dialling GROUP DIAL is displayed 6 Press START COPY twice FUNCTION FUNCTION TEL REGISTRATION CODED SPEED DIAL 00 2131 1250 01 1 538 4500 TELEPHO...

Страница 93: ...r name 7 To change the number use the numeric buttons to enter the new number over the previous number The telephone fax number can be up to 120 digits long If you only want to change the name ignore this step and go to step 8 8 Press START COPY twice to display the registered name TEL 14 30 FaxOnly Ex TEL 03 3758 2111 NAME Canon ESPAÑ_ A A Coded Speed Dialling 4 4 4 4 4 4 4 4 4 4 4 4 4 4 4 4 4 4 ...

Страница 94: ... to 16 characters for the name If you want to keep the same name do not enter a new name and go to step 10 10 Press START COPY 11 To change additional numbers and or names repeat steps 5 to 10 or If you have finished changing numbers and or names press STOP to return to standby mode Ex Canon TOKY_ O A 02 1 4939 25 25 14 30 FaxOnly Speed Dialling 4 16 ...

Страница 95: ...wo digit code assigned to the fax number The name registered under that coded speed dialling code is displayed If no name is registered the number registered under that code will be displayed If you mistakenly enter the wrong code press the STOP button Then press the CODED DIAL button and enter the correct code If no fax number is assigned to the coded speed dialling code you press the LCD display...

Страница 96: ... automatically If an error occurs during sending the FAX L250 will print an error report If this happens try sending the fax again See Faxing Problems on page 10 20 for details about errors You can also use coded speed dialling to send a document to more than one location at a time For details see Sequential Broadcasting on page 5 29 Speed Dialling 4 18 ...

Страница 97: ...ws 1 Press FUNCTION 2 Use or to select TEL REGISTRATION 3 Press START COPY then use or to select GROUP DIAL 4 Press START COPY To store a group under a one touch speed dialling button 5 Use or to select an unused one touch speed dialling button 01 to 16 If a group or number is already registered under the button you select GROUP DIAL or 1 TOUCH SPD DIAL is displayed Users in the UK only If you hav...

Страница 98: ...mes when creating and registering groups If you wish to register a group under a one touch speed dialling button or coded speed dialling code already registered for speed dialling or if you want to re enter a group you must delete the previous information first See pages 4 6 and 4 14 for more details 6 Press START COPY twice 7 Enter the speed dialling numbers you want to store in the group To ente...

Страница 99: ... to add a number to the group press the one touch speed dialling button or coded speed dialling code the number is registered under and then press the START COPYbutton The number will be added to the group You can cancel registering numbers and return to standby mode by pressing the STOP button anytime before pressing the START COPY button in step 8 8 Press until the whole number is deleted then p...

Страница 100: ...e a mistake when selecting a group press the STOP button and start again If you press a one touch speed dialling button or coded speed dialling code that has no group or fax number registered under it the LCD displays NO TEL Make sure you pressed the correct one touch speed dialling button or entered the correct coded speed dialling code and that the group you want has been registered correctly un...

Страница 101: ...3 When you finish entering groups press START COPY The FAX L250 then scans the document into memory and begins dialling the numbers in the groups Group Dialling 4 4 4 4 4 4 4 4 4 23 ...

Страница 102: ...This page is intentionally blank ...

Страница 103: ...ution 5 13 Setting the Scanning Contrast 5 14 Sending Methods 5 15 Manual Sending via the Handset 5 15 Memory Sending 5 15 Dialling Methods 5 15 Sending Documents 5 16 Manual Sending via the Handset 5 16 Memory Sending 5 18 Adding Pages to the Document in the Automatic Document Feeder ADF 5 20 Cancelling Sending 5 21 Removing the Document from the Automatic Document Feeder ADF 5 22 Redialling 5 24...

Страница 104: ...ing 5 32 Sending Other Documents While the FAX L250 is Set for Delayed Sending 5 34 Documents Stored in Memory 5 35 Printing a List of Documents Stored in Memory 5 35 Deleting a Document Stored in Memory 5 37 Resending a Document that Encountered an Error 5 38 Sending with the Password Subaddress Feature 5 40 If a Power Cut Occurs 5 43 5 2 ...

Страница 105: ... 355 9 mm Minimum 105 148 mm Quantity Up to 20 A4 size 20 letter size or 10 legal size pages 1 page for sizes other than these Thickness 0 07 0 13 mm For pages thicker than this load one page at a time All sheets should be of the same thickness Weight 50 90 g m2 All sheets should be of the same weight When the document feed lever is set to Manual Document Feed Size Maximum 216 mm approx 1 m Minimu...

Страница 106: ...ment Feeder ADF Make sure any glue ink or correction fluid on the paper is completely dry before loading the document into the Automatic Document Feeder ADF If you have a document that will not feed into the FAX L250 properly make a photocopy of the document then load the copy instead WRINKLED OR CREASED PAPER CURLED OR ROLLED PAPER TORN PAPER CARBON PAPER OR CARBON BACKED PAPER COATED PAPER ONION...

Страница 107: ...the maximum margins of 3 0 mm on either side of the sheet and 4 0 mm on the top and bottom Make sure your document s text and graphics do not extend into these margins MAX 4 0 mm MAX 4 0 mm MAX 3 0 mm MAX 3 0 mm 208 mm A4 Preparing to Send a Fax 5 5 5 5 5 5 5 5 ...

Страница 108: ...as photos business cards or documents on other special types of paper Manual document feed will allow you to scan your document with minimum damage to the surface of the document When using manual feed use a carrier sheet to avoid scratching the surface of important documents photographs for example Use the document feed lever located at the top of the operation panel to select automatic document ...

Страница 109: ...or Automatic Feed 1 Make sure the document feed lever is set to automatic document feed 2 If the document has multiple pages tap it on a flat surface to even the edges Preparing to Send a Fax 5 5 5 5 5 5 5 5 5 5 5 5 5 5 5 7 ...

Страница 110: ...3 Adjust the document guides to the width of the document 4 Gently insert the document face down top of the document towards you into the Automatic Document Feeder ADF until it stops Sending Faxes 5 8 ...

Страница 111: ...ack Wait until your document has been scanned completely before inserting a new document Trouble With Multipage Documents If you have trouble feeding a multipage document do the following 1 Remove the stack and tap it on a flat surface to even the edges Preparing to Send a Fax 5 5 5 5 5 5 5 5 5 5 5 5 5 5 5 5 5 5 5 5 9 ...

Страница 112: ...jams while feeding see Jams in the Automatic Document Feeder ADF on page 10 5 You cannot feed a multipage document of thick media such as postcards or business cards Use manual feed instead to feed one page at a time Wait until your document has been scanned completely before inserting a new document Sending Faxes 5 10 ...

Страница 113: ...set to manual document feed When using manual feed use a carrier sheet to avoid scratching the surface of important documents photographs for example 2 Adjust the document guides to the width of the document Preparing to Send a Fax 5 5 5 5 5 5 5 5 5 5 5 5 5 5 5 5 5 5 5 5 5 11 ...

Страница 114: ...tomatic Document Feeder ADF until it stops The document is now ready for scanning Wait until your document has been scanned completely before inserting a new document The length of the document is slightly reduced when copying or sending documents using manual feed Sending Faxes 5 12 ...

Страница 115: ...es is for documents that contain photographs With this setting areas of the document that contain photos are automatically scanned with 64 levels of grey rather than just two black and white This gives a much better reproduction of the photos though transmission time is longer Set the resolution as follows 1 Press RESOLUTION The LCD display shows the current resolution setting 2 Press RESOLUTION u...

Страница 116: ...ss FUNCTION 2 Use or to select USER SETTINGS 3 Press START COPY then use or to select SCAN CONTRAST 4 Press START COPY The currently set scanning contrast is displayed 5 Press or to select the scanning contrast you wish to set You can select STANDARD LIGHTER or DARKER You can cancel and return to standby mode by pressing the STOP button any time before pressing the START COPY button in step 6 6 Pr...

Страница 117: ...e fax number and press the START COPY button See page 5 18 for more details on memory sending Since the FAX L250 is multitasking you can even scan a document into the memory while sending a document receiving a document or printing a report Dialling Methods There are several ways of dialling the number of the party you want to send to Regular dialling Use the numeric buttons to dial the recipient ...

Страница 118: ...d fax transmissions Be sure to adjust the document feed lever before loading your document See page 5 6 for details 1 Prepare the document and load it face down into the Automatic Document Feeder ADF Once the document is loaded the LCD display shows the following If necessary you can adjust the resolution and contrast See page 5 13 for details 2 Lift the handset and dial the number Use one of the ...

Страница 119: ... their fax machine or set their fax machine to receive then press START COPY on the FAX L250 and hang up The LCD displays TX and the transmission number TX RX NO Be sure to press the START COPY button before you hang up or you will disconnect the call TX TX RX NO 0012 Sending Documents 5 5 5 5 5 5 5 5 5 5 5 5 5 5 5 5 5 5 5 17 ...

Страница 120: ...r before loading your document See page 5 6 for details 1 Prepare the document and load it face down into the Automatic Document Feeder ADF Once the document is loaded the LCD display shows the following If necessary you can adjust the resolution and contrast See page 5 13 for details 2 Dial the other party s fax number Use one of the dialling methods described on page 5 15 If you must first dial ...

Страница 121: ...the document in transaction reports The display continues to show these three displays in order while the fax is sending When the FAX L250 finishes sending the fax the display shows the TRANSMITTING OK message If an error occurs during sending the FAX L250 will print out an error report If this happens try sending the fax again See Faxing Problems on page 10 20 for details about errors TX SCANNING...

Страница 122: ...utomatic document feed If your document has more pages than this you can add pages while the FAX L250 is scanning 1 Wait until the last sheet in the Automatic Document Feeder ADF starts feeding 2 Load up to 20 additional sheets 10 legal size Insert the first new page so that it overlaps the last page by about 2 5 cm Wait until your document has been scanned completely before inserting a new docume...

Страница 123: ...lay 2 To cancel sending press If you change your mind and want the unit to continue sending press the button The FAX L250 will continue sending normally After you cancel a fax you may need to open the operation panel to remove the document from the Automatic Document Feeder ADF See Removing the Document from the Automatic Document Feeder ADF on page 5 22 CANCEL YES NO TX RX CANCELLED 5 5 5 5 5 5 5...

Страница 124: ...ent Feeder ADF 1 Open the operation panel by gently pulling towards you 2 Remove the document by pulling it out from the top or bottom Do not pull the document without opening the operation panel otherwise the document will tear Sending Faxes 5 22 ...

Страница 125: ...e the operation panel by pressing it down from the centre as shown Be sure to close the operation panel until it locks into place Otherwise the unit will not function properly Cancelling Sending 5 5 5 5 5 5 5 5 5 5 5 5 5 5 5 5 23 ...

Страница 126: ...50 will redial the number how long it will wait between dialling attempts and how much of the fax the FAX L250 will resend if an error occurs See Setting Up Automatic Redialling on page 5 26 for more details When automatic redialling is in use the FAX L250 alternately displays AUTO REDIAL and the transaction number while it is waiting to redial When it begins redialling it alternately displays CAL...

Страница 127: ...0 begins redialling While the FAX L250 is waiting to redial the LCD displays AUTO REDIAL 2 Press STOP The FAX L250 asks you to confirm that you want to cancel 3 To cancel the redialling press The FAX L250 beeps and alternates the following displays The unit then prints an error report if set to print one You can also delete the document from memory See Deleting a Document Stored in Memory on page ...

Страница 128: ... for the auto redial feature are The FAX L250 redials twice The FAX L250 waits two minutes before redialling If an error occurs during transmission the FAX L250 resends the first page of the document and the error page Follow the procedure below to adjust the automatic redialling settings 1 Press FUNCTION 2 Press or to select TX SETTINGS 3 Press START COPY then press or to select AUTO REDIAL One m...

Страница 129: ...s START COPY again then use the numeric buttons to enter the time interval between rediallings 2 to 99 minutes The default setting is two minutes 9 Press START COPY UK and Hong Kong 1 3 times Australia 1 2 times Ireland 1 4 times New Zealand 1 5 times Australia Hong Kong Malaysia 1 99 minutes 1 minute for New Zealand ON REDIAL TIMES 02 TIMES REDIAL INTERVAL 02 MIN TX ERROR RESEND Redialling 5 5 5 ...

Страница 130: ...ress START COPY again then if you selected ON in step 10 use or to select which pages are sent when an error occurs Resends the first page of the document and the page where the error occurred Resends only the page where the error occurred Resends all pages of the document The default setting is ERROR 1st PG 13 Press START COPY to save your selection then press STOP to return to standby mode ON OF...

Страница 131: ...in any order You can also include one destination that you dial manually using the numeric buttons To send a fax to more than one location do the following Be sure to adjust the document feed lever before loading your document See page 5 6 for details 1 Prepare the document and load it face down into the Automatic Document Feeder ADF If necessary you can adjust the resolution and contrast See page...

Страница 132: ...sending automatically If you have entered more than one speed dialling button or code the FAX L250 waits for 10 seconds before it begins sending If you want to review the numbers you entered press the FUNCTION button and use the or buttons to scroll through the numbers 3 When you finish entering numbers press START COPY to begin sending or wait a few seconds for the FAX L250 to begin sending autom...

Страница 133: ...en divide the document into several sections and send each section individually Sending a Document Using Group Dialling If you frequently send faxes to the same group of people you can create a group Groups are stored under one touch speed dialling buttons or coded speed dialling codes See Chapter 4 Speed Dialling for details on registering numbers under groups and using group dialling Sequential ...

Страница 134: ...1 Prepare the document and load it face down into the Automatic Document Feeder ADF If necessary you can adjust the resolution and contrast See page 5 13 for more details 2 Press FUNCTION then DELAYED TX The current time is displayed 3 Use the numeric buttons to enter the time at which you want to send the document Enter the time using the 24 hour clock system Precede single digits with a zero Exa...

Страница 135: ...he numeric buttons Be sure to press CODED DIAL before each code Regular dialling Enter the number using the numeric buttons then press START COPY You can only enter one number with the numeric buttons 6 When you finish entering numbers press START COPY The FAX L250 begins scanning the document into memory SELECT LOCATIONS TEL DELAYED TX R CODED DIAL SCANNING P 001 Delayed Sending 5 5 5 5 5 5 5 5 5...

Страница 136: ...ending operation at a time When the set time comes the FAX L250 dials and sends the document Sending Other Documents While the FAX L250 is Set for Delayed Sending The FAX L250 is a multitasking unit so you can send receive and copy other documents even when you have set the FAX L250 for delayed sending To copy or send other documents after setting the FAX L250 for delayed sending simply follow the...

Страница 137: ...n memory along with the transaction TX RX number of each Once you know the transaction number of a document in memory you can resend it or delete it These procedures are described later in this chapter To print a list of documents stored in memory follow this procedure 1 Press FUNCTION then MEMORY REF 2 Use or to select DOC MEMORY LIST 3 Press START COPY The FAX L250 begins printing a list of docu...

Страница 138: ...C MEMORY LIST TX RX NO MODE CONNECTION TEL ID PGS SET TIME ST TIME 0001 0002 0003 B CAST DELAYED TX TRANSMIT 01 Canon TOKYO 00 CANON ESPAÑA 01 Canon TOKYO 3 2 1 19 02 13 50 19 02 13 52 19 02 14 23 18 00 23 30 18 00 CANON U K Sending Faxes 5 36 ...

Страница 139: ... document you want to delete print the list of documents stored in memory See page 5 35 for details 4 Press START COPY 5 Press to delete the fax or to cancel deleting If you press the unit returns to step 3 6 Press STOP to return to standby mode FUNCTION MEMORY REFERENCE DELETE DOCUMENT FUNCTION MEMORY REF TX RX NO _ 0001 TX RX NO _ 0003 YES NO 14 30 FaxOnly Documents Stored in Memory 5 5 5 5 5 5 ...

Страница 140: ...IAL setting in the TX SETTINGS is set to OFF a document that failed to be sent is also considered an error document 1 Press FUNCTION then MEMORY REF 2 Use or to select MEM RETRANSMIT 3 Press START COPY 4 Use or to select the TX RX number of the document you want to resend If you are not sure of the TX RX number of the document you want to resend print the list of documents stored in memory See pag...

Страница 141: ...5 Press START COPY The document is erased from memory after it is successfully sent DIALLING Documents Stored in Memory 5 5 5 5 5 5 5 5 5 5 5 5 39 ...

Страница 142: ...ure you have the other party s password and subaddress The password and subaddress you enter must be identical to those of the receiving fax To send a document with a password and subaddress follow this procedure Be sure to adjust the document feed lever before loading your document See page 5 6 for more details 1 Prepare the document and load it face down into the Automatic Document Feeder ADF If...

Страница 143: ...a password In this case use the or button to select SELECT LOCATIONS press the START COPY button and go to step 7 5 Press START COPY again then use the numeric buttons to enter the password The password can be up to 20 digits long 6 Press START COPY twice 123456 PASSWORD 654321 SELECT LOCATIONS TEL Sending with the Password Subaddress Feature 5 5 5 5 5 5 5 5 5 5 5 5 5 5 5 5 5 5 5 5 5 5 5 5 5 5 5 5...

Страница 144: ...ED DIAL then enter the two digit code 00 99 using the numeric buttons Be sure to press CODED DIAL before each code Regular dialling Enter the number using the numeric buttons then press START COPY You can only enter one number with the numeric buttons 8 Press START COPY The FAX L250 begins scanning the document FUNCTION DELAYED TX R 01 CANON EUROPE CODED DIAL SCANNING P 001 Sending Faxes 5 42 ...

Страница 145: ...ist of the lost documents when power is restored Because of this you should be sure to print documents stored in memory or resend them as soon as possible While power is out you can only use the FAX L250 to receive telephone calls if you have a telephone connected to the unit You cannot make calls or send or receive faxes 5 5 5 5 5 5 5 5 5 5 5 43 ...

Страница 146: ...This page is intentionally blank ...

Страница 147: ... MACHINE MODE 6 11 Using the FAX L250 with an Answering Machine 6 11 Network FAX TEL Switching Australia Only 6 12 Setting the FAX L250 for Network Switch 6 12 Network Switch System Operation 6 13 Network FAX TEL Switching New Zealand Only 6 14 Setting the FAX L250 for Network Switch 6 14 Network Switch System Operation 6 15 Documents Received in Memory 6 16 Messages Displayed When Documents are R...

Страница 148: ...ely how it handles incoming calls For details see page 6 4 MANUAL MODE Use this mode if you will frequently use the FAX L250 as a telephone and want to answer every call yourself including fax calls The FAX L250 then rings for every call whether phone or fax and you must press the START COPY button to begin receiving a fax FAX ONLY MODE Use this mode if the FAX L250 will be connected to a separate...

Страница 149: ...ress RECEIVE MODE until the mode you want appears After about five seconds the FAX L250 returns to standby mode and displays the time and the new receive mode RECEIVE MODE FAX ONLY MODE RECEIVE MODE ANS MACHINE MODE Fax Tel Mode MANUAL MODE FAX ONLY MODE 14 30 AnsMode 14 30 FaxTel 14 30 Manual 14 30 FaxOnly Different Ways to Receive a Fax 6 6 6 6 6 6 6 6 6 6 6 6 6 6 6 6 6 6 6 6 6 6 3 ...

Страница 150: ... to increase the time the unit takes to check whether a call is from a fax machine or a telephone You can select a time between 0 and 30 seconds the default is 8 seconds F T RING TIME When your unit is set to receive both fax and telephone calls automatically it rings to alert you to pick up the handset if the call is from a person If you do not pick up the handset within a certain amount of time ...

Страница 151: ... receive the document If no document comes in it disconnects the call after approximately 35 seconds The factory default setting is RECEIVE 2 If you set the F T SWITCH ACTION to DISCONNECT the unit will disconnect the phone call immediately freeing up your phone line at this point Different Ways to Receive a Fax 6 6 6 6 6 6 6 5 ...

Страница 152: ...ing FAX L250 listens for FAX TONE For 8 sec FAX TONE detected FAX TONE is not detected FAX L250 starts ringing If you don t pick up the handset within 22 sec F T SW ACTION Choose between RECEIVE factory default setting and DISCONNECT RECEIVE Factory default setting Not all fax machines are capable of sending a FAX TONE For those cases if you set the F T SW ACTION to RECEIVE the FAX L250 switches t...

Страница 153: ...PY 6 Press START COPY again then use the numeric buttons to enter a time between 0 and 30 seconds This setting determines how many seconds the unit waits before ringing when it receives a call The factory default setting is 8 seconds FUNCTION FUNCTION RX SETTINGS RX MODE Fax Tel Mode RING START TIME 08SEC Different Ways to Receive a Fax 6 6 6 6 6 6 6 6 6 6 6 6 6 6 6 6 6 6 6 6 6 6 6 6 6 6 6 6 6 6 6...

Страница 154: ...ing is 22 seconds 9 Press START COPY 10 Press START COPY again then use or to select RECEIVE or DISCONNECT This setting tells the unit what to do if no one picks up the handset within the specified ring time set in step 8 Select RECEIVE to receive the call and DISCONNECT to disconnect the call 11 Press START COPY then press STOP to return to standby mode F T RING TIME 022SEC F T SW ACTION RECEIVE ...

Страница 155: ...to press the start button on their fax machine When you hear a slow beep press START COPY to begin receiving the document If you hear a slow beep or silence 2 A fax machine is trying to send you a document Press START COPY on the FAX L250 then hang up or Enter the two digit ID code from the telephone then hang up Ex The FAX L250 then begins receiving the document This is particularly convenient if...

Страница 156: ... machine s security code See page 12 11 for more details Receiving Faxes Automatically FAX ONLY MODE When the FAX L250 is set up for a dedicated line set FAX ONLY MODE to automatically receive documents whenever a call comes over the fax line 1 Make sure the FAX L250 is set up to receive over a dedicated fax line 2 Press RECEIVE MODE to select FAX ONLY MODE The FAX L250 assumes all incoming calls ...

Страница 157: ...nt to dedicate a separate line for fax communication only and connect that line to the FAX L250 j Using the FAX L250 with an Answering Machine Follow these guidelines when using the FAX L250 with an answering machine Set the answering machine to answer on the first or second ring If the FAX L250 runs out of paper or toner in ANS MACHINE MODE it receives all faxes into memory The faxes then print a...

Страница 158: ...y at the caller s end Triple ring short short short for fax receiving Three short rings at regular intervals Any ring except triple ring depending on your switchboard for telephone conversation When you select NET SWITCH from the RX MODE setting in the RX SETTINGS menu the receive mode will be locked on Fax Tel Mode You will be unable to change the receive mode with the RECEIVE MODE button j Setti...

Страница 159: ...beep it means the call is from a fax machine trying to send a document Press the START COPY button to receive the document If you do not pick up the handset the unit continues to ring until the other party hangs up If an answering machine is connected it takes over the call When you hear the fax call ring pattern triple ring After the unit rings it receives the document automatically If you want t...

Страница 160: ... so that the call is handled as a voice call This means that there is no switching delay at the caller s end When you select NET SWITCH from the RX MODE setting in the RX SETTINGS menu the receive mode will be locked on Fax Tel Mode You will be unable to change the receive mode with the RECEIVE MODE button j Setting the FAX L250 for Network Switch Follow these steps to select NET SWITCH 1 Press FU...

Страница 161: ...beep it means the call is from a fax machine trying to send a document Press the START COPY button to receive the document If you do not pick up the handset the unit continues to ring until the other party hangs up If an answering machine is connected it takes over the call When you hear the fax call ring pattern triple ring After the unit rings it receives the document automatically If you want t...

Страница 162: ...ceives a document into its memory the LCD displays one of the following messages These messages show the action you must take to correct the problem Cause The toner cartridge ran out of toner or is not installed properly Action Make sure the cartridge is installed properly and install a new one if necessary See Installing Replacing the Toner Cartridge on page 2 27 Cause There is no toner cartridge...

Страница 163: ...ile Registering Copying or Printing Since the FAX L250 is a multitasking device it can receive faxes and phone calls while you are entering your user information making copies or printing a report If you receive a fax while you are making copies or printing a report manually the FAX L250 stores the incoming fax in memory Then as soon as you finish making copies or printing the report the FAX L250 ...

Страница 164: ...Cancelling an Incoming Fax To cancel an incoming fax follow this procedure 1 Press STOP 2 Press to stop receiving or to resume receiving the fax CANCEL YES NO 6 18 ...

Страница 165: ...ore attempting to poll a fax machine make sure that fax machine supports polling Your FAX L250 cannot be polled by another fax machine 1 Lift the handset and dial the fax number of the fax machine you wish to poll Use one of the dialling methods described on page 5 15 2 When you hear a beep press START COPY then hang up The FAX L250 begins receiving the fax If the sender is using a Canon fax machi...

Страница 166: ...This page is intentionally blank ...

Страница 167: ...er the R Button 7 2 Long Distance Dialling 7 4 How to Enter Pauses 7 4 Confirming a Dial Tone 7 5 Using Tone Dialling on a Pulse Line 7 6 Restricting Use of the FAX L250 7 7 Using Alternative Telephone Networks UK Only 7 9 Attaching the M Label 7 9 Registering an Alternative Telephone Network 7 10 Sending with an Alternative Telephone Network 7 12 Registering Speed Dialling with the M Button 7 13 ...

Страница 168: ...n register the type of access and the outside line access number under the R button so that you only have to press the FUNCTION and R buttons before dialling the number you wish to reach Follow the instructions below to register the R button j Registering the Access Type and the Outside Line Access Number under the R button Follow these steps to register the access type and the outside line access...

Страница 169: ...tons to enter the outside line access number up to 20 digits 8 Press REDIAL PAUSE 9 Press START COPY then press STOP to return to standby mode If you selected EARTH CONNECTION or HOOKING in step 5 7 Press START COPY then press STOP to return to standby mode PREFIX HOOKING EARTH CONNECTION Ex 123456 REDIAL PAUSE 123456P 14 30 Manual 14 30 Manual Special Dialling 7 7 7 7 7 7 7 7 7 7 7 7 7 7 7 7 7 7 ...

Страница 170: ...the number 2 To enter a pause within a number press REDIAL PAUSE To enter a pause at the end of a number press the REDIAL PAUSE button and then press the START COPY button A pause entered within a number p is two seconds long If necessary you can adjust the length of a pause within a number See page 12 9 for more details To make a longer pause within a number press the REDIAL PAUSE button again Ea...

Страница 171: ...st part of the number until dial tone detection is required 2 When a dial tone detection is required press FUNCTION then press D T Where the dial tone is inserted you will see a small dot During dialling this is where the unit waits for the dial tone 3 Enter the remainder of the number This feature is ineffective in the UK Hong Kong Australia New Zealand Singapore and Malaysia TEL 348 FUNCTION DT ...

Страница 172: ...button is pressed T is displayed in the LCD Numbers entered after pressing the TONE button will be dialled using tone dialling 3 When you have finished hang up the handset When registering one touch speed dialling and coded speed dialling numbers if you enter the TONE button after the number you will switch to tone dialling after the phone connection is made After the number 123456 is dialled it w...

Страница 173: ...follows 1 Press FUNCTION 2 Use or to select SYSTEM SETTINGS 3 Press START COPY twice If a password has already been registered enter it now then press the START COPY button 4 Press START COPY If a password is already registered it will be displayed If a password is not registered the following is displayed FUNCTION FUNCTION SYSTEM SETTINGS UN LOCK PHONE PASSWORD PASSWORD _ 1234 Ex PASSWORD _ 7 7 7...

Страница 174: ...ress START COPY then use or to set LOCK PHONE on or off The default setting is OFF Anyone can send documents or dial normally When set to ON no one can make calls or send documents Does not restrict incoming calls faxes 7 Press START COPY then press STOP to return to standby mode PASSWORD _ 4321 Ex OFF ON 14 30 Manual Special Features 7 8 ...

Страница 175: ...rnational communications The procedures described in this section show you how to use your unit with the 2300 Service of Mercury Communications Limited For details on using your unit with alternative telephone services contact your Canon authorised representative Attaching the M Label Before operating the unit attach the M label to help you identify the button as shown below 02 03 01 04 06 07 05 0...

Страница 176: ...then use or to select M KEY SETTING 4 Press START COPY then use or to select ON 5 Press START COPY 6 Press START COPY again then use or to select the access code You can select 132 default or 131P P stands for a four second pause FUNCTION FUNCTION USER SETTINGS M KEY SETTING ON ACCESS CODE 132 Special Features 7 10 ...

Страница 177: ... to 20 digits long pauses are unnecessary If an ID code is already registered you will see a string of asterisks on the display 9 Press START COPY then press STOP to return to standby mode If you selected 132 in step 6 8 Press STOP to return to standby mode Ex ID CODE 123456789 14 30 Manual 14 30 Manual Using Alternative Telephone Networks UK only 7 7 7 7 7 7 7 7 7 7 7 7 7 7 7 7 7 7 7 7 7 7 7 7 7 ...

Страница 178: ...ephone number of the party you are calling 4 Press START COPY The FAX L250 automatically dials the access code and ID code registered under the M button Next the unit dials the number of the party you are calling and connects the call In order to protect your codes the access code and ID code are not printed on activity reports If M KEY SETTING is set to ON the button 16 cannot be used for one tou...

Страница 179: ...g numbers 1 While you are registering a number for one touch or coded speed dialling and you come to a step that asks you to enter the number of the other party press FUNCTION then press M 2 Use the numeric buttons to enter the number 3 Continue with the procedure for registering one touch or coded speed dialling numbers Once you have registered the M button with the numbers under speed dialling n...

Страница 180: ...This page is intentionally blank ...

Страница 181: ...8 Making Copies This chapter describes how to make copies with your FAX L250 Making Copies 8 2 ...

Страница 182: ... Automatic Document Feeder ADF Once the document is loaded the LCD display shows the following 2 Press START COPY The display now shows COPY the reduction size the copy will be printed at the default is 100 and the number of copies the default is 1 3 To set the copying resolution press RESOLUTION and select the setting you want MEMORY USED 0 FINE DOCUMENT READY Currently used memory Current resolu...

Страница 183: ...o select the reduction percentage you want You can select 70 80 90 or 100 5 If you want to make multiple copies use the numeric buttons to enter the number of copies You can make up to 99 copies The FAX L250 copies at 600 300 dpi for single copies and at 300 300 dpi for multiple copies For high resolution copying make one copy at a time 6 Press START COPY to begin copying To stop copying press the...

Страница 184: ...LL appears in the display while you are making multiple copies of a document you will not be able to use the multiple copy feature for copying the document Instead make single copies of the document as many times as required To correct this situation delete or resend any documents stored in memory See Documents Stored in Memory on page 5 35 Making Copies 8 4 ...

Страница 185: ... numbers list of user s data registered in the FAX L250 and the memory clear list Activity Report 9 2 Transmission TX Reports 9 3 Error TX Report 9 3 TX Report 9 4 Multi TX RX Report 9 5 Reception RX Report 9 6 Memory Clear Report 9 7 User s Data List 9 8 Speed Dialling Lists 9 10 One Touch Speed Dial List 9 11 Coded Speed Dial List 9 11 Group Dial List 9 11 ...

Страница 186: ...14 36 14 41 14 45 14 53 14 57 14 59 905 795 1111 905 795 1111 1 49 39 25 25 2131 1250 905 795 1111 516 488 6700 20 545 8545 20 545 8545 03 3756 6112 2131 1250 1 538 4500 456 123 Canon Canada Canon Canada Canon FRANCE CANON DEUTSCH CANON CANADA CANON U S A CANON Europa NV CANON Europa NV Canon Tokyo CANON DEUTSCH CANON ESPAÑA 5001 5002 0001 0004 5003 5004 0005 0005 5005 0006 0007 AUTO FAX RX AUTO F...

Страница 187: ...ent using memory you can also select whether the first page of the document is printed with the report See page 12 7 for details on setting these options Error TX Report See the next page for an explanation of the report 07 09 98 mon 14 59 fax 81 733 3173 CANON U K 001 ERROR TX REPORT TX FUNCTION WAS NOT COMPLETED TX RX NO CONNECTION TEL CONNECTION ID ST TIME USAGE T PGS 0003 CANON ESPAÑA 10 01 20...

Страница 188: ...e TX REPORT with a transaction number in the ACTIVITY REPORT you can find out exactly how many attempts were made to send the document how many pages were sent in each attempt as well as the usage time for each attempt PGS Represents the total number of pages that were successfully transmitted 07 09 98 MON 14 49 FAX 81 733 3173 CANON U K 001 TX REPORT TRANSMISSION OK TX RX NO CONNECTION TEL CONNEC...

Страница 189: ...ges were transmitted after two retries The default which is two retries can be changed See page 12 9 for more details Multi TX RX Report If you used sequential broadcasting to send a document the Multi TX RX Report is printed 07 09 98 MON 14 59 FAX 81 733 3173 CANON U K 001 MULTI TX RX REPORT TX RX NO INCOMPLETE TX RX TRANSACTION OK ERROR 0007 01 03 3758 2111 02 906 795 1111 Canon TOKYO CANON CANA...

Страница 190: ...t the RX Report every time you receive a document or only if an error occurs during receiving See page 12 7 for details on setting this option 07 09 98 MON 14 38 FAX 81 733 3173 CANON U K 001 RX REPORT RECEPTION OK TX RX NO CONNECTION TEL SUBADDRESS CONNECTION ID ST TIME USAGE T PGS RESULT 5004 CANON U S A 19 02 14 36 00 59 4 516 488 6700 OK 9 6 ...

Страница 191: ...Memory Clear Report You will be unable to send documents or receive faxes in memory until you do this If you have no paper available and you urgently need to send a document or receive a fax in memory press the STOP button to enable sending and receiving However please note that once you have pressed the STOP button the unit will no longer print the Memory Clear Report 07 09 98 MON 15 28 FAX 81 73...

Страница 192: ...r data information you may have entered such as your name and number the date and time and all other settings currently selected Follow this procedure to print the User s Data List 1 Press FUNCTION 2 Use or to select USER SETTINGS 3 Press START COPY then REPORT FUNCTION FUNCTION USER SETTINGS DATE TIME PRINTING REPORT REPORT 9 8 ...

Страница 193: ...ALARM VOLUME CONTROL CALLING VOLUME KEYPAD VOLUME ALARM VOLUME RX CALL LEVEL TEL LINE TYPE SYSTEM SETTINGS UN LOCK PHONE LOCK PHONE RX RESTRICTION DATA FORMAT DISPLAY LANGUAGE TX START SPEED RX START SPEED TOTAL FAX MEMORY 81 733 3173 CANON U K ON OUTSIDE IMAGE FAX ON STANDARD ON VOL MID VOL MID VOL MID STANDARD ROTARY PULSE OFF OFF DD MM YY ENGLISH 14400bps 14400bps 0 656MByte User s Data List 9 ...

Страница 194: ...umbers and names registered under one touch speed dialling buttons and coded speed dialling codes Follow this procedure to print the lists 1 Press FUNCTION 2 Use or to select TEL REGISTRATION 3 Press START COPY 4 Press REPORT FUNCTION FUNCTION TEL REGISTRATION 1 TOUCH SPD DIAL REPORT PRINTING REPORT 9 10 ...

Страница 195: ...GROUP 1 07 09 98 MON 13 39 FAX 81 733 3173 CANON U K 001 CODED SPEED DIAL LIST NO 00 11 60 61 1 538 4500 7390802 63 9399 03 3756 6112 CONNECTION TEL CANON ESPAÑA CANON HONG KONG Mr G Robert Ms A Smith CONNECTION ID 07 09 98 MON 13 39 FAX 81 733 3173 CANON U K 001 GROUP DIAL LIST 05 CANON GROUP 1 08 GROUP 02 01 03 3758 2111 02 905 795 1111 03 20 545 8545 04 1 49 39 25 25 06 516p488 6700 07 2131 125...

Страница 196: ...This page is intentionally blank ...

Страница 197: ...ic Document Feeder ADF 10 5 Jams in the Output Slots 10 8 Jams Inside the Unit 10 9 Jams in the Front Area of the Unit 10 14 After Clearing a Paper Jam 10 17 Problems Feeding Paper Into the FAX L250 Sheet Feeder 10 18 Faxing Problems 10 20 Sending Faxes 10 20 Receiving Faxes 10 22 Telephone Problems 10 26 Copying Problems 10 26 Printing Problems 10 27 Print Quality Problems 10 28 General Problems ...

Страница 198: ... centre Do not attempt to disassemble or repair the unit yourself Attempting to repair the FAX L250 yourself may void the limited warranty Before contacting your local authorised Canon dealer or service centre make sure you have the following information about your FAX L250 The unit s name FAX L250 The FAX L250 serial number on a label on the back of the FAX L250 Where you purchased the unit A det...

Страница 199: ... cannot send a fax using ECM 10 21 Errors occur frequently while sending faxes 10 22 The FAX L250 cannot receive faxes automatically 10 22 The FAX L250 will not switch between telephone and fax calls automatically 10 23 The FAX L250 will not receive faxes manually 10 23 The print quality is poor 10 24 The FAX L250 cannot receive faxes using ECM 10 24 Nothing prints 10 24 Received faxes are blotche...

Страница 200: ... Nothing prints 10 27 Printout does not match paper size 10 27 The printout curls 10 27 Print Quality Problems Print is not clear 10 28 The printout has vertical white streaks 10 28 General Problems The FAX L250 has no power 10 29 Nothing appears in the LCD display 10 29 Frequently Asked Questions 10 4 ...

Страница 201: ...ug the FAX L250 while clearing paper jams j Jams in the Automatic Document Feeder ADF Use this procedure if the document in the FAX L250 s Automatic Document Feeder ADF jams or misfeeds If this occurs the message CHECK DOCUMENT appears in the display 1 Press STOP Do not try to pull the document out without opening the operation panel or you may tear or smudge the document 2 Open the operation pane...

Страница 202: ...force it Contact your local authorised Canon dealer or service centre 4 When you are finished close the operation panel by pressing it down from the centre as shown Be sure to close the operation panel until it locks into place Otherwise the unit will not function properly Frequently Asked Questions 10 6 ...

Страница 203: ...5 Press STOP to clear the error message 6 If you have a multi page document remove the entire document from the Automatic Document Feeder ADF and reload it Problems Index 10 7 ...

Страница 204: ...LCD display 1 Gently pull any jammed paper out of the unit as shown 2 Remove the paper stack from the sheet feeder and reload it following the instructions in Loading Recording Paper on page 2 33 If the paper jam occurred while a fax was being received into the FAX L250 memory that fax will print automatically when the jam is cleared Frequently Asked Questions 10 8 ...

Страница 205: ...ront cover by pressing the release latches on the sides of the unit Lift the cover forward to its open position Do not open the front cover without pressing on the release latches as this may cause damage to your unit Problems Index 10 9 ...

Страница 206: ...d the cartridge by its handle and remove it from the unit Cover the cartridge to protect it from the light 3 Move the paper release lever towards the back of the unit HANDLE Frequently Asked Questions 10 10 ...

Страница 207: ... piece of paper First check the inside of the unit and then the front area The fixing assembly shaded becomes extremely hot when the unit is in use Be very careful not to touch it as injury may result Problems Index 10 11 ...

Страница 208: ...remove all of the paper scraps from the unit Be careful not to spill the toner that is on the jammed sheet of paper The toner has not been fused to the paper yet and toner spilled inside the unit may adversely affect the print quality Be careful not to get toner on your hands or clothing If you do wash it off immediately with cold water Frequently Asked Questions 10 12 ...

Страница 209: ...If the top edge of the paper is in the fixing assembly First move the jammed paper towards the unit 1 then pull it towards you to remove it 2 Problems Index 10 13 ...

Страница 210: ...assembly 1 Pass the paper under the roller as shown 2 Use both hands to carefully pull the jammed paper Be sure to pull gently otherwise the paper may tear and remain inside the unit Be sure to remove all the jammed paper Not doing so will cause paper to jam again Frequently Asked Questions 10 14 ...

Страница 211: ... up delivery slot Hold the front cover and gently pull the sheet through the exit slot Do not close the front cover while removing a jammed sheet of paper This will return the paper release lever to its closed position Problems Index 10 15 ...

Страница 212: ...not to touch it as injury may result When removing the jammed paper be careful not to touch the transfer charging roller as its surface is very delicate and susceptible to finger oil and scratches which may lead to print deterioration TRANSFER CHARGING ROLLER Frequently Asked Questions 10 16 ...

Страница 213: ...he front 3 Close the front cover to reset the unit 4 Load paper in the sheet feeder If you are experiencing repeated paper jams it may be due to the paper you are using Tap the paper on a flat surface before stacking it in the sheet feeder Check that the paper you are using and your printing environment are within the specifications of the unit See Appendix A Specifications Problems Index 10 17 ...

Страница 214: ...m Possible cause Solution Paper does not feed into the FAX L250 The sheet feeder may contain too many sheets Make sure the sheet feeder is not filled past the limit See page 2 33 Paper may not be inserted in the sheet feeder correctly Make sure paper is inserted all the way into the sheet feeder See page 2 33 Printing is skewed Paper may not be stacked correctly in the sheet feeder Make sure the s...

Страница 215: ...t Do not force the stack into the sheet feeder The sheet feeder may contain more than one type of paper Load only one type of paper at a time Make sure the paper you use meets the specifications for media in Appendix A Specifications Let the paper run out before you refill the sheet feeder Avoid mixing new paper with paper remaining in the sheet feeder The paper jams repeatedly The paper itself ma...

Страница 216: ...not sure what type of line you have contact your local telephone company The document may not have been set in the Automatic Document Feeder ADF properly Remove the document stack it and feed it into the Automatic Document Feeder ADF again The one touch or coded speed dialling number you used may not be registered for the feature you are using Check the content of the one touch or coded speed dial...

Страница 217: ...tact your local authorised Canon dealer or service centre Please note that any documents stored in memory wil be erased when the FAX L250 is unplugged Images on faxes received from the FAX L250 are spotted or dirty The receiving fax machine may not be working properly Check the FAX L250 by making a copy If the image is clear the problem may be in the receiving fax machine The document may not be p...

Страница 218: ...cannot receive faxes automatically The FAX L250 may not be set to receive automatically For the FAX L250 to receive faxes automatically it must be in FAX ONLY MODE ANS MACHINE MODE or Fax Tel Mode See page 6 3 The FAX L250 may have a document in memory leaving very little or no memory available Print out any documents stored in memory See page 6 17 An error may have occurred during reception Check...

Страница 219: ...e 10 30 for a listing of the FAX L250 s error messages Print an activity report and look for an error code The sheet feeder may be empty Make sure the sheet feeder has paper in it The sending fax machine may not send the CNG signal that tells the FAX L250 that the incoming signal is a fax In such cases you will have to receive the document manually See page 6 9 The FAX L250 will not receive faxes ...

Страница 220: ...ting Problems on page 10 27 The FAX L250 cannot receive faxes using ECM ECM RX does not appear in the LCD display when receiving The sending fax machine may not support ECM If the sending fax does not support ECM then the FAX L250 receives the fax in normal mode without error checking ECM reception may not be turned on Make sure the FAX L250 has its ECM RX setting turned on Nothing prints The tone...

Страница 221: ...e the fax sent again The sending fax machine may not be functioning properly The sending fax machine usually determines the fax s quality Call the sender and have them make sure the top cover and scanning glass on their fax machine are clean Errors occur frequently while receiving The telephone lines may be in poor condition or you may have a bad connection Lower the speed at which the unit receiv...

Страница 222: ...on the line The FAX L250 may not be plugged in properly Make sure the FAX L250 is correctly plugged into a wall outlet Copying Problems Problem Cause Solution The FAX L250 will not make a copy The document may not be placed in the document feeder correctly Make sure the document you are copying is set in the Automatic Document Feeder ADF properly and the LCD display shows DOCUMENT READY The handse...

Страница 223: ...eceiving mode standby mode If the ALARM lamp stays on call your local authorised Canon dealer or service centre Nothing prints The power cord may not be plugged in securely Make sure the power cord is plugged securely into the unit and into a wall outlet The toner cartridge may need to be replaced Replace the toner cartridge See page 2 27 Printout does not match paper size Paper may not be loaded ...

Страница 224: ...aper has no obvious correct side try turning the paper over and printing on the other side The printout has vertical white streaks Toner may be low or be unevenly distributed Follow these steps 1 Open the front cover and take out the FX 3 toner cartridge 2 Gently rock the cartridge side to side five or six times to evenly distribute the toner inside 3 Put the cartridge back into the unit 4 Close t...

Страница 225: ...on The power cord may not be supplying power Check the power cord by substituting another or by using a voltametre to test it for continuity Nothing appears in the LCD display The FAX L250 may not be receiving power Check the plug and be sure it is firmly plugged into the power connector and the wall outlet If the display remains blank unplug the FAX L250 wait five seconds then plug it in again If...

Страница 226: ...ment using a G3 machine The telephone line type setting on your FAX L250 is incorrect Set your FAX L250 for your telephone line tone or pulse The receiving fax machine did not answer within 35 seconds Contact the other party and have them check their fax machine You can also try to send the document manually For an overseas call add pauses to the registered number CALLING The FAX L250 is dialling ...

Страница 227: ...rvice The unit is connected to an uninterruptible power supply UPS Make sure the power cord is plugged into an AC outlet CLEAR PAPER JAM 009 The FAX L250 has no paper in its sheet feeder or has a paper jam Add paper or clear the jam If a document was received in memory the fax prints the received documents from memory COMMUNICATING PLEASE WAIT You tried to use manual sending via the handset while ...

Страница 228: ... local telephone lines are in good condition HANG UP PHONE The handset is off its hook Place the handset properly onto its hook LOAD PAPER The FAX L250 is out of recording paper Load paper in the sheet feeder Any documents received in memory will then be printed automatically MEMORY FULL 037 The FAX L250 s memory is full because it has received too many documents or a very long or detailed documen...

Страница 229: ...uch or coded speed dialling number has not been registered Register the number NOT AVAILABLE In manual sending via the handset you tried to use a one touchspeed dialling button or a coded speed dialling code that has a group registered in it In manual sending via the handset you cannot send a document to multiple destinations Send the document to one destination at a time PLEASE WAIT The FAX L250 ...

Страница 230: ...LED You pressed the STOP button to cancel the transmission TX RX NO nnnn When the FAX L250 sends or receives a fax it assigns a unique identification number to it Write the number down if you will need it later You can also print an activity management report after the transmission to check the TX RX number if necessary Frequently Asked Questions 10 34 ...

Страница 231: ...an periodic cleaning and replacing of the toner cartridges as needed Cleaning the FAX L250 11 2 Cleaning the FAX L250 Exterior 11 2 Cleaning the Inside of the FAX L250 11 3 Cleaning the Scanner Components 11 6 Replacing the Toner Cartridge 11 8 Transporting the FAX L250 11 9 ...

Страница 232: ...paper towels or similar materials for cleaning they can stick to the components or generate static charges Cleaning the FAX L250 Exterior Clean the FAX L250 outer casing as follows 1 Disconnect the power cord from the FAX L250 2 Wipe the FAX L250 exterior with a clean soft lint free cloth moistened with water or diluted dishwashing detergent solution Never use thinner benzene alcohol or any other ...

Страница 233: ...ly as follows When you unplug the unit any faxes stored in memory will be erased Be sure to print out any documents stored in memory before unplugging the unit See Printing Documents Received in Memory on page 6 17 1 Unplug the FAX L250 2 Open the front cover by pressing the release latches on the sides of the unit Lift the cover forward to its open position Cleaning the FAX L250 11 3 ...

Страница 234: ...bag to avoid exposure to light 4 Use a clean soft dry lint free cloth to remove any toner or paper debris from the shaded area Do not touch the transfer charging roller at the back as this may affect the print quality of the your faxes HANDLE TRANSFER CHARGING ROLLER Maintaining Your FAX L250 11 4 ...

Страница 235: ...toner cartridge Gently press the cartridge into the unit as far as it will go Press down and back on the cartridge s handle 6 Close the front cover Use both hands to lift the cover back into the closed position 7 Plug the unit back in Cleaning the FAX L250 11 5 ...

Страница 236: ...gging the unit See Printing Documents Received in Memory on page 6 17 1 Unplug the FAX L250 2 Open the operation panel 3 Use a soft dry clean cloth to clean the scanning glass and rollers shaded areas If the document scanning glass and rollers are dirty the documents you send or print will also be dirty Clean with a soft cloth that will not scratch the glass or rollers SCANNING GLASS Maintaining Y...

Страница 237: ...nel and the unit Dirt and dust particles that collect on the underside of the operation panel also affect the quality of documents you copy and send 5 Use a soft dry clean cloth to wipe up paper dust around the rollers Cleaning the FAX L250 11 7 ...

Страница 238: ...X 3 toner cartridge contains enough toner to print approximately 2 700 pages of A4 size paper about 4 paper coverage The actual amount varies according to how much toner is used for each page If you cannot solve a print quality problem after following the steps in Chapter 10 Frequently Asked Questions you may need to replace the FX 3 toner cartridge For instructions on replacing the toner cartridg...

Страница 239: ...t clicks into position 5 Disconnect the telephone or answering machine if you have connected one to the unit 6 Disconnect the power cord from the unit 7 Remove the paper rest and support trays from the unit See Attaching Components on page 2 11 8 Replace all tapes and shipping materials you removed when you first unpacked the FAX L250 See Removing the Shipping Materials on page 2 8 9 Pack the FAX ...

Страница 240: ...This page is intentionally blank ...

Страница 241: ...ations your unit performs Understanding the Menu System 12 2 Accessing the TEL REGISTRATION Menu 12 2 Accessing the USER SETTINGS Menu 12 4 Accessing the REPORT SETTINGS Menu 12 6 Accessing the TX SETTINGS Menu 12 8 Accessing the RX SETTINGS Menu 12 10 Accessing the FAX PRINTER Menu 12 12 Accessing the SYSTEM SETTINGS Menu 12 14 ...

Страница 242: ...t functions of your FAX L250 This chapter outlines the various menus and shows you how to use them The factory default settings in the following tables are shown in bold type Accessing the TEL REGISTRATION Menu 1 Press FUNCTION 2 Use or to select TEL REGISTRATION 3 Press START COPY 4 Use or to select the item you want to set or change FUNCTION FUNCTION TEL REGISTRATION 1 TOUCH SPD DIAL 12 2 ...

Страница 243: ...UCH SPD DIAL See page 4 3 One Touch Speed Dialling TELEPHONE NUMBER NAME CODED SPEED DIAL See page 4 11 Coded Speed Dialling TELEPHONE NUMBER NAME GROUP DIAL See page 4 19 Group Dialling TELEPHONE NUMBER NAME Accessing the TEL REGISTRATION Menu 12 3 ...

Страница 244: ...tem you want to set or change See the following table for a list of the items you can select 4 Press START COPY then use or to select a setting or the sub item you want to set or change See the following table for a list of the settings and sub items you can select 5 Press START COPY FUNCTION FUNCTION USER SETTINGS DATE TIME 12 4 ...

Страница 245: ...ON OFF VOLUME CONTROL Set the audio level of the calling signal alarm and buttons on the operation panel CALLING VOLUME Set the volume of the ring produced when the FAX L250 detects a voice call during FAX TEL switchover VOL MIN VOL MID VOL MAX KEYPAD VOLUME Set the volume of keypad touch beep OFF VOL MIN VOL MID VOL MAX ALARM VOLUME Set the volume of the error alarm sound OFF VOL MIN VOL MID VOL ...

Страница 246: ...item you want to set or change See the following table for a list of the items you can select 4 Press START COPY then use or to select a setting or the sub item you want to set or change See the following table for a list of the settings and sub items you can select 5 Press START COPY FUNCTION FUNCTION REPORT SETTINGS TX REPORT 12 6 ...

Страница 247: ...ONLY OUTPUT YES OUTPUT NO TX CONFIRM REP If you choose OUTPUT YES or PRINT ERROR ONLY set whether the first page of the fax also prints ON OFF RX REPORT Enable disable automatic printing of the reception report PRINT ERROR ONLY prints the reception report only when an error occurs during reception OUTPUT YES prints the reception report every time you receive a document OUTPUT NO turns off the rece...

Страница 248: ...tem you want to set or change See the following table for a list of the items you can select 4 Press START COPY then use or to select a setting or the sub item you want to set or change See the following table for a list of the settings and sub items you can select 5 Press START COPY FUNCTION FUNCTION TX SETTINGS ECM TX 12 8 ...

Страница 249: ...hich pages to resend if TX ERROR RESEND is on ERROR 1ST PG ERROR PAGE ALL PAGES ERASE FAILED TX Set whether the fax in memory is erased if an error occurs during sending but then it is resent successfully ON OFF AUTO START TX ON Scanning starts 10 seconds after the last number is entered when sending to multiple numbers 5 seconds if only sending to one location OFF After entering the last number p...

Страница 250: ...tem you want to set or change See the following table for a list of the items you can select 4 Press START COPY then use or to select a setting or the sub item you want to set or change See the following table for a list of the settings and sub items you can select 5 Press START COPY FUNCTION FUNCTION RX SETTINGS ECM RX 12 10 ...

Страница 251: ...s 1 to 99 ANS FAX SWITCH Enable disable whether the FAX L250 automatically switches to fax receive mode if a period of silence is detected after answering the call ON OFF ANS FAX SW TIME Set the duration of silence the FAX L250 listens for to determine if a fax is coming in 6 seconds 1 to 99 MAN AUTO SWITCH Determine if the FAX L250 switches to document receive mode after the FAX L250 rings for a ...

Страница 252: ...m you want to set or change See the following table for a list of the items you can select 4 Press START COPY then use or to select a setting or the sub item you want to set or change See the following table for a list of the settings and sub items you can select 5 Press START COPY FUNCTION FUNCTION FAX PRINTER PAPER SIZE 12 12 ...

Страница 253: ...ble disable economy printing toner saving feature By enabling TONER SAVING toner consumption can be decreased by as much as fifty percent resulting in a longer effective cartridge life ON OFF TONER SUPPLY LOW MEMORY RECEIVE enables receiving documents in memory when the toner level of the cartridge drops MEMORY RECEIVE AUTO PRINT Default settings are shown in bold type Accessing the FAX PRINTER Me...

Страница 254: ...m you want to set or change See the following table for a list of the items you can select 4 Press START COPY then use or to select a setting or the sub item you want to set or change See the following table for a list of the settings and sub items you can select 5 Press START COPY FUNCTION FUNCTION SYSTEM SETTINGS UN LOCK PHONE 12 14 ...

Страница 255: ...on faxes you send DD MM YY MM DD YY YY MM DD DISPLAY LANGUAGE Set the language of the LCD messages ENGLISH FRENCH SPANISH ITALIAN FINNISH GERMAN DANISH SWEDISH DUTCH NORWEGIAN PORTUGUESE SLOVENE HUNGARIAN CZECH TX START SPEED Set the speed at which the FAX L250 starts transmitting Set this to a lower speed if you have difficulties connecting over long distance or noisy lines 14400bps 9600bps 7200b...

Страница 256: ...This page is intentionally blank ...

Страница 257: ...Appendix A Specifications The specifications for the FAX L250 are listed in this section General A 2 Plain Paper Fax A 4 Copier A 6 Telephone A 6 Document Sizes A 7 Printing Area A 8 A 1 ...

Страница 258: ...displays memory used Uses direct transmission when memory is full Liquid crystal display 16 1 Display languages English French Spanish Italian Finnish German Danish Swedish Dutch Norwegian Portuguese Slovene Czech and Hungarian Power source 200 240 V 50 60 Hz Power consumption Maximum approximately 460 W Minimum approximately 8 W Standby mode Dimensions W D H 365 365 242 mm main unit only no trays...

Страница 259: ...Environmental requirements Temperature 10 32 5 C Humidity 20 85 RH Applicable standards Electrical safety GS FIMKO Radiation CISPR Pub22 Class B PTT Energy Star compliant General A 3 ...

Страница 260: ... Document thickness Automatic document feed 0 07 0 13 mm Manual document feed 0 06 0 3 mm Document weight Automatic document feed 50 90 g m2 Manual document feed 40 340 g m2 Effective scanning width 208 mm Transmission time Approx 6 seconds G3 ECM MMR Resolution Fine mode 8 pels mm 7 7 lines mm Standard mode 8 pels mm 3 85 lines mm Scanning image processing Ultra High Quality Image Processing Syst...

Страница 261: ...redialling including error redialling Manual redialling Pause button Networking Delayed transmission up to 117 locations at a single pre set time Sequential broadcast up to 117 locations Automatic receiving Non ring reception Deactivate ECM Net Switch Australia and New Zealand only Report reference Activity report up to 20 transactions Non delivery report TTI Transmitter Terminal Identification To...

Страница 262: ...ial copy 45 seconds Subsequent copies 20 seconds Multiple copies Up to 99 copies of a document Telephone Automatic FAX TEL switchover Answering machine connection CNG detecting signal no sound Telephone connection Optional handset connection Remote reception by telephone Default reception ID 25 Tone button Pause button Net Switch Australia and New Zealand only A 6 ...

Страница 263: ...feed lever is set to Manual document feed Note that the scanning length may be shorter than the length of the actual document Maximum Document Size Minimum Document Size 216 mm 105 mm 148 mm UP TO A MAXIMUM OF 32 MINUTES FOR EACH PAGE OR 355 9 mm IN LENGTH Maximum Document Size Minimum Document Size 216mm 88 9mm 44 5mm UP TO A MAXIMUM OF 32 MINUTES FOR EACH PAGE OR APPROX 1 METRE IN LENGTH A 7 ...

Страница 264: ...he top and bottom are outside the FAX L250 s scanning area Printing Area Note that the unit cannot print completely from the edge of one border to another The size of the margin differs slightly with the paper size MAX 4 0 mm A4 LETTER LEGAL MAX 4 0 mm 208 mm MAX 3 0 mm MAX 3 0 mm MAX 5 mm A4 LETTER MAX 10 1 mm LEGAL MAX 10 6 mm MAX 4 mm MAX 5 mm Appendix A Specifications A 8 ...

Страница 265: ...s section describes the optional equipment available for use with the FAX L250 Optional Handset B 2 Package Contents B 2 Attaching the Handset to Your Unit B 3 Control Panel and Functions B 6 Maintaining Your Handset B 8 B 1 ...

Страница 266: ...n Package Contents Make sure you have the following items If anything is damaged or missing notify your Canon dealer immediately The two screws with a plastic white head are not for use with the FAX L250 You only need the two screws with plugs provided HANDSET HANDSET CRADLE SCREWS WITH PLUGS SCREWS NOT USED FOR THE FAX L250 B 2 ...

Страница 267: ... the screws from the plugs and insert the plugs in the holes on the handset cradle 3 Insert the plugs with the handset cradle in the holes on the unit If you have difficulty inserting the plugs turn the unit so that the left side is facing you and the right side is placed against a wall This will allow you to insert the plugs without the unit moving Optional Handset B 3 ...

Страница 268: ...sh the screws in with your finger use a phillips screwdriver to push them in Do not screw them in as the screws may break Make sure the screws are inserted all the way into the plugs 5 Connect the handset cord to the input jack marked on the left side of the unit Appendix B Options B 4 ...

Страница 269: ...rying the unit do not lift it by the handset cradle as it may break If you need to remove the handset cradle after it is installed use a small phillips screwdriver to remove the two screws Optional Handset B 5 ...

Страница 270: ... 4 Your Canon unit has a R E N value of 1 unless otherwise stated and this handset also has a R E N value of 1 You can therefore use additional equipment with a total R E N value of up to 2 If the R E N value exceeds 4 the ringer volume will be reduced and one or more of the connected equipment may not function HOOK BUTTON R BUTTON RINGER SWITCH TONE PULSE SWITCH TELEPHONE LINE CABLE RECEIVER NUME...

Страница 271: ...ate on both Multi Frequency Tone and Loop Disconnect Pulse telephone lines The Tone Pulse switch enables you to switch from tone dialling to pulse dialling or vice versa Contact your service provider for further information Use a pointed instrument to set this switch to P pulse dialling or T tone dialling Numeric Buttons Use the numeric buttons to dial the number of the party you wish to call Butt...

Страница 272: ...g condition Do not leave your handset exposed to direct sunlight Do not install your handset in hot or humid conditions Do not spray aerosol polishes on your handset as they may enter the holes on your handset and cause damage Use a damp cloth to clean your handset Appendix B Options B 8 ...

Страница 273: ...tion through the FAX L250 s memory C CCITT ITU T Formerly known as CCITT Consultative Committee for International Telegraph and Telephone CCITT has been replaced by the International Telecommunications Union Telecommunications sector ITU T a committee created to set international standards for telecommunications CNG Calling Tone This is a signal sent by fax machines to identify the call as an inco...

Страница 274: ...an pick up the handset With this feature one telephone line can be shared by both the telephone and the fax FINE The resolution setting for documents with very small characters and lines G G3 Group 3 fax machine Defined by CCITT Uses encoding schemes to transmit image data while reducing the amount of data that needs to be transmitted thus reducing transmission time G3 fax machines can transmit on...

Страница 275: ... sending or copying documents with intermediate tones such as photographs Polling One fax machine requesting another to send a document The receiving party calls the fax machine holding the document to be sent and requests that it be sent Pulse See Rotary pulse Q Quick on line sending Quick on line sending is the easiest and quickest way to send a document After a document is set in the Automatic ...

Страница 276: ...it produces output with 600 600 dpi precision Rotary pulse A telephone dialling system where a dial is rotated to send pulses to the telephone switching system When you pulse dial you hear clicks When you touch tone dial the most common dialling system you hear tones Rotary pulse dialling requires certain setting adjustments RX See Receiving S Scanning contrast A setting that darkens or lightens t...

Страница 277: ...sed by as much as fifty percent resulting in a longer effective cartridge life Transaction number A unique number assigned to each fax document sent TX NO or received RX NO by the FAX L250 and used to identify that particular fax document Transmit See Sending TTI Transmit Terminal ID See Sender ID TX See Sending U UHQ Ultra High Quality An exclusive Canon digital image processing system that incor...

Страница 278: ...ner components 11 6 to 11 7 CLEAR PAPER JAM message 6 17 10 31 CODED DIAL button explanation 2 22 coded speed dialling changing names 4 14 changing numbers 4 14 description 4 2 list 9 11 storing numbers 4 11 using 4 17 COMMUNICATING PLEASE WAIT message 10 31 components 2 18 to 2 24 connecting answering machine 2 15 optional handset 2 15 power cord 2 16 telephone 2 15 telephone line 2 14 contrast D...

Страница 279: ...attaching 7 9 manual redialling 5 24 sending via the handset 5 15 5 16 manual document feed 5 3 loading documents 5 11 selecting 5 6 MANUAL MODE description 6 2 selecting 6 3 using 6 9 6 10 memory deleting documents from 5 37 documents in 5 35 to 5 39 list of documents in 5 35 printing documents in 6 17 resending 5 38 MEMORY FULL message 10 32 MEMORY FULL PLEASE WAIT message 10 33 MEMORY REF butto...

Страница 280: ...r loading 2 33 REDIAL PAUSE button explanation 2 21 redialling 5 24 to 5 28 automatic 5 24 cancelling 5 24 5 25 manual 5 24 replaceable parts 2 10 replacing cartridge 2 27 11 8 report 9 2 to 9 7 activity 9 2 transmission TX 9 3 to 9 5 error TX 9 3 TX 9 4 to 9 5 reception RX 9 6 memory clear 9 7 REPORT button explanation 2 33 REPORT SETTINGS accessing 12 6 description 3 7 settings 12 7 registering ...

Страница 281: ...g type 3 12 testing unit 2 36 TONE button explanation 2 24 using 7 6 toner cartridge handling 2 25 storing 2 25 installing 2 27 replacing 2 27 11 8 touch tone setting 3 12 using on a pulse line 7 6 TX SETTINGS description 3 7 accessing 12 8 settings 12 9 TX RX CANCELLED message 10 34 TX RX NO nnnn message 10 34 transporting unit 11 9 U UHQ Ultra High Quality 1 4 UK 5 13 alternative telephone netwo...

Страница 282: ......

Отзывы: