background image

3

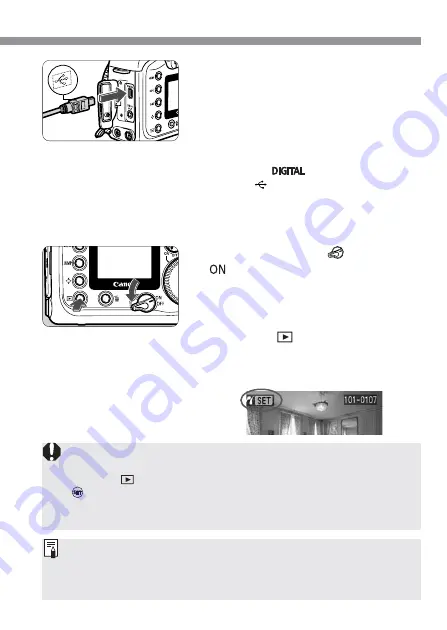
Turn on the printer.

4

Turn the camera’s <

> switch to

<

>.

s

When the printer connection is
confirmed, the beeper will sound
briefly.

5

Connect the camera to the printer.

Connect the camera to the printer with
the USB cable that came with the
camera to. Refer to the printer’s
instruction manual to find out which
port to connect the USB cable to.

When connecting the cable plug to the
camera’s <

> terminal, the cable

plug’s <

> icon must face the front

side of the camera.

3

Preparing to Print

If the camera is connected to the printer and you do not operate it for
approx. 6 minutes, the camera power will turn off automatically. However, if
the auto power off time is longer than 8 minutes, then that setting will take
effect instead.

Press the  <

> button.

s

The image will be displayed, and the
<

w

> icon will appear on the upper

left.

6

In step 

5

, if you hear long beeps, it means something is wrong with the

printer. To find out what’s wrong, do the following:
Press the  <

> button to playback an image. Then do step 

2

 (Press

<

>) and step 

4

 (Print the image) on the next page. An error message

will then appear on the LCD monitor. To fix the problem, see “Error
Messages” on page 11.

Содержание EOS 10D Digital

Страница 1: ...Printing from PictBridge compatible Printers This camera is compatible with PictBridge for direct printing with PictBridge compatible printers Connect the camera to a PictBridge compatible printer to...

Страница 2: ...otos On the menu set Communication to PTP Select Communication Turn the dial to select Communication then press 1 Select PTP Turn the dial to select PTP then press If it is set to Normal printing migh...

Страница 3: ...to Print If the camera is connected to the printer and you do not operate it for approx 6 minutes the camera power will turn off automatically However if the auto power off time is longer than 8 minut...

Страница 4: ...the next page 3 Connected printer icon Print the image Turn the dial to select Print then press s Printing will start When the printing is completed properly the screen returns to step 1 4 Print sett...

Страница 5: ...nd out what the printer s default settings are Printing Effects Image optimization Set the Printing Effects Turn the dial to select E Printing Effects then press s Turn the dial to select the desired...

Страница 6: ...ng frame size Press the or button to change the size of the trimming frame Moving the trimming frame Turn the dial to move the trimming frame horizontally or vertically To move the trimming frame vert...

Страница 7: ...ill reappear after 5 sec of idle time The Trimming setting will be canceled after the printing is completed or if you execute Cancel If Borderless p 9 is set certain printers might not print the image...

Страница 8: ...ur printer s instruction manual Select Paper Settings Turn the dial to select Paper Settings then press s The Paper Settings screen will appear TSetting the Paper Size Set the Paper Size Turn the dial...

Страница 9: ...h Canon paper set the respective paper type as follows Photo Photo Paper Plus Glossy Fast Photo Photo Paper Pro Default Photo Paper Plus Glossy If you are using a non Canon printer refer to the printe...

Страница 10: ...4 Set the Paper Settings p 8 Set the paper and page layout The printing settings will appear on the left 5 Select Print Order Turn the dial to select Print Order then press 2 Select Print Turn the di...

Страница 11: ...itor Press to stop the printing After resolving the problem resume printing To resolve printing problems refer to the printer s instruction manual Paper Error Check whether the paper is properly loade...

Страница 12: ...f a printer problem use the controls on the printer itself to restart printing Refer to the printer s User s Guide for information on how to restart printing Notes on batch printing using Print Order...

Отзывы: