background image

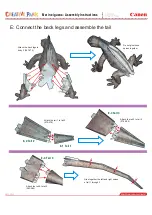
B: Assemble the front legs

Curve left leg 3 and attach 
it to left leg 2 (101-107), 
attach 108 and 109 and 
make it into a ring

Curve right leg 1 and attach 
it to the right foot (121-126), 
making a cylinder shape 
(127-132)

Attach right leg 2 to right 
leg 1, rolling it as you 
attach (133-142)

Curve right leg 3 
and attach it to 
right leg 2 (143-
149), attach 150 
and 151 and 
make it into a ring

Open up glue tabs 152, 
154 and 160 by making 
valley folds

Open up glue tabs 156, 
158 and 159 by making 
valley folds

Curve left leg 1 and attach it to 
the left foot (82-87), making a 
cylinder shape (88-92)

After attaching 93, attach left leg 2 
to left leg 1 (94-99), attach that to 
100 and make it into a ring

B-1 Left foot   

B-2 Left leg 1

B-3 Left leg 2

B-4 Left leg 3

B-5 Right foot

B-6 Right leg 1

B-7 Right leg 2

B-8 Right leg 3

Make the toes (71-80), 
glue 81 and make the 
whole thing into a ring

Make the toes (110-119), glue 120 
and make the whole thing into a ring

PAGE03

Marine iguana: Assembly Instructions

Содержание Creative Park Marine iguana

Страница 1: ...to raise its body temperature enough before entering the sea Its laterally flattened tail is well suited to swimming and it has glands near its nose to expel excess salt ingested from the sea water On its head are rough bumps and on its neck and back is a row of spine like scales known as a crest All four of its legs feature sharp claws which have evolved to allow the marine iguana to cling firmly...

Страница 2: ...it to the head 21 30 A 1 Head A 3 Throat A 5 Neck 2 A 6 Chest A 4 Neck 1 A 2 Chin Align the spines on the left and right and attach Attach the chest to neck 2 67 70 Before you begin For the spines on the iguana s back the assembly instructions direct you to cut away the unnecessary gray pieces at the end This is the most efficient method but it can be difficult to cut the parts after they are glue...

Страница 3: ...glue tabs 152 154 and 160 by making valley folds Open up glue tabs 156 158 and 159 by making valley folds Curve left leg 1 and attach it to the left foot 82 87 making a cylinder shape 88 92 After attaching 93 attach left leg 2 to left leg 1 94 99 attach that to 100 and make it into a ring B 1 Left foot B 2 Left leg 1 B 3 Left leg 2 B 4 Left leg 3 B 5 Right foot B 6 Right leg 1 B 7 Right leg 2 B 8 ...

Страница 4: ... the front legs and chest to neck 2 159 169 align the left and right spines and glue them together Do not glue these spines together Do not glue these spines together Attach the body 1 to chest 170 178 Attach the body 2 to body 1 179 186 C 1 Body 1 C 2 Body 2 PAGE04 Marine iguana Assembly Instructions ...

Страница 5: ...ttach the left leg 4 to left leg 3 223 225 Attach right leg 2 to right leg 1 248 254 and also attach 255 and 256 D 1 Left foot D 6 Right foot D 8 Right leg 2 D 9 Right leg 3 D 10 Right leg 4 D 7 Right leg 1 D 2 Left leg 1 D 3 Left leg 2 D 4 Left leg 3 D 5 Left leg 4 Make the toes 187 196 glue 197 and 198 and make the whole thing into a ring Make the toes 187 196 glue 197 and 198 and make the whole...

Страница 6: ...ttach the tail 1 to tail 2 275 278 Attach the tail 3 to tail 2 279 282 Attach the tail 4 to tail 3 283 286 Glue together the left and right spines of tail 1 through 3 E 2 Tail 2 E 3 Tail 3 E 4 Tail 4 E 1 Tail 1 Do not glue these spines together PAGE06 Marine iguana Assembly Instructions ...

Страница 7: ...7 290 Glue all the left and right spines together Using the tips of some scissors cut away the unnecessary pieces around the spines Attach the remaining parts of tail 4 to the back legs and body 2 291 296 F 1 Rock 1 F 2 Rock 2 F 3 Rock 3 PAGE07 Marine iguana Assembly Instructions ...

Отзывы: