background image

14

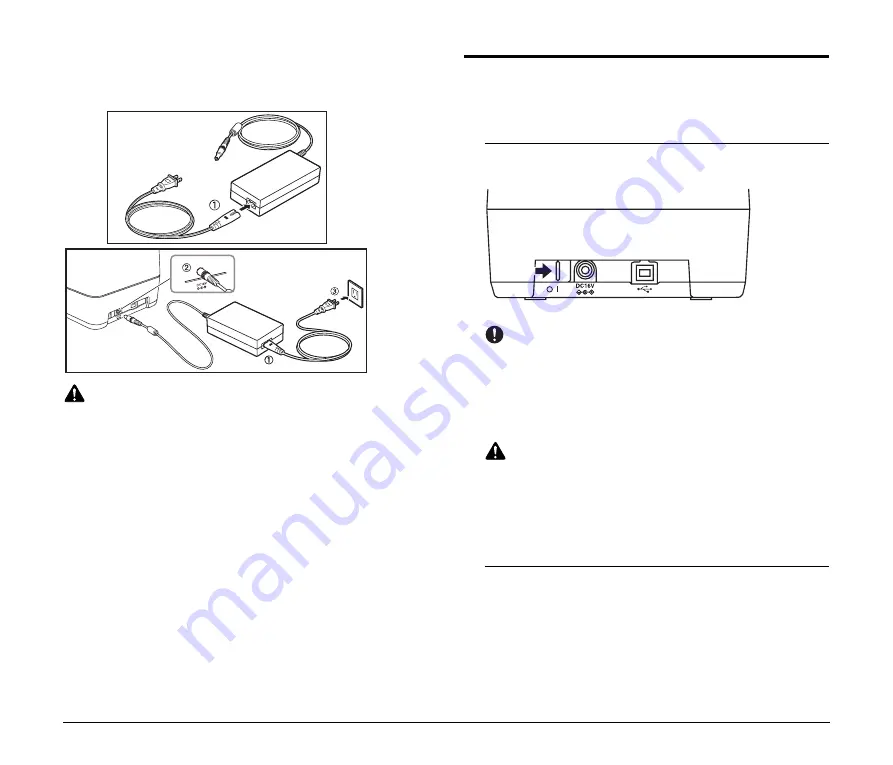
Connecting the Power Cord

Connect the power cord.
Make sure to use only the power cord provided with the scanner.

WARNING

When connecting the power cord, follow these precautions. 
Failure to do so may cause a fire or electrical shock.
• Never grasp the power plug when your hands are wet.
• Never plug the scanner into a multiplug power strip.
• Never bundle or tie the power cord around itself or another 

object. Connect the power plug securely into the power outlet.

• Use only the power cord and power plug provided with the 

scanner.

• Before you connect the power cord, make sure to turn OFF the 

power switch.

• Connect only to a power outlet of the rated voltage and power 

supply frequency (either 120 V, 60 Hz or 220-240 V, 50/60 Hz, 
depending on your region).

• Do not plug the scanner into a power outlet shared with another 

device. If you use an extension cord, make sure that the 
extension cord is rated for the current requirements of the 
scanner.

Turning ON and OFF the Power

Follow the procedures below to turn the scanner power ON and OFF.

Turning ON the Power

1

To turn ON the scanner, slide the Power Switch to the 
right.

IMPORTANT

• When you turn ON the power, the power LED lights and remains 

lit.

• If the scanner does not work, there is a problem with the 

scanner. Turn OFF the power, and contact your local authorized 
Canon dealer or service representative to have the scanner 
serviced.

WARNING

If you hear strange sounds, detect smoke or abnormal heat, 
sense a vibration, or smell odd odors around the scanner, 
turn OFF the power immediately and disconnect the power 
cord from the power outlet. Contact your local authorized 
Canon dealer or service representative to have the scanner 
serviced.

2

Turn ON your computer.

(ON)

Содержание CR-50

Страница 1: ... Please read this manual before operating this scanner Installation Guide ...

Страница 2: ... 90 days from the date you purchased the same as evidenced by a receipt or otherwise The limited warranty does not apply if the failure of the diskette resulted from accident abuse or misapplication of the SOFTWARE and shall not extend to anyone other than the original user of the SOFTWARE CANON CANON S AFFILIATE THEIR DISTRIBUTOR OR DEALER DISCLAIMS ALL IMPLIED WARRANTIES INCLUDING ANY WARRANTY O...

Страница 3: ... aux appareils numériques de Classe B prescrites dans la norme sur le materiel brouilleur Appareils Numériques NMB 003 édictée par l Industrie Canada International ENERGY STAR Office Equipment Program As an ENERGY STAR Partner CANON ELECTRONICS INC has determined that this machine meets the ENERGY STAR Program guidelines for energy efficiency The International ENERGY STAR Office Equipment Program ...

Страница 4: ...recording or by any information storage or retrieval system without the prior written permission of CANON ELECTRONICS INC Disclaimers The information in this document is subject to change without notice CANON ELECTRONICS INC MAKES NO WARRANTY OF ANY KIND WITH REGARD TO THIS MATERIAL EITHER EXPRESS OR IMPLIED EXPECT AS PROVIDED HEREIN INCLUDING WITHOUT LIMITATION THEREOF WARRANTIES AS TO MARKETABIL...

Страница 5: ...for using the CR 50 80 troubleshooting and maintenance For details on the settings of the CR 50 80 refer to the Instructions electronic manual Instructions Electronic Manual Describes how to use the scanner and includes instructions for configuring the scanner settings as well as handling maintenance and troubleshooting information Symbols Used in This Manual The following symbols are used in this...

Страница 6: ...ion Before Use 11 Setting Up the Scanner 11 Checking Your Operating Environment 12 Installing the Scanning Utility 12 Connecting the Scanner to a Computer 13 USB Connections 13 Connecting the Power Cord 14 Turning ON and OFF the Power 14 Turning ON the Power 14 Turning OFF the Power 15 Preparing the Ink Cartridge 16 About the Ink Cartridge 16 Setting the Ink Cartridge and Adjusting the Print Posit...

Страница 7: ...acemaker and feel abnormalities please be away from this product and consult your doctor CAUTION To avoid damage to the scanner never place the scanner on an unstable or vibrating surface The scanner may tip or fall over causing injury Keep all liquids beverages or any type of liquid and clips staples necklaces or other metal objects away from the scanner If you accidentally spill liquid or drop a...

Страница 8: ... Do not plug the scanner into an outlet shared with another device If you use an extension cord make sure that the extension cord is rated for the current requirements of the scanner If you are unsure of anything relating to the power supply contact your local authorized Canon dealer or service representative for further information Never place an object on top of the power cord or step on the pow...

Страница 9: ...lly Do not hold the scanner by the Eject Stopper The scanner weighs approximately 2 kg 4 4 lb WARNING When moving the scanner be sure to turn OFF the power and remove any cables If the cables are not removed before moving the scanner you may damage the plugs or connector by forcibly pulling them out ...

Страница 10: ...horized Canon dealer NOTE Items included in this package may change without any notice CR 50 80 Setup Disc Power Cord 1 Warranty Card 2 USB Cable User Registration Card 2 1 The power cord varies according to the country of purchase 2 For the United States and Canada only Installation Guide Operation Maintenance Guide AC Adapter Marking Labels for Thickness Adjustment Dial ...

Страница 11: ... Turn ON the power See Turning ON the Power on p 14 5 Automatically installing the device driver See p 15 The device driver is installed automatically when Windows recognizes the CR 50 80 IMPORTANT To have the device drivers installed automatically when the computer recognizes the CR 50 80 the software needs to be installed before the CR 50 80 is connected to the computer If you connect the comput...

Страница 12: ...rmation Not all USB interfaces provided as standard with personal computers are guaranteed Contact your local authorized Canon dealer for more detailed information Scanning speeds are slower if your computer s standard USB interface is USB 1 1 You should use the USB cable originally bundled with the scanner or a Hi Speed USB 2 0 compatible cable If the CPU memory interface card and other specifica...

Страница 13: ...to use the USB cable bundled with the scanner or a Hi Speed USB 2 0 compatible cable with the length less than 5 m When the application is running do not turn the scanner OFF or unplug the interface cable Do not connect multiple CR 50 80 scanners to one computer CAUTION Do not turn OFF the scanner or remove the interface cable when an application is running Turn OFF the computer and the scanner be...

Страница 14: ...t plug the scanner into a power outlet shared with another device If you use an extension cord make sure that the extension cord is rated for the current requirements of the scanner Turning ON and OFF the Power Follow the procedures below to turn the scanner power ON and OFF Turning ON the Power 1 To turn ON the scanner slide the Power Switch to the right IMPORTANT When you turn ON the power the p...

Страница 15: ...N CR 80 USB in the Imaging Device directory Turning OFF the Power 1 Turn OFF your computer 2 To turn OFF the scanner slide the Power Switch to the left CAUTION Wait at least 10 seconds before turning the scanner back ON For your safety disconnect the power plug from the power outlet if you are not using the scanner for a long period of time Windows 7 OFF ...

Страница 16: ...int Position The ink cartridge needs to be set to print Set the ink cartridge according to the following procedure You can adjust the print position to three different levels IMPORTANT To set the ink cartridge turn the scanner OFF before removing the Maintenance Cover After the ink cartridge is set replace the Maintenance Cover and then turn the scanner back ON Finish up the unpacked ink cartridge...

Страница 17: ...NT Do not touch the ink jet nozzle or contacts after peeling off the tag and tape 5 Place the ink cartridge shown in the diagram below CAUTION Do not touch the electrical contact on the carriage Doing so may cause a malfunction NOTE Do not use more than one cartridge by rotation If you do so applications cannot check the ink level precisely 6 Push down the ink cartridge until it clicks into place ...

Страница 18: ...ttom 43 5 mm 1 71 from the bottom edge of the document If the ink head drops back when installed the two ink cartridge pins will not fit into the holes on the carriage Push back the ink cartridge lock lever a in the direction of the arrow and reset the cartridge in the correct position b 8 Carefully replace the Imprinter Cover 9 Gently close the Maintenance Cover until it clicks into place Ink Car...

Страница 19: ...19 Document Feeding and Scanning For details on the operations refer to the Instructions Electronic Manual on p 33 or the Operation Maintenance Guide Manual on p 6 ...

Страница 20: ... the Scanning Utility 12 M Moving the Scanner 9 O Operating Environment 12 P Power Cord 10 14 Power Supply 8 Print Position Adjustment Lever 16 R Recognizing the scanner 15 S Scanning Utility 12 Setup Disc 10 T Turning OFF the Power 15 Turning ON the Power 14 U Unpackaging the scanner 10 USB Connections 13 USB Connector 13 ...

Страница 21: ... CANADA CANON EUROPA N V BOVENKERKERWEG 59 61 P O BOX 2262 1180 EG AMSTELVEEN THE NETHERLANDS CANON LATIN AMERICA INC 703 WATERFORD WAY SUITE 400 MIAMI FL 33126 U S A CANON SINGAPORE PTE LTD 1 HARBOUR FRONT AVENUE 04 01 KEPPEL BAY TOWER SINGAPORE 098632 CANON HONGKONG COMPANY LTD 19TH FLOOR THE METROPOLIS TOWER 10 METROPOLIS DRIVE HUNGHOM KOWLOON HONG KONG PUB CE IE 832 CANON ELECTRONICS INC 2011 ...

Отзывы: