background image

2-9

D

ocumen

t and
 P

aper

 Handling

 NOTE

If you use paper of a different size or type

The default paper size/type is set to <Letter> and <Plain 2> in the 
setting menu. If you use a different paper size or paper type, you 
need to change the paper settings.

 “Setting the Paper Size and Type” (

P.2-18)

In the Paper Cassette

Before loading paper in the paper cassette, see “Precautions 
when Loading Paper” (

P.2-14). 

 NOTE

How to load the paper in the optional paper cassette (Cassette 2) 
(MF8380Cdw only): Same as in Cassette 1.

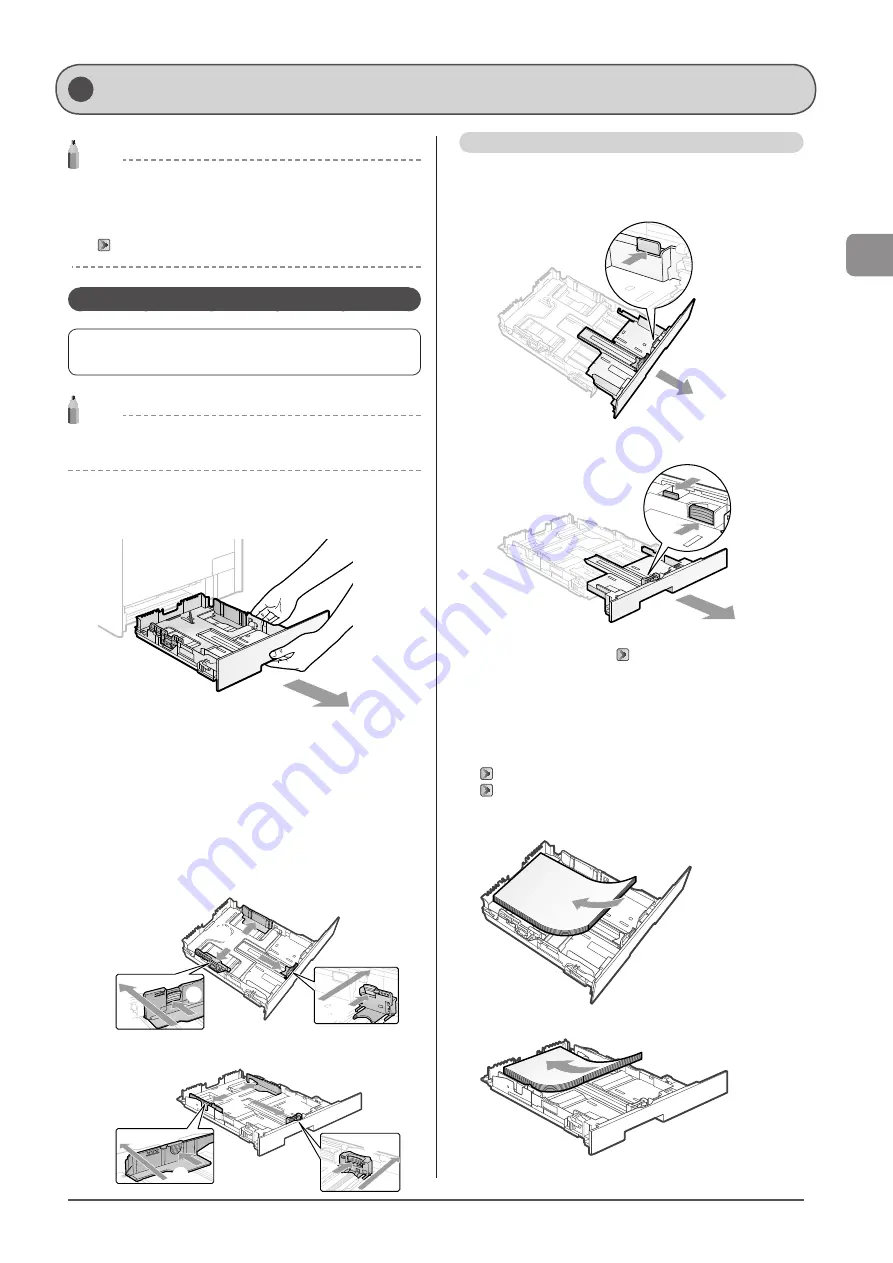
1

  Pull out the paper cassette.

Hold the paper cassette with both hands.


2

  Spread the paper guides a little wider than the 

actual paper width.

(1)  Slide the side paper guides.
 

Holding the lock release lever, slide the paper guides.


The side paper guides move together.


The lock release lever is not installed in MF8080Cw.

(2)  Slide the paper guide at the front center.
 

Holding the lock release lever, slide the paper guides.


MF8380Cdw


(1)

(1)

(2)

(2)


MF8080Cw


(1)

(1)

(2)

(2)

When loading Legal size paper

Holding the lock release lever at the front right, adjust the length of 
the paper cassette.


MF8380Cdw


MF8080Cw


*


If you want to change the size of the paper to be loaded, be sure 
to register the paper size in   “Setting the Paper Size and Type” 

(

P.2-18).

3

  Load the custom size paper so that the edges of 

the paper stack are aligned with the rear side of 

the paper cassette.

Load the paper in portrait orientation.

 “Paper Loading Capacity” (

P.2-15)

 “Paper Loading Orientation” (

P.2-15)

MF8380Cdw


MF8080Cw


Loading Paper

Содержание Color imageCLASS MF8080Cw

Страница 1: ...6 1 6 Using the Scan Functions P 7 1 7 Maintenance P 8 1 8 Troubleshooting P 9 1 9 Registering Setting the Various Functions P 10 1 10 Appendix P 11 1 11 Be sure to read the manual before using the machine Keep the manual for future reference Network Setting Procedure Security Functions Searching the Installation and Connection Procedure See the Starter Guide See the e Manual User Software CD ROM ...

Страница 2: ...arge or reduce copies as well as copy multiple documents onto one sheet Additionally you can erase the background of the document or adjust the density and image quality before copying Below is a quick overview of highlighted copy features that you can utilize in your everyday use Sharpness Adjustment You can emphasize the outline of the image in the document or decrease the contrast Set Set Enlar...

Страница 3: ...er display Some printer driver settings are provided as Profiles beforehand You can perform printing which suits your needs only by selecting a Profile Printing documents from a computer For details see Printing from a Computer from p 4 1 Printing documents from a USB memory Media printing For details see Printing in the e Manual Enlarged Reduced Printing Booklet Printing Watermark Printing Displa...

Страница 4: ...r the destinations when sending the documents Copy Print Fax Scan Quick View Perform Useful Tasks Network Settings Remote UI Sending a Document Directly from a Computer PC Fax For details see Fax in the e Manual Forwarding the Received Fax Manual Forwarding Registering Destinations in the Address Book For details see Registering Destinations in the Address Book from p 5 1 For details see Using the...

Страница 5: ...rarily in the memory without printing You can print the stored documents at any time If you do not need them you can delete them saving paper to be used If an external telephone is connected you can switch to the fax receiving mode immediately by dialing the ID number for fax receiving using the dial buttons of the telephone during a phone call You can specify up to 199 registered destinations as ...

Страница 6: ...m an Application Saving the Documents Using the Operation Panel of the Machine Saving the Documents Using Operations from a Computer You can save scanned documents in a USB memory connected to the machine For details see Scan in the e Manual For details see Using the Scan Functions from p 7 1 Quick View Perform Useful Tasks There are a variety of scan functions that are explained in later pages of...

Страница 7: ...ommunication mode Communication speed Waiting time for connection DNS WINS server Configuring a computer IP address Subnet mask Gateway address As needed Configuration for communicating with a computer LPD RAW WSD Port settings Sharing settings for the printer As needed Miscellaneous Settings Administration Settings Manager ID PIN Device name Installation site Department ID PIN Function restrictio...

Страница 8: ...ing Documents in the Feeder 2 4 Paper Requirements 2 6 Paper Size 2 6 Paper Type 2 7 Printable Area 2 8 Loading Paper 2 9 In the Paper Cassette 2 9 When loading Legal size paper 2 9 When loading envelopes 2 10 When loading Legal size paper 2 11 In the Multi Purpose Tray MF8380Cdw Only 2 12 When loading envelopes 2 12 In the Manual Feed Slot MF8080Cw Only 2 13 When loading envelopes 2 14 Precaution...

Страница 9: ...k 6 5 Specifying destinations using coded dial codes 6 5 Specifying destinations using group addresses 6 6 Canceling Fax Jobs 6 7 Redialing Manual Redialing 6 8 Useful Features 6 9 Notifying the Recipient of an Incoming Fax by Telephone Manual Sending 6 9 Push button Telephone for Tone Dialing 6 9 Sending a Fax Abroad Adding Pauses 6 10 Sending to Multiple Destinations at a Time Sequential Broadca...

Страница 10: ... in the Feeder 9 2 Paper Jams in the Rear Cover and Duplex Unit MF8380Cdw Only 9 3 Paper Jams in the Output Area MF8380Cdw Only 9 4 Paper Jams in the Output Area and Rear Cover MF8080Cw Only 9 5 Paper Jams in the Paper Cassette Cassette 1 or 2 9 5 Paper Jams in the Multi purpose Tray MF8380Cdw Only 9 6 Paper Jams in the Manual Feed Slot MF8080Cw Only 9 7 Onscreen Message 9 9 Error Codes 9 9 When I...

Страница 11: ...ring Setting Functions Appendix This manual e Manual Read the desired chapter to suit your needs The e Manual is categorized by subject to find desired information easily Basic Operation Copy Fax 1 Print 1 Scan 1 Network Settings Security The e Manual is included in the User Software CD ROM Setting and Managing from Computer Troubleshooting Maintenance Setting Menu List Specifications 1 If you are...

Страница 12: ...tions Keys and Buttons Used in This Manual The following symbols and key names are a few examples of how keys to be pressed are expressed in this manual Operation panel keys Key icon Key name Example Stop Display Specify destination Buttons and items on the computer display Preferences Illustrations Used in This Manual Illustrations used in this manual Illustrations of the model MF8380Cdw are used...

Страница 13: ...ilation slots are provided for proper ventilation of working parts inside the machine Never place the machine on a soft surface such as a bed sofa or rug Blocking the slots can cause the machine to overheat resulting in a fire Do not install the machine in the following locations as this may result in a fire or electrical shock A damp or dusty location A location exposed to smoke and steam such as...

Страница 14: ...r power connector is inserted completely after moving the machine Failure to do so can result in an overheating and fire Do not drop paper clips staples or other metal objects inside the machine Also do not spill water liquids or other flammable substances alcohol benzene paint thinner etc inside the machine If these items come into contact with a high voltage area inside the machine this may resu...

Страница 15: ...ng applied to the power cord by a heavy object or by fixing it with staples The power plug is loosened The power cord is tied in a bundle A part of the power cord is put in an aisle The power cord is put in front of the heating appliance CAUTION The fixing unit and its surroundings inside the machine become hot during use When removing jammed paper or when inspecting the inside of the machine do n...

Страница 16: ...ome into direct contact with your skin If the toner comes into contact with your skin wash with soap If the skin becomes irritated or you inhale the toner consult a physician immediately Do not pull out the sealing tape forcefully or stop at midpoint as this may cause toner to spill out If toner gets into your eyes or mouth wash them immediately with cold water and consult a physician Others WARNI...

Страница 17: ...8380Cdw 1 200 W or less MF8080Cw 900 W or less Electrical noise or a dramatic drop in supplied voltage may cause the machine or computer to operate incorrectly or lose data Installation Requirements A location with sufficient space A location with good ventilation A location with a flat even surface A location able to fully support the weight of the machine IMPORTANT Do not install the machine in ...

Страница 18: ...for the machine will be available for at least seven 7 years after production of this machine model has been discontinued Customer Support Customer Support U S A Your machine is designed with the latest technology to provide trouble free operation If you encounter a problem with the machine s operation try to solve it by using the information in Chapter 9 If you cannot solve the problem or if you ...

Страница 19: ...nt that this product including the SOFTWARE is shipped transferred or exported into any country 2 Rights holders of the SOFTWARE retain in all respects the title ownership and intellectual property rights in and to the SOFTWARE Except as expressly provided herein no license or right expressed or implied is hereby conveyed or granted by rights holders of the SOFTWARE to you for any intellectual pro...

Страница 20: ...operly shielded and grounded cables and connectors must be used for connection to host computers and or peripherals in order to meet FCC emission limits AC adaptor with ferrite core must be used for RF interference suppression NOTE This equipment has been tested and found to comply with the limits for a class B digital device pursuant to Part 15 of the FCC Rules These limits are designed to provid...

Страница 21: ...ted or the power switch turned ON until the problem is completely resolved Users should contact Canon Authorized Service Facilities for servicing of equipment Information regarding Authorized Service Facility locations can be obtained by calling Canon Customer Care Center 1 800 OK CANON Rights of the Telephone Company If this equipment Color imageCLASS MF8380Cdw MF8080Cw causes harm to the telepho...

Страница 22: ...gne automatique interurbaine ou Ligne automatique internationale si vous communiquez avec les pays étrangers NOTE Canon vous conseille d utiliser une ligne individuelle conforme aux normes industrielles à savoir ligne téléphonique 2 500 pour appareil à clavier ou 500 pour appareil à cadran impulsions Il est également possible de raccorder ce télécopieur à un système téléphonique à poussoirs car la...

Страница 23: ... cannot escape from the machine during any phase of user operation CDRH Regulations The Center for Devices and Radiological Health CDRH of the U S Food and Drug Administration implemented regulations for laser products on August 2 1976 These regulations apply to laser products manufactured from August 1 1976 Compliance is mandatory for products marketed in the United States CAUTION Use of controls...

Страница 24: ...xxiv ...

Страница 25: ...x Mode 1 9 Scan Mode 1 9 USB Direct Print mode 1 9 Navigating the Menu 1 10 Entering the Menu Screen 1 10 Scrolling Through Menu Items 1 10 Selecting a Menu Item 1 10 Configuring menus using the navigation keys 1 11 Returning to the Default Screen 1 11 Entering Text 1 12 Entering Text Except for IP Address 1 12 Changing the Entry Mode 1 12 Entering Text Symbols and Numbers 1 12 Moving the Cursor E...

Страница 26: ... Paper Cassette P 1 6 7 Document feeder tray Place document 8 Tray extension Pull out the tray extension when the paper is hanging out of the document feeder tray such as Legal size paper 9 Document delivery tray Documents are output 10 Power switch Turns the power ON or OFF 11 Ventilation slots 12 Speaker 13 Lift handles 14 Scanning area Scans documents from the feeder 15 Output tray Printed pape...

Страница 27: ... jack Connect the telephone cable 4 External telephone jack Connect the external telephone 5 Rear cover Open this cover when clearing paper jams 6 Rating label The current value indicated in this rating label shows the average power current consumption 7 Ventilation slots 8 Power socket Connect the power cord 1 2 3 4 5 6 7 8 3 1 2 4 8 5 7 6 ...

Страница 28: ...genta toner cartridge slot The M magenta toner cartridge is installed in this slot 3 C Cyan toner cartridge slot The C cyan toner cartridge is installed in this slot 4 K Black toner cartridge slot The K black toner cartridge is installed in this slot 5 Toner cartridge tray Tray for installing the toner cartridges MF8080Cw 1 2 3 4 5 1 2 3 4 5 ...

Страница 29: ...to the width of the paper 2 The auxiliary tray MF8380Cdw only Be sure to pull out this tray when loading paper in the multi purpose tray 3 Tray extension MF8380Cdw only Open to prevent the paper from hanging out of the multi purpose tray when loading long size paper such as Letter MF8080Cw 1 2 3 1 ...

Страница 30: ...r 3 Lock release lever changing cassette size When loading paper that is longer than A4 size pull out the paper cassette while holding this lever When the paper cassette is inserted with it extended the front side of the paper cassette is not flush with the front surface of the machine as shown in the figure Set the legal dust cover on the paper cassette MF8080Cw 2 1 2 3 1 2 1 3 2 ...

Страница 31: ...aling to send a fax Toner Gauge key Press to check the remaining amount of toner Energy Saver key Press to manually set or cancel the Sleep mode The Energy Saver indicator lights green while in the sleep mode ID key Press to log in out of the machine when the machine is managed by Department ID management Numeric keys 0 9 keys Enter characters and numbers key Press to enter symbols Report key Pres...

Страница 32: ...reen or move the cursor to the left Press to decrease the sound volume of fax communications Key Press to proceed to the next screen or move the cursor to the right Press to increase the sound volume of fax communications OK key Confirms specified or registered settings Reset key Resets the specified settings for the copy fax scan USB direct print mode to their default View Settings key You can ch...

Страница 33: ...nal Type Text 2 Sided Off Fax Mode Press to switch to fax mode screen to use the copy function Specify destination 01 01 2011 12 52AM RX Mode Auto Resolution 200 x 1 When the fax mode screen is displayed you can make your selection by using or The currently selected menu item is highlighted Press OK to proceed to the next screen Specify destination 01 01 2011 12 52AM RX Mode Auto Resolution 200 x ...

Страница 34: ...t shown on the screen press or to scroll up and down the menu The currently selected item is highlighted with a black background Menu Preferences Timer Settings Common Settings Copy Settings Selecting a Menu Item Press OK to select the highlighted menu When the menu has a submenu you can press to select the item and proceed to the next screen You can return to the previous screen by pressing Back ...

Страница 35: ...arentheses at the bottom of the screen When the numeric key icon is displayed on the screen You can enter it using the numeric keys Entering Text P 1 12 Enter numbers or characters such as a PIN System Manager PIN Apply Press OK You can enter numbers or characters using the numeric keys Entering Text P 1 12 Confirming the input To confirm the input Press OK When Apply appears on the display press ...

Страница 36: ... ABC abc 2 DEF def 3 GHI ghi 4 JKL jkl 5 MNO mno 6 PQRS pqrs 7 TUV tuv 8 WXYZ wxyz 9 Not available 0 space _ Not available Moving the Cursor Entering a Space Move the cursor by pressing or To enter a space move the cursor to the end of the text and press Deleting text symbols or numbers To delete text numbers or symbols press Clear To delete all text numbers or symbols press and hold Clear Example...

Страница 37: ...1 13 Before Using the Machine 6 Press until the letter N appears on the screen Register Unit Name CANON Apply Entry Mode A 7 Select Apply using or and press OK The entry is complete ...

Страница 38: ...interval within the range below MF8380Cdw 10 to 240 minutes The default is 10 minutes MF8080Cw 20 to 240 minutes The default is 20 minutes 5 Press Menu to close the menu screen NOTE When the machine enters the sleep mode Energy Saver lights green To enter the sleep mode manually Press Energy Saver The machine does not enter the sleep mode when the machine is in the middle of operation the Processi...

Страница 39: ...ur Clock Specify the time display format Select one of the following display formats using or and press OK The formats include the following 12 Hour AM PM 24 Hour Current Time Settings Specify the current time and date Use or to enter time and date or to switch between AM and PM To move the cursor press or Current Time Settings 01 01 2011 12 52 AM Time Zone Settings Specify the time zone Select th...

Страница 40: ...1 16 Before Using the Machine ...

Страница 41: ...ose Tray MF8380Cdw Only 2 12 When loading envelopes 2 12 In the Manual Feed Slot MF8080Cw Only 2 13 When loading envelopes 2 14 Precautions when Loading Paper 2 14 Paper Loading Capacity 2 15 Paper Loading Orientation 2 15 Paper cassette 2 16 Multi purpose tray MF8380Cdw Only 2 16 Manual feed slot MF8080Cw Only 2 16 Paper cassette 2 16 The multi purpose tray MF8380Cdw Only 2 16 Manual feed slot MF...

Страница 42: ... Bond 80 g m2 IMPORTANT To place your document Make sure any glue ink or correction fluid on the document is completely dry before placing it on the platen glass or into the feeder To prevent paper jams in the feeder Do not use any of the following Wrinkled or creased paper Carbon paper or carbon backed paper Curled or rolled paper Coated paper Torn paper Onion skin or thin paper Stapled or clippe...

Страница 43: ...3 mm 3 64 in 1 mm 3 64 in 1 mm 1 8 in 3 mm 1 8 in 3 mm 3 64 in 1 mm 3 64 in 1 mm Scan Saving in a Computer Platen Glass Feeder 1 64 in 0 5 mm Scan Saving in a USB Memory Sending by E mail Sending to a File Server Platen Glass Feeder 1 16 in 1 5 mm 1 64 in 0 5 mm 1 64 in 0 5 mm ...

Страница 44: ...or copying is complete remove the document from the platen glass Placing Documents in the Feeder Before loading the documents in the feeder see IMPORTANT Placing Documents in the Feeder 1 Spread the document guides a little wider than the actual document width 2 Pull out the tray extension before loading the large size document Pull out the tray extension when the document is hanging out of the do...

Страница 45: ...ore documents are loaded paper jams may occur or the documents may not be scanned While scanning a document Do not add or remove documents When scanning documents is complete Remove the documents from the document delivery tray to avoid paper jams Avoid scanning the same document more than 30 times When scanned repeatedly documents can become folded or torn which may cause paper jams Be sure to al...

Страница 46: ...7 1 2 98 4 mm x 190 5 mm 4 5 Envelope C5 6 3 8 x 9 162 mm x 229 mm 4 Envelope B5 6 7 8 x 9 7 8 176 mm x 250 mm 4 Envelope DL 4 3 8 x 8 5 8 110 mm x 220 mm 4 Custom Paper Size 6 7 1 Only in MF8380Cdw this type of paper can be loaded also in the optional paper cassette Cassette 2 2 Only in MF8380Cdw auto 2 sided print is available 3 Received documents reports or lists can be printed 4 Use envelopes ...

Страница 47: ...w 15 sheets MF8380Cdw 10 sheets MF8080Cw 1 sheet Envelope Envelope MF8380Cdw 10 sheets MF8080Cw 10 sheets MF8380Cdw 5 sheets MF8080Cw 1 sheet 1 Only in MF8380Cdw auto 2 sided print is available 2 Only in MF8080Cw auto 2 sided print in A4 or LETTER size is available 3 Use only the transparencies designed for laser printers NOTE About Chlorine free paper Chlorine free paper can be used with this mac...

Страница 48: ...is 3 8 10 mm on top bottom right and left 3 8 10 mm 3 8 10 mm 3 8 10 mm 3 8 10 mm NOTE To enlarge the printable area Apply the following setting from the printer driver 1 Click Advanced Setting in the Finishing page of printer driver 2 Set Expand Print Region and Print to ON Depending on the job the data may not be printed in a part of document edge or the bottom edge of paper or the following pap...

Страница 49: ...th 1 Slide the side paper guides Holding the lock release lever slide the paper guides The side paper guides move together The lock release lever is not installed in MF8080Cw 2 Slide the paper guide at the front center Holding the lock release lever slide the paper guides MF8380Cdw 1 1 2 2 MF8080Cw 1 1 2 2 When loading Legal size paper Holding the lock release lever at the front right adjust the l...

Страница 50: ...sed tightly 3 Loosen any stiff corners of the envelopes and flatten curls as shown in the figure 4 Align the edges of the envelopes on a flat surface 5 Load the envelopes into the paper cassette with the print side up 4 Align the paper guides securely against the edges of the paper 1 Slide the side paper guides Holding the lock release lever slide the paper guides to be aligned with the width of t...

Страница 51: ...ck does not exceed the line of the load limit mark B MF8380Cdw A A A B B MF8080Cw A B A B A 6 Insert the paper cassette into the machine Push it into the printer firmly When loading Legal size paper When the paper cassette is inserted with it extended the front side of the paper cassette is not flush with the front surface of the machine as shown in the figure Set the legal dust cover on the paper...

Страница 52: ...ides a little wider than the actual paper width 5 Gently insert the paper into the multi purpose tray until it stops with the print side up Load the paper under the load limit guides A Make sure that the paper stack does not exceed the load limit mark B Load the paper in portrait orientation Paper Loading Capacity P 2 15 Paper Loading Orientation P 2 15 B A IMPORTANT Precautions when loading small...

Страница 53: ...ee Precautions when Loading Paper P 2 14 Use the manual feed slot when you want to copy or print on a paper that is different from what is in the paper cassette 1 Slide the paper guides so they align with the width of the loaded paper as shown in the figure Adjust the paper guides to the size of the paper then load the paper deeply to back of the tray IMPORTANT Be sure to insert the paper cassette...

Страница 54: ...e load limit mark when loading paper Make sure that the paper stack does not exceed the line of the load limit mark If the paper stack exceeds the load limit mark lines this may result in misfeeds When printing on envelopes Load envelopes with the front side non glued side facing up You cannot print on the reverse side of envelopes Also be sure to close the flap before loading envelopes NOTE For m...

Страница 55: ...ox 20 sheets Approx 50 sheets Approx 50 sheets Coated paper Approx 20 sheets Approx 50 sheets Approx 50 sheets Envelope Approx 5 sheets Approx 10 sheets Approx 10 sheets MF8080Cw A B Paper type Paper source A Manual feed slot B Cassette 1 Plain paper Ex 21 lb Bond 80 g m 1 sheet Approx 150 sheets Heavy paper Ex 25 lb Bond 91 g m 1 sheet Approx 120 sheets Heavy paper Ex 34 lb Bond 128 g m 1 sheet A...

Страница 56: ...Selecting the Print Side MF8380Cdw Only P 2 21 is set to Print Side Priority with the printing side facing down with the printing side facing down Automatic 1 sided Printing and 2 sided Printing MF8380Cdw Only with the front side facing down with the front side facing down Manual feed slot MF8080Cw Only Portrait layout Landscape layout 1 sided printing with the printing side facing up with the pri...

Страница 57: ...ap and load the envelope Manual feed slot MF8080Cw Only Envelope COM10 Load the envelopes so that the flap is toward the left of the machine when it is viewed from the front Close the flap and load the envelope Envelope B5 Load the envelopes so that the flap is toward the back of the machine when it is viewed from the front Close the flap and load the envelope ...

Страница 58: ...ect it with Paper Size LTR LGL STMT EXEC 5 Select a paper type with or and then press OK Paper Type Plain 2 19 lb Bond Recycled Color Heavy 1 24 lb Bond 6 Press Reset to return to standby mode Registering the Default Paper Settings for the Multi purpose Tray Manual Feed Slot If you want to always load the same paper in the multi purpose tray manual feed slot register the default paper using the fo...

Страница 59: ...ction and Y direction of the custom paper 1 Select the direction with or and then press OK Specify Size Apply X 0 Y 0 X Y 2 Specify the size with or and then press OK Set Length for X 3 8_1 2 3_0 0 3 Select Apply with or and then press OK Specify Size Apply X 3 Y 5 X Y 9 Select the paper type with or and then press OK Paper Type Plain 2 19 lb Bond Recycled Color Heavy 1 24 lb Bond 10 Press Reset t...

Страница 60: ...e Tray Drawer 1 Drawer 2 Register Custom Paper 4 Select Not Registered with or and then press OK When selecting the registered custom paper you can edit and delete the custom paper Register Custom Paper 1 Not Registered 2 Not Registered 3 Not Registered 5 Specifies the size of X direction and Y direction 1 Select the direction with or and then press OK Specify Size Apply X 0 Y 0 X Y 2 Specify the ...

Страница 61: ... other than preprinted paper using preprinted paper only for 1 sided printing When Print Side Priority is selected All pages are printed on the first side for 1 sided printing so the odd pages are always printed on the first side for both 1 sided and 2 sided printing as shown below The side to be placed face up is the same between 1 sided and 2 sided printing even when using preprinted paper 1 sid...

Страница 62: ...p Load paper with the front side first page facing down Print Side Priority When specifying Print Side Priority load paper as follows Feeding direction For details on the procedure for loading paper when using multi purpose tray or when printing pages of the landscape layout see Paper Loading Orientation P 2 15 The procedure for loading paper is the same for 2 sided printing and 1 sided printing W...

Страница 63: ... Image Quality Copy 3 6 Copy Settings 3 7 2 Sided Copying MF8380Cdw Only 3 7 Enlarging Reducing Copies 3 8 Multiple Documents onto One Sheet N on 1 3 8 Collating Copies 3 9 Erase Dark Borders and Frame Lines Frame Erase 3 9 Emphasize the Outline of an Image Sharpness 3 9 Copying an ID Card 3 10 Copying by Saving Paper 3 11 Registering and Using Combination of Copy Settings Mode Memory 3 12 Registe...

Страница 64: ...ging Reducing N on 1 Collating Frame erase Sharpness NOTE When you combine multiple settings for use see Combination of Copy Settings P 3 4 The settings specified here are effective only for the current operation To make the settings effective for all the copy operations see Changing the Default Values P 3 14 Register your frequently used settings into the Mode Memory It is useful See Registering ...

Страница 65: ...to check the details of the job that you want to cancel and press OK Checking and canceling a copy job using Status Monitor Cancel 1 Press Status Monitor Cancel 2 Select Copy Print Job using or and press OK Status Monitor Cancel Device Status Copy Print Job TX Job RX Job 3 Select Job Status using or and press OK Copy Print Job Job Status Copy Job History Print Job History 4 Select a job using or a...

Страница 66: ...ard Copy The frame width specified at Erase Frame increases decreases according to the Copy Ratio setting Paper Depending on its document size selected paper source 2 sided copy is not available 4 on 1 2 on 1 If you want to copy a document in a copy ratio different from its default reduction ratio specify the Copy Ratio later This feature cannot be combined with Erase Frame ID Card Copy Copy Ratio...

Страница 67: ... Background Off Adjustment Off Does not adjust the background density Adjustment Adjusts the background density The next step Adjust the density with or OK Adjustment Adjust by Color Makes the background density lighter Makes the background density darker If adjusting the density for each color 1 Select Adjust by Color with or OK Adjustment Adjust by Color 2 Select the color you want to adjust the...

Страница 68: ...text such as maps This option scans the document at a low resolution for color copy Text Photo Map This option is suitable for documents that contain text and photos or fine diagrams and text such as maps Text Photo Map Quality This option is suitable for documents that contain text and photos or fine diagrams and text such as maps This option scans the document at a high resolution You can set th...

Страница 69: ...Orientation Portrait Landscape 4 When the next screenn is displayed select how to open the original document with or and press OK Original Format Book Type Calendar Type 5 When the next screen is displayed select how to open the original document with or and press OK Finishing Format Book Type Calendar Type To copy a document by placing on the platen glass 1 Place the next page and press Color or ...

Страница 70: ...Ratio using or OK Output Size LTR Plain LTR Plain 1 Select Layout 2 on 1 1 2 on 1 2 4 on 1 1 4 on 1 2 N on 1 Off 2 on 1 4 on 1 ID Card Copy Setting screen n e e r c s e d o m y p o C Select 2 on 1 or 4 on 1 using or OK Select the size of the document using or OK Select an output size using or OK To specify the layout 1 Select Select Layout using or OK 2 Select the layout using or OK When your docu...

Страница 71: ...y mode screen Setting screen Copy Press Start 100 LTR Collate On Erase Frame Off Sharpness 0 1 1 Sharpness Reduces distorted pattern moire It is appropriate for documents that contain halftone such as printed photos Raise the sharpness and emphasize the outline of text or lines It is appropriate for documents which are blueprints or thinly penciled Select Sharpness using or OK Adjust the sharpness...

Страница 72: ...LTR Copy Ratio 100 Di Paper LTR Plain N on 1 Off 1 1 1 4 Select ID Card Copy using or and press OK N on 1 Off 2 on 1 4 on 1 ID Card Copy 5 Press Color or B W Proceed to the next step when the scan is complete 6 Turn sides Place the card with spacing of 1 4 5 mm from the left edge of the platen glass Align the center of the card with the arrow mark as shown below To place the card horizontally A4 B...

Страница 73: ...he front side is complete the document is partially output reserved and fed into the machine again for copying on the back side OK Start Paper Save Copy Keys to be used for this operation 1 Place your document Placing Documents P 2 4 Supported Document Types P 2 2 2 Press Paper Save Copy 3 Select the combination that you want to use using or and press OK Paper Save Copy 2 on 1 1 2 Sided 4 on 1 1 2...

Страница 74: ...Only Registering Mode Memory OK COPY Keys to be used for this operation 1 Press 2 Select Mode Memory using or and press OK Copy Press Start 100 LTR Erase Frame Off Sharpness 0 Mode Memory Off 1 1 3 Select Register Delete using or and press OK Mode Memory Register Delete Mode 1 Mode 2 Mode 3 4 Select the place to register using or and press OK Register Delete Mode 1 Mode 2 Mode 3 Mode 4 5 Select it...

Страница 75: ...sing and press OK Delete No Yes Calling and Copying Mode Memory NOTE Calling Mode Memory When a new Mode Memory is called all copy settings are replaced with that Mode Memory settings After the Mode Memory is called you can change and copy the settings as you like OK COPY Keys to be used for this operation 1 Place your document Placing Documents P 2 4 Supported Document Types P 2 2 2 Press 3 Selec...

Страница 76: ...nformation see Copy Settings P 3 7 5 Select Apply using or after you have specified the setting and press OK Change Defaults Apply No of Copies 1 Density 0 Original Type Text 6 Press Menu to close the menu screen You can confirm the settings of copy function which have been changed from the default setting View Settings Back Keys to be used for this operation 1 Press View Settings The current sett...

Страница 77: ...bes how to print from computers Preparing to Print from Your Computer 4 2 Printing from a Computer 4 3 Scaling Documents 4 3 Printing Multiple Pages on One Sheet 4 3 1 sided Printing and 2 sided Printing MF8380Cdw Only 4 4 Checking and Canceling Print Jobs 4 5 ...

Страница 78: ...he printer driver The printer driver is software required for printing from an application The printer driver will convert application software s print data to print data for the printer The printer driver for this machine has the following features The printer driver for this machine enables you to output print data at an optimum speed by dividing the workload using a computer and the printer As ...

Страница 79: ... scaling ratio for Scaling 5 Click OK NOTE Depending on the selected page size and printer model you are using you may not be able to magnify the document Depending on the printer model you are using you may not be able to magnify the document to the optimum ratio for the selected page size The display may differ according to the operating system as well as the type and version of the printer driv...

Страница 80: ...r to print on one side or both sides of each sheet of paper The default setting is 2 sided printing IMPORTANT Notes on 2 Sided Copying Do not touch your document when making 2 sided copying until the process is complete After copying on the front side is complete the document is partially output reserved and fed into the machine again for copying on the back side Copying on the back side of a prin...

Страница 81: ...ned on blinking A job is being processed Turned off No jobs are in the memory OK Status Monitor Cancel Keys to be used for this operation 1 Press Status Monitor Cancel 2 Select Copy Print Job using or and press OK Status Monitor Cancel Device Status Copy Print Job TX Job RX Job 3 Select Job Status with or and the press OK Copy Print Job Job Status Copy Job History Print Job History 4 Select a job ...

Страница 82: ...t Yes using or and press OK The print job is canceled Cancel No Yes 3 Press Status Monitor Cancel to close the screen NOTE Pressing Stop can also delete the print jobs You can delete the print job also by pressing Stop Press Stop twice to cancel the job when the machine holds one job only For checking only Press Status Monitor Cancel to close the screen ...

Страница 83: ... in the Favorites List 5 3 Registering and Editing from the Operation Panel 5 3 Registering and Editing a destination in the Favorites list Using the Remote UI 5 5 Registering and Editing Coded Dial Codes 5 6 Registering and Editing from the Operation Panel 5 6 Registering and Editing a Coded Dial Code Using the Remote UI 5 8 Registering and Editing Destinations for Group Dialing 5 9 Registering a...

Страница 84: ...ed dial codes Once the destinations have been registered you can press the appropriate coded dial code to select the destination Registering and Editing Coded Dial Codes P 5 6 Group dialing You can specify up to 199 registered destinations as a group address in the Favorites list and coded dial codes Group addresses need to be registered in unused Favorites or coded dial codes All you need to do i...

Страница 85: ... keys to enter the PIN and press OK Address Book PIN Apply Press OK 3 Select Favorites using or and press OK Register Location Coded Dial Favorites 4 Select the destination type to register using or and press OK Destination Type Fax E Mail Group 5 Select Name using or and press OK Fax Apply Type Fax Name Destination 6 Use the numeric keys to specify Name Entering Text P 1 12 Name Max 16 char CANON...

Страница 86: ...Destination Fax Apply Type Fax Name CANON Destination 0123456 6 When the edit is complete select Apply using or and press OK 7 Select Apply using or and press OK Fax Apply Type Fax Name CANON Destination 012345 To delete a destination registered as Farorites 1 Press CANON 0123456789 All Fav 2 Select Delete From Address Book using or and press OK Edit Address Book Address Book Details Delete From A...

Страница 87: ... ID and System Manager PIN 3 Click Log In 1 1 2 2 3 4 Click Address Book 5 Click Favorites To register a new destination in the Favorites list Proceed to Step 4 To edit destination registered in the Favorites list 1 Click No Type or Name 2 Click Edit 3 Specify the required settings in the edit screen and click OK To delete destination registered in the Favorites list 1 Click Delete of the destinat...

Страница 88: ...OK Address Book PIN Apply Press OK 3 Select Coded Dial using or and press OK Register Location Coded Dial Favorites 4 Select the destination type to register using or and press OK Destination Type Fax E Mail Group 5 Select Name using or and press OK Fax Apply Type Fax Name Destination 6 Use the numeric keys to specify Name Entering Text P 1 12 Name Max 16 char CANON Apply Entry Mode A 7 Select App...

Страница 89: ... press OK CANON 0123456789 All Fav A Z 4 Select the item that you want to edit using or and press OK Type Name Destination Coded Dial Fax Type Fax Name CANON02 Destination 987654 Coded Dial 002 5 When the edit is complete select Apply using or and press OK 6 Select Apply using or and press OK Fax Apply Type Fax Name CANON02 Destination 987654 To delete a coded dial code 1 Press CANON 0123456789 Al...

Страница 90: ...Enter System Manager ID and System Manager PIN 3 Click Log In 1 1 2 2 3 4 Click Address Book 5 Click Coded Dial To register a coded dial newly Proceed to Step 4 To edit the registered coded dial 1 Click No Type or Name 2 Click Edit 3 Specify the required settings in the edit screen and click OK To delete the registered coded dial 1 Click Delete of the destination which you want to delete 6 Click t...

Страница 91: ... Book using or and press OK Register New Destina Edit Address Book Address Book Details All A Z When the address book PIN is selected Use the numeric keys to enter the PIN and press OK Address Book PIN Apply Press OK 3 Select Favorites or Coded Dial using or and press OK Register Location Coded Dial Favorites 4 Select Group using or and press OK Destination Type Fax E Mail Group 5 If you selected ...

Страница 92: ...ons are added using or and press OK CANON 2 Destinat CANON01 0123456 CANON02 9876543 Fav A Z All 4 Select Destinations using or and press OK Group Apply Type Group Name CANON Destinations 2 5 Select Add using or and press OK Destination s Apply Add CANON01 0123456789 CANON02 9876543210 6 Select the destination to be added using or and press OK CANON01 01234567 CANON02 98765432 CANON03 001122334 Fa...

Страница 93: ... Fav When the address book PIN is selected Use the numeric keys to enter the PIN and press OK Address Book PIN Apply Press OK 3 Select the group of which name will be changed using or and press OK CANON 2 Destinat CANON01 0123456 CANON02 9876543 Fav A Z All 4 Select Name using or and press OK Group Apply Type Group Name CANON Destinations 2 5 Change Name Entering Text P 1 12 Name Max 16 char CANON...

Страница 94: ... Destination Group Using the Remote UI 1 Start the Web browser 2 Enter http the IP address of the machine in the address field and press the ENTER key on your keyboard Input Example http 192 168 0 215 3 Log on to the Remote UI 1 Select Management Mode 2 Enter System Manager ID and System Manager PIN 3 Click Log In 1 1 2 2 3 4 Click Address Book 5 Click Favorites or Coded Dial ...

Страница 95: ...ion to be deleted from Members List and click Delete 4 Click OK To change the name of the registered group dial 1 Click No Type or Name 2 Click Edit 3 Change the name of Group Name and click OK To delete the registered group dial 1 Click Delete of the group dial which you want to delete 6 Click the unregistered No Type or Name 7 Select Group in Destination Type to Register and click OK 8 Enter the...

Страница 96: ...5 14 Registering Destinations in the Address Book ...

Страница 97: ... Memory to Other Destinations Manual Forwarding 6 16 Configurating Operations for Transfer Errors 6 17 Re fowarding Printing Deleting Documents in Which Transfer Is Failed 6 18 Managing Faxes Stored in Memory 6 19 Checking and Canceling Fax Jobs 6 19 Combining and Printing the Received Documents You Saved 6 19 Checking and Deleting Received Faxes 6 20 Checking the History of Received Sent Faxes 6 ...

Страница 98: ...he scan is complete When your fax is placed on the platen glass Perform the following procedure 1 Select the size of the original document using or and press OK Scan Size LTR LGL STMT 2 Place the next page on the platen glass and press B W Press B W for each page 3 When all documents are scanned completely select Start Sending using or and press OK Your fax is sent to your fax destination 3 Specif...

Страница 99: ...Setting screen Specify destination 01 01 2011 12 52AM Resolution 200 x 1 Density 0 Density Press or to select Density Specify the density Decrease the density Increase the density Tonextpage 2 Sided Original Settings MF8380Cdw only NOTE The 2 Sided Original mode is not available when scanning original using the platen glass scanning with the manual sending mode Fax mode screen Setting screen Speci...

Страница 100: ...st this setting to emphasize the outline of the image or decrease the contrast To clearly capture halftone photos adjust this setting to the appropriate level on the scale This can counteract the effect of moiré patterns uneven gradation and striped patterns To clearly capture text or lines adjust this setting to the appropriate level on the scale It is best suited for scanning blueprints and very...

Страница 101: ...sing and press OK To clear all the scan settings specified press Reset Tonextpage Specifying destinations using the address book When you type an alphanumeric character from the operation panel or search for an alphanumeric character in the address book screen destinations with the matched letter or number are displayed You can select your destination from the displayed list To select a destinatio...

Страница 102: ...e address book To select a group address from the address book you need to register group addresses in the address book in advance Registering and Editing Destinations for Group Dialing 1 Press Address Book 2 Press or to search for your destination Select to display group destinations Select All to display all destinations Select to add or edit destinations Registering Destinations in the Address ...

Страница 103: ... after the fax sending starts select Cancel using or and press OK Scanning Start Sending Cancel Destinations 1 No of TX Pages 1 You can also cancel the job by pressing Stop When a document is loaded on the platen glass When Scan Next Press Start is displayed follow the same steps as the above Scan Next Press Start Start Sending Cancel Destinations 1 No of TX Pages 1 2 Select Yes using or when Canc...

Страница 104: ...reading settings are saved as well You can change them for redialing Resolution Density 2 Sided Original MF8380Cdw only Sharpness Redial restrictions Manual fax sending is not saved in the history and cannot be redialed Notifying the Recipient of an Incoming Fax by Telephone Manual Sending P 6 9 When fax sending from the history is restricted redialing feature is not available Restrict History TX ...

Страница 105: ...ions when sending faxes manually When placing documents on the platen glass only one page can be sent Furthermore the group dialing function is not available The 2 sided printing document cannot be scanned The 2 sided printing scan setting will be invalid You cannot use the 2 Sided Original mode The 2 Sided Original mode is not available when you perform manual sending Check for a dial tone before...

Страница 106: ...rt Pause Keys to be used for this operation 1 Place your fax Placing Documents P 2 4 Supported Document Types P 2 2 2 Press 3 Specify the scanning settings as needed Changing the Scan Settings Fax P 6 3 4 Enter the international access code using the numeric keys For more information on international access codes contact your telephone company Fax Number 012 Apply 5 Press Pause to enter a pause as...

Страница 107: ... 1 CANON 0123456789 Address Book Coded Dial 4 Repeat Step 2 and 3 to enter all the destinations 5 Press B W NOTE The number of destinations that you can specify for a sequential broadcast Using the numeric keys Up to 10 destinations Favorites Up to 19 destinations Coded dial codes Up to 181 destinations To specify destinations using the numeric keys Enter the numbers and press OK For confirming de...

Страница 108: ... fax When the call is a fax When the call is a fax When the call is a voice call When the call is a voice call When you pick up the handset while the incoming call rings When you do not pick up the handset while the incoming call rings When the call is a voice call An incoming call rings for the specified number of times The machine receives the fax automatically The machine does not respond You c...

Страница 109: ...et You can start talking as is The machine judges whether the incoming call is a fax or voice call 2 When the call is a fax When the call is a voice call The machine receives the fax automatically The telephone rings 3 When you pick up the handset during ringing When you do not pick up the handset during ringing You can start talking as is The machine hangs up the telephone or switches to the fax ...

Страница 110: ... calls or receive faxes when the machine is set to manual mode Set this mode when you expect to receive more incoming telephone calls than faxes or when you receive few faxes Operation for when an incoming call is received The external phone rings When you pick up the handset while the telephone rings When the call is a fax When the call is a voice call When you do not pick up the handset while th...

Страница 111: ...OK FAX Keys to be used for this operation 1 Press 2 Select RX Mode using or and press OK Specify destination 01 01 2011 12 52AM RX Mode Auto Resolution 200 x 1 3 Select Fax Tel Auto Switch using or and press OK RX Mode Auto Fax Tel Auto Switch Manual Answering Machine 4 Select the option using or and press OK Fax Tel Auto Switch Apply Ring Start Time 6 Incoming Ring Time After Ring RX Ring Start T...

Страница 112: ...B Direct Print Se Printer Settings Adjustment Maintena System Settings 3 Select Forwarding Settings using or and press OK System Settings Security Settings Communication Manag Select Country Regi Forwarding Settings 4 Select Off or On using or and press OK Forwarding Settings Off On On Starts to transfer received documents Next you need to configure transfer destinations Off Transfer is not perfor...

Страница 113: ...7 All Fav Configurating Operations forTransfer Errors When received documents are transferred or when a transfer error occurs its details can be saved in a memory or printed Menu OK Keys to be used for this operation 1 Press Menu 2 Select System Settings using or and press OK Menu USB Direct Print Se Printer Settings Adjustment Maintena System Settings 3 Select Store Print When Fowarding using or ...

Страница 114: ...d job The job which has been reforwarded successfully is deleted OK Status Monitor Cancel Keys to be used for this operation 1 Press Status Monitor Cancel 2 Select Fax Forwarding Errors using or and press OK Status Monitor Cancel Copy Print Job TX Job RX Job Fax Forwarding Error 3 Select a job using or and press OK Fax Forwarding Errors 12 52AM 12 54AM Detailed information of the forwarding error ...

Страница 115: ...mber 0004 Status Sending Time 01 01 12 52AM 2 Select Yes using or and press OK Cancel No Yes The sending job is canceled Fax transmission to all the destinations will be canceled for sequential broadcast 3 Press Status Monitor Cancel to close the screen To only check the details of the selected job Press Status Monitor Cancel after you have checked the details of the selected job to close the scre...

Страница 116: ...Checking and Deleting Received Faxes Check the details of faxes stored in memory Delete faxes that you no longer need NOTE About faxes stored in memory You can specify forwarding destinations Forwarding Fax Documents P 6 16 You can combine and print documents saved in the memory in stead of printing during receiving Combining and Printing the Received Documents You Saved P 6 19 OK Status Monitor C...

Страница 117: ...OK Status Monitor Cancel Keys to be used for this operation 1 Press Status Monitor Cancel 2 Select TX Job or RX Job using or and press OK Status Monitor Cancel Device Status Copy Print Job TX Job RX Job TX Job Confirm the sending job history RX Job Confirm the received job history 3 Select Job History using or and press OK TX Job Status History Job Status Job History 4 Select the job that you want...

Страница 118: ... Settings 3 Select TX Function Settings using or and press OK Fax Settings Basic Settings TX Function Settings RX Function Settings RX Print Settings 4 Select Change Defaults using or and press OK TX Function Settings Change Defaults Register Unit Name ECM TX Pause Time 5 Select the item using or and press OK Resolution Density 2 Sided Original MF8380Cdw Only Sharpness For more information see Cha...

Страница 119: ...gs Copy Settings Fax Settings 3 Select TX Function Settings using or and press OK Fax Settings Basic Settings TX Function Settings RX Function Settings RX Print Settings 4 Select ECM TX using or and press OK TX Function Settings Change Defaults Register Unit Name ECM TX Pause Time 5 Select Off or On using or and press OK ECM TX Off On Select Apply when Apply appears on the screen after you have sp...

Страница 120: ...ttings TX Function Settings Register Unit Name Fax How to register the sender s name Enter up to 24 alphanumeric characters You can also use or space Entering Text on page 1 12 NOTE Where the sender s name appears on the page The information is printed at the top of each page that you are sending 0001 0001 01 01 2011 02 07 PM FAX 123XXXXXXX CANON Sending Date Time Fax Telephone Number FAX No Page ...

Страница 121: ...ont of the telephone number Check Dial Tone Before Sending Specify whether to check for a dial tone before dialing How to access the option Menu Fax Settings TX Function Settings Check Dial Tone Before Sending Settings Bold Default setting Off Do not check for a dial tone On Check for a dial tone before dialing The steps to take for configuring the receiving settings Follow the steps in the proced...

Страница 122: ...ngs in Ring Times Remote RX Specify whether to receive faxes remotely by dialing the ID number using the push buttons of the external telephone connected to the machine when an incoming call comes If you use the pulse line press Tone and then dial the Remote RX ID How to access the option Menu Fax Settings RX Function Settings Remote RX Settings Bold Default setting Off Disable remote retrieval On...

Страница 123: ...How to access the option Menu Fax Settings RX Print Settings Continue Printing When Toner Is Low Settings Bold Default setting Off The machine does not continue printing received faxes On The machine continues printing received faxes The steps to take for configuring the system settings Follow the steps in the procedure below to configure the system settings The procedure describes the steps to ch...

Страница 124: ...ngs Memory Lock Settings If Memory Lock PIN is specified use the numeric keys to to enter those numbers and then press OK Settings Boldface Default setting Off Disable Memory Lock On Memory Lock PIN Seven digit number Once the PIN is set you are prompted to enter it every time you change or disable the Memory Lock mode settings Print Report Off On Specify whether to print the RX result report when...

Страница 125: ...System Settings Restrict TX Function Allow Fax Driver TX Settings Bold Default setting Off Disallow sending faxes from the fax driver installed on your computer On Allow sending faxes from the fax driver installed on your computer Restrict History TX Specify whether to restrict sending faxes from the history IMPORTANT When settings are not immediately applied During manual redialing operations for...

Страница 126: ...6 30 Using the Fax Functions ...

Страница 127: ...Operation Methods for Scanning 7 2 Scanning Using Keys on the Operation Panel 7 2 Performing a Scan Using a Shortcut Key 7 3 Registering a Shortcut Key Confirming the Destination Registered in the Shortcut Key 7 3 Performing a Scan Using a Shortcut Key 7 4 Saving Scanned Documents to USB Memory Device 7 5 E mailing Scanned Documents MF8380Cdw Only 7 6 Sending Scanned Documents to a File Server MF8...

Страница 128: ...ype Computer Remote Scanner Memory Media 4 Select the destination using or and press OK Specify destination EXAMPLE1 EXAMPLE2 When one computer is connected to the machine via a USB cable This screen is not displayed When more than ten computers are connected to the machine simultaneously Up to 10 computers can be displayed as a list of computers connected to the machine Scanning cannot be perform...

Страница 129: ...matically displayed to which the scanned images are saved By default a folder bearing the scanning date is created inside the Pictures or My Pictures folder in My Documents To change the scanner settings You can re specify the save location file format resolution and other settings from a computer e Manual Scanning Scanning Paper Documents and Saving Them to a Computer USB Network Connection Using...

Страница 130: ...ename the displayed computer names e Manual Scanning Scanning Paper Documents and Saving Them to a Computer USB Network Connection Using the MF Toolbox Specify destination 123456789AB 5 Specify the scan settings using or and press OK Select Scan Type Color Scan B W Scan Custom 1 Custom 2 Scan Mode Resolution Fie Type PDF Settings Color scan Color 300 dpi PDF Searchable High BW scan Black and white...

Страница 131: ... in the USB port This section describes the basic procedure IMPORTANT The USB memory device port on the machine The port supports USB 1 1 Do not insert anything other than USB memory device Supported file systems and memory capacity Supported file systems and memory capacity include the following You can have your USB memory device formatted with one of the following file systems on your computer ...

Страница 132: ...ress OK Status Monitor Cancel Device Status Copy Print Job TX Job RX Job 4 Select Remove Memory Media using or and press OK Device Status Paper Information Remove Memory Media Check Counter Secure Print Memory 5 Remove the USB memory device 6 Press Status Monitor Cancel after you have checked the details of the selected job to close the screen E mailing Scanned Documents MF8380Cdw Only Attach scan...

Страница 133: ... Store and Finish Cancel When scanning is complete the scanned document is e mailed Sending Scanned Documents to a File Server MF8380Cdw Only Sending scanned documents to a file server This section describes the basic procedure NOTE Preparation for Scanning File Server You can send scanned documents to a file server You can convert scanned documents into TIFF files and send them to a file server B...

Страница 134: ... B W Scanning starts When additional pages can be scanned on the platen glass 1 Place the next page and press Color or B W 2 To finish scanning select Store and Finish using or and press OK Scan Next Press Start Store and Finish Cancel When scanning is complete the scanned document is sent to the file server ...

Страница 135: ...When Cleaning the Machine 8 4 Replacing Toner Cartridges 8 5 About the Supplied Toner Cartridge 8 5 About Replacement Toner Cartridges 8 5 Handling Toner Cartridges 8 6 Storing Toner Cartridges 8 6 Checking the Toner Level 8 7 When a Message Appears 8 7 Replacing the Toner Cartridges 8 7 Purchase Consumables 8 10 Recycling Used Cartridges 8 11 The Clean Earth Campaign 8 11 U S A PROGRAM 8 11 Packa...

Страница 136: ...Scan Settings USB Direct Print Se Printer Settings Adjustment Maintenan 3 Press or to select Clean Fixing Unit and then press OK Adjustment Maintenance Toner Saver Mode Black Text Processi Special Processing Clean Fixing Unit 4 Make sure that paper is loaded and then press OK Load the paper indicated in the display Cleaning starts It takes approx 68 seconds for MF8380Cdw and approx 74 seconds for ...

Страница 137: ...seconds for MF8080Cw Clean ITB Start 5 Press Menu to close the menu screen Cleaning the Platen Glass Follow this procedure to clean the platen glass and under surface of the feeder or the platen glass cover 1 Turn OFF the power switch and disconnect the power cord 2 Open the feeder or the platen glass cover 3 Clean the platen glass and the under surface of the feeder or the platen glass cover 1 Cl...

Страница 138: ...rials tend to stick to the components or generate static charges NOTE About sending or receiving faxes When the power plug is unplugged the machine cannot send or receive faxes When a job is waiting to be printed The job is deleted when you turn OFF the power switch About jobs stored in memory Jobs can be stored in memory for approximately five minutes after the power plug has been unplugged To vi...

Страница 139: ...inting paper size or the document type MF8380Cdw Toner cartridges Target for replacing toner cartridges Canon Cartridge 118 Black Average yield of K Black toner cartridge 1 2 3 400 sheets Canon Cartridge 118 Yellow Canon Cartridge 118 Magenta Canon Cartridge 118 Cyan Average yield of Composite Y Yellow M Magenta and C Cyan toner cartridges 1 2 2 900 sheets MF8080Cw Toner cartridges Target for repl...

Страница 140: ...ges in a safe and trouble free manner store them in a place that fulfills the following conditions Do not store toner cartridges in a location exposed to direct sunlight Do not store toner cartridges in a location subject to high temperature or humidity or in a location with dramatic changes in temperature or humidity Storage temperature range 32 to 95 F 0 to 35 C Storage humidity range 35 to 85 R...

Страница 141: ...ay Message When it is displayed Description and solutions Prepare Toner Color toner cartridge When a toner cartridge soon needs to be replaced Have ready a replacement toner cartridge It is recommended that you replace the toner cartridge before printing a large amount of data Cart parts life end Toner Color replcmnt recmnd Toner cartridges with print quality that cannot be guaranteed due to their...

Страница 142: ...e the drum protective cover A A Front View 6 Place the toner cartridge on a flat surface 7 Remove the tab and the pull out the sealing tape approx 19 3 4 50 cm long 1 2 IMPORTANT When pulling out the sealing tape Do not pull the sealing tape diagonally or sideways If the tape breaks this may become difficult to pull out completely Top View Even if the sealing tape stops at midpoint pull it out of ...

Страница 143: ...the front cover as this may damage the machine Precautions when ReplacingToner Cartridge See Maintenance and Inspections P xviii in Important Safety Instructions as well IMPORTANT About replacement toner cartridges For optimum print quality replacement is recommended using genuine Canon toner cartridges Model name Supported Canon genuine toner cartridge MF8380Cdw Canon Cartridge 118 Yellow Canon C...

Страница 144: ... cartridge in the new location for two hours or longer without opening the protective bag to allow it to adjust to the new temperature Keep the toner cartridge away from equipment that generates magnetic fields such as LCD displays and computers A toner cartridge is a magnetic product Keep the toner cartridge away from products that may be damaged by magnetism such as a floppy disk or disk drive T...

Страница 145: ...n Canada through donations to the World Wildlife Fund Canada and The Nature Conservancy of Canada Since its inception The Canon Cartridge Recycling Program has collected huge amount of cartridges that otherwise would have been discarded into landfills or similar facilities Instead this rapidly growing program returns used cartridges to the manufacturing process thus conserving an array of resource...

Страница 146: ...ent exceeds the above limits please call 1 800 OK Canon for special shipping information Please Note Do not send defective cartridges for replacement Defective cartridges under warranty should be exchanged by an authorized dealer or service facility as provided in the warranty Shipping Apply the UPS authorized returning label provided in this guide Residents of Alaska and Hawaii Do not use the UPS...

Страница 147: ...tion box can accommodate eight individual cartridge boxes Place your eight individually packaged boxes of empty cartridges into the Canon collection box Seal the box Apply the Canon Canada Inc Canada Post label provided in this brochure Canon s labels are specially marked so that Canon pays the postage Deliver to any local Canada Post outlet or franchise Customers who hold a Commercial pick up agr...

Страница 148: ...phone cable 5 Unplug the external telephone cable from the external device jack 6 Unplug the telephone line cable from the telephone line jack Power cord 7 Unplug the power plug from the AC power outlet 8 Remove it from the machine Whether the cable is connected or not varies depending on your environment 2 If telephone cables are connected disconnect all the telephone cables from the machine 3 Pu...

Страница 149: ... optional paper cassette Cassette 2 may drop resulting in personal injury Put the machine down slowly and carefully Be careful not to hurt your hands or fingers WARNING When transporting the machine Be sure to turn off the power switches of the machine and your computer and then unplug the power plug and interface cables Failure to do so can damage the cables or cords resulting in a fire or electr...

Страница 150: ...8 16 Maintenance ...

Страница 151: ... 9 14 Check the Following First 9 14 Is the power switched ON 9 14 Has the power switch been just turned ON 9 14 Is the machine in the sleep mode 9 14 Are the settings properly configured 9 14 Is the Error indicator on or blinking 9 14 Does a message appear on the screen 9 15 Is the telephone line connected or configured properly 9 15 If You Cannot Solve a Problem 9 15 When a Power Failure Occurs ...

Страница 152: ...s of paper to avoid further jams If paper jams occur repeatedly Check the followings Fan the paper stack and tap the edge on a flat surface to align the paper before loading it into the machine Make sure that the paper you are using meets the requirements for use e Manual Specifications Paper Supported Paper Types Make sure that you have removed all scraps of paper from the inside of the machine N...

Страница 153: ...per Jams in the Rear Cover and Duplex Unit MF8380Cdw Only Referring to the procedure on the display follow the steps below to remove jammed paper Keys to be used for this operation 1 Press Paper jam Press to display steps 2 Open the rear cover 1 2 3 Open the paper output guide by holding the green tab A A 4 Remove the paper by pulling it gently Make sure that no paper is jammed inside the paper ou...

Страница 154: ...r cover The machine is ready to print Paper Jams in the Output Area MF8380Cdw Only Referring to the procedure on the display follow the steps below to remove jammed paper Keys to be used for this operation 1 Press Paper jam Press to display steps 2 Open the front cover 3 Lift the scanning platform 4 Remove the paper by pulling it gently 5 Lower the scanning platform 6 Close the front cover The mac...

Страница 155: ...he paper by pulling it gently 7 Close the rear cover The machine is ready to print Paper Jams in the Paper Cassette Cassette 1 or 2 Referring to the procedure on the display follow the steps below to remove jammed paper Cassette 2 optional can be used only for MF8380Cdw OK Keys to be used for this operation 1 Press Press OK to exit the operation screen Paper jam Press to display steps End Press OK...

Страница 156: ...pose Tray MF8380Cdw Only Referring to the procedure on the display follow the steps below to remove jammed paper OK Keys to be used for this operation 1 Press Press OK to exit the operation screen Paper jam Press to display steps End Press OK 2 Remove the paper by pulling it gently If the jammed paper cannot be removed easily Do not try to remove it forcefully but proceed to Step 3 3 Close the mul...

Страница 157: ... then press OK The machine is ready to print Is all of the jammed paper removed Yes No NOTE If the jammed paper cannot be removed in Step 6 See Paper Jams in the Rear Cover and Duplex Unit MF8380Cdw Only P 9 3 and remove the paper Paper Jams in the Manual Feed Slot MF8080Cw Only Referring to the procedure on the display follow the steps below to remove jammed paper OK Keys to be used for this oper...

Страница 158: ...the manual feed transport guide to its original position Push them up until it clicks A 7 Close the manual feed slot cover 8 Insert the paper cassette into the machine 9 When the following screen appears select Yes with and then press OK The machine is ready to print Is all of the jammed paper removed Yes No ...

Страница 159: ...number Problem 2 The receiving fax machine may not be a G3 fax machine Action Make sure the receiving fax machine is a G3 fax machine If it is a G3 fax machine send the document again Otherwise switch to the communication mode supported by the receiving fax machine and send the document again 012 Problem The receiving fax machine is out of paper Action Make sure that there is enough paper loaded i...

Страница 160: ...tten to and writing failed Action Check to see if the memory media was disconnected and try writing again Problem 2 An error occurs when transferring images to memory media and images cannot be transferred normally Action Check the memory media status and then repeat the operation Problem 3 The connected memory media is formatted with an unsupported file system Action Make sure that the memory med...

Страница 161: ...in the computer file server 806 Problem 1 When sending to a file server the specified user name and password are incorrect Action Make sure that the user name and password that is registered for the destination matches the user account user name and password that is registered in the computer file server Problem 2 When sending e mail the specified destination is incorrect Action Check the register...

Страница 162: ...e Manual Security Entering PIN for Printing Secure Printing Setting Secure Printing 861 Problem 1 Cannot print because the print data was received from another printer driver Action Print the data again from the printer driver for the machine Problem 2 Printing cannot be performed because print data is broken Action Repeat the operation 863 Problem A process problem in the printer has occurred and...

Страница 163: ... paper size in the Paper Settings menu to match the size loaded in thepaper drawer or multi purpose tray manual feed slot Cancel the job and refer to For the Paper Cassette P 2 18 to change the paper size in Paper Settings menu IMPORTANT When printing using the printer driver Make sure that the paper size specified in the printer driver also matches the size loaded in the paper cassette or multi p...

Страница 164: ...Press Energy Saver on the operation panel to return from the sleep mode If this works Are the settings properly configured If the machine makes the error sound and does not start operating even after Color or B W has been pressed the settings may not have been configured properly Check the configured settings Is the Error indicator on or blinking Ensure that paper is loaded properly in the paper c...

Страница 165: ...able is properly connected Make sure that the telephone cable is connected to the external device port and the device cable is connected to the telephone line port mistakenly Specifying Initial Settings for the Fax Functions and Connecting the Telephone Cable Make sure that the line type dial or push specified in the menu matches the type of line connected to the machine Select Line Type P 6 24 Ma...

Страница 166: ...al telephone depending on your telephone system IMPORTANT To save documents in memory when the power supply is cut off If the power is lost due to a power failure or the power cord is accidentally unplugged data can be stored in memory for approximately five minutes so you can back it up NOTE Charging the built in battery It takes approximately five hours to completely charge the built in battery ...

Страница 167: ...aper Curls Try one of the following to solve the problem Cause 1 Damp paper is used Solution Replace the paper stack with new unopened one e Manual Specifications Paper Supported Paper Types Cause 2 The paper type loaded is not appropriate Solution Make sure that the number of sheets or the paper type loaded in the paper drawer or multi purpose tray manual feed slot meets the paper specifications ...

Страница 168: ... appropriate Solution Make sure that the number of sheets or the paper type loaded in the paper drawer or multi purpose tray manual feed slot meets the paper specifications e Manual Specifications Paper Supported Paper Types Cause 4 There is a foreign object inside the machine Solution Remove the foreign object from the machine Vertical Streaks Appear on the Output Perform following procedure Caus...

Страница 169: ...g procedure Cause A document with no margins was printed Solution 1 Data is printed with a margin of 5 mm 10 mm for envelopes Provide a margin around the data Printable Area P 2 8 Solution 2 Perform the following procedure in the printer driver 1 Display the Finishing sheet 2 Click Advanced Setting 3 Set Enlarge Print Area to Off Printing Is Faded A B C Perform following procedure Cause The toner ...

Страница 170: ... Cause A document with no margins was printed Solution 1 Data is printed with a margin of 5 mm 10 mm for envelopes Provide a margin around the data Printable Area P 2 8 Solution 2 Perform the following procedure in the printer driver 1 Display the Finishing sheet 2 Click Advanced Setting 3 Set Enlarge Print Area to Off ...

Страница 171: ...pport download drivers or support documents or view answers to frequently asked questions visit http www canon ca Free live technical support is available from 9 A M to 8 P M EST Monday through Friday excluding holidays for products still under warranty 1 800 OK CANON To find the location of the authorized service facility nearest you visit http www canon ca or call 1 800 OK CANON If the problem c...

Страница 172: ... smoke or an odd odor Turn OFF the power switch immediately disconnect the power cord and contact the Canon Customer Care Center Do not attempt to disassemble or repair the machine yourself IMPORTANT If you attempt to fix the machine yourself It may void the limited warranty ...

Страница 173: ... Registering Setting theVarious Functions You can set or change machine functions from the setting menu according to your purpose Setting Menu List 10 2 Printing a User Data List 10 2 Contents of the Setting Menu 10 2 ...

Страница 174: ...g the setting Returns to the previous hierarchy Resets the settings Resets the copy scan fax USB direct print mode Menu Operations Back Reset Viewing the Route Map Register the following types of destination Favorites Coded dialing Group dialing Address Book key Press Menu to exit the menu screen and return to the default screen Register the size and type of the paper to be used You can also regis...

Страница 175: ... Settings How to display Press Select Paper Settings Setting the Paper Size and Type P 2 17 4800 bps 33600 bps 14400 bps 9600 bps 4800 bps IPv4 Settings IPv6 Settings TCP IP Settings IP Address Settings PING Command Auto Obtain Select Protocol Manual Obtain IP Address Off DHCP Auto IP Off 0 0 0 0 Subnet Mask 0 0 0 0 Gateway Address View Settings Auto Obtain IP Address Off On DNS Dynamic Updt Time ...

Страница 176: ...X 2 1 to110 to 65535 RAW Settings Off On WSD Settings WSD Print Settings WSD Scan Settings Use Multicast Discovery Off Communication Mode Half Duplex Full Duplex Ethernet Type 10 Base T 100 Base TX Continues from the previous page Continues from the previous page Continues to the next page WINS Settings WINS Resolution Off On WINS Server Address 0 0 0 0 Scope ID HTTP 1 to 80 to 65535 SMTP TX 2 1 t...

Страница 177: ...oner Is Low Gamma 1 0 Gamma 1 4 Gamma 1 8 Gamma 2 2 Image Quality in Text Photo Photo Mode Data Size Priority Normal Image Quality Priority Image Quality in Text Mode Data Size Priority Normal Image Quality Priority Name Ascending Name Descending Date Time Ascending Date Time Descending CD ROM CD ROM CD ROM P 1 11 P 1 10 P 3 9 Common Settings TX Function Settings 1 Register Confirm Destination Sho...

Страница 178: ...gs Use SSL IPv4 Address Filter Off On Off On Send Filter Receive Filter IPv6 Address Filter Off On Off On Send Filter Receive Filter MAC Address Filter Off On Off On TX Start Speed 33600 bps 14400 bps 9600 bps 7200 bps 4800 bps 2400 bps RX Start Speed 33600 bps 14400 bps 9600 bps 7200 bps 4800 bps 2400 bps Memory Lock PIN Off On Communication Management Settings Forwarding Settings 2 Off On Off On...

Страница 179: ... Off On Memory Media Storage On Off Off On USB Direct Print On Off Off On Secure Print Settings 2 Select PDL Plug n Play Update Firmware 2 Initialize Key and Certificate 2 Initialize Address Book 2 Initialize System Settings 2 Secure Print Del Time 10 to 30 to 240 min Select PDL Plug n Play Initialize All Printer Settings CD ROM Initialize All CD ROM System Manager Information Settings Device Info...

Страница 180: ...10 8 Registering Setting the Various Functions ...

Страница 181: ...pecifications 11 2 Machine Specifications 11 2 Wireless LAN Specification 11 2 Copy Specifications 11 2 Printer Specifications 11 3 Scanner Specifications 11 3 Fax Specifications 11 3 Telephone Specifications 11 4 Transmission Specifications MF8380Cdw Only 11 4 Cassette Feeding Unit V1 optional MF8380Cdw Only 11 4 Index 11 5 ...

Страница 182: ...3 1 2 674 mm x 1 327 mm x 851 mm When the optional Cassette Feeding Unit V1 is installed 26 3 4 x 52 1 4 x 37 1 2 679 mm x 1 327 mm x 951 mm MF8080Cw 26 1 2 x 48 3 8 x 31 1 2 674 mm x 1 229 mm x 801 mm Machine Specifications Environmental Conditions Temperature 50 to 86 F 10 to 30 C Humidity 20 to 80 RH no condensation Color Compatibility Full Color Gradation 256 gradations Acceptable Documents Su...

Страница 183: ...Print speeds vary depending on the paper type and size as well as the paper feeding direction Print speeds on smaller paper sizes may be slower Plus the machine may experience downtime or decrease the print speed in the middle of a continuous print run to adjust the temperature inside the machine or maintain the optimal print quality 3 May vary depending on the output environment Scanner Specifica...

Страница 184: ...k White Inputted Image Text Text Photo Photo Paper Size LGL LTR STMT Specification for E mail Sending Communication Protocol SMTP Data Format PDF Compact PDF Resolution Resolutions for data formats are PDF PDF Compact Black and White 300 dpi MMR Compression Text 300 dpi Background 150 dpi Color 200 dpi JPEG Compression Text 300 dpi Background 150 dpi System Environment Windows XP Vista 7 Server 20...

Страница 185: ...x D Date Settings 1 15 Density Copy 3 5 Fax 6 3 Disclaimers xx Display 1 9 Display Messages 9 9 LCD Standby Mode 1 9 Document delivery tray 1 2 Document feeder tray 1 2 Document guides 1 2 Documents Clearing Jams 9 2 Placing 2 4 Receiving Faxes 6 12 Scan Area 2 2 Sending Faxes 6 2 E Entering Text 1 12 Error Code 9 9 External telephone jack 1 3 F Favorites 5 2 Editing 5 3 Storing 5 3 Fax Documents ...

Страница 186: ...anual Feed Slot 1 2 1 5 Paper guide 1 5 The auxiliary tray 1 5 Tray extension 1 5 O Operation Panel 1 2 1 7 Output tray 1 2 P Paper Clearing Jams 9 2 Loading 2 9 Printable Area 2 8 Printable Range 2 8 Requirements 2 6 Paper Cassette 1 2 1 6 Lock release lever 1 6 Paper guide 1 6 Platen glass 1 2 Power socket 1 3 Power Supply xiii Requirements xvii Power switch 1 2 Printable Area 2 8 Printing a Use...

Страница 187: ...3 Time Settings 1 15 Toner Cartridges Checking the Toner Level 8 7 Handling 8 6 Replacing 8 7 Storing 8 6 Toner cartridge slot 1 4 Toner cartridge tray 1 4 Trademarks xix Transporting the Machine 8 14 Tray extension 1 2 Troubleshooting 9 1 Clearing Jams 9 2 Error Code 9 9 If You Cannot Solve a Problem 9 15 When a Power Failure Occurs 9 16 When Incorrect Size Setting Appears 9 13 U USB memory port ...

Страница 188: ......

Страница 189: ......

Страница 190: ......

Страница 191: ......

Страница 192: ...Success NY 11042 U S A CANON EUROPA N V Bovenkerkerweg 59 61 1185 XB Amstelveen The Netherlands CANON CHINA CO LTD 15F Jinbao Building No 89 Jinbao Street Dongcheng District Beijing 100005 PRC CANON SINGAPORE PTE LTD 1 HarbourFront Avenue 04 01 Keppel Bay Tower Singapore 098632 CANON AUSTRALIA PTY LTD 1 Thomas Holt Drive North Ryde Sydney NSW 2113 Australia CANON GLOBAL WORLDWIDE SITES http www ca...

Отзывы: