5-4. Flash ROM Writing Operation
<Difference from the BJC-50/BJC-50v>
As the BJC-55/BJ M40 does not have a parallel interface, the firmware of the Flash
ROM is written using the "USB Loader."
5-4-1. Writing method
a) Download the USB Loader to the host computer.
(1) Send the USB Loader from the "Software download" page on QISS to the host
computer.
This software will operate only on Windows 98 OS computers.
Also, the BJC-55 / BJ M40 printer driver must be installed.
(2) Connect the printer which the firmware is to be written with the host computer.
Note that the printer should be turned off.
The other USB devices should be unplugged from the host computer.
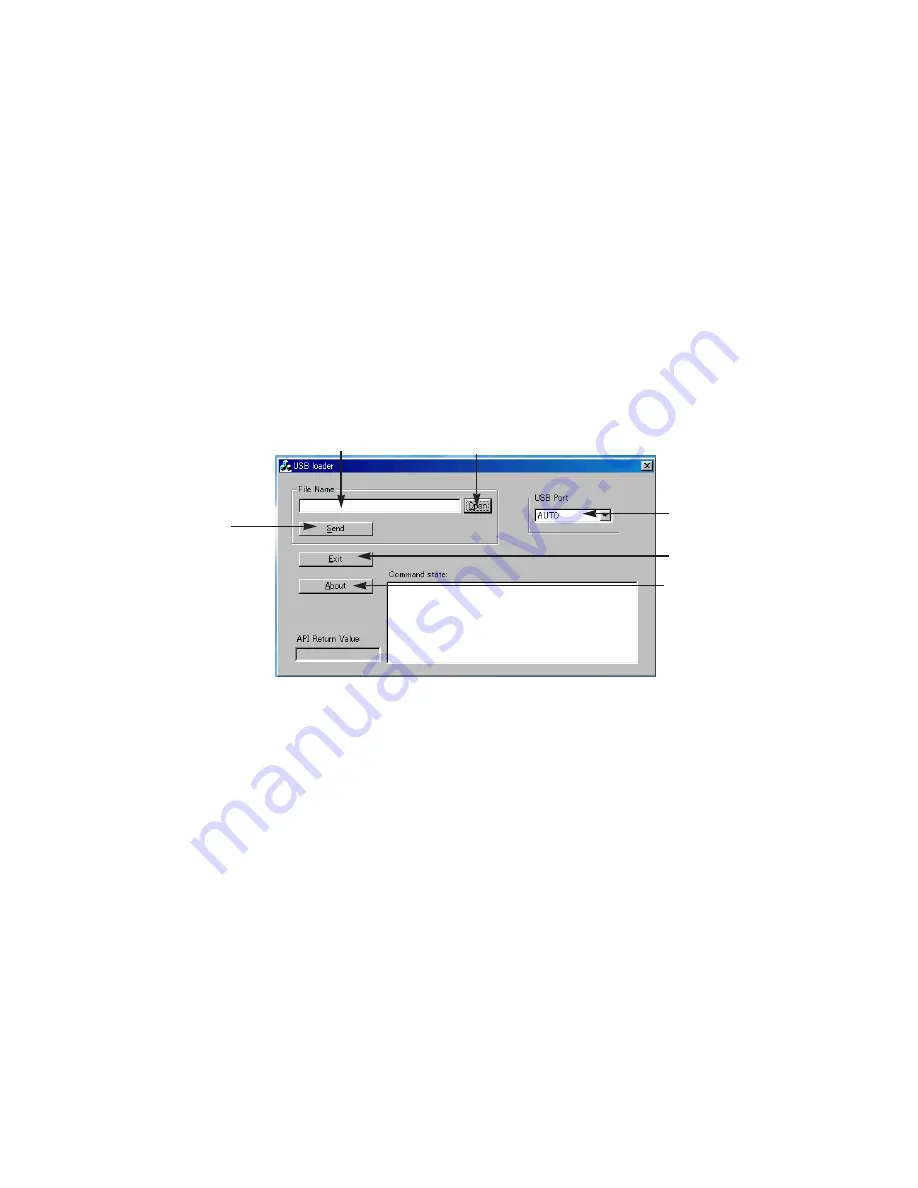
(3) Open the USB loader with a double-click.
<Main Dialog Box of the USB Loader>
b) Enter the writing mode of the printer.
(1) Remove the DC plug of the universal adapter and the Lithium Ion Battery.
(2) While pressing the
RESUME
button and
Cartridge Replacement
button, insert
the DC plug of the universal adapter and release the buttons after one long beep.
(3) Press the
RESUME
button, and release the button after one short beep. When the
initial sequence finishes, another short beep will sound, the Power LED lights, and
the printer will enter the writing mode (stand-by-to-receive state.)
The
RESUME
button does not work while in the writing mode.
Do not turn off the power with the
POWER
button while in the writing mode.
c) Download the firmware.
(1) Download the firmware for upgrading from the software download page in QISS
into the host computer.
(2) Select "AUTO" from the "USB Port" in the main dialog box of the "USB loader."
11
Select a port.
Exit USB loader.
About USB loader.
(Version etc.)
Send the selected
file to the printer.
Open the dialog box for selecting a file.
Select the file to be sent to the printer.
Содержание BJC-55 Series
Страница 1: ...BJC 55 SERVICE MANUAL Canon...
Страница 34: ......
Страница 50: ......
Страница 72: ...2 4 Character Code Tables Code page 437 Code page 850 Part 2 Product Specifications BJC 50 2 22...
Страница 73: ...Code page 860 Code page 863 2 23 BJC 50 Part 2 Product Specifications...
Страница 74: ...Code page 865 Code page 857 Part 2 Product Specifications BJC 50 2 24...
Страница 75: ...Code page 855 Code page 852 2 25 BJC 50 Part 2 Product Specifications...
Страница 76: ...Code page 864 Code page 869 Part 2 Product Specifications BJC 50 2 26...
Страница 78: ......
Страница 96: ...3 4 1 Demonstration print Part 3 Operating Instructions BJC 50 3 18 Figure 3 13 Demonstration Print Sample...
Страница 103: ...3 6 4 EEPROM settings list print 3 25 BJC 50 Part 3 Operating Instructions Figure 3 20 EEPROM Settings List Print Sample...
Страница 106: ...Part 3 Operating Instructions BJC 50 3 28 This page intentionally left blank...
Страница 108: ......
Страница 160: ......
Страница 164: ...4 ADJUSTMENT No parts need to be adjusted Part 5 Maintenance BJC 50 5 4...
Страница 198: ...7 CIRCUIT DIAGRAMS 7 1 Parts Layout 7 1 1 Control board Upper section Part 5 Maintenance BJC 50 5 38...
Страница 199: ...7 1 2 Control board Lower section 5 39 BJC 50 Part 5 Maintenance...
Страница 200: ...Part 5 Maintenance BJC 50 5 40 This page intentionally left blank...
Страница 206: ...PRINTED IN JAPAN IMPRIME AU JAPON CANON INC The printing paper contains 70 waste paper...


