background image

12

* Do not use tripods with fastening screws longer than 5.5 mm (0.2 in.) as it may damage the camcorder.
**

only.

About the 

 Terminal

 (LANC) stands for Local Application Control Bus System. The 

 terminal allows you to connect and control 

connected devices. Connect only devices with the 

 mark to the 

 terminal.



Operation cannot be guaranteed for connections with devices not bearing the 

 mark.



Some buttons of connected devices may not operate or may operate differently than the buttons on the camcorder.

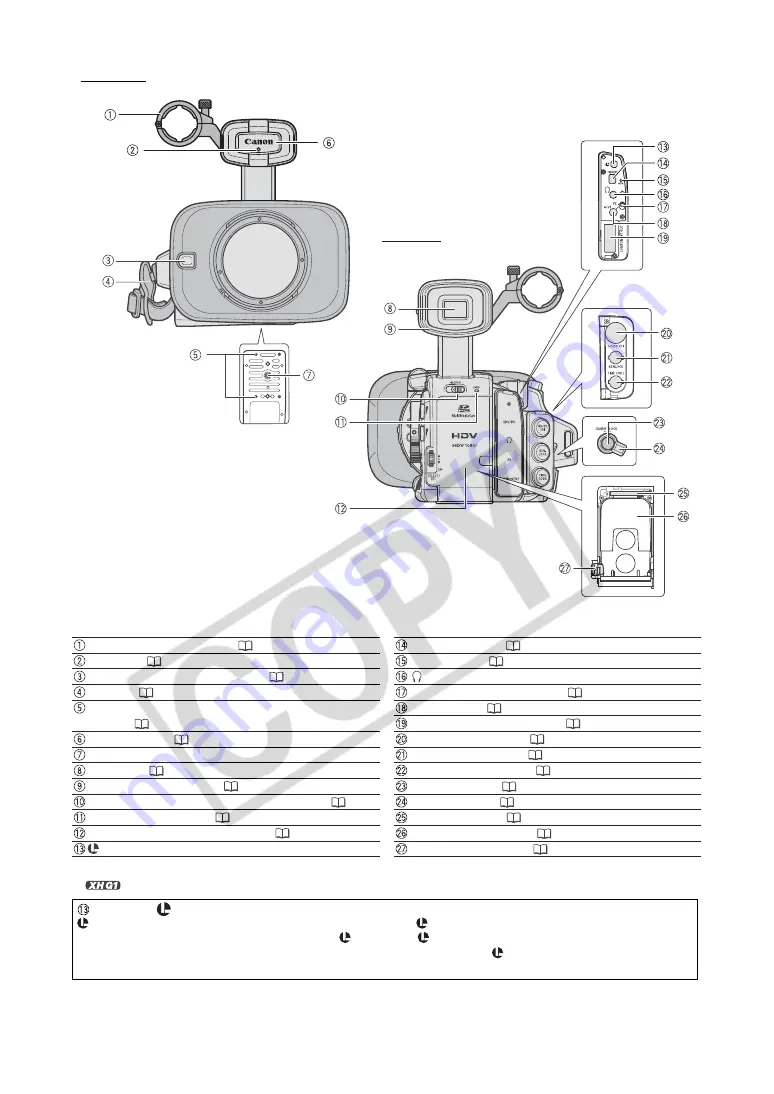
Front view

Backview

External microphone holder (

48)

Tally lamp (

89)

External sensor for the Instant AF (

35)

Grip belt (

20)

Attachment sockets for the optional TA-100 Tripod

Adapter (

155)

Remote sensor (

22, 105)

Tripod socket*
Viewfinder (

18)

Dioptric adjustment lever (

18)

OPEN (open the battery compartment) switch (

15)

CARD access indicator (

112)

Battery/memory card compartment (

15)

 terminal

HDV/DV terminal (

98, 106, 109)

HDV indicator (

89)

 (headphones) terminal

Video output selection switch (

99)

A/V1 terminal (

97)

COMPONENT OUT terminal (

98)

HD/SD SDI terminal** (

97)

GENLOCK terminal** (

44)

TIME CODE terminal** (

44)

Start/stop button (

27)

STANDBY lever (

28)

Memory card slot (

24)

Battery attachment unit (

15)

BATT. RELEASE latch (

15)

Содержание A-1

Страница 1: ...tal Video Cassette HD VIDEO CAMERA RECORDER Instruction Manual CAM SCOPE ET LECTEUR VID O HD Manuel d instruction VIDEOC MARA Y GRABADORA HD Manual de Instrucciones NTSC A PUB DIM 776 English Fran ais...

Страница 2: ...by turning the equipment off and on the user is encouraged to try to correct the interference by one or more of the following measures Reorient or relocate the receiving antenna Increase the separati...

Страница 3: ...cian to replace your obsolete outlet Do not defeat the safety purpose of the polarized plug 12 Power Cord Protection Power cords should be routed so that they are not likely to be walked on or pinched...

Страница 4: ...ct has been dropped or the cabinet has been damaged f When the product exhibits a distinct change in performance This indicates a need for service 20 Replacement Parts When replacement parts are requi...

Страница 5: ...es and products not mentioned above may be trademarks or registered trademarks of their respective companies ANY USE OF THIS PRODUCT OTHER THAN CONSUMER PERSONAL USE IN ANY MANNER THAT COMPLIES WITH T...

Страница 6: ...section and the recording standards used by the recorder section The video signal can be set to HD high definition or SD standard definition specifications The recording standard on the tape will be...

Страница 7: ...the Frame Rate 40 Setting the Time Code 42 Synchronizing the Camcorder s Time Code 44 Setting the User Bit 46 Audio Recording 47 Image Stabilizer 51 Using the Programmed AE Modes 52 Recording in the...

Страница 8: ...age Quality Size 110 File Numbers 111 Recording Still Images on a Memory Card 112 Selecting the Drive Mode 115 Selecting the Metering Method 117 Using an Optional Flash 118 Reviewing a Still Image Rig...

Страница 9: ...Shoulder Strap STV 290N Stereo Video Cable DTC 1000Component Video Cable The serial number of this product can be found at the battery attachment unit of the camcorder Write down the number and other...

Страница 10: ...35 POSITION PRESET ON SET switch 34 37 ND FILTER switch 39 Iris ring 56 57 Side panel 144 POWER indicator OPEN open the LCD display switch 19 CH1 CH2 dials 49 AUDIO LEVEL switch 49 SELECT SET dial 25...

Страница 11: ...witch 33 card tape switch 112 VIDEO2 terminal 99 TIME CODE switch 44 LOCK switch 28 MIC external microphone terminal 47 XLR MIC ATT switches 48 LINE MIC switch 48 Input channel selection switch 48 Len...

Страница 12: ...er Front view Backview External microphone holder 48 Tally lamp 89 External sensor for the Instant AF 35 Grip belt 20 Attachment sockets for the optional TA 100 Tripod Adapter 155 Remote sensor 22 105...

Страница 13: ...fast forward button 95 button 120 REC record button 106 Start stop button 27 LOCK switch 28 OPEN EJECT switch 23 Grip zoom lever 33 PHOTO button 112 Zoom speed adjustment dial 33 RESET button MIC ATT...

Страница 14: ...button 100 END SEARCH button 32 SEARCH SELECT button 102 103 REC PAUSE button 106 REW button 95 ZERO SET MEMORY button 101 button 95 PAUSE button 95 REMOTE SET button 105 AV DV button 108 Zoom buttons...

Страница 15: ...is completed 4 When the charging is completed remove the battery pack from the adapter 5 Unplug the power cord from the power outlet and disconnect it from the adapter Attaching the Battery Pack 1 Tu...

Страница 16: ...rom the power adapter when charging a battery pack Turn off the camcorder before connecting or disconnecting the power adapter If the adapter is used close to a TV it may cause picture interference Mo...

Страница 17: ...min 460 min Typical Recording Time Viewfinder NORMAL 100 min 155 min 215 min 310 min Viewfinder BRIGHT 100 min 155 min 215 min 310 min LCD screen NORMAL 100 min 150 min 210 min 290 min LCD screen BRIG...

Страница 18: ...backlight of the viewfinder These adjustments will not affect your recording 1 Press the MENU button 2 Turn the SELECT SET dial to select DISPLAY SETUP and press the dial 3 Select CVF SETUP and then...

Страница 19: ...brightness contrast color sharpness and backlight of the LCD Panel These adjustments will not affect your recording 1 Press the MENU button 2 Turn the SELECT SET dial to select DISPLAY SETUP and pres...

Страница 20: ...color displays Follow the procedure below to turn both of them to black white display mode 1 Press the MENU button 2 Turn the SELECT SET dial to select DISPLAY SETUP and press the dial 3 Select CVF LC...

Страница 21: ...y light 1 Place the lens hood on the front of the lens so that the window for the external Instant AF sensor faces down and turn it 90 degrees clockwise Be careful not to deform the lens hood Make sur...

Страница 22: ...camcorder and wireless controller are equipped with 2 remote sensor modes 105 If the wireless controller does not work verify that the camcorder and wireless controller are set to the same mode When...

Страница 23: ...traight fully into the compartment with the window facing out Remove the cassette by pulling it straight out 3 Close the cassette compartment by pressing on the mark on the cover The cassette compartm...

Страница 24: ...ry card once to release it and then remove the memory card 4 Close the compartment If you use memory cards other than the supplied one make sure to initialize them with the camcorder 124 Turn off the...

Страница 25: ...button to close the menu The and displays at the bottom of the screen will give you additional indications about what buttons to operate during each menu setting You may find it more convenient to use...

Страница 26: ...year display starts flashing 6 Turn the SELECT SET dial to select the first field of the date and press the dial The next part of the display starts flashing Set the rest of the date and time in the s...

Страница 27: ...nnect the power source The end search date search and index search functions may not work correctly if you mix recordings in HDV and DV standards on the same tape We recommend not mixing recordings in...

Страница 28: ...te the power save function if you wish to make adjustments without worrying about losing your settings as a result of the automatic shut off Once the camcorder entered the power save mode press the st...

Страница 29: ...aining tape time may not appear Depending on the tape the indication may not be displayed correctly Remaining battery charge The battery symbol indicates the charge status of the battery pack starts f...

Страница 30: ...ng option and close the menu Displaying the Safety Zone Guide The safety zone guide shows a frame including 80 or 90 of the screen area Use it as an indication to accurately frame subjects Open the me...

Страница 31: ...g option and select YES to confirm the selection and close the menu HD To record on the tape in HDV standard or to use the camcorder as a high definition HD camera SD16 9 SD4 3 To record on the tape i...

Страница 32: ...the tape plays back the last few seconds of the recording and stops the tape Pressing the button again cancels the search The end search function cannot be used once you unload the cassette The end s...

Страница 33: ...indicator When the ZOOM SPEED switch is set to VAR variable the zoom speed will depend on how you operate the zoom lever Pressing gently will result in a slower zoom pressing harder in a faster zoom Z...

Страница 34: ...ON SET switch to SET The preset zoom position appears in yellow on the zoom indicator Returning to the Preset Zoom Position Move the POSITION PRESET ON SET switch to ON The camcorder returns to the pr...

Страница 35: ...automatic focus even while focusing manually Autofocus The autofocus is set when the focus mode switch is set to AF The camcorder uses the TTL autofocus system with a focusing range of 2 cm 0 8 in at...

Страница 36: ...n recording under dark conditions the focusing range narrows and the picture may appear blurred Autofocus may not work well on the following subjects In that case focus manually Reflective surfaces Su...

Страница 37: ...white while using the focus assist functions Peaking While recording or in record pause press the PEAKING button The outlines of the subject will be emphasized Press the button again to cancel the fu...

Страница 38: ...Select F SPEED PSET select a setting option and close the menu The selected speed appears next to MF Returning to the Preset Focus Setting Move the POSITION PRESET ON SET switch to ON The camcorder re...

Страница 39: ...perture value Depending on the scene the color may change when turning the ND filter on off In such case setting a custom white balance may be effective 63 Screen display What it means What you should...

Страница 40: ...e 2 3 pulldown method 24F 2 3 Mode Signals are down converted to 60i using the 2 3 pulldown method This 24F mode is suited for playback on a TV screen but may require the extension compression of some...

Страница 41: ...setting option and close the menu 2 3 24F appears in white 2 3 3 2 24F appears in orange If you are using an editing system that does not support the 2 3 3 2 pulldown method make sure to record in 24F...

Страница 42: ...tion and close the menu REC RUN Close the menu REC RUN PS FREE RUN Continue the procedure below to set the initial value 2 Select SET The hours display flashes 3 Set the time code s initial value Turn...

Страница 43: ...time codes including 24F frame rate in SD mode there might be a discontinuity in the time code at the point where the recording starts When recording over existing scenes When a time code discontinui...

Страница 44: ...DI OUTPUT to ON the time code data will also be output through the HD SD SDI terminal In SD mode Time Code IN is not available if you select the 24F frame rate the mode will be canceled and the TC IN...

Страница 45: ...nization is possible even if the external Genlock signal is in SD standard However the Genlock synchronization will not be possible if the external Genlock signal is in HD standard but the camcorder i...

Страница 46: ...ted 00 00 00 00 2 Select SET The first character of the user bit flashes 3 Turn the SELECT SET dial to select a number or letter and press the dial The next character of the user bit starts flashing S...

Страница 47: ...V AUDIO select a setting option and close the menu Selecting the Microphone s Audio Recording Mode You can select the most appropriate setting given your recording conditions for recording audio with...

Страница 48: ...nding switch to ON Make sure to connect the microphone first before turning on the phantom power Keep the microphone connected when turning off the phantom power Use commercially available microphones...

Страница 49: ...cator can also be turned on off with the custom key 70 Automatic Audio Adjustments Set the AUDIO LEVEL switch to A When recording audio using the built in microphone with the AUDIO LEVEL switch set to...

Страница 50: ...and the sampling frequency settings Embedded audio is disabled if the tape is recorded with unlocked audio or will appear on the screen The sampling rate will be 48 kHz MENU 25 SIGNAL SETUP SDI OUTPUT...

Страница 51: ...g option and close the menu The image stabilizer cannot be turned off in the Easy Recording mode We recommend turning off the image stabilizer when mounting the camcorder on a tripod The image stabili...

Страница 52: ...erture Priority and M Manual modes you can manually change some settings to match the recording conditions Easy Recording The camcorder automatically controls the focus shutter speed aperture gain whi...

Страница 53: ...of shutter speed and aperture levels Spotlight The Spotlight mode automatically adjusts the exposure to effectively record images and or subjects lit by a spotlight or other concentrated light source...

Страница 54: ...g clear scan Recording programs EXP LOCK button Iris ring 1 1 SHUTTER dial 1 1 AE shift adjustment 0 0 0 GAIN adjustment AGC ON 0 dB AGC ON WHITE BALANCE adjustment auto Custom preset adjustments CUST...

Страница 55: ...for the recording conditions In such case readjust the shutter speed If you are using an ND filter turn it off first and readjust the shutter speed The image quality may decrease to some extent when...

Страница 56: ...than the aperture value shutter speed etc are adjusted automatically The aperture changes when you lock and change the exposure When the AGC switch is set to ON the numeric value flashes on the scree...

Страница 57: ...elect the shutter speed with the SHUTTER dial With the customized functions 83 you can change the direction of the adjustment when you operate the SHUTTER dial Shutter speed 60i 30F Frame rates 1 4 1...

Страница 58: ...estimate The mark above the indicator denotes the automatic exposure setting The mark of the indicator denotes the current exposure setting within 2 stops beyond 2 stops the marker will blink With the...

Страница 59: ...order to darken or lighten the image Select from 15 AE levels 2 0 1 5 1 25 1 0 0 75 0 5 0 25 0 0 25 0 5 0 75 1 0 1 25 1 5 2 0 1 Set the dial to Tv or Av 2 Select the desired AE shift level Open the me...

Страница 60: ...Positions 1 Set the dial to Tv Av or M 2 Open the menu and select CAMERA SETUP Select the GAIN SETTING submenu and then one of the GAIN switch options 36dB is available only in mode 3 Select a settin...

Страница 61: ...3 Set the GAIN switch to the desired gain position When you select high gain values the picture may flicker slightly The 36dB setting in particular allows you to film with a higher sensitivity but is...

Страница 62: ...preset settings Press the WHITE BAL button so the preset icon starts flashing and the neutral value 0 appears next to it Adjust the white balance with the dial to a value between 9 and 9 and press th...

Страница 63: ...e result will still be better than with the auto setting As long as the built in rechargeable lithium battery is charged the camcorder retains the custom white balance setting even if you turn it off...

Страница 64: ...be displayed while using the Peaking assist function 37 Available zebra pattern settings 70 IRE 75 IRE 80 IRE 85 IRE 90 IRE 95 IRE and 100 IRE Selecting the Zebra Pattern Level Open the menu and sele...

Страница 65: ...lues as an approximate reference 0 purple 3 red 6 orange 9 green 12 blue CHROMA Adjust the color saturation for the color to be detected The more you adjust to the area detected will extend to include...

Страница 66: ...pen the menu and select CAMERA SETUP and select the COLOR CORR submenu 2 Select CORRECT select a correction mode other than OFF to correct only area A only area B or both and then close the menu MENU...

Страница 67: ...a 1 Open the menu select CAMERA SETUP and then select the SKIN DETAIL submenu 2 Select each setting option adjust the levels as necessary and press the SELECT SET dial After the adjustment you will re...

Страница 68: ...the picture will be detected and the detail level in these areas will be decreased to obtain a softer picture To activate the sky detail effect Open the menu and select CAMERA SETUP Select SKY DETAIL...

Страница 69: ...on the screen You can adjust the frequency from 60 1 Hz to 203 9 Hz 1 Set the dial to Tv or M 2 Turn the SHUTTER dial to set the shutter speed to CS 3 Open the menu and select CAMERA SETUP Select CLEA...

Страница 70: ...gs In a recording mode Open the menu and select DISPLAY SETUP Select GUIDE INFO set it to CUSTOM KEYS and close the menu In a playback mode Open the menu and select DISPLAY SETUP Select CUSTOM KEY set...

Страница 71: ...An index signal cannot be added or erased later ZEBRA Zebra Pattern 64 Press the CUSTOM KEY 1 or 2 button The zebra pattern is activated Press the button again to deactivate it VCR STOP VCR Stop 28 Wh...

Страница 72: ...button again to hide the audio level indicator CVF LCD BW Viewfinder and LCD Screen s Black White Display Press the CUSTOM KEY 1 or 2 button The image on both the viewfinder and the LCD screen will b...

Страница 73: ...2 dB or 20 dB Society of Motion Picture and Television Engineers Association of Radio Industries and Businesses 1 Select the standard of the color bars signal COLOR BARS and the strength of the audio...

Страница 74: ...p button again This camcorder Record pause mode Connected device Record pause mode While both this camcorder and a connected device are recording if this camcorder stops recording because of a conditi...

Страница 75: ...e and sound may become distorted Changing the Display Language The language used in the camcorder displays and menu items can be changed to German Spanish French Italian Polish Russian simplified Chin...

Страница 76: ...frequency horizontal vertical detail balance coring NR1 NR2 color matrix color gain color phase R gain G gain B gain R G matrix R B matrix G R matrix G B matrix B R matrix and B G matrix Available onl...

Страница 77: ...zontal vertical detail balance in the range 9 only horizontal to 9 only vertical COR Coring Adjust the detail noise level in the range 9 to 9 NR1 Noise Reduction 1 You can select from OFF HIGH MIDDLE...

Страница 78: ...B Gain Adjust the blue level in the range 50 to 50 RGM R G Matrix Adjust the level in the range 50 to 50 RBM R B Matrix Adjust the level in the range 50 to 50 GRM G R Matrix Adjust the level in the r...

Страница 79: ...h change on the screen Repeat this step to adjust all the items you want to adjust 6 When you finish adjusting all the items in the custom preset select RETURN press the SELECT SET dial and close the...

Страница 80: ...a Custom Preset File Follow steps 1 3 as described in Changing the Custom Preset Settings 79 to open the custom preset editing screen and select the custom preset file you want to protect 1 From the b...

Страница 81: ...and select the filename under which you want to store the file on the memory card Up to 20 custom preset files can be stored on the memory card If you try to save more than 20 custom preset filed one...

Страница 82: ...CUTE and in the confirmation screen select EXECUTE to load the file 6 Close the menu Custom preset files 7 to 9 are predefined settings designed for specific scenes These 3 custom preset files are pro...

Страница 83: ...left select RETURN and press the SELECT SET dial 3 From the bottom bar select TUNE The first item in the list will be highlighted in blue 4 From the list select an item you want to adjust and press th...

Страница 84: ...file currently activated Copying a Custom Function File to the Memory Card 1 Open the menu select CUSTOMIZE and then select the CUSTOM FUNCTION submenu 2 From the column on the left select the custom...

Страница 85: ...as well Custom Function 00 SHCKLSS WB GN WHITE BALANCE OFF OFF OFF GAIN OFF 01 AE RESPONSE MID MID MID 02 HIGH SPEED ZOOM OFF 03 FOCUS RING CTRL 04 BUTTONS OPER MAGN WB SET EXP LOCK PUSH AF 05 RINGS...

Страница 86: ...Response AE RESPONSE Selects the camcorder s response when you change the automatic exposure setting Setting Options 00 MIDDLE 01 HIGH 02 LOW Custom Function 00 SHCKLSS WB GN WHITE BALANCE OFF GAIN OF...

Страница 87: ...ECTION Rings Direction Changes the direction of the adjustment when turning the camcorder s rings Zoom ring NORMAL turn up for wide angle W REVERSE turn down for wide angle W Focus ring NORMAL turn up...

Страница 88: ...ting Options 00 OFF 01 ON 02 ON CP DATA MARKER LEVEL Markers Intensity Level Selects the intensity of the markers displayed on the screen between 40 gray and 100 white F AST BW MOD Focus Assist Functi...

Страница 89: ...when receiving a command from the wireless controller Setting Options 00 ON 01 BLINK 02 OFF LED LED Indicators Selects the operation of the LED indicators on the camcorder When set to type 1 all LED...

Страница 90: ...Open the menu select CUSTOMIZE and then select CUSTOM DISPLAY The custom display editing screen appears The current settings of the selected custom display file will be shown in the custom display ite...

Страница 91: ...e column on the left select READ FROM CARD 3 Select OK press the SELECT SET dial and close the menu Custom Display Items List The default value for all items is the option assigned to 00 REC PROGRAMS...

Страница 92: ...ng Options 00 OFF 01 NORMAL 02 WARNING TAPE CARD Tape Card Related Displays Setting Options Skin detail Sky detail Color correction 00 OFF OFF OFF 01 ON 02 OFF ON 03 ON 04 OFF OFF ON 05 ON 06 OFF ON 0...

Страница 93: ...plays You can select to display the information regarding the battery pack permanently or only the warning when the battery is almost empty Setting Options 00 OFF 01 NORMAL 02 WARNING WIRELESS REMOTE...

Страница 94: ...94 Location of the Custom Displays 00 03 02 09 11 14 12 01 02 06 04 21 12 19 14 18 10 14 18 07 08 06 05 07 02 08 20 13 12 00 03 16 15 15 14 14 01 02 06 04 21 19 07 08 06 07 05 02 08 16 20 17 02...

Страница 95: ...press the button on the camcorder or the PAUSE button on the wireless controller during normal playback Rewind Playback Fast Forward Playback Press down and hold the or button on the camcorder or the...

Страница 96: ...ack pause Hold the button pressed down to enter the continuous frame advance reverse playback Slow Reverse Slow Forward Plays back at about 1 3 normal speed Press the SLOW button on the wireless contr...

Страница 97: ...rminal COMPONENT OUT Terminal HDV DV Terminal Video Terminals HD LETTERBOX set to OFF 1920x1080 D3 1440x1080 MPEG TS LETTERBOX set to ON SD SDI D1 SD MPEG TS SD in 16 9 LETTERBOX set to OFF 640x480 D1...

Страница 98: ...UP Select COMP OUT select a setting option and close the menu Using the HDV DV Terminal When connecting the camcorder to a monitor TV that supports DV you may need to carry out a procedure on the TV t...

Страница 99: ...t video signal depending on the TV or monitor you connect Open the menu and select SIGNAL SETUP Select COMP OUT select a setting option and close the menu Using the VIDEO Terminal Refer to the connect...

Страница 100: ...ght Output CH2 CH Left Output CH3 Right Output CH4 MIX FIXED Left Output CH1 CH3 Right Output CH2 CH4 Mix balance fixed at 1 1 MIX VAR Left Output CH1 CH3 Right Output CH2 CH4 Mix balance can be adjus...

Страница 101: ...reset to 0 00 00 and the mark appears To cancel press the ZERO SET MEMORY button again 2 After you finish playing back the tape stop and rewind it If the tape counter shows a negative value fast forwa...

Страница 102: ...button to display INDEX SEARCH appears 2 Press the or button to begin searching Press more than once to search for further index signals up to 10 times Press the STOP button to stop searching Playbac...

Страница 103: ...s the or button to begin searching Press more than once to search for further date changes up to 10 times Press the STOP button to stop searching A recording of longer than a minute per date time zone...

Страница 104: ...isplaying the Data Code Press the DATA CODE button on the wireless controller The data code will not appear the next time you turn on the camcorder Six Second Auto Date The date and time appear for 6...

Страница 105: ...ge the wireless controller to mode 2 Press the ZOOM W button and keep it pressed for over 2 seconds to change the wireless controller to mode 1 If you have set the camcorder to mode 1 press the ZOOM W...

Страница 106: ...utton to stop recording 9 Connected device Stop playback HDV DV In When recording from an external digital device you can select the time code to be used for the recording made with this camcorder Sel...

Страница 107: ...TECTED PLAYBACK IS RESTRICTED appears and you will not be able to view the contents of the tape If you attempt to record from such tape via the DV terminal COPYRIGHT PROTECTED DUBBING RESTRICTED appea...

Страница 108: ...rk properly e g signals that include copyright protection signals or anomalous signals such as ghost signals For normal use set AV DV to OFF If it is set to ON digital signals cannot be input via the...

Страница 109: ...persist disconnect the cable turn both the camcorder and the computer off and the on again and reconnect them Make sure that the computer video capturing system is compatible with the video signal sta...

Страница 110: ...still images that can be recorded will decrease if you store custom preset files on the card MENU 25 RECORDING SETUP IMG QUALITY FINE Recording still images in mode Simultaneous recording of a still i...

Страница 111: ...umber will be reset each time a new memory card is inserted If the memory card already contains image files the consecutive file number will be assigned CONTINUOUS The camcorder memorizes the file num...

Страница 112: ...adjust the focus Exposure is locked When you press the PHOTO button on the wireless controller recording starts immediately 3 Press the PHOTO button fully The symbol disappears The CARD access indica...

Страница 113: ...lly powered off in order to resume recording press the STANDBY button or turn the dial to OFF and then back to a recording mode Recording a Still Image on a Memory Card While Recording Movies on a Tap...

Страница 114: ...cates the quality and size currently selected for recording still images Remaining Card Capacity for Still Images flashing in red No card in green 6 or more images in yellow 1 to 5 images in red No mo...

Страница 115: ...figures are approximate and vary with the recording conditions and subjects Sufficient space on the memory card is required The continuous shooting will stop when the card is full Continuous Shooting...

Страница 116: ...116 Auto Exposure Bracketing Press the PHOTO button Three still images in different exposures are recorded to the memory card Make sure that there is sufficient space on the memory card...

Страница 117: ...er of the screen EVALUATIVE Appropriate for standard shooting conditions including backlit scenes The camcorder divides images into several zones for light metering It evaluates the position and brigh...

Страница 118: ...indicator will flash in white Once charged the indicator will stay on in green If the indicator keeps flashing in white for a long time replace the flash s batteries 2 Press the PHOTO button to record...

Страница 119: ...still image is displayed as long as you hold the PHOTO button after recording The still image operations menu appears when you press the SELECT SET dial while you are reviewing a still image or when y...

Страница 120: ...ames have been changed may not be played back correctly Do not turn off the camcorder change the position of the card tape switch or the dial open the memory card cover or remove the memory card while...

Страница 121: ...mage is displayed Image Jump Function You can locate images without displaying them one by one The number in the upper right of the screen indicates the image number of the current image out of the to...

Страница 122: ...erase 2 Press the SELECT SET dial to open the still image operations menu In mode the menu appears when you press the SELECT SET dial while you are reviewing a still image or if you press the SELECT...

Страница 123: ...g a still image or if you press the SELECT SET dial immediately after recording an image 3 Select PROTECT 4 Select ON appears and now the image cannot be erased To remove the protection select OFF ins...

Страница 124: ...We recommend using the COMPL INIT option when you feel that the time it takes to record an image on or read an image from the memory card has become too long Depending on the memory card the complete...

Страница 125: ...appears on the image To cancel the print order set the number of copies to 0 5 Select CLOSE to close the menu Selecting in Index Screen Display 1 Move the zoom lever toward W Up to 6 images appear Sel...

Страница 126: ...Aperture setting in Av mode Aperture shutter speed setting in Manual mode Custom white balance Exposure lock Returns to off Aperture shutter speed setting during exposure lock Reset MENU settings MEN...

Страница 127: ...SDI SPEC AUTO SD LOCKED 97 CAMERA SETUP 24F MODE SEL 2 3 2 3 3 2 41 AE SHIFT 2 0 1 5 1 25 1 0 0 75 0 5 0 25 0 0 25 0 5 0 75 1 0 1 25 1 5 2 0 59 GAIN SETTING GAIN L 3dB 0dB 3dB 6dB 12dB 18dB 36dB 60 GA...

Страница 128: ...DEUTSCH ENGLISH ESPA OL FRAN AIS ITALIANO POLSKI 75 MARKERS OFF LEVEL MARK CENT MARK GRID 30 ASPECT GUIDE OFF 4 3 13 9 14 9 1 66 1 1 75 1 1 85 1 2 35 1 30 SAFETY ZONE OFF 80 90 30 ZEBRA ON OFF 64 ZEBR...

Страница 129: ...UTO LOW MIDDLE HIGH BLACK STRETCH MIDDLE PRESS MASTER PED 9 9 SETUP LEVEL 9 9 SHARPNESS 9 9 H DTL FREQ LOW MIDDLE HIGH DTL HV BALANCE 9 9 CORING 9 9 NR1 OFF LOW MIDDLE HIGH NR2 OFF LOW MIDDLE HIGH COL...

Страница 130: ...01 SLOW BUTTONS OPER 00 15 RINGS DIRECTION 00 07 DIALS DIRECTION 00 03 FOCUS PRIORITY 00 OFF 01 ON SIMULT IMG REC 00 02 MARKER LEVEL 00 07 F AST BW MOD 00 03 OBJ DST UNIT 00 meter 01 ft ZOOM INDICATOR...

Страница 131: ...01 FOCUS 00 02 01 ND 00 OFF 01 ON IMAGE EFFECTS 00 07 F ASSIST FUNC 00 03 CUSTOMIZE 00 03 RECORDING STD 00 OFF 01 ON DV REC MODE 00 OFF 01 ON FRAME RATE 00 OFF 01 ON TAPE 00 07 03 TAPE REMAINDER 00 0...

Страница 132: ...EC RUN PS FREE RUN1 42 START VALUE SET RESET 42 HDV DV IN REGEN COPY 106 PLAYBACK STD AUTO HDV DV 95 COMP OUT 480i 1080i 480i 98 SDI OUTPUT ON OFF 97 SDI SPEC AUTO SD LOCKED 97 AV DV ON OFF 108 HD DOW...

Страница 133: ...LEVEL ON OFF 49 LANGUAGE DEUTSCH ENGLISH ESPA OL FRAN AIS ITALIANO POLSKI 75 CUSTOM KEY ON OFF 70 DATA CODE DATE TIME DATE TIME CAMERA DATA CAM D T 104 6 SEC DATE ON OFF 104 UB DISPLAY ON OFF 46 SYST...

Страница 134: ...H SPEED ZOOM 00 OFF 01 ON FOCUS RING CTRL 00 NORMAL 01 SLOW BUTTONS OPER 00 15 RINGS DIRECTION 00 07 DIALS DIRECTION 00 03 FOCUS PRIORITY 00 OFF 01 ON SIMULT IMG REC 00 02 MARKER LEVEL 00 07 F AST BW...

Страница 135: ...35 IMG STAB ON OFF 51 SKIN DETAIL EFFECT LEVEL OFF LOW MIDDLE HIGH 67 HUE CHROMA AREA Y LEVEL SKY DETAIL SOFT OFF 68 COLOR CORR CORRECT OFF A B A B 65 A AREA SEL COLOR PHASE CHROMA AREA Y LEVEL A ARE...

Страница 136: ...75 MARKERS OFF LEVEL MARK CENT MARK GRID 30 ZEBRA ON OFF 64 ZEBRA LEVEL 70 75 80 85 90 95 100 64 TV SCREEN ON OFF 90 GUIDE INFO OFF CUSTOM KEYS D T DISPLAY 29 SYSTEM SETUP CUSTOM KEY 1 ZEBRA TV SCREEN...

Страница 137: ...NE RENAME PROTECT RESET Setting Items KNEE AUTO LOW MIDDLE HIGH BLACK STRETCH MIDDLE PRESS SHARPNESS 9 9 H DTL FREQ LOW MIDDLE HIGH DTL HV BALANCE 9 9 CORING 9 9 COLOR GAIN 50 50 COLOR PHASE 9 9 R GAI...

Страница 138: ...ONS OPER 00 15 RINGS DIRECTION 00 07 DIALS DIRECTION 00 03 FOCUS PRIORITY 00 OFF 01 ON SIMULT IMG REC 00 02 MARKER LEVEL 00 07 F AST BW MOD 00 03 OBJ DST UNIT 00 meter 01 ft ZOOM INDICATOR 00 BAR 01 N...

Страница 139: ...02 01 ND 00 OFF 01 ON IMAGE EFFECTS 00 07 F ASSIST FUNC 00 03 CUSTOMIZE 00 03 RECORDING STD 00 OFF 01 ON DV REC MODE 00 OFF 01 ON FRAME RATE 00 OFF 01 ON TAPE 00 07 03 TAPE REMAINDER 00 02 TAPE CARD...

Страница 140: ...COPIES 125 SLIDESHOW CANCEL START 120 DISPLAY SETUP CVF SETUP BRIGHTNESS 18 CONTRAST COLOR SHARPNESS BACKLIGHT BRIGHT NORMAL LCD SETUP BRIGHTNESS 19 CONTRAST COLOR SHARPNESS BACKLIGHT BRIGHT NORMAL C...

Страница 141: ...86 SHCKLSS WB GN 00 03 AE RESPONSE 00 02 HIGH SPEED ZOOM 00 OFF 01 ON FOCUS RING CTRL 00 NORMAL 01 SLOW BUTTONS OPER 00 15 RINGS DIRECTION 00 07 DIALS DIRECTION 00 03 FOCUS PRIORITY 00 OFF 01 ON SIMU...

Страница 142: ...7 Exposure lock 58 AE shift 59 Sky detail 68 White balance 62 Skin detail 67 Custom preset 76 Manual focus 36 Custom function 83 Color correction 65 Peaking 37 Custom keys 70 Date and time 26 Gain 60...

Страница 143: ...orward playback rewind playback 2 playback 1 playback Frame advance playback User bit 46 Audio level indicator 49 Custom function 83 Image protected 123 Custom preset data embedded with the still imag...

Страница 144: ...4 Side panel Time code Tape has reached the end Remaining battery charge Genlock Audio level indicator Time code setting Video output signal from the HD SD SDI Terminal Time code synchronization setti...

Страница 145: ...recording playback CARD FULL No remaining capacity on the memory card Replace with another card or erase images NAMING ERROR The folder and file numbers have reached their maximum value UNIDENTIFIABLE...

Страница 146: ...d by lighting equipment Do not disassemble the camcorder If the camcorder does not function properly consult qualified service personnel Handle the camcorder with care Do not subject the camcorder to...

Страница 147: ...r sound stops momentarily about 0 5 seconds the video heads need to be cleaned To maintain the best picture quality we recommend cleaning the video heads frequently with the Canon DVM CL Digital Video...

Страница 148: ...ON HAS BEEN DETECTED appears for approx 4 seconds and starts flashing If a cassette is loaded the warning message CONDENSATION HAS BEEN DETECTED REMOVE THE CASSETTE appears and starts flashing Remove...

Страница 149: ...rm these precautions at the same time for all battery packs Although the battery pack s operating temperature range is from 0 C to 40 C 32 F to 104 F the optimal range is from 10 C to 30 C 50 F to 86...

Страница 150: ...emory disc to a computer use a commercially available card reader or PC PCMCIA memory card adapter Initialize new memory cards with the camcorder Memory cards initialized with other devices such as a...

Страница 151: ...on a TV Screen You can only play back your recordings on TVs with NTSC system The NTSC system is used in the following countries areas American Samoa Antigua Aruba Bahamas Barbados Bermuda Bolivia Ca...

Страница 152: ...T button with a pointed item Pressing the RESET button resets all settings Problem Cause Solution The dial is not in the OFF position but the POWER indicator is off The LED indicators option in the cu...

Страница 153: ...start playback Camcorder is turned off or is not set to mode Set the camcorder to mode 95 Cassette is not loaded Load a cassette 23 Tape is running but image will not appear on the TV screen Video he...

Страница 154: ...1100 Shoulder Strap DC 920 DC Coupler BP 930 BP 945 BP 950G BP 970G Battery Pack CB 920 Car Battery Adapter CA 920 Compact Power Adapter CH 910 Dual Battery Charger Holder BP 930 BP 945 BP 950G BP 97...

Страница 155: ...HC 4200 System Case A solid lockable case that provides safe and stylish protection for the camcorder during transportation and storage TA 100 Tripod Adapter The TA 100 allows you to quickly mount un...

Страница 156: ...e ZR 2000 is connected to the LANC terminal of a Canon camcorder it is possible to control functions such as the start and stop of recording the zoom and the focus functions while reviewing the pictur...

Страница 157: ...30 000 Adapter holder D82 0780 000 DTC 1000 Component Video Cable D82 0820 000 BP 970G Battery Pack 0972B002AA CB 920 Car Battery Adapter 8034A002AA CH 910 Dual Battery Charger Holder 3036A002AA ZR 20...

Страница 158: ...74 ips LP 12 56 mm s 0 49 ips Maximum Recording Time 60 min cassette 60 min SP 60 min LP 90 min Fast Forward Rewind Time Approx 2 min 20 sec with a 60 min cassette Viewfinder 0 57 in wide 16 9 aspect...

Страница 159: ...3 5 dBV 16 ohm load 50 ohms LANC Terminal 2 5 mm stereo mini jack GENLOCK Terminal BNC jack input 1 Vp p 75 ohms TIME CODE Terminal BNC jack input 0 5 V 18 Vp p 10 kohms output 1 Vp p 75 ohms HD SD SD...

Страница 160: ...me code 42 DV control 74 E Easy recording recording program 52 End search 32 Erasing still images 122 Error messages 145 Exposure 58 External synchronizations 44 External video analog line in 106 Exte...

Страница 161: ...level 77 Sharpness 77 Shoulder strap 20 Shutter speed 55 Signal standard 31 Simultaneous recording tape memory card 113 Skin detail 67 Sky detail 68 Slideshow 120 Specifications 158 Spotlight recordi...

Страница 162: ...ustom keys 1 Can only be assigned to Custom Key 2 2 This function can only be operated with a custom key Index write can also be operated with the wireless controller CUSTOM KEY 1 TIME CODE TV SCREEN...

Страница 163: ...R INABILITY TO USE THE DV CAMCORDER REGARDLESS OF THE LEGAL THEORY ON WHICH THE CLAIM IS BASED AND EVEN IF CUSA HAS BEEN ADVISED OF THE POSSIBILITY OF SUCH DAMAGES NOR SHALL RECOVERY OF ANY KIND AGAIN...

Страница 164: ...Liesse Quebec H4T 1V7 z If you have any questions call the Canon Canada Information Center toll free at 1 800 828 4040 Canada only z Si vous avez des questions veuillez t l phoner sans frais au Canad...

Отзывы: