Canon 8747B002 Скачать руководство пользователя страница 83

Examining the Nozzle Check Pattern

Examine the nozzle check pattern, and clean the print head if necessary.

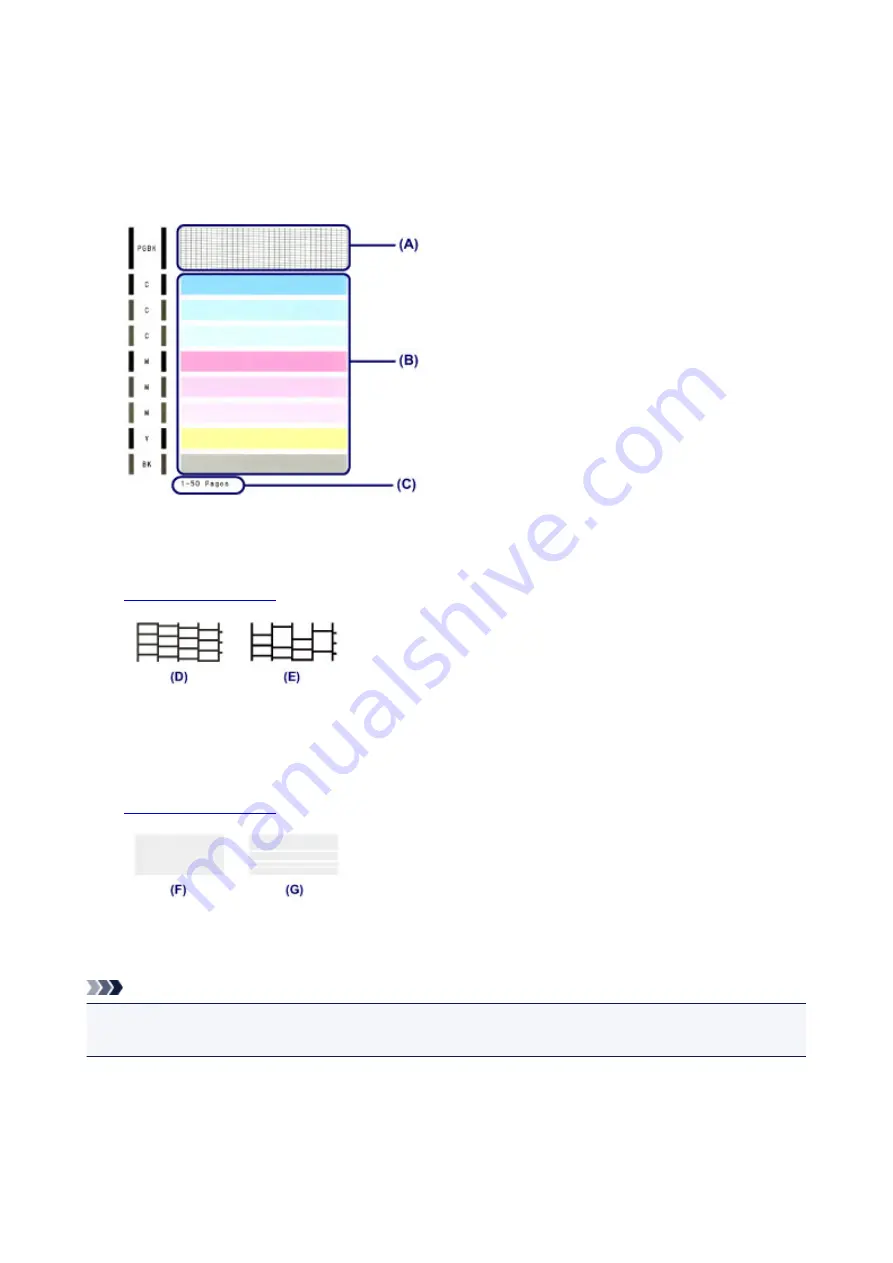
1. Check if there are missing lines in the pattern (A) or horizontal white streaks in the pattern

(B).

(C) Number of sheets printed so far

If there are missing lines in the pattern (A):

Cleaning the print head

 is required.

(D) Good
(E) Bad (lines are missing)

If there are horizontal white streaks in the pattern (B):

Cleaning the print head

 is required.

(F) Good
(G) Bad (horizontal white streaks are present)

Note

• The total number of sheets printed so far is shown in increments of 50 sheets on the printout of the

nozzle check pattern.

83

This manual downloaded from http://www.manualowl.com

Содержание 8747B002

Страница 1: ...iX6800 series Online Manual Read Me First Useful Functions Available on the Printer Overview of the Printer English This manual downloaded from http www manualowl com...

Страница 2: ...ud Print 22 Using Remote UI 24 Printing from AirPrint Compliant Device 27 Overview of the Printer 32 Safety Guide 33 Safety Precautions 34 Regulatory and Safety Information 35 Main Components and Basi...

Страница 3: ...rint Heads from Your Computer 87 Cleaning the Paper Feed Rollers from Your Computer 89 Aligning the Print Head 90 Aligning the Print Head Position from Your Computer 91 Aligning the Print Head Positio...

Страница 4: ...Changing the Settings in the Admin Password Sheet 134 Monitoring Wireless Network Status 135 Initializing the Network Settings of the Machine 138 Viewing the Modified Settings 139 Screens for Network...

Страница 5: ...bout Technical Terms 180 Restrictions 186 About Firewall 187 Tips for Ensuring Optimal Printing Quality 188 Useful Information about Ink 189 Key Points to Successful Printing 191 Be Sure to Make Paper...

Страница 6: ...me of its initial sale This guide does not disclose the manuals of all the products sold by Canon See the manual supplied with the product when using a product that is not described in this guide How...

Страница 7: ...ructions including important information To avoid damage and injury or improper use of the product be sure to read these indications Note Instructions including notes for operation and additional expl...

Страница 8: ...irPrint and the AirPrint logo are trademarks of Apple Inc IOS is a trademark or registered trademark of Cisco in the U S and other countries and is used under license Google Cloud Print Google Chrome...

Страница 9: ...y Searching for Functions Enter your product s model name and a keyword for the function you want to learn about Example When you want to learn how to load paper Enter your product s model name load p...

Страница 10: ...m a search Searching for Reference Pages Enter your model name and a reference page title You can find reference pages more easily by entering the function name as well Example When you want to browse...

Страница 11: ...ion Explanations In this guide most of the operations are described based on the windows displayed when Windows 8 operating system called Windows 8 below is used 11 This manual downloaded from http ww...

Страница 12: ...ul Functions Available Through the Network You can print more conveniently through integration with smartphones and other devices or with services on the web Useful Functions Available from Applicatio...

Страница 13: ...le and events to photos You can organize photos easily as you can display them not only by folder but also by calendar event and person This also allows you to find the target photos easily when you s...

Страница 14: ...e placed automatically according to the theme Other Various Functions My Image Garden has many other useful functions Refer to What You Can Do with My Image Garden for details Download a Variety of Co...

Страница 15: ...re that genuine Canon ink tanks ink cartridges are installed for all colors on a supported printer Note The designs of PREMIUM Contents provided in this page are subject to change without prior notice...

Страница 16: ...e provided by Google Inc By using Google Cloud Print you can print from anywhere with applications or services supporting Google Cloud Print Refer to Printing with Google Cloud Print for details Print...

Страница 17: ...ng Solutions can be downloaded from App Store and Google Play Printing with Windows RT When you use Windows RT printing is easy because you simply connect this machine to the network For information a...

Страница 18: ...gle Cloud Print 1 Preparations for Printing with Google Cloud Print 2 Printing from Computer or Smartphone with Google Cloud Print Important LAN connection with the machine and Internet connection are...

Страница 19: ...rior notice Registering the Machine with Google Cloud Print Register the machine with Google Cloud Print The authentication procedure using the web browser on the computer or the mobile device is requ...

Страница 20: ...ing the web browser on the computer or the mobile device and perform the authentication process following the on screen instructions Note Perform the authentication process with your Google account wh...

Страница 21: ...nt to re register the machine delete the machine from Google Cloud Print by following the steps below 1 Make sure that the machine is turned on If your printer has a LCD monitor 2 Display the Home scr...

Страница 22: ...oogle Cloud Print When the preparation for printing with Google Cloud Print is complete and when the machine is turned on the machine receives the print data and prints it automatically Note Depending...

Страница 23: ...ately When the machine cannot receive the print data or you want to start printing immediately you can check whether there is a print job on the Google Cloud Print and start printing manually Follow t...

Страница 24: ...to the LAN and the LAN environment is connected to the Internet Note that the customer is responsible for paying all Internet connection fees 1 Check that the machine has been turned on If your printe...

Страница 25: ...device open the Web browser and enter the following URL http Printer IP address For Printer IP address enter the IP address that you checked in Checking the printer IP address 2 Remote UI startup The...

Страница 26: ...allows you to register this machine to Google Cloud Print or delete the machine Firmware update This function allows you to update the firmware and check version information Manual Online This functi...

Страница 27: ...AirPrint Operation Environment To use AirPrint you will need one of the following Apple devices running the latest version of iOS iPad all models iPhone 3GS or later iPod touch 3rd generation or late...

Страница 28: ...pp does not let you use printer options you cannot print from that app Note The printer options differ depending on the app and model you are using Normally when you tap Print and select a model name...

Страница 29: ...per Size With AirPrint the paper size is selected automatically according to the app being used on the Apple device and the region in which AirPrint is used When Apple s photo app is used the default...

Страница 30: ...does not print check the following 1 Check that the machine power is on If the machine power is on turn it off and then back on again and check whether the issue is resolved 2 Check that the machine i...

Страница 31: ...he machine is connected to the wireless LAN and then try printing If Bonjour on the machine is disabled AirPrint cannot be used Check the LAN settings on the machine and enable Bonjour Note The window...

Страница 32: ...ettings Information about Network Connection Useful Information about Network Connection About Network Communication Changing and Confirming Network Settings Screens for Network Connection of IJ Netwo...

Страница 33: ...Safety Guide Safety Precautions Regulatory and Safety Information 33 This manual downloaded from http www manualowl com...

Страница 34: ...not place any object on the machine Especially do not place metal objects paper clips staples etc or containers of flammable solvents alcohol thinners etc on top of the machine Do not transport or use...

Страница 35: ...off and on the user is encouraged to try to correct the interference by one or more of the following measures Reorient or relocate the receiving antenna Increase the separation between the equipment a...

Страница 36: ...quipement doit tre install et utilis en gardant une distance de 20 cm ou plus entre le dispositif rayonnant et le corps l exception des extr mit s mains poignets pieds et chevilles Users in Jordan Thi...

Страница 37: ...device is used This product is designed and set in a way to allow you to reduce your electricity costs After the last print it switches to Ready Mode In this mode it can print again immediately if re...

Страница 38: ...38 This manual downloaded from http www manualowl com...

Страница 39: ...Main Components and Basic Operations Main Components About the Power Supply of the Printer 39 This manual downloaded from http www manualowl com...

Страница 40: ...Main Components Front View Rear View Inside View 40 This manual downloaded from http www manualowl com...

Страница 41: ...same size and type of paper can be loaded at the same time and fed automatically one sheet at a time Loading Plain Paper Photo Paper Loading Envelopes 4 paper guides Align with both sides of the pape...

Страница 42: ...nt or printing is in progress Alarm lamp flashes orange An error has occurred and the printer is not ready to print POWER lamp flashes white and Alarm lamp flashes orange alternately An error that req...

Страница 43: ...USB port Plug in the USB cable to connect the printer with a computer 3 power cord connector Plug in the supplied power cord Important Do not touch the metal casing Do not plug in or unplug the USB c...

Страница 44: ...o indicate the ink tank status Checking the Ink Status with the Ink Lamps 2 print head holder The print head is pre installed Note For details on replacing an ink tank see Replacing an Ink Tank 44 Thi...

Страница 45: ...r Supply of the Printer Confirming that the Power Is On Turning the Printer On and Off Notice for the Power Plug Power Cord Notice for Unplugging the Power Cord 45 This manual downloaded from http www...

Страница 46: ...wer Is On The POWER lamp is lit white when the printer is turned on Note It may take a while for the printer to start printing immediately after you turn on the printer 46 This manual downloaded from...

Страница 47: ...print operation is performed from a computer connected by USB cable or network This feature is set to off by default Managing the Printer Power Turning off the printer 1 Press the ON button to turn of...

Страница 48: ...Managing the Printer Power 48 This manual downloaded from http www manualowl com...

Страница 49: ...lug power cord is rusty The power plug power cord is bent The power plug power cord is worn The power plug power cord is split Caution If you find anything unusual with the power plug power cord descr...

Страница 50: ...ugging the power cord while the POWER lamp is lit or flashing white may cause drying or clogging of the print head and print quality may be reduced 1 Press the ON button to turn the printer off 2 Conf...

Страница 51: ...Loading Paper Loading Paper 51 This manual downloaded from http www manualowl com...

Страница 52: ...Loading Paper Loading Plain Paper Photo Paper Loading Envelopes Media Types You Can Use Media Types You Cannot Use Printing Area 52 This manual downloaded from http www manualowl com...

Страница 53: ...s of paper neatly before loading Loading paper without aligning the edges may cause paper jams If paper is curled hold the curled corners and gently bend them in the opposite direction until the paper...

Страница 54: ...them with both sides of the paper stack Do not slide the paper guides too hard The paper may not be fed properly Important Always load paper in the portrait orientation B Loading paper in the landscap...

Страница 55: ...Note After loading paper select the size and type of the loaded paper on the print settings screen of the printer driver 55 This manual downloaded from http www manualowl com...

Страница 56: ...ners and edges of the envelopes to flatten them If the envelopes are curled hold the opposite corners and gently twist them in the opposite direction If the corner of the envelope flap is folded flatt...

Страница 57: ...he envelope will be faced up on the left side Up to 10 envelopes can be loaded at once 5 Slide the paper guides A to align them with both sides of the envelopes Do not slide the paper guides too hard...

Страница 58: ...opes higher than the load limit mark D Note After loading envelopes select the size and type of the loaded envelopes on the print settings screen of the printer driver 58 This manual downloaded from h...

Страница 59: ...ch Canon genuine paper access our website Note You may not be able to purchase some Canon genuine papers depending on the country or region of purchase Paper is not sold in the US by Model Number Purc...

Страница 60: ...ight You can use paper in the following weight range 17 to 28 lb 64 to 105 g m2 except for Canon genuine paper Do not use heavier or lighter paper except for Canon genuine paper as it could jam in the...

Страница 61: ...Paper Everyday Use GP 501 GP 601 3 1 sheet A3 10 sheets A4 and Letter 20 sheets 4 x 6 10 x 15 cm Photo Paper Glossy GP 601 3 1 sheet A3 10 sheets A4 and Letter 20 sheets 4 x 6 10 x 15 cm Photo Paper...

Страница 62: ...ng on the type of paper or environmental conditions either very high or low temperature or humidity In such cases reduce the number of paper you load at a time to less than half 2 We recommend that yo...

Страница 63: ...n genuine paper Paper thinner than a postcard including plain paper or notepad paper cut to a small size when printing on paper smaller than A5 Picture postcards Postcards affixed with photos or stick...

Страница 64: ...Printing Area Printing Area Other Sizes than Letter Legal Envelopes Letter Legal Envelopes 64 This manual downloaded from http www manualowl com...

Страница 65: ...ng use the following paper Photo Paper Pro Platinum PT 101 Glossy Photo Paper Everyday Use GP 501 GP 601 Photo Paper Glossy GP 601 Photo Paper Plus Glossy II PP 201 Photo Paper Pro Luster LU 101 Photo...

Страница 66: ...x 356 0 mm 4 x 6 10 x 15 cm 3 73 x 5 69 inches 94 8 x 144 4 mm 5 x 7 13 x 18 cm 4 73 x 6 69 inches 120 2 x 169 8 mm 8 x 10 20 x 25 cm 7 73 x 9 69 inches 196 4 x 246 0 mm 10 x 12 25 x 30 cm 9 73 x 11 6...

Страница 67: ...203 2 x 271 4 mm Legal 8 00 x 13 69 inches 203 2 x 347 6 mm Recommended printing area A 1 59 inches 40 4 mm B 1 47 inches 37 4 mm Printable area C 0 12 inch 3 0 mm D 0 20 inch 5 0 mm E 0 25 inch 6 4 m...

Страница 68: ...Envelope DL 3 88 x 7 06 inches 98 8 x 179 6 mm Envelope Com 10 3 68 x 7 90 inches 93 5 x 200 9 mm Recommended printing area A 0 12 inch 3 0 mm B 1 47 inches 37 4 mm C 0 22 inch 5 6 mm D 0 22 inch 5 6...

Страница 69: ...Replacing an Ink Tank Replacing an Ink Tank Checking the Ink Status 69 This manual downloaded from http www manualowl com...

Страница 70: ...printer will not be able to inform you when to replace the ink tank properly Once an ink tank has been installed do not remove it from the printer and leave it out in the open This will cause the ink...

Страница 71: ...t head holder moves to the right In this case close and reopen the top cover 3 Remove the ink tank with the lamp flashing fast Push the tab A and lift the ink tank to remove Important Do not touch oth...

Страница 72: ...rtant Handle an ink tank carefully Do not drop or apply excessive pressure to it If the orange tape remains on the Y shape air hole B ink may splash or the printer may not print properly 2 Hold the in...

Страница 73: ...g to the local laws and regulations regarding disposal of consumables 5 Install the new ink tank 1 Insert the front end of the ink tank into the print head at a slant Make sure that the position of th...

Страница 74: ...es orange after the top cover is closed take appropriate action If an Error Occurs When you start printing after replacing the ink tank the printer starts cleaning the print head automatically Do not...

Страница 75: ...he Ink Status Checking the Ink Status with the Ink Lamps You can also check the ink status on the computer screen Checking the Ink Status from Your Computer 75 This manual downloaded from http www man...

Страница 76: ...cause blurred print results or horizontal white streaks Flashing fast at around 1 second intervals Repeats The ink tank is installed in the wrong position Or The ink has run out Make sure that the in...

Страница 77: ...ink lamp is still off after reinstalling the ink tank there has been an error and the printer cannot print Check the Alarm lamp on the printer If an Error Occurs Note You can also check the ink statu...

Страница 78: ...Maintenance When Printing Becomes Faint or Colors Are Incorrect Performing Maintenance from a Computer Cleaning the Printer 78 This manual downloaded from http www manualowl com...

Страница 79: ...Faint or Colors Are Incorrect Maintenance Procedure Printing the Nozzle Check Pattern Examining the Nozzle Check Pattern Cleaning the Print Head Aligning the Print Head 79 This manual downloaded from...

Страница 80: ...s flashing or off take appropriate action Checking the Ink Status with the Ink Lamps Increasing the print quality in the printer driver settings may improve the print result Changing the Print Quality...

Страница 81: ...ave performed the procedure until step 4 and the problem has not been resolved turn off the power and clean the print head deeply again after 24 hours If the problem is still not resolved the print he...

Страница 82: ...in paper 1 Make sure that the power is turned on 2 Load a sheet of A4 or Letter sized plain paper in the rear tray 3 Open the front cover gently then pull out the paper output tray 4 Hold down the RES...

Страница 83: ...r If there are missing lines in the pattern A Cleaning the print head is required D Good E Bad lines are missing If there are horizontal white streaks in the pattern B Cleaning the print head is requi...

Страница 84: ...flashes white once then release it immediately The printer starts cleaning the print head The cleaning will be complete when the POWER lamp lights white after flashing Do not perform any other operati...

Страница 85: ...paper output tray 4 Hold down the RESUME CANCEL button until the POWER lamp flashes white four times then release it immediately The print head alignment sheet will be printed and the print head posit...

Страница 86: ...ur Computer Cleaning the Paper Feed Rollers from Your Computer Aligning the Print Head Aligning the Print Head Position from Your Computer Use Your Computer to Print a Nozzle Check Pattern Cleaning In...

Страница 87: ...is on and then click Execute Print head cleaning starts 4 Complete cleaning The Nozzle Check dialog box opens after the confirmation message 5 Check the results To check whether the print quality has...

Страница 88: ...ty has improved click Print Check Pattern To cancel the check process click Cancel Important Deep Cleaning consumes a larger amount of ink than Cleaning Cleaning the print head frequently will rapidly...

Страница 89: ...he rear tray 2 Open the printer driver setup window 3 Click Roller Cleaning on the Maintenance tab The confirmation message appears 4 Execute paper feed roller cleaning Make sure that the printer is o...

Страница 90: ...rrected and conditions such as color and line streaking are improved If the print results appear uneven because of line shifts or other conditions adjust the position of the print head On this printer...

Страница 91: ...ow 2 Click Print Head Alignment on the Maintenance tab The Start Print Head Alignment dialog box opens 3 Load paper in the printer Load one sheet of A4 size or Letter size plain paper into the rear tr...

Страница 92: ...is off or if communication between the printer and the computer is disabled an error message may appear because the computer cannot collect the printer status If this happens click OK to display the m...

Страница 93: ...aks If it is difficult to pick the best pattern pick the setting that produces the least noticeable horizontal streaks A Least noticeable horizontal streaks B Most noticeable horizontal streaks 9 Conf...

Страница 94: ...d message and click OK The third pattern is printed Important Do not open the top cover while printing is in progress 12 Check the printed pattern Enter the numbers of the patterns with the least noti...

Страница 95: ...setting that produces the least noticeable horizontal stripes A Least noticeable horizontal stripes B Most noticeable horizontal stripes Note To print and check the current setting open the Start Prin...

Страница 96: ...that you need to check before printing the nozzle check pattern 3 Load paper in the printer Load one sheet of A4 size or Letter size plain paper into the rear tray 4 Print a nozzle check pattern Make...

Страница 97: ...the printer driver setup window 2 Click Bottom Plate Cleaning on the Maintenance tab The Bottom Plate Cleaning dialog box opens 3 Load paper in the printer As instructed in the dialog box fold the A4...

Страница 98: ...rior of the Printer Cleaning the Inside of the Printer Bottom Plate Cleaning You can also clean the paper feed roller from a computer Cleaning the Paper Feed Rollers from Your Computer 98 This manual...

Страница 99: ...er Do not use tissue paper paper towels rough textured cloth or similar materials for cleaning so as not to scratch the surface Paper tissue powder or fine threads may remain inside the printer and ca...

Страница 100: ...ing you 3 Open the front cover gently then pull out the paper output tray 3 Hold down the RESUME CANCEL button until the POWER lamp flashes white five times then release it immediately The paper clean...

Страница 101: ...101 This manual downloaded from http www manualowl com...

Страница 102: ...Changing the Printer Settings Changing Printer Settings from Your Computer Initializing the Printer Settings 102 This manual downloaded from http www manualowl com...

Страница 103: ...our Computer Changing the Print Options Registering a Frequently Used Printing Profile Managing the Printer Power Reducing the Printer Noise Changing the Printer Operation Mode 103 This manual downloa...

Страница 104: ...ure for changing the print options is as follows 1 Open the printer driver setup window 2 Click Print Options on the Page Setup tab The Print Options dialog box opens Note When you use the XPS printer...

Страница 105: ...n the Quick Setup tab select the printing profile to be used and if necessary change the settings after Additional Features You can also register necessary items on the Main and Page Setup tabs 3 Clic...

Страница 106: ...If a profile is deleted register the print settings again Deleting Unnecessary Printing Profile 1 Select the printing profile to be deleted Select the printing profile you want to delete from the Comm...

Страница 107: ...off the printer when there are no operations from the printer driver or the printer for a specified period of time 1 Open the printer driver setup window 2 Make sure that the printer is on and then cl...

Страница 108: ...te When the printer is turned off the Canon IJ Status Monitor message varies depending on the Auto Power On setting When the setting is Enable Printer is standing by is displayed When the setting is D...

Страница 109: ...ise Always use quiet mode Select this option when you wish to reduce the operating noise of the printer Use quiet mode during specified hours Select this option when you wish to reduce the operating n...

Страница 110: ...Note The effects of the quiet mode may be less depending on the print quality settings 110 This manual downloaded from http www manualowl com...

Страница 111: ...Alignment function on the Maintenance tab is set to automatic head alignment but you can change it to manual head alignment If the printing results of automatic print head alignment are not satisfacto...

Страница 112: ...printer If an error message is displayed even though the same size that was set is loaded clear the check box Ink Drying Wait Time You can set the length of the printer rest time until printing of th...

Страница 113: ...me impossible To use the printer over network perform setup with the Setup CD ROM or perform it according to the instructions on our website To initialize the printer settings press and hold the RESUM...

Страница 114: ...Information about Network Connection Useful Information about Network Connection 114 This manual downloaded from http www manualowl com...

Страница 115: ...ng the Printer to the Computer Using a USB Cable When Detecting the Printers Have the Same Name during Setup Connecting to Other Computer with LAN Changing the Connection Method from USB to LAN Printi...

Страница 116: ...s Auto setup Set printer name XXXXXXXXXXXX Enable disable IPv6 Enable Enable disable WSD WSD settings Enable Timeout setting WSD settings 1 minute Enable disable Bonjour Bonjour settings Enable Servic...

Страница 117: ...to the Computer Using a USB Cable Connect the printer and the computer using a USB cable as the illustration below The USB port is located on the rear of the printer 117 This manual downloaded from h...

Страница 118: ...e same name on the detection result screen Select a printer with checking the MAC address set to the printer against the MAC address on detection result screen To check the MAC address of the printer...

Страница 119: ...perform setup with the Setup CD ROM or perform it according to the instructions on our website Changing the Connection Method from USB to LAN To change the connection method between the printer and th...

Страница 120: ...ive MAC Address MAC Address XX XX XX XX XX XX SSID SSID SSID of the wireless LAN Communication Mode Communication Mode Infrastructure Channel Channel XX 1 to 13 Encryption Method of the Encryption non...

Страница 121: ...gth 1 Subnet Prefix Length XXX IPsec 2 IPsec setting Active Security Protocol 2 Method of the Security Protocol ESP ESP AH AH Wired LAN DRX Discontinuous reception wired LAN Enable Disable Other Setti...

Страница 122: ...sable XX represents alphanumeric characters 1 Only when IPv6 is activated the status of the network is printed 2 Only IPv6 and the IPsec setting are activated the status of the network is printed 122...

Страница 123: ...cation Changing and Confirming Network Settings Screens for Network Connection of IJ Network Tool Other Screens of IJ Network Tool Appendix for Network Communication 123 This manual downloaded from ht...

Страница 124: ...etailed Settings Changing the WPA or WPA2 Detailed Settings Changing the Settings in the Wired LAN Sheet Changing the Settings in the Admin Password Sheet Monitoring Wireless Network Status Initializi...

Страница 125: ...security software to always allow access IJ Network Tool has been verified to work on Windows XP however it does not support Fast User Switching It is recommended to exit IJ Network Tool when switchi...

Страница 126: ...heet 1 Start up IJ Network Tool 2 Select the printer in Printers When the printer is connected to the computer with a USB cable temporarily select the printer with USBnnn where n is a number appearing...

Страница 127: ...e printer was switched make sure that encryption types for the computer and the access point match that set to the printer If you connect to a network that is not protected with security measures ther...

Страница 128: ...ily select the printer with USBnnn where n is a number appearing in the Port Name column 3 Select Configuration from the Settings menu 4 Click the Wireless LAN tab 5 Select Use WEP in Encryption Metho...

Страница 129: ...ually select Open System or Shared Key according to the setting of the access point 7 Click OK Important If the printer cannot communicate with the computer after the encryption type of the printer wa...

Страница 130: ...settings 1 Start up IJ Network Tool 2 Select the printer in Printers When the printer is connected to the computer with a USB cable temporarily select the printer with USBnnn where n is a number appea...

Страница 131: ...point The passphrase should be a string of 8 to 63 alphanumeric characters or a 64 digit hexadecimal value If you do not know the access point passphrase refer to the instruction manual provided with...

Страница 132: ...s switched make sure that encryption types for the computer and the access point match that set to the printer Note Changing the network settings with the USB cable temporarily may switch the default...

Страница 133: ...AN tab The Wired LAN sheet is displayed For details on the Wired LAN sheet see Wired LAN Sheet 5 Change the settings or confirm Set the IP address of the printer to be used over the LAN Specify a valu...

Страница 134: ...firm To use admin password select the Use admin password check box and enter a password Important The password should consist of alphanumeric characters and be no longer than 32 characters The passwor...

Страница 135: ...The Status screen is displayed and you can check the printer status and connection performance Important If the indicated value is low move your printer closer to the wireless network device 4 If you...

Страница 136: ...s Check that there are no sources of radio interference near the printer and the access point The wireless connection may use the same frequency band as microwave ovens and other sources of radio inte...

Страница 137: ...nt then restart the IJ Network Tool to start over the measurement 7 Click Finish Note If any messages appear on Overall Network Performance move the machine and access point as instructed to improve t...

Страница 138: ...Click Initialize 5 When the confirmation screen is displayed click Yes The network settings of the printer is initialized Do not turn off the printer during initialization Click OK when initializatio...

Страница 139: ...is displayed when you modified the printer settings on the Configuration screen When you click Yes on the Confirmation screen the following screen is displayed for confirming the modified settings 13...

Страница 140: ...ication Type Confirmation Screen PSK Passphrase and Dynamic Encryption Setup Screen Setup Information Confirmation Screen Wired LAN Sheet Admin Password Sheet Network Information Screen Access Control...

Страница 141: ...s not displayed Important To change the printer s network settings using IJ Network Tool it must be connected via a LAN If No Driver is displayed for the name associate the port with the printer When...

Страница 142: ...he Canon IJ Network Tool screen 1 File menu Exit Exits IJ Network Tool 2 View menu Status Displays the Status screen to confirm the printer connection status and wireless communication status Status S...

Страница 143: ...Display Warning Automatically Enables or disables automatic display of the instruction screen When this menu is selected the instruction screen is displayed if one or more ports are unavailable for pr...

Страница 144: ...sheet to change the settings The following screen is the example to change the setting on the Wireless LAN sheet Note This screen is not available depending on the printer you are using For details o...

Страница 145: ...is displayed As the initial settings the unique value is displayed Note Enter the same SSID that the access point is configured to use The SSID is case sensitive 3 Search The Search screen is display...

Страница 146: ...etailed Settings 5 Configuration The detailed settings screen is displayed The WEP the WPA or the WPA2 key selected in Encryption Method can be confirmed and changed For details on WEP setting Changin...

Страница 147: ...closing data such as your personal information to a third party Note Signal strength is displayed as follows Good Fair Poor Type of encryption is displayed as follows Blank No encryption WEP WEP is se...

Страница 148: ...etails screen or the WPA2 Details screen appears if the selected access point is encrypted In this case configure the details to use the same encryption settings set to the access point Access points...

Страница 149: ...aracter type that can be entered differ depending on the combination of the key length and key format Key Length 64bit 128bit Key Format ASCII 5 characters 13 characters Hexadecimal Hex 10 digits 26 d...

Страница 150: ...esent settings 1 Authentication Type Displays the type of authentication used for client authentication This machine supports the PSK authentication method 2 Dynamic Encryption Type Displays the dynam...

Страница 151: ...resent settings 1 Authentication Type Displays the type of authentication used for client authentication This machine supports the PSK authentication method 2 Dynamic Encryption Type Displays the dyna...

Страница 152: ...Type of authentication used for client authentication is displayed 1 Authentication Type Type of authentication used for client authentication is displayed PSK This machine supports the PSK authentica...

Страница 153: ...phrase should be a string of 8 to 63 alphanumeric characters or a 64 digit hexadecimal value If you do not know the access point passphrase refer to the instruction manual provided with the access poi...

Страница 154: ...on Screen Note This screen is not available depending on the printer you are using Displays the settings used for client authentication Confirm the settings and click Finish 154 This manual downloaded...

Страница 155: ...ed over the LAN Specify a value appropriate for your network environment Get IP address automatically Select this option to use an IP address automatically assigned by a DHCP server DHCP server functi...

Страница 156: ...Password tab on the Configuration screen 1 Use admin password Set a password for the administrator with privileges to set up and change detailed options To use this feature select this check box and...

Страница 157: ...d the computers To display the Network Information screen select Network Information from the View menu 1 OK Returns to the Canon IJ Network Tool screen 2 Copy All Information All network information...

Страница 158: ...ol Type Select the type of access control with which to limit access of computers or network devices to the printer over a network The setting items may differ depending on the choice of access contro...

Страница 159: ...he Edit Accessible MAC Address screen is displayed to edit the settings selected in Accessible MAC Addresses Edit Accessible MAC Address Screen Add Accessible MAC Address Screen 4 Add The Add Accessib...

Страница 160: ...esses and any comments 3 Edit The Edit Accessible IP Address screen is displayed to edit the settings selected in Accessible IP Addresses Edit Accessible IP Address Screen Add Accessible IP Address Sc...

Страница 161: ...5 Delete Deletes the selected IP address from the list 161 This manual downloaded from http www manualowl com...

Страница 162: ...section refer to the Add Accessible MAC Address Screen 1 MAC Address Enter the MAC address of a computer or a network device to allow access 2 Comment Optionally enter any information to identify the...

Страница 163: ...ressed as four values ranging from 0 to 255 Start IP Address Enter the first IP address in the range of addresses of the computers or network devices to allow access when you selected Range Specificat...

Страница 164: ...IJ Network Tool Screen Status Screen Connection Performance Measurement Screen Maintenance Screen Network Setup of the Card Slot Screen Associate Port Screen Network Information Screen 164 This manual...

Страница 165: ...s not displayed Important To change the printer s network settings using IJ Network Tool it must be connected via a LAN If No Driver is displayed for the name associate the port with the printer When...

Страница 166: ...he Canon IJ Network Tool screen 1 File menu Exit Exits IJ Network Tool 2 View menu Status Displays the Status screen to confirm the printer connection status and wireless communication status Status S...

Страница 167: ...Display Warning Automatically Enables or disables automatic display of the instruction screen When this menu is selected the instruction screen is displayed if one or more ports are unavailable for pr...

Страница 168: ...yed as Available or Unavailable 2 Signal Strength Indicates the strength of the signal received by the printer ranging from 0 to 100 3 Link Quality Indicates the signal quality excluding the noise whi...

Страница 169: ...ement Connection Performance Measurement Screen Initial Screen Connection Performance Measurement Screen Completion Screen Connection Performance Measurement Screen Initial Screen Click Next to start...

Страница 170: ...point Good connection performance Unstable connection performance Cannot connect Measurement is canceled or cannot measure 2 Remeasurement Measures the connection performance again Note If any messag...

Страница 171: ...urn off the printer during initialization Click OK when initialization is complete Performing initialization when connected over wireless LAN will break the connection so perform setup with the Setup...

Страница 172: ...he network settings of the printer using IJ Network Tool with USB connection after initializing the LAN settings To change the network settings using IJ Network Tool activate the LAN settings in advan...

Страница 173: ...turns to Network Setup of the Card Slot screen and re executes the network drive mapping 3 Cancel Cancels the card slot setup When IJ Network Tool is running over LAN the Cancel button is displayed gr...

Страница 174: ...e printer unless the printer driver is associated with the port 1 Model Displays the name of device specified as a destination port It is blank if the name of device is not detected 2 Printer Displays...

Страница 175: ...d the computers To display the Network Information screen select Network Information from the View menu 1 OK Returns to the Canon IJ Network Tool screen 2 Copy All Information All network information...

Страница 176: ...etwork Communication Using the Card Slot over a Network When the Printer Driver Is Not Associated with a Port About Technical Terms Restrictions About Firewall 176 This manual downloaded from http www...

Страница 177: ...t as the Network Drive The card slot must be mounted to use it over a network To mount the card slot as the network drive follow the procedure below 1 Insert a memory card into the card slot of the ma...

Страница 178: ...ed computer you cannot access the network drive of the card slot On the other hand when you enable it to be writable only from a LAN connected computer the card slot is not detected via USB Make sure...

Страница 179: ...ocedure below 1 Start up IJ Network Tool 2 Select the printer displayed as No Driver on Name 3 Select Associate Port on the Settings menu The Associate Port screen is displayed 4 Select a printer to a...

Страница 180: ...ss point is required This machine does not support ad hoc communication Admin Password Administration password in IJ Network Tool to restrict access to network users It must be entered to access the p...

Страница 181: ...automatically adjusted to match that set to the access point This machine supports channels 1 to 13 Note that the number of channels that can be used for your wireless LAN varies depending on the regi...

Страница 182: ...ne setup where all wireless communications pass through an access point IP Address A unique number with four parts separated by dots Every network device that is connected to the Internet has an IP ad...

Страница 183: ...33 44 55 66 O Operation Status Indicates the status on whether the printer can be used P Proxy server A server that links a LAN connected computer to the Internet When using a proxy server specify th...

Страница 184: ...192 168 127 0 T TCP IP Suite of communications protocols used to connect hosts on the Internet or the LAN This protocol allows different terminals to communicate with each other TKIP An encryption pro...

Страница 185: ...ance in September 2004 as a later version of WPA Provides a stronger encryption mechanism through Advanced Encryption Standard AES Authentication WPA2 defines the following authentication methods PSK...

Страница 186: ...rk key WEP WPA or WPA2 to the access point to encrypt wireless transmission Wireless communication with a product that does not comply with the Wi Fi standard cannot be guaranteed Connecting with too...

Страница 187: ...re or operation system Important If you disabled the firewall function disconnect your network from the Internet Some applications like the network configuration software override firewall settings Ch...

Страница 188: ...Points to Successful Printing Be Sure to Make Paper Settings after Loading Paper Canceling a Print Job Printer Handling Precautions Key to Enjoying Consistent Printing Quality Precautions for Safe Tra...

Страница 189: ...lity degradation or nozzle clogging Does black and white printing use color ink Black and white printing may use ink other than black ink depending on the type of printing paper or the settings of the...

Страница 190: ...Checking the Ink Status with the Ink Lamps 190 This manual downloaded from http www manualowl com...

Страница 191: ...ng borderless printing the area where papers go through may get smeared with ink Clean the inside of your printer with Bottom Plate Cleaning Check how to load the paper correctly Is the paper loaded i...

Страница 192: ...e are various types of paper paper with special coating on the surface for printing photos with optimal quality and paper suitable for documents Each media type has specific preset settings such as ho...

Страница 193: ...ess the ON button while printing is in progress the print data sent from the computer queues in the printer and you may not be able to continue to print Press the RESUME CANCEL button to cancel printi...

Страница 194: ...top cover Do not place any object on the top cover It will fall into the rear tray when the top cover is opened and cause the printer to malfunction Also place the printer where objects will not fall...

Страница 195: ...t the print head will not be capped properly and this will cause drying or clogging When unplugging the power cord make sure that the POWER lamp is not lit Print periodically Just as the tip of a felt...

Страница 196: ...r have its box marked THIS SIDE UP to keep the printer with its bottom facing down Mark also with FRAGILE or HANDLE WITH CARE 1 Turn the printer off 2 Confirm that the POWER lamp is off and unplug the...

Страница 197: ...canceled or uncanceled Identifying badges or insignias Selective service or draft papers Checks or drafts issued by governmental agencies Motor vehicle licenses and certificates of title Traveler s ch...

Страница 198: ...ty 10 to 80 RH no condensation For the temperature and humidity conditions of papers such as photo paper refer to the paper s packaging or the supplied instructions Storage environment Temperature 32...

Страница 199: ...NET Cableless setup Other Features Administration password Minimum System Requirements Conform to the operating system s requirements when higher than those given here Windows Operating System Window...

Страница 200: ...n is required during software installation Windows Internet Explorer 8 9 or 10 is required to install Easy WebPrint EX Easy WebPrint EX for Internet Explorer 9 or 10 can be downloaded from the Canon w...

Отзывы: