background image

Basic Printing

10

3

Specify the required settings.

Note

z

From the Page Setup

Page Setup

Page Setup

Page Setup tab, select the correct document size to be 

printed.

z

To adjust Print Quality settings, select Custom

Custom

Custom

Custom and click Set 

Set 

Set 

Set on the 

Main

Main

Main

Main tab. You can control the print quality in the Set Print Quality

Set Print Quality

Set Print Quality

Set Print Quality 

dialog box.

z

For details about other printer driver functions, refer to the 

User’s 

Guide

 or Help

Help

Help

Help.

z

Select Preview before printing

Preview before printing

Preview before printing

Preview before printing by clicking the check box. This 

displays a preview screen that allows you to confirm the selected 
printing effects and how your document will look when printed. 
Some applications do not contain the function to display the 
preview.

z

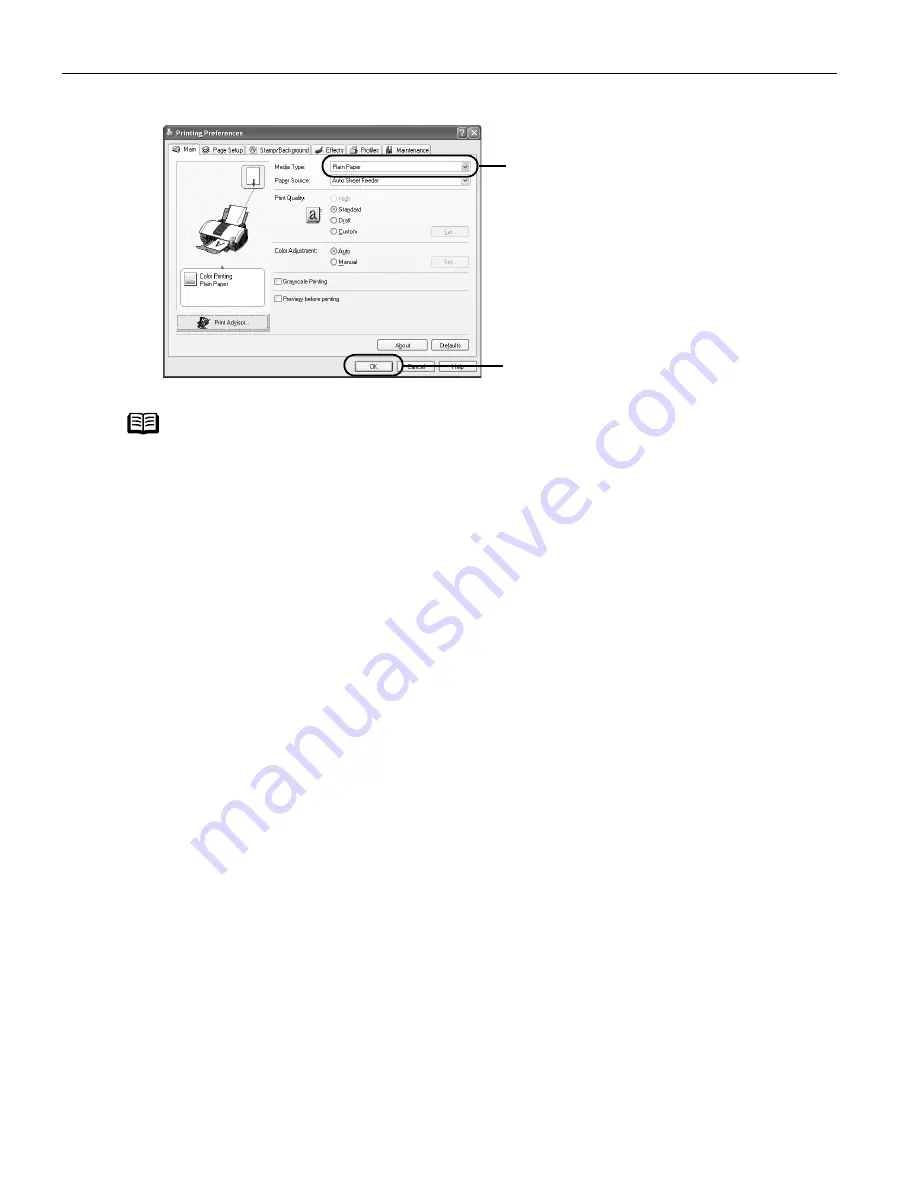
The print settings are automatically changed according to the type 
of paper loaded in the printer if Plain Paper has been selected in 

Media Type

Media Type

Media Type

Media Type.
This function may not work properly for some media.
To ensure high printing quality, you are recommended to select the 
desired type of paper in Media Type

Media Type

Media Type

Media Type first.

(1) Click Media Type

Media Type

Media Type

Media Type to select the 

type of media loaded in the 
printer.

(2) Click OK

OK

OK

OK. 

i960_QSG_US.book  Page 10  Friday, July 11, 2003  9:57 AM

Содержание 8538A001 - i 960 Color Inkjet Printer

Страница 1: ...QuickStart Guide Photo Printer i960Series ...

Страница 2: ...Series Series Series Series Desktop Photo Printer Desktop Photo Printer Desktop Photo Printer Desktop Photo Printer Quick Start Guide Quick Start Guide Quick Start Guide Quick Start Guide ...

Страница 3: ...ribed Specifications are subject to change without notice As an ENERGY STAR partner Canon U S A Inc has determined that this product meets the ENERGY STAR guidelines for energy efficiency All information regarding non Canon products was compiled from publicly available information No representation is made regarding the accuracy thereof For information about printing when you connect a PictBridge ...

Страница 4: ... You can start your 90 day Toll Free Technical Support period at any time during your product s warranty period After that 90 day period you can continue to call via the toll number for technical support see 4 below during the balance of your warranty period or you can extend your service and support coverage both toll free tech support and repair by purchasing a cost attractive Canon CarePAK exte...

Страница 5: ... Paper Plus Glossy 4 x 6 120 sheets 7980A022 Photo Paper Plus Glossy 5 x 7 20 sheets 7980A019 Photo Paper Plus Glossy 8 5 x 11 20 sheets 7980A006 Photo Paper Plus Semi Gloss 4 x 6 20 sheets 8386A008 Photo Paper Plus Semi Gloss 8 5 x 11 20 sheets 8386A007 Photo Paper Pro Perforated 4 x 6 20 sheets 5699A005 Photo Paper Pro for Borderless Printing 4 x 6 20 sheets 1029A014 Photo Paper Pro 8 5 x 11 15 ...

Страница 6: ...ting Maintenance Printing Maintenance Printing Maintenance Replacing an Ink Tank 44 When Printing Becomes Faint or Colors are Incorrect 49 Printing the Nozzle Check Pattern 50 Print Head Cleaning 53 Print Head Deep Cleaning 55 Aligning the Print Head 57 Troubleshooting Troubleshooting Troubleshooting Troubleshooting Cannot Install the Printer Driver 63 Print Quality is Poor or Contains Errors 64 T...

Страница 7: ... interface While in the printer s Properties Properties Properties Properties window press the F1 F1 F1 F1 key or click in the upper right corner Then click the feature you want to know more about or click the Help Help Help Help button when displayed Turn on the Balloon Help by selecting Help Help Help Help then Show Balloon Help Show Balloon Help Show Balloon Help Show Balloon Help Important z B...

Страница 8: ...to jam or malfunction Folded curled or wrinkled paper Damp paper Excessively thin paper less than 64 gsm or 17 lb Excessively thick paper more than 105 gsm or 28 lb non Canon branded paper Picture postcards Postcards affixed with photos or stickers Envelopes with double flaps Sealed envelopes Envelopes with an embossed or treated surface Any type of paper with holes such as loose leaf ...

Страница 9: ...a on page 6 Consult the User s Guide for detailed instructions on how to load envelopes and specialty media into the printer 1 Flatten the four corners of the paper before loading it 2 Prepare to load paper Important When paper is curled hold the opposing curled corners and gently bend them in the opposite direction until the paper becomes completely flat 1 Open the paper rest and then the paper r...

Страница 10: ...er to the instructions packaged with your media 2 Align the paper stackagainstthe right side of the Auto Sheet Feeder 3 Pinch the paper guide and slide it against the left side of the stack of paper Load Limit Mark Load Limit Mark Load Limit Mark Load Limit Mark Do not load paper beyond this Load Limit Mark 1 Insert the paper into the Auto Sheet Feeder with the print side facing up ...

Страница 11: ...media to ensure optimal print quality Photo Quality Media Photo Paper Pro Photo Paper Pro Perforated Photo Paper Plus Glossy Photo Paper Plus Semi gloss Matte Photo Paper Glossy Photo Paper High Resolution Paper Media Suited for Business Documents High Resolution Paper Transparencies ...

Страница 12: ...o 80 sheets High Resolution Paper T Shirt Transfers 1 sheet T Shirt Transfer Transparencies Up to 30 sheets Transparency Note z When using plain paper 64 gsm or 17 lb up to 150 sheets 13 mm in height can be loaded Select Plain Paper Plain Paper Plain Paper Plain Paper from the printer driver Media Media Media Media Type Type Type Type z For detailed description of print media types refer to the Us...

Страница 13: ...unlight or other light sources humidity temperature exposure to cigarette smoke and ozone are just some of the factors that can impact image permanence While many of these variables cannot be controlled there are basic measures that you can take to prolong image quality Use Canon Photo Paper Pro and genuine Canon inks Try Canon Photo Paper Pro or Canon Photo Paper Pro for Borderless Printing 4 6 B...

Страница 14: ...int print print dialog box opens Note z The menu screens and dialog boxes that appear may vary depending on the software application you are using z The steps described in this section are for printing in Windows XP Note In Windows 2000 click the Main Main Main Main tab in the Print Print Print Print dialog box 2 Ensure that Canon Canon Canon Canon i960 i960 i960 i960 is selected 3 Click Preferenc...

Страница 15: ... Preview before printing Preview before printing by clicking the check box This displays a preview screen that allows you to confirm the selected printing effects and how your document will look when printed Some applications do not contain the function to display the preview z The print settings are automatically changed according to the type of paper loaded in the printer if Plain Paper has been...

Страница 16: ... 11 4 Print the document Note You can cancel a print job in progress by simply pressing the RESUME RESUME RESUME RESUME CANCEL CANCEL CANCEL CANCEL button on the printer 1 Click Print Print Print Print or OK OK OK OK ...

Страница 17: ...nu Note z The menu screens and dialog boxes that appear may vary depending on the software application you are using z The steps described in this section are for printing in Mac OS X 3 Select the desired paper size from the Paper Size Paper Size Paper Size Paper Size pull down menu 4 Click OK OK OK OK 2 Select i960 i960 i960 i960 from Format Format Format Format for for for for 2 Select Quality M...

Страница 18: ... list Printer list Printer list Printer list displays a dialog that prompts you to confirm the status of the print job s To cancel a job in progress select the desired document then click Delete Delete Delete Delete To temporarily stop a job in progress click Pause Pause Pause Pause To cancel all the jobs in the list click Stop Printing Stop Printing Stop Printing Stop Printing z You can cancel a ...

Страница 19: ...rder use only PictBridge or Canon Bubble Jet Direct compatible digital cameras or digital video camcorders This section describes how to print from a digital camera and digital video camcorder that is compatible with Bubble Jet Direct For details on how to use PictBridge refer to the leaflet titled Direct Printing from PictBridge compatible Digital Camera z When you print directly from a digital c...

Страница 20: ...etting Media Type Media Type Media Type Media Type Card 1 Photo Paper Pro 4 x 6 101 6 x 152 4 mm Card 2 Photo Paper Plus Glossy 4 x 6 101 6 x 152 4 mm Card 3 Photo paper Plus Glossy 5 x 7 127 x 177 8 mm LTR Photo Paper Pro or Photo Paper Plus Glossy Letter A4 Photo Paper Pro or Photo Paper Plus Glossy A4 1 Load the media with the glossy surface facing up 2 Align the media against the right 3 Pinch...

Страница 21: ... Replay Replay Replay Replay mode 3 Press the SET SET SET SET button to display the Print Print Print Print menu 4 Select Style Style Style Style and specify the Paper Size Paper Size Paper Size Paper Size Borderless Borderless Borderless Borderless or Bordered Bordered Bordered Bordered printing and set Date Printing Date Printing Date Printing Date Printing to ON or OFF 5 Specify a number of cop...

Страница 22: ...ble digital camera may not be index printed The images taken with an Exif 2 2 compatible digital camera will be adjusted by using the Photo Optimizer PRO function If date printing is enabled on the digital camera the date the photograph was taken will be printed excluding the index print Images will be scaled automatically according to the size of the media set on the digital camera z The digital ...

Страница 23: ... the paper rest and move the paper guide to the left side Note Media Types Loadable from the Photo Paper Tray z The size of media that is loadable in the Photo Paper Tray is 4 x 6 z The media types loadable from the Photo Paper Tray are Photo Paper Pro PR 101 4 x 6 Glossy Photo Paper GP 401 4 x 6 Photo Paper Plus Glossy PP 101 4 x 6 and Photo Paper Plus Semi gloss SG 101 4 x 6 z Up to 20 sheets of...

Страница 24: ... Paper Tray along the paper rest and insert it until it clicks into place 3 Load the paper 1 Open the cover on the Photo Paper Tray 2 Load the paper with its printing side facing up Put the protrusions of the Photo Paper Tray all the way into the slots of the printer ...

Страница 25: ...the paper to the right end of the Photo Paper Tray Up to 20 sheets of paper can be loaded at once 4 Pinch the paper guide on the Photo Paper Tray and set it to the left edge of the paper 5 Close the cover on the Photo Paper Tray Paper guide ...

Страница 26: ...eeder and the printer is now ready for feeding paper from the Photo Paper Tray Important z Turning the knob switches the source from where the paper is fed Turning it to the left end feeds paper from the Photo Paper Tray while turning it to the right end feeds paper from the Auto Sheet Feeder z Do not leave paper in the Photo Paper Tray for a long time This may cause paper discoloration due to nat...

Страница 27: ...points at the the the the REMOVE REMOVE REMOVE REMOVE arrow on the arrow on the arrow on the arrow on the Photo Paper Tray Photo Paper Tray Photo Paper Tray Photo Paper Tray to lift up the Photo Paper Tray 2 Slide the lever A on the right side of the Photo Paper Tray upwards to remove it A ...

Страница 28: ...x 4 Specify the required settings 5 Start printing 1 Click Print Print Print Print or OK OK OK OK 6 Pull up the tray when printing is complete See Removing the Photo Paper Tray Removing the Photo Paper Tray Removing the Photo Paper Tray Removing the Photo Paper Tray on page 22 1 Click Media Type Media Type Media Type Media Type to select the type of media loaded in the printer 2 Ensure that the Au...

Страница 29: ...a file to print 3 Select Paper Size Paper Size Paper Size Paper Size 1 Select Page Setup Page Setup Page Setup Page Setup from the application software s File File File File menu 2 Select i960 i960 i960 i960 from Format for Format for Format for Format for 3 Select the paper size from Paper Paper Paper Paper Size Size Size Size 4 Click OK OK OK OK Note The size of media that is loadable in the Pho...

Страница 30: ...r Tray Removing the Photo Paper Tray on page 22 2 Select Quality Media Quality Media Quality Media Quality Media from the pop up menu 3 Click Media Type Media Type Media Type Media Type to select the type of media loaded in the printer 4 Ensure that the Auto Auto Auto Auto Feeder Feeder Feeder Feeder is selected in Paper Source Paper Source Paper Source Paper Source 5 Select Print Mode Print Mode ...

Страница 31: ...ppear when the Printer Properties Printer Properties Printer Properties Printer Properties dialog box is opened from within an application For more information about these additional tabs refer to your Windows documentation 1 Click Start Start Start Start and select Control Panel Control Panel Control Panel Control Panel Printers Printers Printers Printers and and and and Other Hardware Other Hard...

Страница 32: ...red in this chapter For more detailed information see the i960 i960 i960 i960 User s Guide on the Setup Software User s Guide CD ROM You can also access the online help in either of the following ways depending on your operating system Press the F1 F1 F1 F1 key Click in the upper right corner then click the feature you want to know more about Click the Help Help Help Help button when displayed Cli...

Страница 33: ...ication Program Program Program Program on page 26 2 Select Custom Custom Custom Custom in Print Quality Print Quality Print Quality Print Quality then click Set Set Set Set to open the Set Print Set Print Set Print Set Print Quality Quality Quality Quality dialog box 3 Move the slide bar to adjust the print quality 4 When the process is complete click OK OK OK OK 1 Open the Print Print Print Prin...

Страница 34: ...exposure before printing 1 Open the Printer Properties Printer Properties Printer Properties Printer Properties dialog box See Opening the Printer Properties Dialog Box from Your Application Opening the Printer Properties Dialog Box from Your Application Opening the Printer Properties Dialog Box from Your Application Opening the Printer Properties Dialog Box from Your Application Program Program P...

Страница 35: ...o select the Vivid Photo Vivid Photo Vivid Photo Vivid Photo check box on the Effects Effects Effects Effects tab To use Vivid Photo select the Vivid Photo Vivid Photo Vivid Photo Vivid Photo check box under Special Effects Special Effects Special Effects Special Effects Note In Windows Me or Windows 98 In Windows Me or Windows 98 In Windows Me or Windows 98 In Windows Me or Windows 98 If Backgrou...

Страница 36: ... use Photo Noise Reduction select the Photo Noise Reduction Photo Noise Reduction Photo Noise Reduction Photo Noise Reduction check box on the Effects Effects Effects Effects tab To use Photo Noise Reduction select the Photo Noise Reduction Photo Noise Reduction Photo Noise Reduction Photo Noise Reduction check box under Special effects Special effects Special effects Special effects Note In Windo...

Страница 37: ... Printer Properties Dialog Box from Your Application Opening the Printer Properties Dialog Box from Your Application Program Program Program Program on page 26 2 Select all of the necessary settings 3 Click the Profiles Profiles Profiles Profiles tab 4 Enter the new settings in Profiles Profiles Profiles Profiles The Add to Profiles Add to Profiles Add to Profiles Add to Profiles dialog box opens ...

Страница 38: ... Retrieving profile Retrieving profile Select the desired profile from Printing Printing Printing Printing Profiles Profiles Profiles Profiles and click Retrieve Retrieve Retrieve Retrieve from from from from Profiles Profiles Profiles Profiles Deleting unwanted profile Deleting unwanted profile Deleting unwanted profile Deleting unwanted profile Select the desired profile from Printing Profiles P...

Страница 39: ...drivers settings Changing drivers settings Changing drivers settings Changing drivers settings When registered print settings are selected you can delete them Select the name of settings to delete from the Presets Presets Presets Presets in the Print Print Print Print dialog and click Delete Delete Delete Delete When registered print settings are selected you can change their name Select the name ...

Страница 40: ...provide a basic introduction to many features offered by your printer driver Note For detailed descriptions of the printer driver functions refer to the User s Guide included in the Setup Software User s Guide CD ROM Printing with Borderless Printing Reducing Noise from Images Taken with Digital Camera Smoothing the Rough Edges of Certain Images Automatically Resizing the Image to Fit the Page ...

Страница 41: ...Advanced Printing 36 Resizing the Image by Selecting the Scaling Ratio Adding Illustrated Effect to Documents Reducing the Sound of Printer Operation ...

Страница 42: ...itch Windows Macintosh You can select multiple photographs and merge them to create a panoramic photo Easy WebPrint Windows You can easily print Web pages from Internet Explorer or pages from the User s Guide on screen manual of this printer in full size Easy WebPrint automatically adjusts the layout when printing a screen from the web page This feature enables you to print a screen without its ri...

Страница 43: ...ograms Canon Utilities Canon Utilities Canon Utilities Canon Utilities Easy PhotoPrint Easy PhotoPrint Easy PhotoPrint Easy PhotoPrint and then Easy PhotoPrint Easy PhotoPrint Easy PhotoPrint Easy PhotoPrint The Image Selection Image Selection Image Selection Image Selection tab is displayed Note Media Types Suitable for Borderless Printing z Media types compatible with Borderless Printing include...

Страница 44: ...he number of copies 3 Select the paper Guidance Thumbnail Folder window Increases the number of copies Displays the specified number of copies Decreases the number of copies 1 Click the Paper Selection Paper Selection Paper Selection Paper Selection tab 2 Select the size of the paper you want to use from Paper Size Paper Size Paper Size Paper Size 3 Select the type of the paper you want to use fro...

Страница 45: ... specified in the Paper Selection Paper Selection Paper Selection Paper Selection tab 4 Click Print Print Print Print 1 Click the Layout Print Layout Print Layout Print Layout Print tab 2 Select Borderless full Borderless full Borderless full Borderless full ...

Страница 46: ...d double click the Easy PhotoPrint Easy PhotoPrint Easy PhotoPrint Easy PhotoPrint icon in the folder The Image Selection Image Selection Image Selection Image Selection tab is displayed Note Media Types Suitable for Borderless Printing Media Types Suitable for Borderless Printing Media Types Suitable for Borderless Printing Media Types Suitable for Borderless Printing z Media types compatible wit...

Страница 47: ...o print All photographs in the selected folder are displayed 2 Click the button on the thumbnail of the photograph you want to print and specify the number of copies Guidance Thumbnail Folder window Increases the number of copies Displays the specified number of copies Decreases the number of copies ...

Страница 48: ...Print Print Print in the Print Print Print Print dialog box 1 Click the Paper Selection Paper Selection Paper Selection Paper Selection tab 2 Select the size of the paper you want to use from Paper Size Paper Size Paper Size Paper Size 3 Select the type of the paper you want to use from Media Type Media Type Media Type Media Type 1 Click the Layout Print Layout Print Layout Print Layout Print tab ...

Страница 49: ...Yellow BCI 6Y Photo Magenta BCI 6PM Magenta BCI 6M Knowing When to Replace Ink Tank If an ink tank needs replacing the POWER POWER POWER POWER lamp will change from green to orange and flash four times as soon as printing begins It is important to quickly identify the empty tank using the BJ Status Monitor Windows or error messages Macintosh and replace it Note Should missing characters or white s...

Страница 50: ...e ink tank with X symbol is out of ink Replace with a new ink tank Press the RESUME CANCEL RESUME CANCEL RESUME CANCEL RESUME CANCEL button to resume printing with an empty ink tank When printing is finished replace the ink tank immediately If you continue printing with an empty ink tank problems may occur Menu screens will vary to some degree depending on your software environment Empty ink tank ...

Страница 51: ...disk icon where the printer driver was installed the Applications Applications Applications Applications folder and then the Utilities Utilities Utilities Utilities folder 2 Double click the Print Center Print Center Print Center Print Center icon 3 Select i960 i960 i960 i960 from the Name Name Name Name list and click Configure Configure Configure Configure 4 Select i960 i960 i960 i960 from the P...

Страница 52: ...sh the tab and remove the ink tank 3 Prepare a replacement ink tank 1 Unpack the new ink tank and pull off the orange tape 2 Remove the orange protective cap from the bottom of the ink tank and discard it Important z Handle ink tanks carefully to avoid staining clothing or the surrounding area z Discard empty ink tanks according to the local laws and regulations regarding disposal of consumables D...

Страница 53: ...h the protective cap once you have removed it z Once the protective cap is removed do not touch the open ink port Note z To maintain optimal print quality use an ink tank within six months of its first use z Once an ink tank has been used do not remove it from the printer and leave it out in the open This will cause the ink tank to dry out and the printer may not function properly if it is reinsta...

Страница 54: ...nk is installed securely z Increase the Print Quality setting in the printer driver settings Note If Print Head Deep Cleaning does not solve the problem contact the Customer Care Center Print Head Deep Cleaning Print Head Deep Cleaning Print Head Deep Cleaning Print Head Deep Cleaning on page 55 Step 3 If white stripes are noticeable If the print quality is poor Print Head Cleaning Print Head Clea...

Страница 55: ...Menu Opening the Printer Properties Dialog Box Directly from the Start Menu on page 26 3 Print the Nozzle Check Pattern 3 When the confirmation message is displayed click OK OK OK OK When the confirmation message is displayed after the nozzle check pattern has been printed click OK OK OK OK See Examining the Nozzle Check Pattern Examining the Nozzle Check Pattern Examining the Nozzle Check Pattern...

Страница 56: ...lities Utilities folder 2 Double click the Print Center Print Center Print Center Print Center icon 3 Select i960 i960 i960 i960 from the Name Name Name Name list and click Configure Configure Configure Configure 4 Select i960 i960 i960 i960 from the Product Product Product Product list and click Select Select Select Select 3 Print the Nozzle Check Pattern 2 Check the message then click OK OK OK O...

Страница 57: ...ter 1 White stripes in this pattern require runing print head cleaning procedure See Print Head Cleaning on page 53 2 Unevenness in these patterns indicates that the print head requires alignment See Aligning the Print Head on page 57 Note The nozzle check pattern will not be printed correctly if there is not enough ink Replace the ink tank if the remaining amount of ink is insufficient 1 2 ...

Страница 58: ... Printer Properties Dialog Box Directly from the Start Menu Opening the Printer Properties Dialog Box Directly from the Start Menu Opening the Printer Properties Dialog Box Directly from the Start Menu on page 26 3 Start Print Head Cleaning 3 When the confirmation message is displayed click OK OK OK OK Note The print head can also be cleaned from the printer itself With the printer on hold the RES...

Страница 59: ...lect 3 Start Print Head Cleaning 3 When the confirmation message is displayed click OK OK OK OK Important Do not perform any other operations until the print head cleaning finishes This takes about 50 seconds Note z If this does not solve the problem clean the print heads again up to three more times z After print head cleaning finishes print the nozzle check pattern to verify that the print head ...

Страница 60: ...m the Start Menu Opening the Printer Properties Dialog Box Directly from the Start Menu Opening the Printer Properties Dialog Box Directly from the Start Menu Opening the Printer Properties Dialog Box Directly from the Start Menu on page 26 3 Start Print Head Deep Cleaning 3 When the confirmation message is displayed click OK OK OK OK Print head deep cleaning starts when the POWER POWER POWER POWE...

Страница 61: ...t Head Deep Cleaning 3 When the confirmation message is displayed click OK OK OK OK Print head deep cleaning starts when the POWER POWER POWER POWER lamp starts blinking Do not perform any other operation until the print head deep cleaning is completed This takes about one minute Note After print head deep cleaning finishes print the nozzle check pattern to verify that the print head nozzles are c...

Страница 62: ... load a sheet of Letter sized papers in the printer 2 Open the Printer Properties Printer Properties Printer Properties Printer Properties dialog box See Opening the Printer Properties Dialog Box Directly from the Start Menu Opening the Printer Properties Dialog Box Directly from the Start Menu Opening the Printer Properties Dialog Box Directly from the Start Menu Opening the Printer Properties Di...

Страница 63: ...ly check box and then click Send Send Send Send When the confirmation message is displayed click OK OK OK OK 4 Click Print Head Alignment Print Head Alignment Print Head Alignment Print Head Alignment 5 When the confirmation message is displayed click OK OK OK OK 6 After the pattern is printed click Yes Yes Yes Yes ...

Страница 64: ... Maintenance 59 4 Align the Print Head 1 Look at the print out From the patterns select the most even least irregular patterns and enter their numbers 2 Enter the numbers 3 Click OK OK OK OK 4 Click OK OK OK OK ...

Страница 65: ...nd click Configure Configure Configure Configure 4 Select i960 i960 i960 i960 from the Product Product Product Product list and click Select Select Select Select 3 Print the pattern 1 1 1 1 Select Custom Settings Custom Settings Custom Settings Custom Settings from the pull down menu 2 2 2 2 Select Align heads manually Align heads manually Align heads manually Align heads manually check box and th...

Страница 66: ...ance 61 4 Align the Print Head 1 Look at the print out From the patterns select the most even least irregular patterns and enter their numbers 2 Enter the numbers 3 Click Send Send Send Send 4 Click Quit Quit Quit Quit ...

Страница 67: ...operly Paper Does Not Feed Properly Paper Does Not Feed Properly on page 68 Handling Error Messages Handling Error Messages Handling Error Messages Handling Error Messages on page 70 An Error Message Appears on the Screen An Error Message Appears on the Screen An Error Message Appears on the Screen An Error Message Appears on the Screen on page 72 Cannot Print Properly from the Digital Camera Cann...

Страница 68: ...Start Start and select My Computer My Computer My Computer My Computer 2 Double click the CD ROM CD ROM CD ROM CD ROM icon For non XP Windows open the My Computer My Computer My Computer My Computer window and then double click the CD ROM CD ROM CD ROM CD ROM icon Double click the CD ROM CD ROM CD ROM CD ROM icon on your desktop to start installation Installation CD ROM is not working properly Con...

Страница 69: ...eaning Print Head Cleaning Print Head Cleaning on page 53 Media not loaded with the print side up Check that your paper is loaded with the correct print side facing up Incorrect paper type On the Main Main Main Main tab confirm that the Media Type Media Type Media Type Media Type selected matches the paper loaded In the Print Print Print Print dialog box Select Quality Media Quality Media Quality ...

Страница 70: ...paper you are using is compatible with Borderless Printing See Media Types Suitable for Borderless Printing Media Types Suitable for Borderless Printing Media Types Suitable for Borderless Printing Media Types Suitable for Borderless Printing on page 38 See Media Types Suitable for Borderless Printing Media Types Suitable for Borderless Printing Media Types Suitable for Borderless Printing Media T...

Страница 71: ...play Print Queue 4 Select Cancel All Documents Cancel All Documents Cancel All Documents Cancel All Documents in the Printer Printer Printer Printer menu 5 Click Yes Yes Yes Yes when the confirmation message appears The print job is deleted 1 Select Applications Applications Applications Applications from the Go Go Go Go menu 2 Double click the Print Center Print Center Print Center Print Center i...

Страница 72: ...pport USB 2 0 it does not seem to work well Your cable does not support USB 2 0 Be sure to use a USB 2 0 certified cable preferably one no longer than 3 meters approx 9 84 feed You connect to the computer through a USB hub Connect the printer directly to the computer s USB port without going through the hub Either an expansion card supporting USB 2 0 or the driver for USB 2 0 may not be installed ...

Страница 73: ...wn and release after the POWER POWER POWER POWER lamp flashes three times The paper roller rotates as it cleans Repeat this cleaning operation two times 3 Load a stack of Letter sized plain paper in the printer 4 Hold the RESUME CANCEL RESUME CANCEL RESUME CANCEL RESUME CANCEL button down and release after the POWER POWER POWER POWER lamp flashes three times then feed the sheet of paper Repeat thi...

Страница 74: ...L RESUME CANCEL button on the printer Paper jams inside the Photo Paper Tray Remove the paper according to the following procedure 1 Remove the Photo Paper Tray 2 Slowly pull the paper out if jagged paper remains in the paper out slot of the Photo Paper Tray If you cannot pull the paper out or if the paper tears and a piece remains inside the printer open the front cover and remove it Be careful n...

Страница 75: ...nt head not installed Print head not installed correctly Defective print head Install the print head If the print head is already installed remove the print head and check the electrical contacts for foreign matter then reinstall After reinstalling the print head you may need to realign it If this error still remains the print head may be damaged Contact the Customer Care Center Eight flashes Wast...

Страница 76: ... RESUME CANCEL RESUME CANCEL RESUME CANCEL RESUME CANCEL button and move the printer to a darker location Try to align the print head again If print head alignment fails again manually align the print head See Aligning the Print Head Aligning the Print Head Aligning the Print Head Aligning the Print Head on page 57 for information on the manual print head alignment An error that requires contactin...

Страница 77: ...rect paper type from Media Type Media Type Media Type Media Type and then click Print Print Print Print Borderless Printing Error Incorrect paper loaded Ensure that the loaded paper is suitable for Borderless Printing If the error continues disable Paper Identification select the desired type of paper then try printing again Errors on Photo Paper Tray Paper not loaded Load paper in the Photo Paper...

Страница 78: ...d Uninstall Uninstall Uninstall Uninstall 2 Follow the on screen instructions to uninstall driver 3 Follow the procedures described in the Easy Setup Instructions and reinstall the printer driver Error No X300 Printer not ready If the POWER POWER POWER POWER lamp is off turn the printer on If the POWER POWER POWER POWER lamp is flashing green the printer is initializing Wait until the POWER POWER ...

Страница 79: ...ton Printer cover open The front cover is open Close the front cover No print head Print head is defective or not installed Install the print head again according to the Easy Setup Instructions If the problem continues after reinstalling it the print head may be defective Contact the Customer Care Center Waste tank full The waste ink tank is nearly full Press the RESUME CANCEL RESUME CANCEL RESUME...

Страница 80: ...may occur and no more images can be printed If this error occurs disconnect the cable between the printer and the digital camera and press the RESUME CANCEL RESUME CANCEL RESUME CANCEL RESUME CANCEL button on the printer After reconnecting the cable between the printer and the digital camera turn the camera s power back on z When the paper is curled or the printed surface of the paper is scratched...

Страница 81: ...l load automatically 6 If the message No other applications can be running appears click Continue Continue Continue Continue 7 When the Installation was successful screen is displayed click Restart Restart Restart Restart 8 From the Application Application Application Application folder double click on the software to be installed Follow the on screen instructions 9 When the Installation has Finis...

Страница 82: ... Adding Illustrated Effect to Documents Printing the Entire Image in Single Color Printing in Grayscale Reversing the Page Printing Order Printing on Nonstandard Size Paper Reducing the Sound of Printer Operation Registering Printer Driver Settings Printing Media Compatible Media Types Envelopes High Resolution Paper Glossy Photo Paper Photo Paper Pro Photo Paper Pro Perforated Photo Paper Plus Gl...

Страница 83: ...ess Printing 216 0 mm 8 5 in Resident print control mode Canon extended mode Receive buffer 80 KB IInterface USB USB USB 2 0 Hi Speed Acoustic noise level Approx 37 dB A in the highest print quality mode Operating environment Temperature 5 to 35 C 41 to 95 F Humidity 10 to 90 RH no condensation Storage environment Temperature 0 to 40 C 32 to 104 F Humidity 5 to 95 RH no condensation Power supply A...

Страница 84: ...z Available hard disk space for printer driver installation Windows XP Windows 2000 65MB Windows Me Windows 98 30MB 1 USB operation can only be guaranteed on a PC with pre installed Windows XP Windows 2000 Windows Me or Windows 98 This includes Windows XP Windows 2000 or Windows Me upgraded from pre installed Windows 98 or later 2 USB 2 0 Hi Speed operation can only be guaranteed under the environ...

Страница 85: ...the power supply and call for service Periodically unplug the printer and use a dry cloth to wipe off any dust or dirt Periodically unplug the printer and use a dry cloth to wipe off any dust or dirt Periodically unplug the printer and use a dry cloth to wipe off any dust or dirt Periodically unplug the printer and use a dry cloth to wipe off any dust or dirt collected on the plug and the power ou...

Страница 86: ... than the one rated for the printer in the country where you Never use a power supply source other than the one rated for the printer in the country where you Never use a power supply source other than the one rated for the printer in the country where you purchased the printer purchased the printer purchased the printer purchased the printer AC 100 127 V 50 60 Hz AC 100 127 V 50 60 Hz AC 100 127 ...

Страница 87: ...try to correct the interference by one or more of the following measures Reorient or relocate the receiving antenna Increase the separation between the equipment and receiver Connect the equipment into an outlet on a circuit different from that to which the receiver is connected Consult the dealer or an experienced radio TV technician for help Use of a shielded cable is required to comply with Cla...

Страница 88: ...cer thereof items is given by the manufacturer or producer thereof This limited warranty covers all defects encountered in normal use of the Product and does not apply in the following cases a Loss of or damage to the Product due to abuse neglect mishandling improper packaging by you alteration accident electrical current fluctuations improper use failure to follow operating or maintenance instruc...

Страница 89: ...rrected by using one of the above technical support options repair options are available at the time of your call to the Free live technical support number above or via the website at www canontechsupport com This limited warranty gives you specific legal rights and you may also have other rights which vary from state to state Support program specifics are subject to change without notice Canon U ...

Страница 90: ...Easy PhotoPrint 37 38 41 Easy WebPrint 37 Examining the Nozzle Check Pattern 52 Exif 2 2 37 Exif Print 37 G Glossy Photo Paper 7 H Handling Error Messages 70 Help button 2 High Resolution Paper 7 I ImageBrowser 37 Installing the Printer Driver when using Mac OS 9 x 76 L Load Limit Mark 5 Loading Paper 3 M Matte Photo Paper 7 Media speciality 6 to avoid 3 Media Type 7 10 12 Media Types for Digital ...

Страница 91: ...g Photographs Directly from a Digital Camera 14 Printing the Nozzle Check Pattern 50 R Recalling Driver Settings 32 Regulatory Information 82 Replacing an Ink Tank 44 49 RESUME CANCEL button 11 13 S Safety Precautions 80 Saving Driver Setting 32 Speciality Media 7 Specifications 78 T Tech support 84 Transparencies 7 Troubleshooting 62 T Shirt Transfers 7 Turning on the Printer 2 U Uninstalling the...

Страница 92: ... 146 8501 Japan Canon Canada Inc 6390 Dixie Road Mississauga Ontario L5T 1P7 Canada Canon Latin America Inc 703 Waterford Way Suite 400 Miami FL 33126 U S A Canon Mexicana S de R L de C V Periferico Sur No 4124 Col Ex Rancho de Anzaldo C P 01900 Mexico D F P i960 QSG 0603 QA7 2962 V01 2003 Canon U S A Inc Printed in Thailand ...

Отзывы: