background image

DV Messenger

49

E

Changing the Mode of the Camcorder

This section describes the procedure for changing the mode of the camcorder
during communication.

 Caution:

¡

The settings for camera and microphone in the [Audio Tuning Wizard] may be
changed when you change the mode of your camcorder. In such case, reset
with the [Audio Tuning Wizard] before clicking [Start Camera].

1.

•••••••••••••••••••••••••••••••••••••••••••••••••••••••••••••••••••••••••••••••••••••••••••••

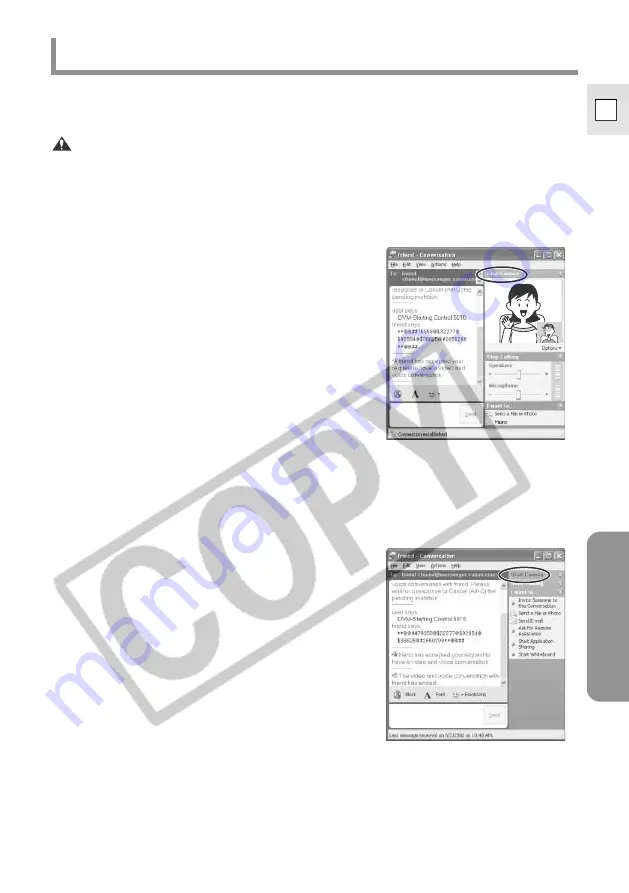
On the [Conversation] window, click [Stop Camera].

2.

•••••••••••••••••••••••••••••••••••••••••••••••••••••••••••••••••••••••••••••••••••••••••••••

Change the mode of the camcorder.

3.

•••••••••••••••••••••••••••••••••••••••••••••••••••••••••••••••••••••••••••••••••••••••••••••

Wait until the video picture and camcorder information such as
the tape counter appear in the display and click [Start Camera].

• A message with the options [Accept] and [Decline] appears in the [Conver-

sation] window of your contact. If your contact clicks [Accept], the
videoconference restarts.

Содержание 70 MC - ZR70MC MiniDV Digital Camcorder

Страница 1: ...ction Manual PUB DIM 491 This software is for use with Windows XP only Ce logiciel ne peut tre employ que sous Windows XP Este software solamente es compatible con Windows XP E Mode d emploi du logici...

Страница 2: ...SOFTWARE or on a medium if any on which the SOFTWARE delivered 3 OWNERSHIP All rights including but not limited to copyrights and trade secret rights to the SOFTWARE belong to Canon its affiliated cor...

Страница 3: ...hereof by clicking YES below and remains in effect until expiration of all copyright interests in the SOFTWARE unless earlier terminated You may terminate this Agreement by destroying the SOFTWARE in...

Страница 4: ...IA Driver Downloading Still Images Movies to a Computer 23 Downloading with the Scanner and Camera Wizard 24 Downloading with Windows Explorer 26 Uploading Files from the Computer to the Memory Card 2...

Страница 5: ...ies Other names and products not mentioned above may be registered trademarks or trademarks of their respective companies AV C Camera Storage Subunit is a standard for downloading and uploading files...

Страница 6: ...If you are using a router for Internet connection your router is UPnP Universal Plug and Play compatible Some modems are equipped with a router function For details refer to the manual of the modem T...

Страница 7: ...oadband connection to the Internet Cautions Proper operation is not guaranteed on a dual CPU PC or on a user built PC Proper operation is not guaranteed for all computers that meet the above requireme...

Страница 8: ...rations with your digital camcorder via the Internet Real Time Video Communication Videoconference 33 You can use your camcorder and computer for real time video and voice communication Sending Movies...

Страница 9: ...non homepage for latest camcorder models Free Download If the person you wish to communicate with does not have DV Messenger it can be downloaded from the Canon Homepage http www canondv com If you le...

Страница 10: ...talling from the DV NETWORK SOLUTION DISK Close all programs that are running before copying the driver files Users of Windows XP Professional must first log in as an Administrator to install programs...

Страница 11: ...t 5 Read the license agreements and click Yes 6 Enter your information and click Next 7 Confirm the target folder and click Next If a dialog appears asking you whether you wish to create a shortcut of...

Страница 12: ...must first log in as an Administrator to install programs 1 Start the computer 2 Connect the power adapter to the camcorder 3 Set the camcorder to CARD PLAY VCR mode 4 Connect the camcorder to the com...

Страница 13: ...card is inserted into the camcorder the Scanner and Camera Wizard opens automatically Proceed to step 5 Downloading Still images Movies to a Computer 23 If no memory card inserted in the camcorder fol...

Страница 14: ...es to change the setting 1 Connect the power adapter to the camcorder 2 Set the camcorder to CARD PLAY VCR mode 3 Connect the camcorder to the computer using the DV cable 22 4 From the start menu sele...

Страница 15: ...pplication automatically select Start this program and click OK If the started application displays a message such as TWAIN data source not found Reinstall the scanner software select WIA Canon Camera...

Страница 16: ...V Messenger and DV Messenger Uninstall in succession 2 If a confirmation dialog appears click Yes The uninstall utility starts and removes DV Messenger 1 Connect the power adapter to the camcorder 2 S...

Страница 17: ...17 E 4 From the start menu select Control panel 5 Click Printers and Other Hardware 6 Click Scanners and Cameras...

Страница 18: ...ot affect the uninstall process The uninstall process is complete Troubleshooting the Driver Uninstall If you had problems uninstalling the driver use the following procedures to remove it Notes Use t...

Страница 19: ...perties 5 Click the Device Manager button 6 If Canon Camera Storage Device appears under Imaging devices and or Other devices categories use the following procedures to delete it 1 Right click the mou...

Страница 20: ...7 From the start menu select My Computer and double click the C WINDOWS and INF folders in succession If the INF Folder Is Not Visible in the WINDOWS Folder Use the following procedures to show all f...

Страница 21: ...nts Click each Oem file until you find the one that contains AV C Camera Strage WIA driver in its first line When you have found the correct file delete the file set 1 Close the Notepad window 2 Right...

Страница 22: ...on DV Camcorder camcorder icon appears in the explorer view If the driver is not installed only the camcorder icon appears Camera icon You can download still images movies from a memory card to the co...

Страница 23: ...lder and select Refresh Still images cannot be uploaded to the memory card using the Scanner and Camera Wizard Do not rotate the still images recorded on a memory card in Windows Picture and Fax Viewe...

Страница 24: ...d starts automatically If the program does not start automatically select My computer on the start menu right click the mouse button in the camera icon and click Get pictures 5 Click Next Thumbnail ve...

Страница 25: ...f the selected still images starts When download is complete a dialog confirming to finish appears 8 If you wish to end the program select Nothing I m finished working with these pictures and click Ne...

Страница 26: ...place of the asterisk The still images movies recorded on the memory card will be displayed If you select Thumbnails on the View menu thumbnail versions of the still images movies appear With images n...

Страница 27: ...IA Driver 27 E 5 Keep the mouse clicked on the thumbnail and move it to the desired folder drag and drop OR 5 Right click the mouse on the image and select Copy 6 Open a folder right click the mouse i...

Страница 28: ...d may not be played back on the camcorder depending on file type and size If you download a still image movie from the camcorder to the computer and upload it again to the camcorder The still image mo...

Страница 29: ...mputer using the DV cable do not connect any other devices to the camcorder s USB terminal Do not connect two or more camcorders to the same computer The DV Messenger may not operate correctly 1 Conne...

Страница 30: ...he firewall is an important security system that protects your computer by limiting or preventing access by other computers on the Internet If you disable the function other computers may be able to a...

Страница 31: ...DV Messenger 31 E 1 From the start menu select Control Panel 2 Click Network and Internet Connections 3 Click Network Connections...

Страница 32: ...nection is listed select a connection other than 1394 Connection If Status is not shown select Details from the View menu 5 Click the Advanced tab remove the checkmark from the Internet Connection Fir...

Страница 33: ...ers to the computer 1 Set the camcorder to TAPE CAMERA mode 2 Connect to the Internet 3 Double click the DV Messenger icon on the desktop or select DV Messenger from the start menu If a dialog appears...

Страница 34: ...A message appears automatically notifying you that your contact has signed in When you have signed in set the camcorder and adjust the volume of the speaker and microphone 1 Set the camcorder to TAPE...

Страница 35: ...camcorder and click Next If you are using a Canon camcorder select Canon DV Device 5 When the video picture appears click Next The live video recording of the camcorder appears in TAPE CAMERA mode In...

Страница 36: ...Next If you are using a Canon camcorder select Canon DV Device The installed sound device appears for Speaker Proceed with the setting unchanged 8 Connect speakers or headphones to the computer Click...

Страница 37: ...annot be adjusted with the volume lever The volume indicator will not operate when the camcorder is in CARD CAMERA mode 10 Click Finish The settings for speaker and microphone are complete There are t...

Страница 38: ...is waiting for response If you click Cancel the request will be cancelled If your contact accepts the request the above dialog disappears The communication between your and your contact s DV Messenge...

Страница 39: ...Yes The communication between your and your contact s DV Messenger starts and you can now operate the camcorder of your contact from the DVM panel 2 When the invitation message appears click on the m...

Страница 40: ...The mode of your camcorder is highlighted only if a Canon camcorder is connected 4 Remote Section The mode of the camcorder of your contact is highlighted only if your contact is using DV Messenger or...

Страница 41: ...end the DV Messenger 50 Taskbar When DV Messenger is started the DV Messenger task and DV Messenger icon appear on the taskbar 1 2 1 DV Messenger task Appears when the DV Messenger panel is displayed...

Страница 42: ...essenger Displays the version of the DV Messenger 2 Help Topics Displays the DV Messenger s help topics 3 Control Panel Open Displays the DV Messenger panel on the screen 4 Disconnect Disconnects the...

Страница 43: ...non Digital Camcorder Non Canon Digital Camcorder You can operate your and your contact s camcorder You can only operate your camcorder You can only operate the camcorder of your contact You cannot op...

Страница 44: ...te your contact s camcorder when set to TAPE CAMERA mode Click the Remote button on the DVM panel The CAMERA Operating Buttons 1 2 4 3 5 1 Zoom W wide angle The subject becomes smaller 2 Zoom T teleph...

Страница 45: ...ended recording modes the picture in the Conversation window may be distorted The buttons on the DVM panel cannot be operated if no tape is inserted into the camcorder If your contact fast forwards re...

Страница 46: ...only be used during playback pause 8 Reversed Frame Advance Plays back the tape frame by frame in reverse Can only be used during playback pause 9 Playback Speed Control Controls the playback speed o...

Страница 47: ...M panel File transfer may not work depending on the Internet connection file type or file size When files are being transferred from your camcorder to the computer of your contact the DVM panel shows...

Страница 48: ...ntact 5 When you have selected the files you wish to transfer click Fetch 6 Select the destination folder enter the file name and click Save The selected file s will be trans ferred to your computer T...

Страница 49: ...e of your camcorder In such case reset with the Audio Tuning Wizard before clicking Start Camera 1 On the Conversation window click Stop Camera 2 Change the mode of the camcorder 3 Wait until the vide...

Страница 50: ...e displayed menu The communication with your contact ends and the Conversation win dow closes If you wish to communicate with another contact select the contact after clicking the Remote button 1 Clic...

Страница 51: ...e computer cannot read the images on the memory card Check if the memory card is correctly inserted into the camcorder When downloading still images movies from the memory card to the computer Canon C...

Страница 52: ...ws Messenger may not be able to receive video and sound if you have changed the operating mode of the camcorder during videoconference Click Stop Camera and then Start Camera to restart the videoconfe...

Страница 53: ...tion window Move the lever to the right until the volume indicator on the right operates Check if the sound device is set to Mute in the Control Panel 1 From the Start menu select Control Panel 2 Sele...

Страница 54: ...operates If you are using a Canon camcorder click Stop Camera and check whether Canon DV Device is selected in the Audio Tuning Wizard Click Start Camera to restart the videoconference Ask your conta...

Страница 55: ...t to Easy Recording program focus cannot be adjusted manually Set the program selector to Q program AE The camcorder turns off during use in TAPE CAMERA mode If the Canon camcorder set to TAPE CAMERA...

Страница 56: ...t operate the camcorder of your contact your contact may not have placed a checkmark to the before Allow Remote Control Check if the camcorder is correctly connected to the computer The firewall is no...

Страница 57: ...c du papier recycl 100 El papel aqui utilizado es 100 reciclado U S A Canon U S A Inc Canon Customer Care Center Tel US 1 800 828 4040 Mon Fri 9 AM to 8 PM Eastern Time CANADA Canon Canada Inc Tel Can...

Отзывы: