background image

6-2

U

sing the F

ax F

unc

tions

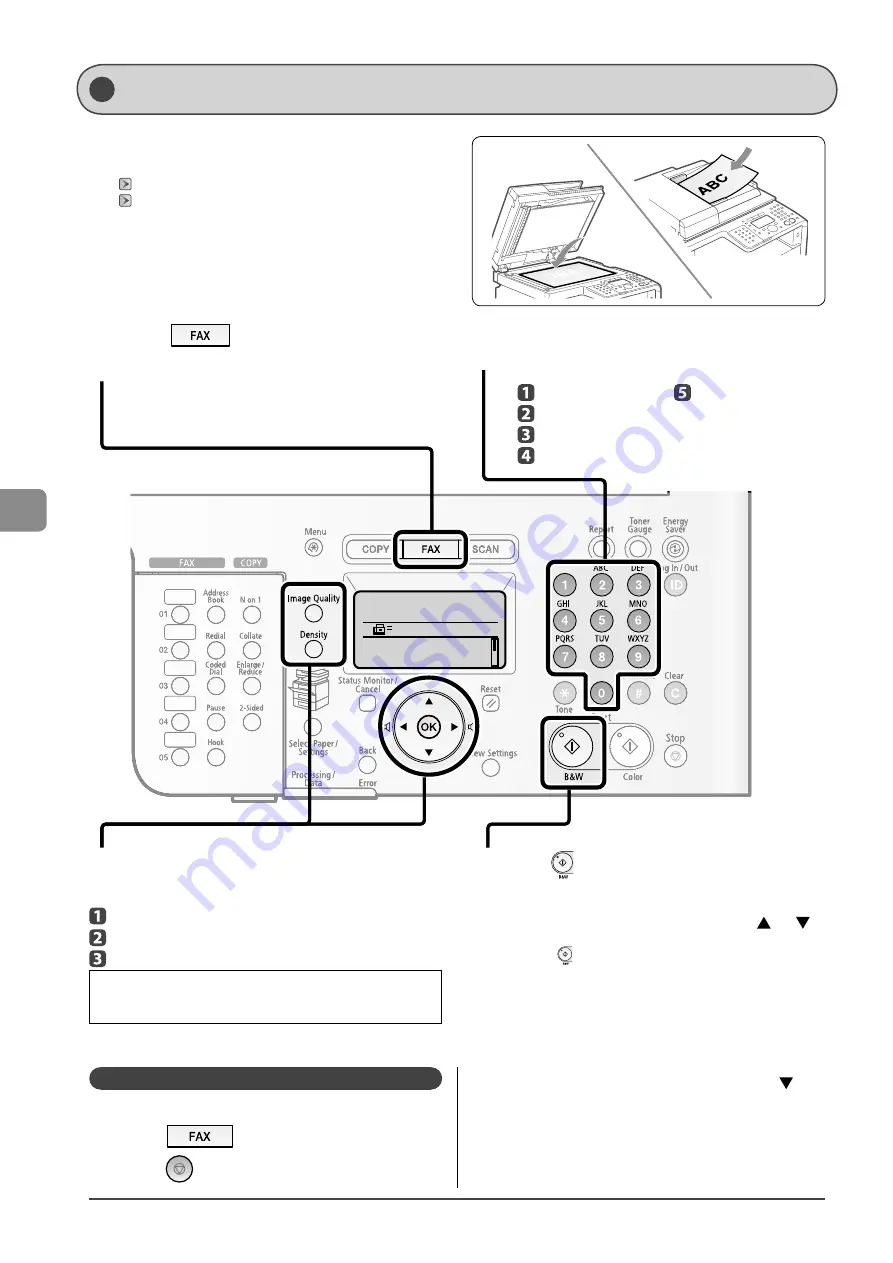
Specify destination.

2010 01/01 12:52AM

RX Mode: Auto
Resolution: 200 x 100...

  1


  Place documents on the platen glass or load 

them in the feeder. 

     "Placing Documents" (

P.2-4) 

     "Documents Requirements" (

P.2-2) 

  2


  Press [

]. 

  3


  Set scanning settings for documents as needed. 

 There are the three items you can specify. 
 (For details, see  P.6-3 .) 

     Image quality settings 

     Density settings 
     Sharpness settings 

 The settings specifi ed here are eff ective only for the current sending 
operation. To make the settings eff ective for all the copy operations, see 
 "Changing the Default Values for Fax" (

P.6-20) .  

  4


  Specify the destination. 

 These are the following methods to specify a destination.
(For details, see  P.6-4  to  6-5 .)  

  5


 Press [

] (B & W). 

   When placing documents on the platen glass 

 Perform the following procedure. 
 (1)  Select the size of the original document with [

] or [

], 

and then press [OK].  

 (2)  Press  [

] (B & W) for each document.  

 (3)  When all documents are scanned completely, select <Start 

Sending>, and then press [OK].  


  Entering the fax number 


  One-touch keys 


  Coded dialing 


  Group dialing 


  Address book 

 -  Sequential  broadcast 

  (

P.6-9) 

 Canceling Sending of Fax D ocuments  

 You can cancel a sending job that is in the process of being sent.   

 1 

 Press 

[

].   

 2 

 Press 

[

] (Stop).  

 Basic Method for  Sending Faxes 


  3 

  When <Cancel?> appears, select <Yes> with [

], 

and then press [OK].  

 Transmission is canceled. 

This section describes the basic procedure for 
sending faxes.

Содержание 3556B001AA

Страница 1: ...nctions P 7 1 7 Maintenance P 8 1 8 Troubleshooting P 9 1 9 Registering Setting the Various Functions P 10 1 10 Appendix P 11 1 11 Basic Operation Guide Please read this guide before operating this product After you finish reading this guide store it in a safe place for future reference Network Setting Procedure Security Functions Searching the Installation and Connection Procedure See the Starter...

Страница 2: ...Various Copy Functions For details see Copying from p 3 1 You can enlarge or reduce standard size documents to copy on standard size paper or specify the copy ratio in percentage You can copy 1 sided documents on both sides of paper You can sort copies into sets arranged in page order You can reduce multiple documents to copy them onto one sheet You can make a copy of a 2 sided card onto one side ...

Страница 3: ...esult on a computer display Some printer driver settings are provided as Profiles beforehand You can perform printing which suits your needs only by selecting a Profile Various Printing Functions For details see Printing from a Computer from p 4 1 Miscellaneous Printing Functions For details see Print in the e Manual Enlarged Reduced Printing Booklet Printing MF8350Cdn Only Watermark Printing Swit...

Страница 4: ... the received documents Forward By registering destinations for sending faxes beforehand you can save many steps to enter the destinations when sending the documents One touch keys Coded dialing Group dialing Copy Print Fax Scan Quick View Perform Useful Tasks Network Settings Remote UI Sending a Document Directly from a Computer PC Fax For details see Fax in the e Manual Forwarding the Received F...

Страница 5: ...y printed immediately However you can store the documents temporarily in the memory without printing You can print the stored documents at any time If you do not need them you can delete them saving paper to be used If an external telephone is connected you can switch to the fax receiving mode immediately by dialing the ID number for fax receiving using the dial buttons of the telephone during a p...

Страница 6: ... WIA Driver Windows XP Vista 7 Only Scanning is performed using the driver system supplied with Windows operating systems There are various scanning methods Scanning from the Scanner and Camera Wizard dialog box Scanning from the Windows Fax and Scan dialog box Scanning from Windows Photo Gallery Scanning from an Application Saving the Documents Using the Operation Panel of the Machine Saving the ...

Страница 7: ...ting USB connection Device information Dept ID management Remote UI On Off Configuring the machine Communication mode Communication speed Waiting time for connection DNS WINS server Configuring a computer IP address Subnet mask Gateway address As needed Configuration for communicating with a computer LPD RAW WSD Port settings Sharing settings for the printer As needed Miscellaneous Settings Admini...

Страница 8: ...arpness 3 6 Copying the ID Card 3 7 Changing the Default Values 3 8 4 Printing from a Computer 4 1 Installing the Printer Driver 4 2 Printing from a Computer 4 3 Scaling Print Output 4 3 Printing Multiple Pages on One Sheet 4 3 2 sided Printing MF8350Cdn Only 4 4 C o n t e n t s Contents ii Manuals for the Machine v Available Features vi How to Use This Manual vi Important Safety Instructions vii ...

Страница 9: ... Automatic Forwarding 6 14 Forwarding Received Fax Documents in Memory to Other Destinations Manual Forwarding 6 14 Re forwarding Printing Deleting the Documents in which a Forwarding Error Occurs 6 15 Checking Handling Fax Documents in Memory 6 17 Checking Canceling Fax Transmission Documents 6 17 Printing Received Fax Documents 6 17 Checking Deleting Received Fax Documents 6 18 Checking the Hist...

Страница 10: ...0Cdn Only 9 6 Paper Jams in the Output Area MF8350Cdn Only 9 7 Paper Jams in the Output Area and Rear Cover MF8050Cn Only 9 8 Display Messages 9 9 Error Code 9 9 If Incorrect size setting Appears 9 11 Troubleshooting 9 12 Check the Following First 9 12 Is the power switch turned ON 9 12 Has the power switch been just turned ON 9 12 Is the machine in Sleep mode 9 12 Is the Error indicator on or bli...

Страница 11: ...ily Preface Installing the Machine Configuring and Connecting the Fax Connecting to a Computer and Installing the Drivers Appendix Before Using the Machine Document and Paper Handling Copying Printing from a Computer Registering Destinations in the Address Book Using the Fax Functions Basic Operation Copy Fax Print Scan Network Settings Security Setting and Managing from Computer Troubleshooting M...

Страница 12: ...s are a few examples of how keys to be pressed are expressed in this manual Operation panel keys Key icon Key name Example Stop Display Specify destination Buttons and items on the computer display Preferences Illustrations Used in This Manual Illustrations used in this manual Illustrations of the model MF8350Cdn are used in this manual When there is any difference among the machines it is clearly...

Страница 13: ...steam such as near a cookery or humidifier A location exposed to rain or snow A location near a water faucet or water A location exposed to direct sunlight A location subject to high temperatures A location near open flames When installing the machine gently lower the machine to the installation site so as not to catch your hands between the machine and the floor or between the machine and other e...

Страница 14: ...ine immediately turn off the power switches of the machine and computer and disconnect the interface cable if it is connected Then unplug the power plug from the AC power outlet and contact your local authorized Canon dealer When plugging or unplugging a USB cable when the power plug is plugged into an AC power outlet do not touch the metal part of the connector as this can result in electrical sh...

Страница 15: ...y result in burns When removing jammed paper or when inspecting the inside of the machine do not expose yourself to the heat emitted from the fixing unit and its surroundings for a pro longed period of time Doing so may result in low tempera ture burns even though you did not touch the fixing unit and its surroundings directly as this may result in burns If paper is jammed remove the jammed paper ...

Страница 16: ...stop at mid point as this may cause toner to spill out If toner gets into your eyes or mouth wash them immediately with cold water and consult a physician Others WARNING If you are using a cardiac pacemaker This machine generates a low level magnetic field If you use a cardiac pacemaker and feel abnormalities please move away from this machine and consult your physician immediately Telephone Equip...

Страница 17: ...it again Miscellaneous precautions The maximum power consumption of the machine is as follows MF8350Cdn 1 200 W or less MF8050Cn 900 W or less Electrical noise or a dramatic drop in mains voltage may cause the machine or computer to operate incorrectly or lose data Installation Requirements A location with sufficient space A location with good ventilation A location with a flat even surface A loca...

Страница 18: ... is designed with the latest technology to pro vide trouble free operation If you encounter a problem with the machine s operation try to solve it by using the informa tion in Chapter 9 If you cannot solve the problem or if you think your machine needs servicing contact Canon Customer Care Center at 1 800 OK CANON between the hours of 8 00 A M to 8 00 P M EST Monday through Friday On line support ...

Страница 19: ...ry 2 Rights holders of the SOFTWARE retain in all respects the title ownership and intellectual property rights in and to the SOFTWARE Except as expressly provided herein no license or right expressed or implied is hereby conveyed or granted by rights holders of the SOFTWARE to you for any intellectual property of rights holders of the SOFTWARE 3 You may use the SOFTWARE solely for use with the Ca...

Страница 20: ...ienced radio TV technician for help Use of shielded cable is required to comply with class B limits in Subpart B of Part 15 of the FCC Rules Do not make any changes or modifications to the equipment unless otherwise specified in this manual If you make such changes or modifica tions you could be required to stop operation of the equip ment Canon U S A Inc One Canon Plaza Lake Success NY 11042 U S ...

Страница 21: ... s telephone number time and date in the Starter Guide Users in Canada Pre Installation Requirements for Canon Facsimile Equipment A Location Supply a suitable table cabinet or desk for the machine See Chapter 11 Appendix for specific dimensions and weight B Order Information 1 A single telephone line touch tone or rotary should be used 2 Order a CA11A modular jack which should be installed by the...

Страница 22: ... alimentation doit être de 115 volts et 15 ampères Pour faciliter l installation le jack CA11A doit être assez proche de la prise de courant Remarques Le présent matériel est conforme aux spécifications tech niques applicables d Industrie Canada Avant d installer cet appareil l utilisateur doit s assurer qu il est permis de le connecter à l équipement de la compagnie de télécommunication locale et...

Страница 23: ...e laser beam cannot escape from the machine during any phase of user operation CDRH Regulations The Center for Devices and Radiological Health CDRH of the U S Food and Drug Administration implemented regulations for laser products on August 2 1976 These regulations apply to laser products manufactured from August 1 1976 Compli ance is mandatory for products marketed in the United States CAUTION Us...

Страница 24: ...xviii ...

Страница 25: ...ual Feed Slot 1 5 Paper Cassette 1 6 Operation Panel 1 7 Main Operation Panel 1 7 Fax Operation Panel 1 8 LCD Standby Mode 1 9 Copy Mode 1 9 Fax Mode 1 9 Scan Mode 1 9 Text Input Method 1 10 Changing Entry Mode 1 10 Entering Letters and Symbols 1 10 Moving the Cursor Entering a Space 1 10 Deleting Characters 1 10 Setting the Sleep Timer 1 11 Setting the Current Date and Time 1 12 Before Using the ...

Страница 26: ... Paper Cassette P 1 6 7 Document feeder tray Place document 8 Tray extension Pull out the tray extension when the paper is hanging out of the document feeder tray such as Legal size paper 9 Document delivery tray Documents are output 10 Power switch Turns the power ON or OFF 11 Ventilation slots 12 Speaker 13 Lift handles 14 Scanning area Scans documents from the feeder 15 Output tray Printed pape...

Страница 27: ...t the LAN cable 3 Telephone line jack Connect the telephone cable 4 External telephone jack Connect the external telephone 5 Rear cover Open this cover when clearing paper jams 6 Rating label The current value indicated in this rating label shows the average power current consumption 7 Ventilation slots 8 Power socket Connect the power cord ...

Страница 28: ...installed in this slot 2 M Magenta toner cartridge slot The M magenta toner cartridge is installed in this slot 3 C Cyan toner cartridge slot The C cyan toner cartridge is installed in this slot 4 K Black toner cartridge slot The K black toner cartridge is installed in this slot 5 Toner cartridge tray Tray for installing the toner cartridges ...

Страница 29: ...er guides Adjust to the width of the paper 2 The auxiliary tray MF8350Cdn Only Be sure to pull out this tray when loading paper in the multi purpose tray 3 Tray extension MF8350Cdn Only Open to prevent the paper from hanging out of the multi purpose tray when loading long size paper such as Letter ...

Страница 30: ...he paper guides to the paper 3 Lock release lever changing cassette size When loading paper that is longer than A4 size pull out the paper cassette while holding this lever When the paper cassette is inserted with it extended the front side of the paper cassette is not flush with the front surface of the machine as shown in the figure Set the legal dust cover on the paper cassette ...

Страница 31: ...switching keys Switches the mode to copy fax or scan 6 LCD Displays messages and operation status Displays items texts and numbers when you are specifying settings 7 Numeric keys key key Numeric keys Enter letters and numbers key Switches the entry mode of characters When sending a fax use this key to transmit the tone signal from the dial line key Press to enter symbols 8 Report key Prints report...

Страница 32: ...s specified or registered settings 18 Back key Returns to the previous screen 19 Error indicator Blinks when an error occurs 20 Processing Data indicator Blinks during transmission and turns on when the machine has waiting jobs 21 Select Paper Settings key Registers a size and type of paper to be loaded in the paper cassette or multi purpose tray Paper Select indicator The indicator for the select...

Страница 33: ...with white letters on a black background and pressing OK proceeds to the next screen Copy Press Start 100 LTR Density 0 Original Type Text 2 Sided Off 1 1 Fax Mode Fax mode screen When using the fax function press to switch to the standby display Specify destination 2010 01 01 12 52AM RX Mode Auto Resolution 200 x 1 Fax menu screen When the fax mode screen is displayed you can select an item using...

Страница 34: ...nterable text 0 _ _ Nonenterable text Moving the Cursor Entering a Space Move with or Move the cursor to the end of the text and press to enter a space Deleting Characters Delete with Clear Pressing and holding Clear key deletes all characters Example Enter CANON 1 Make sure that the input mode is A 2 Repeatedly press to enter C Register Username C Apply Entry Mode A 3 Repeatedly press to enter A ...

Страница 35: ... 5 Press Menu to close the menu screen NOTE When entering sleep mode Energy Saver turns on green To enter sleep mode manually Press Energy Saver Situations where the machine does not enter sleep mode When the machine is in operation When the Processing Data indicator lights or blinks When a message appears on the display and the Error indicator blinks When the machine is operating such as adjustin...

Страница 36: ... DD YYYY DD MM YYYY 12 24 Hour Clock Specifies the display format of time Select a display format with or and then press OK You can select a display format from the following two options 12 Hour AM PM 24 Hour Current Time Settings Specifies the current time and date Use the numeric keys to enter the date and time and then press OK Move the cursor with or Switch between AM and PM with or Current Ti...

Страница 37: ...nual Feed Slot for MF8050Cn 2 12 Precautions when Loading Paper 2 13 Paper Loading Capacity 2 13 Paper Loading Orientation 2 14 When printing paper with a letterhead or logo previously printed paper 2 14 Printing on Envelopes 2 15 Setting a Paper Size and Type 2 16 For the Paper Cassette 2 16 Registering the Default Paper Settings for the Multi purpose Tray Manual Feed Slot 2 16 Registering a Cust...

Страница 38: ...per IMPORTANT When placing document Place the document after glue ink or correction fluid on the document is completely dry To prevent paper jams in the feeder Do not use any of the following Wrinkled or creased paper Carbon paper or carbon backed paper Curled or rolled paper Coated paper Torn paper Onion skin or thin paper Documents with staples or paper clips attached Paper printed with a therma...

Страница 39: ...r 1 8 in 3 mm 1 8 in 3 mm 3 64 in 1 mm 3 64 in 1 mm 1 8 in 3 mm 1 8 in 3 mm 3 64 in 1 mm 3 64 in 1 mm Scan Saving in a Computer Platen Glass Feeder 1 16 in 1 5 mm Scan Saving in a USB Memory Platen Glass Feeder 1 16 in 1 5 mm 1 64 in 0 5 mm 1 64 in 0 5 mm ...

Страница 40: ...r Be careful not to get your fingers caught This may cause personal injury Do not press down the feeder forcefully This may damage the platen glass and cause personal injury Loading Document in the Feeder 1 Spread the document guides a little wider than the actual document width 2 Pull out the tray extension before loading the large size document Pull out the tray extension when the document is ha...

Страница 41: ...f the paper If the document guides are too loose or too tight this may result in misfeeds or paper jams While scanning a document Do not add or remove documents Scanning documents is complete Remove the documents from the document delivery tray to avoid paper jams Avoid scanning the same document more than 30 times When scanned repeatedly documents can become folded or torn which may cause paper j...

Страница 42: ... Envelope Monarch 3 7 8 x 7 1 2 98 4 mm x 190 5 mm 4 5 Envelope C5 6 3 8 x 9 162 mm x 229 mm 4 Envelope B5 7 x 10 176 mm x 250 mm 4 Envelope DL 4 3 8 x 8 5 8 110 mm x 220 mm 4 Custom Paper Size 6 7 1 Only in MF8350Cdn available in the optional paper feeder 2 Only in MF8350Cdn auto 2 sided print is available 3 Received documents reports or lists can be printed 4 Use envelopes with the flap closed 5...

Страница 43: ...F8350Cdn 50 sheets MF8050Cn 50 sheets MF8350Cdn 20 sheets MF8050Cn 1 sheet Index Card Heavy 2 MF8350Cdn 50 sheets MF8050Cn 15 sheets MF8350Cdn 10 sheets MF8050Cn 1 sheet Envelope Envelope MF8350Cdn 10 sheets MF8050Cn 10 sheets MF8350Cdn 5 sheets MF8050Cn 1 sheet 1 Only in MF8350Cdn auto 2 sided print is available 2 Only in MF8350Cdn auto 2 sided print in A4 or LETTER size is available 3 Use only t...

Страница 44: ...in 5 mm 1 4 in 5 mm 1 4 in 5 mm 1 4 in 5 mm Printable Range The shaded area indicates the approximate printable area of A4 paper Note that the margin widths listed below are rough standards and there may be slight variations in actual use ...

Страница 45: ...per guides a little wider than the actual paper width 1 Slide the side paper guides Holding the lock release lever slide the paper guides The side paper guides move together The lock release lever is not installed in MF8050Cn 2 Slide the paper guide at the front center Holding the lock release lever slide the paper guides MF8350Cdn 1 1 2 2 MF8050Cn 1 1 2 2 When loading Legal size paper Holding the...

Страница 46: ...cassette with the print side up 4 Align the paper guides with the loaded paper 1 1 2 2 5 Hold down the paper then set it under the hooks A on the paper guides Make sure that the paper stack does not exceed the line of the load limit mark B MF8350Cdn A A A B B MF8050Cn A B A B A 6 Insert the paper cassette into the machine Push it into the printer firmly When loading Legal size paper When the paper...

Страница 47: ...nter of the tray to open the multi purpose tray IMPORTANT Be sure to insert the paper cassette If the paper cassette is not inserted you cannot print from the multi purpose tray 2 Pull out the auxiliary tray 3 When loading long size paper open the tray extension 4 Spread the paper guides a little wider than the actual paper width 5 Gently insert the paper into the multi purpose tray with the print...

Страница 48: ...ual feed slot when you want to copy or print on a paper that is different from what is in the paper cassette 1 Slide the paper guides so they align with the width of the loaded paper as shown in the figure Adjust the paper guides to the size of the paper then load the paper deeply to back of the tray IMPORTANT Be sure to insert the paper cassette If the paper cassette is not inserted you cannot pr...

Страница 49: ...flatten it before loading NOTE Detailed information about usable paper Paper Requirements P 2 6 Size abbreviation on the paper guides of the paper cassette Paper size Paper guide Legal LGL Letter LTR Executive EXEC B5 JIS B5 Paper Loading Capacity MF8350Cdn A B C Paper type Paper source A Multi purpose tray B Cassette 1 C Cassette 2 optional Plain paper Ex 21 lb Bond 80 g m2 Approx 50 sheets Appro...

Страница 50: ...Selecting Print Side MF8350Cdn Only P 2 19 is set to Print Side Priority with the printing side facing down with the printing side facing down Automatic 2 sided printing MF8350Cdn only with the front side facing down with the front side facing down Multi purpose tray MF8350Cdn only Portrait layout Landscape layout 1 sided printing When Selecting Print Side MF8350Cdn Only P 2 19 is set to Print Spe...

Страница 51: ... flap is toward the back of the paper cassette when they are viewed from the front Close the flap and load the envelope The multi purpose tray MF8350Cdn Only Envelope COM10 Load the envelopes so that the flap is toward the left of the machine when it is viewed from the front Close the flap and load the envelope Envelope B5 Load the envelopes so that the flap is toward the back of the machine when ...

Страница 52: ...e Registering a Custom Paper Size P 2 17 The registered custom paper is listed at the top Select it with Paper Size LTR LGL STMT EXEC 5 Select a paper type with or and then press OK Paper Type Plain 2 19 lb Bond Recycled Color Heavy 1 24 lb Bond 6 Press Reset to return to standby mode Registering the Default Paper Settings for the Multi purpose Tray Manual Feed Slot If you want to always load the ...

Страница 53: ...m paper 1 Select the direction with or and then press OK Specify Size Apply X 0 Y 0 X Y 2 Specify the size with or and then press OK You can also enter values using the numeric keys Set Length for X 3_1 8 3 8_1 2 3 Select Apply with or and then press OK Specify Size Apply X 3_1 8 Y 5_1 16 X Y 9 Select the paper type with or and then press OK Paper Type Plain 2 19 lb Bond Recycled Color Heavy 1 24 ...

Страница 54: ...rawer 1 Drawer 2 Register Custom Paper 4 Select Not Registered with or and then press OK When selecting the registered custom paper you can edit and delete the custom paper Register Custom Paper 1 Not Registered 2 Not Registered 3 Not Registered 5 Specifies the size of X direction and Y direction 1 Select the direction with or and then press OK Specify Size Apply X 0 Y 0 X Y 2 Specify the size wit...

Страница 55: ...printing and 1 sided printing 1 2 3 4 1 2 3 4 1 sided printing 2 sided printing Front Back Specify the setting in the following case When performing 2 sided printing and 1 sided printing on previously printed paper OK Menu Keys to be used for this operation 1 Press Menu 2 Select Common Settings with or and then press OK Menu Sound Volume Control Common Settings Copy Settings Memory Media Settin 3 ...

Страница 56: ...lti purpose tray or when printing pages of the landscape layout see Paper Loading Orientation P 2 14 The procedure for loading paper is the same for 2 sided printing and 1 sided printing When performing 1 sided printing load paper with the printing side facing down When performing 2 sided printing load paper with the front side first page facing down 6 Press Menu to close the menu screen ...

Страница 57: ... Adjusting the Density 3 3 Selecting Image Quality Copy 3 4 2 Sided Copying MF8350Cdn Only 3 4 Enlarging Reducing Copies 3 5 Multiple Documents onto One Sheet N on 1 3 5 Collating Copies 3 6 Erase Dark Borders and Frame Lines Frame Erase 3 6 Emphasize the Outline of an Image Sharpness 3 6 Copying the ID Card 3 7 Changing the Default Values 3 8 Copying ...

Страница 58: ...lating Frame erase Sharpness 4Use numeric keys to enter the desired copy quantity 1 to 99 5 Press Color or B W For color copy Press Color For black and white copy press B W Canceling Copy Jobs You can cancel scanning or ongoing jobs in the following procedure 1 Press Stop 2 When multiple jobs are being processed select the jobs to be canceled with or and then press OK 3 When the Cancel message app...

Страница 59: ...een Density adjustment Setting screen Density Background Default Color Balance Defau Adjust the density with or OK Makes the copy density lighter Makes the copy density darker Background Adjustment Setting screen Density Background Default Color Balance Defau Select Background with or Select Fine Adjustment with or Background Off Fine Adjustment Off Does not adjust the background density Fine Adju...

Страница 60: ...n for color copy Text Photo Map This option is suitable for documents that contain text and photos or fine diagrams and text such as maps Text Photo Map Quality This option is suitable for documents that contain text and photos or fine diagrams and text such as maps This option scans the document at a high resolution You can set the image quality priority to text or photos Printed Image This optio...

Страница 61: ...th or OK You can display the setting screen also by selecting Scale in the copy mode screen For the preset zoom you can select from the following setting values 100 Direct 50 400 Max 25 Min 200 129 STMT LTR 78 LGL LTR 64 LTR STMT 2 on 1 Reduce two page documents to fit on one sheet of paper 4 on 1 Reduce four page documents to fit on one sheet of paper When specifying the layout 1 Select Select La...

Страница 62: ... copies of a three page document printouts of a complete job are grouped and arranged in this page order 1 2 3 1 2 3 1 2 3 Emphasize the Outline of an Image Sharpness Copy mode screen Setting screen Copy Press Start 100 LTR Collate Off Erase Frame Off Sharpness 0 1 1 Sharpness Lowers the sharpness and decreases the contrast on an image s outline It is appropriate for documents which contain printe...

Страница 63: ...1 4 Select ID Card Copy with or and then press OK N on 1 Off 2 on 1 4 on 1 ID Card Copy 5 Press Color or B W After scanning the document completely proceed to the next step 6 Turn and place the card Place the card with a 1 4 5 mm space created from the left edge of the platen glass Additionally align the center of the card with the arrow mark If you want to arrange the cards horizontally If you wa...

Страница 64: ... selected and then press OK Copy Settings Change Defaults 4 Select a setting item with or and then press OK Change Defaults Apply No of Copies 1 Density 0 Original Type Text For details on the settings see the following items Selecting Copy Papers P 3 3 Adjusting the Density P 3 3 Selecting Image Quality Copy P 3 4 2 Sided Copying MF8350Cdn Only P 3 4 Enlarging Reducing Copies P 3 5 Multiple Docum...

Страница 65: ...rom a Computer Installing the Printer Driver 4 2 Printing from a Computer 4 3 Scaling Print Output 4 3 Printing Multiple Pages on One Sheet 4 3 2 sided Printing MF8350Cdn Only 4 4 Checking Deleting Print Jobs 4 4 Checking Print Status in the Middle of Printing or Waiting 4 5 Deleting Print Job in the Middle of Printing or Waiting 4 5 ...

Страница 66: ...About the UFRII LT printer driver The UFRII LT printer driver has the following features The UFRII LT printer driver enables you to output print data at an optimum speed by dividing the workload using a computer and the printer As well as providing faster and more stable printing than conventional models the UFRII LT printer driver uses less memory to operate In addition to the conversion of print...

Страница 67: ...in Page Size and Output Size 4 If you want to increase or decrease the magnification manually select Manual Scaling specify the scaling ratio for Scaling NOTE If the ratio is less than 25 or more than 200 the document is printed without scaling on the paper specified in Output Size 5 Click OK Printing Multiple Pages on One Sheet This mode enables you to reduce multiple pages to fit onto one sheet ...

Страница 68: ...view the online help The display may differ according to the operating system as well as the type and version of the printer driver 1 Display the Finishing sheet For details on the procedure for displaying the printer driver see Printing with the Printer Driver in the e Manual 2 Select 2 sided Printing from Print Style 3 Select binding edge for the paper printout from Binding Location The output i...

Страница 69: ...Status Monitor Cancel to close the Status Monitor Cancel screen Deleting Print Job in the Middle of Printing or Waiting NOTE If the Processing Data Indicator on the operation panel is Turned on blinking A job is being processed Turned off Not jobs are in the memory 1 Press Status Monitor Cancel 2 Select Print Job Status History with or and then press OK Status Monitor Cancel Device Status Copy Job...

Страница 70: ...4 6 Printing from a Computer ...

Страница 71: ... 2 Storing Editing One Touch Keys 5 3 Storing Editing from the Operation Panel 5 3 Storing Editing from the Remote UI 5 4 Storing Editing Coded Dial Codes 5 6 Storing Editing from the Operation Panel 5 6 Storing Editing from the Remote UI 5 8 Storing Editing Recipients for Group Dialing 5 9 Storing Editing from the Operation Panel 5 9 Storing Editing from the Remote UI 5 12 Registering Destination...

Страница 72: ...ial code Up to 181 recipients can be registered Storing Editing Coded Dial Codes P 5 6 Group Dialing You can group the registered recipients up to 199 recipients under one touch keys and coded dial codes Group addresses are to be registered for an unused one touch key or coded dial code Simply specifying the one touch key or coded dial code allow you to specify multiple addresses registered as a g...

Страница 73: ...ination Type Fax Group 4 Select the number to be registered with or and then press OK Enter Registration No 01 Not Registered 02 Not Registered 03 Not Registered 04 Not Registered 5 Confirm that Name is selected and then press OK Fax Apply Name Destination One Touch 01 6 Use the numeric keys to specify Name Text Input Method P 1 10 Name Max 16 char CANON Apply Entry Mode A 7 Select Apply with and ...

Страница 74: ... Apply Name CANON02 Destination 9876543 One Touch 02 When deleting a registered one touch key 1 Press CANON 0123456789 All A Z 2 Select Delete from Address Book with and then press OK Edit Address Book Address Book Details Delete from Address All A Z 3 Select a destination that you want to delete with or and then press OK CANON 0123456789 All A Z 0 9 4 Select Yes with and then press OK Delete from...

Страница 75: ...he number or name 2 Click Edit 3 Specify the required settings in the edit screen for destinations and then click OK When deleting a registered one touch key 1 Select the check box for which you want to delete the number and then click Delete 5 Click Not Registered or the number which is not registered 6 Select Fax from Type 7 Specify the required settings and then click OK 1 2 ...

Страница 76: ...Destination Type Fax Group 4 Confirm that Name is selected and then press OK Fax Apply Name Destination Coded Dial 001 5 Use the numeric keys to specify Name Text Input Method P 1 10 Name Max 16 char CANON Apply Entry Mode A 6 Select Apply with and then press OK Name Max 16 char CANON Apply Entry Mode A 7 Select Destination with and then press OK Fax Apply Name CANON Destination Coded Dial 001 8 U...

Страница 77: ...edit with or and then press OK Name Destination Coded Dial Fax Apply Name CANON02 Destination 9876543 Coded Dial 002 5 Select Apply with after editing and then press OK 6 Select Apply with and then press OK Fax Apply Name CANON02 Destination 9876543 Coded Dial 002 When deleting a registered coded dial code 1 Press CANON 0123456789 All A Z 2 Select Delete from Address Book with and then press OK Ed...

Страница 78: ...anager PIN 3 Click OK 1 2 3 4 Click Address Coded Dial 1 2 When storing a new coded dial code Proceed to Step 5 When editing a registered coded dial code 1 Click the number or name 2 Click Edit 3 Specify the required settings in the edit screen for destinations and then click OK When deleting a registered coded dial code 1 Select the check box for which you want to delete the number and then click...

Страница 79: ... CANON0300112233 All A Z When registering new group addresses 1 Press 2 Confirm that Register New to Address Book is selected and then press OK Register New to Addr Edit Address Book Address Book Details All A Z 3 Select One Touch or Coded Dial with and then press OK Register Dest Coded Dial One Touch 4 Select Group with and then press OK Destination Type Fax Group 5 If you selected One Touch in S...

Страница 80: ...76543 CAON03 0011223 GROUP 2 Destinat All A Z 0 9 4 Select Destination with and then press OK Group Apply Name GROUP Destinations 2 One Touch 03 5 Confirm that Add is selected and then press OK Destination Apply Add CANON010123456789 CANON029876543210 6 Select a destination to be added with or and then press OK CAON01 0123456 CAON02 9876543 CAON03 00112233 All A Z 0 9 7 Select Apply with and then ...

Страница 81: ...ress Book Details All A Z 3 Select a group for which the group name is changed with or and then press OK CAON02 9876543 CAON03 0011223 GROUP 2 Destinat All A Z 0 9 4 Confirm that Name is selected and then press OK Group Apply Name GROUP Destinations 2 One Touch 03 5 Change Name Name Max 16 char GROUP A Apply Entry Mode A 6 Select Apply with and then press OK Name Max 16 char GROUP A Apply Entry Mo...

Страница 82: ...ick Edit 3 Click Address Book 4 Click One Touch or Coded Dial from the drop down list select the check box for the number to be added in a group and then click OK When deleting the destination from registered group addresses 1 Click the number or name 2 Click Edit 3 Select the destination from Members List to be deleted and then click Delete 4 Click OK When changing group name of registered group ...

Страница 83: ...ess Book 8 Click One Touch or Coded Dial from the drop down list select the check box for the number to be registered in a group and then click OK 1 3 2 9 Check if the registered destinations are displayed in Members List and then click OK 1 2 ...

Страница 84: ...5 14 Registering Destinations in the Address Book ...

Страница 85: ...s in which a Forwarding Error Occurs 6 15 Checking Handling Fax Documents in Memory 6 17 Checking Canceling Fax Transmission Documents 6 17 Printing Received Fax Documents 6 17 Checking Deleting Received Fax Documents 6 18 Checking the History of Received Sent Fax Documents 6 19 Changing the Default Values for Fax 6 20 Changing the Fax Settings Items Specified Using the Menu Button 6 21 Setting pr...

Страница 86: ...0 4 Specify the destination These are the following methods to specify a destination For details see P 6 4 to 6 5 5 Press B W When placing documents on the platen glass Perform the following procedure 1 Select the size of the original document with or and then press OK 2 Press B W for each document 3 When all documents are scanned completely select Start Sending and then press OK Entering the fax ...

Страница 87: ... Select Sharpness with or and then press OK If you want to clearly scan halftone dots which of printed photos adjust the sharpness to This can reduce the moire effect patchy patterns called moire If you want to clearly scan text or lines adjust the sharpness to This is appropriate for scanning documents which are blueprints or thinly penciled Resolution 200 x 100 dpi Norma 200 x 200 dpi Fine 200 x...

Страница 88: ...c keys To use this feature you need to register destinations in coded dials beforehand Storing Editing Coded Dial Codes P 5 6 If incorrect keys are pressed After pressing Reset repeat the procedure from specifying the settings for the document scanning Specifying Destinations Using the One Touch Keys Press the one touch key 01 to 19 of the destination To use this feature you need to register desti...

Страница 89: ...ecting All displays all the recipients CANON 012XXXXXX GroupA 2 Destin User01 012xxxxx All A Z 3 Select a recipient with or and then press OK CANON 012XXXXXX GroupA 2 Destin User01 012xxxxx All A Z Specifying Destinations Using Group Dialing When the numbers are registered in a one touch key Press the one touch key 01 to 19 in which destination groups are registered When the numbers are registered...

Страница 90: ...ess 3 Press Redial 4 Select a recipient with or and then press OK Redial 012XXXXXX 5 Press B W NOTE Destinations that can be redialed A destination entered with the numeric keys Up to the last three destinations Only the last destination when using Hook When restricting the sending function Redialing is not available Restrict Sending from History P 6 27 When turning this machine OFF The registered...

Страница 91: ...roceed to Step 9 8 Ask the recipient to set their fax machine to receive faxes 9 When you hear a beep press B W and hang up the handset Aftercompletingthescanning youcansendthefaxdocuments NOTE Restrictions for manual sending When placing documents on the platen glass only one page can be sent Furthermore the group dialing function is not available Check the dial tone before entering a fax number ...

Страница 92: ...ct to a recipient by dialing an international telephone identification number country code and the recipient s fax number at the same time In this case add a pause after the international telephone identification number Because adding a pause provides a point where wait time can be added when dialing it is easier to connect to the recipient FAX Numeric keys Start Pause Keys to be used for this ope...

Страница 93: ...nation 2010 01 01 12 52AM Add Destination Confirm Delete Dest 3 Selectamethodforaddingdestinationswith or and then press OK Fax New Address Book Coded Dial Specifying Destinations P 6 4 Add Destination Fax New Address Book Coded Dial 4 Repeat Step 2 and 3 to enter all the destinations 5 Press B W NOTE The number of destinations capable of sequential broadcast You can select destinations in the fol...

Страница 94: ... rings in Incoming Ring on P 6 25 Without an external telephone connected When the call is a fax When the call is a fax When the call is a fax When the call is a voice call When the call is a voice call When you pick up the handset while the incoming call rings When you do not pick up the handset while the incoming call rings When the call is a voice call An incoming call rings for the specified n...

Страница 95: ...nging When you do not pick up the handset during ringing You can start talking as is The machine hangs up the telephone or switches to the fax receive mode 4 Receives a fax automatically An incoming call rings To configure so that the incoming call does not ring see Incoming Ring P 6 25 Respond to a telephone call by picking up the handset Fax Tel mode The telephone rings the number of times speci...

Страница 96: ...le option if you expect to use the machine mainly as a telephone and only occasionally receive fax documents DRPD Distinctive Ring Pattern Detection mode The DRPD service allows you to assign distinctive ring patterns for two phone numbers on a single telephone line Your machine will automatically monitor incoming calls and based on the ring pattern will let you know if the incoming call is a fax ...

Страница 97: ...art Time 6 Incoming Ring Time After Ring Receive Ring Start Time Specify the duration for which the machine attempts to detect the fax tone before it starts ringing Specify a duration between 5 seconds and 30 seconds and then press OK Incoming Ring Time Set the ringing time Specify a duration between 15 seconds and 300 seconds and then press OK After Ring Specify the operation for when the phone i...

Страница 98: ... operation 1 Press Menu 2 Select System Settings with or and then press OK Menu Printer Settings Timer Settings Adjustment Cleaning System Settings When the system manager ID and system manager PIN are specified Use the numeric keys to enter the ID and number and then press ID Sys Manager ID PIN Login Press ID Logout Press ID Manager ID 0123456 PIN 3 Select Forwarding Settings with or and then pre...

Страница 99: ...ination You can specify the destination only with one touch keys or coded dial codes Specifying Destinations P 6 4 CANON 012XXXXXX GroupA 2 Destin User01 012xxxxx All A Z 7 Press B W Re forwarding Printing Deleting the Documents in which a Forwarding Error Occurs OK Status Monitor Cancel Keys to be used for this operation 1 Press Status Monitor Cancel 2 Select Fax Job Status History with or and th...

Страница 100: ...r Cancel to close the screen For printing 1 Select Print with or and then press OK Details Delete Print Forward Job Number 0004 2 Select Yes with and then press OK Print No Yes 3 Press Status Monitor Cancel to close the screen For deleting 1 Select Delete with or and then press OK Details Delete Print Forward Job Number 0004 2 Select Yes with and then press OK The job will be deleted Delete No Yes...

Страница 101: ...Sending 12 54AM Waiting Scan The detailed information is displayed Details Cancel Job Number 0004 Status Sending Time 01 01 12 52AM For canceling 1 Select Cancel with or and then press OK Details Cancel Job Number 0004 Status Sending Time 01 01 12 52AM The sending job is canceled Fax transmission to all the destinations will be canceled for sequential broadcast 2 Select Yes with and then press OK ...

Страница 102: ... documents saved in the memory are printed 6 Press Menu to close the menu screen Checking Deleting Received Fax Documents You can check detailed information about fax documents saved in memory You can also delete unnecessary documents NOTE Stored documents in memory You can specify the destination to forward the documents Forwarding Received Fax Documents in Memory to Other Destinations Manual For...

Страница 103: ...cuments OK Status Monitor Cancel Keys to be used for this operation 1 Press Status Monitor Cancel 2 Select Fax Job Status History with or and then press OK Status Monitor Cancel Device Status Copy Job Status Fax Job Status Histo Print Job Status Hi 3 Select Job History with or and then press OK Fax Job Status History Send Job Status Receive Job Status Job History Forwarding Error Sta 4 Select a jo...

Страница 104: ...edia Settin Send Receive Setting 3 Select Common Settings with or and then press OK Send Receive Settings Common Settings Fax Settings 4 Select Send Settings with or and then press OK Common Settings Send Settings Receive Settings 5 Select Change Defaults with or and then press OK Send Settings Register Username Change Defaults Sender ID 6 Select a setting item with or and then press OK Resolution...

Страница 105: ...Settings Memory Media Settin Send Receive Setting 3 Select Fax Settings with or and then press OK Send Receive Settings Common Settings Fax Settings 4 Select Send Settings with or and then press OK Fax Settings Basic Settings Send Settings Receive Settings Fax Setup Guide 5 Select ECM Sending with or and then press OK Send Settings ECM Sending Pause Time Auto Redial Check Dial Tone Befo 6 Select O...

Страница 106: ...ation where the sender ID is printed Mark No as TEL FAX FAX TEL Select a character to be added in front of a telephone number Fax No Register your machine s fax number How to display the settings Send Receive Settings Fax Settings Basic Settings Fax No Settings You can enter numbers with the numeric keys up to 20 characters Select Line Type Change the setting if you cannot send faxes If you are no...

Страница 107: ...or redialing Redial Interval 2 to 99 minutes Specifies the interval for redialing Redial If Error Occurs Off On Specifies whether or not to redial when a sending error occurs Check Dial Tone Before Sending When sending a fax you can specify whether or not to dial after checking the dial tone How to display the settings Send Receive Settings Fax Settings Send Settings Check Dial Tone Before Sending...

Страница 108: ...n ratio Preset Reduces the image size at a ratio specified in Reduction Ratio Reduction Ratio 97 95 90 75 Specify a reduction ratio for when Reduction Mode is set to Preset Reduction Direction Vertical Horizontal Vertical Vertical Horizontal Reduces the image size in vertical horizontal direction Vertical Reduces the image size only in vertical direction Received Page Footer You can specify whethe...

Страница 109: ...r fax receiving using the dial buttons of the telephone during a phone call How to display the settings Send Receive Settings Fax Settings Receive Settings Remote Receiving Settings Boldface Default settings Off Disables the remote receiving function On Remote Receive ID 00 to 25 to 99 times Enables the remote receiving function You can specify an ID number for fax receiving in Remote Receive ID M...

Страница 110: ...eful when there is difficulty initiating the sending of a document How to display the settings System Settings Communications Settings Fax Settings Send Start Speed Settings Boldface Default settings 33600 bps 14400 bps 9600 bps 7200 bps 4800 bps 2400 bps Receive Start Speed This function changes the receive start speed which is useful when there is difficulty initiating the receiving of a documen...

Страница 111: ... in the address book one touch keys coded dial codes How to display the settings System Settings Restrict Sending Restrict New Destinations Settings Boldface Default settings Off Does not perform restriction On Performs restriction Specifies destinations registered under the one touch keys and coded dial codes Allow Driver Faxing You can specify whether to permit sending of faxes from computer usi...

Страница 112: ...6 28 Using the Fax Functions ...

Страница 113: ...a computer or a USB memory If you are a Macintosh user see the Scanner Driver Guide Basic Operation Methods for Scanning 7 2 Scanning Documents and Saving Them in a Computer USB Network Connection 7 2 Saving Scanned Documents in a USB Memory 7 3 Using the Scan Functions ...

Страница 114: ...ected by a USB cable This screen is not displayed If eleven or more computers are connected via a network The eleventh and subsequent computers are not displayed you cannot scan Reduce the number of computers connected to this machine via a network e Manual Scan Scanning Documents and Saving Them in a Computer USB Network Connection Registering the Scanner in MF Network Scan Utility Network Connec...

Страница 115: ...file type of data Connect the USB memory formatted in FAT to the machine directly Only PDF is supported as the file type to save For more details see Scan in the e Manual OK SCAN Start Keys to be used for this operation 1 Connect the USB memory to the USB memory port When the USB memory is connected the access indicator turns on When the access indicator is blinking the memory media is being read ...

Страница 116: ...ta is saved Folder name The SCAN_00 folder is created in the uppermost hierarchy root directory in the USB memory and the file is saved in this folder When the SCAN_00 folder is full the SCAN_01 folder is created and folders up to SCAN_99 will be created in order File name A file name between SCAN0000 PDF and SCAN9999 PDF is provided The two digit number of the folder is provided in the fifth and ...

Страница 117: ...es 8 5 About the Supplied Toner Cartridge 8 5 About Replacement Toner Cartridges 8 5 Handling Toner Cartridges 8 6 Checking the Toner Level 8 6 When a Message Appears 8 7 Replacing Toner Cartridges 8 7 Precautions when Replacing Toner Cartridges 8 8 Purchase Consumables 8 9 Recycling Used Cartridges 8 10 The Clean Earth Campaign 8 10 U S A PROGRAM 8 10 Packaging 8 10 Shipping 8 11 CANADA PROGRAM C...

Страница 118: ...he Exterior Clean the exterior of the machine and ventilation slots 1 Turn OFF the main power switch and disconnect the power cord 2 Clean the exterior of the machine with a soft well wrung out cloth dampened with water or mild detergent diluted with water 3 When the printer is completely dry connect the power cord and then turn ON the power Cleaning the Fixing Unit In the following cases the fixi...

Страница 119: ...rocessi Special Processing Clean Fixing Unit Clean ITB 4 Press OK Cleaning starts It takes approx 51 seconds for MF8350Cdn and approx 83 seconds for MF8050Cn Clean ITB Start 5 Press Menu to close the menu screen Cleaning the Platen Glass Follow this procedure to clean the platen glass and under surface of the feeder WARNING When cleaning the outside of the machine Turn OFF the main power switch an...

Страница 120: ...ss Menu 2 Press or to select Adjustment Cleaning and then press OK Menu Send Receive Settin Printer Settings Timer Settings Adjustment Cleaning 3 Press or to select Clean Feeder and then press OK Adjustment Cleaning Special Processing Clean Fixing Unit Clean ITB Clean Feeder 4 Load 10 sheets of A4 or Letter size plain paper in the feeder and then press OK Cleaning starts It takes approximately 65 ...

Страница 121: ...e the toner cartridge earlier than the described life time depending on installation environment of the machine the printing paper size or the document type MF8350Cdn Toner cartridges Target for replacing toner cartridges CanonCartridge118Black AverageyieldofK Black tonercartridge 1 2 3 400 sheets CanonCartridge118Yellow CanonCartridge118Magenta CanonCartridge118Cyan AverageyieldofCompositeY Yello...

Страница 122: ...equired when transporting the machine such as during relocation Do not store the toner cartridge in a salty atmosphere or where there are corrosive gases such as from aerosol sprays Do not remove the toner cartridge from the machine unnecessarily Print quality may deteriorate if the drum surface is exposed to light or is damaged Always hold the toner cartridge by its handle to avoid touching the d...

Страница 123: ...r toner cartridge Whenatonercartridgehas reachedtheendofitslife Whenatonercartridgeis damaged Replacethetonercartridge withanewone However whenthecyan magenta oryellowtonerruns out youcanperformonly blackandwhiteprinting Black yellow magenta or cyan will appear in Toner Color Replacing Toner Cartridges Before replacing toner cartridges see Precautions when Replacing Toner Cartridges P 8 8 If the m...

Страница 124: ...ront cover as this may damage the machine Precautions when Replacing Toner Cartridges See Maintenance and Inspections P viii in Important Safety Instructions as well WARNING Do not dispose of a used toner cartridge in open flames This may cause the toner remaining inside the cartridges to ignite resulting in burns or fire CAUTION Precautions if you get toner on your hands or clothing If toner gets...

Страница 125: ...tive cover Keep the protective bag for the toner cartridge and the removed drum protective cover You will need them when you remove the toner cartridge for machine maintenance or other purposes Do not touch the high voltage contacts A This may result in damage to the machine A A Precautions when installing toner cartridges The position of the toner cartridges in the machine is determined by the to...

Страница 126: ... Canada through donations to the World Wildlife Fund Canada and The Nature Conservancy of Canada Since its inception The Canon Cartridge Recycling Program has collected huge amount of cartridges that otherwise would have been discarded into landfills or similar facilities Instead this rapidly growing program returns used cartridges to the manufacturing process thus conserving an array of resources...

Страница 127: ...ent exceeds the above limits please call 1 800 OK Canon for special shipping information Please Note Do not send defective cartridges for replacement Defective cartridges under warranty should be exchanged by an authorized dealer or service facility as provided in the warranty Shipping Apply the UPS authorized returning label provided in this guide Residents of Alaska and Hawaii Do not use the UPS...

Страница 128: ...tion box can accommodate eight individual cartridge boxes Place your eight individually packaged boxes of empty cartridges into the Canon collection box Seal the box Apply the Canon Canada Inc Canada Post label provided in this brochure Canon s labels are specially marked so that Canon pays the postage Deliver to any local Canada Post outlet or franchise Customers who hold a Commercial pick up agr...

Страница 129: ...s and cord USBcable 2 Turnthecomputeroff 3 Removeitfromthemachine LANcable 4 Removeitfromthemachine Powercord 5 UnplugthepowerplugfromtheACpoweroutlet 6 Removeitfromthemachine Whether the cable is connected or not varies depending on your environment 2 If telephone cables are connected disconnect all the telephone cables from the machine 3 Pull out the paper cassette Hold the paper cassette with b...

Страница 130: ...g materials and pack the machine and the parts appropriately Precautions when Transporting the Machine WARNING When transporting the machine Be sure to turn off the power switches of the machine and your computer and then unplug the power plug and interface cables Failure to do so can damage the cables or cords resulting in a fire or electrical shock CAUTION Do not carry the machine with the paper...

Страница 131: ... 9 7 Paper Jams in the Output Area and Rear Cover MF8050Cn Only 9 8 Display Messages 9 9 Error Code 9 9 If Incorrect size setting Appears 9 11 Troubleshooting 9 12 Check the Following First 9 12 Is the power switch turned ON 9 12 Has the power switch been just turned ON 9 12 Is the machine in Sleep mode 9 12 Is the Error indicator on or blinking 9 12 Is a message displayed on the display 9 13 Is t...

Страница 132: ...ct with your skin or clothing Wash with cold water Warm water will set the toner When removing the jammed document or paper When a paper jam occurs follow the message displayed in the screen to remove jammed paper completely without a piece of paper remaining Also do not put your hands forcibly into the parts other than the parts directed on the screen Failure to do so may result in burns or injur...

Страница 133: ... OK to exit the operation screen Paper jam Press to display steps End Press OK 2 Pull out the paper cassette Hold the paper cassette with both hands If the optional paper cassette Cassette 2 is installed in MF8350Cdn pull out the optional paper cassette also 3 Remove the paper by pulling it gently 4 Insert the paper cassette into the machine If the optional paper cassette Cassette 2 is installed i...

Страница 134: ...to display steps End Press OK 2 Remove the paper by pulling it gently If the jammed paper cannot be removed easily Do not try to remove it forcefully but proceed to Step 3 3 Close the multi purpose tray 4 Pull out the paper cassette Hold the paper cassette with both hands 5 Lower the manual feed transport guide 1 Hold the tabs A on both sides 2 Push them down A IMPORTANT Do not touch the rubber pa...

Страница 135: ... to print Is all of the jammed paper removed No Yes NOTE If the jammed paper cannot be removed in Step 6 See Paper Jams in the Rear Cover or Duplex Unit MF8350Cdn Only P 9 6 and remove the paper Paper Jams in the Manual Feed Slot MF8050Cn Only Referring to the procedure on the display follow the steps below to remove jammed paper OK Keys to be used for this operation 1 Press Press OK to exit the o...

Страница 136: ...assette into the machine 9 When the following screen appears select Yes with and then press OK The machine is ready to print Is all of the jammed paper removed No Yes Paper Jams in the Rear Cover or Duplex Unit MF8350Cdn Only Referring to the procedure on the display follow the steps below to remove jammed paper Keys to be used for this operation 1 Press Paper jam Press to display steps 2 Open the...

Страница 137: ...de firmly until it clicks A A 7 Remove the paper by pulling it gently 8 Close the rear cover The machine is ready to print Paper Jams in the Output Area MF8350Cdn Only Referring to the procedure on the display follow the steps below to remove jammed paper Keys to be used for this operation 1 Press Paper jam Press to display steps 2 Open the front cover 3 Lift the scanning platform 4 Remove the pap...

Страница 138: ...ure on the display follow the steps below to remove jammed paper Keys to be used for this operation 1 Press Paper jam Press to display steps 2 Lift the scanning platform 3 Remove the paper by pulling it gently 4 Lower the scanning platform 5 Open the rear cover 2 1 6 Remove the paper by pulling it gently 7 Close the rear cover The machine is ready to print ...

Страница 139: ...ause to the fax number Cause 2 The recipient may not be using a G3 fax machine Action Ask the recipient what type of fax machine is being used and then send the document to the recipient s G3 fax machine If the recipient does not have a G3 fax machine send the document again using a communication mode compatible with the recipient s fax machine 012 Cause The recipient s machine has run out of pape...

Страница 140: ...tact your administrator for more details e Manual Security Specifying the Setting for Departmental ID Management Specifying Whether or Not to Receive a Print Job from an Unknown ID e Manual Security Specifying the Setting for Departmental ID Management Specifying Whether or Not to Receive a Scan Job from an Unknown ID 822 Cause The job cannot be printed due to the incorrect image format Action Rep...

Страница 141: ... according to the size of the loaded paper After canceling a job see Setting a Paper Size and Type P 2 16 and then change Paper Settings IMPORTANT For a print job Check that the paper size setting on the computer is also correct Loading paper of the size specified in the Paper Settings menu See Loading Paper P 2 9 and reload the paper specified in the Paper Settings menu Printing from the multi pu...

Страница 142: ...rned ON Wait a moment until the machine starts If there is no problem Is the machine in Sleep mode Press Energy Saver on the operation panel to cancel the Sleep mode If there is no problem Is the Error indicator on or blinking Make sure that paper is loaded properly in the paper cassette or multi purpose tray Loading Paper P 2 9 Check if paper is jammed Clearing Jams P 9 2 Turn OFF the main power ...

Страница 143: ...heck that the telephone cable is correctly connected Check if the cables for the telephone line port and external device port on the back of the machine are connected inversely Configuring and Connecting the Fax Starter Guide Make sure the machine is set for the correct telephone line type dial push Select Line Type P 6 18 If You Cannot Solve a Problem If You Cannot Solve a Problem Check if there ...

Страница 144: ... using the external telephone However the above varies depending on your telephone IMPORTANT Data storage for when power supply is cut off Even if power is suddenly lost due to a power failure or accidental unplugging any sent or received documents stored in memory are backed up for about 5 minutes NOTE Charging the built in battery It takes approximately 5 hours to completely charge the built in ...

Страница 145: ...eCLASS MF8350Cdn MF8050Cn Serial number a character string which consists of three alphabets and a 5 digit number and is indicated on the label located inside the front cover of the machine MF8350Cdn Serial No Serial Number MF8050Cn Serial No Serial Number Place of purchase Nature of problem Steps you have taken to solve the problem and the results WARNING If the machine makes strange noises emits...

Страница 146: ... of your call to the live technical support number above or via the website at http www canon ca Support program specifics are subject to change without notice Please have the following information ready when you contact Canon Product name Color imageCLASS MF8350Cdn MF8050Cn Serial number a character string which consists of three alphabets and a 5 digit number and is indicated on the label locate...

Страница 147: ...You can set or change machine functions from the setting menu according to your purpose Setting Menu List 10 2 Printing a User Data List 10 2 Contents of the Setting Menu 10 2 Registering Setting the Various Functions ...

Страница 148: ...These represents reference areas in this manual For the items with the icon see the e Manual Register the size and type of the paper to be used You can also register a custom paper size Select Paper Settings key Configure the machine settings You can perform adjustment and cleaning Menu key You can specify the settings for various report output conditions and output a report Report key Returns to ...

Страница 149: ...o Settings ECM Sending Speed Off On 33600 bps 14400 bps 9600 bps 4800 bps Long Distance Domestic International 1 International 2 International 3 P 5 3 Setting a Paper Size and Type P 2 16 Sound Volume Control Common Settings Volume Key Priority Fax Volume Settings Off On Entry Tone Off On Entry Error Tone Off On Warning Tone Off On Job Done Tone Off Settings Menu Priority Off Off Sending Done Tone...

Страница 150: ...iving Incoming Ring Off On Off On Time Date Settings Remote Receiving Receive Settings Off Off Manual Auto Switch Off Received Page Footer Off On Continue Printing When Toner Is Low Receive Settings Print Speed Priority Print Side Priority Paper Feed Method Switch CD ROM Multi Purpose Tray Print Speed Priority Print Side Priority Drawer 1 Print Speed Priority Print Side Priority Drawer 2 Continues...

Страница 151: ... Host Domain On DNS Dynamic Update Settings Off Off Off On On View Settings Use IPv6 Off View Settings Stateless Address Settings On Off View Settings Use DHCPv6 DNS Settings mDNS Settings On mDNS Name Off Host Name Domain Name On Register Manual Address Off On Register Stateful Address Off On Register Stateless Address Off On System Manager ID Up to seven digits System Manager PIN UP to seven dig...

Страница 152: ... Communications Settings Forwarding Settings Store Print When Forwarding Remote UI On Off Restrict Sending Display Job History USB Device On Off Memory Media Storage On Off Select PDL Plug n Play Initialize All System Manager Information Update the Firmware Initialize Address Book Initialize System Settings CD ROM CD ROM CD ROM TX Image Report Off On Print Reports Lists Off On For Errors Only Send...

Страница 153: ...achine Main Specifications 11 2 Machine Specifications 11 2 Copy Specifications 11 2 Printer Specification 11 2 Scanner Specifications 11 3 Fax Specifications 11 3 Telephone Specifications 11 3 Cassette Feeding Unit V1 optional MF8350Cdn Only 11 3 Index 11 4 Appendix ...

Страница 154: ...ndensation Color Compatibility Full Color Gradation 256 gradations Acceptable Documents Documents Requirements P 2 2 Acceptable Paper Stock Paper Requirements P 2 6 Printable Range Printable Range P 2 8 Scanning Range Scanning Range P 2 2 Copy Specifications Copy Specifications Scanning Resolution Text Photo Map Speed Color 300 dpi x 300 dpi Text Photo Map Text Photo Map Speed B W 300 dpi x 600 dp...

Страница 155: ...200 dpi x 100 dpi Fine 200 dpi x 200 dpi Photo 200 dpi x 200 dpi Superfine 200 dpi x 400 dpi Ultrafine 400 dpi x 400 dpi Dialing System One touch keys 19 destinations Coded dialing 181 destinations Group dialing 199 destinations Address book dialing Regular dialing with numeric keys Automatic redialing Manual redialing Sequential broadcast 201 destinations Receiving System Automatic reception Remo...

Страница 156: ... Copyright xiii D Date Settings 1 12 Density Copy 3 3 Fax 6 3 Disclaimers xiii I n d e x Display 1 9 Display Messages 9 9 LCD Standby Mode 1 9 Document delivery tray 1 2 Document feeder tray 1 2 Document guides 1 2 Documents Clearing Jams 9 2 Placing 2 4 Receiving Faxes 6 10 Requirements 2 2 Scanning Range 2 2 Sending Faxes 6 2 Documents Requirements 2 2 E Error Code 9 9 External telephone jack 1 ...

Страница 157: ...urpose Tray Manual Feed Slot 1 2 1 5 Paper guide 1 5 The auxiliary tray 1 5 Tray extension 1 5 O One Touch Keys 5 2 Editing 5 3 Storing 5 3 Operation Panel 1 2 1 7 Fax Operation Panel 1 8 Main Operation Panel 1 7 Output tray 1 2 P Paper Clearing Jams 9 2 Loading 2 9 Paper Size and Type 2 16 Printable Range 2 8 Requirements 2 6 Paper Cassette 1 2 1 6 Lock release lever 1 6 Paper guide 1 6 Paper Req...

Страница 158: ...nput Method 1 10 Time Settings 1 12 Toner Cartridges 8 5 Checking the Toner Level 8 6 Handling 8 6 Replacing Toner Cartridges 8 7 When a Message Appears 8 7 Toner cartridge slot 1 4 Toner cartridge tray 1 4 Trademarks xiii Transporting the Machine 8 13 Tray extension 1 2 Troubleshooting 9 1 Clearing Jams 9 2 Error Code 9 9 If Incorrect size setting Appears 9 11 If a Power Failure Occurs 9 14 If Yo...

Страница 159: ...on Plaza Lake Success NY 11042 U S A CANON EUROPA N V Bovenkerkerweg 59 61 1185 XB Amstelveen The Netherlands CANON CHINA CO LTD 15F Jinbao Building No 89 Jinbao Street Dongcheng District Beijing 100005 PRC CANON SINGAPORE PTE LTD 1 HarbourFront Avenue 04 01 Keppel Bay Tower Singapore 098632 CANON AUSTRALIA PTY LTD 1 Thomas Holt Drive North Ryde Sydney NSW 2113 Australia CANON GLOBAL WORLDWIDE SIT...

Отзывы: