Canon 1438B002 - PIXMA iP4300 Photo Printer Скачать руководство пользователя страница 71

67

Troubleshooting

Inside of the printer is dirty.

When performing duplex printing, if the paper size specified in the printer driver 
does not match the actual size of paper loaded in the paper source, the inside 
will become stained with ink, causing printed paper to become smudged.

z

Check the page size setting in your application. Then, check 

Page Size

 on 

the 

Page Setup

 sheet in the printer properties dialog box of the printer driver 

(Windows) or the 

Page Setup

 dialog box of the printer driver (Macintosh).

z

Follow the procedure below to clean the inside of the printer.
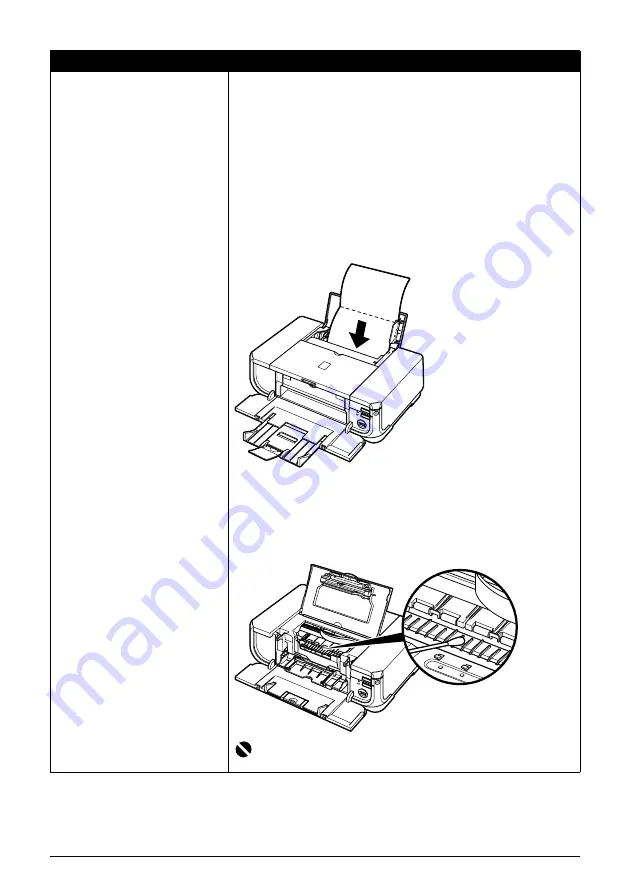
(1)

Make sure that the printer is turned on, and then remove any paper from the 

Auto Sheet Feeder.

(2)

Press the Open Button to open the Paper Output Tray and extend the Output 

Tray Extension.

(3)

Fold a sheet of A4 or Letter-sized plain paper in half widthwise, and then 

unfold it.

(4)

Load this sheet of paper in the Auto Sheet Feeder with the open side to the 

front.

(5)

Hold down the 

RESUME/CANCEL

 button and release it when the 

POWER


lamp flashes green five times.
The paper cleans the inside of the printer as it feeds through the printer.

If the ejected paper is smudged, clean the inside of the printer again.
If the problem is not resolved after performing cleaning twice, the protrusions 
inside the printer may be stained. In this case, wipe off any ink from the 
protrusions using a cotton swab or the like.

Important

Before cleaning the inner parts, be sure to turn the printer off.

Cause

Action

Содержание 1438B002 - PIXMA iP4300 Photo Printer

Страница 1: ...Photo Printer Quick Start Guide Series The following ink tanks are compatible with this product QT5 0428 V01 XXXXXXXX CANON INC 2006 PRINTED IN THAILAND ...

Страница 2: ...during your product s warranty period For more information and updated program specifics please visit our web site at www canontechsupport com Support program specifics are subject to change without notice Ordering Information For additional supplies use the following descriptions and order numbers Description Order Ink Tanks PGI 5 Black 0628B002 CLI 8 Black 0620B002 CLI 8 Cyan 0621B002 CLI 8 Mage...

Страница 3: ...Photo Printer Quick Start Guide ...

Страница 4: ...meets the ENERGY STAR guidelines for efficiency All information regarding non Canon products was compiled from publicly available information No representation is made regarding the accuracy thereof About Consumables Consumables ink tanks FINE Cartridges are available for 5 years after production has stopped Trademarks z Windows and Internet Explorer are trademarks of Microsoft Corporation registe...

Страница 5: ... Printing the Nozzle Check Pattern 36 Examining the Nozzle Check Pattern 38 Print Head Cleaning 39 Print Head Deep Cleaning 42 Aligning the Print Head 44 Cleaning Your Printer 55 Troubleshooting 60 Cannot Install the Printer Driver 61 Cannot Connect to Computer Properly 63 Print Results Not Satisfactory 64 Printer Does Not Start 69 Paper Does Not Feed Properly 70 Paper Jams 72 ALARM Lamp Flashes O...

Страница 6: ... On Off Feature You can set the printer to turn on and off automatically z Auto Power On Automatically turns on the printer when print data is sent from the computer z Auto Power Off Automatically turns off the printer when no print data is sent for a certain interval Set this setting in the Maintenance sheet of the printer driver in Windows and in the Canon IJ Printer Utility on a Macintosh For s...

Страница 7: ... is turned off Important About the Power Plug When removing the power plug after turing off the printer be sure to confirm that the POWER lamp is not lit If the power plug is removed from the wall outlet with the POWER lamp still lit or flashing green the printer may become unable to print See Keeping the Best Printing Results on page 34 ...

Страница 8: ...ts 4 x 6 101 6 x 152 4 mm Glossy Photo Paper Matte Photo Paper MP 101 10 sheets A4 Letter 20 sheets 4 x 6 101 6 x 152 4 mm 10 sheets A4 Letter 20 sheets 4 x 6 101 6 x 152 4 mm Matte Photo Paper Photo Paper Plus Glossy 3 PP 101 10 sheets A4 Letter 5 x 7 127 0 x 177 8 mm 20 sheets 4 x 6 101 6 x 152 4 mm 10 sheets A4 Letter 5 x 7 127 0 x 177 8 mm 20 sheets 4 x 6 101 6 x 152 4 mm Photo Paper Plus Glos...

Страница 9: ...ionally when printing on A5 or smaller sized paper do not use paper thinner than a post card including plain paper or notepad paper cut to a small size z Folded curled or wrinkled paper z Damp paper z Paper that is too thin weighing less than 64 gsm 17 lb z Paper that is too thick non Canon genuine paper weighing more than 105 gsm 28 lb z Picture postcards z Postcards affixed with photos or sticke...

Страница 10: ...outs in hot or humid conditions Never expose them to heat or direct sunlight z Store printouts in photo albums photo frames or presentation binders to protect them from direct exposure to air or sunlight z Do not mount printouts in an adhesive type album as you may not be able to remove them Note that some types of clear plastic folders and albums may cause the edges of the paper to turn yellow Us...

Страница 11: ...nter and the Cassette found at the front of the printer A Auto Sheet Feeder B Cassette z When Printing for the First Time At purchase the printer is set to feed from the Auto Sheet Feeder If you are printing without changing paper source settings load paper in the Auto Sheet Feeder Note For details on loading paper see Loading Paper in the Auto Sheet Feeder on page 13 B A ...

Страница 12: ...u print make sure that the paper source selection matches the paper source where you actually loaded paper To change the paper source simply press the Paper Feed Switch For details see Changing the Paper Source on page 11 A Press to change the paper source Note You can also select the paper source using the printer driver For details on paper source selection using the printer driver refer to the ...

Страница 13: ...witch You can also specify the type and size of paper to be fed from the Cassette using the printer driver You can print more efficiently by specifying the type of paper you use regularly this way since the paper source will be switched automatically to the Cassette for this paper A Auto Sheet Feeder Load paper of various types and sizes including photo paper B Cassette Load paper you use most reg...

Страница 14: ...et Feeder or Cassette according to the location of the printer For example if you intend to install the printer in a small place such as on a shelf with minimal space you can use just the Cassette for printing Note z For details on loading paper see Loading Paper on page 12 z For details on printer driver settings refer to the Printer Driver Guide on screen manual Note Some types and sizes of pape...

Страница 15: ...when printing Confirm the setting in the printer driver See Printing with Windows on page 19 or Printing with Macintosh on page 20 z If a setting other than Paper Feed Switch is selected for Paper Source in the printer driver the printer driver settings takes precedence when printing For details on paper source selection using the printer driver refer to the Printer Driver Guide on screen manual N...

Страница 16: ... Auto Sheet Feeder only Non standard sizes for the Auto Sheet Feeder 2 13 x 3 39 to 8 5 x 23 54 0 x 86 0 mm to 215 9 x 584 2 mm Non standard sizes for the Cassette 3 5 x 5 to 8 5 x 11 69 89 0 x 127 0 mm to 215 9 x 297 0 mm Paper weight 17 to 28 lb 64 to 105 gsm z You can load up to 150 sheets of plain paper 17 lb 64 gsm 0 52 inches 13 mm in height in the Auto Sheet Feeder However proper feeding of...

Страница 17: ...ading Loading paper without aligning the edges may cause paper jams z If paper is curled hold the opposing curled corners and gently bend them in the opposite direction until the paper becomes completely flat See Paper is curled on page 68 z To avoid curling handle paper as follows Put unused paper back into the package and keep them on a level surface Take out only the necessary number of sheets ...

Страница 18: ...rners of the paper before loading it on page 13 2 Prepare to load paper 1 Pull out the Cassette from the printer 2 Remove the Cover on the Cassette Note Make sure that the Cover Guide is set upright when you load paper in the Auto Sheet Feeder Note Select the page size of the loaded paper in Page Size in the printer driver For details on printer driver settings see Printing with Windows on page 19...

Страница 19: ...onstandard size paper with less than 8 inches 203 mm in length do not extend the Cassette 4 Load the paper with the print side facing DOWN 1 Load the paper into the Cassette with the print side facing DOWN and the leading edge to the far side 2 Align the paper stack against the right side of the Cassette 3 Slide the paper guides to fit to the loaded paper stack A 1 2 3 Do not load higher than the ...

Страница 20: ...ton to open the Paper Output Tray 2 Pull out the Paper Output Tray Extension completely 3 Press the Paper Feed Switch so that the Cassette lamp A lights Note When closing the Paper Output Tray Extension after printing lift it up slightly Note z Select the page size of the loaded paper in Page Size in the printer driver For details on printer driver settings see Printing with Windows on page 19 or ...

Страница 21: ...hts up 4 In the printer driver select Envelope in Media Type and then select DL Env or Comm Env 10 in Page Size For details on printer driver settings see Printing with Windows on page 19 or Printing with Macintosh on page 20 Important z Do not use envelopes with embossed or treated surfaces a double flap pressure seals or sticker flaps z Select either DL Env or Comm Env 10 in the printer driver a...

Страница 22: ...n the left side A maximum of 5 envelopes can be loaded at once 3 Slide the Paper Guide against the side of the envelope 4 Press the Paper Feed Switch so that the Cassette lamp lights up 5 In the printer driver select Envelope in Media Type and then select DL Env or Comm Env 10 in Page Size For details on printer driver settings see Printing with Windows on page 19 or Printing with Macintosh on pag...

Страница 23: ...a document or open a file to print using an appropriate application software 4 Select Print on the application software s File menu 5 Make sure that Canon iP4300 is selected and click Preferences or Properties 6 Specify the required settings and click OK Make sure that Paper Feed Switch is selected in Paper Source 7 Click Print or OK Note For details on other printer driver functions click Help or...

Страница 24: ...p on the application software s File menu 5 Confirm that iP4300 is selected in Format for 6 Select the desired paper size in Paper Size 7 Click OK 8 Select Print on the application software s File menu 9 Select Quality Media in the pop up menu 10 Specify the required settings Make sure that Paper Feed Switch is selected in Paper Source 11 Click Print Note For details on other printer driver functi...

Страница 25: ... model as long as it complies with the PictBridge standard z You can select the images to print and specify various print settings from your camera or mobile phone PictBridge compatible digital still cameras digital camcorders and camera equipped mobile phones are hereafter collectively referred to as PictBridge compliant device Caution Do not connect any equipment other than PictBridge compliant ...

Страница 26: ... compliant device for direct printing will appear on the LCD of the device when the printer is correctly connected Note Depending on the model or brand of your device you may have to select a print mode compliant with PictBridge before connecting the device You may also have to turn on the device or select Play mode manually after connecting the device to the printer Perform necessary operations o...

Страница 27: ...nge the page size or media type operate the device to select the PictBridge print setup mode and confirm or change the settings About the Settings Explained Below Some setting items explained below may not be available on some devices In this case the Default setting explained below is applied for the setting item In the following description names of settings items are given according to those us...

Страница 28: ...5 cm 8 x 10 for Paper size and Default for Paper type z Layout and Trimming Settings If these settings are set to Default the setting to follow that of the printer on the PictBridge compliant device Borderless is applied for Layout and Off No trimming is applied for Trimming When printing onto Photo Stickers PS 101 select N up for Layout then select 16 up Some PictBridge compliant devices may disp...

Страница 29: ...hot set this PictBridge setting item to Off If you select Date File No or Both the date and or file number will be printed over the date printed by the camera s function z Confirming and Changing PictBridge Print Settings on the Printer You can confirm and change the default settings for items such as media type and size that are preset to the printer and applied to PictBridge printing To change t...

Страница 30: ... The ink lamp flashes slowly at around 3 second intervals You can continue printing for a while but we recommend you to have a replacement ink tank available Ink is out Repeats The ink lamp flashes quickly at around 1 second intervals and the ALARM lamp on the printer flashes orange four or sixteen times Replace the ink tank with a new one Black CLI 8BK Magenta CLI 8M Black PGI 5BK Cyan CLI 8C Yel...

Страница 31: ...e x symbol appears above a tank that may have run out of ink and the Ink may have run out message is displayed Replace the ink tank with a new one Ink is out The x symbol appears above a tank has run out of ink and the Ink has run out message is displayed and then an error message informing you that you need to replace the ink tank is displayed Replace the ink tank with a new one immediately To co...

Страница 32: ... the following messages is displayed on your computer Confirm the empty tank and replace it with a new one After replacing the tank close the Top Cover to resume printing If the ALARM lamp flashes orange four times z Ink may have run out Replacing the ink tank is recommended z Click Cancel Printing to cancel printing Replace the ink tank with a new one z If printing is in progress and you want to ...

Страница 33: ...n this condition you need to release the function for detecting the remaining ink level Press and hold the RESUME CANCEL button for at least 5 seconds and then release it With this operation releasing the function for detecting the remaining ink level is memorized and the Canon IJ Status Monitor will no longer display the remaining ink level Please be advised that Canon shall not be liable for any...

Страница 34: ...sixteen times z Ink has run out Replace the ink tank Printing under the current condition may damage the printer z Click Delete Job to cancel the current printing job Click Stop Job to stop the current printing job Click Stop All Jobs to stop all printing jobs Replace the ink tank with a new one z If you want to continue printing in this condition you need to release the function for detecting the...

Страница 35: ...erly when it is reinstalled To maintain optimal printing quality use an ink tank within six months of first use z Color ink may be consumed even when printing a black and white document or when black and white printing is specified Color ink is also consumed in Print Head Cleaning and Print Head Deep Cleaning which may be necessary to maintain the printer s performance When an ink tank is out of i...

Страница 36: ... in the exact order shown in step 4 1 as failure to follow this step may cause the ink to leak and stain your clothes and hands z Do not squeeze the side of ink tanks as this may cause the ink to leak out and stain your clothes and hands z Do not re attach the protective cap once you have removed it Discard it according to the local laws and regulations regarding disposal of consumables z Do not t...

Страница 37: ...e installed Note Make sure that the Inner Cover is closed Printing will not start with the Inner Cover open since paper can not be fed properly Note z If the ALARM lamp still flashes orange after the Top Cover is closed see ALARM Lamp Flashes Orange on page 76 z When you start printing after replacing the ink tank Print Head Cleaning is performed automatically Do not perform any other operations u...

Страница 38: ...not be done properly causing the Print Head to dry and clog When You Are Not Using the Printer for a Long Time When you are not using the printer for a long time print in both black white and in color or perform Print Head Cleaning about once a month to prevent degradation of the Print Head Numerous nozzles are installed in the Print Head for high precision printing Just as the uncapped tip of a b...

Страница 39: ...hing fast even though ink remains in that ink tank it is inserted in the wrong position Make sure that the ink tank of the correct color is inserted in each position matching the label See Replacing an Ink Tank on page 26 If the ink tank lamp is not lit the tank is not set properly Press the mark on the ink tank until the tank clicks into place Make sure that all packaging material is peeled off t...

Страница 40: ...rinting 6 Examine the pattern and take the appropriate action See Examining the Nozzle Check Pattern on page 38 Note z Make sure that the Inner Cover is closed Printing the Nozzle Check Pattern Without a Computer z Nozzle check pattern printing can be performed also from the printer itself using the RESUME CANCEL button 1 With the printer on load a sheet of A4 or Letter sized plain paper in the Au...

Страница 41: ... you loaded the paper 4 Open the Canon IJ Printer Utility dialog box 5 Print the Nozzle Check Pattern 1 Select Test Print in the pop up menu 2 Click Nozzle Check 3 Read the message and click Print Check Pattern The nozzle check pattern is printed Do not open the Top Cover while printing 6 Examine the pattern and take the appropriate action See Examining the Nozzle Check Pattern on page 38 Note Cli...

Страница 42: ...eaks appear 2 When cleaning is necessary click Cleaning on the Pattern Check dialog box To proceed to cleaning of the Print Head go to step 4 3 of the Windows or Macintosh Print Head Cleaning procedure depending on your platform See Print Head Cleaning on page 39 If no lines of the group 1 pattern are missing and the group 2 patterns have no white streaks click Exit or Quit to exit nozzle check pa...

Страница 43: ...o be cleaned When cleaning the nozzles of black ink tanks Select Black to clean the nozzles of PGI 5BK Color to clean the nozzles of CLI 8BK 4 Click Execute Print Head Cleaning starts when the POWER lamp starts flashing green Do not perform any other operations until Print Head Cleaning finishes This takes about 40 seconds 5 Load a sheet of A4 or Letter sized plain paper in the Auto Sheet Feeder o...

Страница 44: ... of PGI 5BK Color to clean the nozzles of CLI 8BK 4 Click OK Print Head Cleaning starts when the POWER lamp starts flashing green Do not perform any other operations until Print Head Cleaning finishes This takes about 40 seconds 5 Load a sheet of A4 or Letter sized plain paper in the Auto Sheet Feeder or Cassette 6 Press the Paper Feed Switch to select the paper source in which you loaded the pape...

Страница 45: ... Pattern on page 38 Note The nozzle check pattern will not be printed correctly if there is not enough ink Replace the ink tank if the remaining amount of ink is insufficient See Replacing an Ink Tank on page 26 Note If the problem is not resolved after performing steps 4 and 5 twice try Print Head Deep Cleaning See Print Head Deep Cleaning on page 42 ...

Страница 46: ...k tanks Select Black to clean the nozzles of PGI 5BK Color to clean the nozzles of CLI 8BK 4 Click Execute 5 When the confirmation message is displayed click OK Print Head Deep Cleaning starts when the POWER lamp starts flashing green Do not perform any other operations until Print Head Deep Cleaning finishes This takes about 75 seconds 5 Check the condition of the Print Head 1 Print the nozzle ch...

Страница 47: ...d Deep Cleaning starts when the POWER lamp starts flashing green Do not perform any other operations until Print Head Deep Cleaning finishes This takes about 75 seconds 5 Check the condition of the Print Head 1 Print the nozzle check pattern to check the print head condition See Printing the Nozzle Check Pattern on page 36 If a particular color is not printed properly replace the ink tank of that ...

Страница 48: ...m the Cassette when performing Automatic Print Head Alignment Always load paper in the Auto Sheet Feeder Aligning the Print Head without a Computer z The Print Head can also be aligned from the printer itself using the RESUME CANCEL button If the printer driver is not installed in the computer align the Print Head in this way 1 Make sure that the printer is on 2 Press the Open Button to open the P...

Страница 49: ...d plain paper in the Auto Sheet Feeder 2 Press the Open Button to open the Paper Output Tray and extend the Output Tray Extension 3 Open the Canon IJ Printer Utility dialog box Note Clicking Check Setting prints the current settings and finishes Print Head Alignment Note z The pattern is printed in black and blue z If the pattern is not printed successfully see ALARM Lamp Flashes Orange on page 76...

Страница 50: ...es to complete If the pattern is printed as shown to the right the Print Head is aligned automatically Note Clicking Check Setting prints the current settings and finishes Print Head Alignment Note z The pattern is printed in black and blue z If the pattern is not printed successfully see ALARM Lamp Flashes Orange on page 76 z If results of Automatic Print Head Alignment are not satisfactory see M...

Страница 51: ...e Paper Feed Switch to select the paper source in which you loaded the paper 4 Open the printer properties dialog box 5 Click the Maintenance tab and then Custom Settings 6 Select the Align heads manually check box and then click Send 7 When the confirmation message is displayed click OK 8 In the Maintenance sheet click Print head alignment 9 When the confirmation message is displayed click Print ...

Страница 52: ...t the printout From the patterns select the most even least irregular patterns for each column and enter their numbers Click OK 12 When the confirmation message is displayed click OK Important Do not open the Top Cover while printing ...

Страница 53: ...ally and columns K and L are striped horizontally For Columns K and L the best patterns will be smooth and have no streaks in the border indicated by the arrows A Less noticeable white streaks B More noticeable white streaks Note If it is difficult to pick the best pattern pick the setting that produces the least noticeable vertical white streaks A B ...

Страница 54: ...he printer is on and load three sheets of A4 or Letter sized plain paper in the Auto Sheet Feeder or Cassette Important Do not open the Top Cover while printing Note When you turn off the printer be sure to press the POWER button on the printer Otherwise the settings made here will not be saved Important You cannot print the print head alignment pattern if paper of size other than A4 or Letter is ...

Страница 55: ...ox 5 Select Custom Settings in the pop up menu 6 Select the Align heads manually check box and then click Send 7 When the confirmation message is displayed click OK 8 Select Test Print in the pop up menu 9 Click Print Head Alignment 10 When the confirmation message is displayed click Print Head Alignment Important Do not open the Top Cover while printing Note Clicking Check Setting prints the curr...

Страница 56: ... the printout From the patterns select the most even least irregular patterns for each column and enter their numbers Click Send 12 When the confirmation message is displayed click OK Important Do not open the Top Cover while printing ...

Страница 57: ...r Columns K and L the best patterns will be smooth and have no streaks in the border indicated by the arrows A Less noticeable white streaks B More noticeable white streaks 14 When the confirmation message is displayed click OK Note If it is difficult to pick the best pattern pick the setting that produces the least noticeable vertical white streaks Important Do not open the Top Cover while printi...

Страница 58: ... the same way select the most even patterns for each column enter their numbers then click Send Note When you turn off the printer be sure to press the POWER button on the printer Otherwise the settings made here will not be saved ...

Страница 59: ...on 3 Press the Paper Feed Switch to select the paper source to clean 4 Hold down the RESUME CANCEL button and release it when the POWER lamp flashes green three times The Paper Feed Rollers will rotate as they clean 5 Repeat step 4 twice 6 Load three or more sheets of A4 or Letter sized plain paper in portrait orientation in the paper source you selected in step 3 7 Hold down the RESUME CANCEL but...

Страница 60: ...ter can also be cleaned without a computer it can be performed from the printer itself 1 Make sure that the printer is turned on and then remove any paper from the Auto Sheet Feeder 2 Press the Open Button to open the Paper Output Tray and extend the Output Tray Extension 3 Fold a sheet of A4 or Letter sized plain paper in half widthwise and then unfold it 4 Load this and only this sheet of paper ...

Страница 61: ...e Auto Sheet Feeder with the open side to the front 5 Open the printer properties dialog box 6 Click the Maintenance tab and then Bottom Plate Cleaning 7 Follow the instructions displayed in the message The paper cleans the inside of the printer as it feeds through the printer If the ejected paper is smudged clean the inside of the printer again If the problem is not resolved after performing clea...

Страница 62: ...er with the open side to the front 5 Open the Canon IJ Printer Utility dialog box 6 Make sure that Cleaning is selected in the pop up menu 7 Click Bottom Plate Cleaning 8 Follow the instructions displayed in the message The paper cleans the inside of the printer as it feeds through the printer If the ejected paper is smudged clean the inside of the printer again If the problem is not resolved afte...

Страница 63: ...aning the Protrusions Inside the Printer If protrusions inside the printer are stained wipe off any ink from the protrusions using a cotton swab or the like Important Before cleaning the inner parts be sure to turn the printer off ...

Страница 64: ...e 70 z Paper Jams on page 72 z ALARM Lamp Flashes Orange on page 76 z ALARM Lamp Flashes Orange on page 76 z POWER Lamp Flashes Green and ALARM Lamp Flashes Orange Alternately on page 78 z Error Message Appears on the Screen on page 78 z Writing Error Output Error Communication Error on page 78 z Error Regarding Automatic Duplex Printing Is Displayed on page 79 z Error No 300 Is Displayed on page ...

Страница 65: ...er driver 1 Click Cancel on the Printer Connection screen 2 Click Start Over on the Installation Failure screen 3 Click Back on the screen that appears next 4 Click Exit on the Welcome screen then remove the CD ROM 5 Turn the printer off 6 Restart the computer 7 Make sure you have no application software running including anti virus software 8 Follow the procedure described in the Easy Setup Instr...

Страница 66: ...ons for proper installation If the drivers were not installed correctly uninstall the printer driver restart your computer and then reinstall the drivers Refer to the Printer Driver Guide on screen manual Note If the installer was forced to be terminated due to an Windows error the system may be in an unstable condition and you may not be able to install the drivers Restart your computer before re...

Страница 67: ...upports USB 2 0 Hi Speed connection z The USB cable and the USB hub if you are using one support USB 2 0 Hi Speed connection Be sure to use a certified USB 2 0 Hi Speed cable We recommend the cable to be no longer than around 10 feet 3 meters z The operating system of your computer supports USB 2 0 Hi Speed connection Obtain and install the latest update for your computer z The USB 2 0 Hi Speed dr...

Страница 68: ...inter driver Windows or the Page Setup dialog box of the printer driver Macintosh You are performing automatic duplex printing When performing automatic duplex printing the printable area at the top of the page will be 0 08 inches 2 mm narrower than the usual For this reason the bottom of the page may not be printed To prevent this select Use reduced printing from the printer driver Important Redu...

Страница 69: ...o check that ink is ejecting properly z If the problem is not resolved after performing Print Head Cleaning twice Perform Print Head Deep Cleaning If the problem is not resolved after performing Print Head Deep Cleaning turn off the printer and perform Print Head Deep Cleaning again after 24 hours or later z If the problem is still not resolved after performing Print Head Deep Cleaning twice The P...

Страница 70: ... Media sheet of the Print dialog box Macintosh matches the type of the loaded printing paper Cause Action Paper Feed Rollers are dirty Follow the procedure below to clean the Paper Feed Rollers Cleaning the Paper Feed Rollers will wear the rollers so perform this procedure only when necessary 1 Make sure that the printer is turned on and then remove any paper from the Auto Sheet Feeder and Cassett...

Страница 71: ...e any paper from the Auto Sheet Feeder 2 Press the Open Button to open the Paper Output Tray and extend the Output Tray Extension 3 Fold a sheet of A4 or Letter sized plain paper in half widthwise and then unfold it 4 Load this sheet of paper in the Auto Sheet Feeder with the open side to the front 5 Hold down the RESUME CANCEL button and release it when the POWER lamp flashes green five times The...

Страница 72: ... 2 to 5 mm B in height We recommend printing curl corrected paper one sheet at a time Printing on thick paper Selecting the Prevent paper abrasion setting will widen the clearance between the Print Head and the loaded paper If you notice abrasion even with the media type set correctly to match the loaded paper set the printer to prevent paper abrasion Clear the Prevent paper abrasion check box onc...

Страница 73: ... Ink Tank on page 26 Ink tank not installed in proper position Open the Top Cover and check the ink lamps If there is still sufficient ink but its ink lamp is flashing red an ink tank may be installed in a wrong position Confirm that the ink tanks are installed in the appropriate positions See Replacing an Ink Tank on page 26 Ink tank is not installed securely Part of the orange tape is remaining ...

Страница 74: ...he print jobs are deleted Cause Action Printing on inappropriate type of paper Check to see if the paper you are printing on is not too thick or curled See Media Types You Cannot Use on page 5 Paper Feed Rollers are dirty Follow the procedure below to clean the Paper Feed Rollers Cleaning the Paper Feed Rollers will wear the rollers so perform this procedure only when necessary 1 Make sure that th...

Страница 75: ...n page 12 Paper source selection is inappropriate Make sure that the proper paper source is selected If not change the paper source using the Paper Feed Switch or the printer driver For details see Changing the Paper Source on page 11 Note When printing from your computer if a setting other than Paper Feed Switch is selected for Paper Source in the printer driver the printer driver settings takes ...

Страница 76: ...g the paper in the printer see Paper Does Not Feed Properly on page 70 to confirm that you are using the correct paper and are loading it into the printer correctly z A5 sized paper are suited to print documents consisting mainly of text We do not recommend using such paper to print documents with photos or graphics since the printout may curl and cause paper exit jams If you cannot remove the pap...

Страница 77: ...dure below 1 Turn off the power and then open the Rear Cover 2 Fold a piece of A4 or Letter sized plain paper in four push it in until it hits the jammed paper then pull out the paper folded in four 3 Close the Rear Cover then turn on the power Wait until the jammed paper is automatically ejected If you cannot remove the jammed paper or the paper jam error continues after removing the paper contac...

Страница 78: ...5 Slowly pull the jammed paper out 6 If any paper is sticking out of the Cassette reload the paper in the Cassette 7 Insert the Cassette into the printer again and press the RESUME CANCEL button on the printer If you turned off the printer in step 2 all print jobs in queue are canceled Reprint if necessary Note When reloading the paper into the printer see Paper Does Not Feed Properly on page 70 t...

Страница 79: ...ion immediately after removing the jammed paper 4 If any paper is sticking out of the Cassette reload the paper in the Cassette Reload paper in the Auto Sheet Feeder if necessary 5 Insert the Cassette into the printer 6 Press the RESUME CANCEL button on the printer Note When reloading the paper into the printer see Paper Does Not Feed Properly on page 70 to confirm that you are using the correct p...

Страница 80: ...with the ink tank installed Then printing can continue Replacing the ink tank is recommended after the printing The printer may be damaged if printing is continued under the ink out condition See Replacing an Ink Tank on page 26 Note If multiple ink lamps are flashing check how fast they are flashing Fast flashing at about 1 second intervals indicates the tank is empty Slow flashing at about 3 sec...

Страница 81: ...d sheet will not be printed Eleven flashes Automatic Print Head Alignment failed Possible causes are as follows z Paper of size other than A4 or Letter is loaded in the Auto Sheet Feeder Press the RESUME CANCEL button on the printer to dismiss the error then load a sheet of A4 Letter sized paper in the Auto Sheet Feeder Automatic Print Head Alignment cannot be performed using paper from the Casset...

Страница 82: ... Press and hold the RESUME CANCEL button for at least 5 seconds and then release it With this operation releasing the function for detecting the remaining ink level is memorized Please be advised that Canon shall not be liable for any malfunction or trouble which may be caused by continuation of printing under the ink out condition See Replacing an Ink Tank on page 26 Cause Action The printer is n...

Страница 83: ...onnect the printer directly to the computer and try printing again If printing starts normally there is a problem with the relay device Consult the reseller of the relay device for details z There could also be a problem with the USB cable Replace the USB cable and try printing again Printer driver is not installed properly The printer driver may not be installed properly Uninstall them following ...

Страница 84: ...elect iP4300 in Printer on the Print dialog box If iP4300 does not appear in Printer follow the procedure below to check that the driver for your printer is installed to your computer 1 Select Print and Fax Preferences from Printer In Mac OS X v 10 2 8 or 10 3 x select Edit Printer List from Printer 2 Check that iP4300 is displayed in the list of printers and that the check box is selected In Mac ...

Страница 85: ... is not compatible with this printer Disconnect the cable connecting the printer and the device and then reconnect it Depending on the model or brand of your device you may have to select a PictBridge compliant print mode on the device before connecting it to the printer You may also have to turn on the camera or select Play mode manually after connecting the device to the printer Perform necessar...

Страница 86: ...ra s instruction manual and take perform necessary operation before connection z The print head nozzles may be clogged if printing becomes faint or colors are incorrect See When Printing Becomes Faint or Colors Are Incorrect on page 35 z If the paper is curled or its surface is scratched during printing make sure that you are using the correct type of paper If the problem is not resolved by using ...

Страница 87: ...n See Replacing an Ink Tank on page 26 Note If multiple ink lamps are flashing check how fast they are flashing Fast flashing at about 1 second intervals indicates the tank is empty Slow flashing at about 3 second intervals indicates ink is low For details on different flashing speeds see Getting the Ink Level Information on page 26 z Printer ALARM lamp flashes orange seven times and the ink lamp ...

Страница 88: ...st 5 seconds and then release it With this operation releasing the function for detecting the remaining ink level is memorized Please be advised that Canon shall not be liable for any printer malfunction or damage caused by refilled ink tanks See Replacing an Ink Tank on page 26 Hardware Error When the ALARM lamp on the printer flashes orange fifteen times an ink tank error has occurred Replace th...

Страница 89: ...the desktop System Requirements Browser Help Viewer Note z Microsoft Internet Explorer 5 0 or later must be installed z The on screen manual may not be displayed properly depending on your operating system or Internet Explorer version We recommend that you keep your system up to date with Windows Update Note If you installed the User s Guide from the Manual folder in the Setup CD ROM open the fold...

Страница 90: ... 203 2 mm max for Borderless Printing 8 5 inches 216 mm Acoustic noise level Approx 34 0 dB A when printing in the highest quality mode on Photo Paper Pro Operating environment Temperature 5 to 35 C 41 to 95 F Humidity 10 to 90 RH no condensation Storage environment Temperature 0 to 40 C 32 to 104 F Humidity 5 to 95 RH no condensation Power supply AC 100 240 V 50 60 Hz Power consumption Printing A...

Страница 91: ... camera has a 16 up option See Recommended Paper and Requirements on page 4 2 If using a Canon PictBridge compatible camera you can select it Paper type Default the setting to follow that of the printer Photo Photo Paper Plus Glossy Glossy Photo Paper Fast Photo Photo Paper Pro Plain Paper Only A4 Letter Layout Default the setting to follow that of the printer Borderless Bordered N up 2 4 9 16 Lay...

Страница 92: ...et Explorer 5 0 or later must be installed The on screen manual may not be displayed properly depending on your operating system or Internet Explorer version We recommend that you keep your system up to date with Windows Update Browser Help Viewer Note The on screen manual may not be displayed properly depending on your operating system We recommend that you keep your system up to date ...

Страница 93: ...etect smoke unusual smells or strange noises around the printer immediately unplug the printer at the power supply and call for service Periodically unplug the printer and use a dry cloth to wipe off any dust or dirt collected on the plug and the power outlet If the printer is placed at a location exposed to a lot of dust smoke or high humidity the dust collected on the plug absorbs moisture and m...

Страница 94: ...place the printer on a thick rug or carpet Do not place the printer with its back attached to the wall Power supply Ensure that the area around the power outlet is kept clear at all times so you can easily unplug the power cord if necessary Never remove the plug by pulling on the cord Do not use an extension lead cord Never use a power supply source other than the one rated for the printer in the ...

Страница 95: ...mall children If a child ingests any ink consult a doctor immediately Do not shake Print Heads or ink tanks Ink may leak out and stain clothing or the surrounding area Never touch the electrical contacts on a Print Head after printing The metal parts may be very hot and could cause burns Do not throw ink tanks into fire ...

Страница 96: ...uired to comply with Class B limits in Subpart B of Part 15 of the FCC Rules Do not make any changes or modifications to the equipment unless otherwise specified in the manual If such changes or modifications should be made you could be required to stop operation of the equipment Canon U S A Inc One Canon Plaza Lake Success NY 11042 1 516 328 5600 Canon U S A INC LIMITED WARRANTY USA Only The limi...

Страница 97: ...ACTORY LOADED ON THE PRODUCT OR CONTAINED ON THE SOFTWARE DISKETTES OR CD ROMS ENCLOSED WITH OR ACCOMPANYING THE PRODUCT AND ANY UTILITY SOFTWARE DISTRIBUTED WITH OR FOR THE PRODUCT IS SOLD AS IS AND WITHOUT WARRANTY BY CANON USA THE SOLE WARRANTY WITH RESPECT TO SUCH SOFTWARE IS CONTAINED IN THE SOFTWARE MANUFACTURER S LICENSE AGREEMENT DISTRIBUTED THEREWITH INCLUDING ANY LIMITATIONS AND DISCLAIM...

Страница 98: ...eet address The Canon USA repair facility will ship out the replacement Product via 2nd day Air freight service prepaid by Canon USA After receipt of the replacement Product with instructions and a prepaid waybill follow the enclosed instructions on how to ship the defective Product to the Canon USA repair facility The defective Product must be returned in the shipping carton in which the replacem...

Страница 99: ...ct to the availability of refurbished or new replacement units Canon U S A Inc One Canon Plaza Lake Success NY 11042 USA 2006 Canon U S A Inc Canon is a registered trademark of Canon Inc in the United States and may also be a registered trademark in other countries ...

Страница 100: ... 4 N Nozzle Check Pattern examining 38 printing 36 P PGI 5BK Black 26 Print Head automatic print head alignment 44 cleaning 39 deep cleaning 42 manual print head alignment 47 Printing Photographs Directly from a Compliant Device 21 connecting 21 PictBridge 23 R Replacing Ink Tanks 31 ink level information 26 knowing when to replace ink tank 28 Routine Maintenance 26 replacing ink tanks 31 S Safety...

Страница 101: ...during your product s warranty period For more information and updated program specifics please visit our web site at www canontechsupport com Support program specifics are subject to change without notice Ordering Information For additional supplies use the following descriptions and order numbers Description Order Ink Tanks PGI 5 Black 0628B002 CLI 8 Black 0620B002 CLI 8 Cyan 0621B002 CLI 8 Mage...

Страница 102: ...Photo Printer Quick Start Guide Series The following ink tanks are compatible with this product QT5 0428 V01 XXXXXXXX CANON INC 2006 PRINTED IN THAILAND ...

Отзывы: