background image

ESPAÑOL

19

Funcionamiento 

1. Abra la puerta e introduzca las prendas en el 

tambor. Controle que las prendas no traben 
el cierre de la puerta.

2. Cuando fuera a secar prendas delicadas, 

presione el botón ‘DELICADOS’ para 
reducir el nivel de calor. Cuando termine, 
vuelva a presionarlo para seleccionar alta 
temperatura.

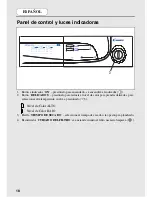
Nivel de Calor ALTO 

Nivel Nivel de Calor BAJO
3. Gire la perilla ‘TIEMPO DE SECADO’ 

hasta que el tiempo de secado deseado 
coincida con el símbolo 

.

La opción PRE-PLANCHADO que aparece 

con el símbolo 

 en la perilla de 

‘TIEMPO DE SECADO’ es una función de 
acondicionamiento y anti-arrugas. La 
secadora secará la carga durante 8 minutos 
seguidos de un período de enfriamiento de 2 
minutos y se la recomienda especialmente 
para prendas que, antes de plancharlas, 
hayan quedado durante algún tiempo en un 
canasto, por ejemplo. Las prendas que se 
sequen al aire libre en una soga o en el 
interior sobre radiadores también podrían 
quedar duras. El proceso de PRE-
PLANCHADO estira las arrugas del género 
facilitando y agilizando el planchado.

4. Cierre la puerta suavemente empujándola 

hasta escuchar el ‘clic’ del cierre.

5. Presione el botón ‘ON’. Se encenderá el 

indicador y comienza el ciclo de secado.

6. La carga se seca dando vueltas en aire 

caliente controlado termostáticamente. El 
aire frío se utiliza en los últimos 10 minutos 
para reducir las arrugas y enfriar la carga 
para poder retirarla.

7. Terminado el programa, el tambor deja de 

girar y la perilla quedará en el símbolo 

.

Abra la puerta y retire la carga. 

8. Después de cada ciclo de secado limpie el 

filtro para asegurar la máxima eficiencia de 
su secadora (ver la sección ‘Filtro’).

¡ADVERTENCIA! 

EL TAMBOR, LA PUERTA Y 

LA CARGA PODRÍAN ESTAR 

MUY CALIENTES.

Содержание CDV262

Страница 1: ...User Instructions Instrucciones para el Usuario CDV 262 Reverse Action EN ES ...

Страница 2: ... or other fuels Check regularly that the air flowing through the dryer is not restricted Check the fluff filter after use and clean if necessary The venting hose or duct should be checked periodically and any accumulation of fluff removed The inlet and outlets should be kept free from obstructions If the dryer is used frequently the period between checks should be reduced accordingly Dryness Cloth...

Страница 3: ...Before using the tumble dryer for the first time please read this instruction book thoroughly remove all items packed inside drum wipe the inside of the drum and door with a damp cloth to remove any dust which may have settled in transit IMPORTANT This dryer must only be used for drying household textiles and garments where a water solution has been used for the cleaning process DO NOT tumble dry ...

Страница 4: ...xhaust hot air to the external atmosphere is strongly recommended to ensure maximum drying efficiency Protect the external outlet from prevailing winds to ensure back draughts do not reduce the drying performance If the dryer is installed under a worktop or built in it is essential to use the venting hose to carry the hot moist air away from the dryer otherwise re circulation of the moist air will...

Страница 5: ...s from thin underwear C By type of fabric Cottons linen Towels cotton jersey bed and table linen Synthetics Blouses shirts overalls etc made of polyester or polyamid as well as for cotton synthetic mixes D By drying level Sort into iron dry cupboard dry etc For delicate articles press the DELICATES button to select low drying temperature Do not tumble dry Woollens silk delicate fabrics nylon stock...

Страница 6: ...Pull the filter upwards fig 4 2 Open filter as shown fig 5 3 Gently remove lint using a soft brush or your fingertips 4 Snap the filter together and push back into place Filter Care Indicator Lights when the filter needs cleaning If the laundry is not drying check that the filter is not clogged The indicator will also light when the venting hose is blocked or kinked 3 WARNING WHEN THE TUMBLE DRYER...

Страница 7: ... During the last 10 minutes the load is always tumbled in cool air For delicate fabrics select the DELICATES button for all Drying Programmes This reduces the drying temperature to protect your garments HEAT SETTING HEAVY LOAD MEDIUM LOAD LIGHT LOAD COTTON HIGH 110 115 Min 60 70 Min 40 55 Min SYNTHETICS LOW 65 75 Min 50 60 Min 40 50 Min ACRYLICS LOW 50 60 Min 40 50 Min 30 40 Min ...

Страница 8: ...on the indicator will light 2 DELICATES button press to reduce the heat level for delicate items press again to select high temperature 3 DRYING TIME dial selects drying time or pre ironing option 4 FILTER CARE indicator lights when filter needs cleaning HIGH Heat setting LOW Heat setting ...

Страница 9: ...time prior to ironing in a linen basket for example Garments may also become stiffened when dried outside on a washing line or inside on radiators The PRE IRONING process relaxes the creases in the fabric making ironing quicker and easier 4 Gently close the door pushing it slowly until you hear the door click shut 5 Press the ON button The indicator will light and the drying cycle begins 6 The loa...

Страница 10: ...to allow circulation of air to dry it Wipe the outside of the machine and the door with a soft cloth DO NOT use abrasive pads or cleaning agents To prevent the door sticking periodically clean the door gasket with a non scratch cream cleaner Technical specifications Drum capacity 115 litres Maximum load 6 kg Height 85 cm Width 60 cm Depth 60 cm Energy Label Band C Note For electrical data refer to...

Страница 11: ... fully closed Go to page 9 Is the dryer switched on both at the mains supply and at the machine Go to page 8 Has the drying time or the program been selected Go to page 8 Has the ON button been pressed after opening the door Go to page 6 Filter Care Indicator on Does the filter need cleaning Go to page 6 Is the venting hose kinked or blocked Go to page 4 If the supply cord on this appliance is dam...

Страница 12: ...humos emitidos por aparatos que quemen gas u otros combustibles Controle periódicamente que la circulación de aire dentro de la secadora no esté obstruida Después de cada uso controle el filtro de lanilla y límpielo si fuera necesario La manguera o ducto de ventilación debe revisarse periódicamente retirando cualquier resto de lanilla que pudiera haberse acumulado La entrada y salidas deben manten...

Страница 13: ...nto Antes de usar la secadora por primera vez lea este manual de instrucciones detenidamente retire todas las piezas que vienen dentro del tambor pase un género húmedo por el interior del tambor y puerta para eliminar el polvo que podría haberse acumulado antes de su entrega IMPORTANTE Esta secadora debe utilizarse para secar prendas y textiles domésticos sólo cuando hubieran sido lavados con agua...

Страница 14: ...a manguera de ventilación para descargar el aire caliente al ambiente exterior Proteja la salida externa de la influencia de los vientos pues cualquier contracorriente podría reducir el rendimiento del secado Si la secadora fuera instalada debajo de una mesada o embutida es esencial utilizar la manguera de ventilación para expulsar el aire húmedo caliente lejos de la secadora pues de lo contrario ...

Страница 15: ...oallas separadas de ropa interior C Por tipo de género Algodones linos Toallas jerseys de algodón ropa de cama y mantelería Sintéticos Blusas camisas ropa de trabajo etc de poliéster o poliamida y también de mezclas de algodón sintéticos D Por nivel de secado Clasifique por secado a plancha secado en aparador etc Para prendas delicadas presione el botón DELICADOS para seleccionar secado a baja tem...

Страница 16: ... 4 2 Abra el filtro como se ilustra fig 5 3 Retire suavemente las pelusas con un cepillo suave o con sus dedos 4 Cierre el filtro y colóquelo nuevamente Indicador de Cuidado del Filtro Se enciende cuando el filtro necesita limpieza Si las prendas no se secan controle que el filtro no esté obstruido El indicador también se encenderá cuando la manguera de ventilación esté obstruida o enroscada 3 ADV...

Страница 17: ... Durante los últimos 10 minutos la carga siempre da vueltas en aire frío Para géneros delicados seleccione el botón DELICADOS en todos los Programas de Secado Menor temperatura de secado para proteger sus prendas NIVEL DE CALOR CARGA PESADA CARGA MEDIANA CARGA LIVIANA ALGODÓN ALTO 110 115 min 60 70 min 40 55 min SINTÉTICOS BAJO 65 75 min 50 60 min 40 50 min ACRÍLICOS BAJO 50 60 min 40 50 min 30 40...

Страница 18: ...DELICADOS presiónelo para reducir el nivel de calor para prendas delicadas para seleccionar alta temperatura vuelva a presionarlo 3 Perilla TIEMPO DE SECADO selecciona el tiempo de secado o la opción pre planchado 4 El indicador CUIDADO DEL FILTRO se enciende cuando el filtro necesita limpieza Nivel de Calor ALTO Nivel de Calor BAJO ...

Страница 19: ...e plancharlas hayan quedado durante algún tiempo en un canasto por ejemplo Las prendas que se sequen al aire libre en una soga o en el interior sobre radiadores también podrían quedar duras El proceso de PRE PLANCHADO estira las arrugas del género facilitando y agilizando el planchado 4 Cierre la puerta suavemente empujándola hasta escuchar el clic del cierre 5 Presione el botón ON Se encenderá el...

Страница 20: ... para que se seque con el aire Seque el exterior de la máquina y la puerta con un género suave NO use esponjas ni agentes de limpieza abrasivos Para evitar que la puerta se pegotee periódicamente lave el burlete con un limpiador cremoso Especificaciones técnicas Capacidad del tambor 115 litros Carga máxima 6 kg Altura 85 cm Ancho 60 cm Profundidad 60 cm Banda de Energía C Nota consulte la informac...

Страница 21: ...erta Vaya a la página 19 Está encendida la secadora tanto en la alimentación de red como en la máquina Vaya a la página 18 Seleccionó el tiempo o programa de secado Vaya a la página 18 Presionó el botón ON después de abrir la puerta Vaya a la página 16 Indicador de Cuidado del Filtro encendido Necesita una limpieza el filtro Vaya a la página 16 Está enroscada u obstruida la manguera de ventilación...

Страница 22: ...ITALIANO 39 40001361 2001 REGISTERED TRADEMARK ...

Отзывы: