17
I
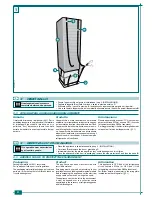
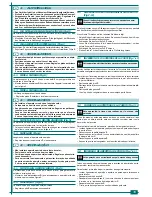
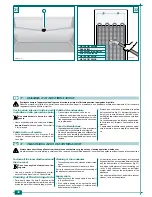
• Remove screws K which hold the middle hinge I in place.
• Open the upper door in order to remove the middle hinge in the direc-
tion of the arrow.
• Remove the upper door in the direction of the arrow.
• Remove plate A on the left-hand side and insert it in the right-hand side
(previously occupied by the middle hinge).
• Unscrew the upper pin S.
• Screw the upper pin S back into the left-hand side.
• Insert the upper door, making sure to align the metal piece S.
• Desenrosquen los tornillos K que mantienen sujeta la bisagra intermedia I.
• Saquen la bisagra intermedia abriendo la puerta superior como indica la
flecha.
• Saquen la puerta superior en el sentido indicado por la flecha.
• Quiten la plaquita A colocada en la parte izquierda y pónganla en la parte
derecha (ocupada anteriormente por la bisagra intermedia ).
• Desenrosquen el perno superior S.
• Enrosquen el perno superior S en la parte izquierda.
• Coloquen la puerta superior colocando correctamente el perno S.
• Coloquen la bisagra intermedia I y sujétenla con sus propios tornillos.
• Desaparafusar os parafusos K que mantém fixa a dobradiça Intermediá-
ria I.
• Tirar a dobradiça intermediária abrindo a porta superior como indicado
pela seta.
• Tirar a porta superior no sentido indicado pela seta.
• Tirar a chapa A da parte esquerda e inserí-la na parte direita (ocupada
anteriormente pela dobradiça intermediária).
• Desaparafusar o eixo superior S.
• Aparafusar novamente o eixo superior S na parte esquerda.
• Inserir a porta superior juntando corretamente o eixo S.
• Inserir a dobradiça intermediária I e fixá-la com os próprios parafusos.
• Lösen Sie die Schrauben K, mit denen das mittlere Scharnier I befestigt
ist.
• Ziehen Sie das mittlere Scharnier heraus, indem Sie die obere Tür in Pfeilrichtung
öffnen.
• Ziehen Sie die obere Tür des Gefrierschranks in Pfeilrichtung heraus.
• Ziehen Sie das Plättchen A auf der linken Seite heraus und setzen Sie es
auf der rechten Seite ein, dort wo zuvor das mittlere Scharnier befestigt
war.
• Lösen Sie den oberen Stift S.
• Schrauben Sie den oberen Stift S jetzt auf der linken Seite fest.
• Setzen Sie die obere Tür ein. Der Bolzen S muss sich korrekt einpassen.
• Dévissez les vis K qui fixent la charnière intermédiaire I.
• Enlevez la charnière intermédiaire en ouvrant la porte supérieure comme
indiqué par la flèche.
• Otez la porte supérieure dans le sens indiqué par la flèche.
• Enlevez la plaquette A de la partie gauche et introduisez-la dans la partie
droite (occupée précédemment par la charnière intermédiaire).
• Dévissez la cheville supérieure S.
• Revissez la cheville supérieure S dans la partie gauche.
• Introduisez la porte supérieure en assemblant correctement la cheville S.
• Introduisez la charnière intermédiare I et fixez-la avec ses propres vis.
D
F
P
E
GB
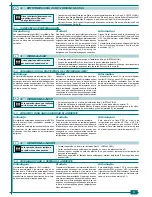
• Svitate le viti K che tengono fissata la cerniera intermedia I.
• Estraete la cerniera intermedia aprendo la porta superiore come indi-
cato dalla freccia.
• Sfilate via la porta superiore nel senso indicato dalla freccia.
• Estraete il piastrino A dalla parte sinistra e inseritelo nella zona destra
(occupata precedentemente dalla cerniera intermedia).
• Svitate il perno superiore S.
• Riavvitate il perno superiore S nella parte sinistra.
• Inserite la porta superiore accoppiando correttamente il perno S.
• Inserite la cerniera intermedia I e fissatela con le proprie viti. Per facilitare
il montaggio agite contemporaneamente sulla chiusura della porta.
• Inserite la porta del congelatore accoppiando correttamente la cerniera
intermedia.
• Svitate il perno F della cerniera inferiore C e rimontatelo in posizione op-
posta.
• Rimontate la cerniera inferiore C sul lato sinistro e fissatela con le viti V.
• Rimontate il piedino sinistro.
• Rimontate il piedino destro. .
• Insert the middle hinge I and attach it with the accompanying screws. At
the same time, to facilitate the assembly, move the handle of the door
closing mechanism back and forth.
• Insert the freezer door, aligning the middle hinge correctly.
• Unscrew the metal piece F from the lower hinge C and place it in the
opposite position.
• Replace the lower hinge C into position on the left-hand side and screw V
it back into position.
• Reattach the left foot.
• Reattach the right foot.
• Setzen Sie das Zwischenscharnier I ein und befestigen Sie es mit den
Scharnierschrauben. Um die Montage zu Erleichtern, wirken Sie gleich-
zeitig auf den Verschluss der Tür ein.
• Setzen Sie die Tür des Eisschrankes ein. Das Zwischenscharnier muss
sich korrekt einpassen.
• Lösen Sie den Bolzen F des unteren Scharniers C, und montieren Sie
diesen erneut in entgegengesetzter Position.
• Montieren Sie das mittlere Scharnier C auf der linken Seite und schrauben Sie
es fest. V.
• Montieren Sie erneut den linken Fuß.
Pour faciliter le montage intervenez en même temps sur la fermeture de la
porte.
• Introduisez la porte du congélateur en assemblant correctement la char-
nière intermédiare.
• Dévissez la cheville F de la charnière inférieure C et remontez-la en posi-
tion inverse.
• Remontez la charnière inférieure C sur le côté gauche et fixez-la à l’aide
des vis V.
• Remontez le pied gauche.
• Remontez le pied droit.
Para facilitar el montaje, actúen contemporáneamente en el cierre de la
puerta.
• Coloquen la puerta del congelador poniendo en posición correcta la bisagra
intermedia.
• Desenrosquen el perno F de la bisagra inferior C y móntenlo de nuevo en
la posición opuesta.
• Monten de nuevo la bisagra inferior C en el lado izquierdo y sujétenla
con los tornillos V.
• Monten de nuevo la patita izquierda.
• Monten de nuevo la patita derecha.
Para facilitar a montagem, operar contemporaneamente no fechamento
da porta.
• Inserir a porta do freezer juntando corretamente a dobradiça intermediá-
ria.
• Desaparafusar o eixo F da dobradiça inferior C e montá-lo novamente na
posição oposta.
• Remontar a dobradiça inferior C no lado direito e fixá-la com os parafusos
V.
• Montar novamente o pé esquerdo.
• Montar novamente o pé direito.
Содержание CBCA260
Страница 2: ...2 ...
Страница 37: ...37 ...
Страница 38: ......
Страница 39: ......
Страница 40: ...461305590 15 09 04 Litograf s r l Jesi GFC34H rel 010202 ...

