pg. 6
pg. 7
pg. 6
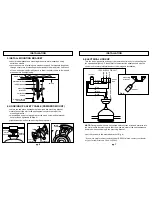
• secure rubber gasket and mounting bracket to metal outlet box using
outlet box screws
• secure once more by placing two wood screws and flat washers (supplied)
through outer slots of mounting bracket and into the wood joist. Leave one
of the wood screws sufficiently loose to allow the safety cable to be looped
around before final tightening.
3. INSTALL MOUNTING BRACKET
INSTALLATION
• obtain fan and place hemisphere of downrod into mounting bracket
• rotate fan until the slot in the hemisphere locks into the tab of the
mounting bracket
• place looped end of safety cable over the wood screw and flat washer
not previously tightened (in Step 3)
• tighten above wood screw securing the safety cable
4. HOOKING UP SAFETY CABLE (DOWNROD MOUNT)
pg. 7
wood screws &
flat washers
outlet box
screws
mounting
bracket
rubber gasket
metal outlet box
wood joist
ceiling
safety
cable
hemisphere
mounting
bracket
tab
slot
hemisphere
safety
cable
mounting
bracket
This fan is equipped with a canopy type remote control unity for controlling the
fan speeds and light kit. Please refer to the instruction sheet packed with the
control unit for more information about the wiring and installation.
5. ELECTRICAL HOOKUP
INSTALLATION
Fig. A
NOTE: Once ground wires are connected, carefully tuck wires and marrette into
the metal outlet box making sure that the wires are clear of the hemisphere and
downrod when positioning in the moutning bracket.
• put the receiver in the moutning bracket (Fig. A)
*If you want a replacement remote control (CQ002), please contact your dealer
or your customer service 1-800-265-1833
120V SUPPLY CIRCUIT
receiver
blue
black
white
white
black
white
black
gr
ound
gr
een
gr
ound to downr
od
outlet
box
receiver
mounting
bracket

